Tuya Connect Kit(C)
更新时间:2023-09-18 06:38:01下载pdf
Tuya Connect Kit 使用 C 语言实现,适用于开发者自主开发硬件设备逻辑业务接入涂鸦 IoT。Tuya Connect Kit 提供设备激活、DP 上下行和 OTA 等基础业务接口封装,Kit 不依赖具体设备平台及操作系统环境,也可以运行在单任务环境,仅需要支持 TCP/IP 协议栈及提供 SDK 必要的系统依赖接口即可完成接入。
Tuya Connect Kit 移植
有关 Tuya Connect Kit 的移植说明,请参考 Tuya Connect Kit 移植指导。
开发步骤
第一步:创建产品
登录 涂鸦 IoT 开发平台,创建一个产品,获取产品 ID。具体操作步骤,请参考 选品类创建产品。
第二步:产品功能定义
创建完产品后,根据产品功能需求,在涂鸦 IoT 开发平台进行功能数据点(DP)定义,功能点是对产品功能的抽象表示,每种功能都可以通过不同功能类型定义。
目前您可以设置的功能类型包括布尔型、数值型、枚举型、故障型、字符串型、透传型。更多详情,请参考 功能定义。
第三步:获取设备授权信息
授权信息是设备接入涂鸦的凭证,由 UUID 和 AUTHKEY 组成。授权信息可以在 IoT 平台硬件开发步骤获取。
- 在硬件开发步骤选择 自研模组 SDK 开发,并填写相关信息,单击确定。
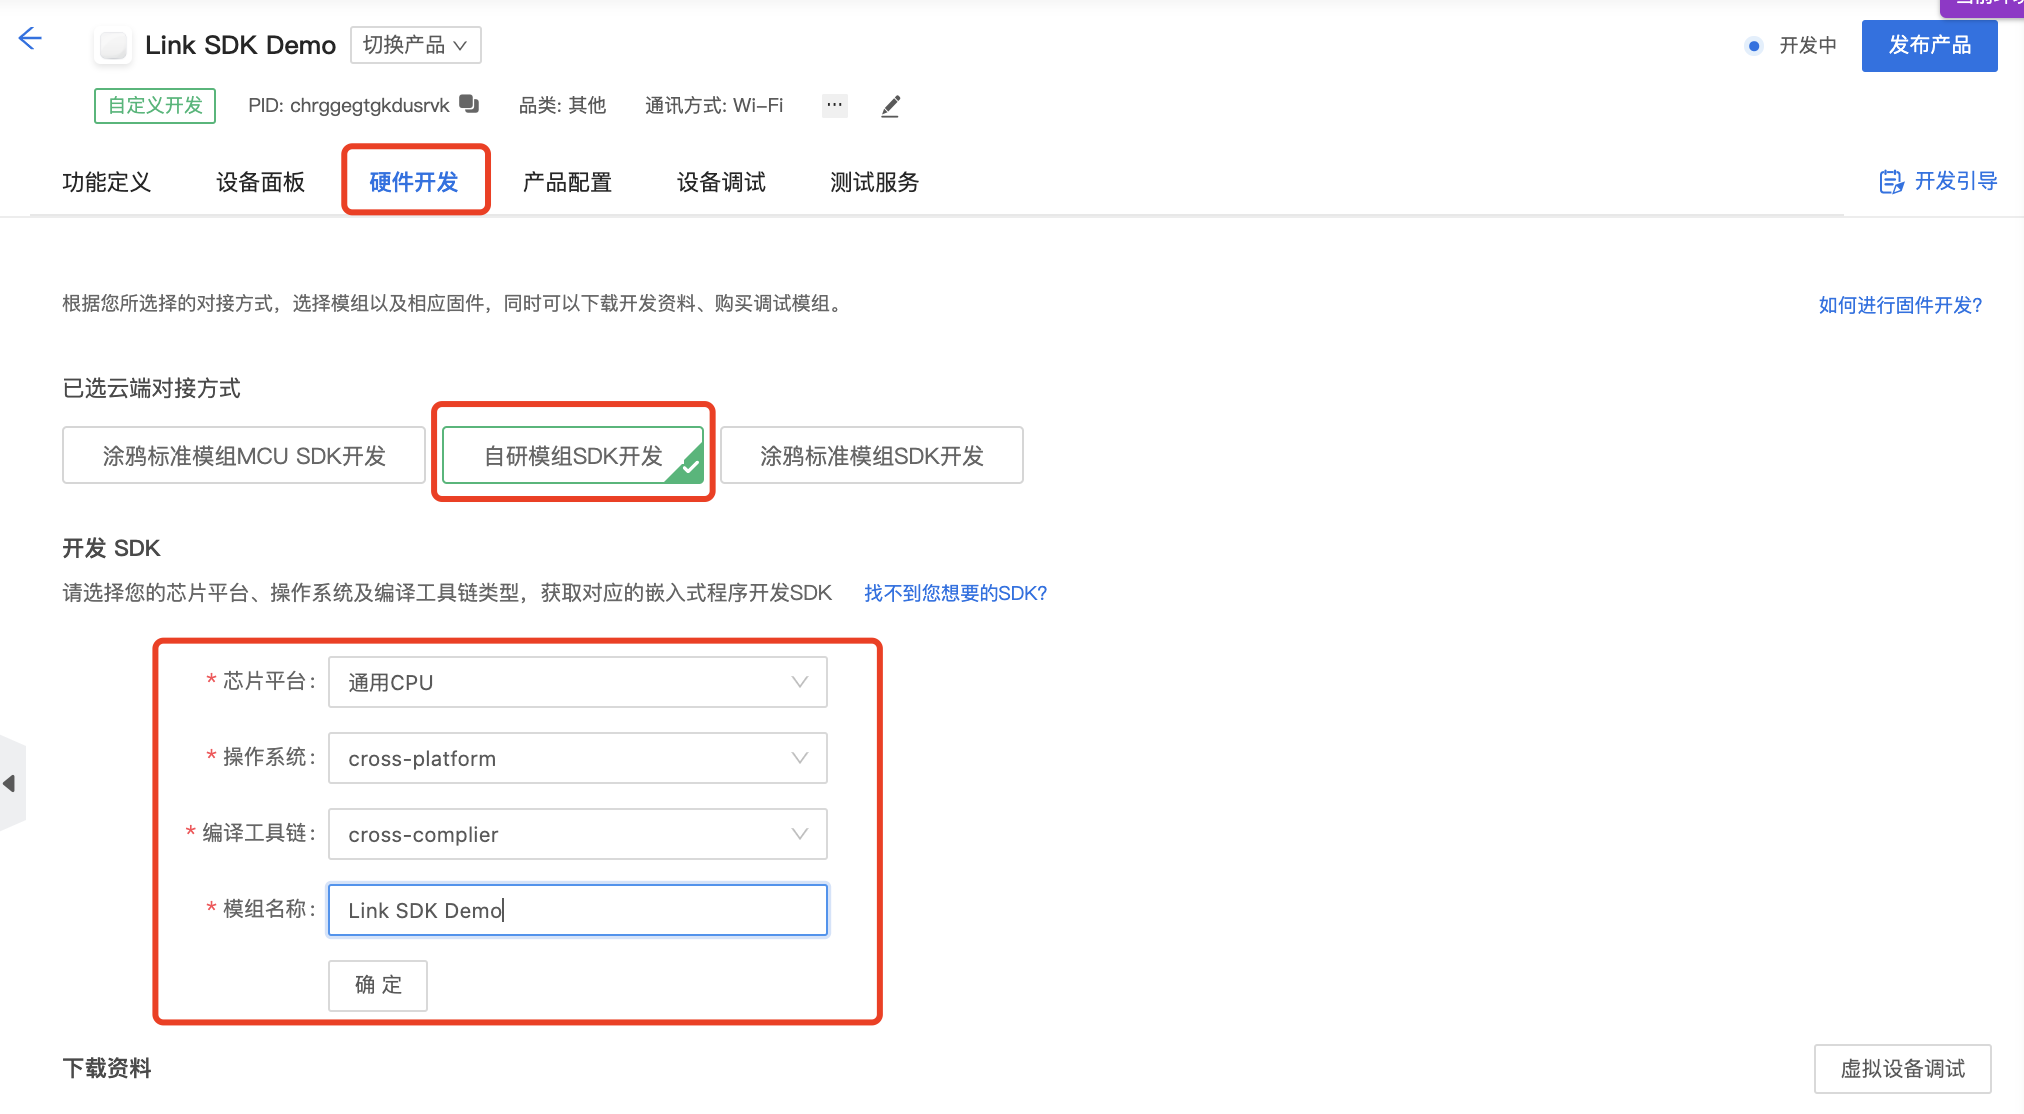
- 单击 免费领取 10 个激活码 申请授权信息。
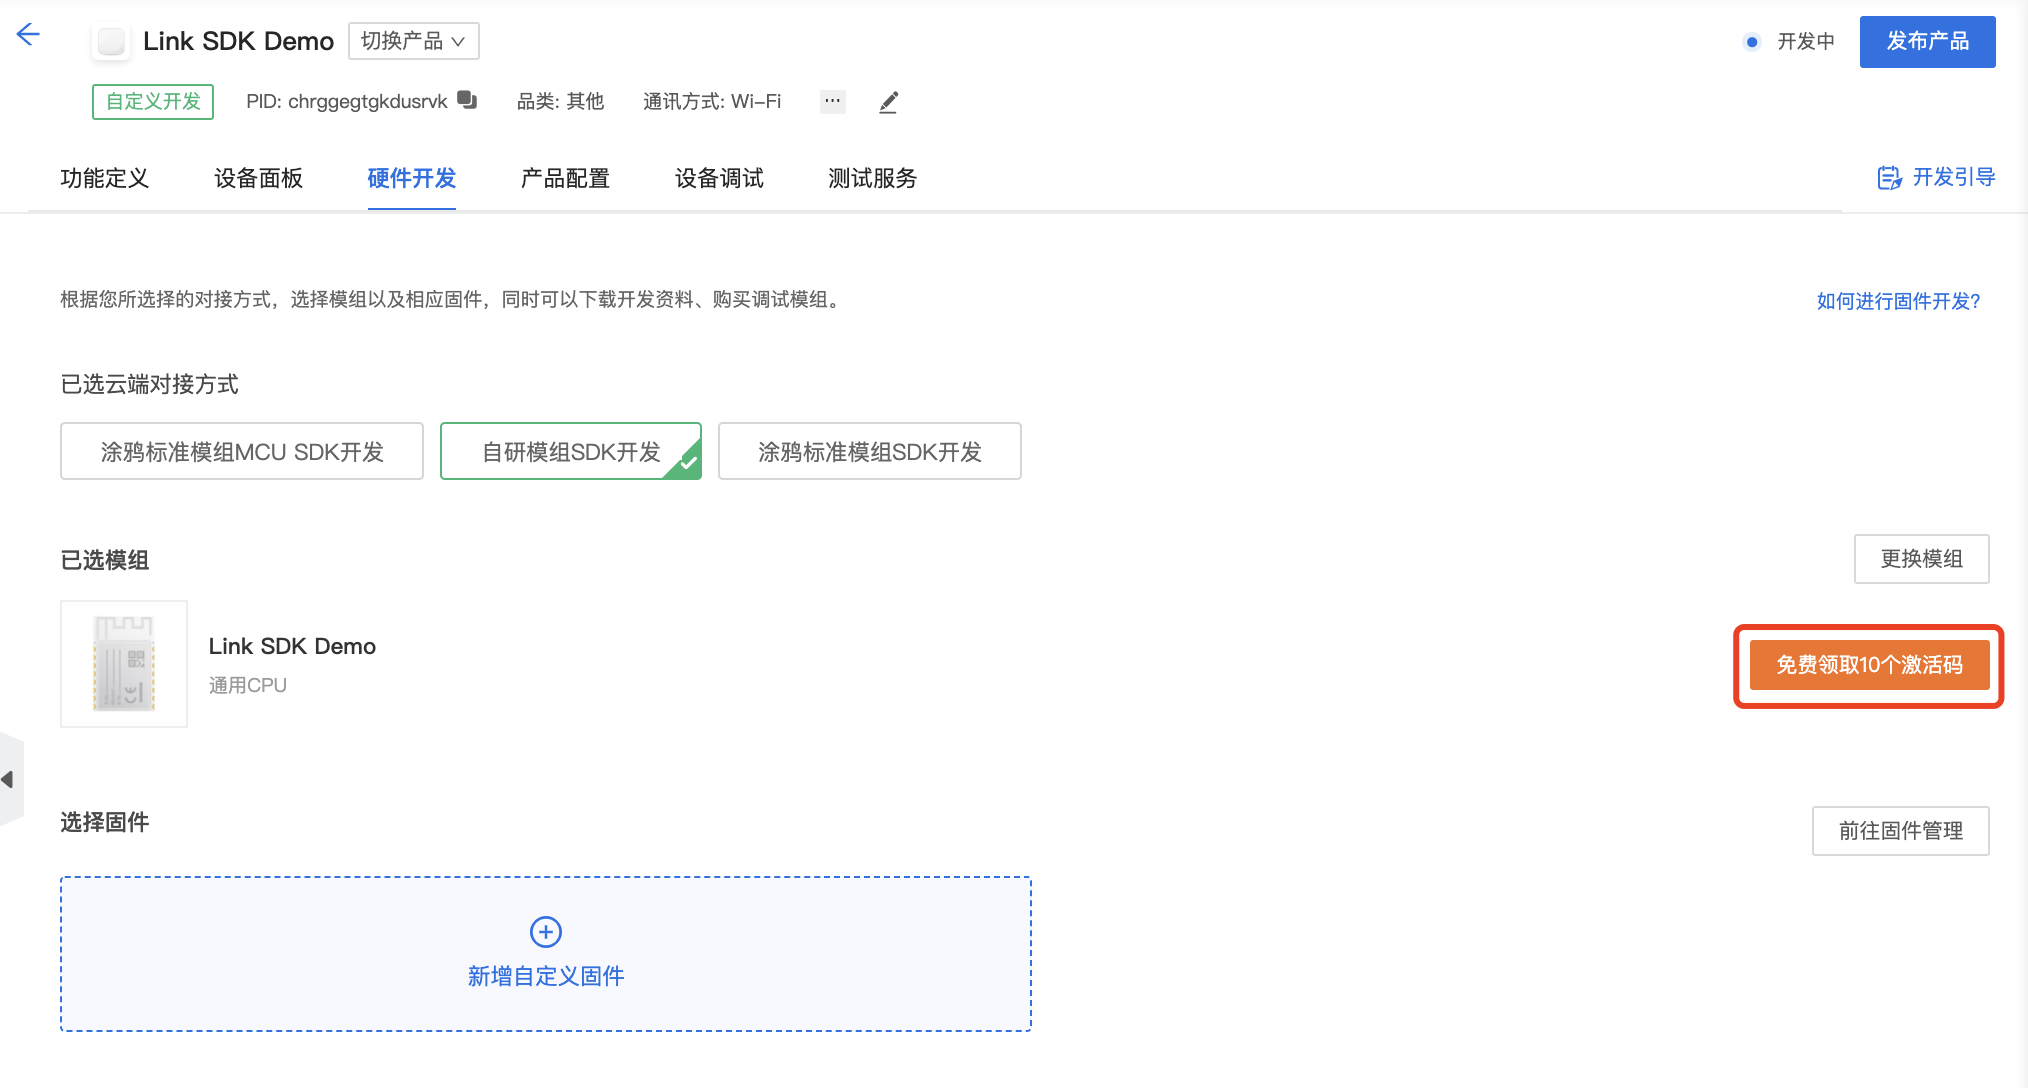
- 交付形式选择 授权码清单。

第四步:下载 Tuya Connect Kit
您可以在 涂鸦 GitHub 仓库 下载 Tuya Connect Kit。
该 Kit 的 C 代码文件通过以下目录结构提供:
certs:设备私钥,设备证书,服务端 CA 根证书docs:参考文档libraries:外部依赖库,包含 MQTT client、HTTP client、mbedTLS 等interface:平台必要移植接口,SDK 功能接口include:SDK 有文件,包含了 SDK APIsrc:SDK 源代码platform:平台移植接口适配utils:通用工具模块examples:例程
第五步:配置设备信息
配置设备信息时,将您获取到的产品 ID 与授权信息写入 SDK examples/linux/switch_demo/tuya_config.h 文件中,设置为 TUYA_PRODUCT_KEY、TUYA_DEVICE_UUID、TUYA_DEVICE_AUTHKEY 的宏,即可完成基础信息配置。
第六步:编译执行(Ubuntu)
本小节以 Ubuntu 系统为例,介绍 SDK 编译步骤。本节介绍同样适用于 Debian 系统。
-
安装
make等相关环境依赖。sudo apt-get install make cmake libqrencode-dev -
克隆代码仓库。
git clone https://github.com/tuya/tuya-iot-link-sdk-embedded-c.git --recurse-submodules -
新建一个文件夹开始编译。
mkdir build && cd build cmake .. make -
运行 Demo,SDK 内置了部分产品的 Demo 代码,例如开关 Demo。
./bin/switch_demo -
在手机 App 上绑定设备。
打开智能生活 App,扫描在 Linux 终端例程程序输出的二维码绑定设备测试。
第七步:(可选)生成设备二维码
您可以通过二维码生成工具生成如下 URL 二维码,进行设备绑定测试。
-
二维码 URL 格式:
https://smartapp.tuya.com/s/p?p=<PRODUCT_KEY>&uuid=<UUID>&v=2.0- <PRODUCT_KEY>:您在涂鸦 IoT 开发平台创建的产品的 ID
- <UUID>:待绑定设备的 UUID
-
二维码 URL 示例:
https://smartapp.tuya.com/s/p?p=U0fxNCEnZptKnQ**&uuid=f2ef8b136911f4**&v=2.0
应用示例
-
实例化和初始化一个设备对象
tuya_iot_client_t,用来初始化产品 ID 和授权信息等配置参数。/* instantiate the client */ tuya_iot_client_t client; /* instantiate the config */ tuya_iot_config_t config = { .software_ver = "1.0.0", .productkey = <Product ID>, .uuid = <UUID>, .authkey = <AUTHKEY>, .event_handler = user_event_handler_cb }; /* initialize the client */ tuya_iot_init(&client, &config); -
定义应用层事件回调,回调函数用于应用层接收 SDK 事件通知,如数据功能点(DP)下发,云端连接状态通知。
/* Tuya SDK event callback */ void user_event_handler_on(tuya_iot_client_t* client, tuya_event_msg_t* event) { switch(event->id){ case TUYA_EVENT_DP_RECEIVE: TY_LOGI("DP recv:%s", (const char*)event->data); /* 接收到 DP 下发,需要将处理后的状态 DP 数据上报, 同步 App 面板状态 */ break; case TUYA_EVENT_MQTT_CONNECTED: TY_LOGI("Device MQTT Connected!"); break; ... default: break; } } -
启动 Tuya IoT SDK 服务。
tuya_iot_start(&client); //Tuya IoT SDK 服务任务,数据接收处理,设备在线保活等任务处理: -
循环调用将当前线程产生给底层的 Link SDK 客户端。
tuya_iot_yield(&client);上报示例:
/* 布尔型数据上报 */
const char bool_value[] = {"{\"101\":true}"};
tuya_iot_dp_report_json(&client, bool_value);

/* 数值型数据上报 */
const char int_value[] = {"{\"102\":123}"};
tuya_iot_dp_report_json(&client, int_value);

/* 字符型数据上报 */
const char string_value[] = {"{\"103\":\"helloworld\"}"};
tuya_iot_dp_report_json(&client, string_value);

/* 枚举型数据上报 */
const char enum_value[] = {"{\"104\":\"auto\"}"};
tuya_iot_dp_report_json(&client, enum_value);

/* RAW 型数据上报 */
const char raw_value[] = {"{\"105\":\"aGVsZA==\"}"};
tuya_iot_dp_report_json(&client, raw_value);

/* 多 DP 类型数据组合上报 */
const char multiple_value[] = {"{\"101\":true,\"102\":123,\"103\":\"hellowrold\",\"104\":\"auto\",\"105\":\"aGVsZA==\"}"};
tuya_iot_dp_report_json(&client, multiple_value);
接口说明
SDK 初始化
| 接口信息 | 说明 |
|---|---|
| 函数原型 | int tuya_iot_init(tuya_iot_client_t* client, tuya_iot_config_t* config) |
| 功能描述 | 设备初始化 |
| 输入参数 | client 设备管理句柄 config 设备初始化信息配置 |
| 输出参数 | 无 |
| 返回值 | int 参见通用错误码 |
启动服务
| 接口信息 | 说明 |
|---|---|
| 函数原型 | int tuya_iot_start(tuya_iot_client_t *client) |
| 功能描述 | 启动设备 SDK 服务 |
| 输入参数 | client 设备管理句柄 |
| 输出参数 | 无 |
| 返回值 | int 参见通用错误码 |
停止服务
| 接口信息 | 说明 |
|---|---|
| 函数原型 | int tuya_iot_stop(tuya_iot_client_t *client) |
| 功能描述 | 停止设备 SDK 服务 |
| 输入参数 | client 设备管理句柄 |
| 输出参数 | 无 |
| 返回值 | int 参见通用错误码 |
后台运行服务
| 接口信息 | 说明 |
|---|---|
| 函数原型 | int tuya_iot_yield(tuya_iot_client_t* client) |
| 功能描述 | SDK 后台运行服务 |
| 输入参数 | client 设备管理句柄 |
| 输出参数 | 无 |
| 返回值 | int 参见通用错误码 |
| 备注 | 需要在程序主循环调用该服务函数 |
DP 数据上报
| 接口信息 | 说明 |
|---|---|
| 函数原型 | int tuya_iot_dp_report_json(tuya_iot_client_t* client, char* dps) |
| 功能描述 | 上报 DP 数据到云端 |
| 输入参数 | client 设备管理句柄 dps JSON 格式 DP 数据 |
| 输出参数 | 无 |
| 返回值 | int 参见通用错误码 |
| 备注 | 需要在程序主循环调用该服务函数 |
示例格式
{
    "101":true,           # 布尔型
    "102":18,             # 数值型
    "103":"hello wrold", # 字符串型
    "104":"auto",         # 枚举型
    "105":"aGVsZA==",     # RAW 型(base64)
    "106":2               # 故障型(32bit)
}
有关 DP 功能点的详细说明,请参考 功能定义。
Demo 设备例程
#include <stdio.h>
#include <stdlib.h>
#include <assert.h>

#include "tuya_log.h"
#include "tuya_config.h"
#include "tuya_iot.h"
#include "cJSON.h"

/* for App QRCode scan test */
extern void example_qrcode_print(char* productkey, char* uuid);

/* Tuya device handle */
tuya_iot_client_t client;

#define SWITCH_DP_ID_KEY "1"

/* Hardware switch control function */
void hardware_switch_set(bool value)
{
    if (value == true) {
        TY_LOGI("Switch ON");
    } else {
        TY_LOGI("Switch OFF");
    }
}

/* DP data reception processing function */
void tuya_iot_dp_download(tuya_iot_client_t* client, const char* json_dps)
{
    TY_LOGD("Data point download value:%s", json_dps);

    /* Parsing json string to cJSON object */
    cJSON* dps = cJSON_Parse(json_dps);
    if (dps == NULL) {
        TY_LOGE("JSON parsing error, exit!");
        return;
    }

    /* Process dp data */
    cJSON* switch_obj = cJSON_GetObjectItem(dps, SWITCH_DP_ID_KEY);
    if (cJSON_IsTrue(switch_obj)) {
        hardware_switch_set(true);

    } else if (cJSON_IsFalse(switch_obj)) {
        hardware_switch_set(false);
    }

    /* relese cJSON DPS object */
    cJSON_Delete(dps);

    /* Report the received data to synchronize the switch status. */
    tuya_iot_dp_report_json(client, json_dps);
}

/* Tuya SDK event callback */
static void user_event_handler_on(tuya_iot_client_t* client, tuya_event_msg_t* event)
{
    switch(event->id){
    case TUYA_EVENT_DP_RECEIVE:
        tuya_iot_dp_download(client, (const char*)event->data);
        break;

    case TUYA_EVENT_WAIT_ACTIVATE:
        /* Print the QRCode for Tuya App bind */
        example_qrcode_print(client->productkey, client->uuid);
        break;

    case TUYA_EVENT_MQTT_CONNECTED:
        TY_LOGI("Device MQTT Connected!");
        break;

    default:
        break;
    }
}

int main(int argc, char **argv)
{
    int ret = OPRT_OK;

    /* Initialize Tuya device configuration */
    ret = tuya_iot_init(&client, &(const tuya_iot_config_t){
        .productkey = TUYA_PRODUCT_KEY,
        .uuid = TUYA_DEVICE_UUID,
        .authkey = TUYA_DEVICE_AUTHKEY,
        .event_handler = user_event_handler_on
    });

    assert(ret == OPRT_OK);

    /* Start tuya iot task */
    tuya_iot_start(&client);

    for(;;) {
        /* Loop to receive packets, and handles client keepalive */
        tuya_iot_yield(&client);
    }

    return ret;
}
该内容对您有帮助吗?
是意见反馈该内容对您有帮助吗?
是意见反馈