本文档面向已经了解 面板小程序开发 的开发者,您需要充分了解什么是 面板小程序 和 产品功能。若对上述概念有所疑问,涂鸦推荐您了解以下预备知识。如已了解,可跳过本文。
理解关系
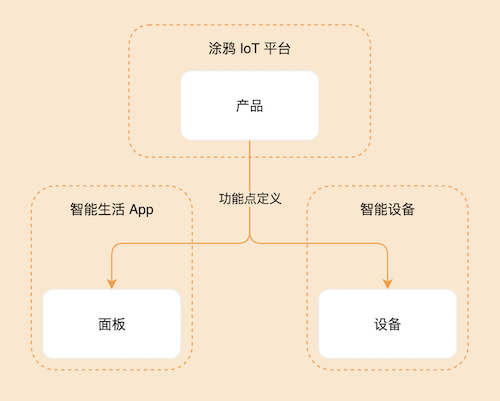
面板是 IoT 智能设备在 App 终端上的产品形态。创建产品之前,首先来了解一下什么是面板,以及面板和产品、设备之间的关系:
- 面板是运行在 智能生活 App、OEM App(涂鸦定制 App) 上的界面交互程序,用于控制智能设备的运行,展示智能设备的实时状态。
- 产品将面板与智能设备联系起来,产品描述了其具备的功能、在 App 上面板显示的名称、智能设备拥有的功能点等。
- 智能设备是搭载了涂鸦智能模组的设备,通常在设备上都会贴有一张二维码,使用 智能生活 App 扫描二维码,即可在 App 中获取并安装该设备的控制面板。
- 产品、面板、设备之间的关系可参考下图:
照明灯带模板使用 SDM (Smart Device Model) 开发。关于 SDM 相关,可以参考 SDM 文档。
相关概念
产品名称:照明幻彩灯带三路灯
产品介绍
根据支持的白光、彩光 DP 不同,照明中灯分为一路至五路。
其含义为:
- 五路:支持彩光
colour_data、白光亮度bright_value、白光色温temp_value。 - 四路:支持彩光、白光亮度。
- 三路:支持彩光。
- 二路:支持白光亮度、白光色温。
- 一路:支持白光亮度。
需求原型
- 开关:单击开关按钮通过
switch_ledDP 切换开关状态。 - 首页:页面包含开关、调光、情景、音乐以及更多(计划包含定时和倒计时、灯带裁剪),面板根据产品所配置的功能点进行具体展示。如五路四路显示白光和彩光,一路二路只显示彩光,三路只显示彩光。

- 彩光调节:
- 当选中彩光模式时:
- 进行点选和全选的切换:
- 当切换为全选时,单击或拖动色盘松手后下发 DP
paint_colour_data,上方灯带会同步改变。 - 当切换为点选时,如果灯带未存在高亮,单击或拖动色盘松手后不会下发 DP。只有当手指进行上方灯带的涂抹选择时,灯带高亮并且灯带颜色会同步改变。当灯带选中存在高亮状态时,单击或拖动色盘松手后下发 DP
paint_colour_data,上方灯带会同步改变。
- 当切换为全选时,单击或拖动色盘松手后下发 DP
- 单击橡皮擦时,高亮的灯带会关闭。
- 如果选中全选,渐变按钮(🔘)不可操作。
- 进行点选和全选的切换:
- 当选中色块时:
- 进行点选和全选的切换:
- 当切换为全选时,单击或拖动色盘松手后下发 DP
paint_colour_data,上方灯带会同步改变。 - 当切换为点选时,如果灯带未存在高亮,单击或拖动色盘松手后不会下发 DP,只有当手指进行上方灯带的涂抹选择时,灯带高亮并且灯带颜色会同步改变。当灯带选中存在高亮状态时,单击或拖动色盘松手后下发 DP
paint_colour_data,上方灯带会同步改变。
- 当切换为全选时,单击或拖动色盘松手后下发 DP
- 单击橡皮擦时,高亮的灯带会关闭。
- 如果选中全选,渐变按钮(🔘)不可操作。
- 进行点选和全选的切换:
- 当选中组合时:
- 灯带根据色块组合的颜色均分灯带 。
- 只允许渐变按钮(🔘)操作,单击后灯带在不同颜色交接处会呈现出渐变的效果。

- 当选中彩光模式时:
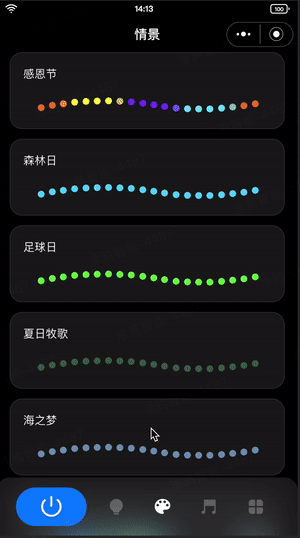
- 情景:
- 情景分为两种:
- 本地写死的数据:按照 DP 的定义的格式编写拼接,具体见后续的功能实现模块。
- 云端数据:需要开通高级能力。直接跳转小程序功能页面,无需开发,自行在涂鸦提供的后台进行情景数据配置即可。
- 操作:单击对应的情景,下发 DP
dreamlight_scene_mode,灯带变化。
- 情景分为两种:
- 音乐:
- 音乐分为两种:
- 本地音乐:使用设备硬件的麦克风收音,面板下发单击对应音乐模式时下发一次音乐配置的 DP 数据。
- App 音乐:使用手机麦克风进行收音,面板转换 App 接收到的音频,通过 DP
dreamlightmic_music_data持续下发。
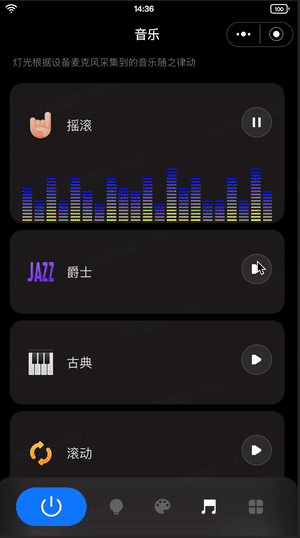
- 音乐分为两种:
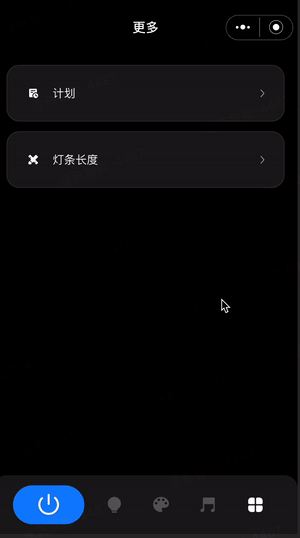
- 更多:
- 定时倒计时功能:
- 定时:到对应时间点后设备执行设定的动作。
- 云定时:通过定时接口处理,到设定时间后,通过云端下发 DP 数据,设备响应。
- 设备定时:通过 DP 下发,包含设定的具体时间和功能,到设定时间后,设备执行并响应。
- 倒计时:设定一定时间后设备响应设定的动作。
- 群组下不支持。
- 设置时通过 DP
countdown下发数据,以秒(s)为单位。
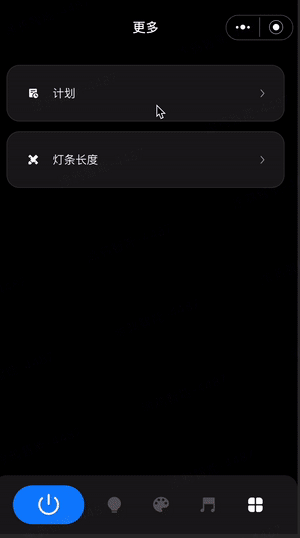
- 灯带裁剪功能:
- 用户可在 App 上进行修正调整灯带长度,来调节灯光显示范围。
- 通过多个 DP 之间的配合来进行灯带长度或个数显示的调节。
- 定时倒计时功能:
功能汇总
当前照明灯带模板必需的功能点:
switch_led,
work_mode,
paint_colour_data,
dreamlight_scene_mode,
dreamlightmic_music_data,
light_pixel,
lightpixel_number_set,
当前照明灯带模板可选的功能点:
countdown,
light_length,
开关
参数 | 取值 |
dpid | 20 |
code | switch_led |
type | 布尔型(Bool) |
mode | 可下发可上报(rw) |
工作模式
参数 | 取值 |
dpid | 21 |
code | work_mode |
type | 枚举型(Enum) |
mode | 可下发可上报(rw) |
property | 枚举值: white, colour, scene, music |
倒计时
参数 | 取值 |
dpid | 26 |
code | countdown |
type | value |
mode | 可下发可上报(rw) |
property | { "unit": "s", "min": 0, "max": 86400, "scale": 0, "step": 1, "type": "value"} |
灯带长度
参数 | 取值 |
dpid | 46 |
code | light_length |
type | value |
mode | 上报(ro) |
property | {"unit": "cm", "min": 1, "max": 10000, "scale": 0, "step": 1, "type": "value" } |
灯带点数
参数 | 取值 |
dpid | 47 |
code | light_pixel |
type | value |
mode | 上报(ro) |
property | { "min": 1, "max": 1024, "scale": 0, "step": 1, "type": "value" } |
点数/长度设置
参数 | 取值 |
dpid | 53 |
code | lightpixel_number_set |
type | value |
mode | 可下发可上报(rw) |
property | { "min": 1, "max": 1000, "scale": 0, "step": 1, "type": "value" } |
以上为raw 类型 以外的功能点,raw 类型 DP 请查看具体协议。

首先需要创建一个产品,定义产品有哪些功能点,然后再在面板中一一实现这些功能点。
注册登录 涂鸦开发者平台,并在平台创建产品:
- 单击页面左侧 产品 > 产品开发,在 产品开发 页面单击 创建产品。
- 在 标准类目 下选择 照明,产品品类选择 幻彩灯带。
- 选择智能化方式,选择产品方案为 幻彩灯带三路,并完善产品信息,如填写产品名称为 PublicLamp。
- 单击 创建产品 按钮,完成产品创建。
注意:本模板只支持幻彩灯带三路,其它路可按逻辑自行适配。
🎉 在这一步,一个名为 PublicLamp 的照明灯带产品创建完成。
开发者平台创建面板小程序
面板小程序的开发在 小程序开发者 平台上进行操作,首先请前往 小程序开发者平台 完成平台的注册登录。
详细操作步骤可以参考 面板小程序 > 创建面板小程序。
拉取并运行模板项目
面板模板仓库:仓库地址
- 首先,拉取项目。
git clone https://github.com/Tuya-Community/tuya-ray-materials.git - 进入照明灯带模板,安装依赖并启动项目。
cd ./template/PublicPanelStripLamp - 打开 IDE 并点击导入。
- 选择下载的路径进行导入,并关联到已经创建的面板小程序与产品。

- 绑定具体设备即可,IDE 会自动安装依赖并构建项目。
工程目录
完成以上步骤后,一个面板小程序的开发模板初始化完成。以下为工程目录及其介绍:
├── public
│ ├── images # 项目的静态资源
├── src
│ ├── app.config.ts # 自动生成配置
│ ├── app.tsx # App 根组件
│ ├── components # 组件目录
│ ├── constant # 常量目录
│ ├── containers # 聚合的组件目录
│ ├── devices # 智能设备模型目录
│ │ ├── index.ts # 定义并导出智能设备模型
│ │ ├── protocols # 定义当前设备所需要的 DP 声明
│ │ ├─────parses # 定义当前设备所需要的 DP 复杂协议
│ │ └── schema.ts # 当前智能设备 DP 功能点描述,IDE 可自动生成
│ ├── global.config.ts
│ ├── hooks # 自定义 Hooks 目录
│ ├── i18n # 多语言目录
│ ├── pages # 页面目录
│ └── routes.config.ts # 路由配置
│─── typings # 业务类型定义目录
│ └── sdm.d.ts # 智能设备类型定义文件
需求实现
IDE 生成 SDM schema 到项目

生成 SDM schema 至项目中,可以查看 src/devices/schema.ts。
export const defaultSchema = [
	{
		attr: 641,
		canTrigger: true,
		code: "switch_led",
		defaultRecommend: true,
		editPermission: false,
		executable: true,
		extContent: "",
		iconname: "icon-dp_power",
		id: 20,
		mode: "rw",
		name: "开关",
		property: {
			type: "bool",
		},
		type: "obj",
	},
	{
		attr: 640,
		canTrigger: true,
		code: "work_mode",
		defaultRecommend: true,
		editPermission: false,
		executable: true,
		extContent: "",
		iconname: "icon-dp_mode",
		id: 21,
		mode: "rw",
		name: "模式",
		property: {
			range: ["white", "colour", "scene", "music"],
			type: "enum",
		},
		type: "obj",
	},
	// ...
] as const;
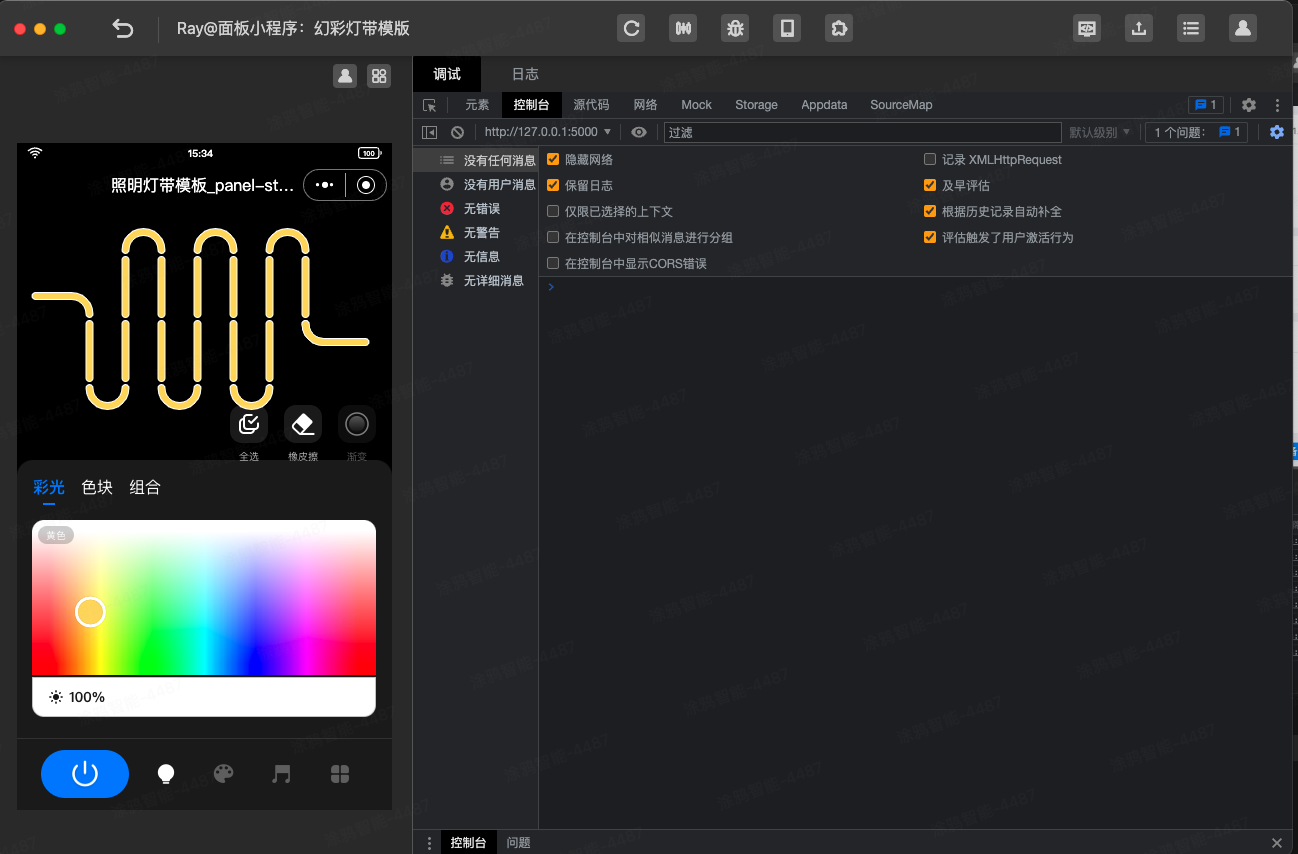
首页:调节色盘下发彩光调色
分析需求
- 首页添加组件 开关按钮。
- 根据
switch_led下发的值展示不同按钮图片。 - 单击开关组件触发事件,上报 开、关 的 DP 值。
- 根据
- 确认开关 DP 为
switch_led,可作为属性传入组件。 - 使用
useProps获取实时下发的 DP 值。示例:import React from "react"; import { View } from "@ray-js/ray"; import { useProps } from "@ray-js/panel-sdk"; export default function () { const power = useProps((props) => props.switch_led); return ( <View style={{ flex: 1 }}> <View>switch_led: {power}</View> </View> ); } - 使用
useActions下发 DP。关于如何通过 SDM 下发 DP,请参考:SDM 下发教程。
示例:
import React from "react";
import { View } from "@ray-js/ray";
import { useActions } from "@ray-js/panel-sdk";

export default function () {
	const handleTogglePower = () => {
		actions.switch_led.toggle({ throttle: 300 });
	};
	return (
		<View style={{ flex: 1 }}>
			<Button img={power} onClick={handleTogglePower} />
		</View>
	);
}
实现开关组件
根据上述分析,来实现开关组件:开关组件实现。
import React from "react";
import res from "@/res";
import { View, Image } from "@ray-js/ray";
import dpCodes from "@/config/dpCodes";
import { Button } from "@/components";
import { useActions, useProps } from "@ray-js/panel-sdk";
import styles from "./index.module.less";

export const PowerButton = () => {
	const power = useProps((props) => props.switch_led);
	const actions = useActions();
	const handleTogglePower = () => {
		actions.switch_led.toggle({ throttle: 300 });
	};
	return (
		<View className={styles.container}>
			<Image className={styles.bg} mode="aspectFill" src={bottom_dark} />
			<Button
				img={power}
				onClick={handleTogglePower}
				imgClassName={styles.powerBtn}
				className={styles.powerBox}
			/>
		</View>
	);
};
- 首页:首页根据是否有彩光、白光 DP 显示对应 Tab 页,当前模板支持三路。
- 调光功能:彩光主要基于 HSV 模型,将 Hue(色调)、Saturation(饱和度)、Value(明度)三个数据整合成
paint_colour_data。您可以查看开发者平台创建方案的 DP 具体协议,也可查看具体 代码解析 DP 进行下发。- 注意灯带分为操作分为两部分,一部分为涂抹模式(包含全选、单选、橡皮擦、渐变),一部分为调光模式(包含彩光、色块和组合)。
- 由于
paint_colour_dataDP 只能记忆最近一次的灯光数据,所以需要将灯带的每个灯珠颜色值进行云端存储,每当 DP 变换时进行云端灯珠颜色同步。 - 灯带图是用 Canvas 进行绘制,为了方便计算涂抹位置,灯带形状简化为矩形,同时也扩大了操作范围方便用户进行点击涂抹等操作。
- 情景功能:通过 DP
dreamlight_scene_mode进行下发。 - 音乐律动:
- 通过 DP
dreamlightmic_music_data进行下发。 - 注意协议的格式,可参考。
- 通过 DP
- 更多
- 对于简单协议转换,可以直接在
src/devices/protocols/index中声明,如下:import dpParser from './parsers'; import { lampSchemaMap } from '@/devices/schema'; const { colour_data } = lampSchemaMap; export const protocols = { [colourCode]: [ { name: 'hue' as const, bytes: 2, default: 0, defaultValue: 0, }, { name: 'saturation' as const, bytes: 2, defaultValue: 1, }, { name: 'value' as const, bytes: 2, defaultValue: 1, }, ], }; - 对于高级协议转换,可将对应协议规则放到
src/devices/protocols/parsers中,再到src/devices/index中进行引用,如下:import _ from 'lodash-es'; import { utils } from '@ray-js/panel-sdk'; import { lampSchemaMap } from '@/devices/schema'; import { log } from '@/utils'; /** 调光器模式 */ export enum DimmerMode { white, colour, colourCard, combination, } export type DimmerTab = keyof typeof DimmerMode; /** 涂抹类型 */ enum SmearMode { all, single, clear, } interface ColourData { hue: number; saturation: number; value: number; } /** 调光器的 Value 类型 */ export interface DimmerValue { colour?: ColourData; colourCard?: ColourData; combination?: ColourData[]; } /** 涂抹 DP 数据 */ export interface SmearDataType { /** 版本号 */ version: number; /** 模式 (0: 白光, 1: 彩光, 2: 色卡, 3: 组合) */ dimmerMode: DimmerMode; /** 涂抹效果 (0: 无, 1: 渐变) */ effect?: number; /** 灯带 UI 段数 */ ledNumber?: number; /** 涂抹动作 (0: 油漆桶, 1: 涂抹, 2: 橡皮擦) */ smearMode?: SmearMode; /** 彩光色相 */ hue?: number; /** 彩光饱和度 */ saturation?: number; /** 彩光亮度 */ value?: number; /** 白光亮度 */ brightness?: number; /** 白光色温 */ temperature?: number; /** 当前涂抹色是否是彩光 */ isColour?: boolean; /** 点选类型(0: 连续,1: 单点) */ singleType?: number; /** 当次操作的灯带数 */ quantity?: number; /** 组合类型 */ combineType?: number; /** 颜色组合 */ combination?: ColourData[]; /** 编号 */ indexs?: Set<number>; } const { toFixed, generateDpStrStep, numToHexString } = utils; const { paint_colour_data } = lampSchemaMap; function nToHS(value = 0, num = 2) { return numToHexString(value || 0, num); } /** 转化为 Number */ function toN(n: any) { return +n || 0; } function avgSplit(str = '', num = 1) { const reg = new RegExp(`.{1,${num}}`, 'g'); return str.match(reg) || []; } function sToN(str = '', base = 16) { return parseInt(str, base) || 0; } const _defaultValue = { version: 0, dimmerMode: DimmerMode.colour, effect: 0, smearMode: SmearMode.all, hue: 0, saturation: 1000, value: 1000, brightness: 1000, temperature: 1000, ledNumber: 20, } as SmearDataType; export default class SmearFormater { uuid: string; defaultValue: SmearDataType; constructor(uuid = paint_colour_data.code, defaultValue = _defaultValue) { this.uuid = uuid; this.defaultValue = defaultValue; } parser(val = ''): SmearDataType { const validVal = (val || '').slice(0, 1) === '0'; if (!val || typeof val !== 'string' || !validVal) { console.warn(paint_colour_data.code, 'DP 数据有问题,无法解析', val); return this.defaultValue; } const step = generateDpStrStep(val); const version = toN(step(2).value); // 版本号 const dimmerMode = toN(step(2).value); // 调节模式 const effect = toN(step(2).value); // 调节效果 const ledNumber = toN(step(2).value); // 段数 const result = { version, dimmerMode, effect, ledNumber, } as SmearDataType; if (dimmerMode === DimmerMode.white) { // 白光 result.smearMode = toN(step(2).value); // 调节动作 result.brightness = toN(step(4).value); // B 亮度 result.temperature = toN(step(4).value); // T 色温 } else if ([DimmerMode.colour, DimmerMode.colourCard].includes(dimmerMode)) { // 彩光/色卡 const smearMode = toN(step(2).value); // 调节动作 result.smearMode = smearMode; result.hue = toN(step(4).value); // H result.saturation = toN(step(4).value); // S result.value = toN(step(4).value); // V if ([SmearMode.clear, SmearMode.single].includes(smearMode)) { const singleDataStr = toFixed(toN(step(2).value).toString(2), 8); // 段选 const singleType = sToN(singleDataStr.slice(0, 1), 2); result.singleType = singleType; // 段选 => 0:连续;1:不连续; result.quantity = sToN(singleDataStr.slice(1), 2); // 段选 => 连续时,无意义;不连续时,代表段的总数 let indexItem = step(2); const indexs = new Set<number>(); while (!indexItem.done) { indexs.add(toN(indexItem.value - 1)); indexItem = step(2); } if (indexItem.done) { indexItem.value !== null && indexs.add(toN(indexItem.value - 1)); } result.indexs = indexs; } } else if (dimmerMode === DimmerMode.combination) { result.smearMode = SmearMode.all; // 颜色组合 result.combineType = toN(step(2).value); const getHSV = () => { const hue = toN(step(4).value); const saturation = toN(step(4).value); const lastItem = step(4); const value = toN(lastItem.value); return { hue, saturation, value, done: lastItem.done }; }; result.combination = []; let _done = false; while (!_done) { const { hue, saturation, value, done } = getHSV(); const res = { hue, saturation, value }; result.combination.push(res); _done = done; } } log(result, 'SmearDataType result'); return result; } formatter(_data: SmearDataType): string { const data = { ...this.defaultValue, ..._data, }; const { version = 0, dimmerMode = DimmerMode.colour, effect = 0, ledNumber = 20, smearMode = SmearMode.all, hue = 0, saturation = 0, value = 0, brightness = 0, temperature = 0, combineType = 0, combination = [], } = data; // 白光不支持渐变 const _effect = nToHS(dimmerMode === DimmerMode.white ? 0 : effect); let result = `${nToHS(version)}${nToHS(dimmerMode)}${_effect}${nToHS(ledNumber)}`; if (dimmerMode === DimmerMode.white) { // 白光 result += `${nToHS(smearMode)}${nToHS(brightness, 4)}${nToHS(temperature, 4)}`; } else if ([DimmerMode.colour, DimmerMode.colourCard].includes(dimmerMode)) { // 彩光/色卡 const isClear = smearMode === SmearMode.clear; if (isClear) { // 橡皮擦关灯下发颜色全部为 0 const _hue = 0; const _saturation = 0; const _value = 0; result += `${nToHS(smearMode)}${nToHS(_hue, 4)}${nToHS(_saturation, 4)}${nToHS(_value, 4)}`; } else { result += `${nToHS(smearMode)}${nToHS(hue, 4)}${nToHS(saturation, 4)}${nToHS(value, 4)}`; } if ([SmearMode.single, SmearMode.clear].includes(smearMode)) { const { singleType = 1, indexs = new Set() } = data; const quantity = indexs.size; const singleDataStr = `${nToHS( parseInt(`${singleType}${toFixed(quantity.toString(2), 7)}`, 2) )}`; const indexsStr = `${[...indexs].reduce((acc, cur) => acc + nToHS(cur + 1), '')}`; result += `${singleDataStr}${indexsStr}`; } } else if (dimmerMode === DimmerMode.combination) { // 组合 const colors = combination.map( item => `${nToHS(item.hue, 4)}${nToHS(item.saturation, 4)}${nToHS(item.value, 4)}` ); result += `${nToHS(combineType)}${colors.join('')}`; } log(new SmearFormater().parser(result), 'SmearDataType formatter'); return result; } }src/devices/protocols/parsers/index.ts集中导出处理。import dpParser from "./parsers"; import { lampSchemaMap } from "@/devices/schema"; const { dreamlightmic_music_data, paint_colour_data } = lampSchemaMap; export const protocols = { [dreamlightmic_music_data.code]: dpParser.micMusicTransformer, [paint_colour_data.code]: dpParser.smearFormatter, };