- This article is recommended for students who have some experience in Miniapp development, or who have read the Miniapp development guide (basic).
- After studying this article, you will have a deeper understanding of Smart MiniApps, and be able to optimize the performance and experience of existing Miniapps.
Learning Content
❣️ Smart MiniApp view layer and logic layer data communication and use sjs to optimize performance.
❣️ How to modularize the Smart MiniApp.
❣️ Advanced usage guide for custom components.
What is an event
- Events are the communication method from the view layer to the logic layer.
- Events can feed back the user's behavior to the logic layer for processing.
- Events can be bound to components, and when the trigger event is reached, the corresponding event handler function in the logic layer will be executed.
- Event objects can carry additional information such as id, dataset, touches.
1. Normal event binding
Event bindings are written similar to component properties, such as:
<view bind:tap="handleTap">
    Click here!
</view>
If the user taps this view , the page's handleTap will be called.
The event binding function can be a data binding, such as:
<view bind:tap="{{ handlerName }}">
    Click here!
</view>
Page({
  data: {
    handlerName: "handleTap",
  },
  handleTap() {
    console.log("click handleTap");
  },
});
The event will also trigger
2. Use sjs functions to respond to events
<!-- Note: The bound SJS function must be enclosed in {{}} -->
<sjs module="sjs" src="./test.sjs"></sjs>
<view id="tapTest" data-hi="WeChat" bind:tap="{{sjs.tapName}}"> Click me! </view>
// The test.sjs file implements the tapName function
function tapName(event, ownerInstance) {
  console.log("tap miniApp", JSON.stringify(event));
}
module.exports = {
  tapName: tapName,
};
ownerInstance contains some methods to set the style and class of the component.
3. Bind and prevent event bubbling
In addition to bind, you can also use catch to bind events. Unlike bind, catch prevents events from bubbling up.
- Click on
inner viewto triggerhandleTap3,handleTap2. - Click on
middle viewto triggerhandleTap2. - Click on
outer view, triggerhandleTap1.
<view id="outer" bind:tap="handleTap1">
  outer view
  <view id="middle" catch:tap="handleTap2">
    middle view
    <view id="inner" bind:tap="handleTap3">
      inner view
    </view>
  </view>
</view>
1. Background
The effect of frequent user interaction is relatively slow on the Miniapp. For example, there are two elements A and B on the page. The user makes a touchmove gesture on A and requires B to follow the movement. Movable-view is a typical example. The response process of a touchmove event is:
- a. The touchmove event is thrown from the view layer (Webview) to the logic layer (App Service)
- b. The logic layer (App Service) processes the touchmove event, and then changes the position of B through setData
A touchmove response needs to go through two communications between the logic layer and the rendering layer and one rendering, and the communication takes a lot of time. In addition, setData rendering will block the execution of other scripts, resulting in a delay in the animation process of the entire user interaction.
2. Implementation plan
The idea of SJS is to reduce the number of communications and let events respond at the view layer (Webview). The framework of the Miniapp is divided into the view layer (Webview) and the logic layer (App Service). The purpose of this layering is to control, and the developer's code can only run in the logic layer (App Service), and this idea must allow the development of The author's code runs in the view layer (Webview)
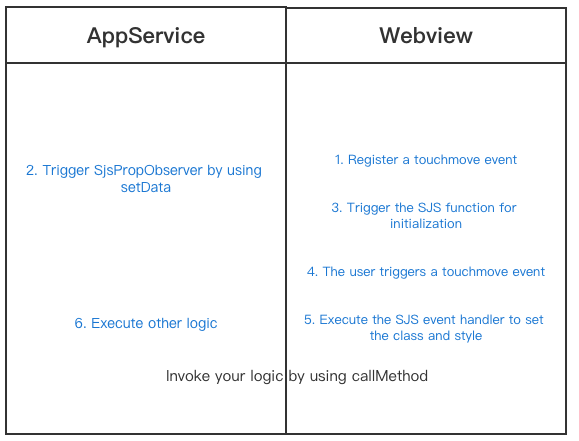
3. How to use
tyml defines events
<sjs module="test" src="./test.sjs"></sjs>

<view change:prop="{{test.propObserver}}" prop="{{propValue}}" bind:touchmove="{{test.touchmove}}" class="movable"></view>
The SJS file test.sjs defines and exports event handlers and functions triggered by property changes:
// event: event object
// ownerInstance: represents the ComponentDescriptor instance of the component where the component that triggered the event is located. If the component that triggered the event is in the page, ownerInstance represents the page instance
const touchmove = function (event, ownerInstance) {
  console.log("log event", JSON.stringify(event));
};

// newValue: new value
// oldValue: old value
// ownerInstance: represents the ComponentDescriptor instance of the component where the component that triggered the event is located. If the component that triggered the event is in the page, ownerInstance represents the page instance
// instance: ComponentDescriptor instance representing the component that triggered the event
const propObserver = function (newValue, oldValue, ownerInstance, instance) {
  console.log("prop observer", newValue, oldValue);
};

export default {
  touchmove: touchmove,
  propObserver: propObserver,
};
The above change:prop (property prefixed with change:) is to trigger the SJS function when the prop property is set, the value must be enclosed in {{}}. Similar to the observer property in the properties defined by Component, it will be triggered after setData({propValue: newValue}) is called.
Sometimes in the process of development, we need to query the current position, properties, style and other information of a node. We can use ty.createSelectorQuery It returns a SelectorQuery object instance.
Sample code
const query = ty.createSelectorQuery();
query.select("#the-id").boundingClientRect();
query.selectViewport().scrollOffset();
query.exec(function (res) {
  res[0].top; // #the upper boundary coordinates of the-id node
  res[1].scrollTop; // Vertical scroll position of the display area
});
Get the intersection state of a node:
ty.createIntersectionObserverAPI can be used to monitor the intersection state of two or more component nodes at the layout position . This set of APIs can often be used to infer whether certain nodes are visible to the user and to what percentage.
The main concepts involved in this set of APIs are as follows.
- Reference node: the monitored reference node, and its layout area is taken as the reference area. If there are multiple reference nodes, the intersection of their layout areas will be taken as the reference area. The page display area can also be used as one of the reference areas.
- Target node: The target to be monitored can only be one node by default (when using the selectAll option, multiple nodes can be monitored at the same time).
- Intersection area: The intersection area between the layout area of the target node and the reference area.
- Intersection ratio: The ratio of the intersection area to the reference area.
- Threshold: If the intersection ratio reaches the threshold, the listener's callback function will be triggered.
The following code indicates that the callback function is fired when .ball and .scroll-view intersect. See more
onLoad(){
  this._observer = ty.createIntersectionObserver()
  this._observer
    .relativeTo('.scroll-view')
    .observe('.ball', (res) => {
      this.setData({
        appear: res.intersectionRatio > 0
      })
    })
}

onUnload() {
  if (this._observer) this._observer.disconnect()
}
In an Miniapp, you can often use CSS gradients and CSS animations to create simple interface animations. At the same time, you can also use ty.createAnimation interface to dynamically create simple animation effects.
Sample code
This sample code implements a simple rotation animation effect and achieves more effectsView
<view class="animation-element" animation="{{animation}}"></view>
<button bind:tap="rotate">rotate</button>
Page({
  data: {
    animation: [],
  },
  onReady: function () {
    this.animation = ty.createAnimation();
  },
  rotate: function () {
    this.animation.rotate(Math.random() * 720 - 360).step();
    let anim = this.animation.export();
    this.setData({ animation: anim });
  },
});
1. The page or component gets the App event
The Smart Mini Program API mainly provides the following application-level events:
- ty.onAppHide: monitor the Miniapp switching background event. This event coincides with the callback timing of App.onHide.
- ty.offAppHide:Cancel listening for Miniapp switching background events
- ty.onAppShow:monitor the Miniapp switching foreground event. This event matches the callback parameter of App.onShow.
- ty.offAppShow:Cancel the monitoring of the Miniapp switch to the foreground event.
- ty.onError:monitor the Miniapp error event. Such as script errors or API call errors, etc. This event is consistent with the callback timing and parameters of App.onError.
- ty.offError:Cancel the monitoring of Miniapp error events.
- ty.onThemeChange: Monitor theme change events.
- ty.offThemeChange:Cancel listening for theme change events.
- ty.onPageNotFound: monitor the page not found event to be opened by the Miniapp. This event coincides with the callback timing of App.onPageNotFound.
2. Smart MiniApp modularization
1. Component gets page life cycle pageLifetimes
The lifecycle declaration object of the page where the custom component is located, which can be used to respond to event processing.
Sample code
Component({
  pageLifetimes: {
    show: function () {
      // page is displayed
    },
    hide: function () {
      // page is hidden
    },
    resize: function (size) {
      // page size change
    },
  },
});
2. Get the component instance
- You can call
this.selectComponentin the parent component to get the instance object of the child component. This allows direct access to arbitrary data and methods of the component. - When calling, you need to pass a matching selector
selector, such as:this.selectComponent(".my-component"). - In the following example, the parent component will get the child component instance object whose
classismy-component, which is thethisof the child component.
// parent component
Page({
  data: {},
  getChildComponent: function () {
    const child = this.selectComponent(".my-component");
    console.log(child);
  },
});
3.behaviors
behaviors are features for code sharing between components, similar to "mixins" or "traits" in some programming languages.
Each behavior can contain a set of properties, data, lifecycle functions and methods. When a component references it, its properties, data, and methods will be incorporated into the component, and the lifecycle functions will be called at the corresponding time. Each component can reference multiple behavior , and behavior can also reference other behavior .
For detailed parameter meaning and usage, please refer to Behavior Reference Document.
When components are referenced, they can be listed one by one in the behaviors definition section.
Sample code
4. Relationship between components
Sometimes it is necessary to implement a component like this:
<custom-ul>
  <custom-li> item 1 </custom-li>
  <custom-li> item 2 </custom-li>
</custom-ul>
In this example, custom-ul and custom-li are both custom components, they have a relationship with each other, and the communication between them is often complicated. At this point, adding the relations definition section when the component is defined can solve such a problem.
// path/to/custom-ul.js
Component({
relations: {
"./custom-li": {
type: "child", // The associated target node should be a child node, (relative relationship of target components, optional values are parent , child , ancestor , descendant)
linked: function (target) {
// Executed every time a custom-li is inserted, target is the node instance object, triggered after the attached life cycle of the node
},
linkChanged: function (target) {
// Every time a custom-li is moved, the target is the node instance object, which is triggered after the node's moved life cycle
},
unlinked: function (target) {
// Executed every time a custom-li is removed, target is the node instance object, triggered after the node's detached life cycle
},
},
},
});
// path/to/custom-li.js
Component({
relations: {
"./custom-ul": {
type: "parent", // The associated target node should be the parent node (relative relationship of target components, optional values are parent , child , ancestor , descendant)
linked: function (target) {
// Executed every time it is inserted into custom-ul, target is the custom-ul node instance object, triggered after the attached life cycle
},
linkChanged: function (target) {
// Executed after each move, target is the custom-ul node instance object, triggered after the moved life cycle
},
unlinked: function (target) {
// Executed every time it is removed, target is the custom-ul node instance object, triggered after the detached life cycle
},
},
},
});
**Note: relations definitions must be added to both component definitions, otherwise it will not take effect. **
5. Pure data field pureDataPattern
Pure data fields are some data fields that are not used for interface rendering and can be used to improve page update performance.
In some cases, some fields in data (including fields set by setData) are neither displayed on the interface nor passed to other components, but are only used inside the current component.
At this point, you can specify such data fields as "pure data fields", and they will only be recorded in this.data without participating in any interface rendering process, which will help improve page update performance.
The way to specify "pure data fields" is to specify pureDataPattern as a regular expression in the options definition section of the Component constructor, and fields whose field names match this regular expression will become pure data fields.
Component({
  options: {
    pureDataPattern: /^_/, // Specify all data fields starting with _ as pure data fields
  },
  data: {
    a: true, // normal data field
    _b: true, // pure data field
  },
  methods: {
    myMethod() {
      this.data._b; // pure data fields can be obtained in this.data
      this.setData({
        c: true, // normal data field
        _d: true, // pure data field
      });
    },
  },
});
Plain data fields in the above components will not be applied to TYML:
<view ty:if="{{a}}"> this line will be displayed </view>
<view ty:if="{{_b}}"> this line will not be displayed </view>
6. Custom component extension
To better customize the functionality of custom components, the custom component extension mechanism can be used.
Extended effect
// behavior.js
module.exports = Behavior({
  definitionFilter(defFields) {
    defFields.data.from = "behavior";
  },
});

// component.js
const myBehavior = require("behavior.js");
Component({
  data: {
    from: "component",
  },
  behaviors: [myBehavior],
  ready() {
    console.log(this.data.from); // here you will find the output behavior instead of component
  },
});
Through the example, we can find that the extension of the custom component actually provides the ability to modify the definition section of the custom component. The above example is to modify the content in the data definition section of the custom component.
For detailed usage, please check the document.
You can self-check the existing Mini Programs according to the Experience Optimization Guide to improve performance and user experience.
- Congratulations 🎉 for completing this tutorial! Other more small program development to dig yourself!
- If you have any questions, you can contact the Tuya Smart MiniApp team