Prerequisites
- Have read the Ray Novice Village Tasks to get to know the basics of the Ray framework.
- Have read Develop Universal Panel Based on Ray to get to know the basics of Ray panel development.
- The AI pet template is developed with the
Smart Device Model (SDM). For more information, see the documentation of Smart Device Model.
Create a panel
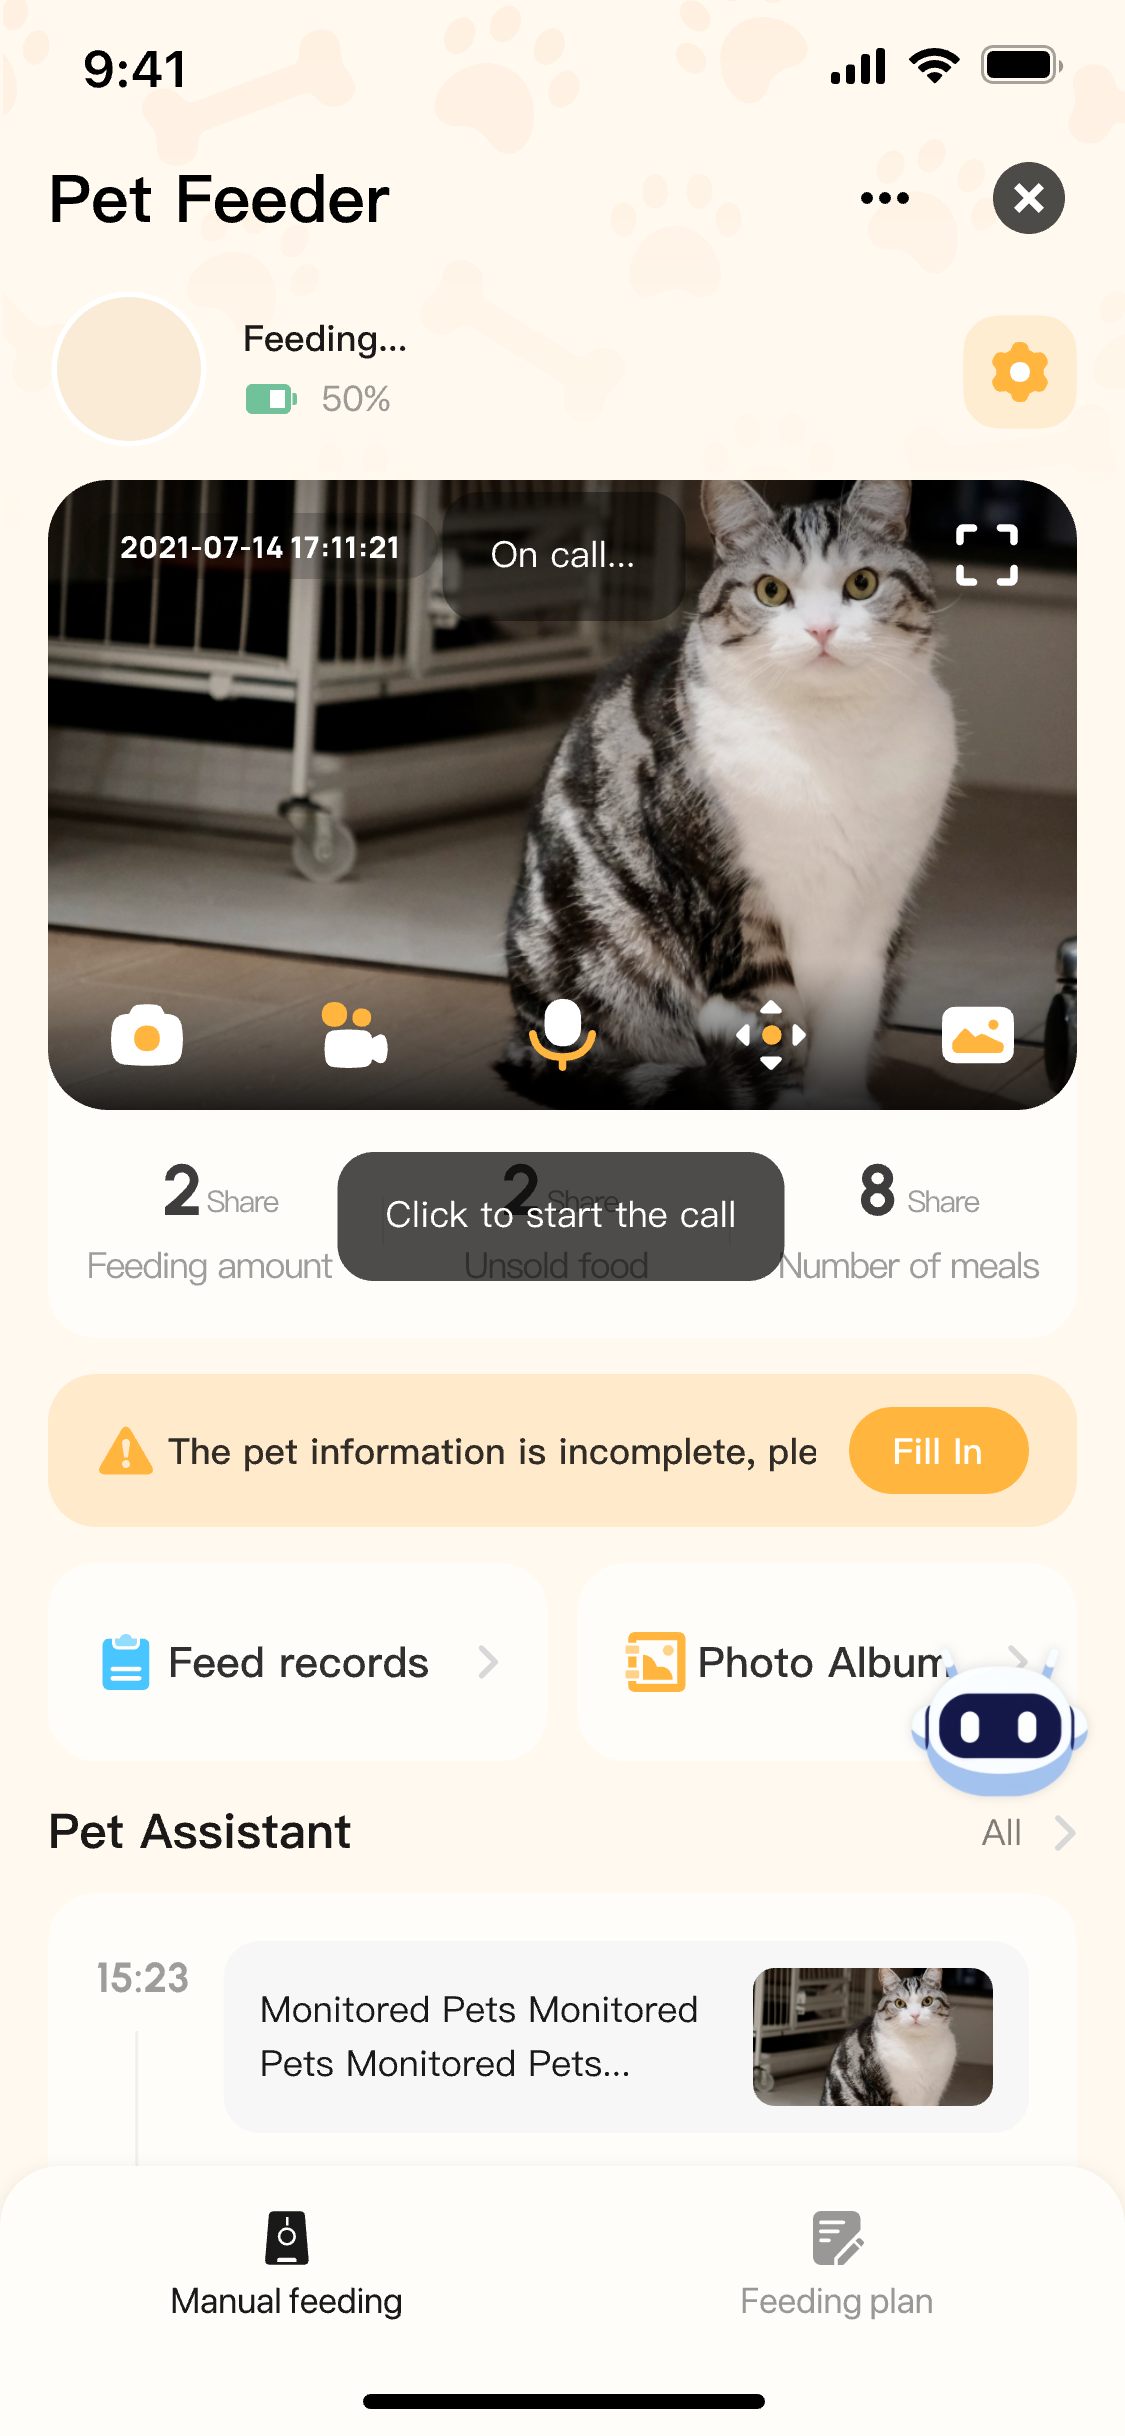
You can use the panel miniapp to develop an AI pet device panel based on the Ray framework.
- Pet profile: You can manage pet information on the panel, including adding, deleting, modifying, checking, and uploading and analyzing pet frontal photos.
- Multi-pet identification: Monitor pets' eating patterns and identify which pet it is.
Required conditions
- Smart Life app
- Tuya MiniApp IDE
- NVM and Node development environment (v18.x is recommended)
- Yarn dependency management tool
For more information, see Panel MiniApp > Set up environment.
A product defines the data points (DPs) of the associated panel and device. Before you develop a panel, you must create a product, define the required DPs, and then implement these DPs on the panel.
Register and log in to the Tuya Developer Platform and create a product.
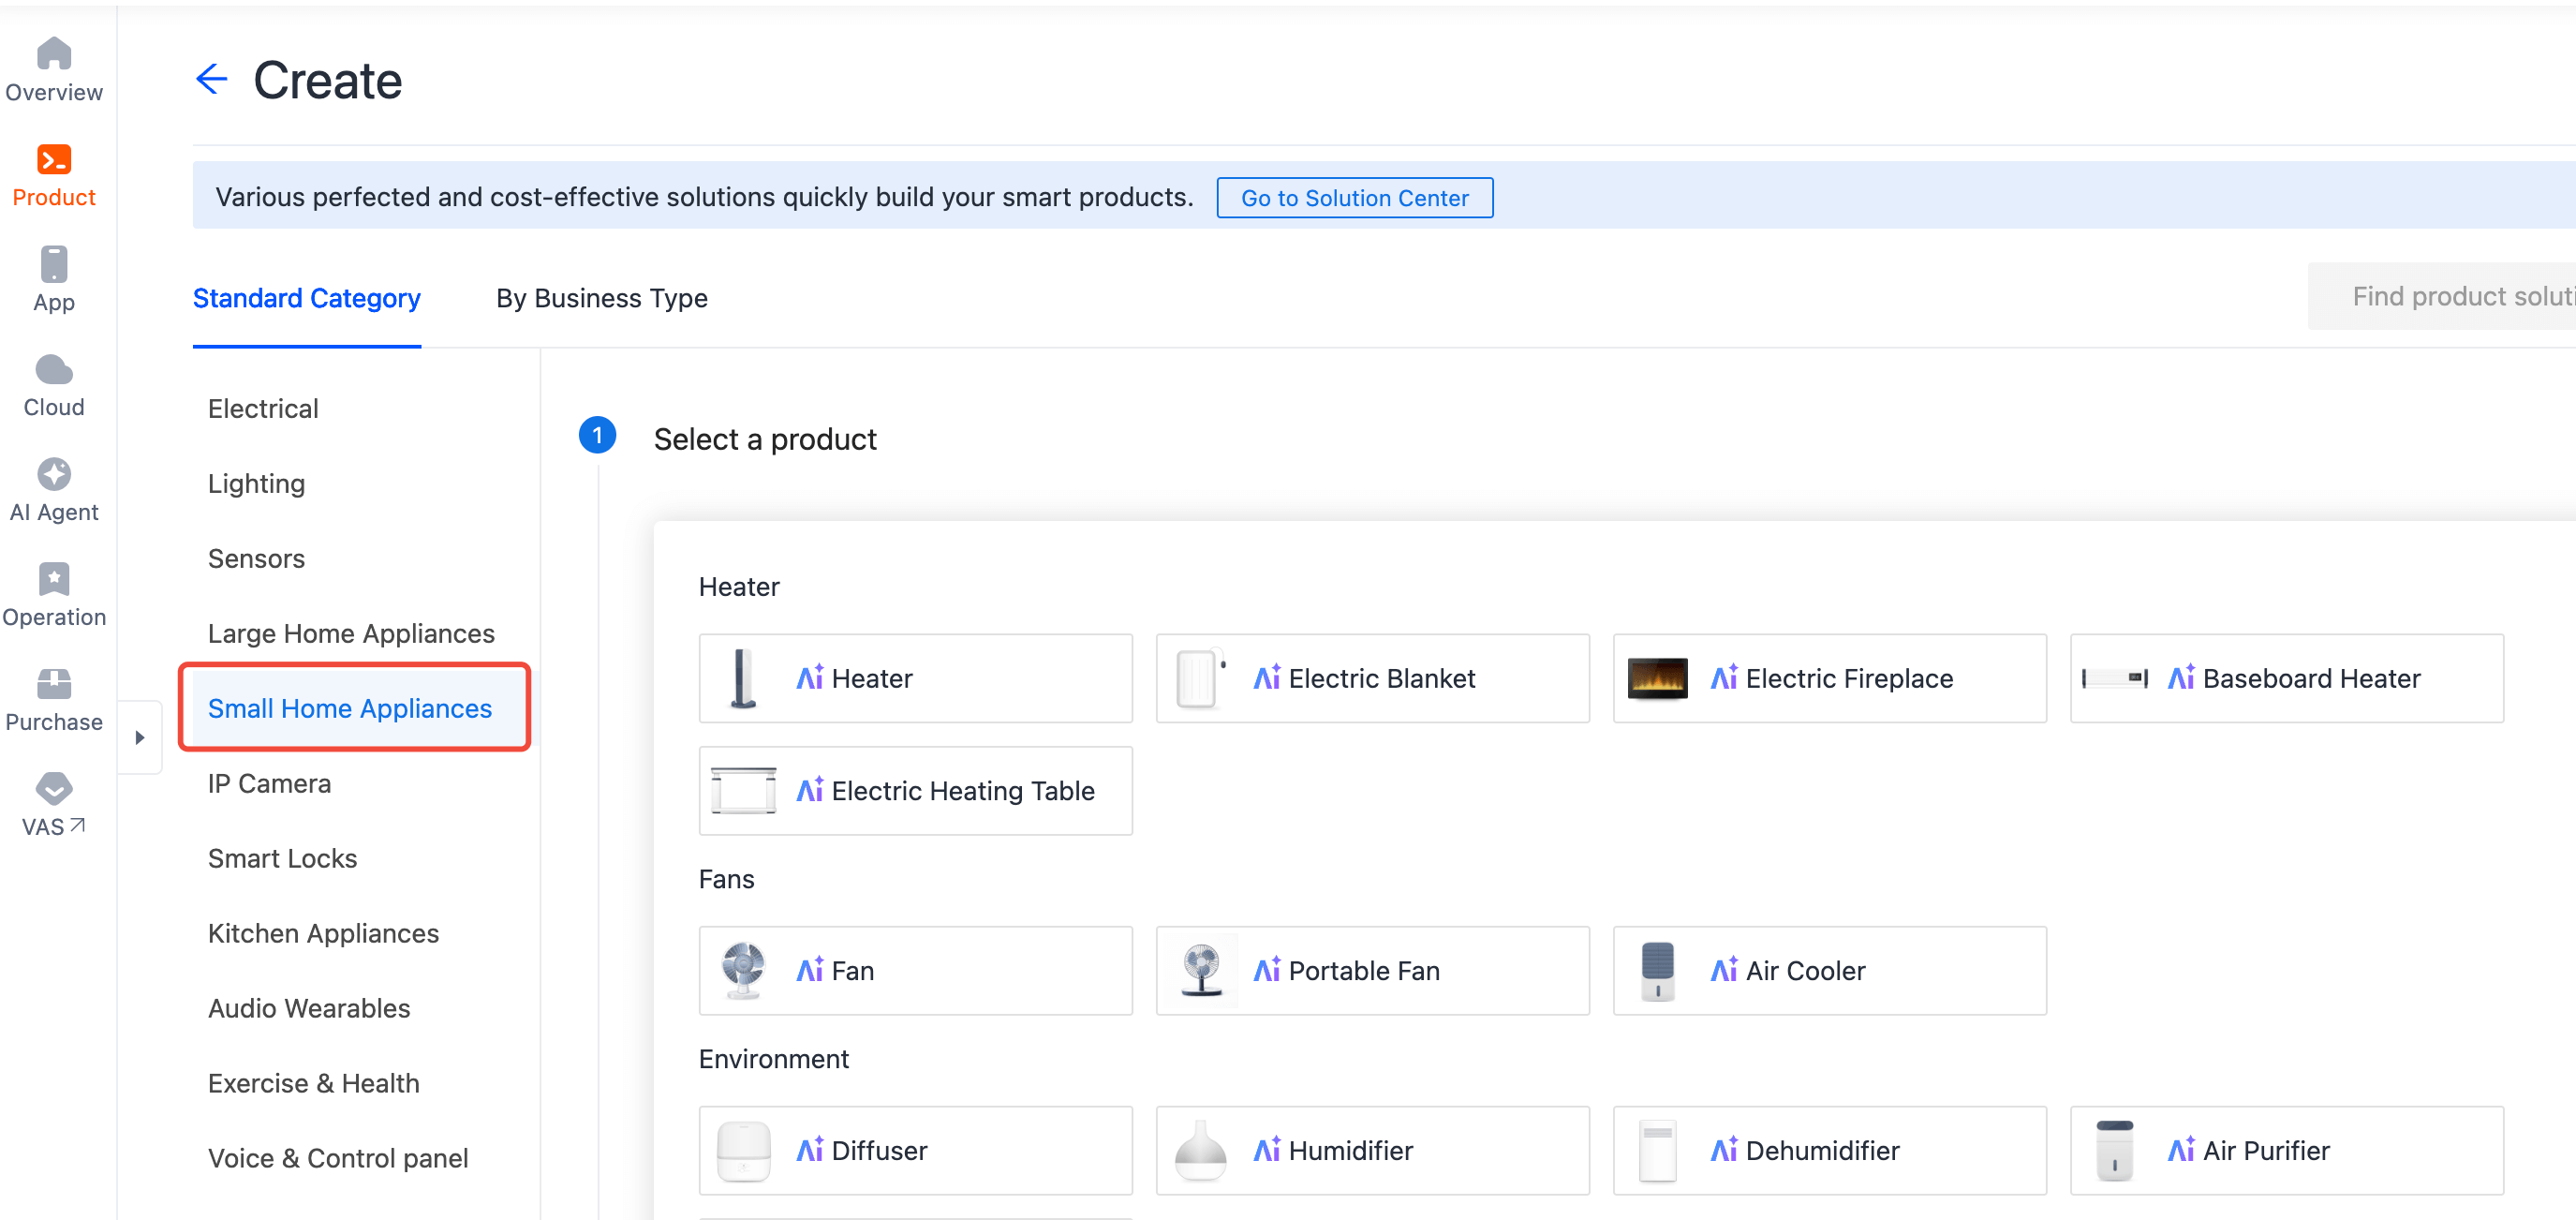
- In the left-side navigation pane, choose Product > Development > Create.

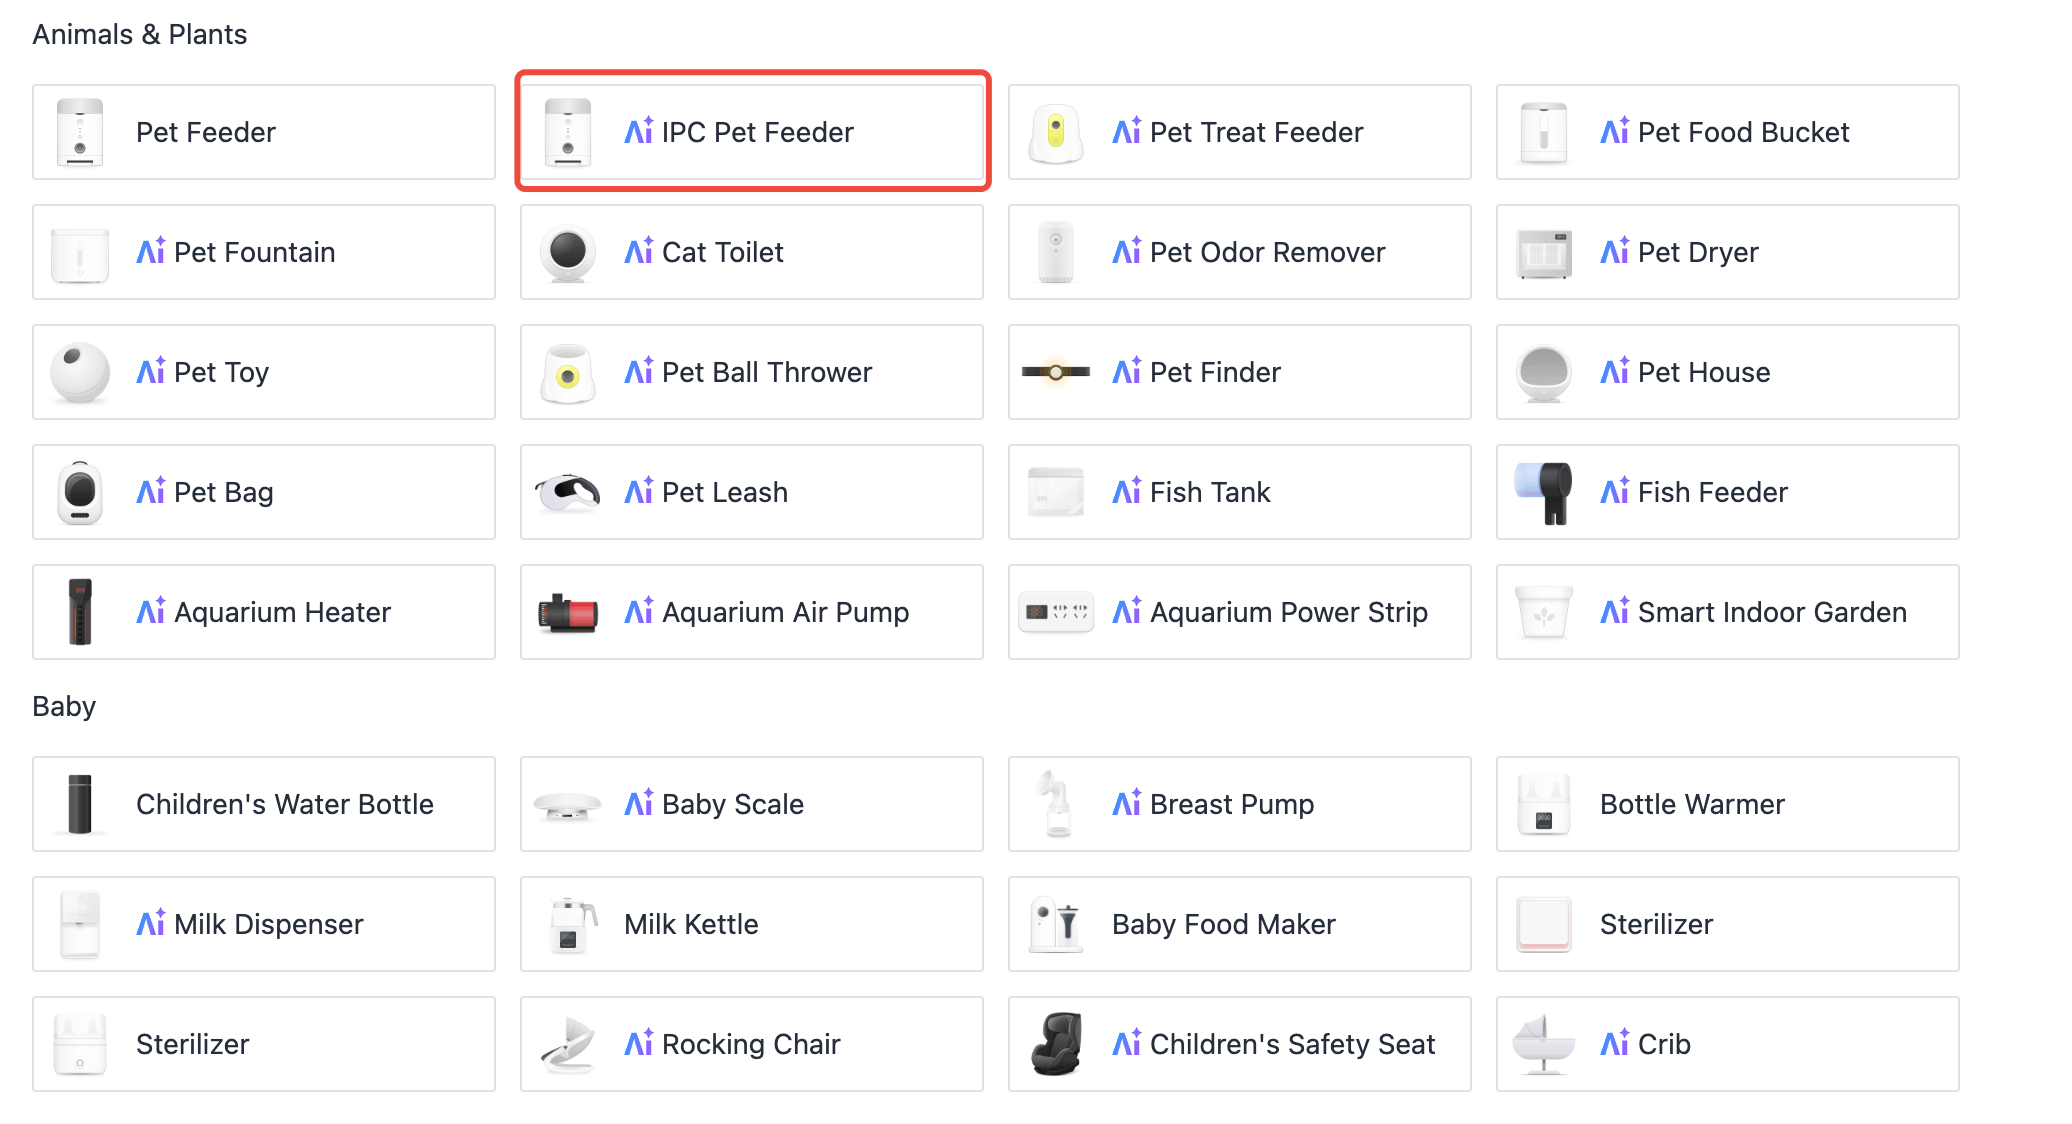
- In the Standard Category tab, select the Small Home Appliances > IPC Pet Feeder.
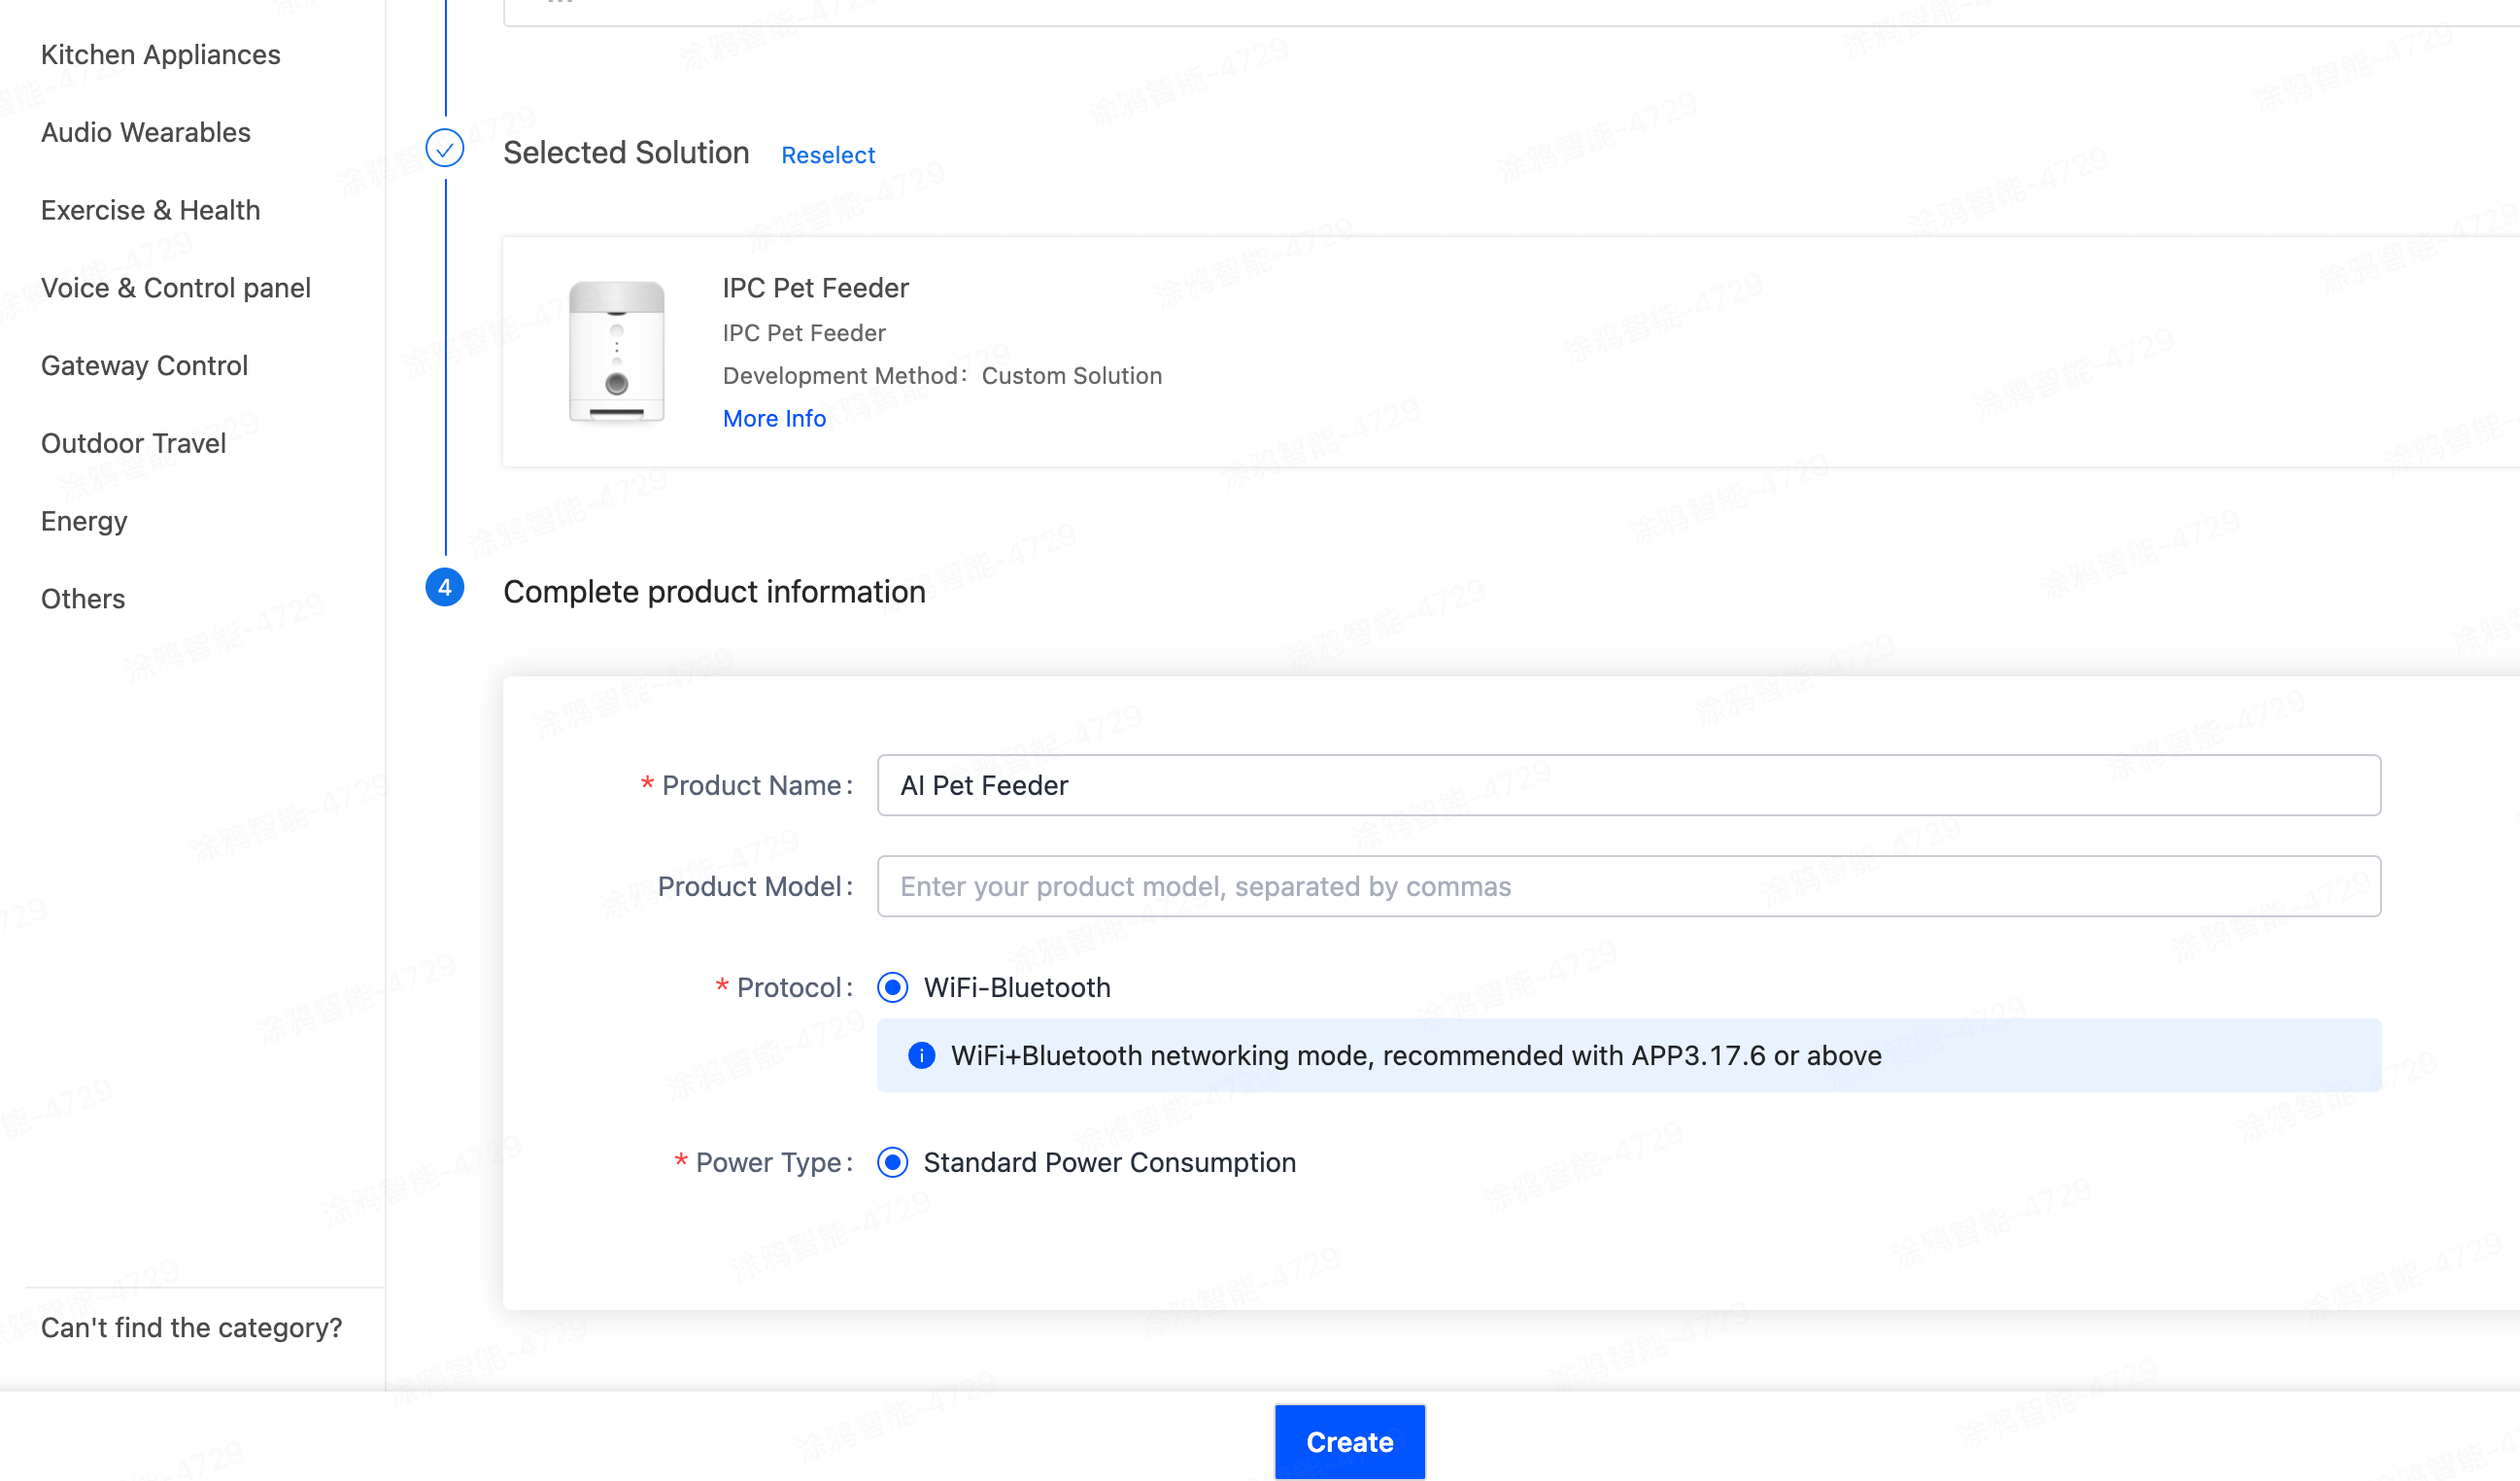
- Select a smart mode and solution, and complete product information.
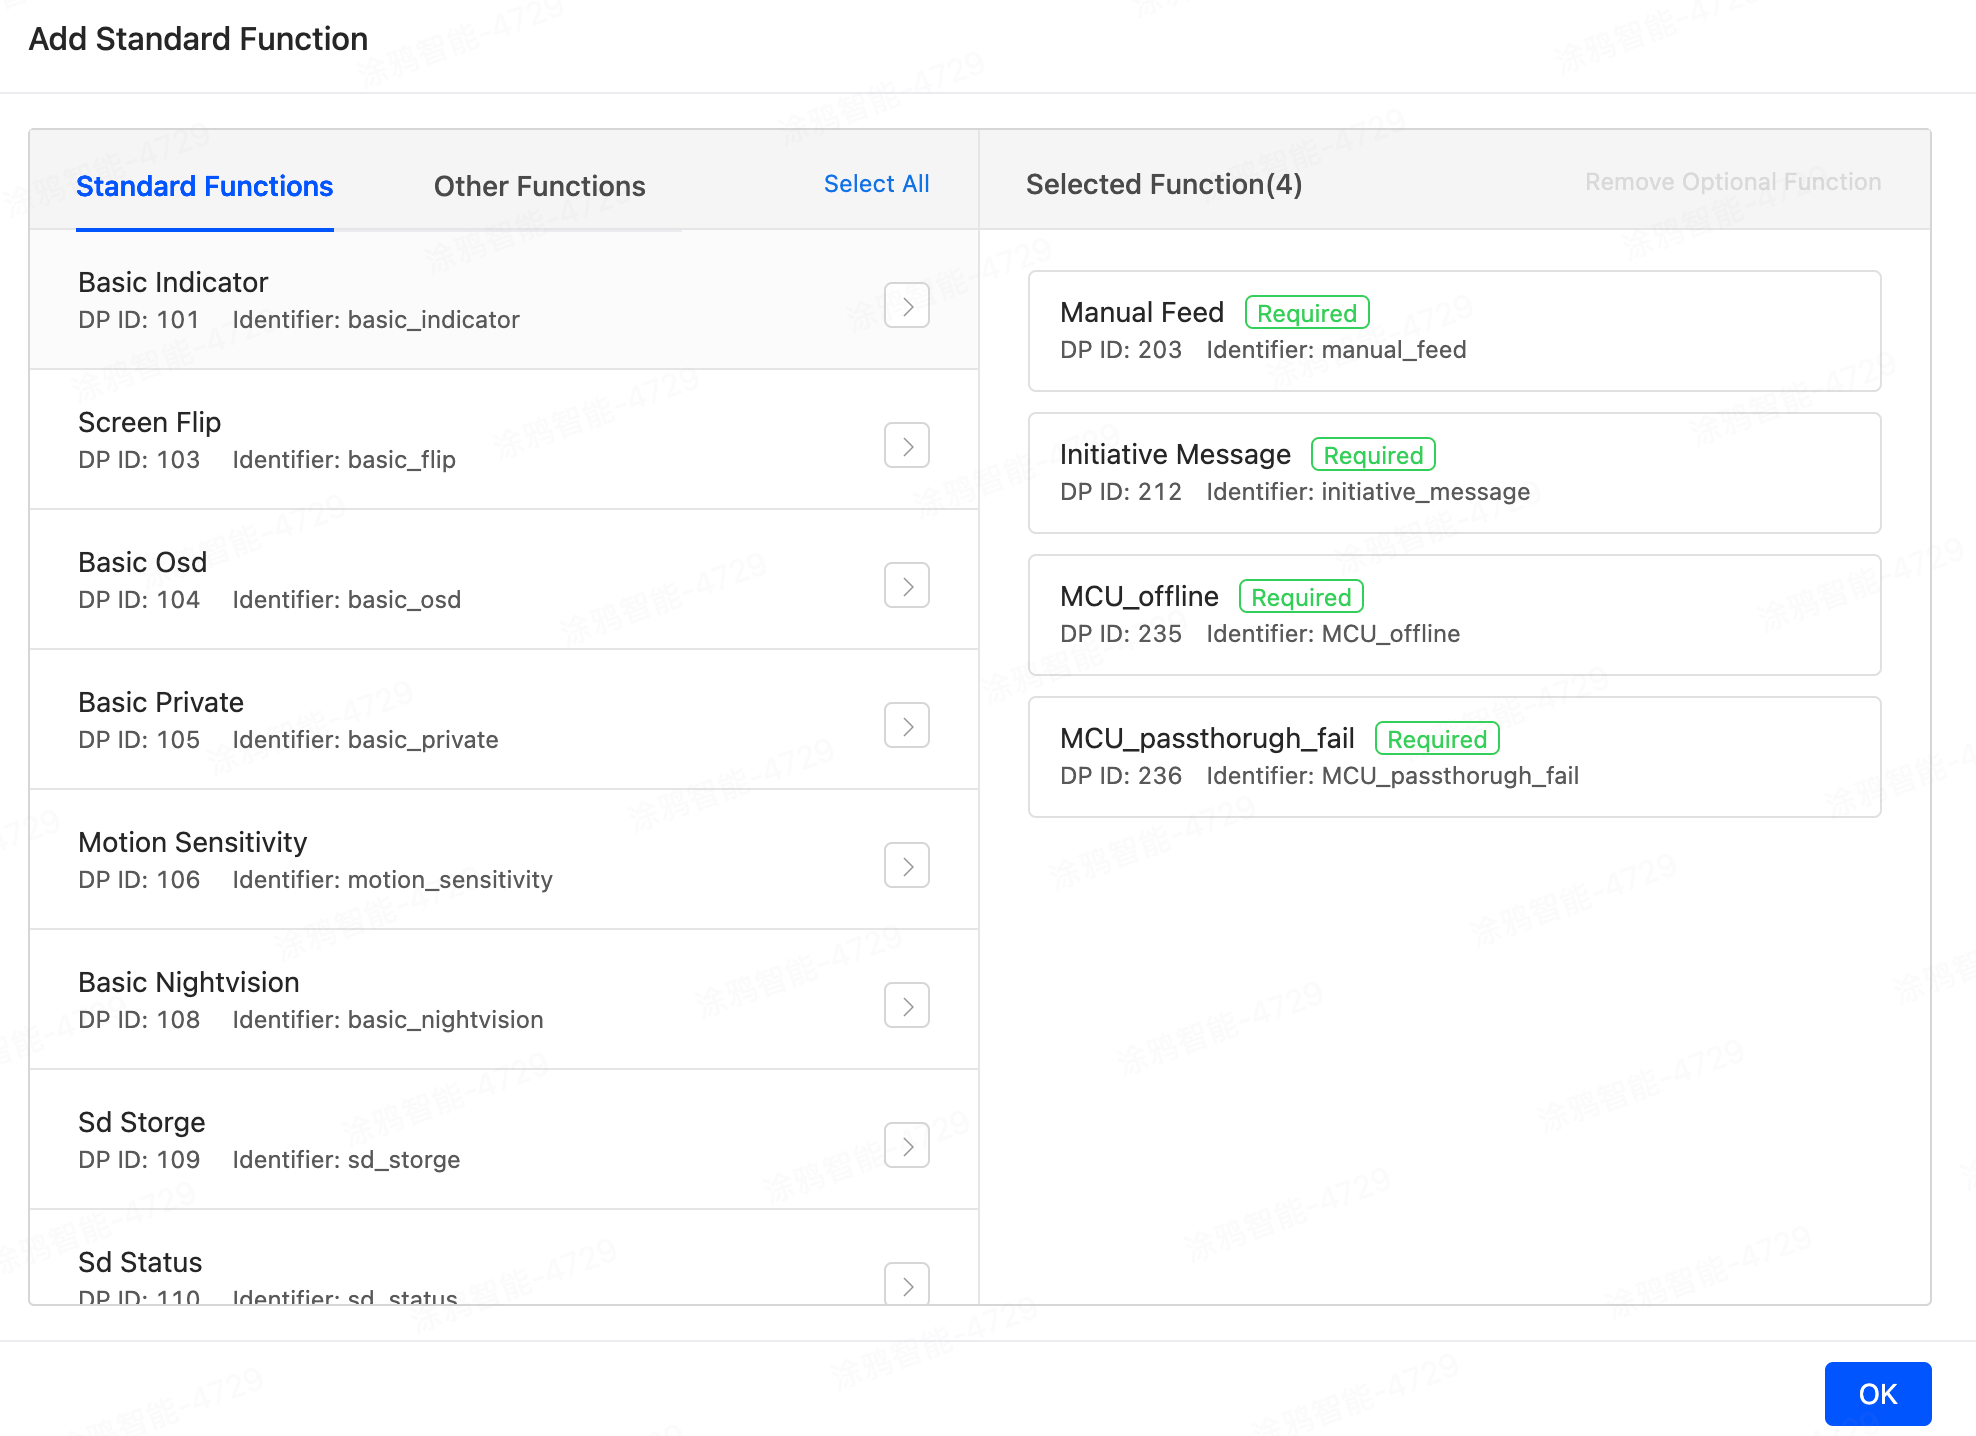
- On the page of Add Standard Function, choose your desired DPs or use the default settings, and click OK.
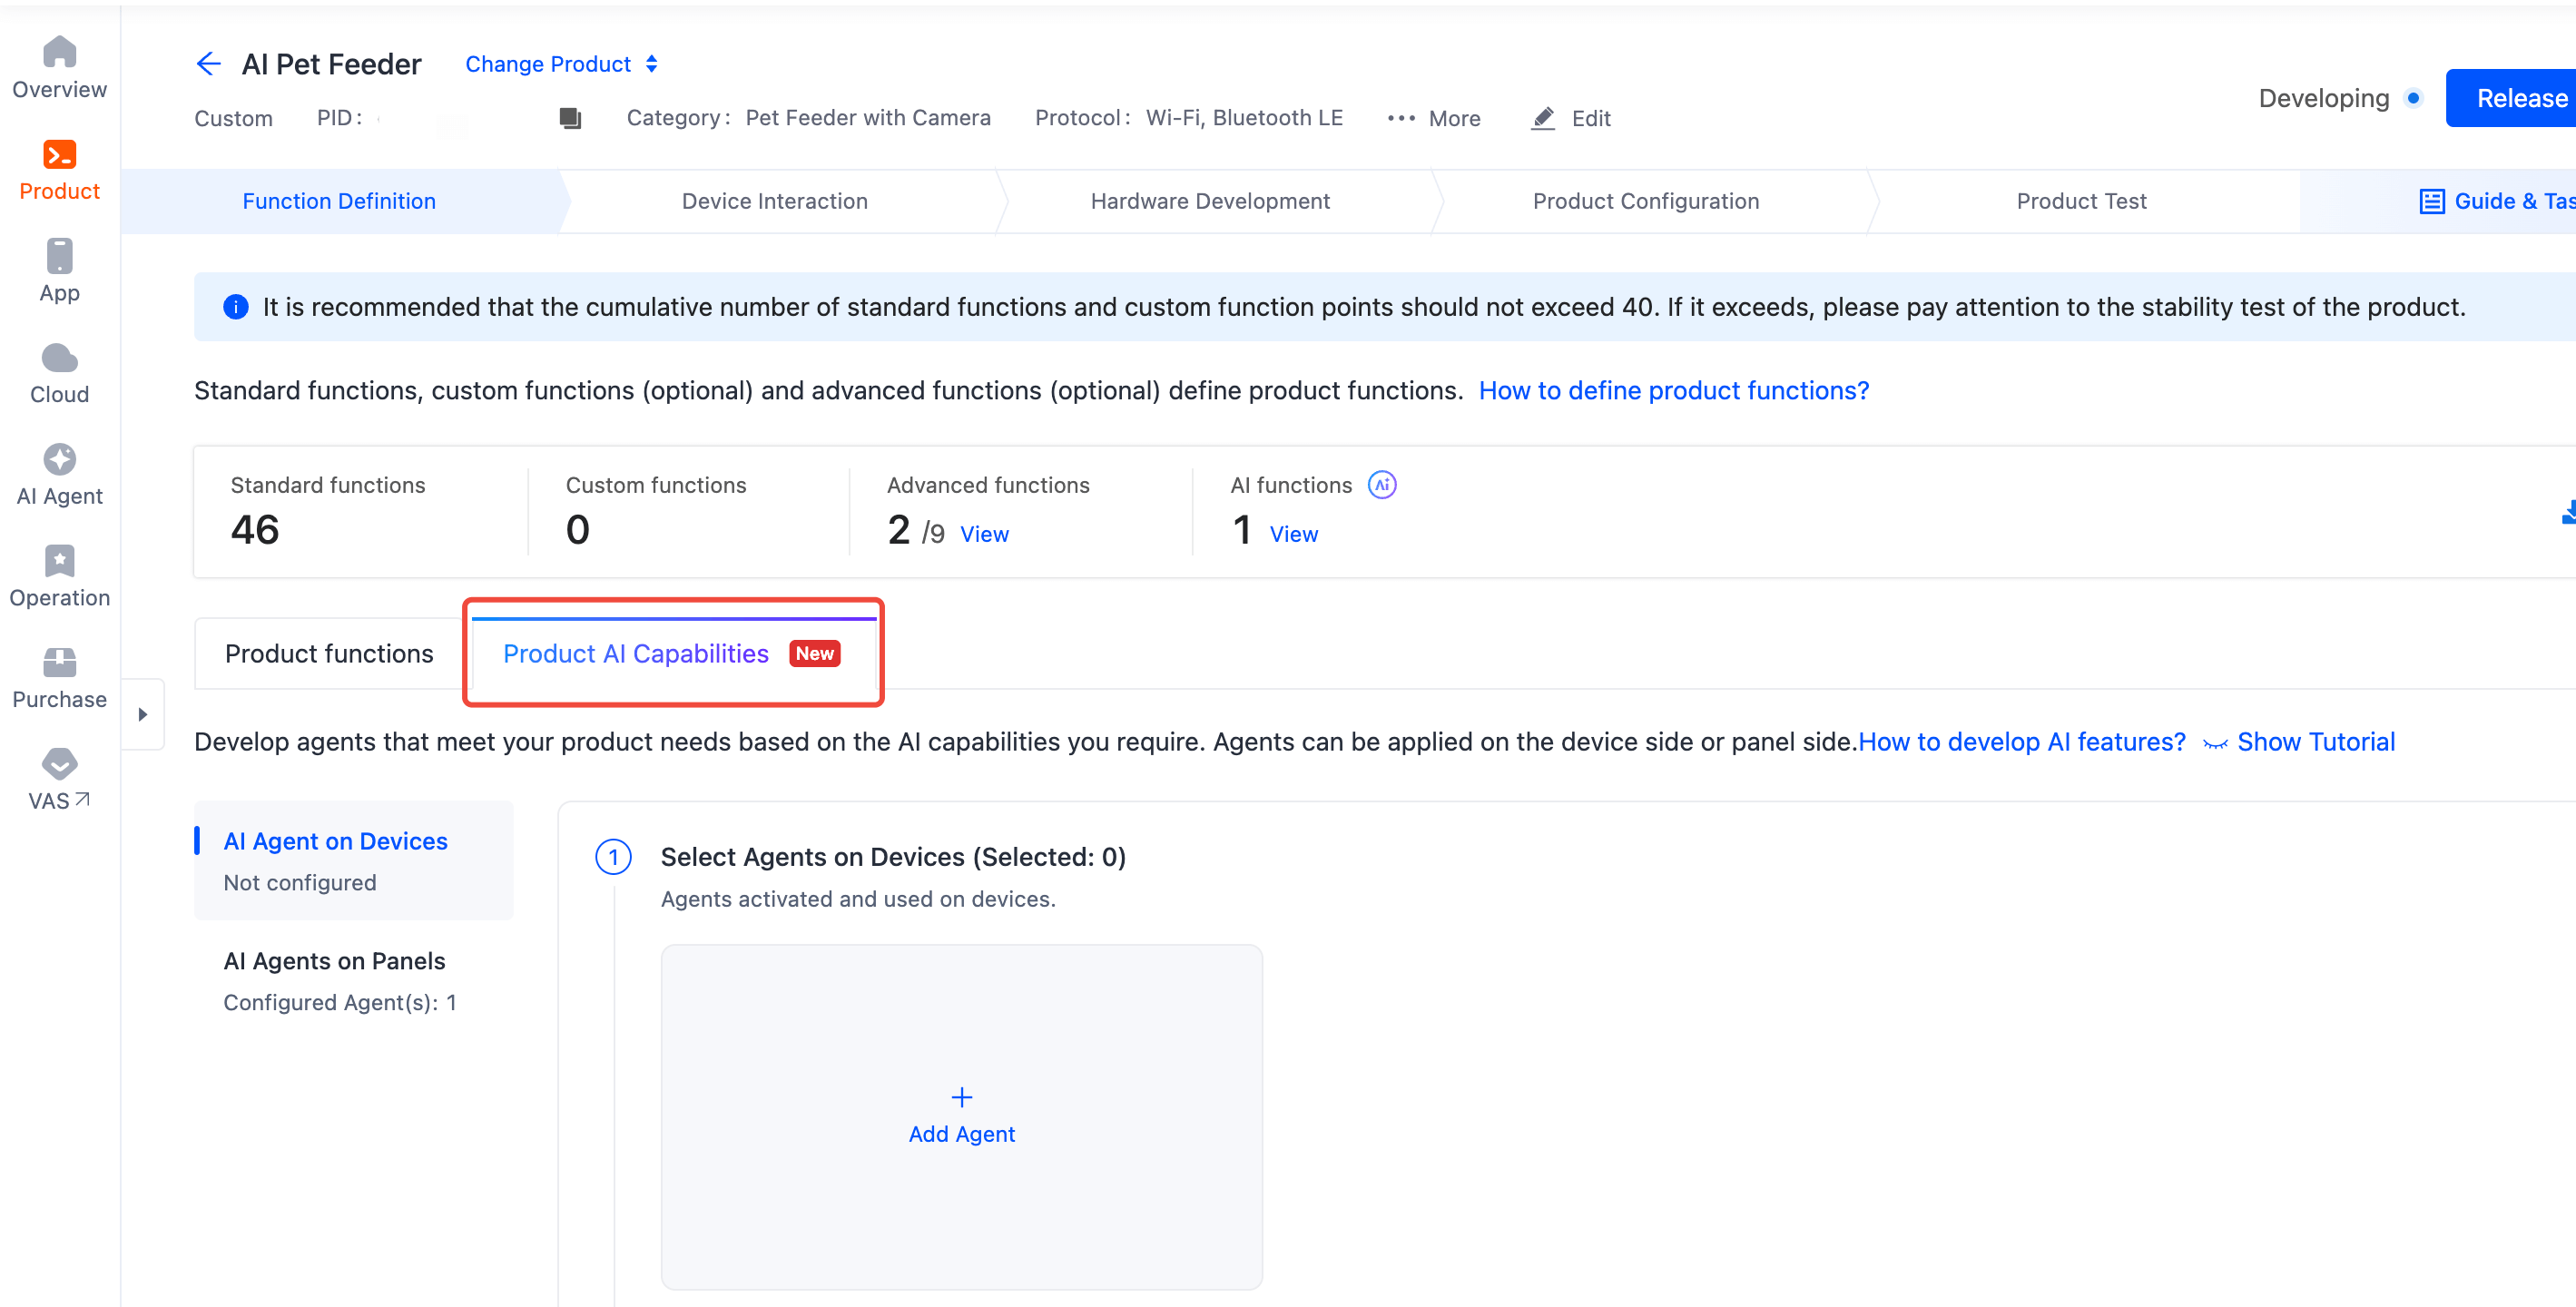
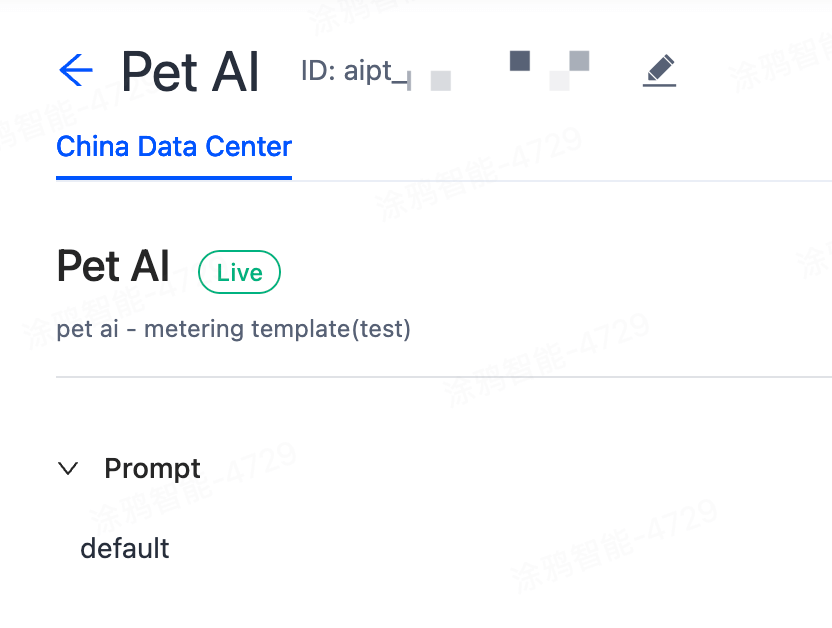
- On the product details page, copy the product ID (PID), and contact your project manager to configure and enable the Product AI Capabilities for this PID.
- After confirming this feature has been enabled, you can find the Product AI Capabilities tab in Function Definition.
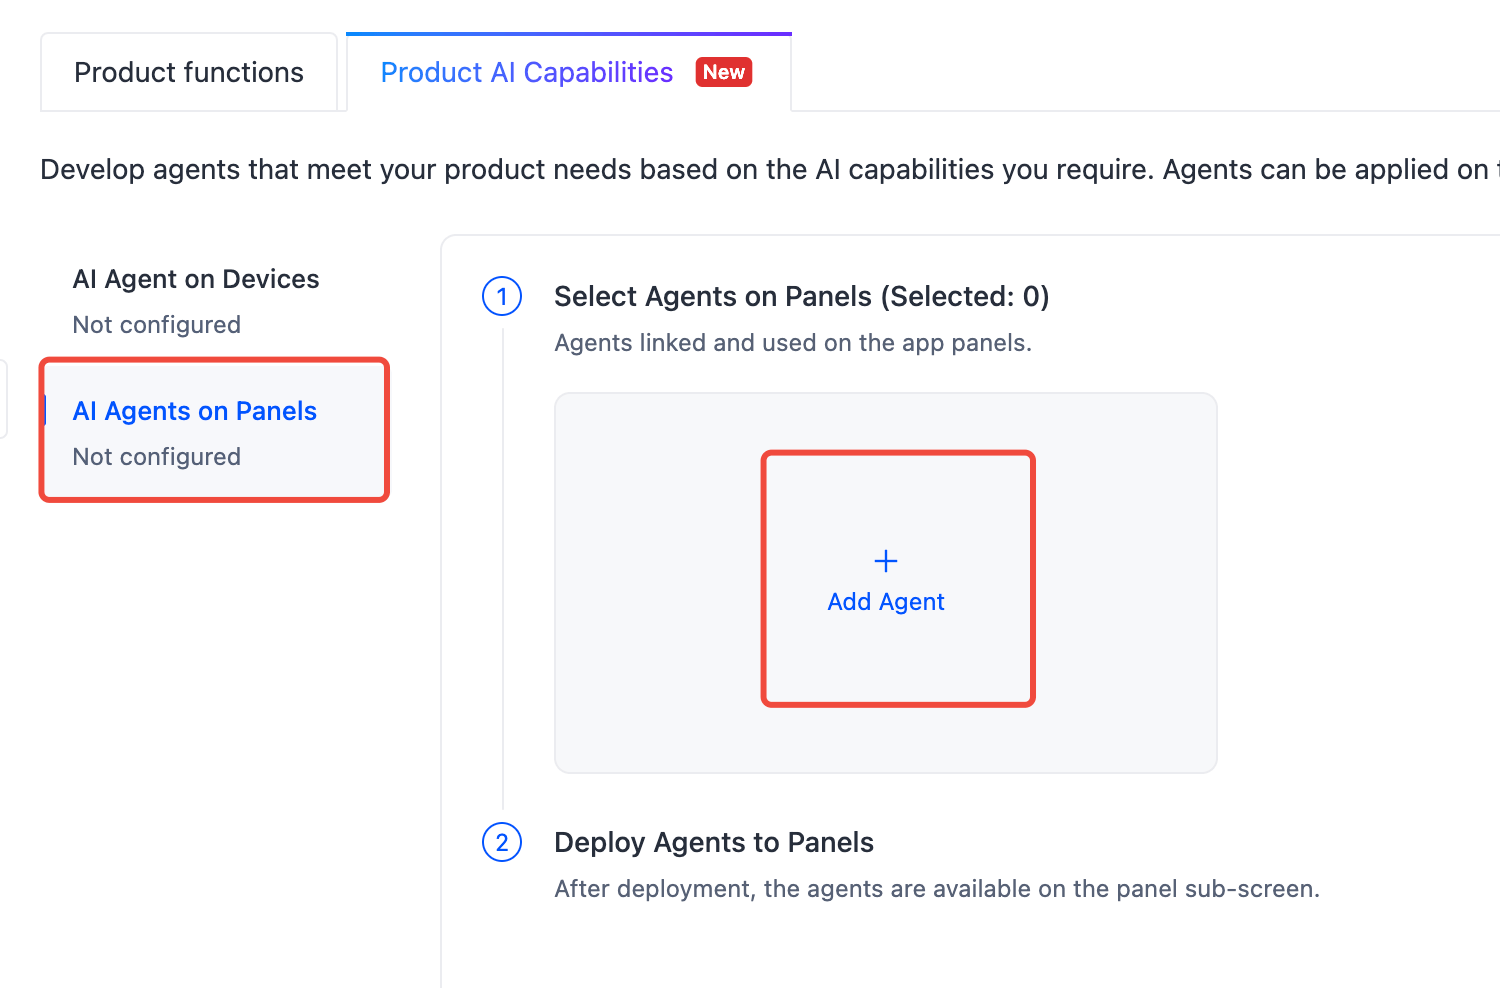
- Under AI Agents on Panels, click Add Agent.
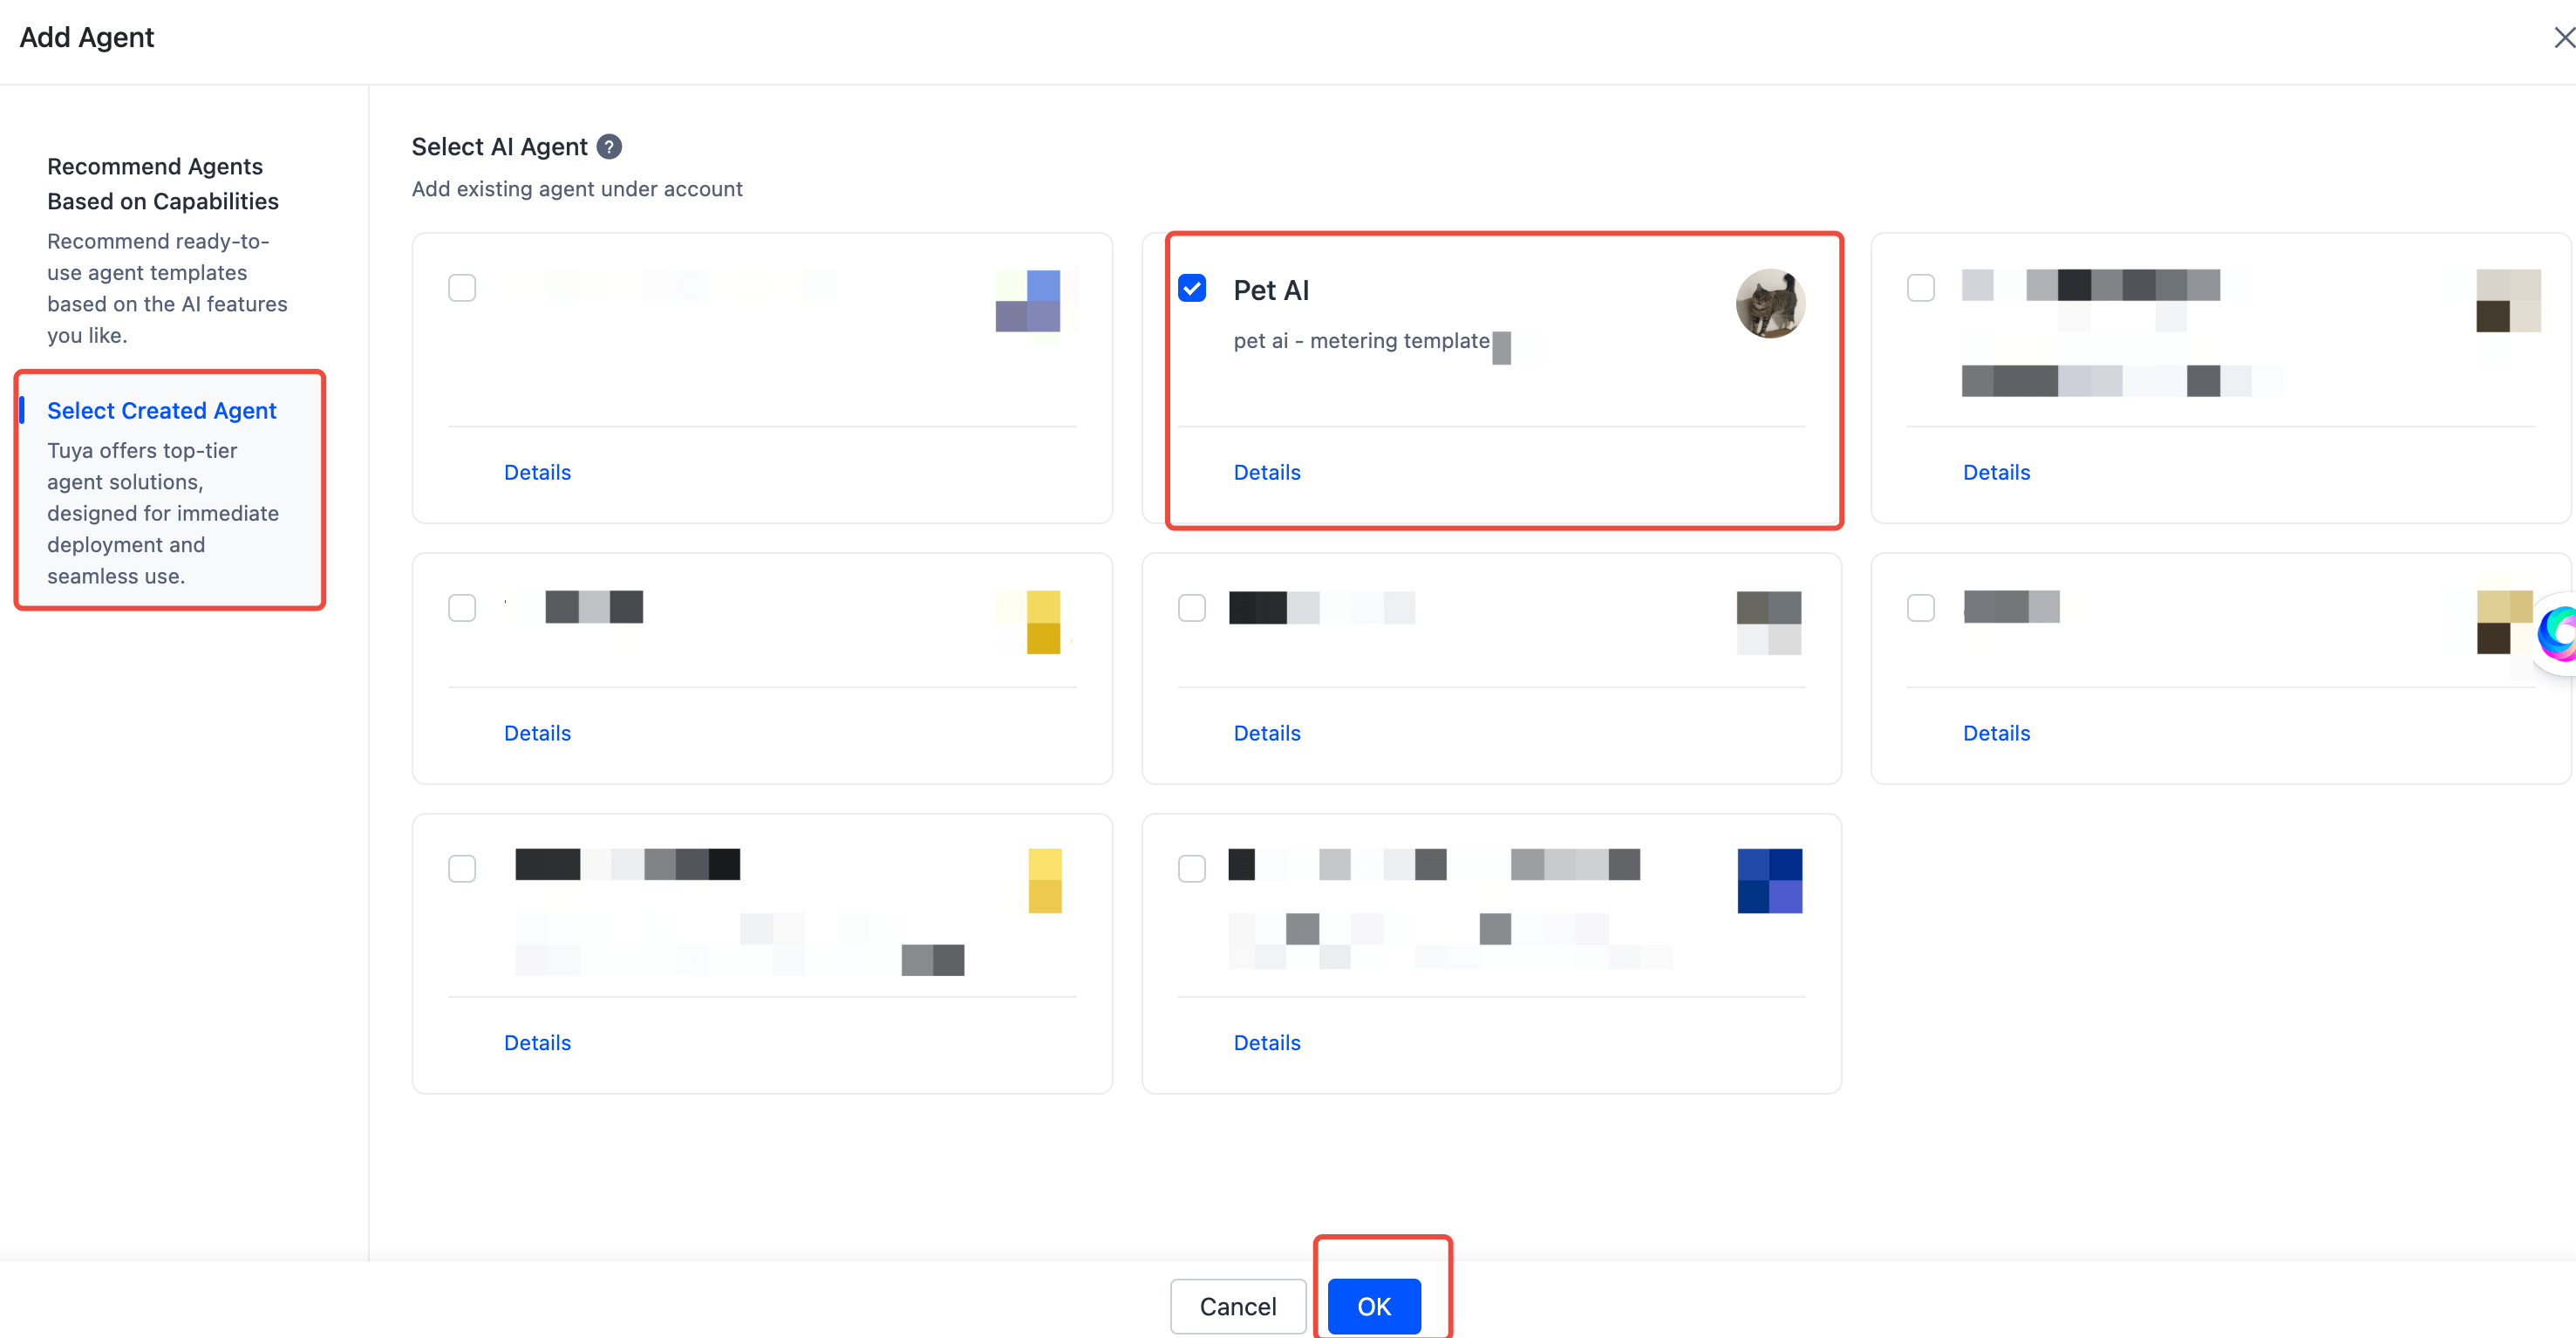
- On the Add AI Agents on Panels page, select Select Created Agent tab, choose Pet AI, click OK.
- In the section of Selected AI agents, click Details.
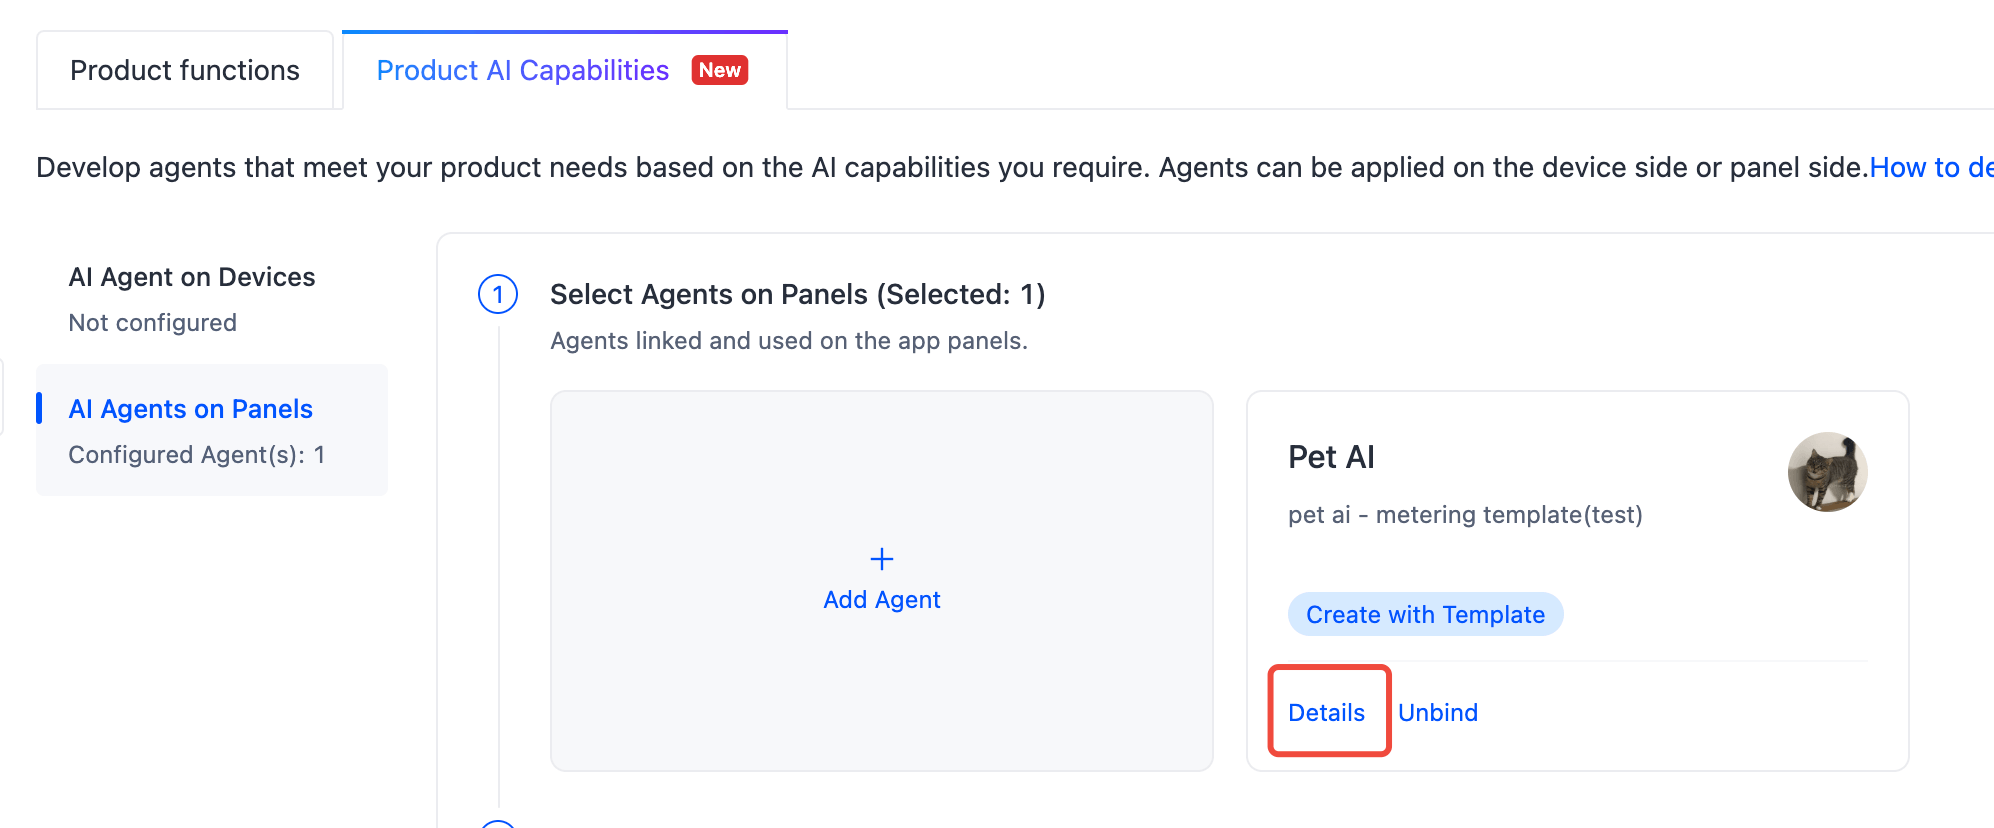
- Copy the agent ID and save it for later use.
Create panel miniapp on Smart MiniApp Developer Platform
Register and log in to the Smart MiniApp Developer Platform. For more information, see Create panel miniapp.
Create a project based on a template
Open Tuya MiniApp IDE and create a panel miniapp project based on the AI pet template. For more information, see Initialize project.
- App version
- Smart Life app v6.3.0 and later
- Kit dependency
- BaseKit: 3.0.0
- MiniKit: 3.1.0
- DeviceKit: 4.6.0
- BizKit: 4.5.1
- IPCKit: 5.18.0
- HomeKit: 3.1.4
- baseversion: 2.27.0
- Dependent components
- @ray-js/ray^1.6.25
- @ray-js/components-ty-ipc^2.2.4
In the project, configure the agent ID you copied in the previous Create a product > Step 10. The template code is src/pages/Home/index.
// The agent ID. Change it to the agent ID configured for the product.
const AGENT_ID = "xxx";
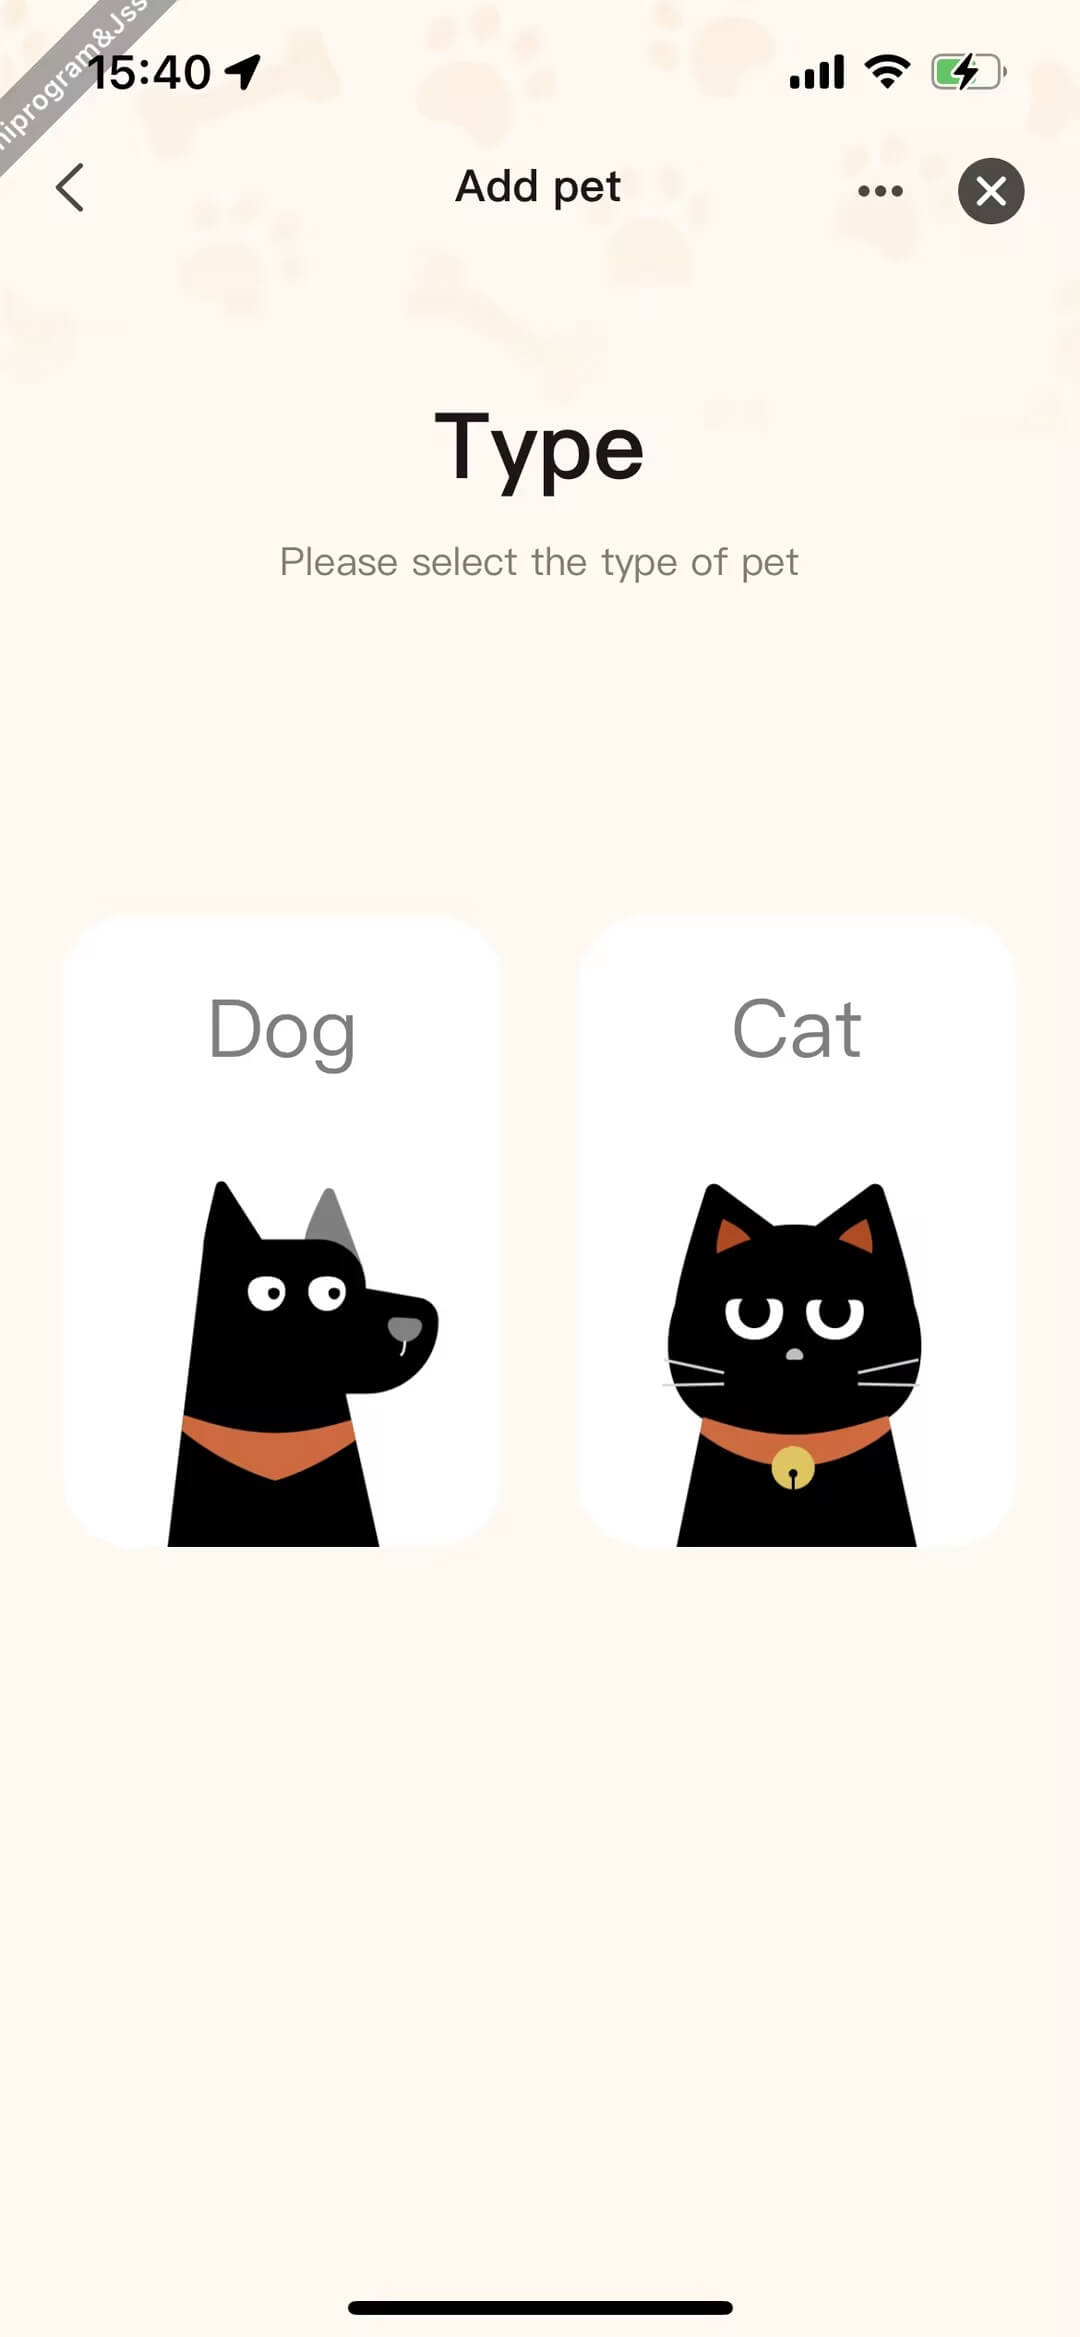
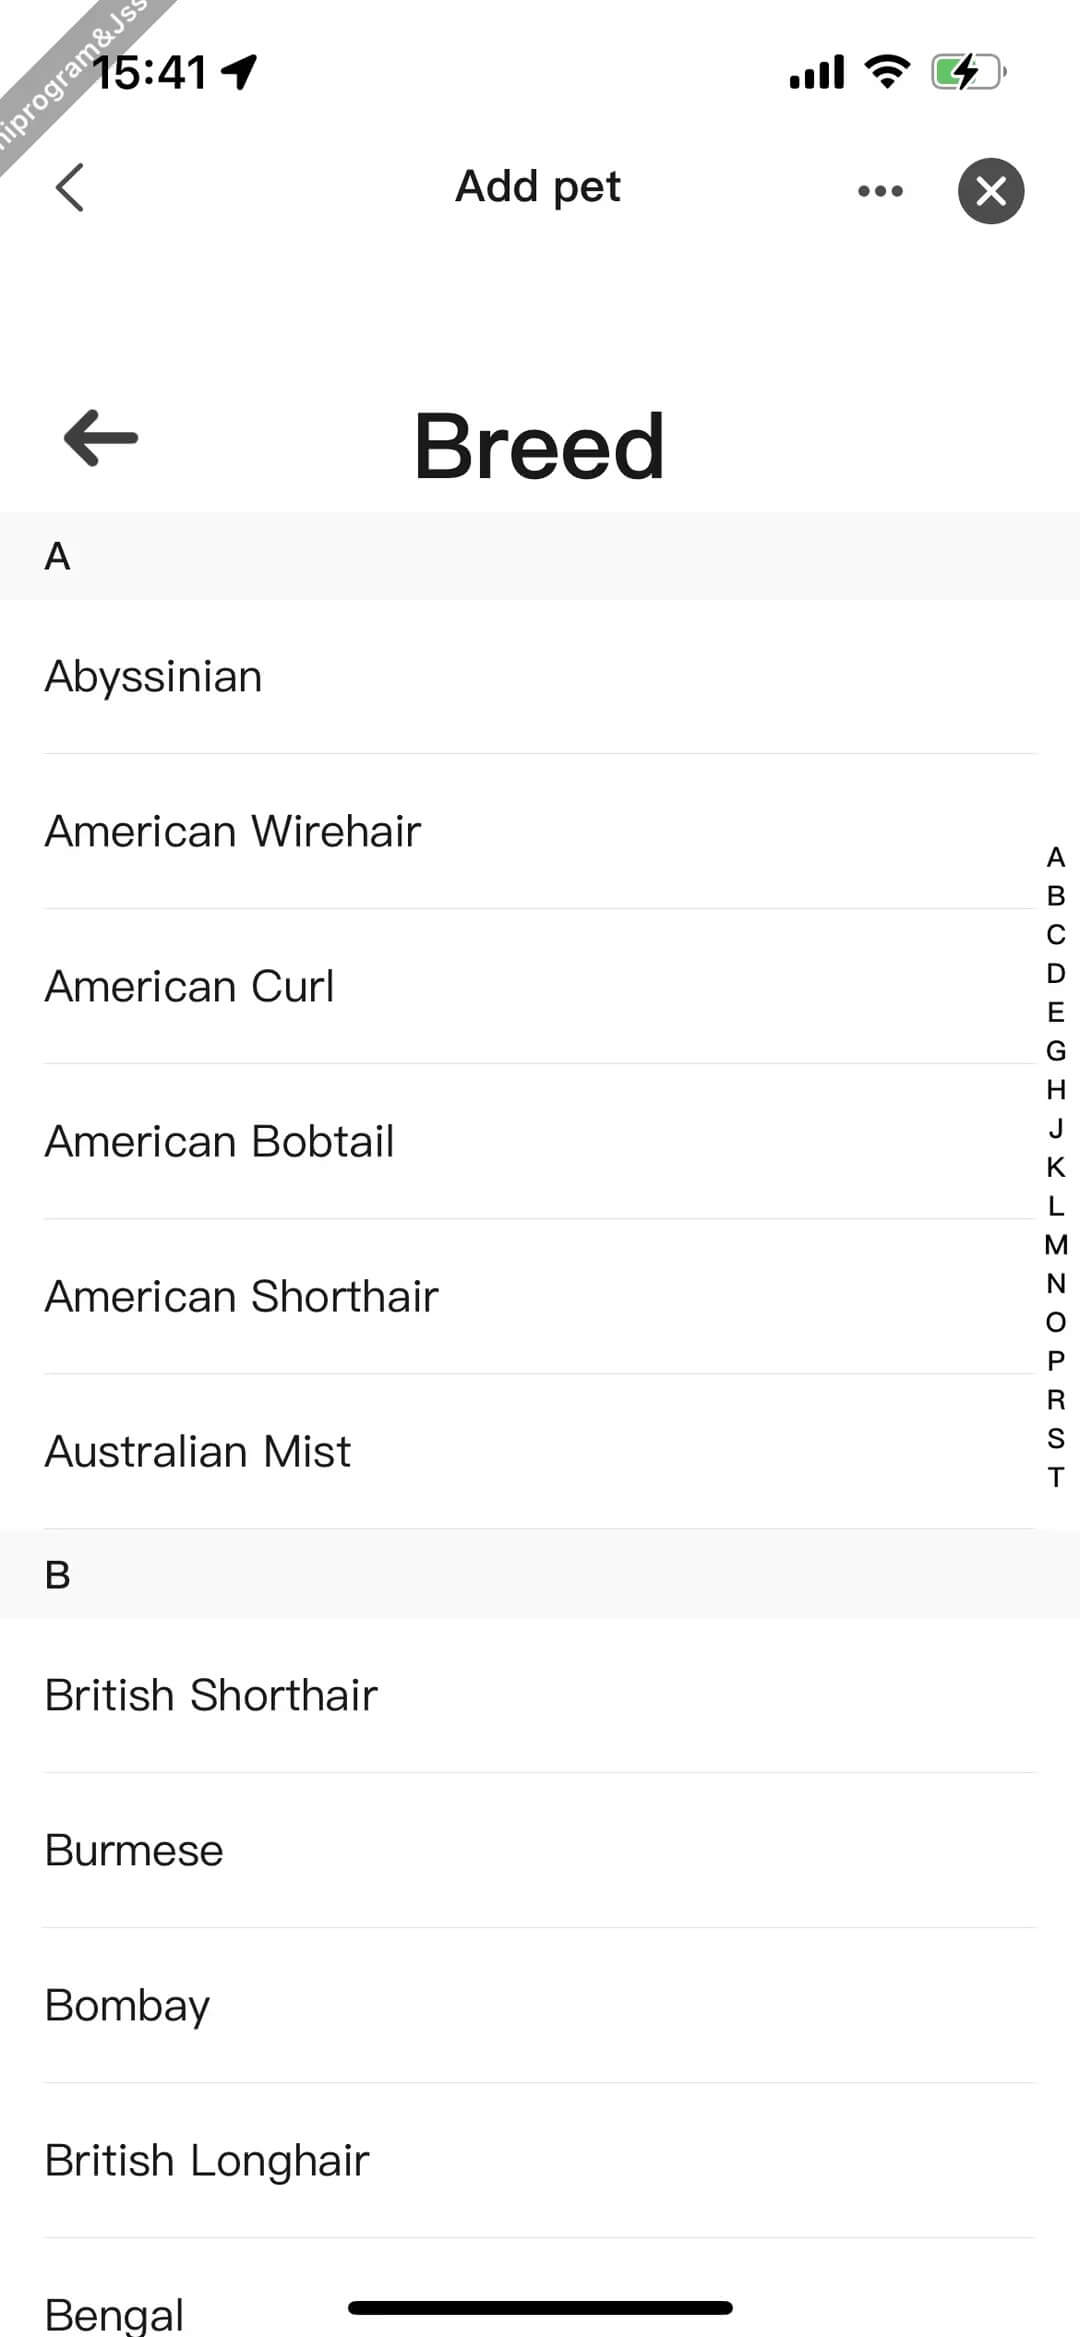
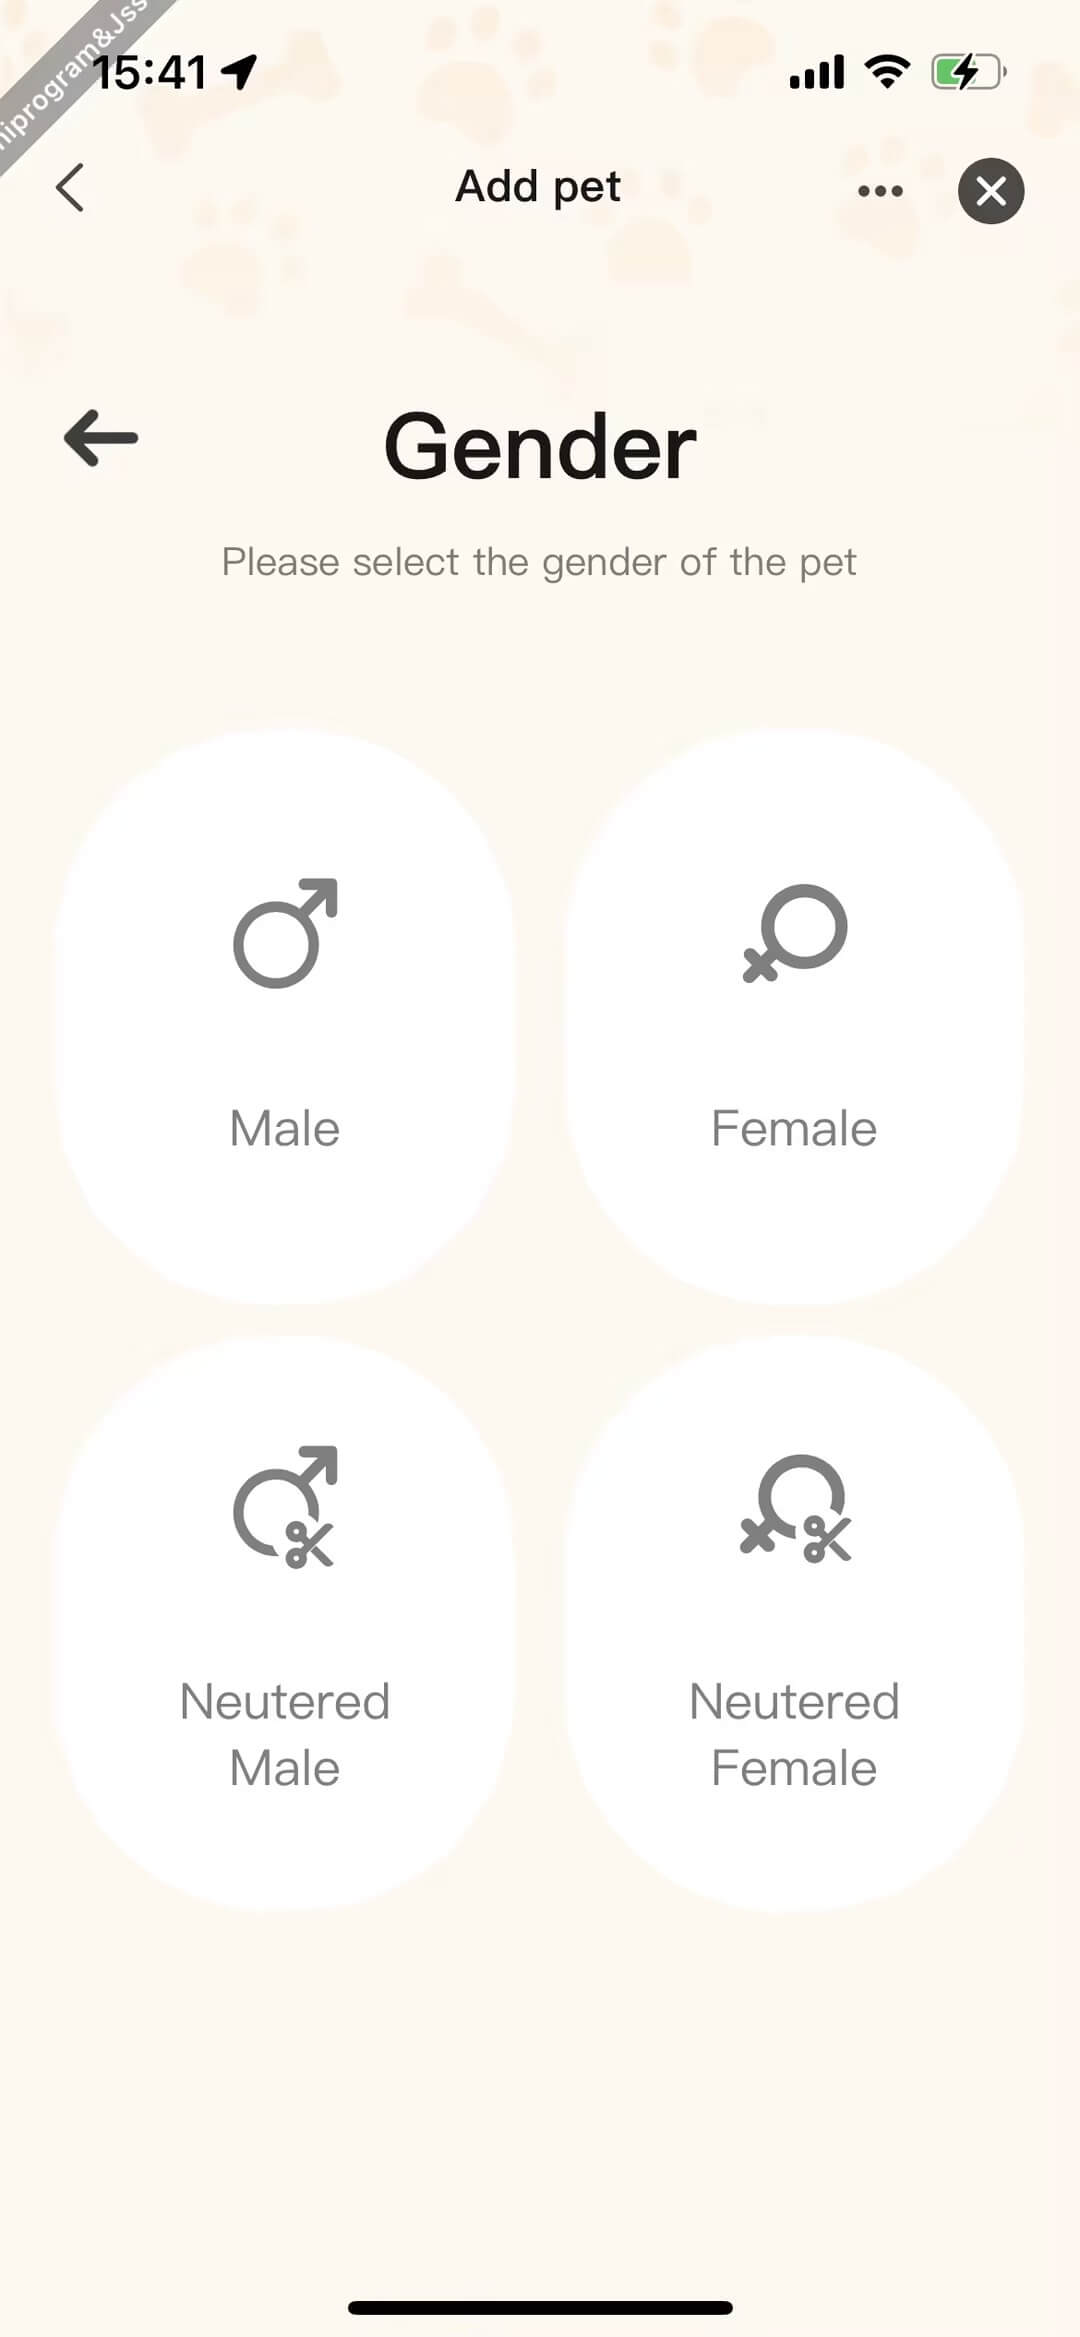
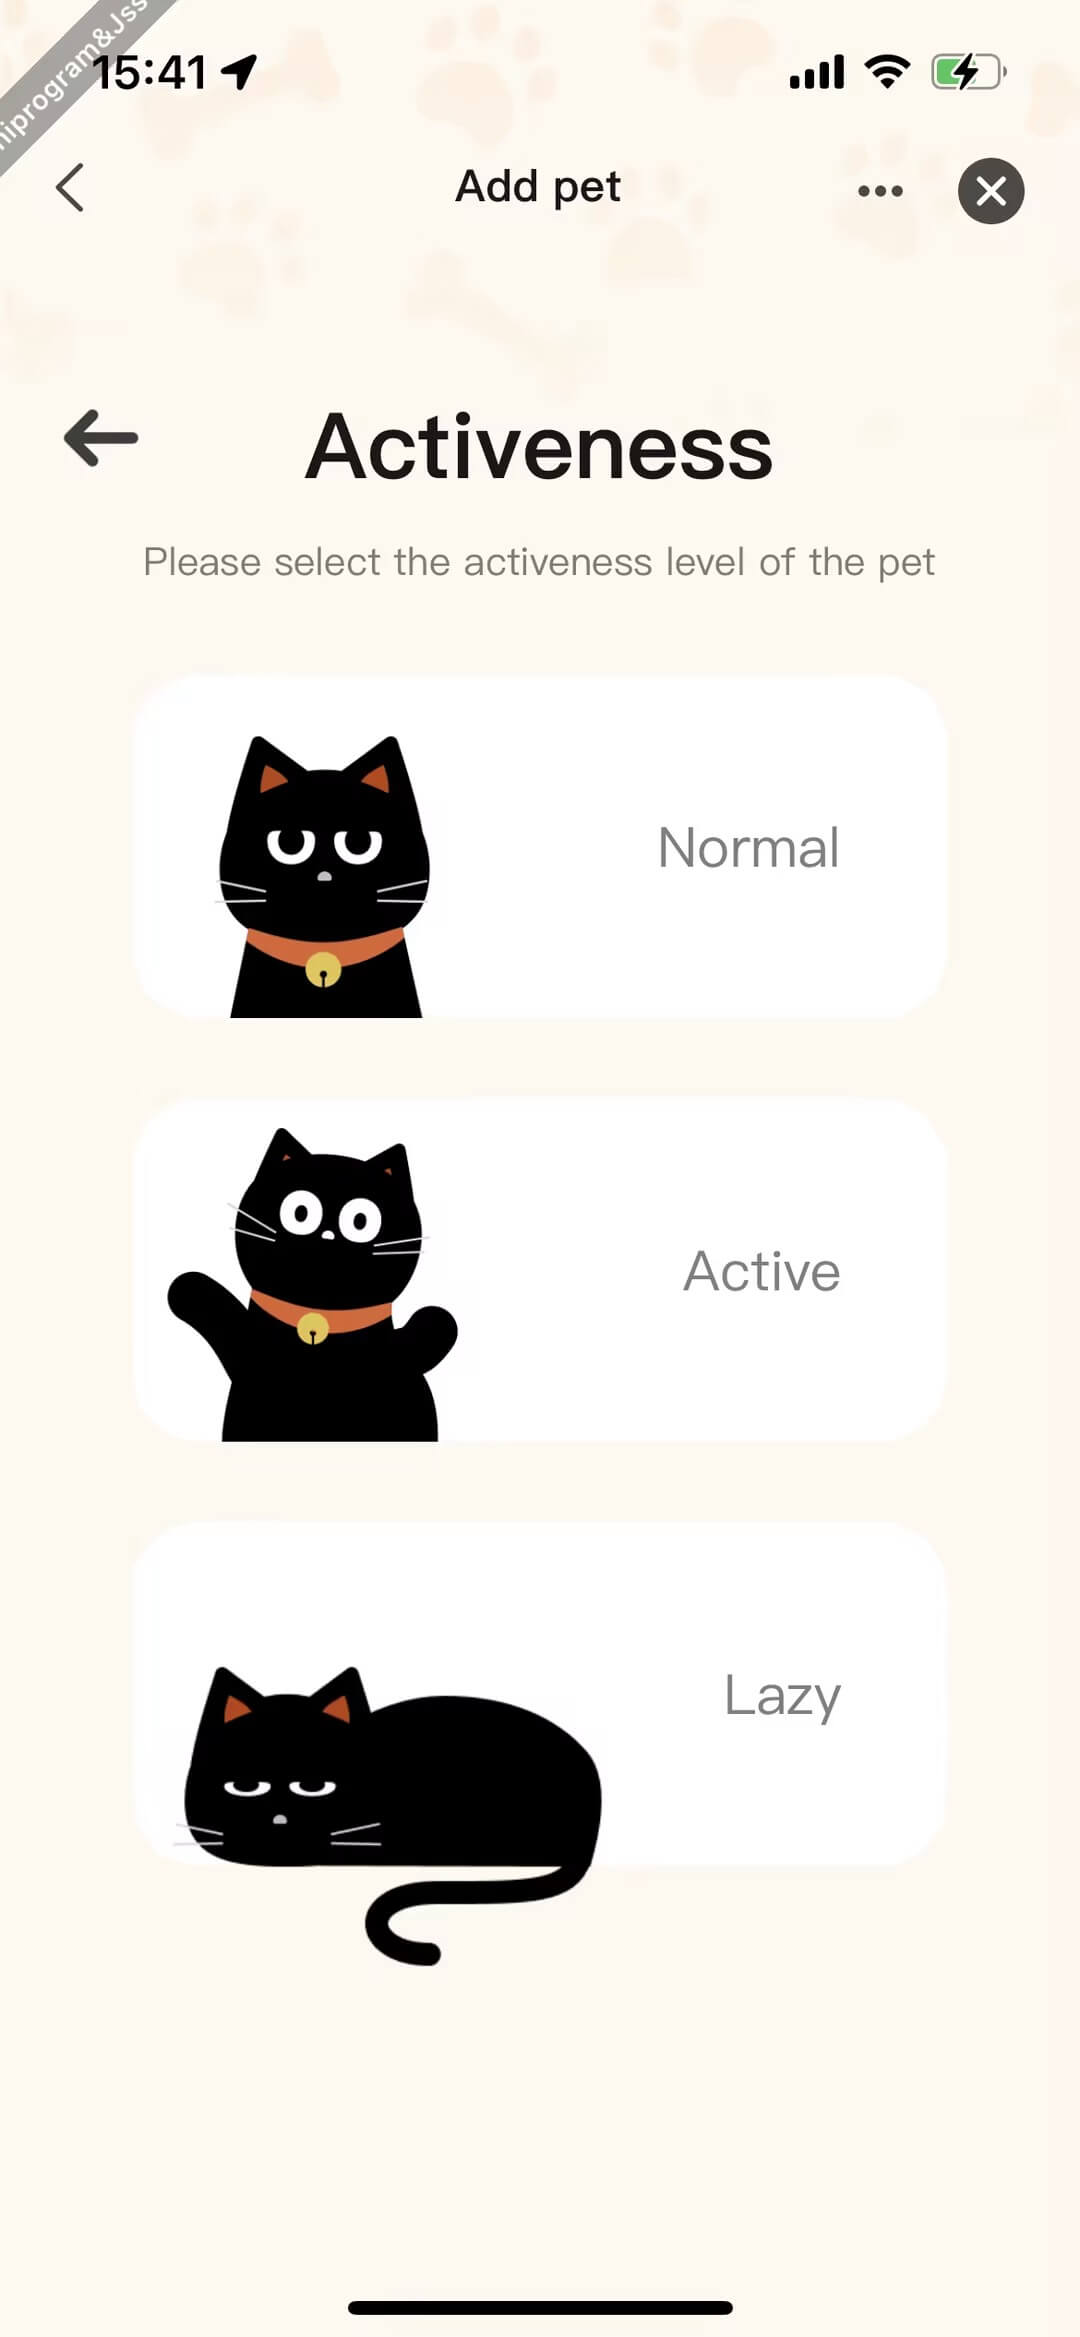
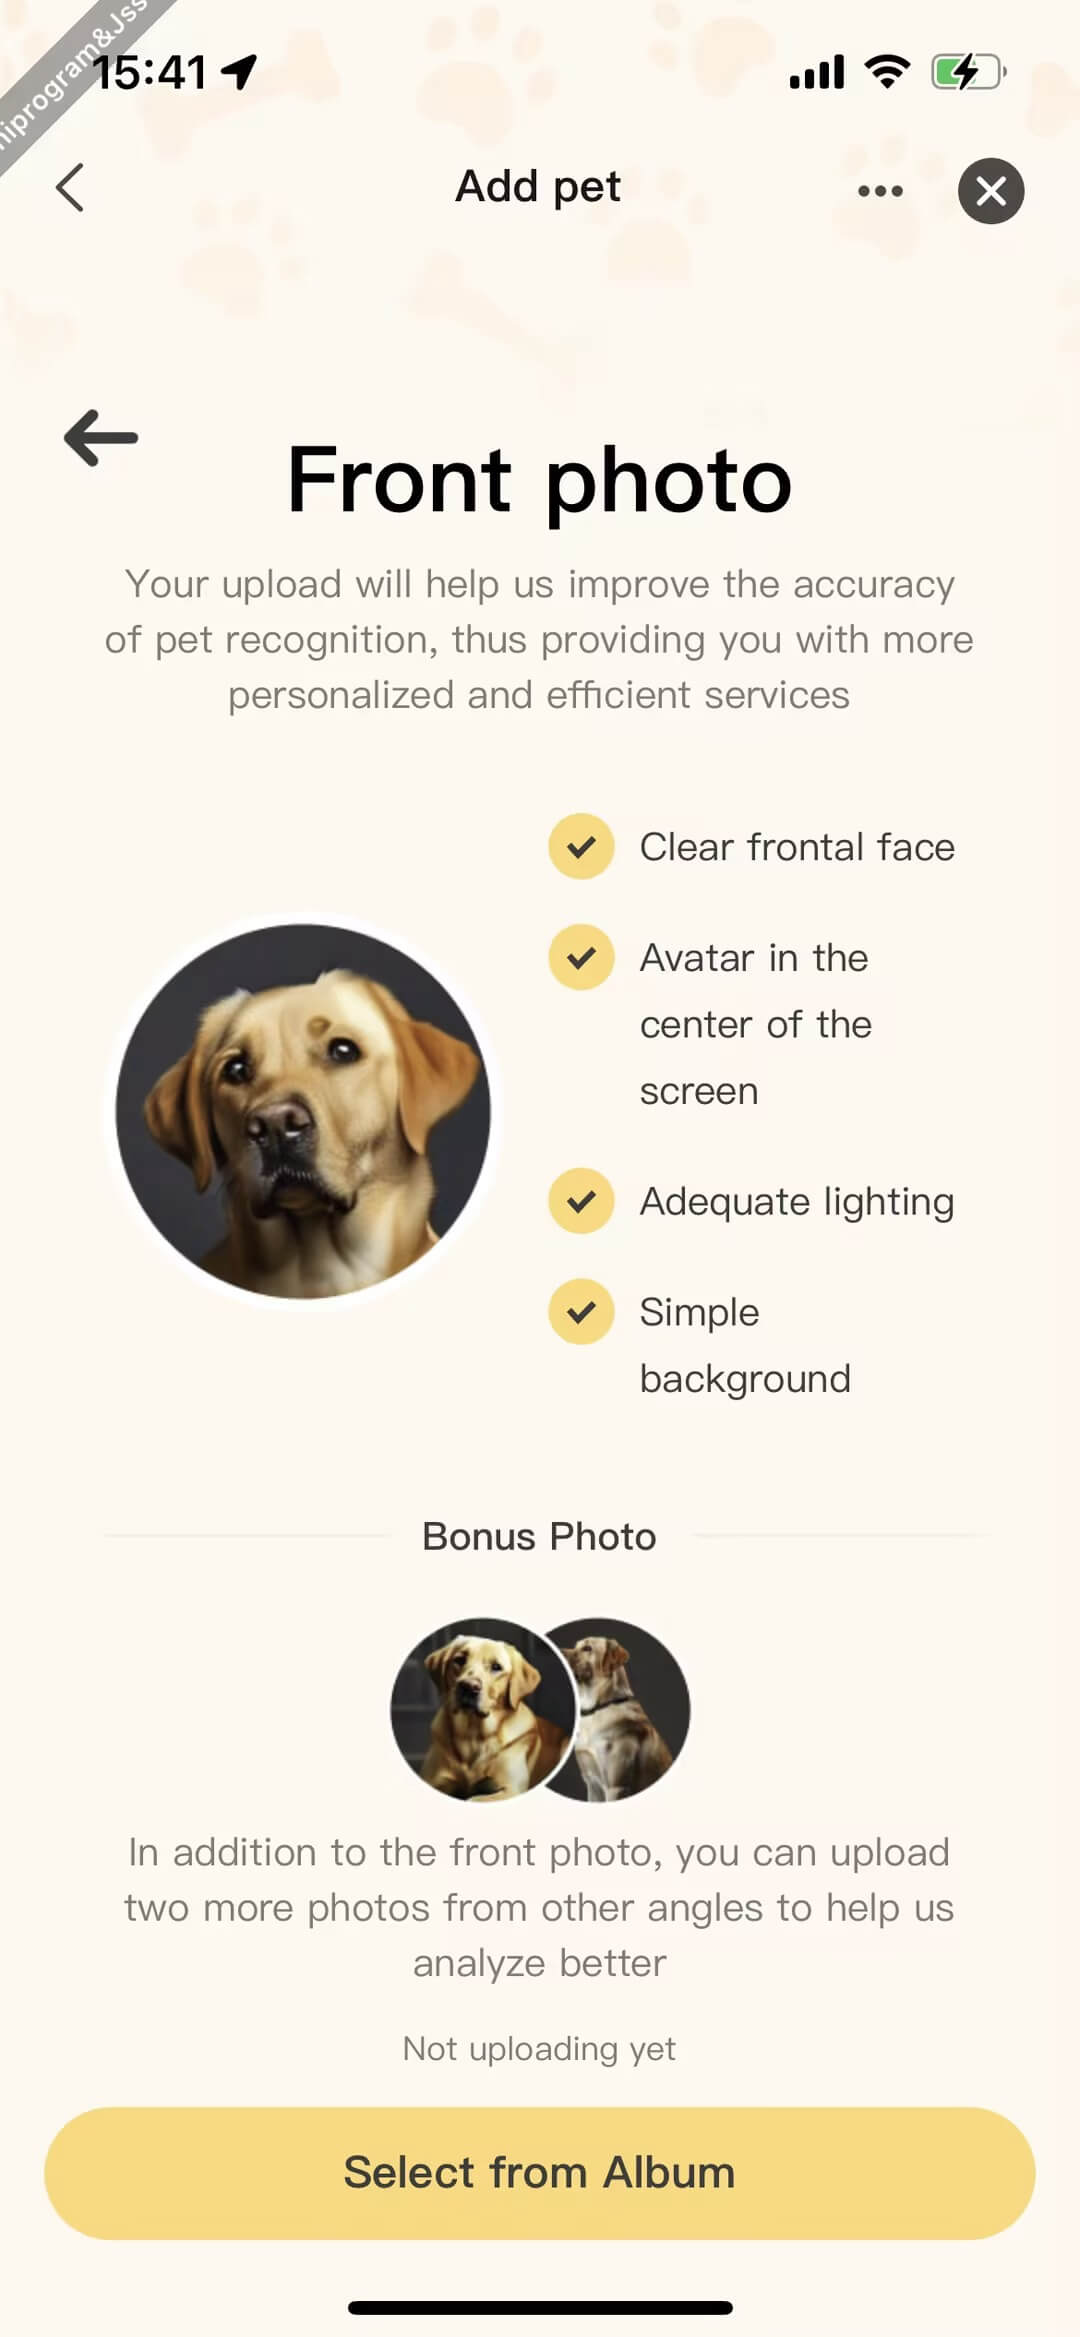
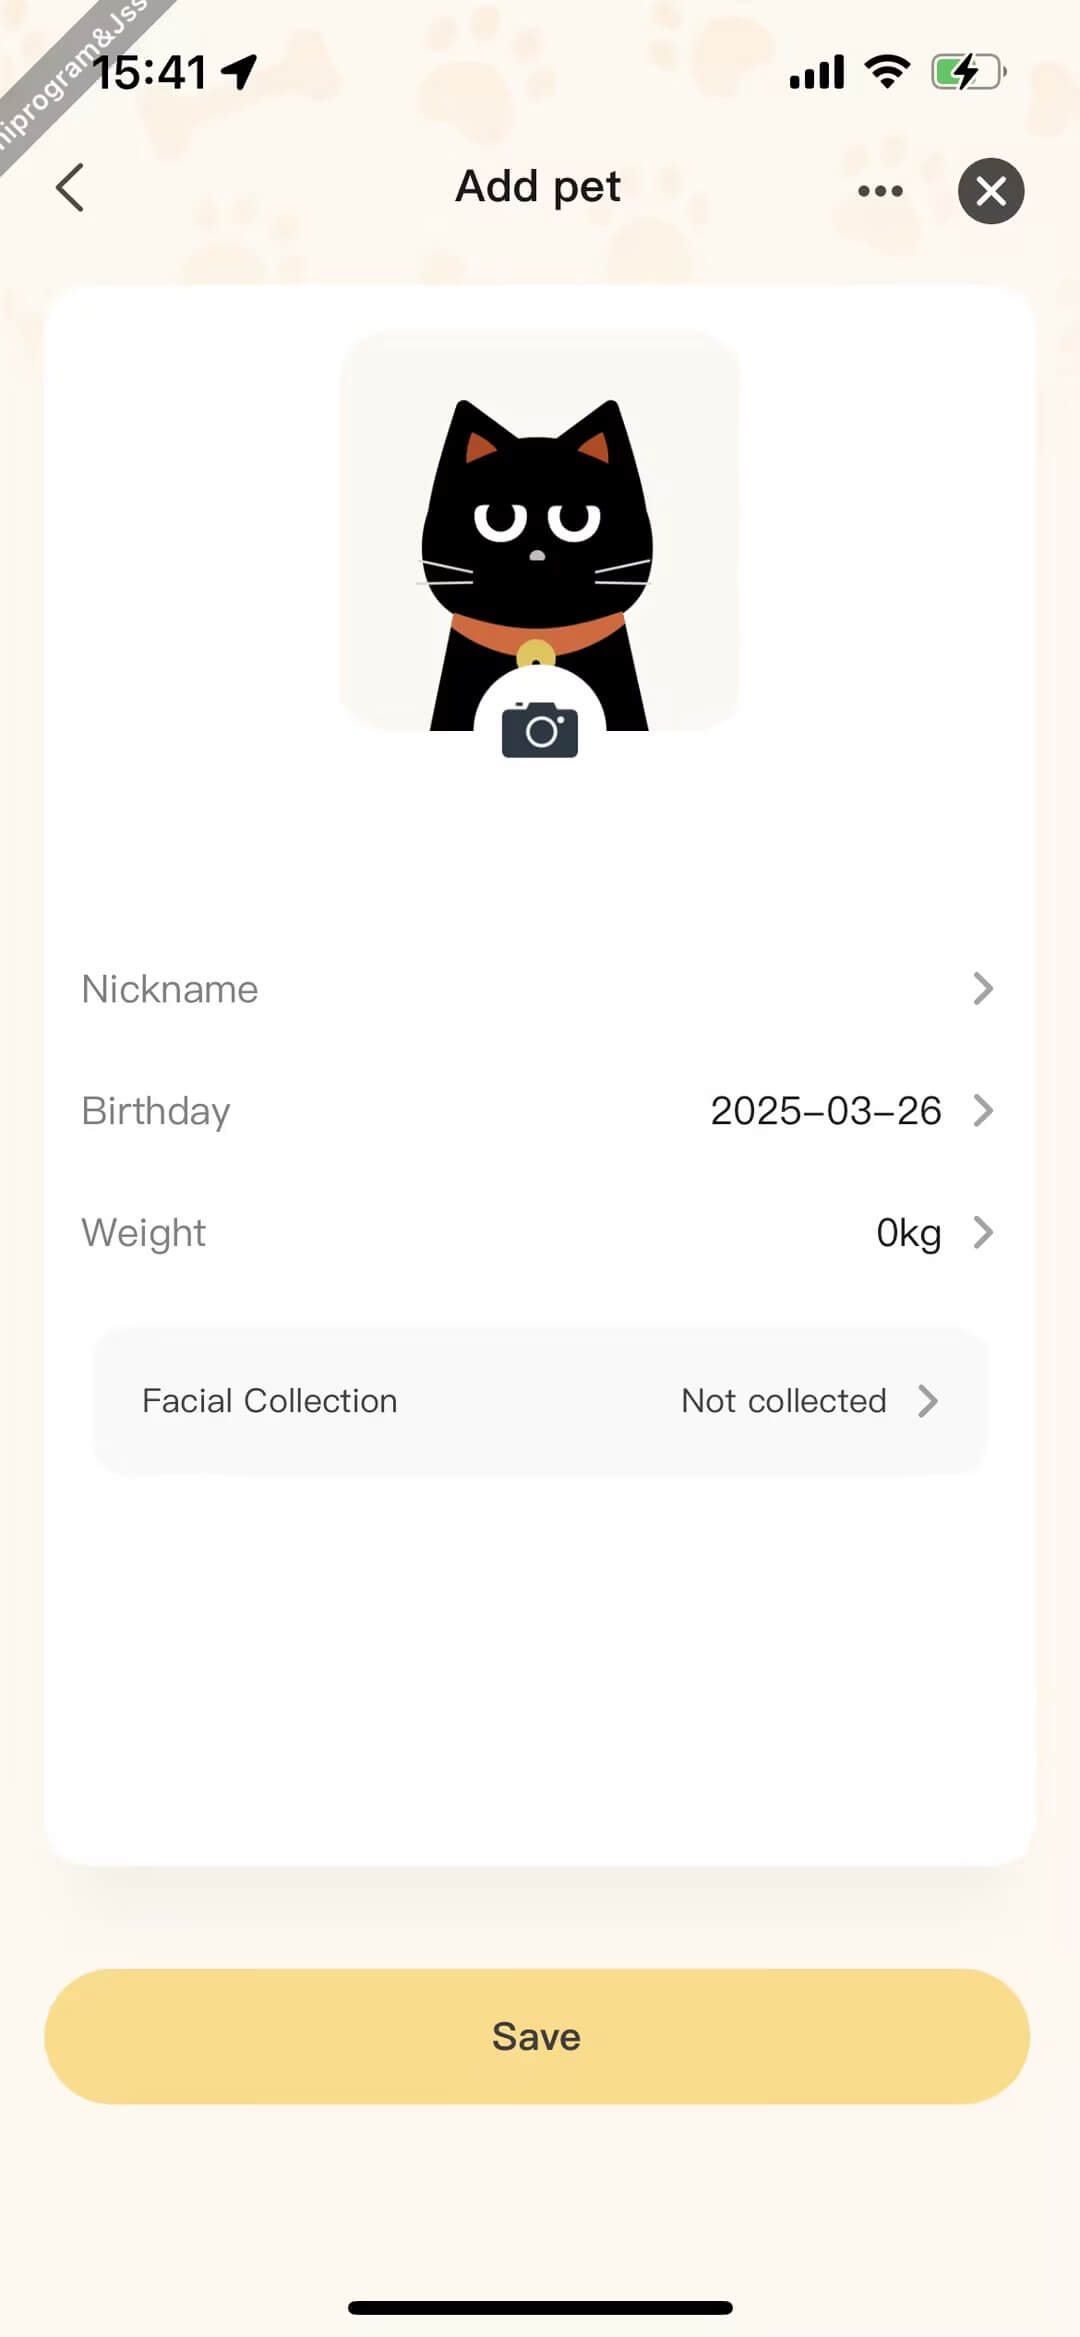
Add pet
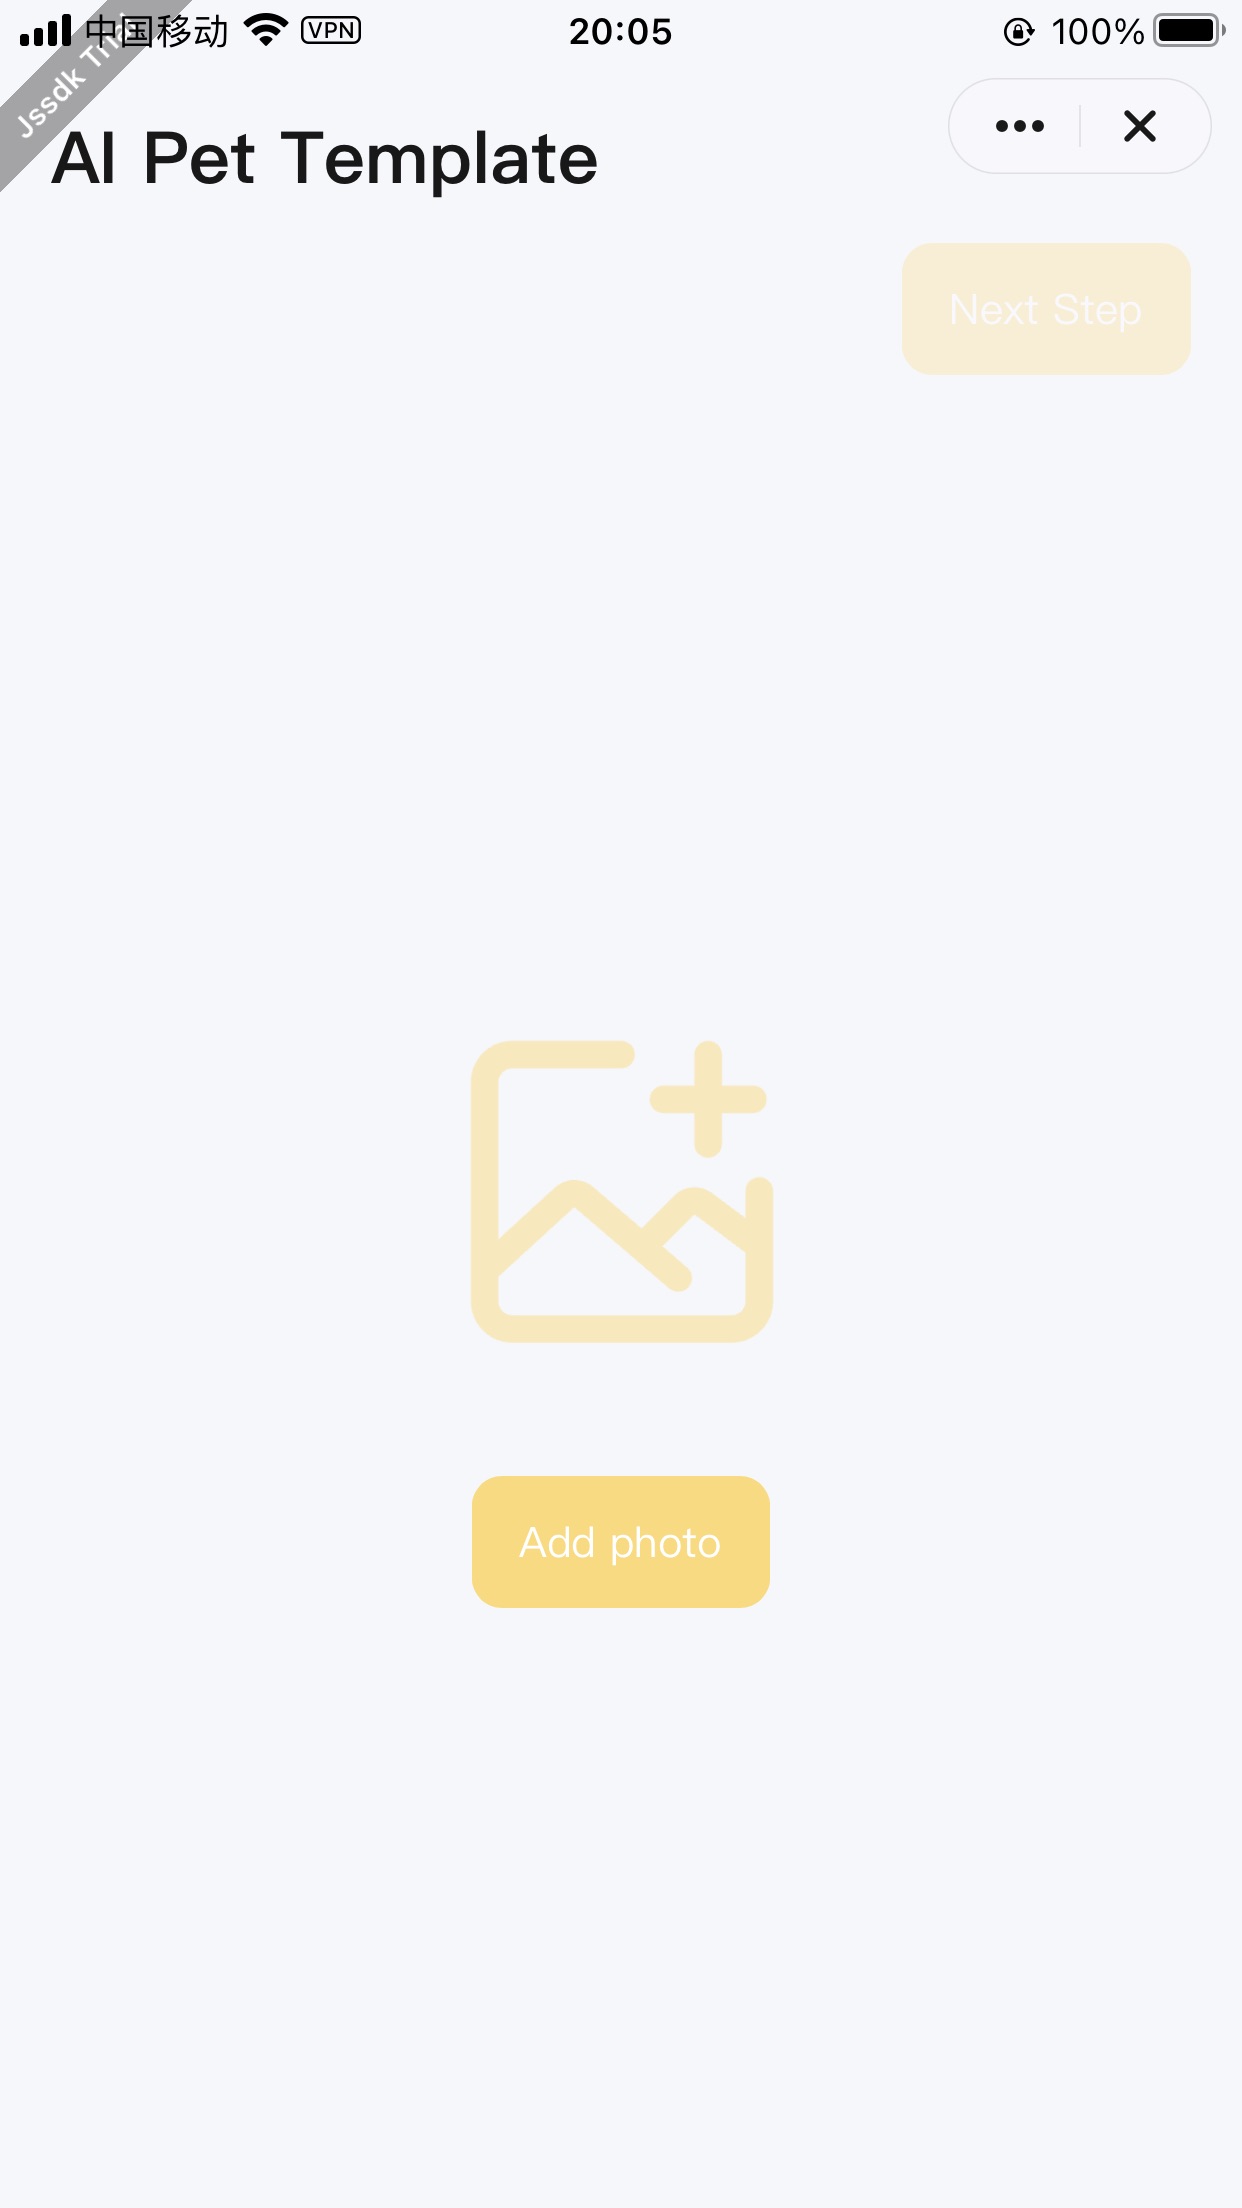
Before using the panel, you need to add your pet's information first, follow the guided process to select the pet's type, breed, gender, activity level, upload a frontal photo, and fill in the pet's nickname, birthday, weight and other information.
Demonstration
Code snippet
<View className={styles.content}>
  {step === 0 && <PetType value={type} onChange={handlePetTypeChange} />}
  {step === 1 && (
    <PetBreed
      petType={type}
      value={breed}
      onChange={handlePetBreedChange}
      onBack={() => setStep((step) => step - 1)}
    />
  )}
  {step === 2 && (
    <PetSex
      value={sex}
      onChange={handlePetSexChange}
      onBack={() => setStep((step) => step - 1)}
    />
  )}
  {step === 3 && (
    <PetActiveness
      petType={type}
      value={activeness}
      onChange={handlePetActivenessChange}
      onBack={() => setStep((step) => step - 1)}
    />
  )}
  {step === 4 && (
    <PetAnalytics
      goNext={handleGoNext}
      onBack={() => setStep((step) => step - 1)}
    />
  )}
  {step === 5 && (
    <PetInfo
      petType={type}
      breed={breed}
      sex={sex}
      activeness={activeness}
      profile={profile}
    />
  )}
</View>
const handleSave = async () => {
  if (name.trim() === '') {
    ToastInstance({
      context: this,
      message: Strings.getLang('pet_info_name_empty'),
    });
    return;
  }

  if (weight === 0) {
    ToastInstance({
      context: this,
      message: Strings.getLang('weight_not_zero'),
    });
    return;
  }

  try {
    showLoading({
      title: '',
      mask: true,
    });
    const petId = await (dispatch as AppDispatch)(
      addPet({
        petType,
        breedCode: breed,
        sex,
        activeness,
        name: name.trim(),
        avatar: bizUrlRef.current,
        weight: weight * 1000,
        birth: birthday,
        ownerId: getHomeId(),
        timeZone: moment().format('Z'),
        tuyaAppId: getTuyaAppId(),
        idPhotos: profile?.idPhotos,
        features: profile?.features,
      })
    ).unwrap();

    dispatch(fetchPetDetail({ petId, forceUpdate: true }));
    setNavigationBarBack({ type: 'system' });
    navigateBack();

    if (store.getState().global.selectedPetId === -1) {
      dispatch(setSelectedPetId(petId));
    }
  } catch (err) {
    errorToast(err);
  } finally {
    hideLoading();
  }
};
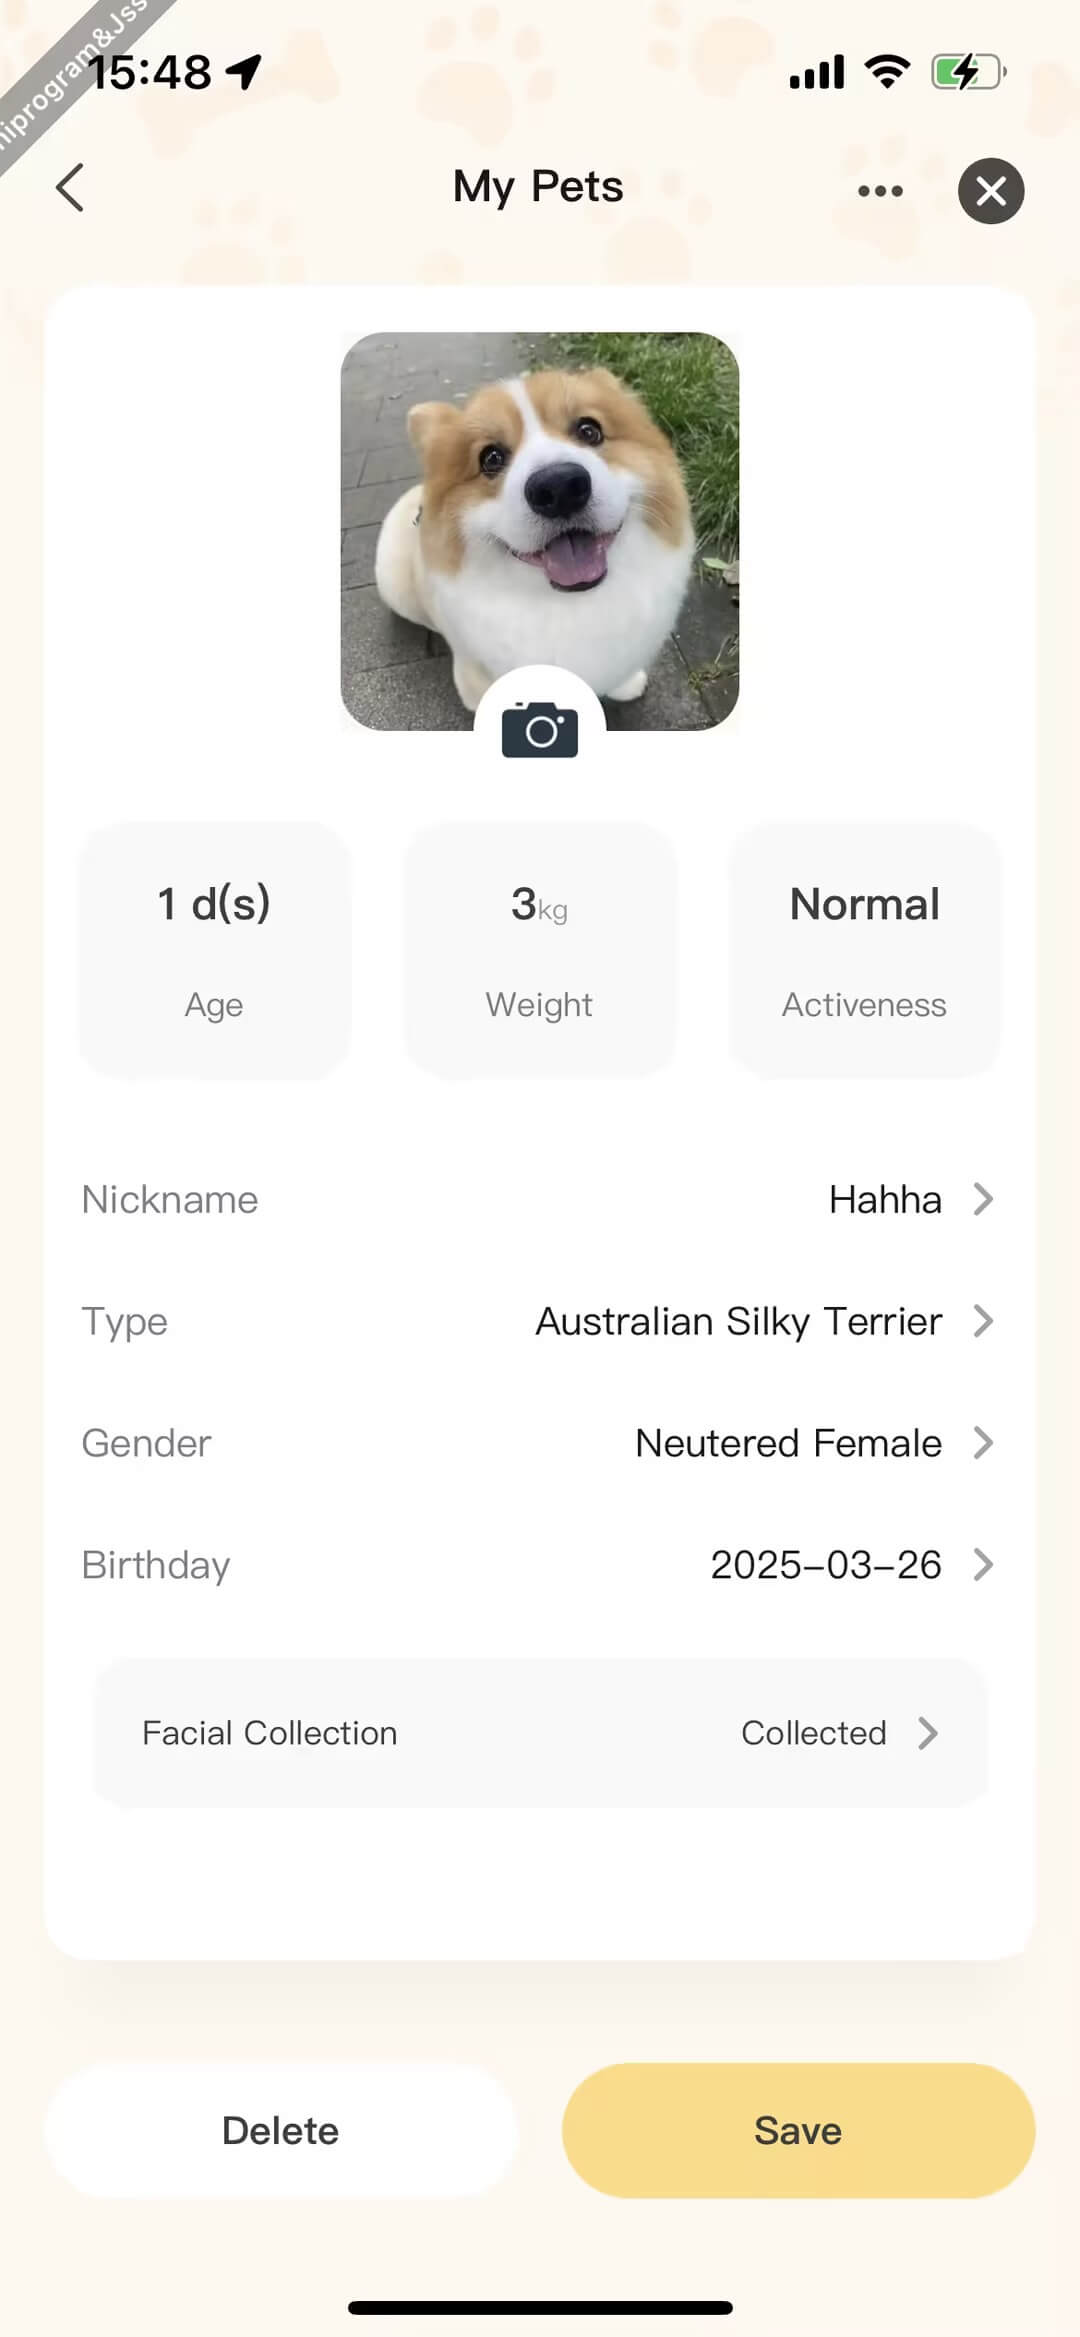
View pet details, update, and delete pets
Click on a pet to view the pet's detailed information. On the details page, you can update the pet's information and delete the pet's records.
Code snippet
// Update pet information
const handleSave = async () => {
  if (name.trim() === '') {
    ToastInstance({
      context: this,
      message: Strings.getLang('pet_info_name_empty'),
    });
    return;
  }

  try {
    showLoading({
      title: '',
      mask: true,
    });
    await (dispatch as AppDispatch)(
      updatePet({
        id: pet.id,
        petType: pet.petType,
        breedCode,
        sex,
        activeness,
        name: name.trim(),
        avatar: bizUrlRef.current,
        weight: weight * 1000,
        birth: birthday,
        rfid: pet.rfid,
        ownerId: getHomeId(),
        timeZone: moment().format('Z'),
        tuyaAppId: getTuyaAppId(),
        idPhotos: profile?.idPhotos,
        features: profile?.features,
      })
    ).unwrap();

    if (pet.id) {
      await (dispatch as AppDispatch)(
        fetchPetDetail({ petId: Number(pet.id), forceUpdate: true })
      ).unwrap();
    }

    navigateBack();
  } catch (err) {
    console.log(err);
  } finally {
    hideLoading();
  }
};

// Delete pet
const handleDelete = async () => {
  try {
    await DialogInstance.confirm({
      context: this,
      title: Strings.getLang('tips'),
      message: Strings.getLang('pet_delete_tips'),
      confirmButtonText: Strings.getLang('confirm'),
      cancelButtonText: Strings.getLang('cancel'),
    });

    showLoading({
      title: '',
      mask: true,
    });
    await (dispatch as AppDispatch)(deletePet(pet.id)).unwrap();
    navigateBack();
  } catch (err) {
    console.log(err);
  } finally {
    hideLoading();
  }
};
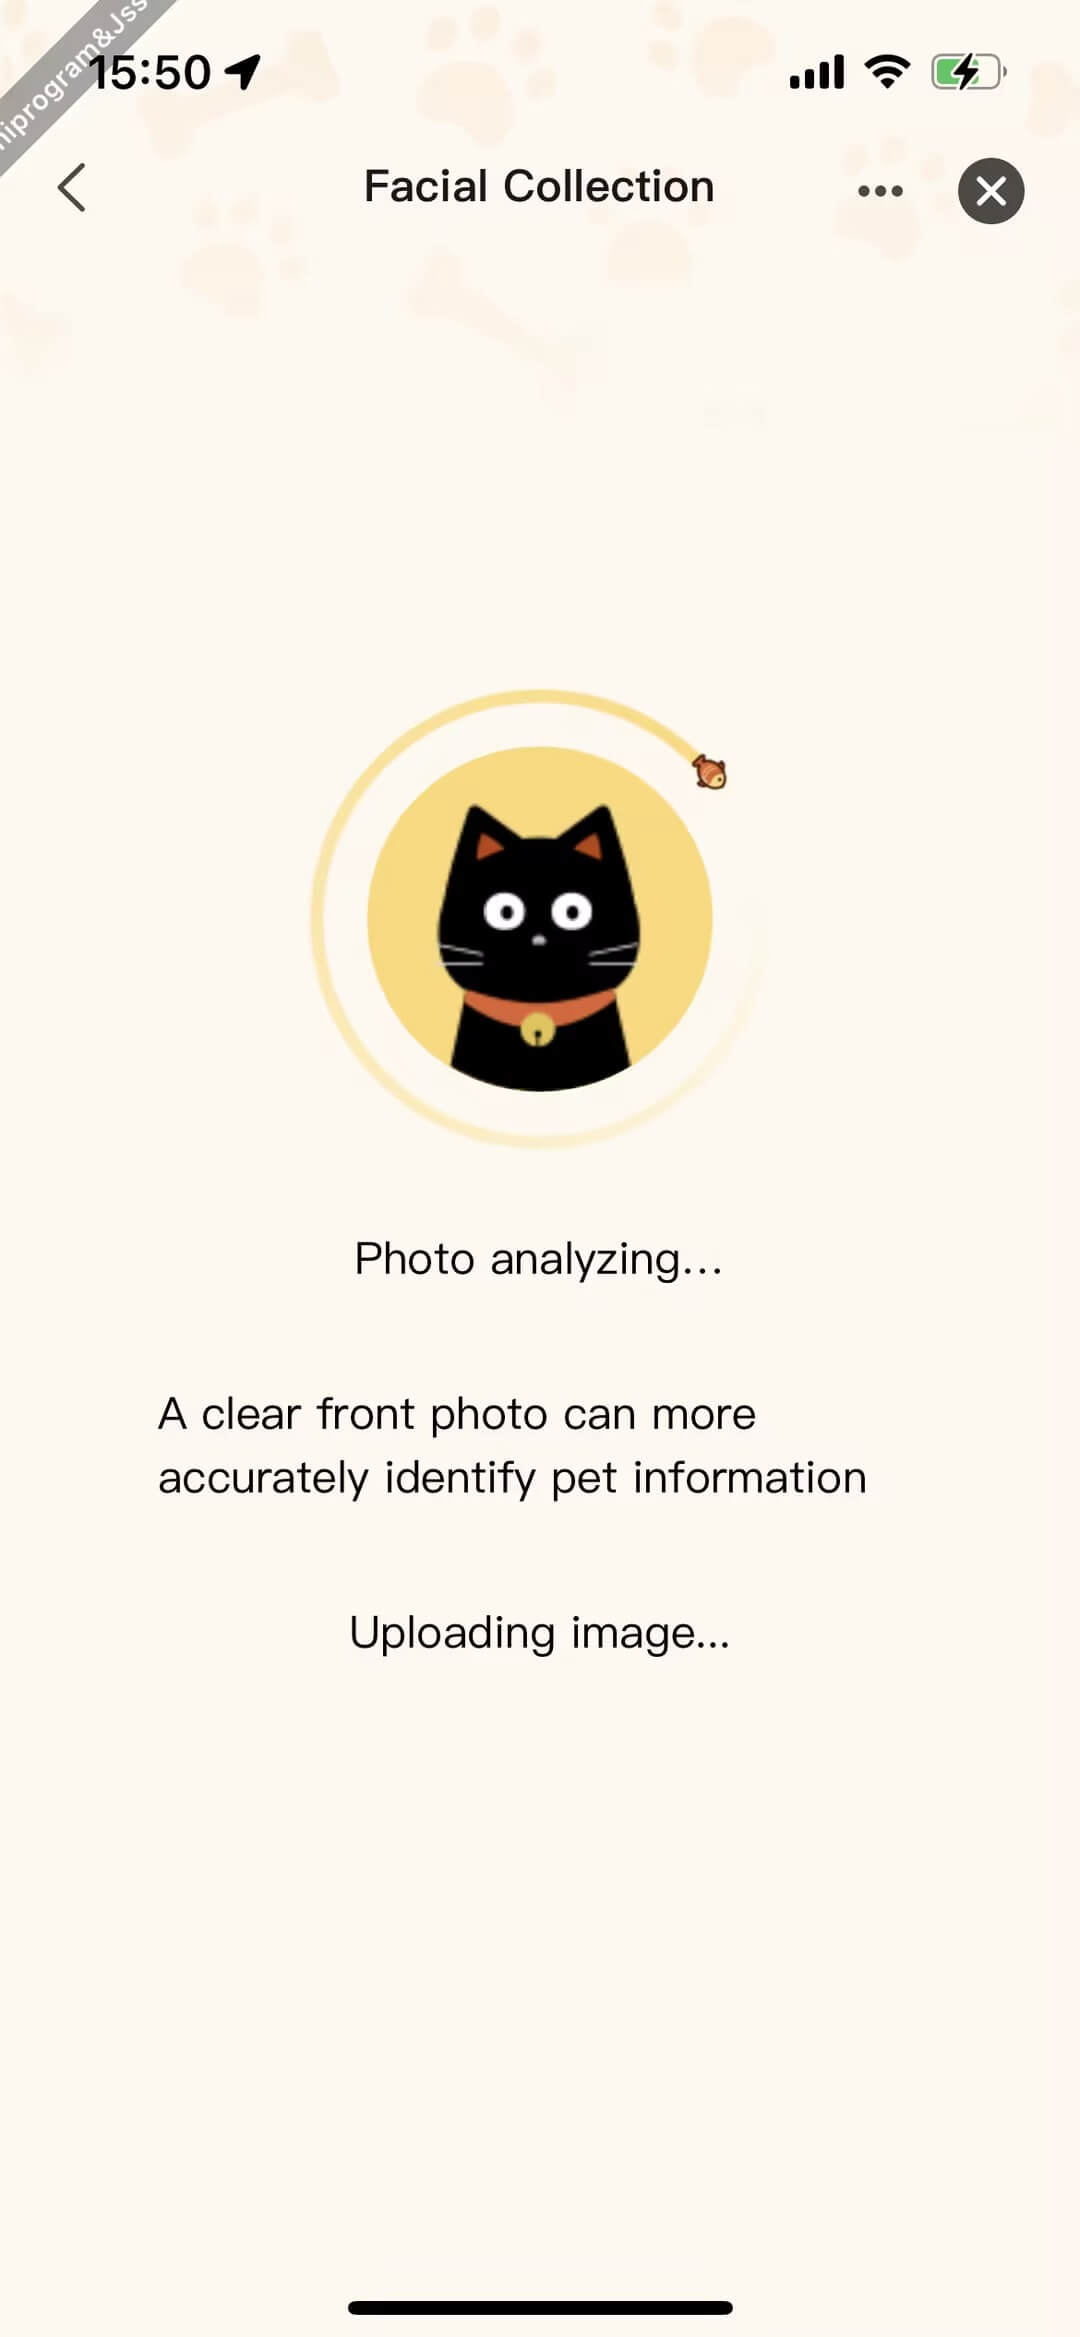
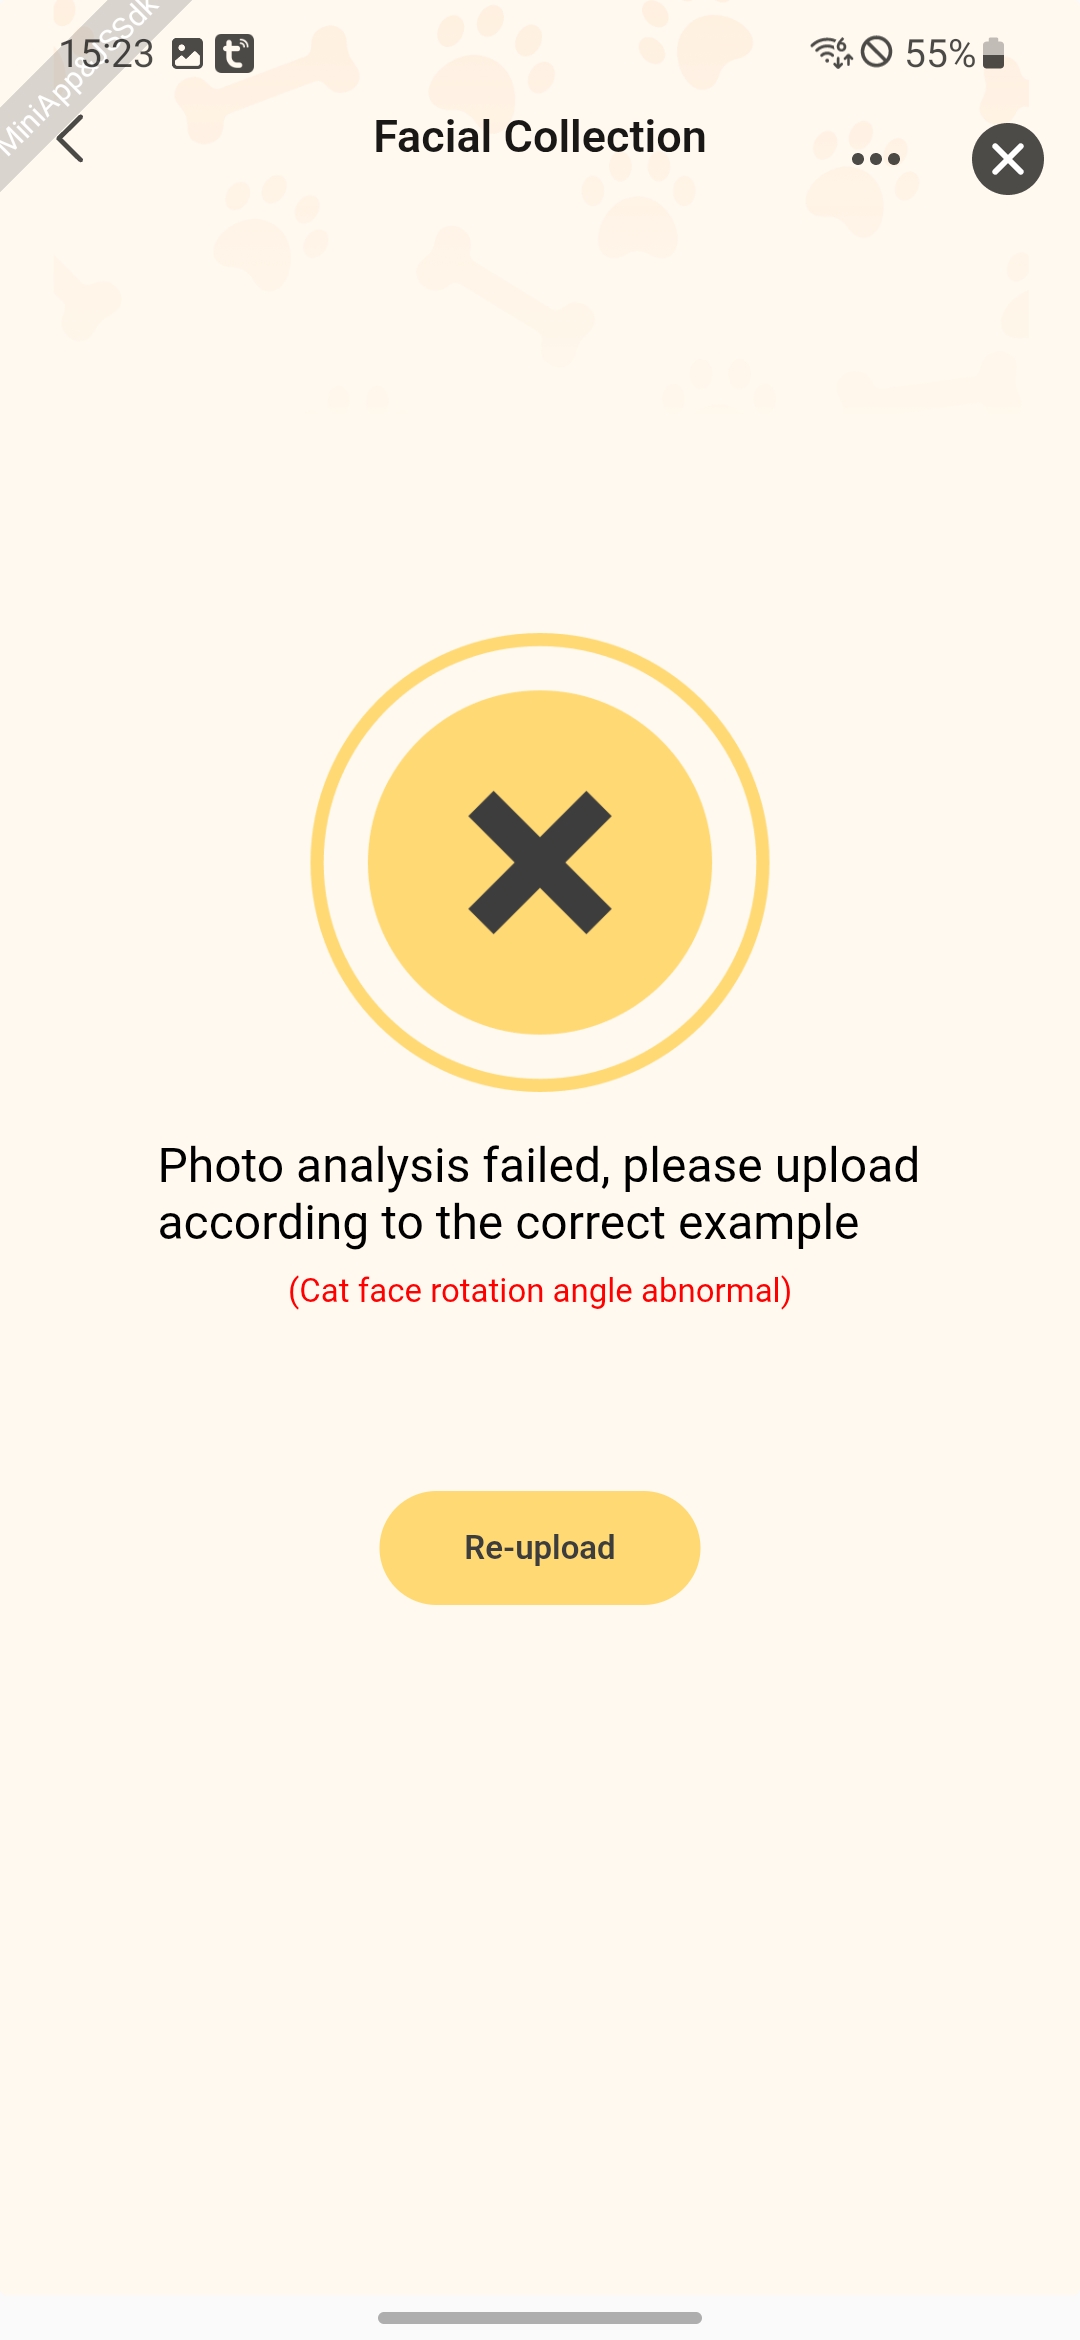
- First, use the on-device AI capabilities of the app to perform pet recognition and foreign object filtering on pet images, completing the upload image quality assessment.
- 1. Pet image resource import
- Call the
chooseImagemethod to allow end users to select images from their local gallery or take photos using the camera. - Call the
resizeImagemethod to crop the image to the target size while maintaining the aspect ratio, then perform quality compression based on file size limits.
- Call the
- 2. Pet image quality detection
- Call the
petsDetectCreatemethod to initialize the AI pet image quality detection instance. - Call the
petsPictureQualityDetectForImagemethod to perform quality detection on the pet image based on input parameters and return the detection result. - When the page is destroyed, call
petsDetectDestoryto release the pet image quality detection instance and avoid memory leaks.
- Call the
- 1. Pet image resource import
- If the pet image passes the on-device AI quality check, upload it to the cloud for further analysis (e.g., identifying body shape, fur color, facial expressions, etc.) to accurately recognize the pet during feeding.
- 1. Request a file upload signature and corresponding
objectKeyfrom the cloud. - 2. Upload the image to the specified server, then pass the
objectKeyto the feature analysis API.- The API returns a
taskId, which is used to poll the feature analysis results API for progress updates. - Display analysis results based on the response:
- If
analysisResultis2, the analysis succeeded. - If
analysisResultis1, the analysis failed.
- If
- The API returns a
- 1. Request a file upload signature and corresponding
Demonstration

Code snippet
export async function pictureQualityDetect(pathUrl: string) {
  const result = await new Promise<{
    imagePath: string;
    lowQuality: boolean;
    lowQualityReason: number;
  }>((resolve, reject) => {
    petsPictureQualityDetectForImage({
      inputImagePath: pathUrl,
      labelAllow: 1,
      objectAreaPercent: 30,
      objectFaceRotationAngle: 40,
      objectFaceSideAngle: 45,
      maximumPictureBrightness: 80,
      minimumPictureBrightness: 0,
      success: res => {
        resolve(res);
      },
      fail: error => {
        reject(error);
      },
    });
  });

  return result;
}

const handleChooseImg = async () => {
    let paths = [];

    try {
      paths = await chooseImage(3, () => enter('analyzing'));
    } catch (err) {
      return;
    }

    // Proceed to the next stage first
    setState({
      analyzingText: Strings.getLang('add_pet_analytics_upload_img'),
    });

    const controller = new AbortController();
    controllerRef.current = controller;
    let tempPaths: Array<{ imagePath: string; lowQuality: boolean; lowQualityReason: number }> = [];
    let pathList: Array<{ imagePath: string; lowQuality: boolean; lowQualityReason: number }> = [];

    if (petType === 'cat') {
      try {
        tempPaths = (await Promise.all(paths.map(url => pictureQualityDetect(url)))).map(d => d);

        pathList = tempPaths.filter(item => !item.lowQuality) as Array<{
          imagePath: string;
          lowQuality: boolean;
          lowQualityReason: number;
        }>;
        const lowQualityList = tempPaths
          .filter(item => item.lowQuality)
          .map(item => item.lowQualityReason) as Array<number>;

        if (pathList.length === 0) {
          const errorText = Array.from(new Set(lowQualityList)).map((lowQualityItem, index) => {
            return `${Strings.getLang(`dsc_${lowQualityItem}`)}`;
          });
          setPicErrorTips(errorText.join('、'));
          setTimeout(() => {
            enter('failed');
          }, 1000);

          return;
        }
      } catch (error) {
        enter('failed');
        return;
      }
    }

    let images: Array<{ imageDisplayUrl: string; objectKey: string }> = [];

    const pathSourceList = petType === 'cat' ? pathList.map(element => element.imagePath) : paths;
    try {
      images = (
        await Promise.all(pathSourceList.map(p => uploadImageCat(p, ANALYTICS_BIZ_TYPE)))
      ).map(d => ({
        imageDisplayUrl: d.publicUrl,
        objectKey: d.cloudKey,
      }));
      if (controller.signal.aborted) {
        return;
      }
    } catch (error) {
      setTimeout(() => {
        enter('failed');
      }, 1000);
      return;
    }

    let idx = 0;
    const tips = [
      Strings.getLang('add_pet_analytics_upload_tip1'),
      Strings.getLang('add_pet_analytics_upload_tip2'),
      Strings.getLang('add_pet_analytics_upload_tip3'),
      Strings.getLang('add_pet_analytics_upload_tip4'),
      Strings.getLang('add_pet_analytics_upload_tip5'),
    ];

    const id = setInterval(() => {
      setState({
        analyzingText: tips[idx++ % tips.length],
      });
    }, 3000);

    try {
      const taskId = await analyzePetFeature({
        ownerId: homeId,
        images,
        miniAppId,
        agentId: AGENT_ID,
      });
      const [infoRes] = await Promise.all([
        loopGetAnalysisResult({
          taskId,
          controller,
          type: AnalysType.Profile,
        }),
      ]);
      if (infoRes) {
        setState({
          similarShow: true,
          petResInfo: infoRes,
        });
      } else if (infoRes) {
        emitter.emit('selectProfile', infoRes);
        enter('success');
      } else {
        // Timeout
        enter('failed');
      }
    } catch (error) {
      enter('failed');
      return;
    } finally {
      clearInterval(id);
    }
  };

// Upload image
export async function uploadImage(filePath: string, bizType: UploadFileBizType) {
  const fileName = parseFileName(filePath);
  const signInfo = await getPetUploadSign({ bizType, fileName });
  const { url, objectKey } = signInfo;

  await uploadFile(url, filePath, fileName);

  return { cloudKey: objectKey };
}
It mainly displays the eating status of pets in the household. When a pet comes to eat, the specific pet will be identified and a eating record will be generated.

Code snippet
const [eatingRecords, setEatingRecords] = useState<IEatingRecord[]>([]);

const getData = async (pageNo: number, isFresh?: boolean) => {
  try {
    const day = dayjs();
    const startOfDay = day.clone().startOf('day').valueOf();
    const endOfDay = day.clone().endOf('day').valueOf();
    setRefreshing(!!isFresh);

    const eatParams = {
      ownerId: homeId,
      uuid: getDevInfo().uuid,
      startTime: startOfDay,
      endTime: endOfDay,
      pageNo,
      pageSize: 100,
    };
    const { pageNo: pageNumber, hasNext, data = [] } = await fetchPetEatingRecordApi(eatParams);
    setRefreshing(false);
    setHasNext(hasNext);
    setCurrentPageNo(pageNumber);

    const formattedEatingRecord = data.map(item => {
      const petName = Array.isArray(item.pets)
        ? item.pets.map(p => {
            return find(pets, { id: p.petId })?.name;
          })
        : Strings.getLang('pet');
      return {
        ...item,
        timeStamp: item.recordTime,
        type: RECORD_DATA_TYPE.feed,
        desc: Strings.formatValue('dsc_feed_eating', petName),
      };
    });

    if (pageNo > 1) {
      setEatingRecords([...eatingRecords, ...formattedEatingRecord]);
    } else {
      setEatingRecords(formattedEatingRecord);
    }
  } catch (error) {
    setRefreshing(false);
    console.log('fetch error: ', error);
  }
};
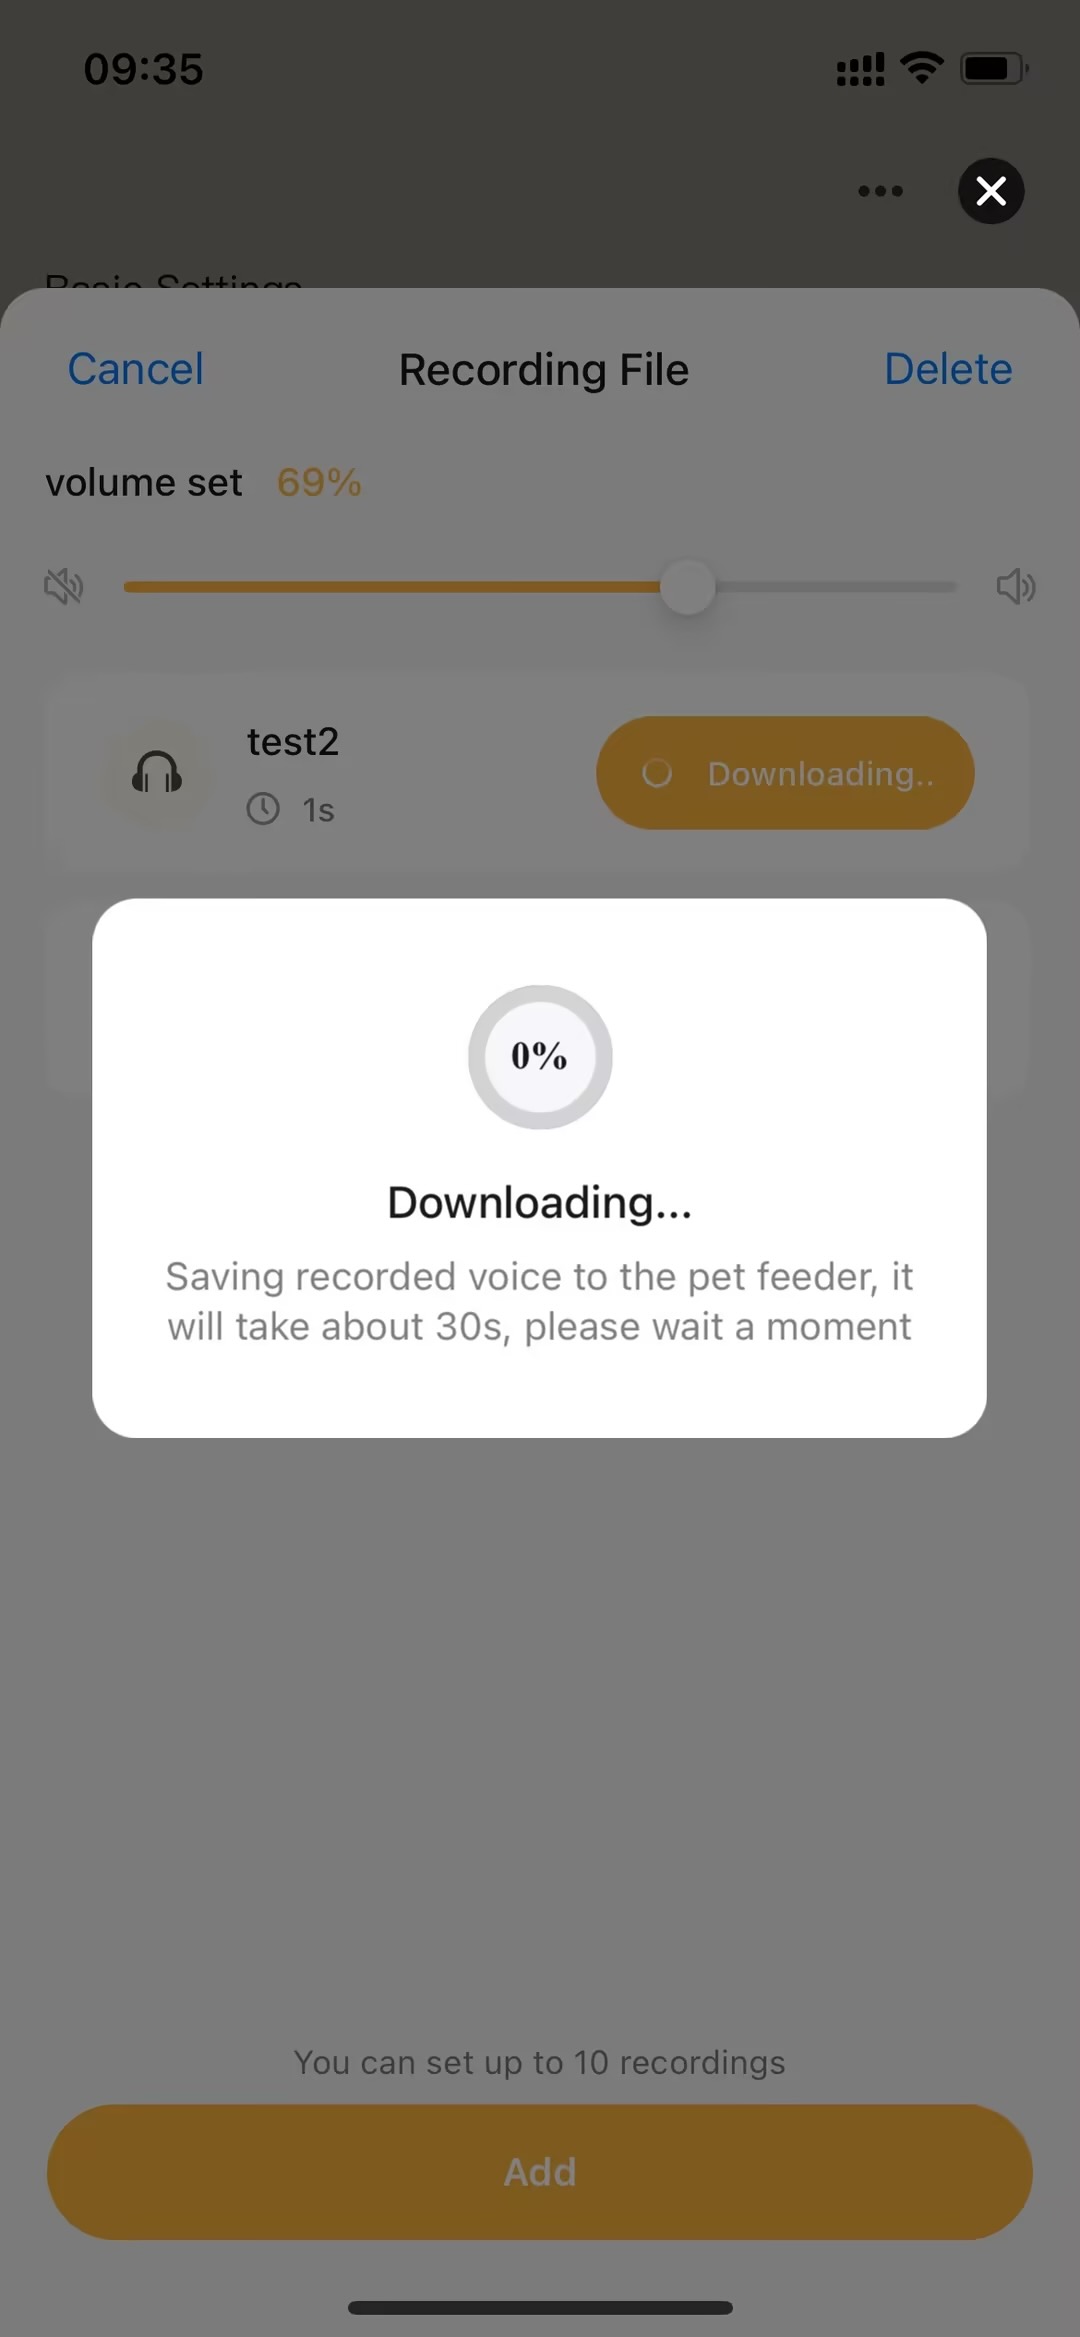
Supports users in recording and playing audio for specific scenarios, helping to soothe pets, find pets, or engage in fun interactions.
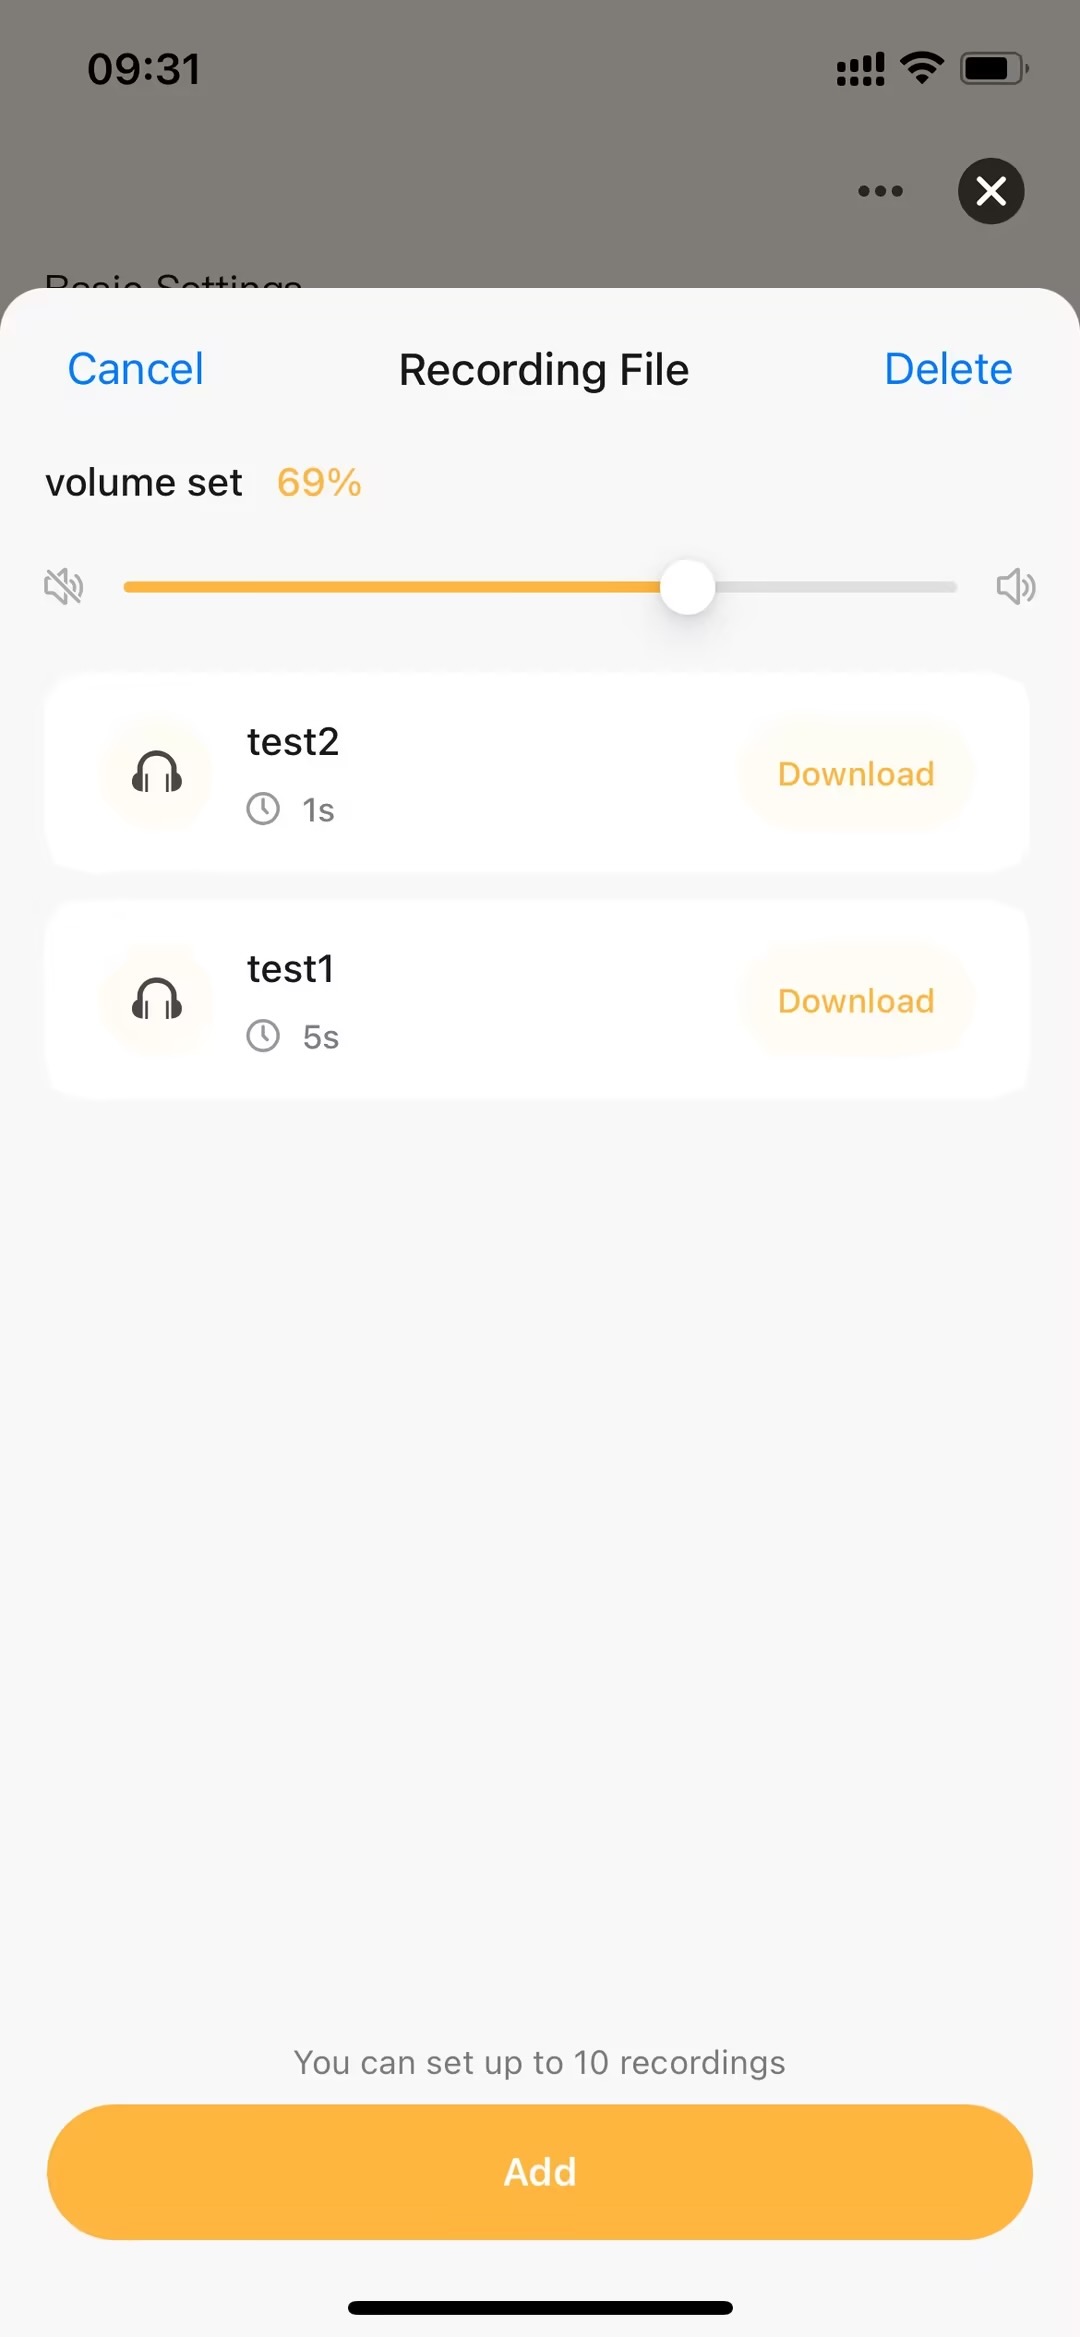
Code snippet
// Initialize recording data
useEffect(() => {
  dispatch(fetchAudios());
}, []);

// Home component
<PageContainer
  show={showVoices}
  customStyle="backgroundColor: transparent"
  position="bottom"
  overlayStyle="background: rgba(0, 0, 0, 0.5);"
  onLeave={() => setShowVoices(false)}
  onAfterEnter={() => setReady(true)}
  onClickOverlay={() => setShowVoices(false)}
>
  <Voices ready={ready} onClose={() => setShowVoices(false)} />
</PageContainer>;

// Recording process

import { getRecorderManager } from '@ray-js/ray';

const recordManager = useRef(getRecorderManager());
const recordFile = useRef<string>();

// (1) Start recording
const handleStart = () => {
  recordManager.current.start({
    frameSize: undefined,
    format: 'wav',
    success: res => {
      recordFile.current = res.tempFilePath;
      setIsRecording(true);
    },
    fail: err => {
      console.log(err);
    },
  });
};

// (2) Finish recording
const handleFinish = () => {
  recordManager.current.stop({
    success: () => {
      setIsRecording(false);
      onRecorded(recordFile.current);
    },
  });
};

// (3) Preview recording

import { getRecorderManager } from '@ray-js/ray';

const audioContext = useRef<ty.CreateInnerAudioContextTask>();
audioContext.current = createInnerAudioContext();

const handleListen = () => {
  if (isPlaying) {
    audioContext.current?.stop?.({
      success: () => {
        setIsPlaying(false);
      },
    });
  } else {
    audioContext.current?.play?.({
      src: file,
      autoplay: true,
      loop: false,
      success: () => {
        setIsPlaying(true);
      },
    });
  }
};

// (4) Save recording
const handleSave = async () => {
  try {
    const {
      data: { inputValue },
    } = await DialogInstance.input({
      context: this,
      title: Strings.getLang('dsc_input_audio_name'),
      overlayStyle: { background: 'transparent' },
      value: '',
      cancelButtonText: Strings.getLang('dsc_cancel'),
      confirmButtonText: Strings.getLang('dsc_confirm'),
      selector: '#smart-dialog-voice',
    });

    if (file) {
      try {
        showLoading({
          title: Strings.getLang('dsc_uploading'),
        });

        const { cloudKey } = await uploadAudio(
          file,
          'pet_media-device',
          'application/octet-stream'
        );

        await fileRelationSave(
          {
            objectKey: cloudKey,
            fileName: `${inputValue}_@_${duration}`,
          },
          devId
        );

        await (dispatch as AppDispatch)(fetchAudios()).unwrap();

        onSave();
      } catch (err) {
        showToast({
          title: Strings.getLang('dsc_save_fail'),
          icon: 'fail',
        });
      } finally {
        hideLoading();
      }
    }
  } catch (err) {
    console.log(err);
  }
};

// (5) Delete recording
import { showLoading, hideLoading, showToast } from '@ray-js/ray';

const [edit, setEdit] = useState(false);
const [selectedIds, setSelectedIds] = useState<string[]>([]);

const handleEdit = async () => {
  if (audiosTotal === 0) return;
  if (edit) {
    try {
      if (selectedIds.length !== 0) {
        showLoading({
          title: '',
        });

        await (dispatch as AppDispatch)(deleteAudios(selectedIds)).unwrap();
      }
      setEdit(false);
      setSelectedIds([]);
    } catch (err) {
      showToast({
        title: Strings.getLang('dsc_delete_failed'),
        icon: 'fail',
      });
    } finally {
      hideLoading();
    }
  } else {
    setEdit(true);
  }
};
Primarily supports users in two-way voice intercom, accompanying pets, and enhancing pets' emotional connections.
Code snippet
// Core component
<IpcPlayer
  objectFit="contain"
  defaultMute={isMute}
  devId={devId}
  onlineStatus={isOnline}
  updateLayout={`${playerLayout}`}
  scalable={false}
  onChangeStreamStatus={handleChangeStreamStatus}
  onCtx={handleCtx}
  onPlayerTap={handlePlayerClick}
  clarity={videoClarityObj[mainDeviceCameraConfig.videoClarity]}
  privateState={dpBasicPrivate ?? false}
  playerStyle={{ borderRadius: 20 }}
/>;

// Export audio and video instance
const handleCtx = (ctx) => {
  dispatch(updateIpcCommon({ playerCtx: ctx }));
};

// Start two-way intercom
export const startTalk = async () => {
  const { isTwoTalking } = store.getState().ipcCommon;
  // Start intercom
  return new Promise((resolve, reject) => {
    const { playerCtx } = store.getState().ipcCommon;

    playerCtx.ctx.startTalk({
      success: () => {
        if (isTwoTalking) showToast("ipc_3s_can_not_donging", "none");
        resolve(true);
      },
      fail: () => {
        showToast();
        reject();
      },
    });
  });
};

// Stop two-way intercom
export const stopTalk = (showErrorToast = true) => {
  return new Promise((resolve, reject) => {
    const { playerCtx } = store.getState().ipcCommon;

    playerCtx.ctx.stopTalk({
      success: () => {
        resolve(false);
      },
      fail: () => {
        showErrorToast && showToast();
        reject();
      },
    });
  });
};
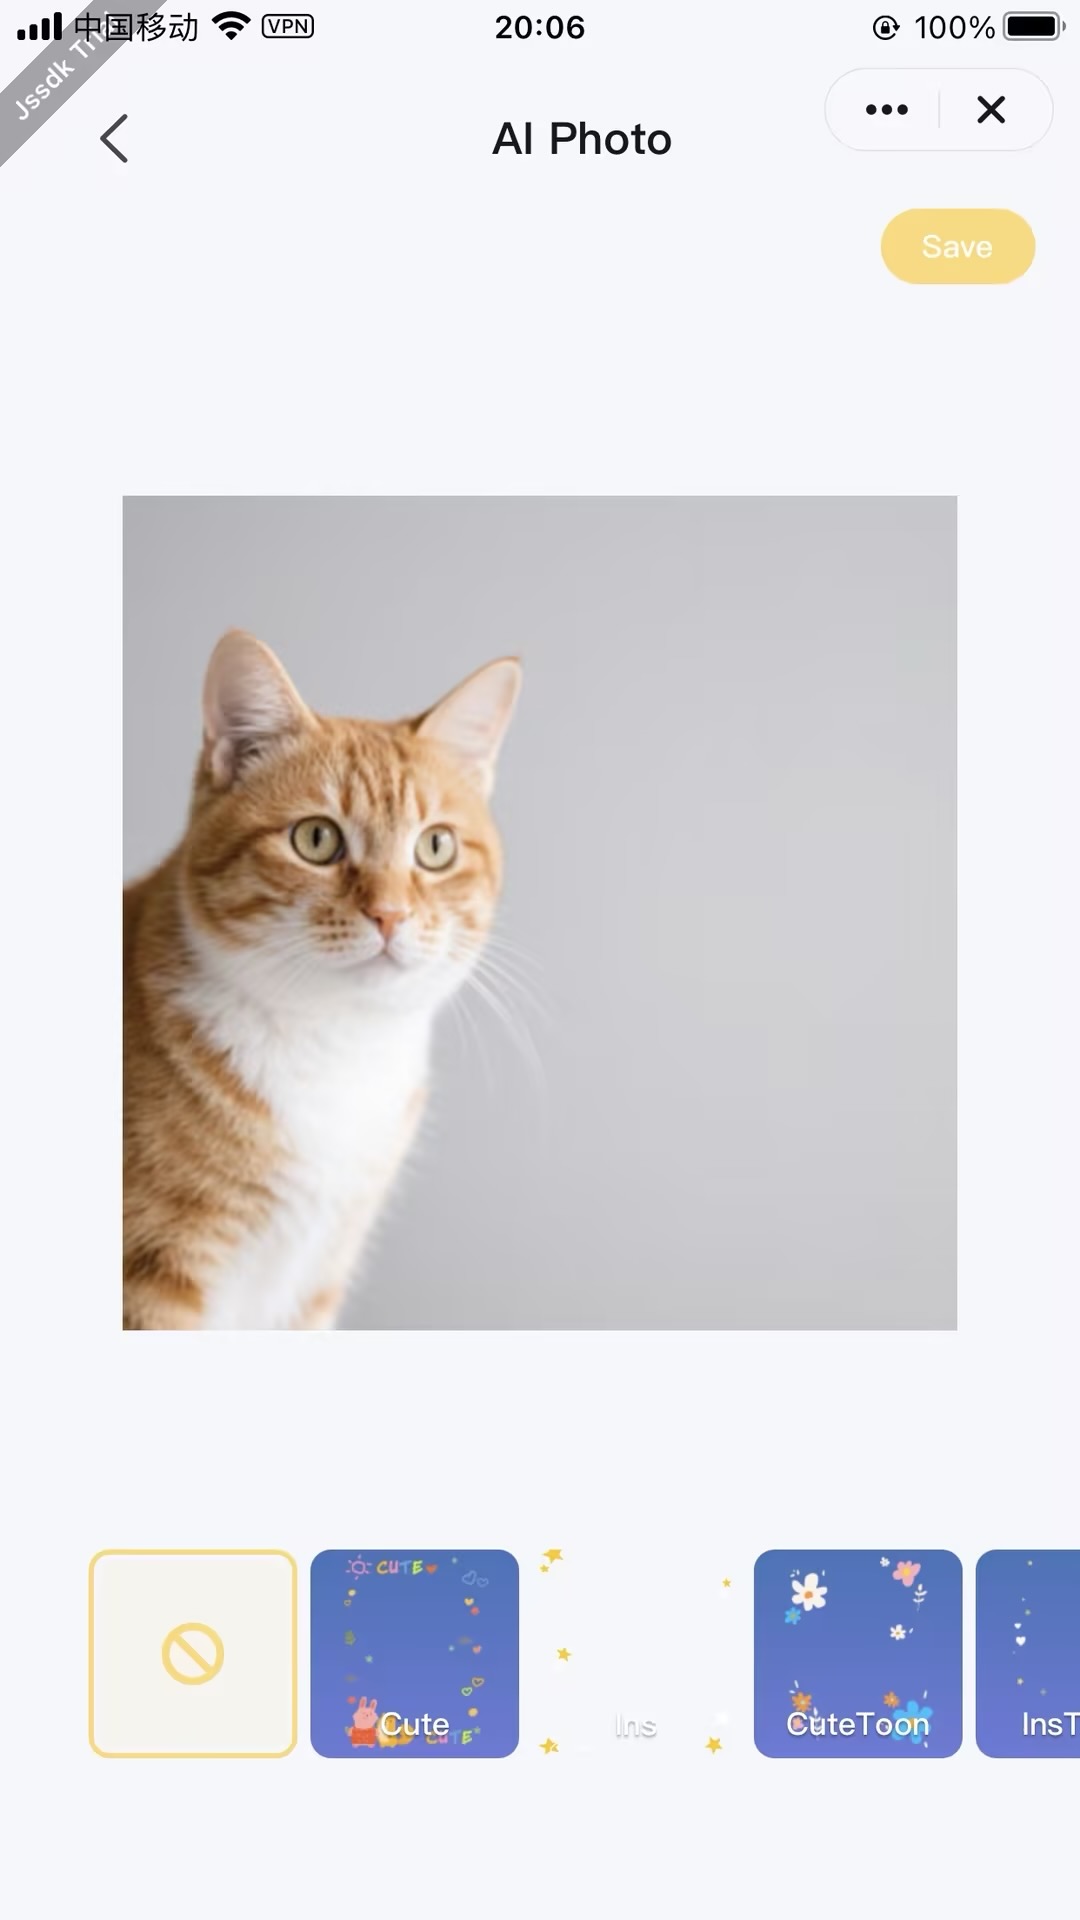
- Portrait Material Resource Management: B-end customers can upload custom fun templates, which can be accessed through specified APIs in the template panel
- 1. Portrait Material Resource Configuration
- For portrait material resource configuration tutorials, please contact your project manager or submit a ticket.
- 2. Portrait Material Resource Retrieval:
- Call
getAiFilterTemplateDatato obtain portrait material resources configured by B-end customers.
- Call
- 1. Portrait Material Resource Configuration
- Batch Import of Pet Material Resources: Supports users to batch import local images, videos and other material resources for AI secondary editing
- 1. Pet Material Resource Selection
- Call the encapsulated
chooseMediaAsyncmethod to support users in batch selecting images or video resources from local albums. - If the material resource is an image, call the encapsulated
compressImageAsyncBatchmethod to maintain original aspect ratio while cropping to target size, then compress quality based on file size limits.
- Call the encapsulated
- 2. Pet Material Resource Caching
- Call the encapsulated
addPhotosAsyncmethod to cache pet material resources in the App sandbox for future editing.
- Call the encapsulated
- 1. Pet Material Resource Selection
- Pet Portrait Generation: Using On-App AI technology to intelligently merge preset fun theme templates with user-uploaded images.
- Call
createForegroundVideoServicemethod to initialize pet portrait service instance. - Call
processPetForegroundMediaByTemplatemethod with input parameters to generate pet portraits and return portrait media resources. - Call
destroyForegroundVideoServicemethod when page is destroyed to prevent memory leaks.
- Call
Feature Demonstration

Related Code Segments
// Initialize photo material resources
useEffect(() => {
  // Pull filter type data
  getAiFilterTemplateData()
    .then(res => {
      console.log('~ getAiFilterTemplateData res ~', res);
      const tempRes = {};
      res.forEach(item => {
        tempRes[item.style] = item.templates;
      });
      console.log('~ getAiFilterTemplateData tempRes ~', tempRes);
      dispatch(initAiFilterData(tempRes));
    })
    .catch(err => {
      console.log('~ getAiFilterTemplateData ~', err);
    });
}, []);

// Select pet assets
const handleAdd = React.useCallback(
  (type: string) => {
    authorizeAsync({ scope: 'scope.writePhotosAlbum' })
      .then(() => {
        return chooseMediaAsync({
          count: type === 'image' ? MAX_CHOOSE_IMAGE_NUM : MAX_CHOOSE_VIDEO_NUM,
          mediaType: type,
          sourceType: ['album'],
          isFetchVideoFile: false,
          isGetAlbumFileName: true,
        });
      })
      .then(res => {
        showLoading({ title: Strings.getLang('loadingTip') });
        const newPhotos = res.tempFiles.map(d => ({
          ...d,
          fileType: d.fileType as 'image' | 'video',
        }));

        // Filter out duplicate photos
        const filterPhotos = newPhotos.filter(d =>
          photos.find(p => p.tempFilePath === d.tempFilePath || p.originUrl === d.tempFilePath)
        );

        if (filterPhotos?.length) {
          showToast({ title: Strings.getLang('samePhotoTip'), icon: 'none' });
        }

        const _newPhotos = newPhotos
          .filter(
            d =>
              !photos.find(
                p => p.tempFilePath === d.tempFilePath || p.originUrl === d.tempFilePath
              )
          )
          .map(d => ({ ...d, originUrl: d.tempFilePath }));

        if (!_newPhotos?.length) {
          hideLoading();
          return;
        }

        if (type === 'image') {
          handleImageCompress(_newPhotos);
          return;
        }

        // Video is not compressed
        hideLoading();
        dispatch(addPhotosAsync(_newPhotos));
      })
      .catch(err => {
        hideLoading();
        console.log('=== authorizeAsync or chooseMediaAsync err', err);
      });
  },
  [photos, resolution]
);

// Processing image compression
const handleImageCompress = (_newPhotos) => {
  const { width, height } = getResolution(resolution);
  const _newPhotosPath = _newPhotos.map(d => d.tempFilePath);

  compressImageAsyncBatch(_newPhotosPath, width, height)
    .then(res => {
      hideLoading();
      const { fileList = [] } = (res || {}) as { fileList: string[] };
      const _newPhotosRes = _newPhotos.map((d, index) => ({
        ...d,
        tempFilePath: fileList[index],
      }));

      dispatch(addPhotosAsync(_newPhotosRes));
      handleImageThumbnail(_newPhotosRes);
    })
    .catch(err => {
      hideLoading();
      console.error('=== compressImageAsyncBatch err', err);
      showToast({ title: Strings.getLang('addImageError'), icon: 'none' });
    });
};

// Processing image thumbnails
const handleImageThumbnail = (_newPhotosRes) => {
  const _imgCheckedList = _newPhotosRes.map((current, i) => {
    const { fileFullName } = getFileNameAndExtension(current?.tempFilePath || '') || {};
    return {
      id: i + 1,
      src: current?.tempFilePath,
      originUrl: current?.originUrl,
      thumbnail: current?.thumbTempFilePath,
      fileName: fileFullName,
      fileType: current?.fileType,
      title: '',
    };
  });

  const _imgCheckedListPath = _imgCheckedList.map(d => d.src);

  fetchImageThumbnailBatch(_imgCheckedListPath, [])
    .then(res => {
      const _imgCheckedListRes = _imgCheckedList.map((d, index) => ({
        ...d,
        thumbnail: (res[index] || '') as string,
      }));
      dispatch(updateImgCheckedList(_imgCheckedListRes));
    })
    .catch(err => {
      console.error('~ fetchImageThumbnailBatch ~', err);
    });
};

// Pet photo generation
useEffect(() => {
  clearAiFilterEventId();
  createForegroundVideoService();
  return () => {
    destroyForegroundVideoService();
  };
}, []);

// Generate pet photos
const changeAppAiFilterImg = (url: string, templateCode: string, aiFilter: any) => {
  if (!templateCode) return;

  showLoading({
    title: Strings.getLang('aiAppFilterTip'),
    mask: true,
  });

  processPetForegroundMediaByTemplate({
    templateObject: {
      effect: aiFilter,
      type: 'APP',
      outputType: 'image',
    },
    mediaSource: url,
    success(res) {
      console.log('createForegroundVideoService', res);
      const path = res.outputPath;
      hideLoading();

      const __tempCurrentImg = {
        ...currentImg,
        filterCode: templateCode,
        filterSrc: path,
      };

      updateCurrentImg(__tempCurrentImg);

      if (path?.slice(-4) === '.mp4') {
        fetchVideoThumbnail(path, __tempCurrentImg);
      } else {
        fetchImageThumbnail(path, __tempCurrentImg);
      }
    },
    fail(err) {
      console.log('createForegroundVideoService err', err);
      hideLoading();
      showToast({
        icon: 'error',
        title: Strings.getLang(`aiFilterFailed${Math.abs(err?.innerError?.errorCode) || ''}`),
      });
    },
  });
};
- Congrats! 🎉 You have finished learning this guide.
- If you have any problem during the development, you can contact Tuya's Smart MiniApp team for troubleshooting.