Prerequisites
- Have read the Ray Novice Village Tasks to get to know the basics of the Ray framework.
- Have read Develop Universal Panel Based on Ray to get to know the basics of Ray panel development.
Create a panel
In the CodeLab, you can use the panel miniapp to develop a beacon device panel on top of the beacon device panel template. Based on the capabilities of the DP-Kit interceptor, you can implement the following capabilities:
- Immediately respond to the sent data point (DP) commands: Beacon devices usually do not report data, but only receive DP commands. Configure an interceptor to implement uncontrolled mode.
- Ignore device data reporting: Debugging of virtual devices can be affected by data reporting. Configure an interceptor to ignore data reporting.
- Automatically synchronize device properties in the cloud: Beacon devices usually do not report data. You need to synchronize the device data in the cloud to get your initial data and device status.
Learning objectives
- Configure immediate responses to optimize beacon panel performance.
- Use the beacon device panel template to quickly initialize a beacon panel project.
- Configure an immediate response to DP sending.
- Configure to ignore device data reporting and allowlist DPs. For example, a response is required when the battery level DP is reported.
- Configure DP data sync and allowlist DP in the cloud. For example, you do not need to sync the battery level DP.
Prerequisites
- Smart Life app
- Tuya MiniApp IDE
- NVM and Node development environment (v16.x is recommended)
- Yarn dependency management tool
For more information, see Panel MiniApp > Set up environment.
Product name: Beacon light
Requirement prototype
You need to create a control panel for the beacon lighting device. The UI prototype is shown below:
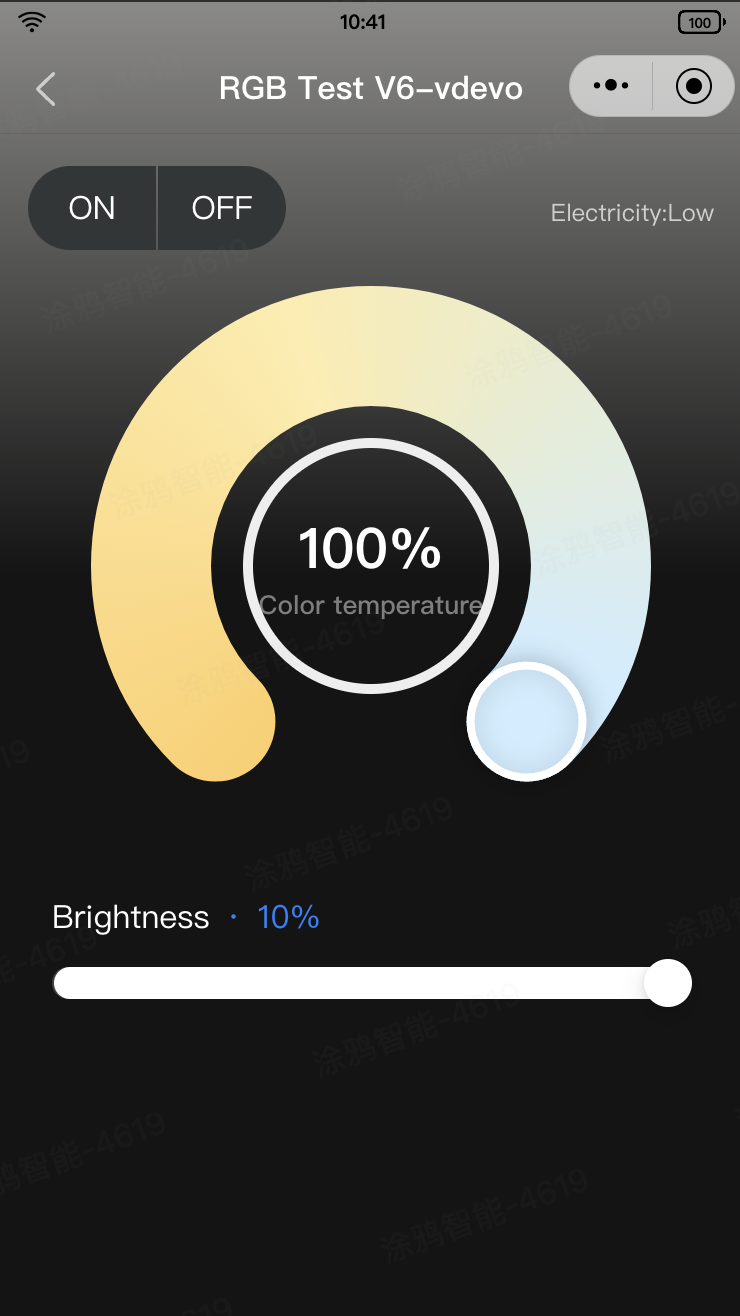
The panel shows an on/off switch, battery level, color temperature wheel, and brightness slider. The battery level data is proactively reported by the device, and other DP data is not reported.
Description of DPs
The current panel must include the following DPs:
DP ID | DP name | Identifier | Data transfer type | Data type | DP property |
1 | Switch | switch_led | Send and report (read-write) | Boolean | {"type":"bool"} |
3 | Brightness | bright_value | Send only (write-only) | Value | {"min":10,"max":1000,"step":1,"unit":"","scale":0,"type":"value"} |
4 | Color temperature | temp_value | Send only (write-only) | Value | {"min":0,"max":1000,"step":1,"unit":"","scale":0,"type":"value"} |
62 | Battery level status | battery_state | Send and report (read-write) | Enum | {"range":["low","middle","high"],"type":"enum"} |
Create a standard lighting product, define data points, and configure the data points in the panel.
Register and log in to the Tuya Developer Platform and create a product.
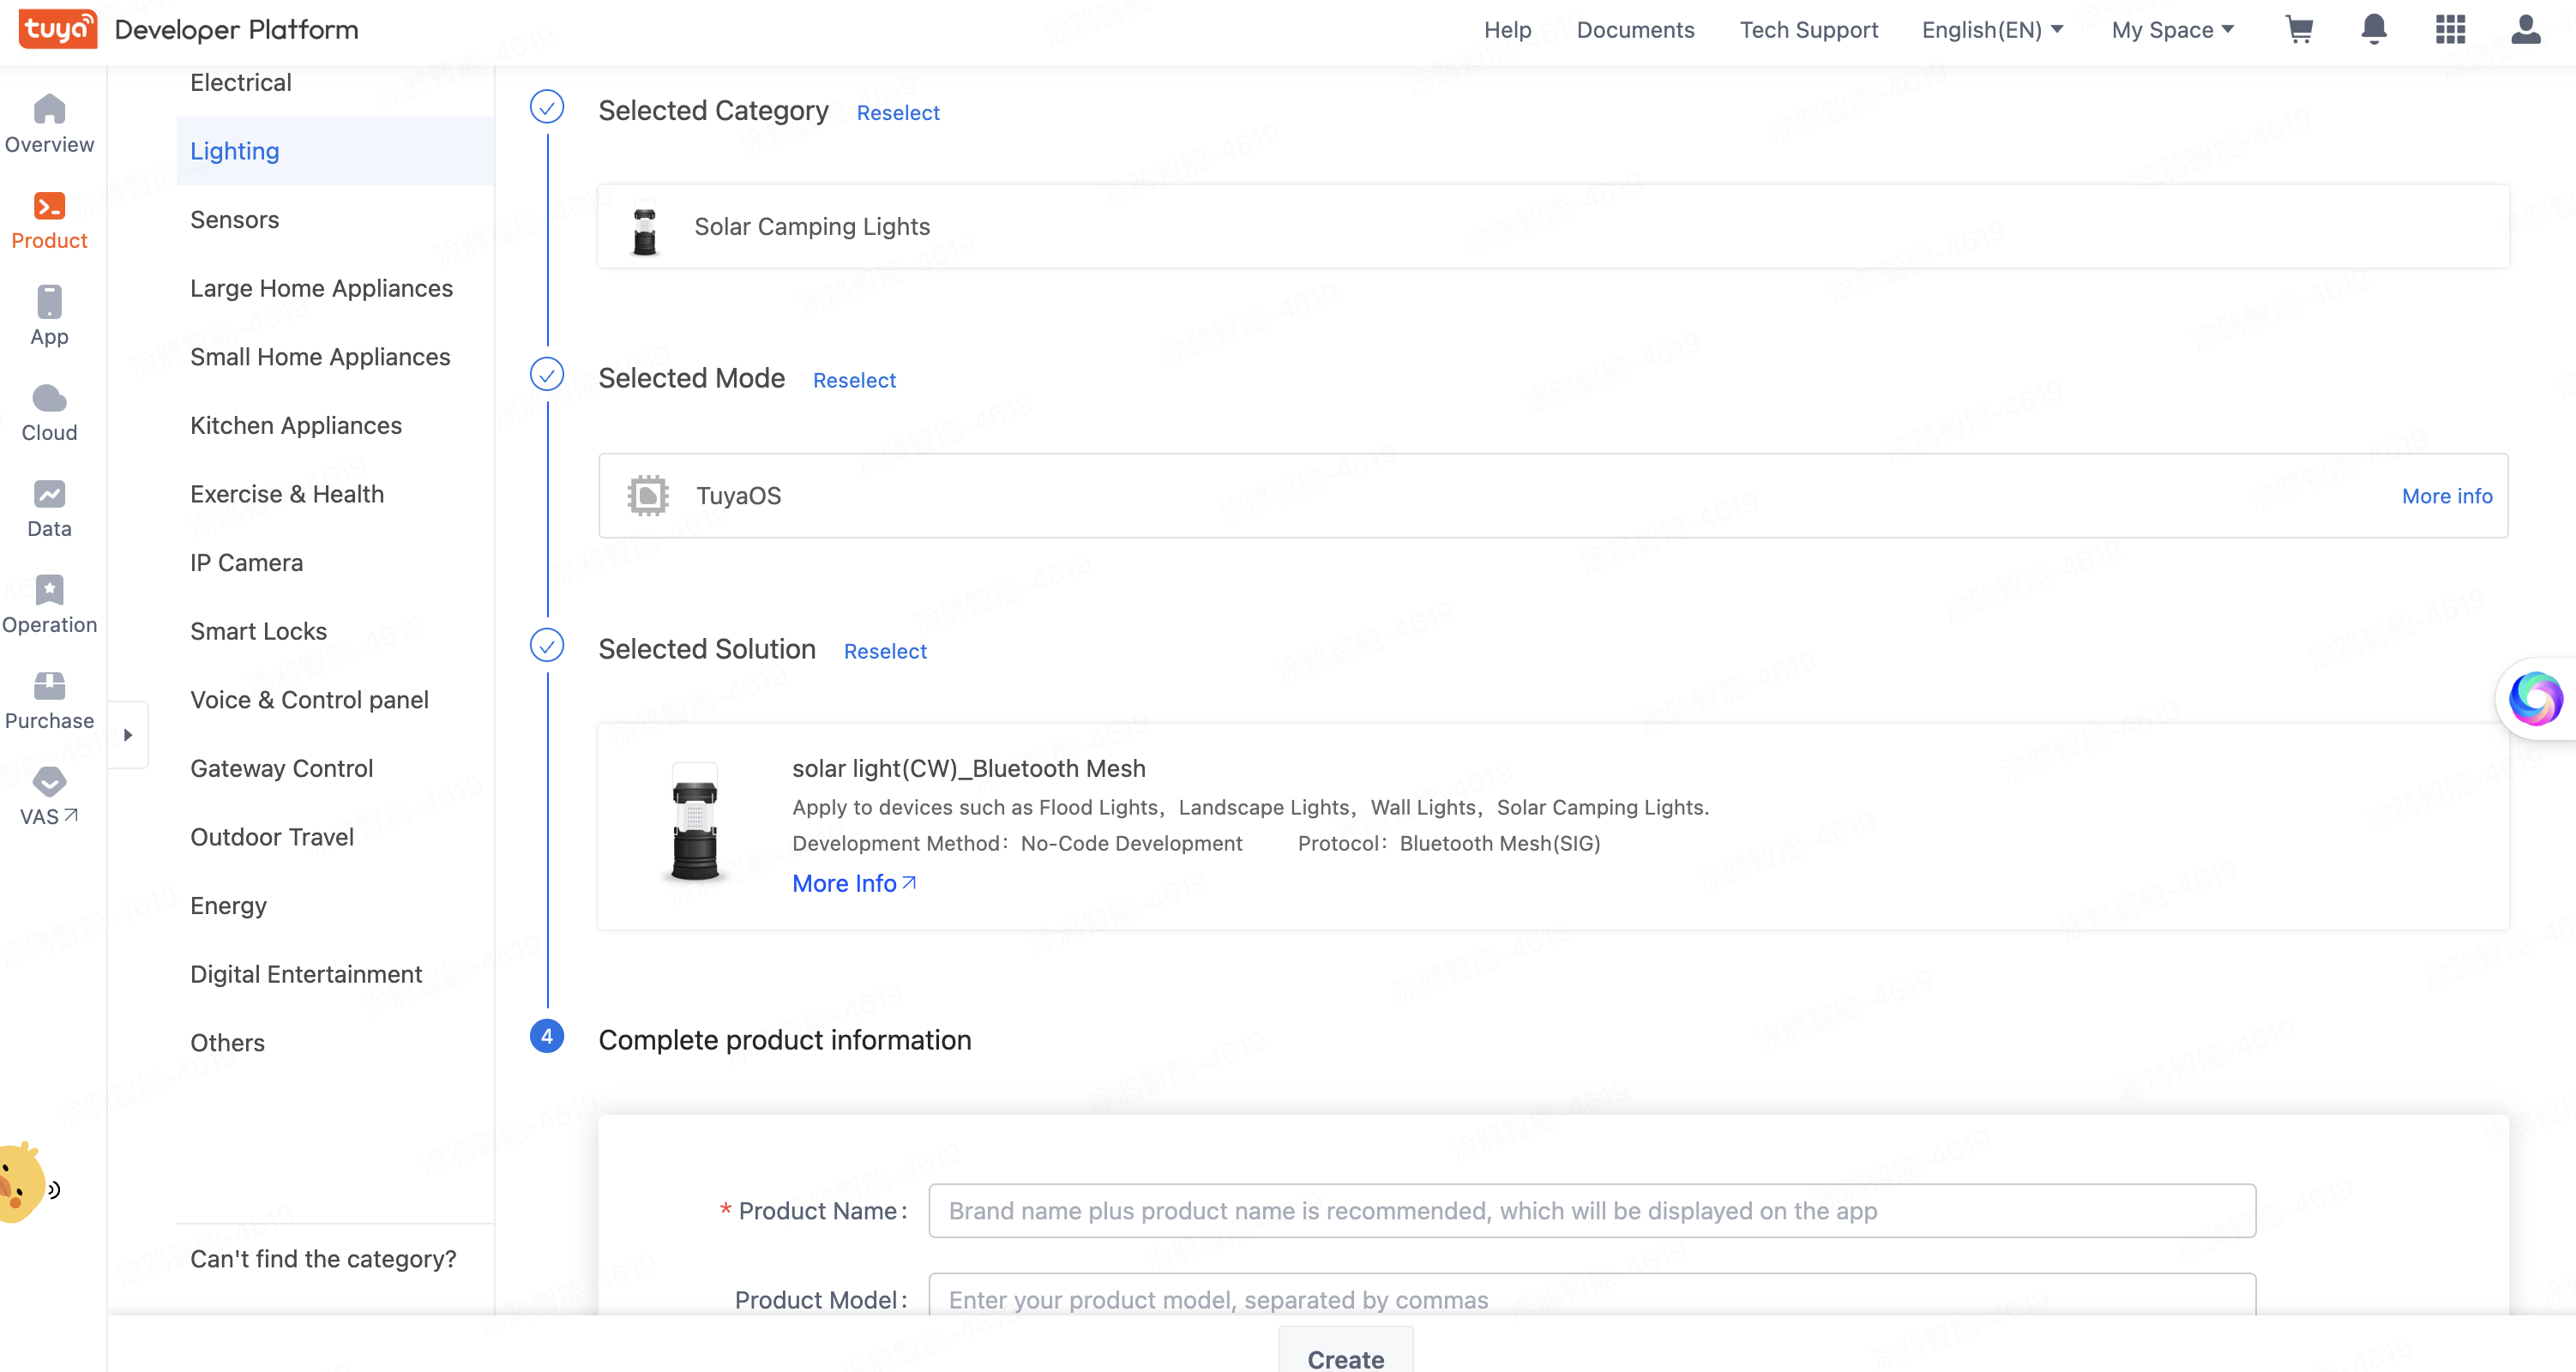
- In the left-side navigation pane, choose Product > Development > Create.
- In the Standard Category tab, choose Lighting > Outdoor Lighting > Solar Camping Lights.
- Select a smart mode, select solar light (CW) solution, and then complete the product information.
- Click Create.
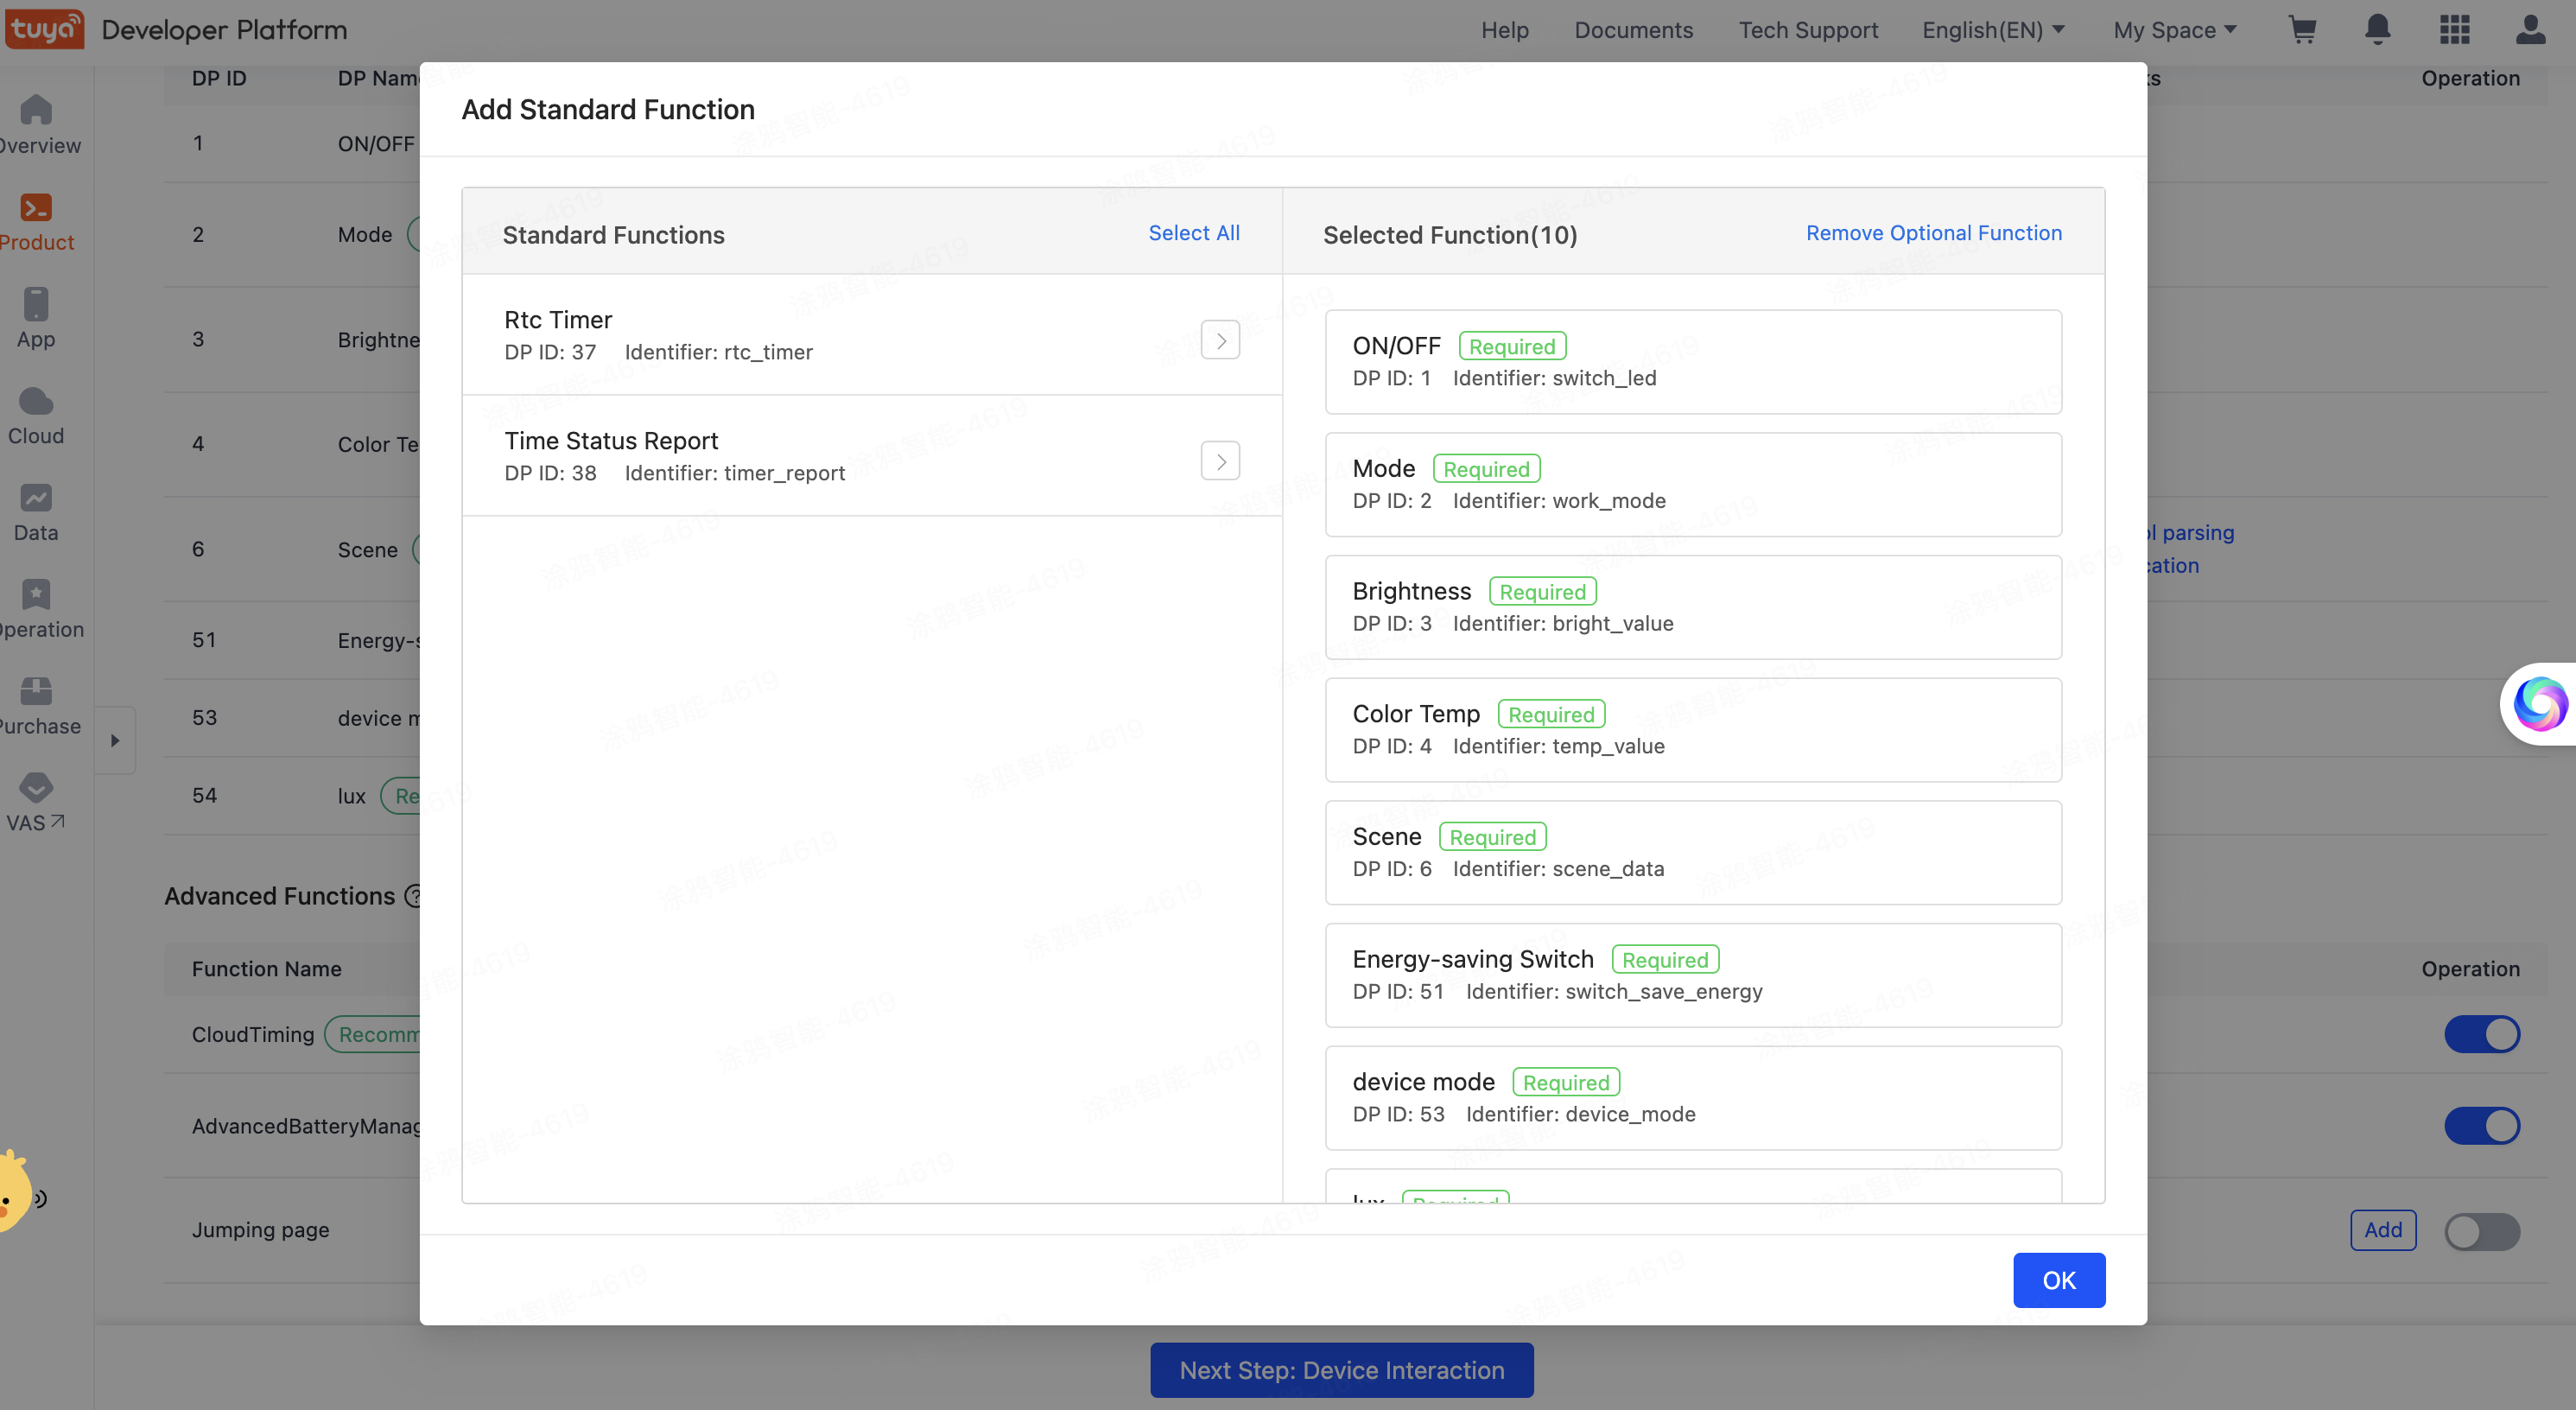
- On the page of Add Standard Function, choose your desired DPs or use the default settings. Click OK, and a standard lighting device is defined.
Create panel miniapp on Smart MiniApp Developer Platform
Register and log in to the Smart MiniApp Developer Platform. For more information, see Create panel miniapp.
Create a project based on a template
Open Tuya MiniApp IDE and create a panel miniapp project based on the beacon device panel template. For more information, see Initialize project.
Create a DP-Kit interceptor in your project. The template code is in src/devices/index.
export const dpKit = createDpKit<SmartDeviceSchema>({});

export const devices = {
  lamp: new SmartDeviceModel<SmartDeviceSchema>({
    // Configure DP-Kit interceptor to SDM model
    interceptors: dpKit.interceptors,
  }),
};
After the device model is initialized, you need to initialize DP-Kit.
// The callback to invoke when the app is started
onLaunch() {
  devices.lamp.init();
  devices.lamp.onInitialized(res => {
    dpKit.init(devices.lamp); // Initialize DP-Kit
  });
}
You have now completed the basic configuration of the DP-Kit for the SDM model.
The characteristics of beacon devices are that they almost only receive DP commands and do not report data. Therefore, using the previous controlled mode to write panel logic can lead to an unresponsive UI. You can use DP-Kit to set up the immediate response mode to resolve this issue.
In sendDpOption, set immediate to true.
export const dpKit = createDpKit<SmartDeviceSchema>({
  sendDpOption: {
    immediate: true, // Enable immediate response to DP commands, not controlled by the device
  },
});
When you call actions in the panel, the panel will respond immediately without waiting for the device to report DP data. Here is an example:
const actions = useActions();
actions.bright_value.set(100); // After the brightness is sent, the panel responds immediately
Debugging of virtual devices can be affected by data reporting. Configure an interceptor to ignore data reporting.
export const dpKit = createDpKit<SmartDeviceSchema>({
  // Start to ignore data reporting
  ignoreDpDataResponse: {
    debug: true, // Enable log viewing
  },
});
In this case, when the device reports any DP, the panel UI that gets data through useProps will not respond and update.
However, for some special DPs such as battery level, you still need to configure an allowlist to monitor the data reported by the device.
export const dpKit = createDpKit<SmartDeviceSchema>({
  // Start to ignore data reporting
  ignoreDpDataResponse: {
    debug: true, // Enable log viewing
    whiteDpCodes: [dpCodes.batteryStateCode], // Need to respond to the battery level DP reporting
  },
});
When the device reports the battery level, the battery UI that gets data through useProps will not respond and update. Here is an example:
const battery_state = useProps(state => state?.battery_state);
// Update when the device reports battery_state
<Battery value={battery_state} />
Beacon devices do not report DP data. After you configure the Ignore DP data reporting mode, you cannot get the initial state of the panel when you first enter it. You can achieve this by configuring DP cloud synchronization.
Set synchronizeDevProperty to be true:
export const dpKit = createDpKit<SmartDeviceSchema>({
  sendDpOption: {
    // Sync the sent DP to the device data storage in the cloud
    synchronizeDevProperty: {
      // The default value if no data is available in the cloud
      defaultState: {
        [dpCodes.brightCode]: 1000,
        [dpCodes.temperatureCode]: 1000,
      },
    },
    // Alternatively, set synchronizeDevProperty to be true
  },
});
When the panel sends a DP, the DP data will be saved to the device data in the cloud. When you exit and enter the panel again, the cloud DP data will be automatically pulled and injected into the panel as the initial state. Also, you can specify the default value if no data is available in the cloud.
defaultState supports functional initialization. For example, the brightness defaults to the maximum value of the product configuration.
export const dpKit = createDpKit<SmartDeviceSchema>({
  sendDpOption: {
    // Sync the sent DP to the device data storage in the cloud
    synchronizeDevProperty: {
      // The default value if no data is available in the cloud
      async defaultState (schema) {
        // Alternatively, make an API request
        const brightSchema = schema.find(item => item.code === dpCodes.brightCode)
        return {
          [dpCodes.brightCode]: brightSchema.max || 1000,
          [dpCodes.temperatureCode]: 1000,
        }
      },
    },
  },
});
Respond to DP sending and reporting
After you have completed the configuration (the above configuration has built-in support in the template code), use SDM actions to send DPs.
const actions = useActions();

// Invoked when you drag the color temperature wheel
actions.temp_value.set(100);
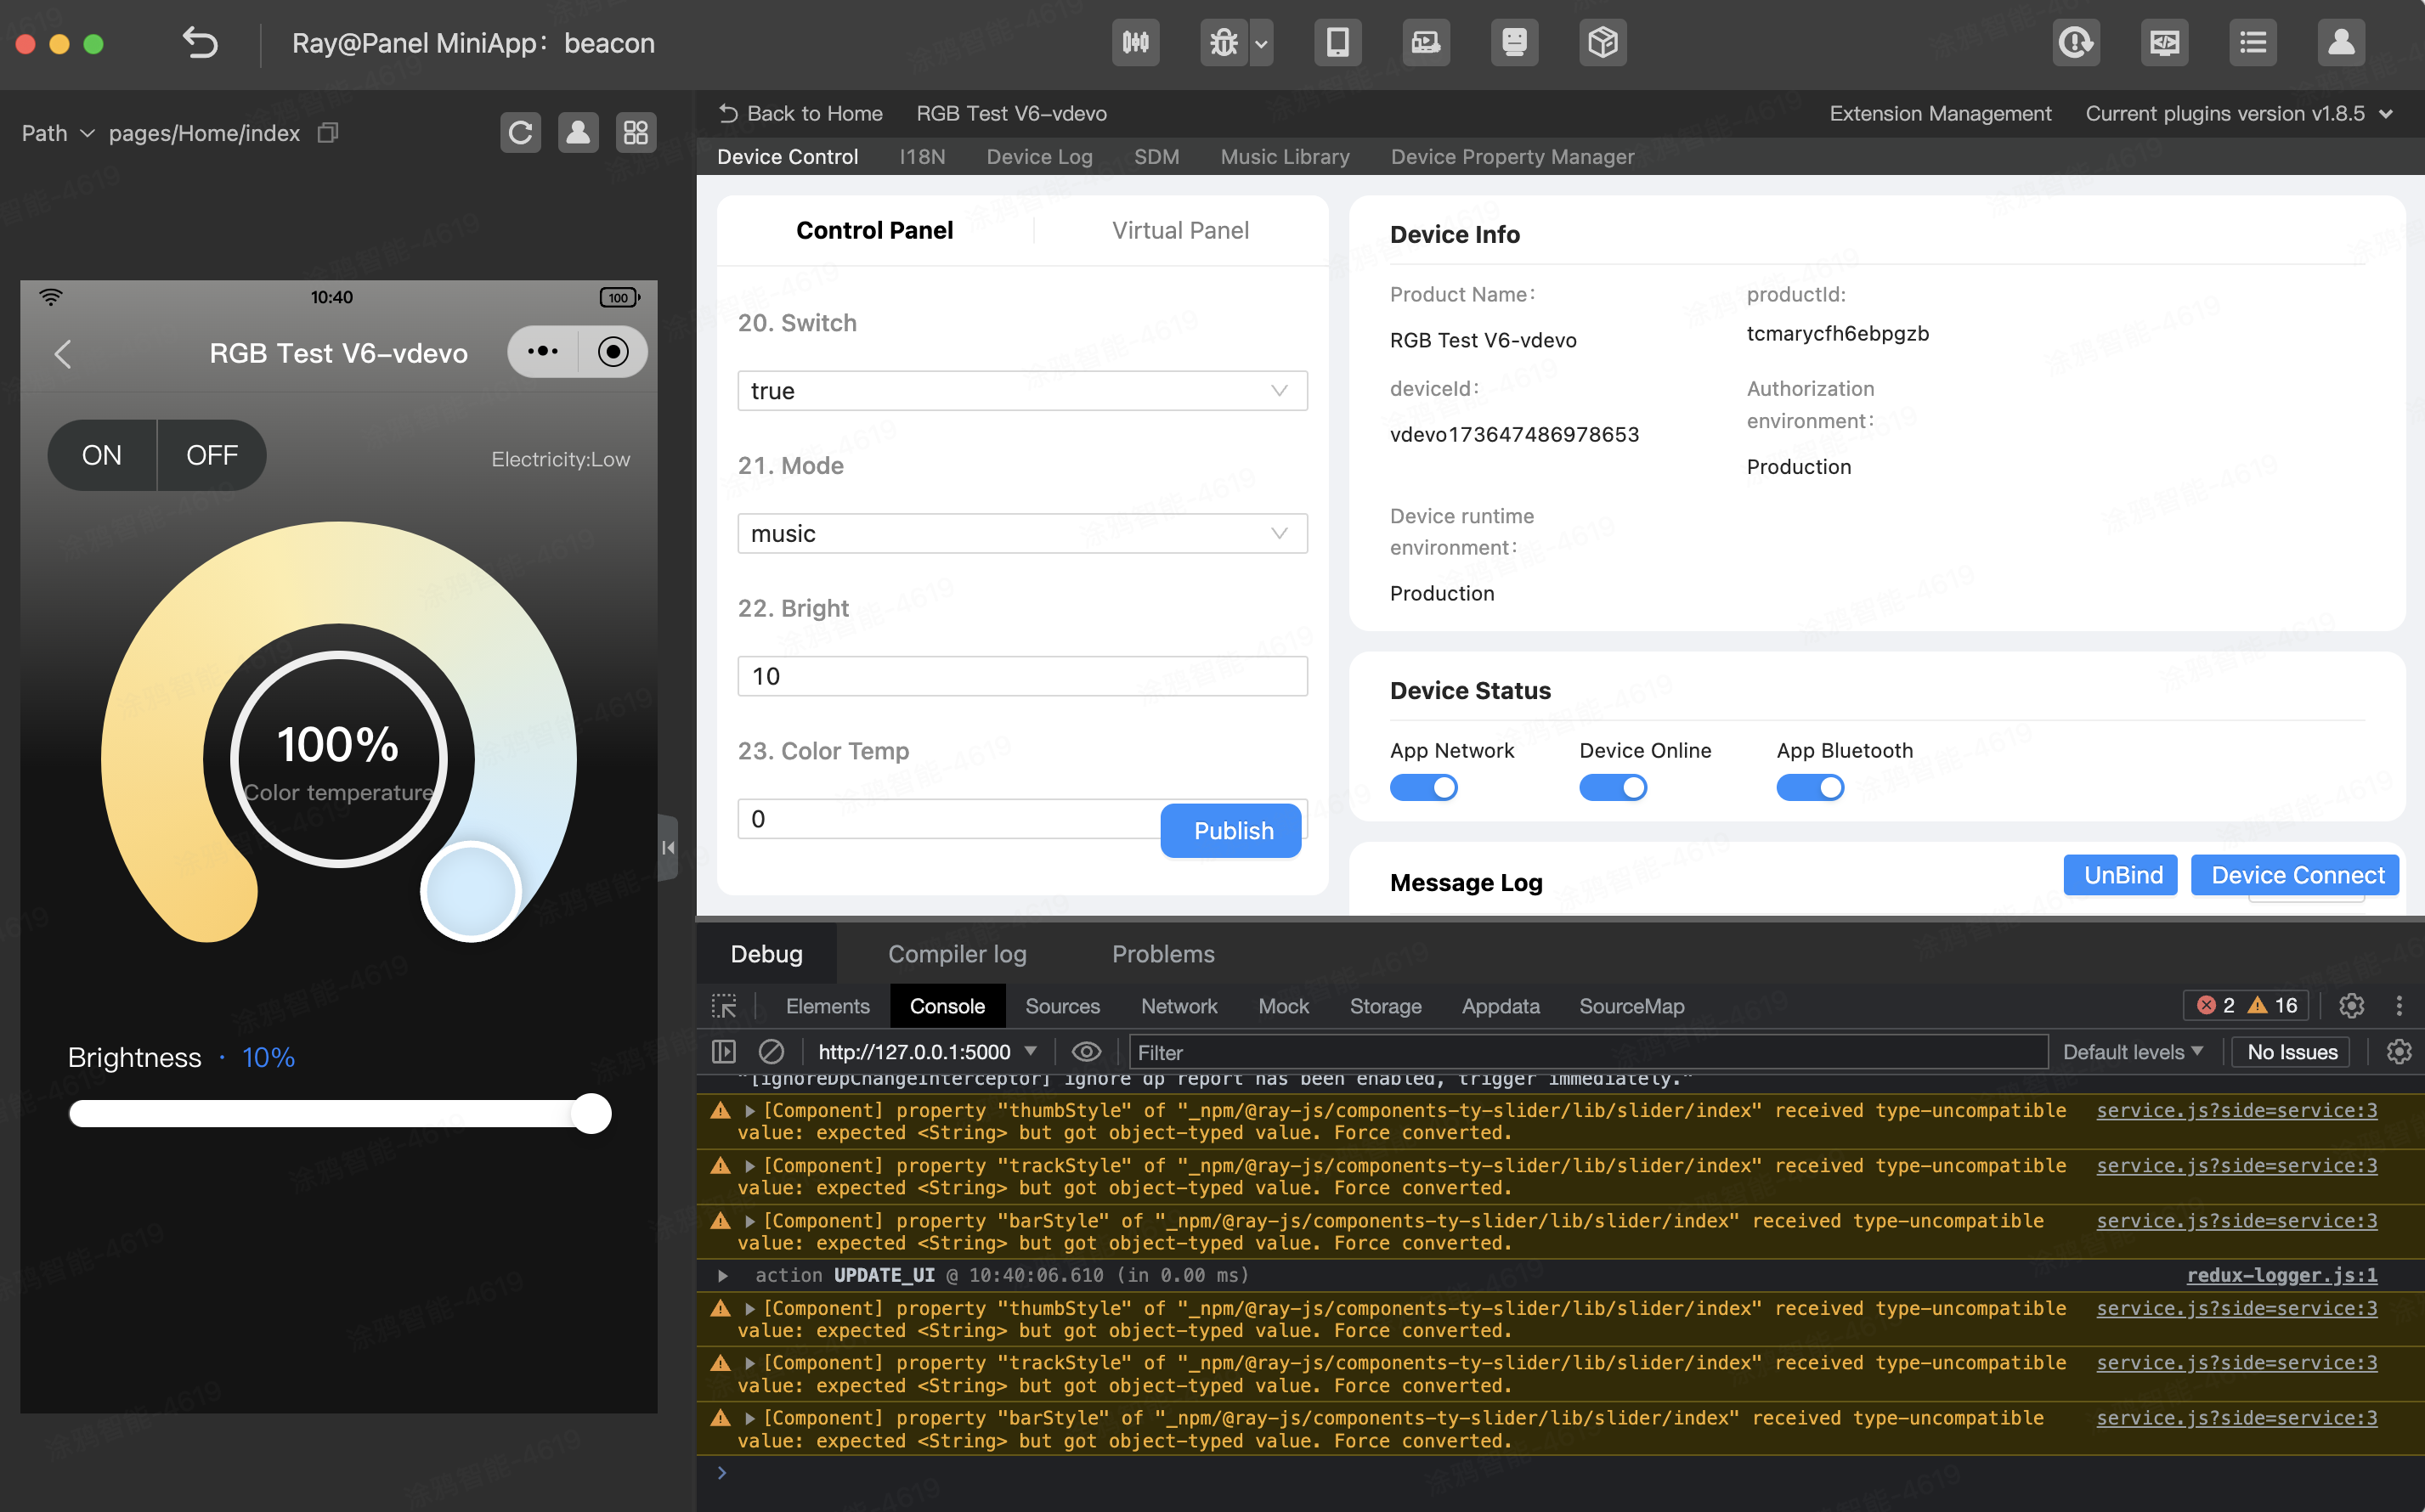
Tap the on/off switch and drag the brightness slider to view the logs reported by the Console debugger.
- Congrats! 🎉You have finished learning this guide.
- If you have any problem during the development, you can contact Tuya's Smart MiniApp team for troubleshooting.