基于涂鸦SDK开发智能灯光控制系统iOS App案例分享

概况
智能灯是一款常见的智能设备,安装智能灯后,用户可以使用手机 App 轻松调整室内颜色和亮度,设置不同的照明场景来轻松创造出温暖、放松、有趣或者鼓舞人心的室内空间。
物料清单
(可选)一款智能灯设备
数量:1任何 Powered By Tuya 设备皆可,您也可以前往涂鸦智选平台采购样品。查看详情
步骤
第 1 步:了解智能灯和 RGB 5 路灯
在智能灯具的开发过程中,您会碰到各种各样的某路灯,例如一路灯或者五路灯。不同的数字代表照明产品能实现的功能不同,如下表所示:
一路灯 二路灯 三路灯 四路灯 五路灯 亮度 色温+亮度 HSV 亮度+HSV 色温+亮度+HSV 其中,五路灯有白光和彩光是 2 种模式切换,但不可同时启用。
彩光的色彩模型常见的有 RGB 模型和 HSV 模型:
-
RGB 色彩模型
RGB(Red、Green、Blue)色彩模式是一种面向硬件的色彩模型,显示系统都采用RGB颜色模型来进行图像显示。RGB色彩模型属于加法混色原理,每种原色的数值越高,色彩就越亮,RGB都是0时是黑色,都是255时是白色。
RGB色彩模型表示直接,但是RGB数值和色彩的三属性没有直接的联系,不能揭示色彩之间的关系。 -
HSV 色彩模型
HSV 色彩模式是一种面向用户感官的色彩模型,侧重与色彩表示。这是根据人的视觉系统对亮度的敏感度要强于色彩值这个生理特性而提出的颜色模型。它比 RGB 更接近人们对彩色的感知经验。非常直观地表达颜色的色调、鲜艳程度和明暗程度,方便进行颜色的对比。
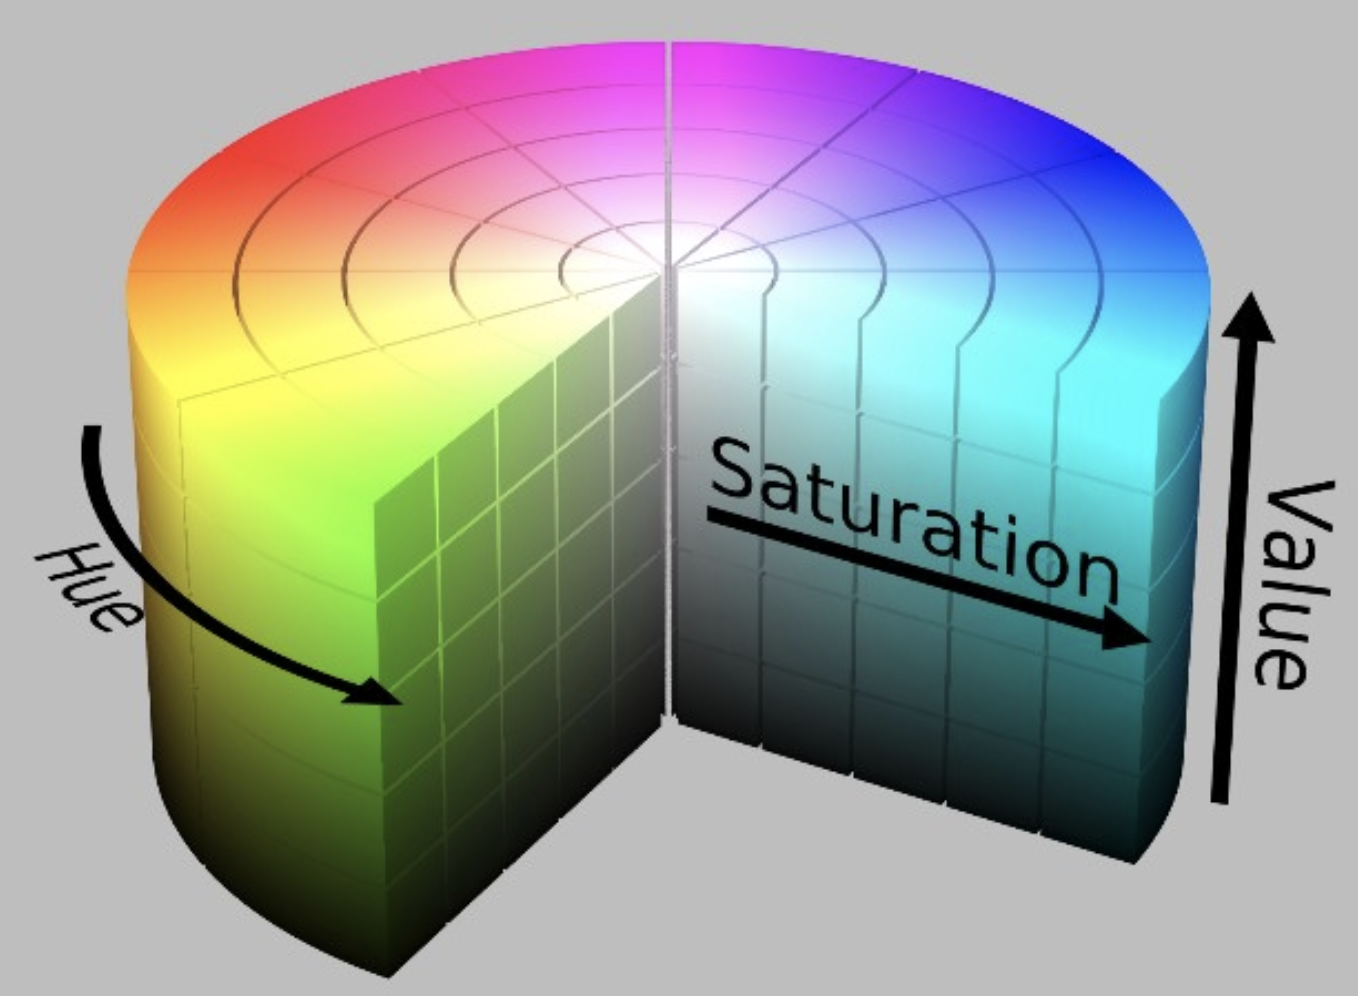
HSV(Hue、Saturation、Value)分别对应色相、饱和度、明度。-
色相 H:用角度度量,取值范围为0°~360°,从红色开始按照逆时针方向计算,红色为0°,绿色为120°,蓝色为240°,黄色为60°,青色为180°,品红为300°,对应于绕圆柱的中心轴的角度。
-
饱和度 S:表示色彩的纯度,对应于离圆柱的中心轴的距离。数值越高颜色则深而艳,数值越低则颜色逐渐变灰,取值范围为0.0~1.0,白色的S=0。
-
明度 V:表示颜色的明亮程度。取值范围为0.0(黑色)~1.0(白色)。对应于绕圆柱的中心轴的高度,轴取值为自底部的黑色V=0到顶部的白色V=1,如下图所示。

-
-
第 2 步:准备工作
跟随本教程基于涂鸦 iOS App SDK 开发一个智能灯 App 之前,您需要做以下准备:
- 创建 App SDK
- 集成 SDK
- 完成用户注册和登录
- 创建家庭
- 完成设备配网的逻辑
- 完成设备控制的逻辑
以上步骤都在 基于涂鸦 App SDK 快速地开发一款 iOS IoT App 教程有详细的描述,您可以参考教程完成准备工作。
第 3 步:了解功能点
功能点是对产品功能的抽象表示,是具体智能设备功能的抽象,用于描述产品功能及其参数。
-
功能点 ID:功能点的编码。设备与云端的功能数据通过功能点 ID 进行传输。
-
功能点名称:自定义的功能名称。
-
标识名:功能点 Code 值,用于 App 显示功能名称的多语言管理。支持字母、数字和下划线,以字母开头。
-
数据类型:
类型 参数名 说明 示例 布尔型 bool 非真即假的二值型变量。 开关功能的开或者关。 数值型 value 可线性调节类型的数据。 温度调节,温度范围 20-40℃。 枚举型 enum 自定义的有限集合值。 工作档位,低档/中档/高档。 故障型 fault 用于上报和统计故障的功能点,支持多故障,数据只上报。 温度传感器故障、电机故障和高温故障等。 字符串型 string 以字符串形式传输的功能点。 为智能灯具设置彩光模式。 透传型 raw 以二进制形式透传的功能点。 - -
数据传输类型:
- 可下发可上报:指令数据可以发送给设备,设备数据可以传输给云端。
- 只上报:数据只支持从设备传输给云端。
- 只下发:数据只支持从云端发送给设备。
例如,假设某款产品的 PID 为 ylr9R01cMWnMR***,而且其功能点如下表所示:
DP ID DP Code 功能名称 描述 模式 类型 类型详情 1 led_switch 开关 产品开关 rw bool {“type”:“bool”} 2 work_mode 模式 增加音乐模式 rw enum {“range”:[“white”, “colour”, “scene”, “scene_1”, “scene_2”, “scene_3”, “scene_4”, “music”],“type”:“enum”} 3 bright_value 亮度 亮度调节 rw value {“min”:25,“unit”:"", “scale”:0,“max”:255,“type”:“value”, “step”:1} 4 temp_value 冷暖 冷暖光调节 rw value {“min”:0,“unit”:"", “scale”:0,“max”:255,“type”:“value”, “step”:1} 5 colour_data 彩光模式数 rgbhsv rw string {“type”:“string”, “maxlen”:14} 6 scene_data 情景模式数 rgbhsv rw string {“type”:“string”, “maxlen”:14} 7 flash_scene_1 柔光模式 跑马灯效果的柔光模式 rw string {“type”:“string”, “maxlen”:14} 8 flash_scene_2 缤纷模式 跑马灯效果的缤纷模式 rw string {“type”:“string”, “maxlen”:44} 9 flash_scene_3 炫彩模式 跑马灯效果的炫彩模式 rw string {“type”:“string”, “maxlen”:14} 10 flash_scene_4 斑斓模式 跑马灯效果的斑斓模式 rw string {“type”:“string”, “maxlen”:44} 101 music 音乐灯 音乐灯 wr string {“type”:“string”, “maxlen”:255} -
第 4 步:下载 Demo
该 Demo 完成了基于 DP 控制智能灯泡的开关、亮度、冷暖、颜色的程序逻辑,您可以参考 Demo 代码进行修改。以下步骤介绍如何下载 Demo 和为 Demo 配置系统环境:
-
在终端的命令行中输入,下载 demo 到本地。
git clone https://github.com/tuya/tuya-home-ios-sdk.git -
打开项目设置,Target -> General,修改
Bundle Identifier为涂鸦 IoT 平台对应的 iOS 包名 -
导入安全图片到工程根目录,重命名为
t_s.bmp,并加入「项目设置 => Target => Build Phases => Copy Bundle Resources」中。 -
在项目的
PrefixHeader.pch文件添加以下内容:#import <TuyaSmartHomeKit/TuyaSmartKit.h> -
打开
AppDelegate.m文件,在[AppDelegate application:didFinishLaunchingWithOptions:]方法中初始化SDK。[[TuyaSmartSDK sharedInstance] startWithAppKey:<#your_app_key#> secretKey:<#your_secret_key#>]; -
开启 Debug 模式,打印一些日志用于分析问题。
#ifdef DEBUG
    [[TuyaSmartSDK sharedInstance] setDebugMode:YES];
#else
#endif
-
第 5 步:设置功能点
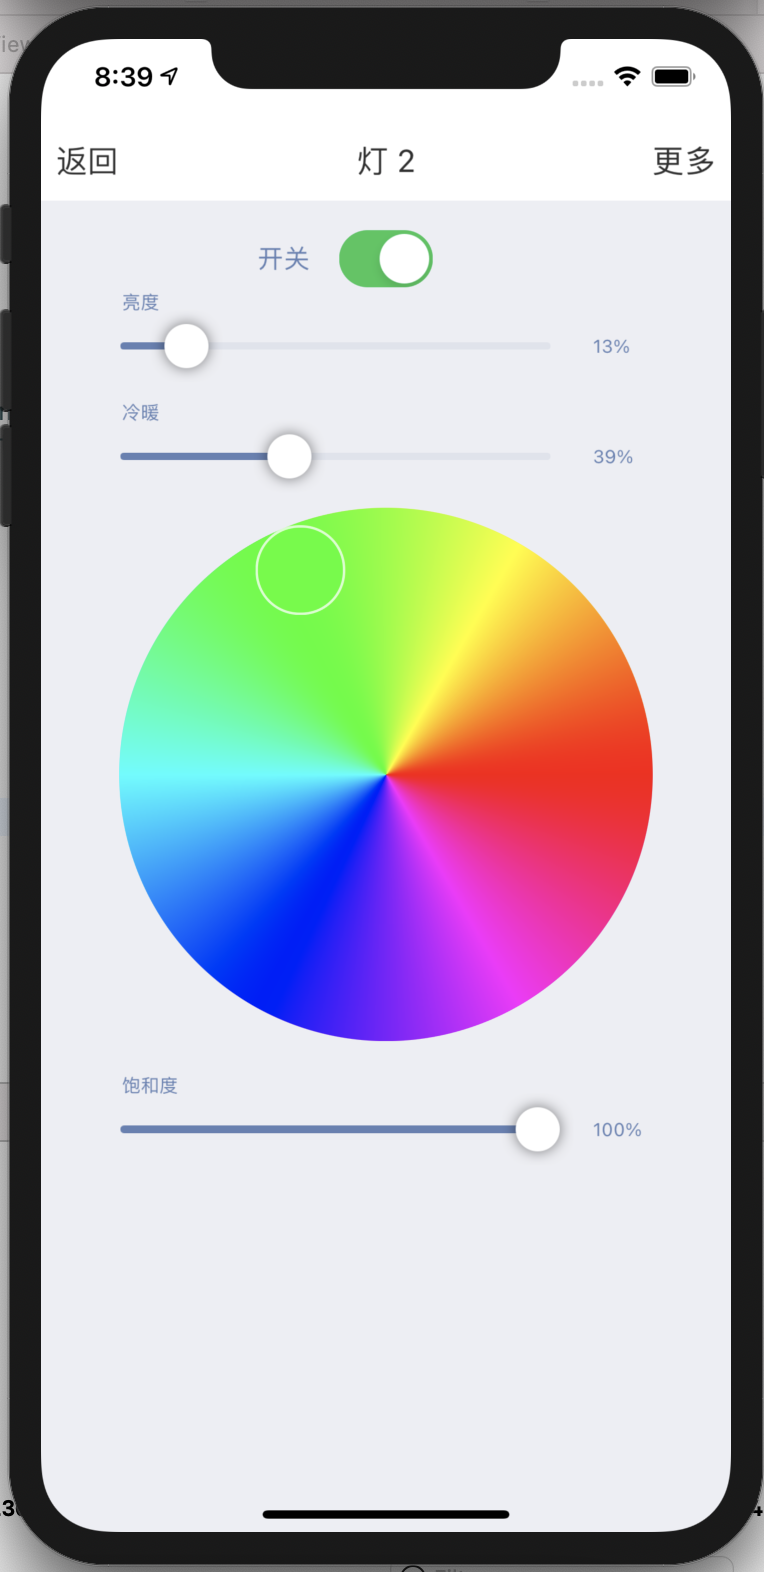
智能灯控制页面的如果下图所示:

按以下示例设置 DP:
NSString * const kLightSwtichDpId = @"1";/* 控制灯开关的 DP */
NSString * const kLightColorTypeDpId = @"2";/* 控制灯类型的 DP */

NSString * const kLightColorBrightDpId = @"3";/* 控制彩灯亮度的 DP */
NSString * const kLightColorTempDpId = @"4";/* 控制彩灯 temp 的 DP */

NSString * const kLightColorDpId = @"5";/* 控制灯色彩的 DP */
按以下示例设置开关操作:
- (void)switchAction:(UISwitch *)sender {
    // 开关操作
    WEAKSELF_AT
    [TPDemoProgressUtils showMessag:TYSDKDemoLocalizedString(@"loading", @"") toView:self.view];

    [self.device publishDps:@{kLightSwtichDpId:@(sender.isOn)} success:^{
        [TPDemoProgressUtils hideHUDForView:weakSelf_AT.view animated:NO];
    } failure:^(NSError *error) {
        [TPDemoProgressUtils hideHUDForView:weakSelf_AT.view animated:NO];
        [TPDemoProgressUtils showError:error.localizedDescription];
    }];
}
第 6 步:调节亮度、冷暖光、颜色、饱和度
无论是在白光模式还是彩光模式下,您都可以进行亮度调节,按以下示例进行亮度调节:
// Bright
NSDictionary *dps = self.device.deviceModel.dps;
if ([[dps objectForKey:kLightColorTypeDpId] isEqualToString:@"colour"]) {
    int ir,ig,ib;

    _hsvValue.v = value;

    HSVToRGB(_hsvValue.h, _hsvValue.s, _hsvValue.v, &ir, &ig, &ib);

    UIColor *resColor = RGBCOLOR(ir, ig, ib);

    NSString *dpsString = [NSString stringWithFormat:@"%@%@",
                           [[[resColor hexStringFromColor] lowercaseString] substringFromIndex:1],
                           [self getHexStringFromHSV:_hsvValue]];

    publishDps = @{
                     kLightSwtichDpId:@(YES),
                     kLightColorDpId:dpsString,
                     kLightColorTypeDpId:@"colour"
                     };

} else {
    CGFloat tempV = (value * 100 - 1)/(100.0-1.0) * (self.maxValue - self.minValue) + self.minValue;
    int val = [self round:tempV];
    publishDps = @{
                  kLightSwtichDpId:@(YES),
                  kLightColorBrightDpId:@(val),
                  kLightColorTypeDpId:@"white",
                  };
}

[self.device publishDps:publishDps success:^{

} failure:^(NSError *error) {

}];
如果是调节灯具的冷暖光,则只能在白光模式下进行,按以下示例调节冷暖光:
// Temperature
int dpsInt = (int)(value * (self.tempMaxValue - self.tempMinValue) + self.tempMinValue);
publishDps = @{
    kLightColorTypeDpId:@"white",
    kLightColorTempDpId:@(dpsInt)
};

[self.device publishDps:publishDps success:^{

} failure:^(NSError *error) {

}];
如果是调节灯具的光颜色,则只能在彩光模式下进行,按以下示例调节光颜色:
#pragma mark - RSColorPickerViewDelegate
- (void)colorPickerDidChangeSelection:(RSColorPickerView *)colorPicker {

    NSDictionary *dps = self.device.deviceModel.dps;

    BOOL isSwitch = [[dps objectForKey:kLightSwtichDpId] tysdk_toBool];

    if (!isSwitch) {
        return;
    }

    HSVType hsv = [self.class getHSVFromUIColor:colorPicker.selectionColor];

    _hsvValue.h = hsv.h;
    _hsvValue.s = hsv.s;
    _currentH = hsv.h;

    if (_hsvValue.v == 0) {
        _hsvValue.v = 1;
    }

    int r, g, b;

    HSVToRGB(_hsvValue.h, _hsvValue.s, _hsvValue.v, &r, &g, &b);

    NSString *dpsString = [NSString stringWithFormat:@"%02x%02x%02x%@",
                           (unsigned int)r,
                           (unsigned int)g,
                           (unsigned int)b,
                           [self getHexStringFromHSV:_hsvValue]];

    NSDictionary *publishDps = @{
                                 kLightColorDpId:dpsString,
                                 kLightColorTypeDpId:@"colour",
                                 };

    [self.device publishDps:publishDps success:^{

    } failure:^(NSError *error) {

    }];
}
如果是调节灯具的光饱和度,则只能在彩光模式下进行,按以下示例调节光颜色饱和度:
// Saturation
_hsvValue.s = value;

if (_hsvValue.v == 0) {
    _hsvValue.v = 1;
}
int r, g, b;
HSVToRGB(_hsvValue.h, _hsvValue.s, _hsvValue.v, &r, &g, &b);

NSString *dpsString = [NSString stringWithFormat:@"%02x%02x%02x%@",
                       (unsigned int)r,
                       (unsigned int)g,
                       (unsigned int)b,
                       [self getHexStringFromHSV:_hsvValue]];

publishDps = @{
                 kLightColorDpId:dpsString,
                 kLightColorTypeDpId:@"colour",
             };
[self.device publishDps:publishDps success:^{

} failure:^(NSError *error) {

}];
按以下示例进行智能灯状态变化回调刷新:
#pragma mark - TuyaSmartDeviceDelegate

/// DP 数据更新
- (void)device:(TuyaSmartDevice *)device dpsUpdate:(NSDictionary *)dps {
    [self reloadData];
}

- (void)reloadData {

    _hsvValue = [self getHSVFromDpId:kLightColorDpId];

    NSDictionary *dps = self.device.deviceModel.dps;
    BOOL isSwitch = [[dps objectForKey:kLightSwtichDpId] boolValue];
    [self.switchButton setOn:isSwitch];

    double brightnessValue = [self getBrightness:dps];
    [self.brightSliderView setSliderValue:brightnessValue];

    double tempValue = [self getTempValue:[[dps objectForKey:kLightColorTempDpId] doubleValue]];
    [self.tempSliderView setSliderValue:tempValue];

    HSVType hsv = [self getHSVFromDpId:kLightColorDpId];
    UIColor *color = [self getColorFromDpId:kLightColorDpId];

    NSLog(@" h : %f, s : %f, v : %f, color : %@", hsv.h, hsv.s, hsv.v, color);
    if (fabs(roundf(hsv.h) - roundf(_currentH)) > 1) {

        _currentH = hsv.h;

        self.colorPicker.selectionColor = color;
        self.colorPicker.brightness = 1;
        self.colorPicker.opaque = YES;
    }

    [self.saturationSliderView setSliderValue:hsv.s];
}
该内容对您有帮助吗?
是我要提建议


