前提条件
- 已阅读 Ray 新手村任务,了解 Ray 框架的基础知识。
- 已阅读 使用 Ray 开发万能面板,了解 Ray 面板开发的基础知识。
构建内容
在 Codelab 中,您可以利用面板小程序开发构建出一个支持 1-5 路标准能力的照明光源品类面板,并结合智能设备模型及功能页等能力,快速实现以下功能:
- 调光
- 收藏颜色
- 断电记忆
- 停电勿扰
- 开关渐变
- 倒计时
- 云定时
学习内容
- 如何创建一个照明光源产品。
- 如何使用光源模板快速初始化一个面板项目。
- 如何配合智能设备模型快速实现调光功能。
- 如何实现收藏颜色的功能。
- 如何实现同时兼容 1-5 路灯。
- 如何借助功能页快速实现倒计时和定时功能。
所需条件
- 智能生活 App
- Tuya MiniApp IDE
- NVM 及 Node 开发环境(建议使用 16.x 系列版本)
- Yarn 依赖管理工具
详见 面板小程序 > 搭建环境。
产品名称:照明光源一至五路灯
产品介绍
根据支持的白光、彩光 DP 不同,照明中灯分为一路至五路。
其含义为:
- 五路:支持彩光
colour_data、白光亮度bright_value、白光色温temp_value。 - 四路:支持彩光、白光亮度。
- 三路:支持彩光。
- 二路:支持白光亮度、白光色温。
- 一路:支持白光亮度。
需求原型
- 开关:单击中间按钮切换
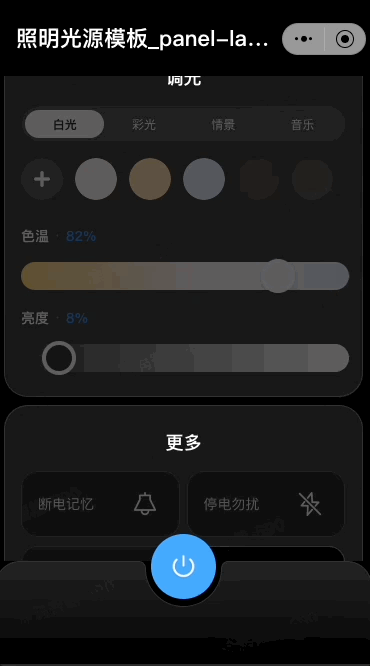
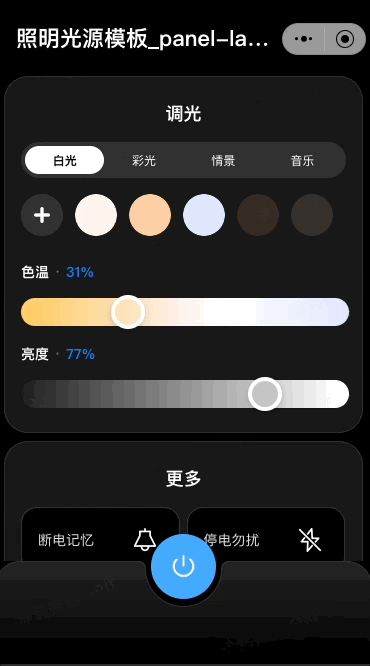
switch_led开关状态。 - 首页:页面分为调光、开关、更多功能(断电记忆、停电勿扰、开关渐变等),面板根据产品所配置的功能点进行动态适配展示:
- 存在
colour_data、bright_value、temp_valueDP 时,表现为五路产品,即显示彩光及白光亮度和色温。 - 存在
colour_data、bright_valueDP 时,表现为四路产品,即显示彩光及白光亮度。 - 只存在
colour_dataDP 时,表现为三路产品,即只显示彩光。 - 只存在
bright_value、temp_valueDP 时,表现为二路产品,即只显示白光亮度及色温。 - 只存在
bright_valueDP 时,表现为一路产品,只显示白光亮度。
- 存在
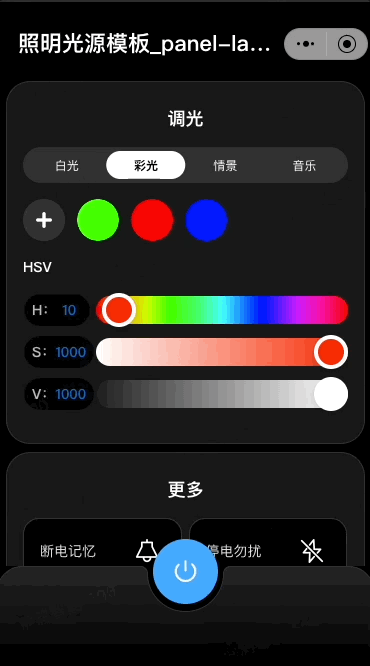
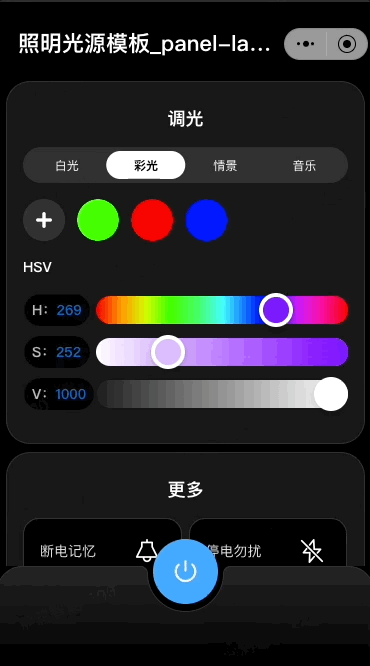
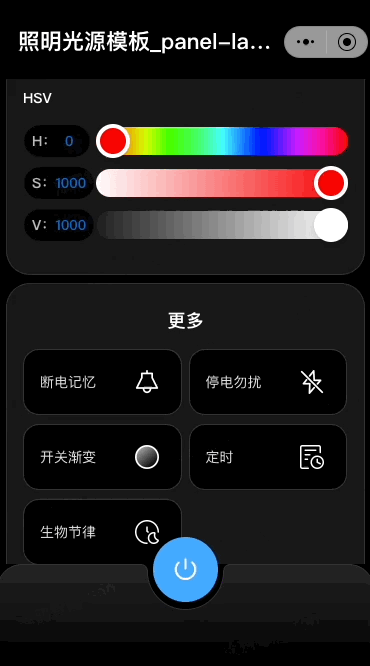
- 彩光调节:
- 第一个滑动条对应的是 HSV 模型中的 Hue(色相),对应范围为 0-360。
- 第二个滑动条对应的是 HSV 模型中的 Saturation(饱和度),对应范围为 0-1000。
- 第三个滑动条对应的是 HSV 模型中的 Value(明度),对应范围为 0-1000。
- 滑动滑条时,如果
control_data功能点存在,则通过control_data调节 DP 下发数据,该 DP 只下发不上报,需要通过节流控制每一条下发间隔 300ms,松手时下发colour_data彩光 DP。
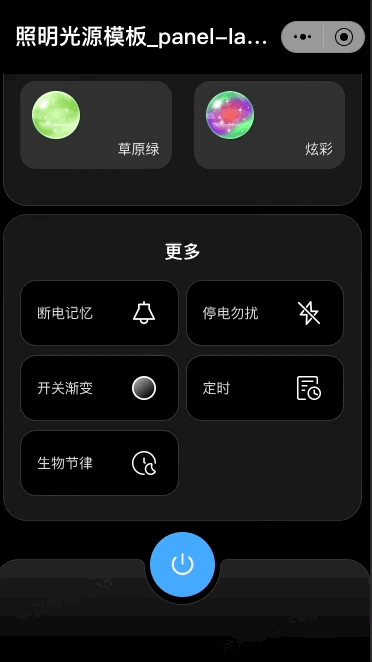
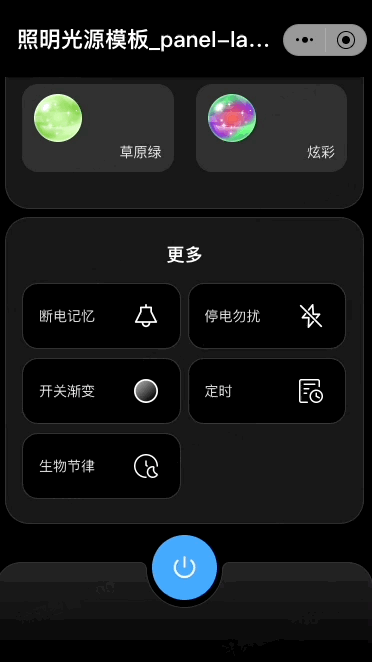
- 彩光收藏颜色:
- 彩光收藏颜色最大个数为 8 个,默认为红、绿、蓝三个颜色不可删除。
- 当有颜色为选中状态,且该颜色不是默认数据时,颜色中会出现删除按钮,再次单击选中颜色则将颜色删除。
- 添加时往云端存储当前的 HSV 数值,当添加颜色重复时出现弹窗显示添加重复。
- 选中状态会根据当前
colour_dataDP 去更新 Index 值。
- 白光调节:第一个滑动条对应色温,通过
control_data调节 DP 下发数据。该 DP 只下发不上报,松手时色温下发temp_value,亮度下发bright_valueDP。

- 白光收藏颜色:
- 白光收藏颜色最大个数为 8 个,默认为亮度 1000,色温 1000、500、0。
- 当不支持色温时(一路灯、四路灯),默认配置为色温:1000,亮度分别为 1000、500、0。
- 三个默认颜色不可删除。当有颜色为选中状态,且该颜色不是默认数据时,颜色中会出现删除按钮,再次单击选中颜色则将颜色删除。
- 添加时往云端存储当前的 HSV 数值,当添加颜色重复时出现弹窗显示添加重复。选中状态会根据当前
bright_value和temp_valueDP 去更新 Index 值。
- 断电记忆:用于设置在产品断电重启之后,是否存储记忆上回用户设置的颜色、亮度色温、场景模式等。设置断电记忆需要维持当前设置 5 秒方可生效,面板具有以下三个功能选项:
- 恢复记忆:恢复断电前的设备状态。
- 初始模式:使用产品默认配置的颜色和亮度。
- 用户定制:使用用户自定义的颜色和亮度,单击 用户定制 跳转至颜色和亮度的设置页,可实时预览灯光,选择完成后单击 保存,用户定制 区域的小图标会展示当前所选择的颜色。默认值为初始颜色和亮度,设置过之后则根据设置的颜色、亮度显示。更多详情可参考 照明通用文档 > 断电记忆功能说明。

- 停电勿扰:停电勿扰功能用于设置电源通断电时灯光开启的状态,支持对每次从电源开启的默认灯光状态进行设置。智能灯具在停电后再次来电时会自动亮灯,如果是在半夜来电,灯光亮起来时会惊扰到用户,影响睡眠,而停电勿扰功能则可以解决这个问题。更多详情可参考 照明通用文档 > 停电勿扰功能说明。

- 开关渐变:通过 App 控制灯的开关。目前可以通过开发者平台配置开关过程灯光是否渐变,但是渐变时间是固定的,不可调整。短时间内瞬间亮灯或灭灯,会使用户感觉灯光比较刺眼,影响用户使用感受。比如,在酒店场景下,客人进客房开灯的时候,开灯瞬间灯立刻亮起,灯光会特别刺眼。
- 云定时: 云定时功能,包括设定开关时间及周循环,无需硬件嵌入式开发,设备端只需实现定时开关功能,云端实现定时开关时间的设置和周循环的设置。需注意云定时和生物节律功能互斥,即云定时和生物节律功能不能同时开启。
- 倒计时: 倒计时功能设定后会下发
countdownDP,设备会在指定时间内自动开启或关闭。
- 生物节律: 生物节律功能可以模拟一天当中自然光亮度和色温的变化,让用户感受回归自然的灯光,需注意云定时和生物节律功能互斥,即云定时和生物节律功能不能同时开启,更多详情可参考 照明通用文档 > 生物节律功能说明。

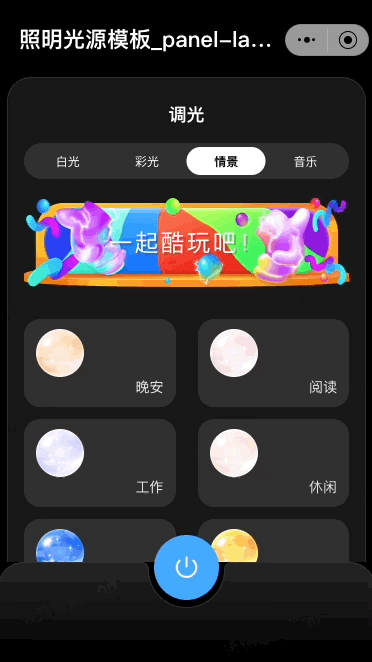
- 情景: 情景功能支持将设备一系列常用的灯光效果保存为情景,方便用户快速切换灯光效果。
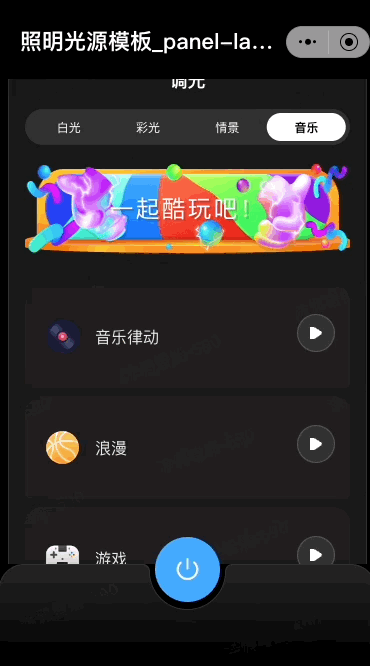
- 音乐律动: 音乐律动功能可以让设备的灯光跟随手机麦克风采集到的音乐的节奏变化,并组装好颜色数据下发给
music_dataDP,让用户感受音乐的魅力。
功能汇总
当前照明光源模板必须的功能点见下表,其中调光涉及的功能 bright_value 和 colour_data 必须存在任意一个,其他功能点可根据产品需求进行配置。
switch_led
work_mode
bright_value
colour_data
DP ID | 功能点名称 | 标识符 | 数据传输类型 | 数据类型 | 功能点属性 |
20 | 开关 | switch_led | 可下发可上报(rw) | bool | - |
21 | 模式 | work_mode | 可下发可上报(rw) | enum | 枚举值: white,colour,scene,music |
22 | 白光亮度 | bright_value | 可下发可上报(rw) | value | 数值范围: 10-1000,间距: 1,倍数: 0,单位: |
23 | 冷暖值 | temp_value | 可下发可上报(rw) | value | 数值范围: 0-1000,间距: 1,倍数: 0,单位: |
24 | 彩光 | colour_data | 可下发可上报(rw) | string | - |
25 | 场景 | scene_data | 可下发可上报(rw) | string | - |
26 | 倒计时 | countdown | 可下发可上报(rw) | value | 数值范围: 0-86400,间距: 1,倍数: 0,单位: s |
27 | 音乐律动 | music_data | 只下发(wr) | string | - |
28 | 实时调节 | control_data | 只下发(wr) | string | - |
30 | 生物节律 | rhythm_mode | 可下发可上报(rw) | raw | - |
33 | 断电记忆 | power_memory | 可下发可上报(rw) | raw | - |
34 | 停电勿扰 | do_not_disturb | 可下发可上报(rw) | bool | - |
35 | 开关渐变 | switch_gradient | 可下发可上报(rw) | raw | - |
对于部分 raw 类型功能点,建议查看具体协议描述,以便更好地进行开发。

首先需要创建一个产品,定义产品有哪些功能点,然后再在面板中一一实现这些功能点。
注册登录 涂鸦开发者平台,并在平台创建产品:
- 单击页面左侧 产品 > 产品开发,在 产品开发 页面单击 创建产品。
- 在 标准类目 下选择 照明,产品品类选择 光源,然后选择智能化方式和产品方案,并完善产品信息。
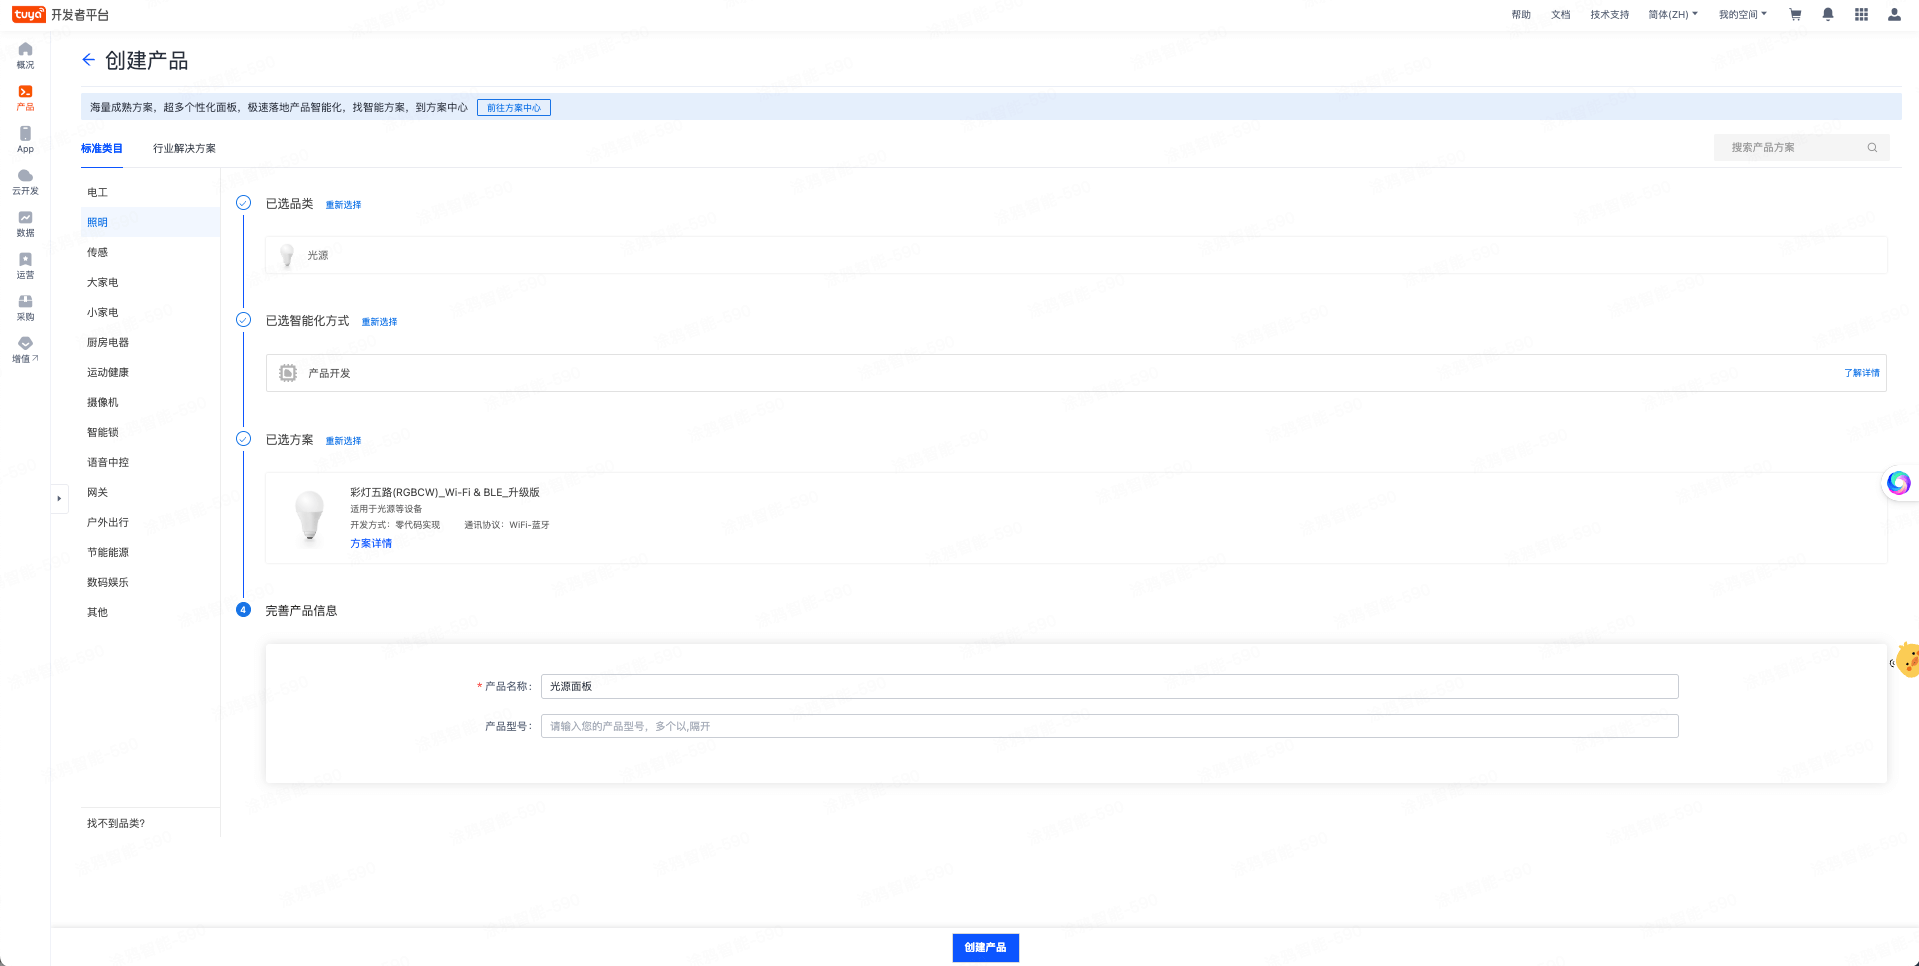
- 单击 创建产品 按钮,完成产品创建。
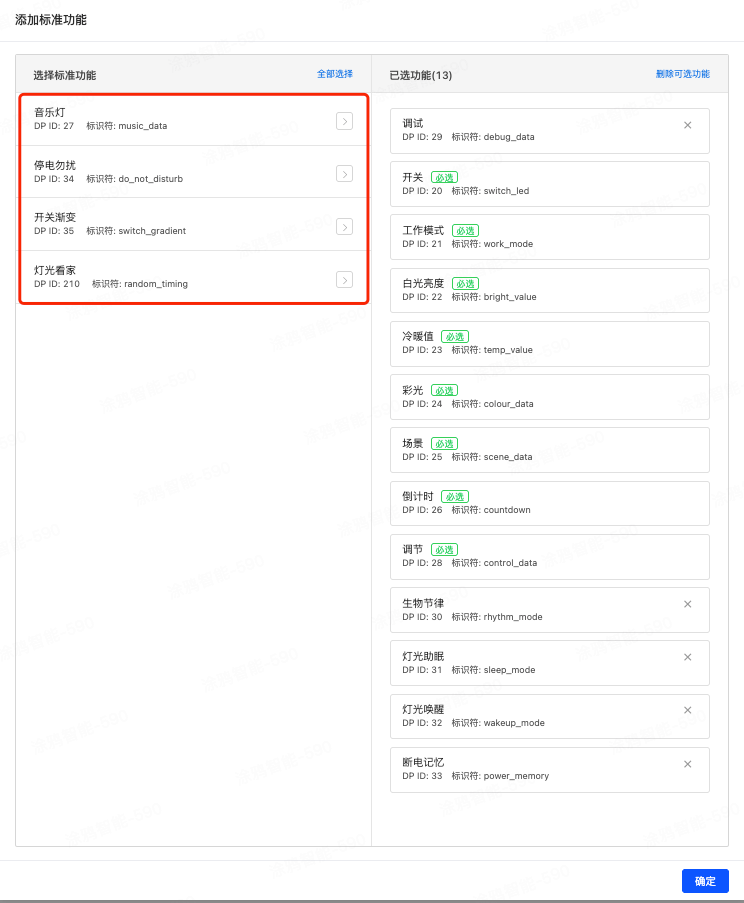
- 产品创建完成后,进入到 添加标准功能 页面,保持默认选择的标准功能即可,在后续实际开发过程中,可以根据实际需求自定义调整功能点。
🎉 在这一步,成功完成创建了一个照明光源产品。
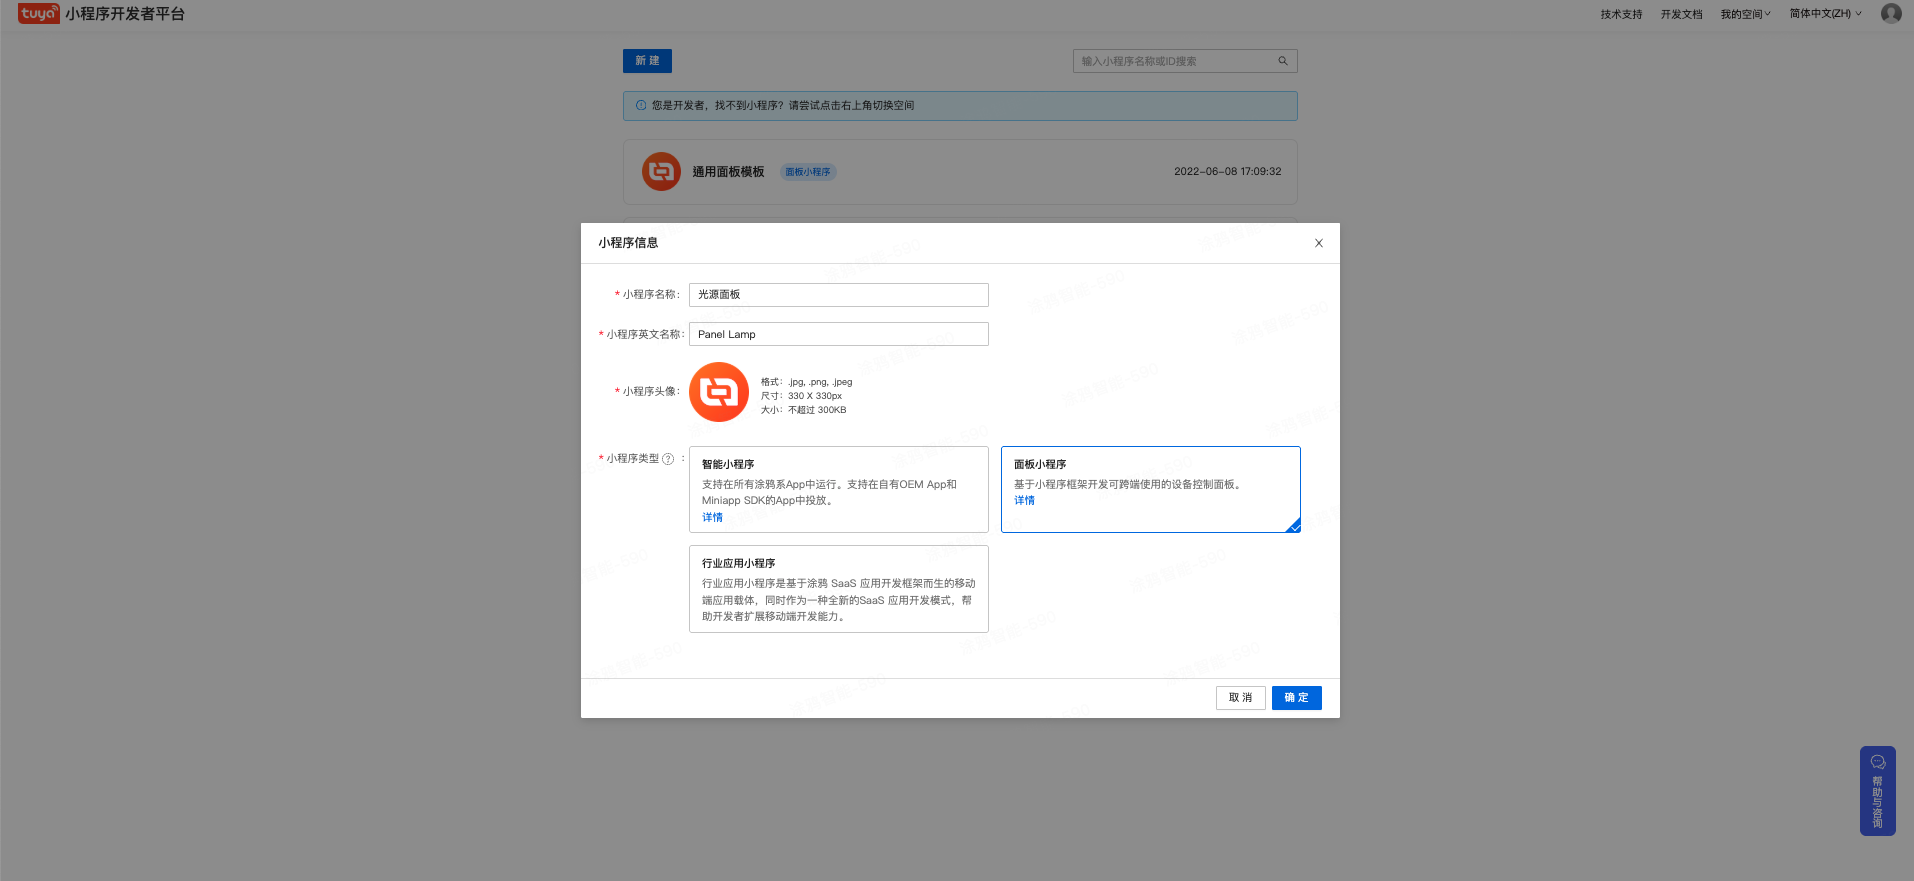
开发者平台创建面板小程序
面板小程序的开发在 小程序开发者 平台上进行操作,首先请前往 小程序开发者平台 完成平台的注册登录。
详细操作步骤可以参考 面板小程序 > 创建面板小程序。
IDE 基于模板创建项目
照明光源模板的仓库地址,请参考 仓库地址。
- 打开 IDE,单击 新建,输入项目名称,选择要关联的面板小程序和调试产品,然后单击 下一步。
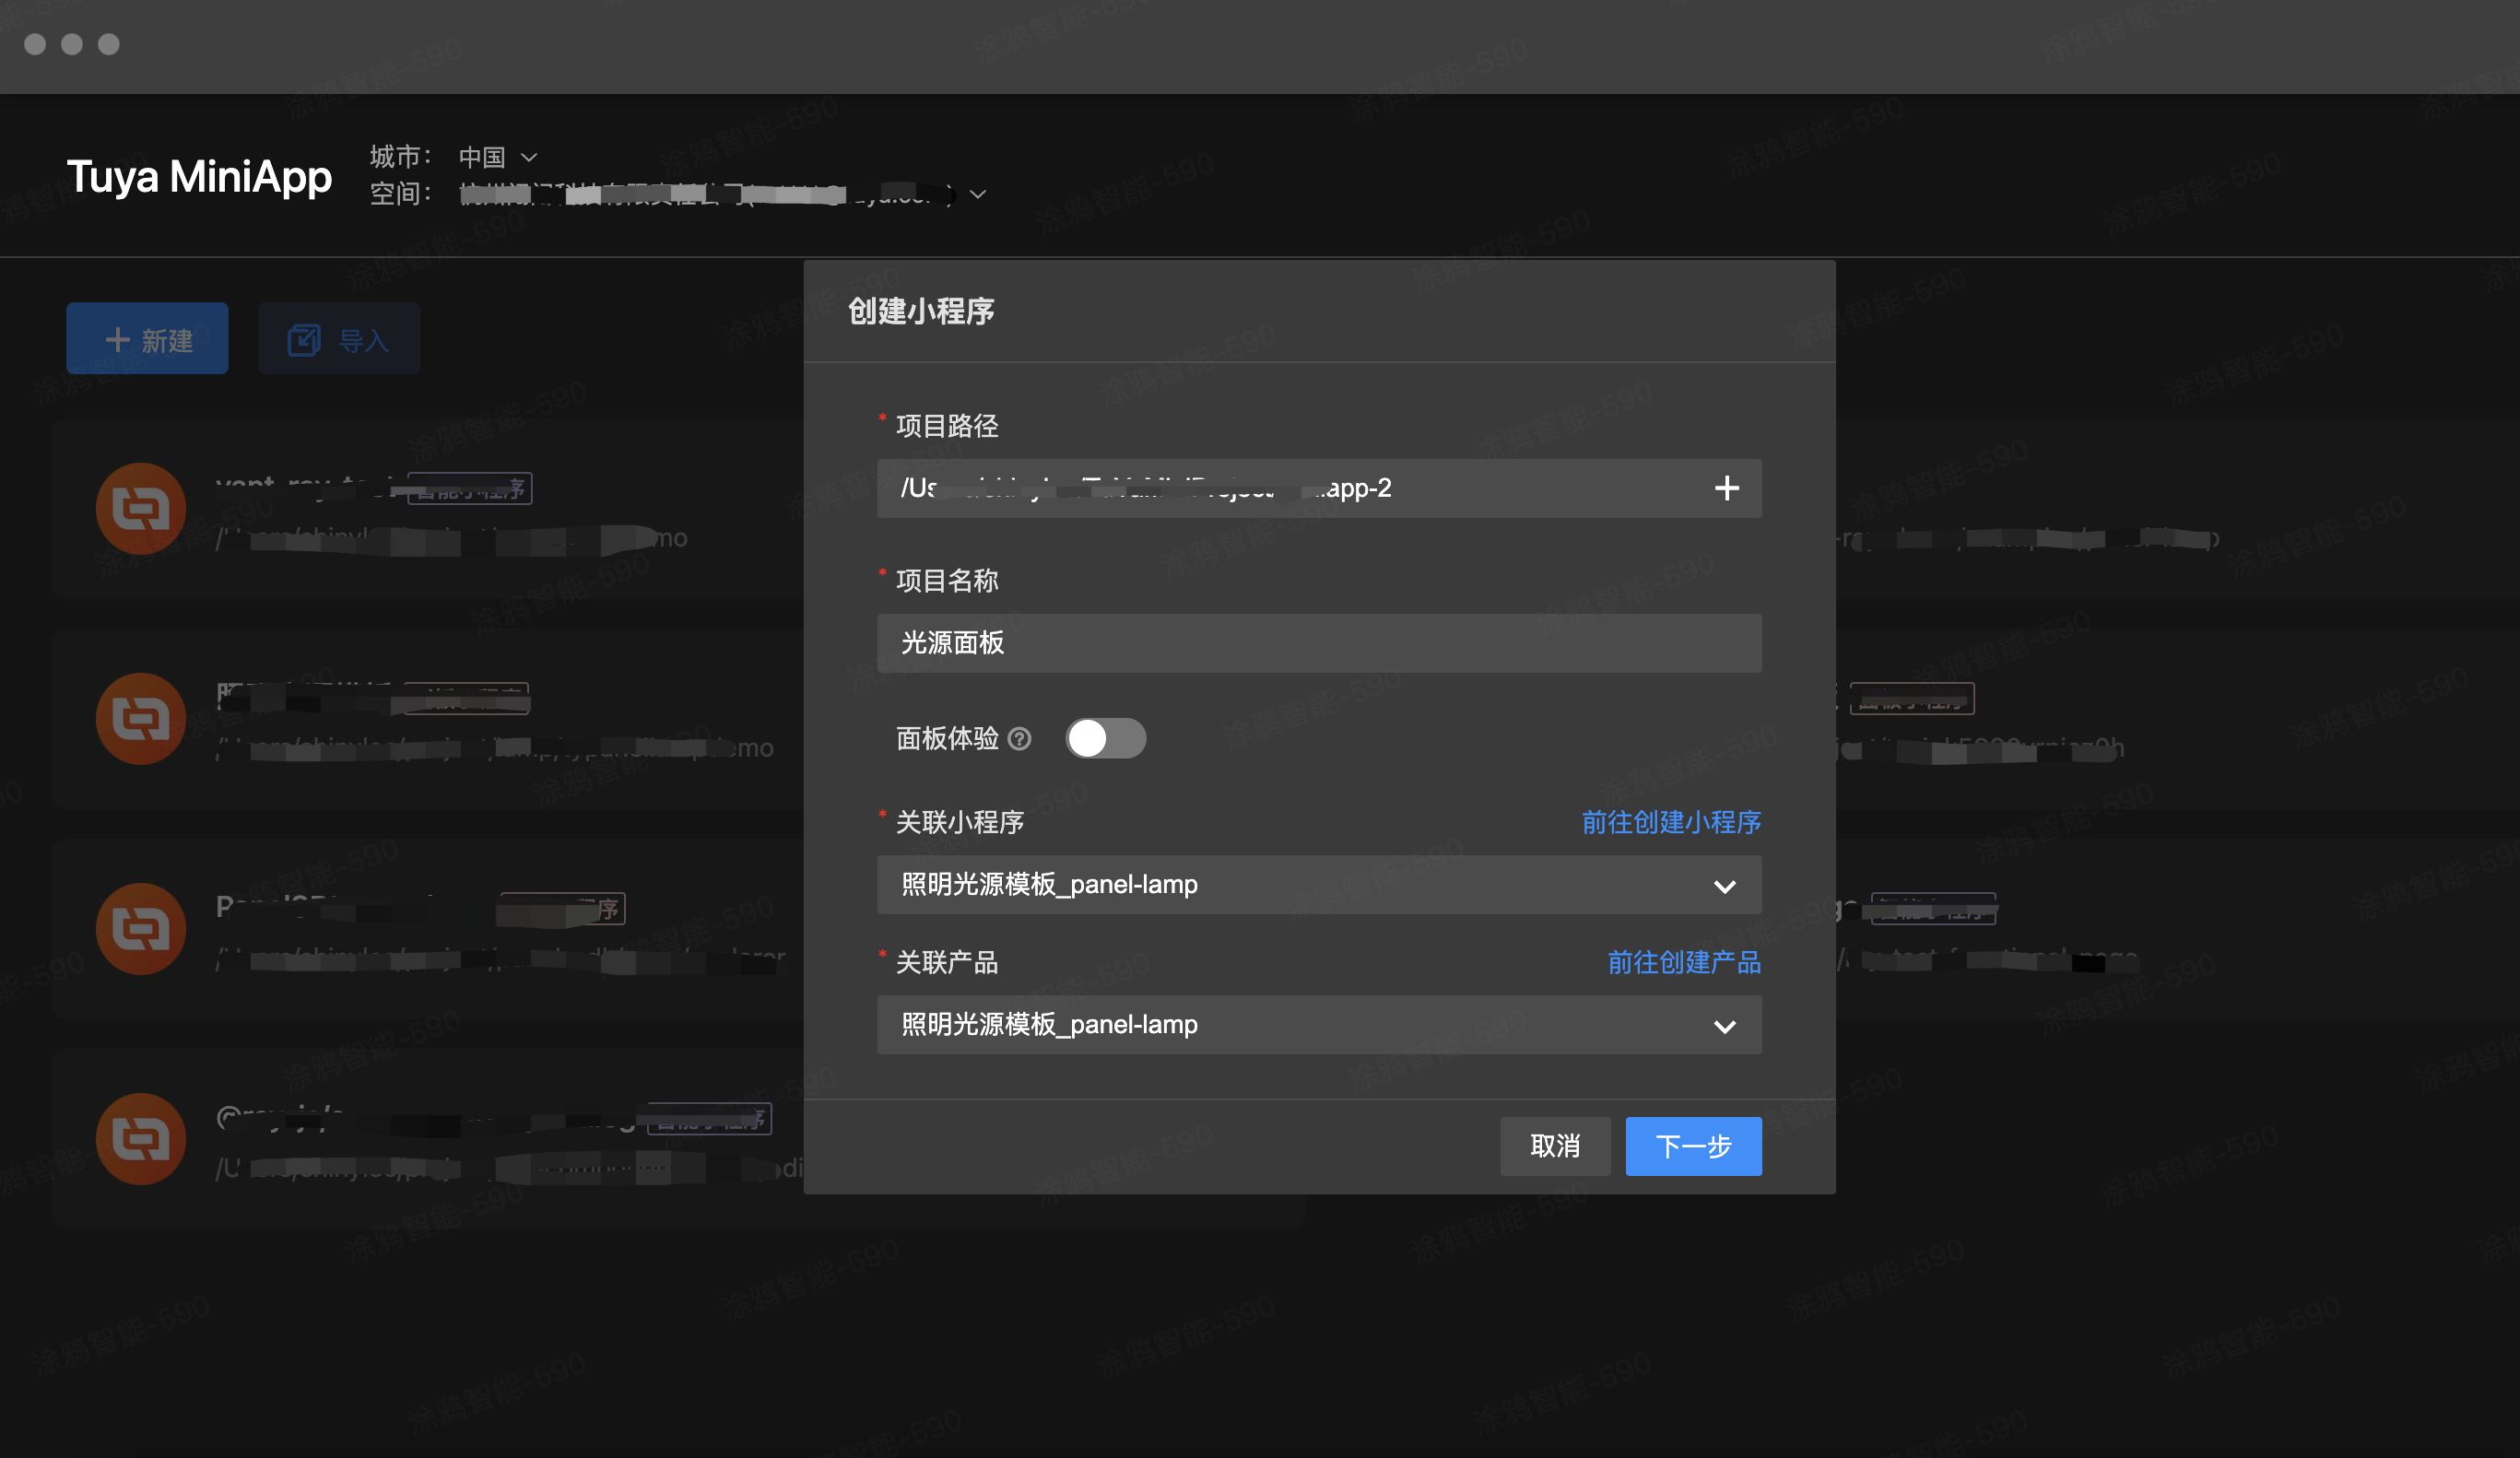
- 在 选择模板 页面,选择 通用照明光源模板,单击 创建 ,IDE 会自动安装依赖并构建项目。

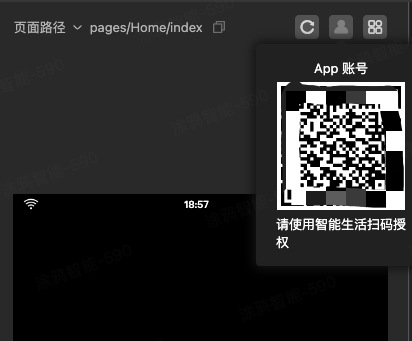
- 首次进入项目开发后,单击账户图标,出现二维码后,使用 智能生活 App 扫描二维码授权登录,用于授权 IDE 访问及控制智能设备。
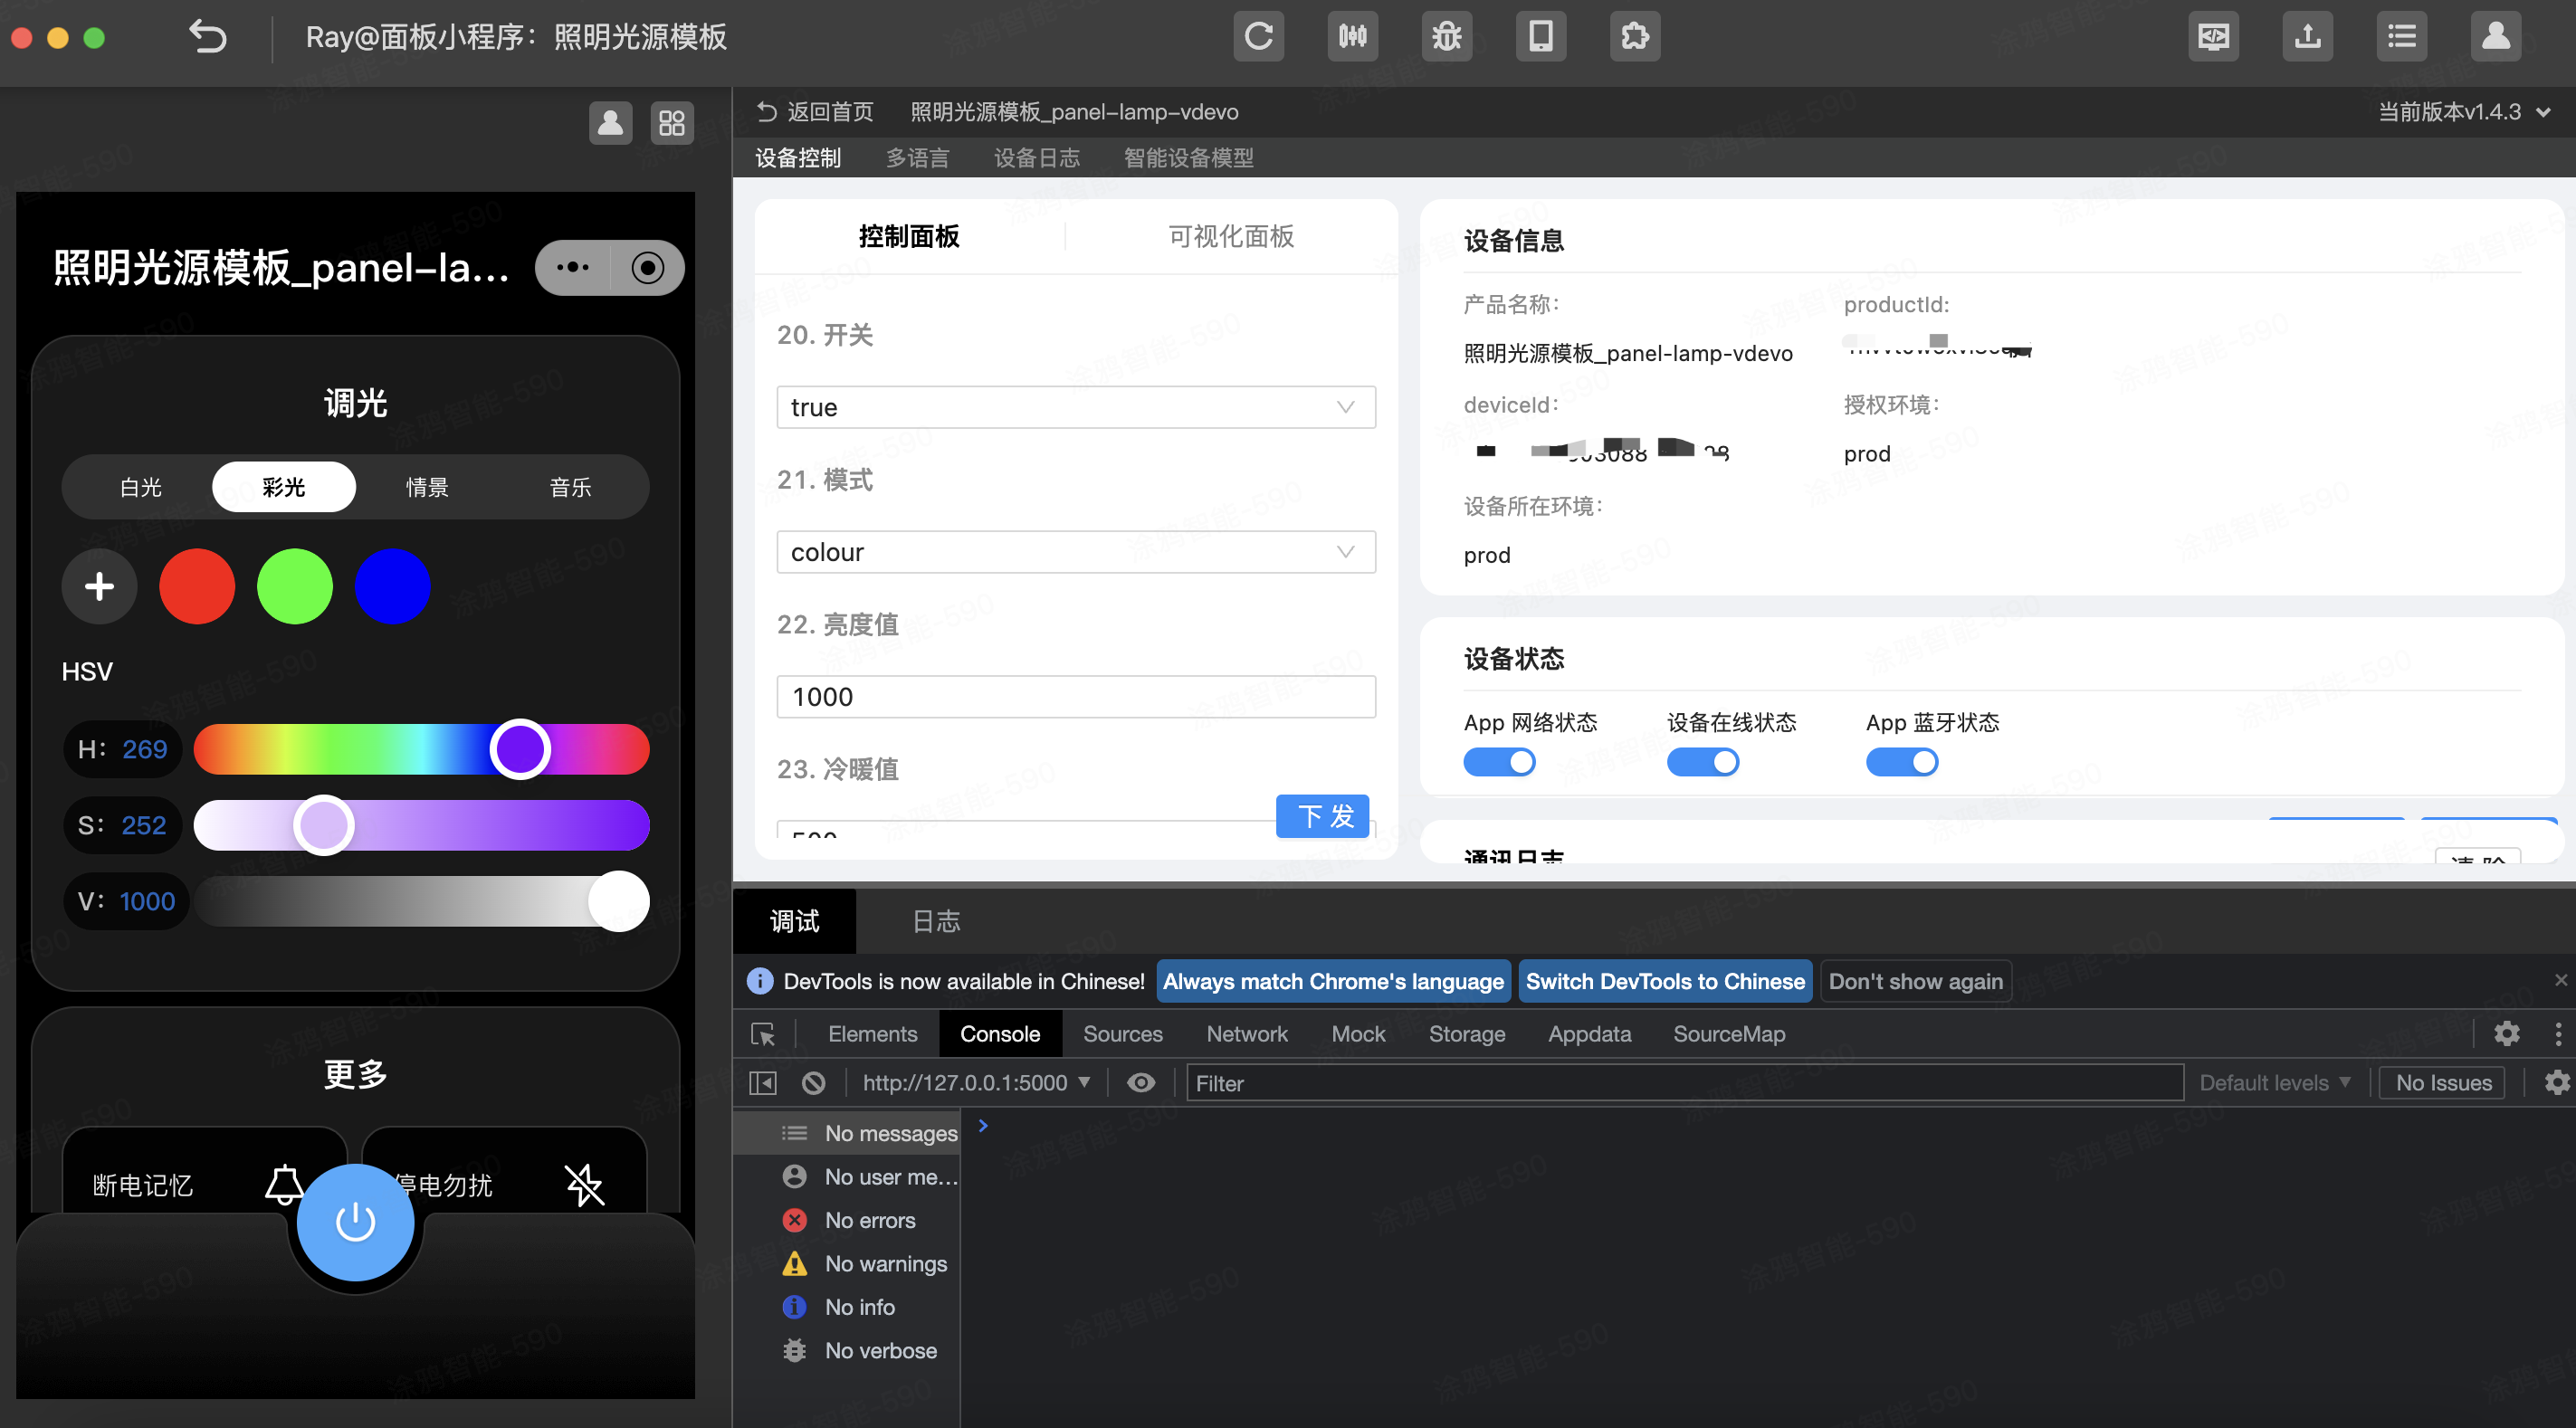
- 如果当前授权 App 的家庭列表中不存在和当前关联产品匹配的设备,则需要手动添加一个虚拟设备,用于开发环境进行调试。

- 添加完虚拟设备后,出现如下图所示的信息,即说明项目创建成功。
工程目录
完成以上步骤后,一个面板小程序的开发模板初始化完成。在开始实现调光功能之前,首先介绍一下工程目录。
.
├── public          # 静态资源目录
│   └── images
├── ray.config.ts   # Ray 配置文件
├── src
│   ├── api         # 定义一些通用的 API
│   ├── components  # 定义一些通用的组件
│   ├── config      # 定义一些通用的配置
│   ├── constant    # 定义一些通用的常量
│   ├── devices     # 定义当前设备模型,需结合 SDM 使用
│   ├── hooks       # 定义通用的一些 Hooks
│   ├── i18n        # 定义当前项目用到的多语言
│   ├── pages       # 定义当前项目的页面组件
│   ├── redux       # 状态管理 Redux 目录
│   ├── utils       # 定义一些通用的工具方法
│   ├── app.config.ts # 自动生成的文件配置,请勿修改
│   ├── app.less      # 小程序级别的 Less 配置
│   ├── app.tsx       # 根组件
│   ├── composeLayout.tsx # 处理通用业务逻辑的组件
│   ├── global.config.ts  # 小程序全局配置文件
│   ├── routes.config.ts  # 小程序路由配置文件
│   └── variables.less    # 小程序 Less 变量
├── typings               #业务类型定义目录
│   ├── lamp.d.ts         # 照明业务相关通用类型定义文件
│   ├── sdm.d.ts          # 智能设备类型定义文件
需求实现
生成产品定义文件(Schema)
参考代码见:src/devices/schema.ts
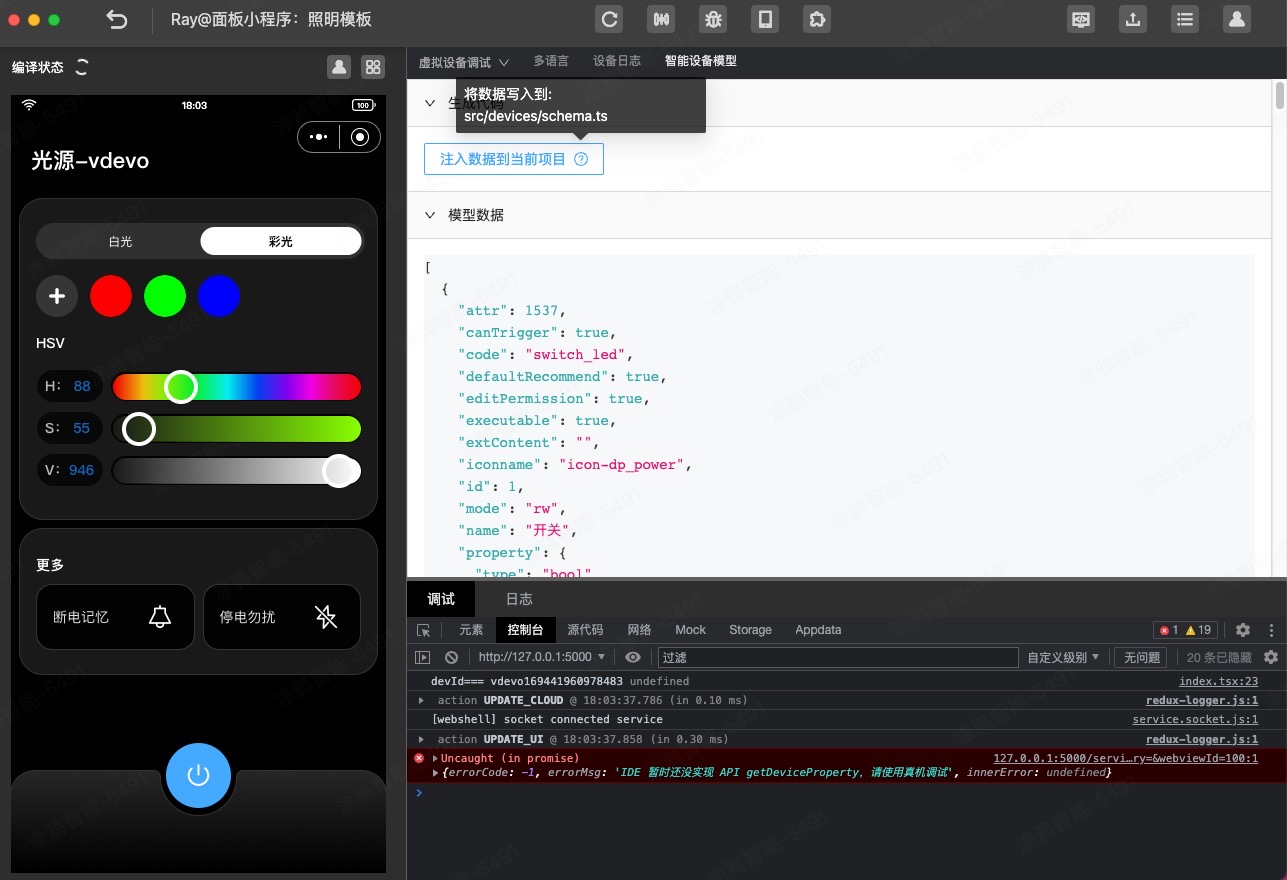
生成 SDM schema 至项目中,可以查看 src/devices/schema.ts,生成后使用配套的 useProps、useActions、useStructuredProps、useStructuredActions 等 Hooks 可以自动基于产品定义文件生成的 Schema 进行类型推断。
export const defaultSchema = [
	{
		attr: 641,
		canTrigger: true,
		code: "switch_led",
		defaultRecommend: true,
		editPermission: false,
		executable: true,
		extContent: "",
		iconname: "icon-dp_power",
		id: 20,
		mode: "rw",
		name: "开关",
		property: {
			type: "bool",
		},
		type: "obj",
	},
	{
		attr: 640,
		canTrigger: true,
		code: "work_mode",
		defaultRecommend: true,
		editPermission: false,
		executable: true,
		extContent: "",
		iconname: "icon-dp_mode",
		id: 21,
		mode: "rw",
		name: "模式",
		property: {
			range: ["white", "colour", "scene", "music"],
			type: "enum",
		},
		type: "obj",
	},
	// ...
] as const; // 注意此处要加上断言,以便获得更好的 TS 类型提示;
控制设备开关
参考代码见:src/components/ControlBar/index.tsx
- 添加开关按钮组件,使用
useProps获取设备当前switch_led开关的状态并展示不同的组件。 - 单击开关按钮组件时,使用
useActions下发设备当前switch_led开关状态。
示例:
import React from "react";
import { View } from "@ray-js/ray";
import { useProps, useActions } from "@ray-js/panel-sdk";

export default function () {
  // 获取当前设备的开关状态
	const power = useProps((props) => props.switch_led);
	const actions = useActions();

	const handleTogglePower = React.useCallback(() => {
		actions.switch_led.toggle({ throttle: 300 });
	}, []);

	return (
		<View style={{ flex: 1 }}>
			<View>switch_led: {power}</View>
			<View onClick={handleTogglePower}>点击切换开关状态</View>
		</View>
	);
}
调节滑动条控制设备彩光颜色
参考代码见:src/pages/Home/index.tsx、src/components/Dimmer/Colour/index.tsx
- 分别添加彩光、饱和度、亮度滑动条组件,使用
useStructuredProps获取设备当前colour_data数据里包含的 Hue、Saturation 和 Value。 - 滑动滑条时,使用
useStructuredActions下发设备当前colour_data数据中的特定数据。
详细的接入指南可参考:智能设备模型 > 复杂 DP 协议数据获取及下发
示例:
import React from "react";
import { View } from "@ray-js/ray";
import { useProps, useActions } from "@ray-js/panel-sdk";
import {
	LampColorSlider,
	LampSaturationSlider,
	LampBrightSlider,
} from "@ray-js/components-ty-lamp";

export default function () {
	const colour = useStructuredProps((props) => props.colour_data);
	const dpStructuredActions = useStructuredActions();

	const handleTouchEnd = React.useCallback(
		(type: "hue" | "saturation" | "value") => {
			return (v: number) => {
				dpStructuredActions[code].set(value, {
					throttle: 300,
					immediate: true,
				});
			};
		},
		[colour]
	);

	return (
		<View style={{ flex: 1 }}>
			<LampColorSlider
				value={colour?.hue ?? 1}
				onTouchEnd={handleTouchEnd("hue")}
			/>
			<LampSaturationSlider
				hue={colour?.hue ?? 1}
				value={colour?.saturation ?? 1}
				onTouchEnd={handleTouchEnd("saturation")}
			/>
			<LampBrightSlider
				value={colour?.value ?? 1}
				onTouchEnd={handleTouchEnd("value")}
			/>
		</View>
	);
}
查询收藏颜色数据
参考代码见:src/composeLayout.tsx
进入面板后,在根组件根据自定义 Key 查询当前设备收藏颜色数据,并将获取到的数据通过 设备存储能力 缓存到云端和 App 本地,最后借助 Redux 将收藏颜色数据维护本地的全局状态里,方便后续页面或组件复用。
import React, { Component } from "react";
import { Provider } from "react-redux";
import { showLoading, hideLoading } from "@ray-js/ray";
import { utils } from "@ray-js/panel-sdk";
import store from "@/redux";
import { devices, dpKit } from "@/devices";
import defaultConfig from "@/config/default";
import { initCloud } from "./redux/modules/cloudStateSlice";
import "./styles/index.less";
import { CLOUD_DATA_KEYS_MAP } from "./constant";

const { defaultColors, defaultWhite } = defaultConfig;

interface Props {
	devInfo: DevInfo;
	extraInfo?: Record<string, any>;
	preload?: boolean;
}

interface State {
	devInfo: DevInfo;
}

const composeLayout = (Comp: React.ComponentType<any>) => {
	return class PanelComponent extends Component<Props, State> {
		async onLaunch() {
			devices.lamp.init();
			devices.lamp.onInitialized((device) => {
				dpKit.init(device);
				this.initCloudData();
			});
		}

		/**
		 * 初始化设备维度缓存的云端数据,并同步到 Redux
		 */
		async initCloudData() {
			showLoading({ title: "" });
			const storageKeys = [
				CLOUD_DATA_KEYS_MAP.collectColors,
				CLOUD_DATA_KEYS_MAP.collectWhites,
			];
			return Promise.all(
				storageKeys.map((k) => devices.lamp.model.abilities.storage.get(k))
			)
				.then((data) => {
					// 在云端没有数据的情况下,使用默认值
					const cloudData = {
						[CLOUD_DATA_KEYS_MAP.collectColors]: [...defaultColors],
						[CLOUD_DATA_KEYS_MAP.collectWhites]: [...defaultWhite],
					} as Parameters<typeof initCloud>["0"];
					data.forEach((v, i) => {
						const storageKey = storageKeys[i];
						if (v) {
							const value = utils.parseJSON(v);
							cloudData[storageKey] = value?.data?.value;
						}
					});
					store.dispatch(initCloud(cloudData));
					hideLoading();
				})
				.catch((err) => {
					console.log("storage.get failed", err);
					hideLoading();
				});
		}

		render() {
			const { extraInfo } = this.props;

			return (
				<Provider store={store}>
					<Comp extraInfo={extraInfo} {...this.props} />
				</Provider>
			);
		}
	};
};

export default composeLayout;
写入收藏颜色数据
参考代码见:src/components/CollectColors/index.tsx
在后续添加或删除颜色时,将数据同步到云端,如下述代码所示,通过 Redux 配合 StorageAbility 实现了收藏颜色的本地全局状态和云端数据状态维护。
注意:设备缓存的数据存在上限,建议不要超过 256 个字符,最大不允许超过 1024 个字符,否则会出现存储失败。
import React, { useState, useEffect } from 'react';
import _ from 'lodash-es';
import { View, showModal, showToast } from '@ray-js/ray';
import { utils, useSupport } from '@ray-js/panel-sdk';
import { useUnmount } from 'ahooks';
import clsx from 'clsx';
import { useSelector } from 'react-redux';
import Strings from '@/i18n';
import { Button } from '@/components';
import { devices } from '@/devices';
import { CLOUD_DATA_KEYS_MAP } from '@/constant';
import { ReduxState, useAppDispatch } from '@/redux';
import {
  selectActiveIndex,
  updateColorIndex,
  updateWhiteIndex,
} from '@/redux/modules/uiStateSlice';
import {
  selectCollectColors,
  updateCollectColors,
  updateCollectWhites,
} from '@/redux/modules/cloudStateSlice';
import styles from './index.module.less';

const { hsv2rgbString, brightKelvin2rgb } = utils;

const MAX_LENGTH = 8;
const MIN_LENGTH = 3;

interface IProps {
  showAdd?: boolean;
  style?: React.CSSProperties;
  addStyle?: React.CSSProperties;
  disable?: boolean;
  isColor: boolean;
  colourData: COLOUR;
  brightness: number;
  temperature: number;
  chooseColor: (v: COLOUR & WHITE) => void;
  addColor?: () => void;
  deleteColor?: (v: any) => void;
}

export const CollectColors = (props: IProps) => {
  const {
    isColor,
    chooseColor,
    addColor,
    addStyle,
    deleteColor,
    showAdd = true,
    disable = false,
    colourData,
    brightness,
    temperature,
    style,
  } = props;
  const [animate, setAnimate] = useState(false);
  const support = useSupport();
  const dispatch = useAppDispatch();
  const activeIndex = useSelector((state: ReduxState) => selectActiveIndex(state, isColor));
  const collectColors = useSelector((state: ReduxState) => selectCollectColors(state, isColor));

  useEffect(() => {
    if (isColor) {
      const newColorIndex = collectColors?.findIndex(item => {
        const { hue: h, saturation: s, value: v } = item;
        const { hue, saturation, value } = colourData;
        return h === hue && saturation === s && value === v;
      });
      newColorIndex !== activeIndex && dispatch(updateColorIndex(newColorIndex));
    } else if (support.isSupportTemp()) {
      const newWhiteIndex = collectColors?.findIndex(item => {
        const { brightness: b, temperature: t } = item;
        return b === brightness && t === temperature;
      });
      newWhiteIndex !== activeIndex && dispatch(updateWhiteIndex(newWhiteIndex));
    } else {
      const newWhiteIndex = collectColors?.findIndex(item => {
        const { brightness: b } = item;
        return b === brightness;
      });
      newWhiteIndex !== activeIndex && dispatch(updateWhiteIndex(newWhiteIndex));
    }
  }, [colourData, temperature, brightness, isColor, collectColors]);

  useUnmount(() => {
    setAnimate(false);
  });

  const handleAddColor = () => {
    if (activeIndex > -1) {
      showModal({
        title: Strings.getLang('repeatColor'),
        cancelText: Strings.getLang('cancel'),
        confirmText: Strings.getLang('confirm'),
      });
    } else {
      const newList = [...collectColors, isColor ? { ...colourData } : { brightness, temperature }];
      const storageKey = isColor
        ? CLOUD_DATA_KEYS_MAP.collectColors
        : CLOUD_DATA_KEYS_MAP.collectWhites;
      devices.lamp.model.abilities.storage
        .set(storageKey, newList)
        .then(() => {
          if (isColor) {
            dispatch(updateColorIndex(newList.length - 1));
            dispatch(updateCollectColors(newList as ReduxState['cloudState']['collectColors']));
          } else {
            dispatch(updateWhiteIndex(newList.length - 1));
            dispatch(updateCollectWhites(newList as ReduxState['cloudState']['collectWhites']));
          }
        })
        .catch(err => {
          showToast({ title: Strings.getLang('addColorFailed') });
          console.log('storage.save addColor failed', err);
        });
    }
    addColor?.();
  };
  const handleDeleteColor = item => {
    const newList = _.cloneDeep(collectColors);
    if (activeIndex > -1) {
      newList.splice(activeIndex, 1);
      const storageKey = isColor
        ? CLOUD_DATA_KEYS_MAP.collectColors
        : CLOUD_DATA_KEYS_MAP.collectWhites;
      devices.lamp.model.abilities.storage
        .set(storageKey, newList)
        .then(() => {
          if (isColor) {
            dispatch(updateColorIndex(-1));
            dispatch(updateCollectColors(newList as ReduxState['cloudState']['collectColors']));
          } else {
            dispatch(updateWhiteIndex(-1));
            dispatch(updateCollectWhites(newList as ReduxState['cloudState']['collectWhites']));
          }
        })
        .catch(err => {
          console.log('storage.save deleteColor failed', err);
        });
    }
    deleteColor?.(item);
  };

  const handleChoose = (item, index) => {
    if (!disable) {
      chooseColor(item);
      if (isColor) dispatch(updateColorIndex(index));
      else dispatch(updateWhiteIndex(index));
      setAnimate(true);
    }
  };

  let isAddEnabled = collectColors.length < MAX_LENGTH && showAdd;
  if (!isColor && !support.isSupportTemp()) isAddEnabled = false; // 白光仅支持亮度的情况下不支持添加

  return (
    <View className={styles.row} style={style}>
      {isAddEnabled && (
        <Button
          img="/images/add_icon.png"
          imgClassName={styles.icon}
          className={clsx(styles.button, styles.add)}
          style={addStyle}
          onClick={handleAddColor}
        />
      )}
      <View
        className={styles.colorRow}
        style={{
          marginLeft: isAddEnabled ? 108 : 0,
        }}
      >
        <View style={{ display: 'flex' }}>
          {collectColors?.map((item, index) => {
            const isActive = index === activeIndex;
            const bg = isColor
              ? hsv2rgbString(
                  item.hue,
                  item.saturation / 10,
                  (200 + 800 * (item.value / 1000)) / 10
                )
              : brightKelvin2rgb(
                  200 + 800 * (item.brightness / 1000),
                  support.isSupportTemp() ? item.temperature : 1000,
                  { kelvinMin: 4000, kelvinMax: 8000 }
                );
            return (
              <View
                key={index}
                className={`${styles.circleBox} ${styles.button}`}
                style={{
                  marginRight: index === collectColors.length - 1 ? 0 : '24rpx',
                  border: isActive ? `4rpx solid ${bg}` : 'none',
                  background: 'transparent',
                  opacity: disable ? 0.4 : 1,
                }}
                onClick={() => handleChoose(item, index)}
              >
                <View
                  className={styles.circle}
                  style={{
                    backgroundColor: bg,
                    transform: `scale(${isActive ? 0.7 : 1})`,
                    transition: animate ? 'all .5s' : 'none',
                  }}
                />
                {index + 1 > MIN_LENGTH && isActive && (
                  <Button
                    img="/images/delete_icon.png"
                    imgClassName={styles.deleteIcon}
                    className={clsx(styles.button, styles.noBg)}
                    onClick={() => handleDeleteColor(item)}
                  />
                )}
              </View>
            );
          })}
        </View>
      </View>
    </View>
  );
};
参考代码见:src/components/Dimmer/White/index.tsx
通过 useSupport Hooks,可以快速判断当前设备是否支持某些功能,比如是否支持色温调节、是否支持亮度调节等,从而在 UI 层面进行功能自适配,如下述代码所示,通过 isSupportTemp 方法动态控制了色温滑块的渲染条件。因此,如果在运行的设备上不存在色温 DP 时,该色温滑块将会隐藏。
注意:在使用 useSupport 之前,需要在设备定义目录中,置入 SmartSupportAbility,参考 src/devices/index.ts。
import React from "react";
import { View } from "@ray-js/ray";
import { useProps, useActions, useSupport } from "@ray-js/panel-sdk";
import {
	LampColorSlider,
	LampSaturationSlider,
	LampBrightSlider,
} from "@ray-js/components-ty-lamp";

export default function () {
	const support = useSupport();
	const temperature = useProps((dpState) => dpState.temp_value);
	const actions = useActions();

	const handleTouchEnd = React.useCallback((temp) => {
		actions.temp_value.set(temp);
	}, []);

	return (
		<View style={{ flex: 1 }}>
			{support.isSupportTemp() && (
				<LampTempSlider value={temperature} onTouchEnd={handleTouchEnd} />
			)}
		</View>
	);
}
所以,想使一款设备面板同时适配 1-5 路灯,可以根据 1-5 路灯的产品定义,通过 useSupport 来判断当前设备支持的功能,然后根据支持的功能来动态渲染 UI。
配置倒计时及定时功能页
参考代码见:src/global.config.ts
通过在 global.config.ts 全局配置注入的 functionalPages 配置项,可以定时倒计时功能页的 appid 从而后续实现一行代码直接跳转到对应的功能页。
import { GlobalConfig } from '@ray-js/types';

export const tuya = {
  window: {
    backgroundColor: 'black',
    navigationBarTitleText: '',
    navigationBarBackgroundColor: 'white',
    navigationBarTextStyle: 'black',
  },
  functionalPages: {
    // 定时倒计时功能页
    rayScheduleFunctional: {
      appid: 'tyjks565yccrej3xvo',
    },
  },
};

const globalConfig: GlobalConfig = {
  basename: '',
};

export default globalConfig;
跳转倒计时及定时功能页
参考代码见:
通过 navigateTo 方法,可以直接跳转到定时倒计时功能页,如下述代码所示,通过 openScheduleFunctional 方法实现了一键跳转到定时倒计时功能页。
import { navigateTo } from '@ray-js/ray';
import { devices } from '@/devices';
import { getCachedLaunchOptions } from '@/api/getCachedLaunchOptions';
import { lampSchemaMap } from '@/devices/schema';

const { deviceId, groupId } = getCachedLaunchOptions()?.query ?? {};

export const openScheduleFunctional = async () => {
  const { support } = devices.lamp.model.abilities;
  const supportCountdown = support.isSupportDp(lampSchemaMap.countdown.code);
  const supportCloudTimer = support.isSupportCloudTimer();
  const supportRctTimer = false;
  const url = `functional://rayScheduleFunctional/home?deviceId=${deviceId ||
    ''}&groupId=${groupId ||
    ''}&cloudTimer=${supportCloudTimer}&rtcTimer=${supportRctTimer}&countdown=${supportCountdown}`;
  navigateTo({
    url,
    success(e) {
      console.log('navigateTo openScheduleFunctional success', e);
    },
    fail(e) {
      console.log('navigateTo openScheduleFunctional fail', e);
    },
  });
};
- 恭喜你 🎉 完成了本教程的学习!
- 有任何问题可以联系涂鸦智能小程序团队,下方是一些和本教程相关的链接,希望能帮助到你。