前提条件
- 已阅读 Ray 新手村任务,了解 Ray 框架的基础知识。
- 已阅读 使用 Ray 开发万能面板,了解 Ray 面板开发的基础知识。
构建内容
在 Codelab 中,您可以利用面板小程序开发构建出一个支持一键执行及自动化的无线开关面板,通过基于场景联动的能力,实现以下能力:
- 一键执行:在设备面板小程序中单击 UI 按钮时,通过一键执行触发执行其他设备的功能。
- 自动化:实现在实体按键操作(单击、双击、长按)后,批量控制多个关联设备的能力。
学习内容
- 如何创建一个无线开关产品。
- 如何使用一键执行模板快速初始化一个面板项目。
- 如何实现在面板小程序中动态渲染按键列表及其绑定状态。
- 如何实现在面板小程序中单击 UI 按钮时,一键控制其他关联的设备。
- 如何实现在实体按键操作(单击、双击、长按)后,批量控制多个关联设备。
前置准备
- 智能生活 App
- Tuya MiniApp IDE
- NVM 及 Node 开发环境(建议使用 16.x 系列版本)
- Yarn 依赖管理工具
更多详细介绍,请参考 面板小程序 > 搭建环境。
产品名称:无线开关
需求原型
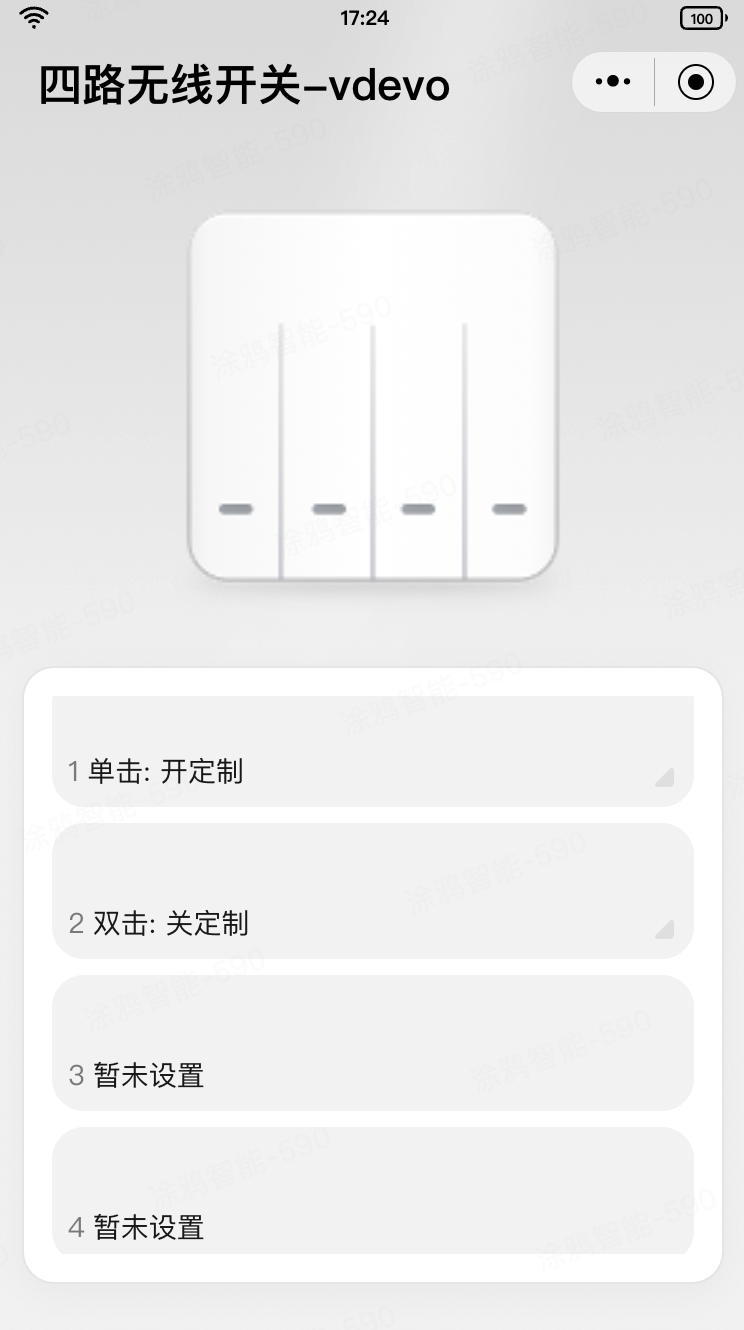
- 首页功能:
- 顶部展示当前设备的图片,中心区域展示设备的按键列表信息,并展示每个按键是否已经绑定了对应的一键执行场景。
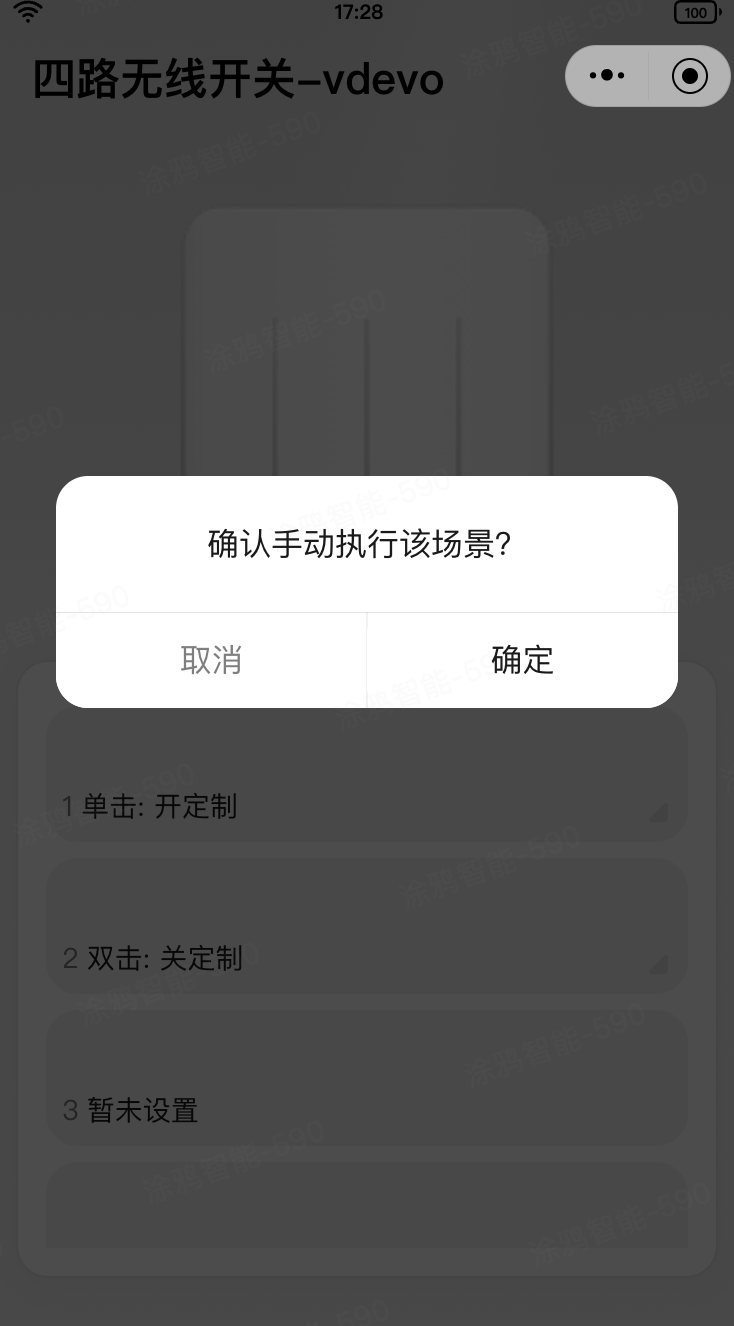
- 单击已绑定一键执行场景的按键后,展示确认手动执行场景的二次确认框。
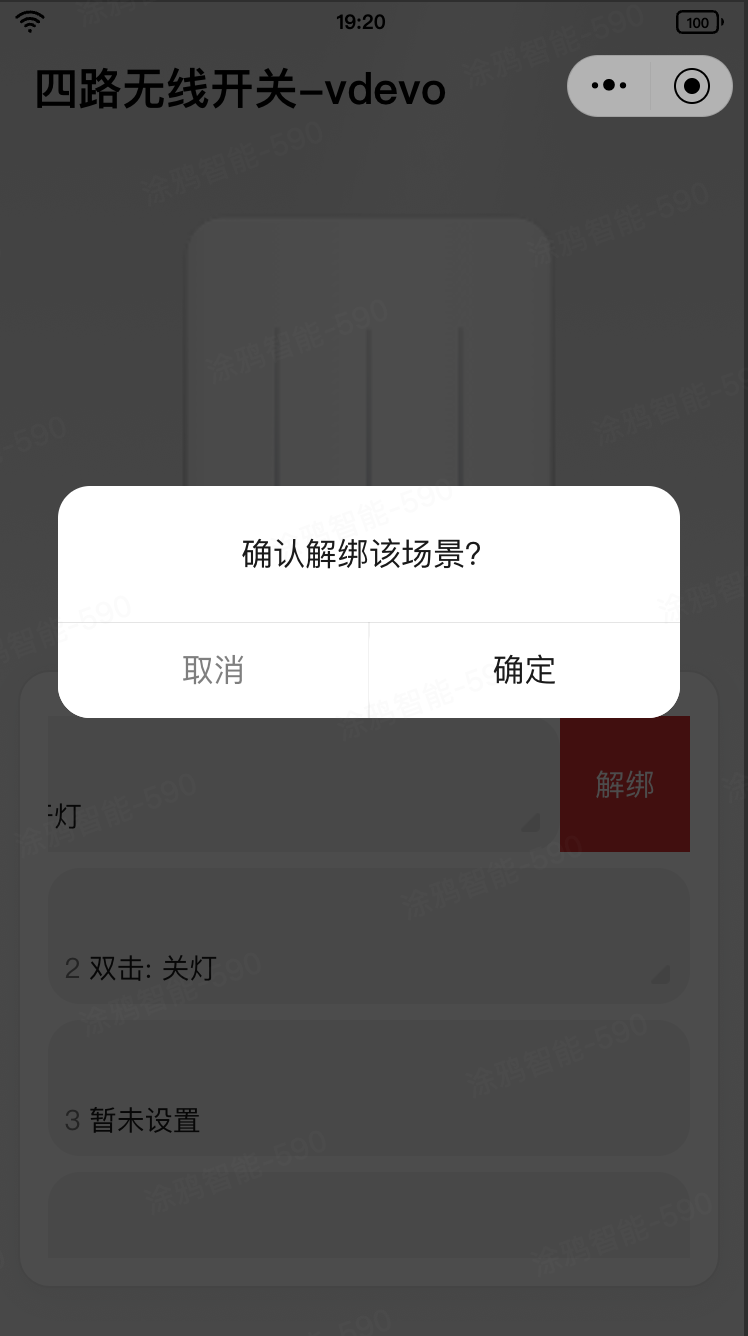
- 对于已绑定一键执行场景的按键,右滑列表项并单击 解绑,展示确认解绑的二次确认框。
- 对于已绑定一键执行场景的按键,单击其右下角的三角形按钮后,跳转进入一键执行场景的编辑页。
- 对于未绑定一键执行场景的按键,单击后展示选择触发开关场景的按键条件,选择好触发条件后则会跳转进入 选择联动 页面。
- 顶部展示当前设备的图片,中心区域展示设备的按键列表信息,并展示每个按键是否已经绑定了对应的一键执行场景。
- 选择联动 页功能:
- 列表中展示支持给当前开关按键绑定的所有一键执行类型的场景联动。
- 在按键的未选中状态,单击右下角的添加按钮,跳转进入 创建场景 页。
- 在按键的选中状态,单击右下角的添加按钮,跳转进入一键执行场景的编辑页。
- 单击 确认 会保存当前选择的状态,并返回首页。
- 列表中展示支持给当前开关按键绑定的所有一键执行类型的场景联动。
功能汇总
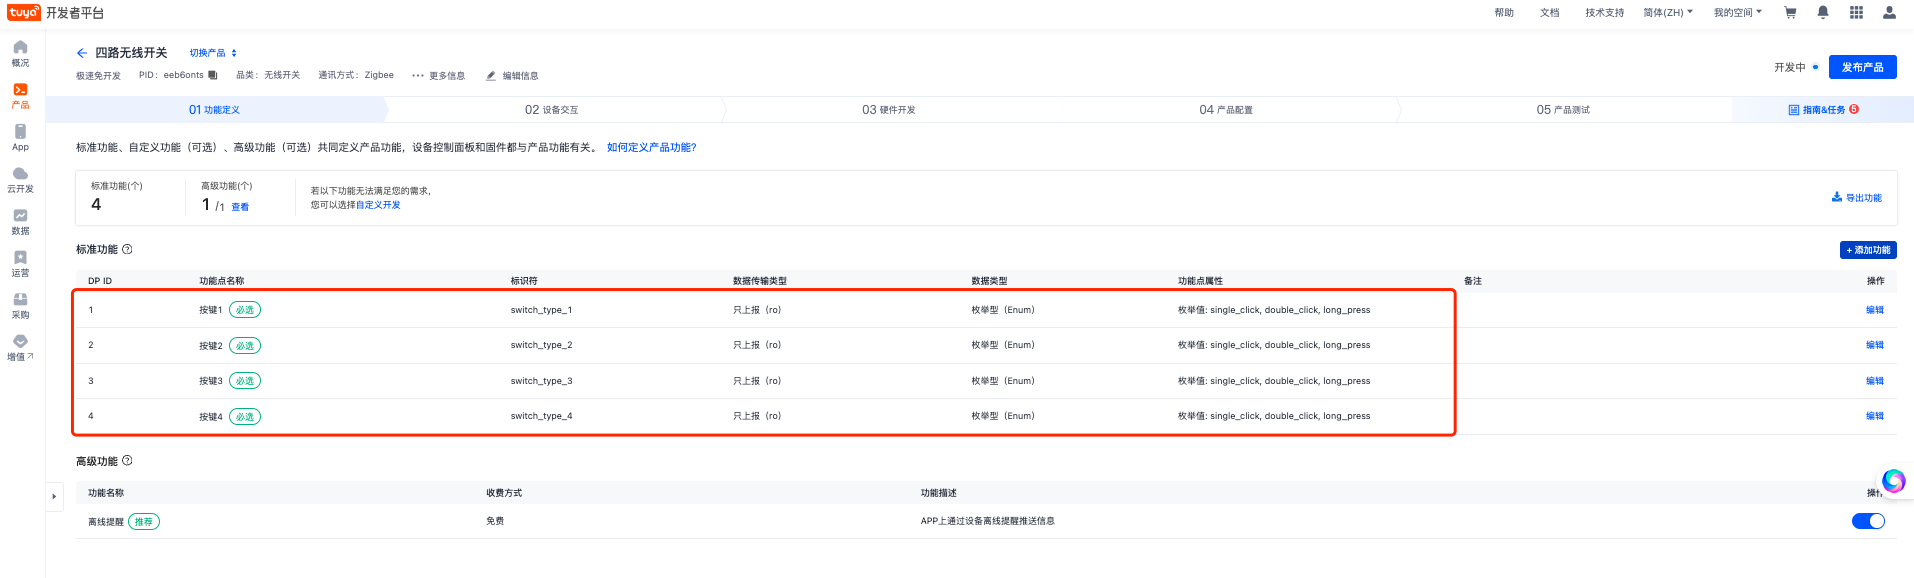
当前无线开关需要的功能点见下表,其中场景按键 DP 可以根据实际设备的长度自行删减,但注意必须为 switch_type_${btnId} 的格式。
DP ID | 功能点名称 | 标识符 | 数据传输类型 | 数据类型 | 功能点属性 |
1 | 按键 1 | switch_type_1 | 只上报(ro) | enum | 枚举值: single_click, double_click, long_press |
2 | 按键 2 | switch_type_2 | 只上报(ro) | enum | 枚举值: single_click, double_click, long_press |
3 | 按键 3 | switch_type_3 | 只上报(ro) | enum | 枚举值: single_click, double_click, long_press |
4 | 按键 4 | switch_type_4 | 只上报(ro) | enum | 枚举值: single_click, double_click, long_press |
首先需要创建一个产品,定义产品有哪些功能点,然后再在面板中一一实现这些功能点。
注册登录 涂鸦开发者平台,并在平台创建产品:
- 单击页面左侧 产品 > 产品开发,在 产品开发 页面单击 创建产品。
- 在 标准类目 下选择 电工,产品品类选择 无线开关,然后选择智能化方式和产品方案,并完善产品信息。
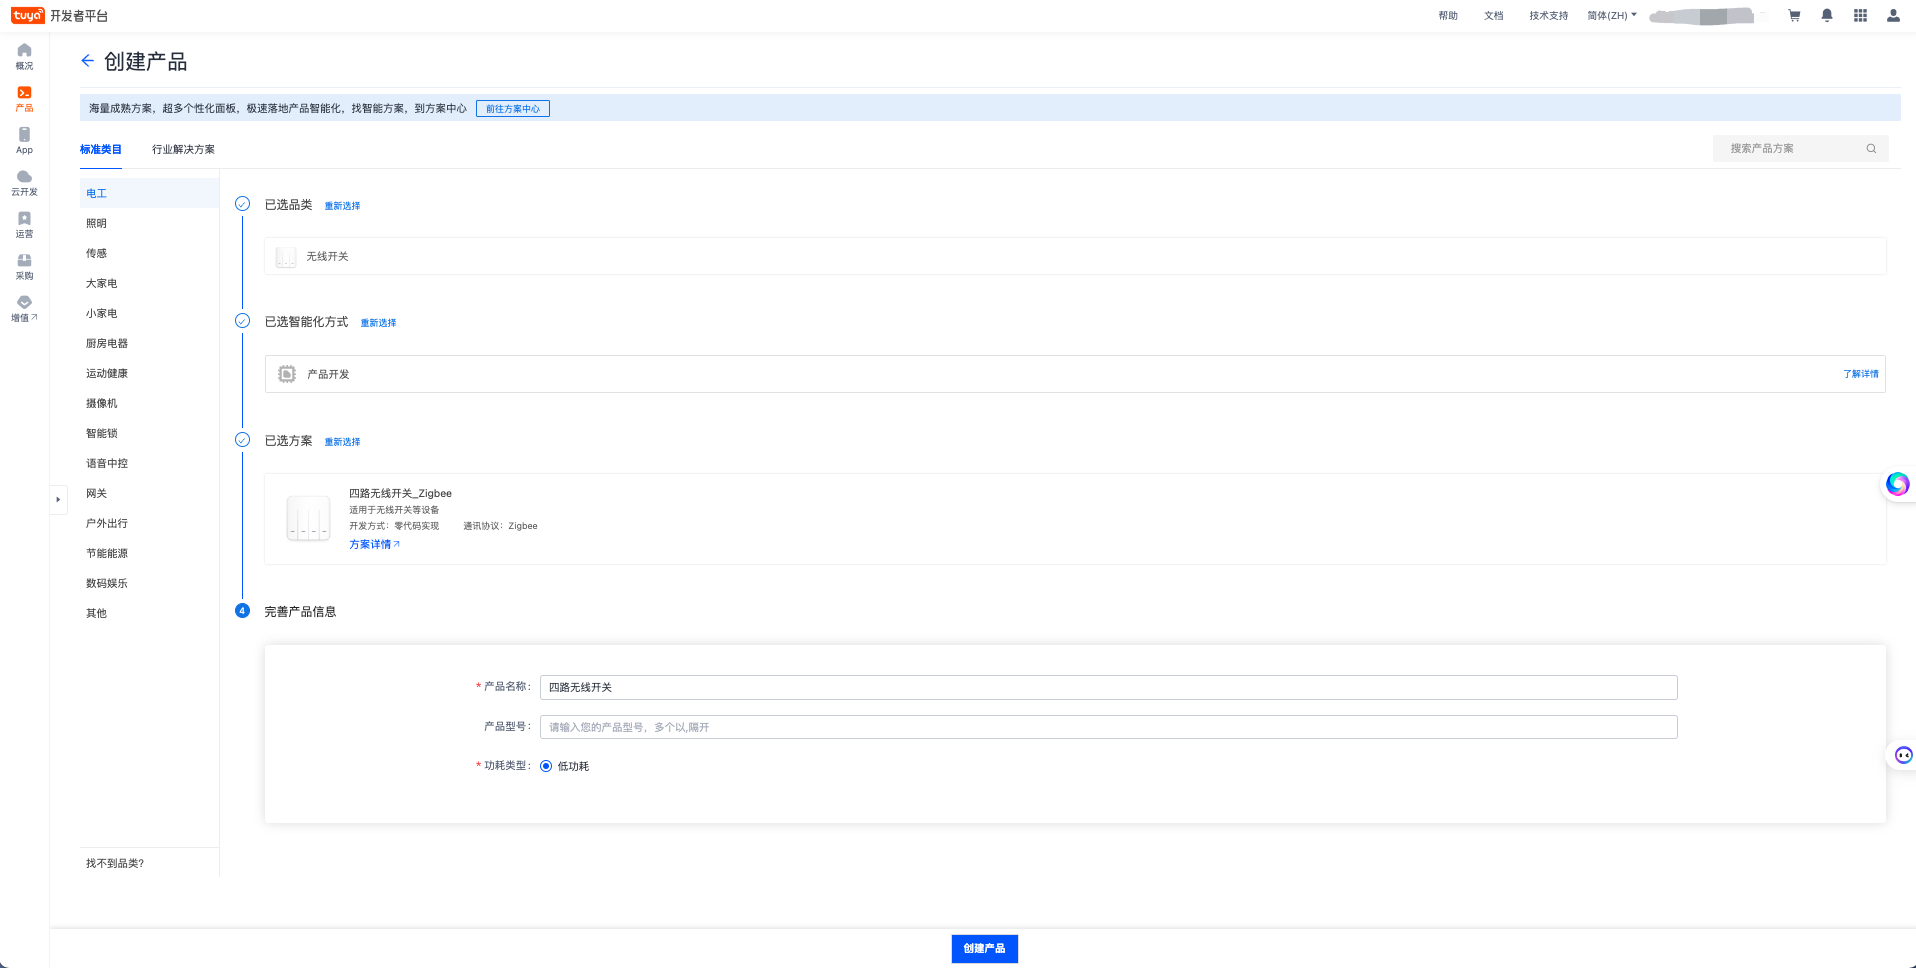
- 单击 创建产品 按钮,完成产品创建。
- 产品创建完成后,进入到 添加标准功能 页面,根据实际场景选择对应的开关功能点。如,在当前 Codelab 中,选择 switch_type_1 > switch_type_4 四个开关功能点,即创建一个存在四个按键的四路无线开关设备,具体如下图所示:
- 单击 确定 完成产品初始功能点设置。
开发者平台创建面板小程序
面板小程序的开发在 小程序开发者 平台上进行操作,首先请前往 小程序开发者平台 完成平台的注册登录。
详细操作步骤可以参考 面板小程序 > 创建面板小程序。
IDE 基于模板创建项目工程
打开 IDE 创建一个基于无线开关一键执行模板的面板小程序项目,需要在 Tuya MiniApp IDE 上进行操作。
详细操作步骤可以参考 面板小程序 > 初始化项目工程。
- 首先,根据 DP 功能点的定义,动态渲染开关按键列表。可以通过
SDM的SmartDeviceSchema类型定义来获取到当前设备的 DP 功能点列表,然后根据switch_type_${no}的 DP 功能点命名规则,来匹配获取到当前设备的按键列表,代码如下所示:import { SmartDeviceSchema } from 'typings/sdm'; export const getSceneDps = (schema: SmartDeviceSchema) => { if (!Array.isArray(schema)) return []; return schema.map(s => s.code.match(/switch_type_(\d+)/)?.[1]); }; - 然后在首页根据
getSceneDps函数获取到的按键列表,动态渲染开关按键列表。import React from 'react'; import { Image, ScrollView, View } from '@ray-js/ray'; import { useCreation } from 'ahooks'; import { useSelector } from 'react-redux'; import { DpSchema, useDevice } from '@ray-js/panel-sdk'; import { TopBar } from '@/components'; import { selectBindTapToRunRules } from '@/redux/modules/sceneSlice'; import { getSceneDps } from '@/utils/getSceneDps'; import { Scene } from './components/scene'; import styles from './index.module.less'; export function Home() { const schema = useDevice(d => d.devInfo.schema); const dpSchema = useDevice(d => d.dpSchema); const devInfo = useDevice(d => d.devInfo); const bindTapToRunRules = useSelector(selectBindTapToRunRules); const sceneDpList = useCreation(() => { return getSceneDps(schema).map(btnId => { // 一些暂时可忽略的逻辑代码 }); }, [schema, bindTapToRunRules]); return ( <View className={styles.view}> <TopBar /> <View className={styles.content}> <View className={styles.main}> <View className={styles.logo}> <Image src={devInfo.iconUrl} /> </View> </View> <ScrollView style={{ maxHeight: '360px', height: 'auto' }} className={styles.card} refresherTriggered scrollY > <Scene sceneDpList={sceneDpList} /> </ScrollView> </View> </View> ); }
- 首先,在项目初始化时获取一些项目强依赖的数据,比如
当前设备已绑定的一键执行列表。因此需要通过 Redux dispatchgetBindTapToRunRules异步 Action。import React, { Component } from 'react'; import { Provider } from 'react-redux'; import { hideLoading, showLoading } from '@ray-js/ray'; import { devices, dpKit } from './devices'; import store from './redux'; import { getCurrentHomeInfoAsync, setIsInitialized } from './redux/modules/uiStateSlice'; import { getBindTapToRunRules, getTapToRunRulesAsync } from './redux/modules/sceneSlice'; import './styles/index.less'; interface Props { devInfo: DevInfo; // eslint-disable-next-line react/require-default-props extraInfo?: Record<string, any>; } interface State { devInfo: DevInfo; } const composeLayout = (SubComp: React.ComponentType<any>) => { const { dispatch } = store; return class PanelComponent extends Component<Props, State> { async onLaunch(object: any) { devices.common.init(); devices.common.onInitialized(device => { dpKit.init(device); // 在数据加载完毕之前,阻塞用户的操作行为 showLoading({ title: '', mask: true }); Promise.all([dispatch(getBindTapToRunRules())]).finally(() => { dispatch(setIsInitialized(true)); hideLoading(); }); dispatch(getTapToRunRulesAsync()); dispatch(getCurrentHomeInfoAsync()); }); } render() { const { extraInfo } = this.props; return ( <Provider store={store}> <SubComp extraInfo={extraInfo} {...this.props} /> </Provider> ); } }; }; export default composeLayout; - 这个异步 Action 会通过 TapToRun 能力的
getBindTapToRunRulesAPI 来获取到当前设备已绑定的一键执行列表,然后再写入到 Redux Store 中。export const getBindTapToRunRules = createAsyncThunk<BindTapToRunRules>( 'scene/getBindTapToRunRules', async (_, thunkApi) => { try { const data = await devices.common.model.abilities.tapToRun.getBindTapToRunRules(); thunkApi.dispatch(sceneSlice.actions.initBindTapToRunRules(data)); return data; } catch (error) { return []; } } ); export const selectTapToRunRules = (state: ReduxState) => state.scene.tapToRunRules; - 回到首页,通过
useSelector获取到 Redux Store 中的tapToRunRules数据,并实现之前暂时未实现的逻辑代码以判断。const sceneDpList = useCreation(() => { return getSceneDps(schema).map(btnId => { let bindDpId: number; let bindDpValue: string; const bindScene = bindTapToRunRules?.find(b => { const switchSceneSchema = dpSchema[`switch_type_${btnId}`] as DpSchema; bindDpId = +b?.associativeEntityId.split('#')?.[0]; // 已经绑定一键执行的功能点 bindDpValue = b?.associativeEntityId.split('#')?.[1]; // 已经绑定一键执行的功能点值 if (switchSceneSchema?.id === bindDpId) { return true; } return false; }); const bindRule = bindScene?.associativeEntityValueList?.[0]; return { btnId, bindDpId, bindDpValue, bindScene, bindRule, }; }); }, [schema, bindTapToRunRules]); - 最后,根据解析好的额外数据(
btnId、bindScene、bindRule) 等来判断当前按键是否已经绑定了一键执行,以及在页面中展示名称或相关信息。import React, { useState } from 'react'; import { useRequest } from 'ahooks'; import { Text, View, Image, router, showLoading, hideLoading, showToast, openEditScene, } from '@ray-js/ray'; import { BindTapToRunRules } from '@ray-js/panel-sdk/lib/sdm/abilities/tapToRun/type'; import { ActionSheet, Dialog, DialogInstance, SwipeCell } from '@ray-js/smart-ui'; import Strings from '@/i18n'; import { Empty } from '@/components'; import { useAppDispatch } from '@/redux'; import { unbindAsync, updateTapToRunRulesAsync } from '@/redux/modules/sceneSlice'; import { mapObject2QueryString } from '@/utils/mapObject2QueryString'; import { devices } from '@/devices'; import { usePageReShow } from '@/hooks/usePageReShow'; import styles from './index.module.less'; interface Props { sceneDpList: Array<{ btnId: string; bindDpId?: number; bindDpValue?: string; bindScene?: BindTapToRunRules[number]; bindRule?: BindTapToRunRules[number]['associativeEntityValueList'][0]; }>; } enum SwitchType { SingleClick = 'single_click', DoubleClick = 'double_click', LongPress = 'long_press', } const actions = Object.values(SwitchType).map(type => ({ id: type, name: Strings.getLang(`sceneSwitchType_${type}`), })); export const Scene: React.FC<Props> = ({ sceneDpList }) => { const dispatch = useAppDispatch(); const [showSwitchTypeDpId, setShowSwitchTypeDpId] = useState(''); // 从 App 一键执行页面创建或编辑后需要刷新下数据源 usePageReShow(() => { dispatch(updateTapToRunRulesAsync()); }); const hideActionSheet = React.useCallback(() => { setShowSwitchTypeDpId(''); }, []); const { run: runTriggerRule } = useRequest( (ruleId: string) => devices.common.model.abilities.tapToRun.trigger({ ruleId }), { manual: true, loadingDelay: 1000, onBefore: () => showLoading({ title: '', mask: true }), onSuccess: (_, [ruleId]) => { const scene = sceneDpList.find(d => d?.bindRule?.triggerRuleId === ruleId); hideLoading(); return showToast({ title: Strings.formatValue('sceneTriggerSuccess', scene.bindRule.name), }); }, onError: (_, [ruleId]) => { const scene = sceneDpList.find(d => d?.bindRule?.triggerRuleId === ruleId); hideLoading(); return showToast({ title: Strings.formatValue('sceneTriggerFailed', scene.bindRule.name), icon: 'error', }); }, } ); const handleSelectSwitchType = React.useCallback( data => { const switchType = data?.detail?.id as string; const path = mapObject2QueryString('/scene-select', { dpId: showSwitchTypeDpId, dpValue: switchType, }); hideActionSheet(); return router.push(path); }, [showSwitchTypeDpId] ); const handleClose = React.useCallback((data: (typeof sceneDpList)[number]) => { return event => { const { position, instance } = event.detail; switch (position) { case 'cell': instance.close(); break; case 'right': DialogInstance.confirm({ message: Strings.getLang('unbindTip'), cancelButtonText: Strings.getLang('cancel'), confirmButtonText: Strings.getLang('confirm'), }) .then(() => { const bindId = `${data?.bindScene?.bindId}`; dispatch(unbindAsync({ bindId })).then(result => { instance.close(); if (result.meta.requestStatus === 'rejected') { showToast({ title: Strings.getLang('requestFailed'), icon: 'error', }); } }); }) .catch(() => instance.close()); break; default: } }; }, []); const handleSceneItemClick = React.useCallback((data: (typeof sceneDpList)[number]) => { return () => { const { btnId, bindRule } = data; if (!bindRule) { setShowSwitchTypeDpId(`${btnId}`); return; } DialogInstance.confirm({ message: Strings.getLang('triggerTip'), cancelButtonText: Strings.getLang('cancel'), confirmButtonText: Strings.getLang('confirm'), }) .then(() => { const triggerRuleId = data?.bindRule?.triggerRuleId; runTriggerRule(`${triggerRuleId}`); }) .catch(() => true); }; }, []); const handleClickSetting = React.useCallback((data: (typeof sceneDpList)[number]) => { return (evt => { evt?.origin?.stopPropagation(); const sceneId = data?.bindRule?.id; if (data?.bindRule?.id) { openEditScene({ sceneId }); } }) as React.ComponentProps<typeof View>['onClick']; }, []); return ( <View> {sceneDpList.length === 0 ? ( <Empty title={Strings.getLang('sceneEmptyTip')} /> ) : ( <View> {sceneDpList.map((d, idx) => { const { bindRule, bindDpValue } = d; const itemText = bindRule?.name ? `${Strings.getLang(`sceneSwitchType_${bindDpValue}` as any)}: ${bindRule?.name}` : Strings.getLang('defaultName'); return ( <SwipeCell key={idx} asyncClose rightWidth={65} disabled={!bindRule} // 没有绑定规则的不可滑动解绑 slot={{ right: <View className={styles.right}>{Strings.getLang('unbind')}</View>, }} onClose={handleClose(d)} > <View className={styles.item} onClick={handleSceneItemClick(d)}> <View className={styles.content}> <View className={styles.textWrapper}> <Text className={styles.textNo}>{idx + 1}</Text> <Text className={styles.textScene}>{itemText}</Text> </View> </View> {bindRule && ( <View onClick={handleClickSetting(d)}> <Image className={styles.imageIcon} src="/images/icon_triangle.png" /> </View> )} </View> </SwipeCell> ); })} </View> )} <Dialog id="smart-dialog" /> <ActionSheet description={Strings.getLang('sceneSwitchTypeSelect')} cancelText={Strings.getLang('cancel')} show={!!showSwitchTypeDpId} actions={actions} onSelect={handleSelectSwitchType} onClose={hideActionSheet} onCancel={hideActionSheet} /> </View> ); };
- 首先,在项目初始化时获取当前家庭的
可绑定的一键执行列表数据,因此需要通过 Redux dispatchgetTapToRunsAsync异步 Action。import React, { Component } from 'react'; import { Provider } from 'react-redux'; import { hideLoading, showLoading } from '@ray-js/ray'; import { devices, dpKit } from './devices'; import store from './redux'; import { getCurrentHomeInfoAsync, setIsInitialized } from './redux/modules/uiStateSlice'; import { getBindTapToRunRules, getTapToRunRulesAsync } from './redux/modules/sceneSlice'; import './styles/index.less'; interface Props { devInfo: DevInfo; // eslint-disable-next-line react/require-default-props extraInfo?: Record<string, any>; } interface State { devInfo: DevInfo; } const composeLayout = (SubComp: React.ComponentType<any>) => { const { dispatch } = store; return class PanelComponent extends Component<Props, State> { async onLaunch(object: any) { devices.common.init(); devices.common.onInitialized(device => { dpKit.init(device); // 在数据加载完毕之前,阻塞用户的操作行为 showLoading({ title: '', mask: true }); Promise.all([dispatch(getBindTapToRunRules())]).finally(() => { dispatch(setIsInitialized(true)); hideLoading(); }); dispatch(getTapToRunRulesAsync()); dispatch(getCurrentHomeInfoAsync()); }); } render() { const { extraInfo } = this.props; return ( <Provider store={store}> <SubComp extraInfo={extraInfo} {...this.props} /> </Provider> ); } }; }; export default composeLayout; - 进入 选择联动 页面后,如果当前已经获取到了
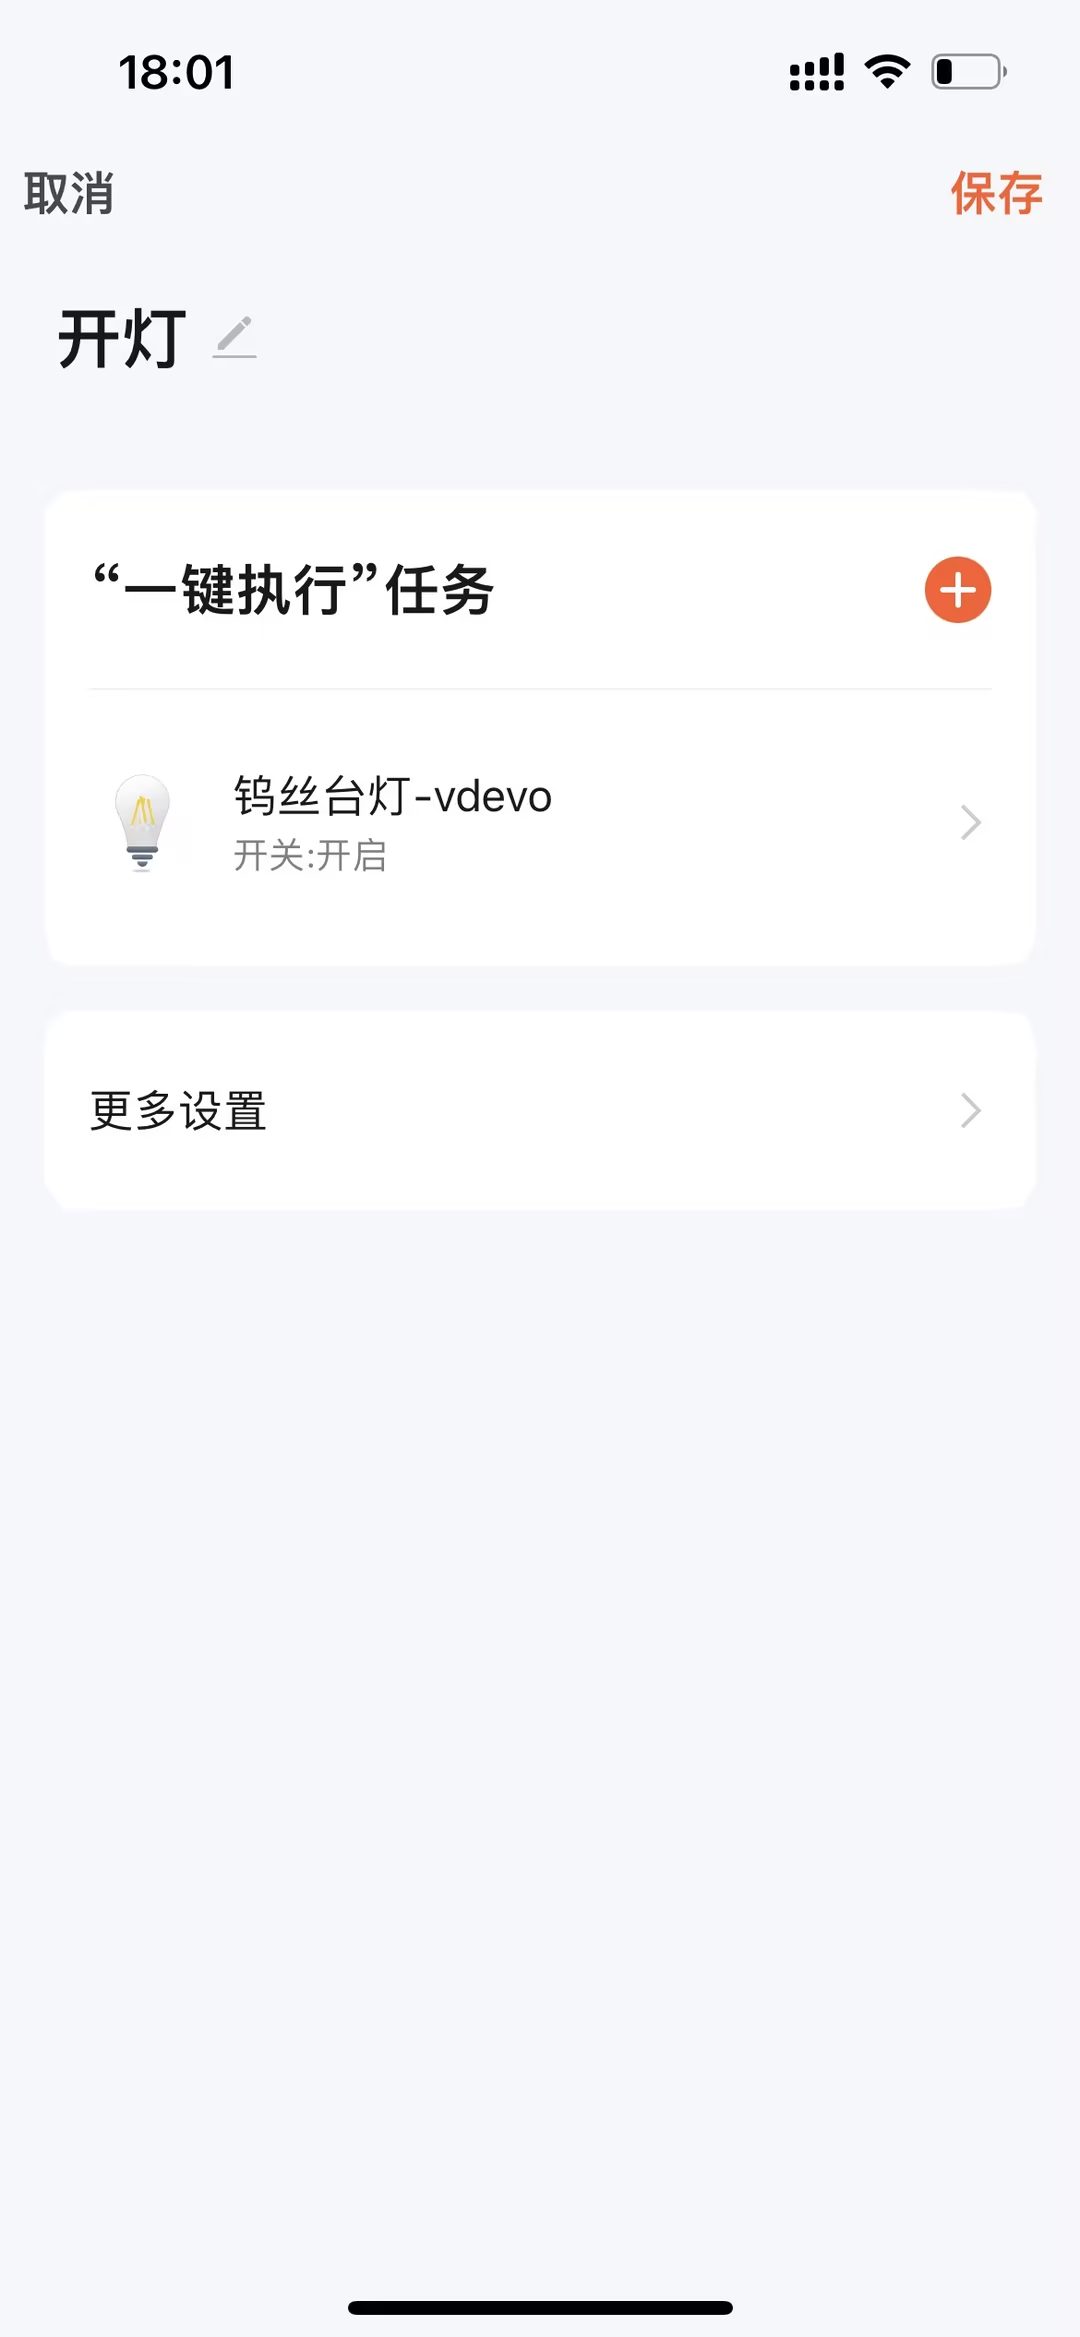
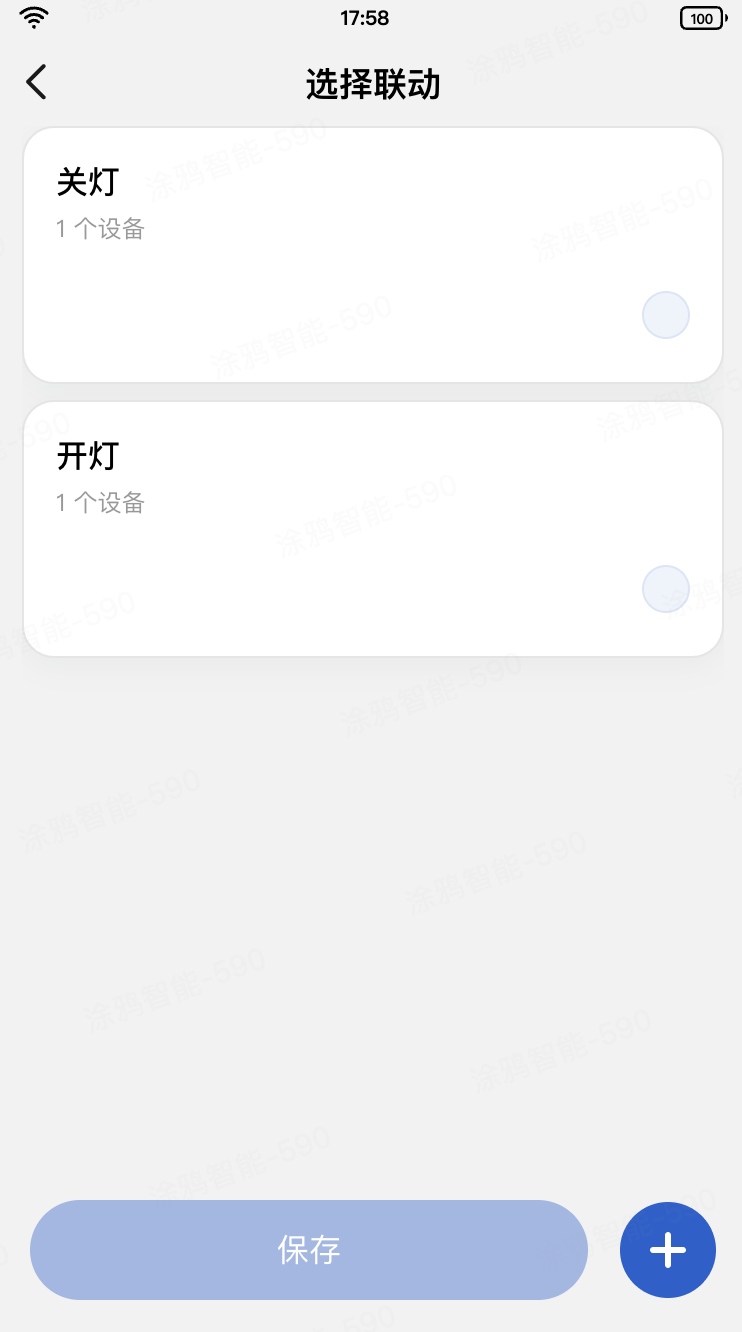
可绑定的一键执行列表数据,就可以根据这些数据来动态渲染一键执行列表,如下图所示: - 在选择完要绑定的一键执行后,单击 保存,此时需要 Dispatch
bindAsync异步 Action 来绑定当前设备的按键与一键执行的关联关系,同时刷新已绑定的一键执行列表。其中 Query 的入参dpId和dpValue分别代表的是当前设备的按键 DP ID 和按键 DP value,比如,对按键 1 设置了双击进入选择联动页,传入的 DP ID 即为 1,DP Value 为 double_click,即在设备的按键 1 上报double_click时,会自动触发当前绑定的一键执行。import React from 'react'; import { Image, View, openCreateTapToRunScene, openEditScene, router, useQuery } from '@ray-js/ray'; import clsx from 'clsx'; import { useSelector } from 'react-redux'; import { TopBar, Empty, FixedBottom, RuleItem } from '@/components'; import Strings from '@/i18n'; import { TopBarHeight } from '@/components/top-bar'; import { getCachedSystemInfo } from '@/api/getCachedSystemInfo'; import { usePageReShow } from '@/hooks/usePageReShow'; import { useHideMenuButton } from '@/hooks/useHideMenuButton'; import { bindAsync, selectTapToRunRules, updateTapToRunRulesAsync, } from '@/redux/modules/sceneSlice'; import { useAppDispatch } from '@/redux'; import styles from './index.module.less'; import { SceneSelectQuery } from './index.type'; const FooterHeight = 88; const { screenHeight } = getCachedSystemInfo(); const contentHeight = `${screenHeight - (TopBarHeight + FooterHeight)}px`; export function SceneSelect() { // 从 App 一键执行页面创建或编辑后需要刷新下数据源 usePageReShow(() => { dispatch(updateTapToRunRulesAsync()); }); useHideMenuButton(); const dispatch = useAppDispatch(); const query: SceneSelectQuery = useQuery(); const tapToRunRules = useSelector(selectTapToRunRules); const [fixedBottomHeight, setFixedBottomHeight] = React.useState('180rpx'); // 默认为 iPhone 6 基准 const [activeIdx, setActiveIdx] = React.useState(-1); const isEmpty = tapToRunRules.length === 0; const handleItemClick = React.useCallback((idx: number) => { return () => setActiveIdx(idx); }, []); const handleSave = React.useCallback(() => { const data = tapToRunRules?.[activeIdx]; dispatch(bindAsync({ dpId: query.dpId, dpValue: query.dpValue, ruleId: data.id })); router.back(); }, [tapToRunRules, activeIdx]); const handleAddClick = React.useCallback(() => { const rule = tapToRunRules[activeIdx]; if (!rule) { // 支持 App 5.13.0 以上版本 openCreateTapToRunScene().catch(err => console.warn('openCreateTapToRunScene failed', err)); return; } openEditScene({ sceneId: rule.id }); }, [tapToRunRules, activeIdx]); return ( <View className={styles.view}> <TopBar title={Strings.getLang('sceneSelect')} isSubPage /> <View className={styles.content} style={{ marginBottom: fixedBottomHeight }}> {isEmpty ? ( <Empty style={{ height: contentHeight, marginTop: 0 }} title={Strings.getLang('sceneSelectEmptyTip')} /> ) : ( <View className={styles.list}> {tapToRunRules?.map((data, idx) => { const bindDeviceNums = data?.actions?.length ?? 0; const isActive = activeIdx === idx; return ( <RuleItem key={idx} isActive={isActive} title={data.name} subTitle={Strings.formatValue( bindDeviceNums > 1 ? 'sceneBindDeviceNums' : 'sceneBindDeviceNum', bindDeviceNums )} onClick={handleItemClick(idx)} /> ); })} </View> )} <FixedBottom className={styles.footer} contentHeight="100rpx" getFixedBottomHeight={setFixedBottomHeight} > <View className={clsx( styles.button, (isEmpty || activeIdx === -1) && styles.button__disabled )} onClick={handleSave} > {Strings.getLang('save')} </View> <Image className={styles.imageAdd} src="/images/icon_add.png" onClick={handleAddClick} /> </FixedBottom> </View> </View> ); }export const bindAsync = createAsyncThunk<boolean, BindParams>( 'scene/bindAsync', async (params, thunkApi) => { await devices.common.model.abilities.tapToRun.bind({ dpId: params.dpId, dpValue: params.dpValue, ruleId: params.ruleId, }); thunkApi.dispatch(updateBindTapToRunRulesAsync()); return true; } ); - 绑定成功后,页面会自动返回到首页,并且会刷新已绑定的一键执行列表,此时就完成了绑定一键执行。
// 从 App 一键执行页面创建或编辑后需要刷新下数据源
usePageReShow(() => {
 dispatch(updateTapToRunRulesAsync());
});
import { usePageEvent } from '@ray-js/ray';
import { useRef } from 'react';

/**
 * 在页面第二次 onShow 的时候才会触发,用于一些首次不需要执行的逻辑情况,比如从 App 页面返回
 */
export function usePageReShow(fn: (...arg: any) => any) {
  const isMounted = useRef(false);
  usePageEvent('onShow', () => {
    if (isMounted.current) fn();
    isMounted.current = true;
  });
}
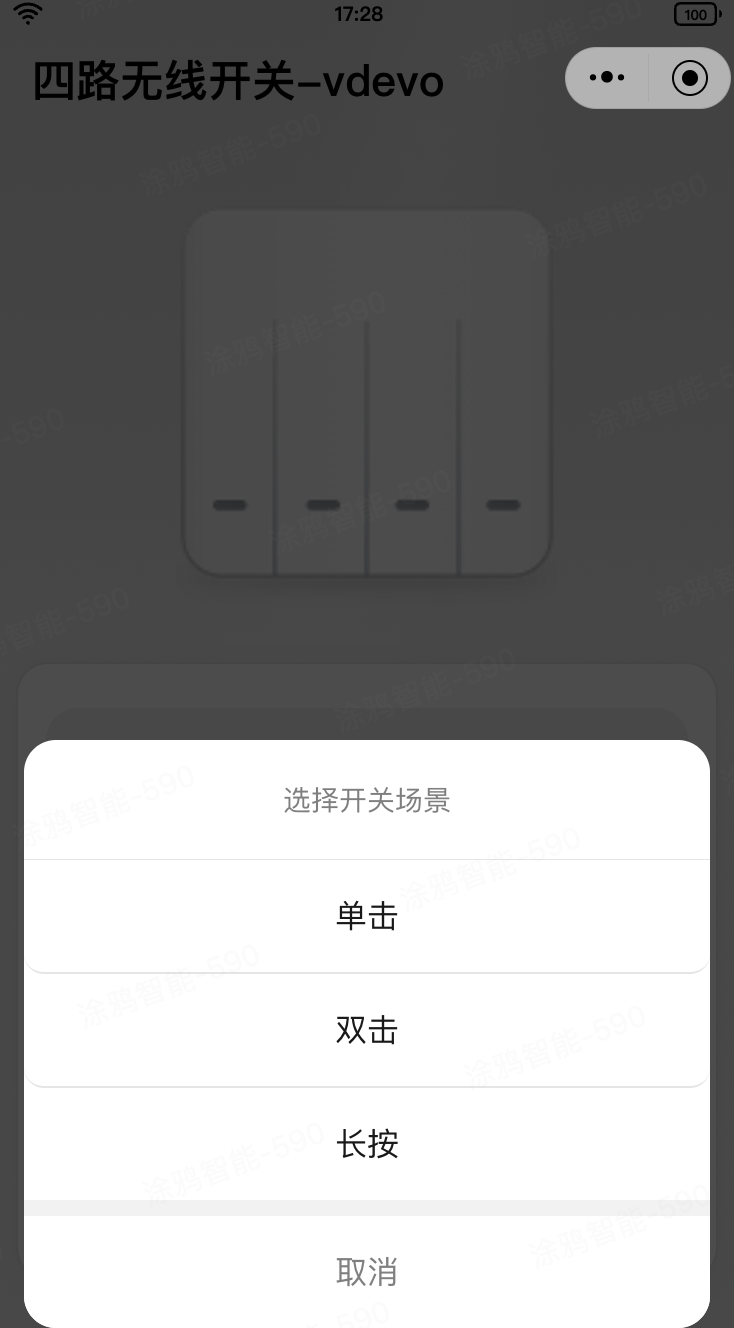
- 在一键执行绑定成功并回到首页后,如单击已绑定的一键执行按键,会弹出确认手动执行场景的二次确认框,如下图所示:
- 在单击 确定 后,可以直接调用
SmartTapToRunAbility的triggerAPI 来触发一键执行,代码如下所示。const { run: runTriggerRule } = useRequest( (ruleId: string) => devices.common.model.abilities.tapToRun.trigger({ ruleId }), { manual: true, loadingDelay: 1000, onBefore: () => showLoading({ title: '', mask: true }), onSuccess: (_, [ruleId]) => { const scene = sceneDpList.find(d => d?.bindRule?.triggerRuleId === ruleId); hideLoading(); return showToast({ title: Strings.formatValue('sceneTriggerSuccess', scene.bindRule.name), }); }, onError: (_, [ruleId]) => { const scene = sceneDpList.find(d => d?.bindRule?.triggerRuleId === ruleId); hideLoading(); return showToast({ title: Strings.formatValue('sceneTriggerFailed', scene.bindRule.name), icon: 'error', }); }, } ) const handleSceneItemClick = React.useCallback((data: (typeof sceneDpList)[number]) => { return () => { const { btnId, bindRule } = data; if (!bindRule) { setShowSwitchTypeDpId(`${btnId}`); return; } DialogInstance.confirm({ message: Strings.getLang('triggerTip'), cancelButtonText: Strings.getLang('cancel'), confirmButtonText: Strings.getLang('confirm'), }) .then(() => { const triggerRuleId = data?.bindRule?.triggerRuleId; runTriggerRule(`${triggerRuleId}`); }) .catch(() => true); }; }, []); - 如果传入的
triggerRuleId无误,对应的一键执行规则有效且关联的设备运行状态正常,就会触发一键执行,否则会提示触发失败。
在 按键绑定一键执行 章节中,假定了在设备的按键 1 上报 double_click 时会触发当前绑定的一键执行,那么在对实体按键 1 执行双击操作时,如果正常上报了 double_click,就会正常触发一键执行。请注意,本文介绍的一键执行必须在有网的环境下才可以使用。
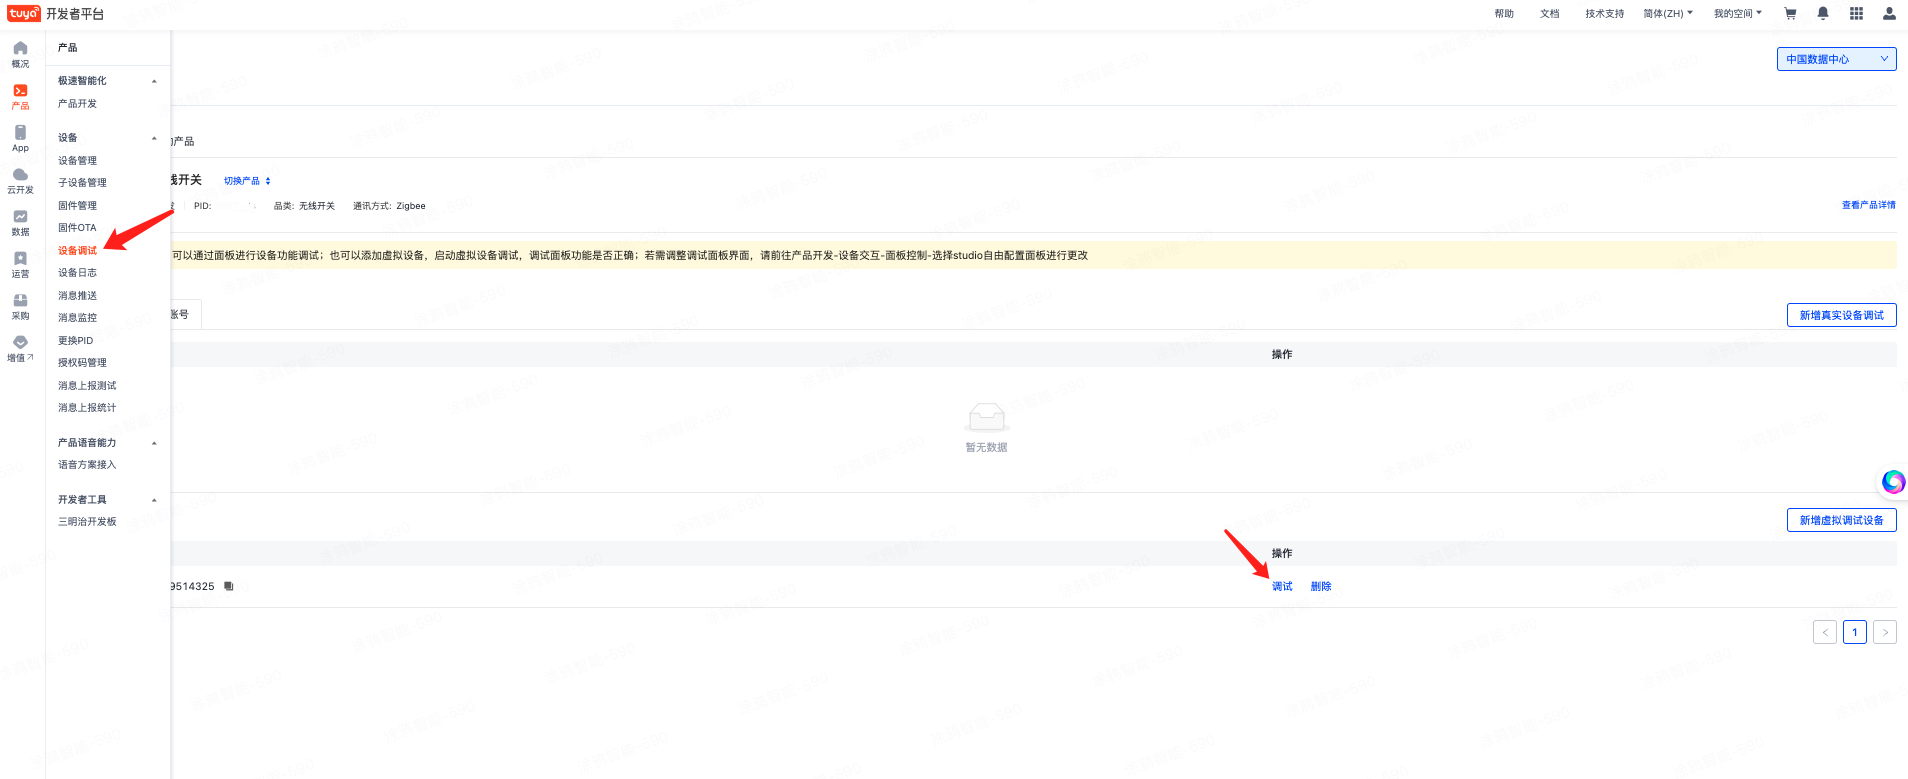
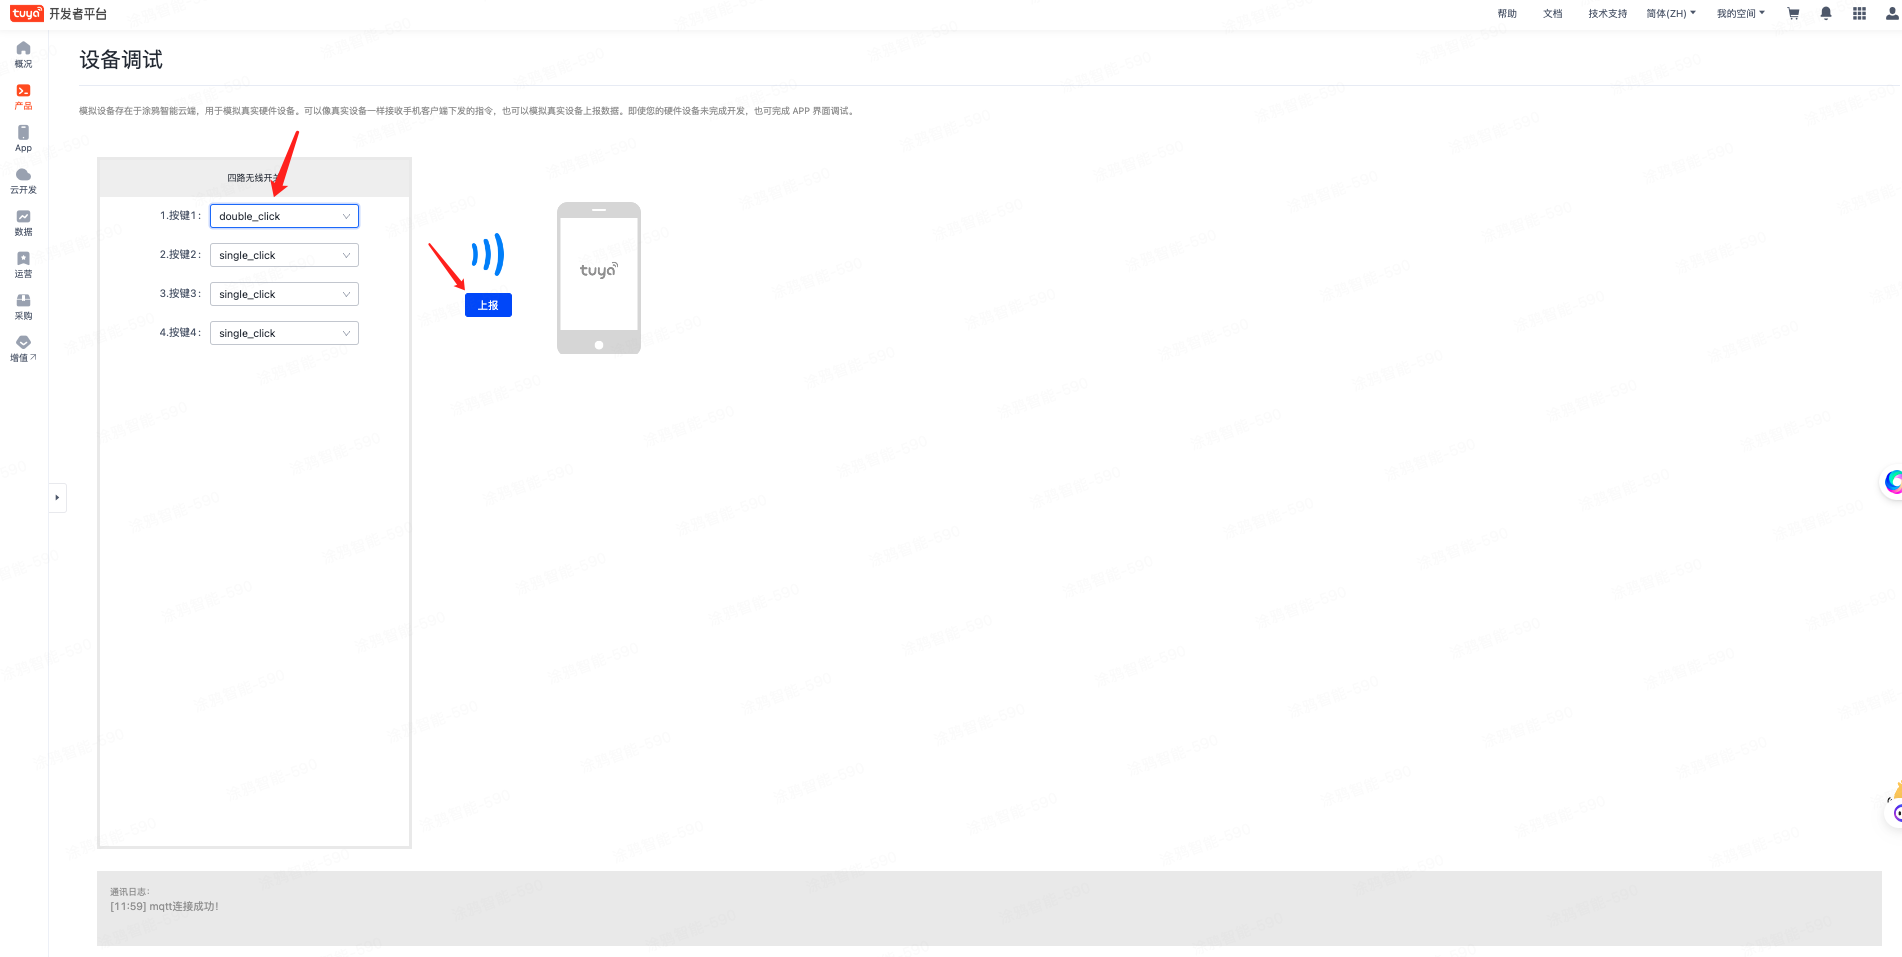
当不存在实体设备时,也可以借助涂鸦开发者平台的设备调试功能进行模拟上报,验证当前开发的功能是否正常,如下图所示:
- 恭喜你 🎉 完成了本教程的学习!
- 有任何问题可以联系涂鸦智能小程序团队