前提条件
- 已阅读 Ray 新手村任务,了解 Ray 框架的基础知识。
- 已阅读 使用 Ray 开发万能面板,了解 Ray 面板开发的基础知识。
构建内容
在 Codelab 中,您可以利用面板小程序开发构建出一个 Zigbee 遥控器群组开关,通过配合 Zigbee 网关,实现在实体按键操作后批量控制多个被绑定设备的能力。
学习内容
- 如何创建一个 Zigbee 遥控器群组开关产品。
- 如何使用 Zigbee 遥控器群组模板快速初始化一个面板项目。
- 如何实现开关按键绑定多个特定品类的设备。
- 如何实现开关按键的绑定设备情况展示。
前置准备
- 智能生活 App
- Tuya MiniApp IDE
- NVM 及 Node 开发环境(建议使用 16.x 系列版本)
- Yarn 依赖管理工具
更多详细介绍,请参考 面板小程序 > 搭建环境。
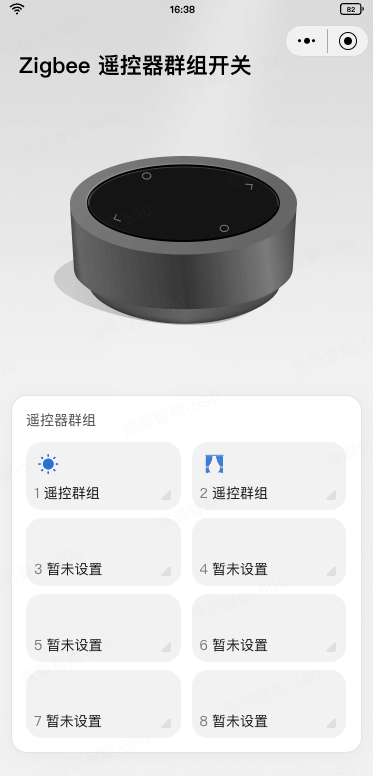
产品名称:Zigbee 遥控器群组开关
需求原型
- 首页功能:
- 顶部展现当前设备的图片,中心区域则展示设备的按键列表信息,并显著标明每个按键是否已与家庭中的其他设备成功绑定。
- 单击未绑定设备的按键跳转进入 群组设置 页;单击已绑定设备的按键,则根据绑定的设备类型判断,跳转进入 灯光群组 编辑页或 窗帘群组 编辑页。

- 群组设置 页功能:展示当前支持品类的遥控器群组创建页面的入口列表,单击则进入对应品类的群组创建页。
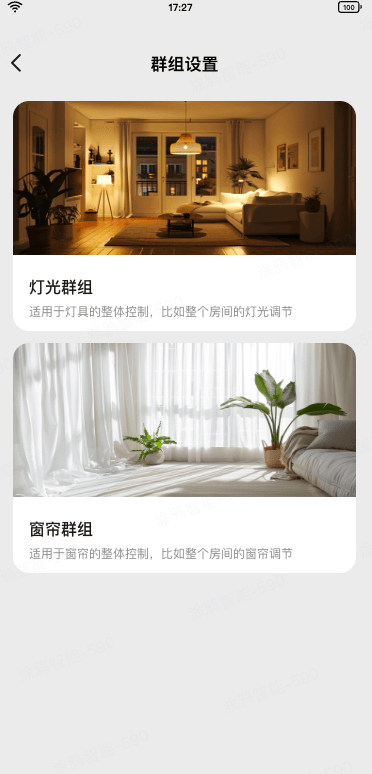
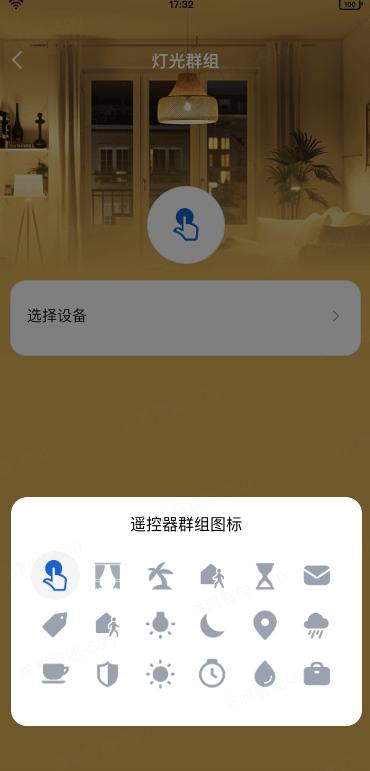
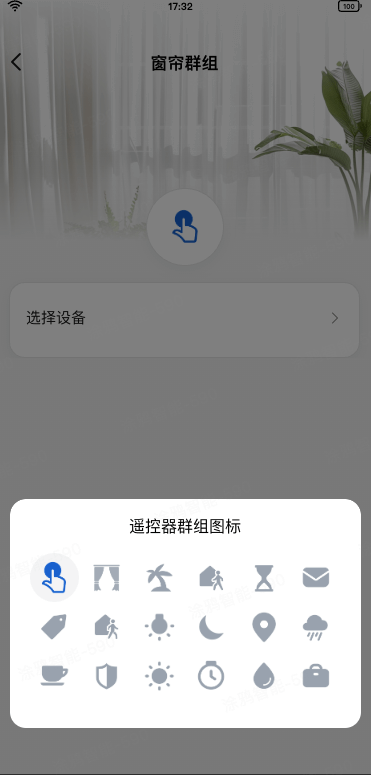
- 灯光/窗帘群组 编辑页功能:
- 单击顶部的图标可以选择不同的遥控器群组图标,用于在首页区分不同的绑定功能。
- 单击选择设备列表项,会跳转进入 创建群组 页进行设备的选择和绑定。
- 单击底部的 保存 按钮,则会保存当前遥控器群组的图标。注意设备的绑定在 创建群组 页就已经完成了,不会受到保存操作的影响。
- 创建群组 页功能:
- 展示当前家庭中被筛选后的设备列表,单击设备列表项并单击右上角的 保存 即可完成设备的配对绑定。
- 绑定完成后,单击对应的实体按键,会同时触发被绑定设备的控制。

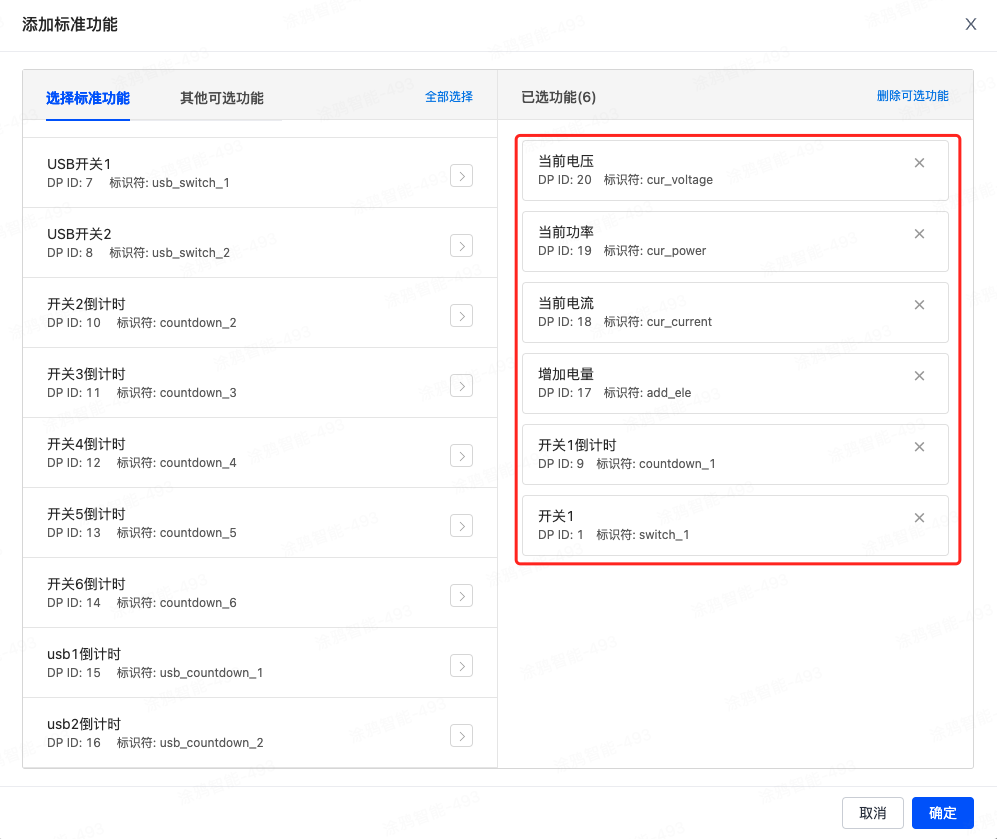
功能汇总
当前 Zigbee 遥控器群组开关需要的功能点见下表,其中场景按键 DP 可以根据实际设备的长度自行删减,但注意必须在 switch_1 -> switch_8 的数值范围之间,此外 scene_switch DP 点的枚举值必须和开关的 DP 点一一对应。
DP ID | 功能点名称 | 标识符 | 数据传输类型 | 数据类型 | 功能点属性 |
24 | 开关1 | switch_1 | 可下发可上报(rw) | bool | - |
25 | 开关2 | switch_2 | 可下发可上报(rw) | bool | - |
26 | 开关3 | switch_3 | 可下发可上报(rw) | bool | - |
27 | 开关4 | switch_4 | 可下发可上报(rw) | bool | - |
112 | 按键 | scene_switch | 可下发可上报(rw) | enum | 枚举值: switch_1, switch_2, switch_3, switch_4 |
首先需要创建一个 Zigbee 遥控器群组开关产品,定义产品有哪些功能点,然后再在面板中根据这些功能点进行实现。


开发者平台创建面板小程序
面板小程序的开发在 小程序开发者 平台上进行操作,首先请前往 小程序开发者平台 完成平台的注册登录。
详细操作步骤可以参考 面板小程序 > 创建面板小程序。
IDE 基于模板创建项目工程
打开 IDE 创建一个基于无线开关一键执行模板的面板小程序项目,需要在 Tuya MiniApp IDE 上进行操作。
详细操作步骤可以参考 面板小程序 > 初始化项目工程。
在本章节中,您将会了解到动态渲染开关按键列表及开关按键设备绑定状态的功能逻辑,方便您在后续的开发过程中,基于涂鸦提供的示例代码,根据差异化的业务场景实现不同的功能交互。
动态渲染开关按键列表
- 首先,根据 DP 的定义,动态渲染开关按键列表,可以通过
SDM的SmartDeviceSchema类型定义来获取到当前设备的 DP 列表,然后根据scene_switch的 DP 来获取到当前设备的按键列表。import { SmartDeviceSchema } from 'typings/sdm'; export const getSwitchDps = (schema: SmartDeviceSchema) => { if (!Array.isArray(schema)) return []; const sceneSwitchSchema = schema.find(s => s.code === 'scene_switch'); // @ts-ignore const sceneSwitchRange = sceneSwitchSchema?.property?.range as string[]; if (!sceneSwitchRange) return []; return sceneSwitchRange .filter(range => { const btnIdx = +range.match(/switch_(\d+)/)?.[1]; return btnIdx >= 1 && btnIdx <= 8; }) .map(range => { const btnIdx = +range.match(/switch_(\d+)/)?.[1]; return btnIdx; }); }; - 然后根据
getSwitchDps函数获取到的按键列表,动态渲染开关按键列表。import React from 'react'; import { Image, ScrollView, View } from '@ray-js/ray'; import { TopBar } from '@/components'; import { useCreation } from 'ahooks'; import { useSelector } from 'react-redux'; import { useDevice } from '@ray-js/panel-sdk'; import { selectGroupDevices } from '@/redux/modules/groupSlice'; import { ResGetZigbeeLocalIds } from '@/api/getZigbeeLocalIds'; import { GroupDevices } from '@/api/getGroupDevices'; import { BindType } from '@/constant'; import { getSwitchDps } from '@/utils/getSwitchDps'; import { Group } from './components/group'; import styles from './index.module.less'; export function Home() { const schema = useDevice(d => d.devInfo.schema); const groupDevices = useSelector(selectGroupDevices); const dataSource = useCreation(() => { return getSwitchDps(schema).map(btnId => { let bindType: BindType; const bindGroupInfo = localIds.find(localInfo => localInfo.code === `switch_${btnId}`); let bindGroupDevices: GroupDevices; const categoryCode = bindGroupInfo?.categoryCode; if (categoryCode && groupDevices[categoryCode]) { bindGroupDevices = groupDevices[categoryCode]?.filter(d => d.checked); if (bindGroupDevices?.[0]?.category === 'lamp') { bindType = BindType.GroupLight; } else if (bindGroupDevices?.[0]?.category === 'curtain') { bindType = BindType.GroupCurtain; } } return { btnId, bindType, bindGroupInfo, bindGroupDevices, }; }); }, [schema, groupDevices]); return ( <View className={styles.view}> <TopBar /> <View className={styles.content}> <View className={styles.main}> <View className={styles.logo}> <Image src="/images/logo.png" /> </View> </View> <ScrollView style={{ maxHeight: '360px', height: 'auto' }} className={styles.card} refresherTriggered scrollY > <Group data={dataSource} /> </ScrollView> </View> </View> ); } export default Home;
开关按键设备绑定状态
- 在项目初始化时,需要获取一些项目强依赖的数据,比如
按键绑定设备数据。因此需要通过 Redux dispatchgetZigbeeLocalIdAsync异步 Action。import React, { Component } from 'react'; import { Provider } from 'react-redux'; import { hideLoading, showLoading } from '@ray-js/ray'; import { devices, dpKit } from './devices'; import store from './redux'; import { getOssUrlAsync, getCurrentHomeInfoAsync, setIsInitialized, } from './redux/modules/uiStateSlice'; import { getGroupIconsAsync, getZigbeeLocalIdAsync } from './redux/modules/groupSlice'; import './styles/index.less'; interface Props { devInfo: DevInfo; // eslint-disable-next-line react/require-default-props extraInfo?: Record<string, any>; } interface State { devInfo: DevInfo; } const composeLayout = (SubComp: React.ComponentType<any>) => { const { dispatch } = store; return class PanelComponent extends Component<Props, State> { async onLaunch(object: any) { console.log('=== App onLaunch', object); devices.common.init(); devices.common.onInitialized(device => dpKit.init(device)); // 在强依赖的数据加载完毕之前,阻塞用户的操作行为 showLoading({ title: '', mask: true }); Promise.all([dispatch(getOssUrlAsync()), dispatch(getZigbeeLocalIdAsync())]).finally(() => { dispatch(setIsInitialized(true)); hideLoading(); }); dispatch(getGroupIconsAsync()); dispatch(getCurrentHomeInfoAsync()); } render() { const { extraInfo } = this.props; return ( <Provider store={store}> <SubComp extraInfo={extraInfo} {...this.props} /> </Provider> ); } }; }; export default composeLayout; - 这个异步 Action 首先获取到当前设备的
本地 ID,然后再通过getGroupDevicesAPI 来获取到当前设备的按键绑定设备数据,最后再写入到 Redux Store 中。export const getZigbeeLocalIdAsync = createAsyncThunk( 'scene/getZigbeeLocalIdAsync', async (_, thunkApi) => { const res = await getZigbeeLocalIds(); thunkApi.dispatch(groupSlice.actions.initLocalIds({ localIds: res.locals })); const groupDevices = await Promise.all( res.locals.map(local => getGroupDevices(local.categoryCode)) ); const groupDevicesMap = res.locals.reduce((acc, local, index) => { acc[local.categoryCode] = groupDevices[index]; return acc; }, {}); thunkApi.dispatch(groupSlice.actions.initGroupDevices({ groupDevices: groupDevicesMap })); return res; } ); export const selectBindGroupDevices = (state: ReduxState, categoryCode: string) => { return state.group.groupDevices?.[categoryCode]?.filter(item => item.checked) ?? []; }; - 回到首页,通过
useSelector获取到 Redux Store 中的groupDevices数据,然后根据bindType、bindGroupInfo、bindGroupDevices三个字段来判断当前按键是否已经绑定了设备,以及绑定的设备类型。注意需要把btnId按键 ID 传递给下一个页面,用于判断属于哪个按键。const schema = useDevice(d => d.devInfo.schema); const groupDevices = useSelector(selectGroupDevices); const dataSource = useCreation(() => { return getSwitchDps(schema).map(btnId => { let bindType: BindType; const bindGroupInfo = localIds.find(localInfo => localInfo.code === `switch_${btnId}`); let bindGroupDevices: GroupDevices; const categoryCode = bindGroupInfo?.categoryCode; if (categoryCode && groupDevices[categoryCode]) { bindGroupDevices = groupDevices[categoryCode]?.filter(d => d.checked); if (bindGroupDevices?.[0]?.category === 'lamp') { bindType = BindType.GroupLight; } else if (bindGroupDevices?.[0]?.category === 'curtain') { bindType = BindType.GroupCurtain; } } return { btnId, bindType, bindGroupInfo, bindGroupDevices, }; }); }, [schema, groupDevices]); - 最后,根据
bindType来判断当前按键是否已经绑定了设备,以及绑定的设备类型,然后在页面中展示不同的 UI。import React from 'react'; import clsx from 'clsx'; import { Text, View, Image, router } from '@ray-js/ray'; import { useSelector } from 'react-redux'; import Strings from '@/i18n'; import { ColorImage, Empty } from '@/components'; import { selectIsInitialized, selectCoverList } from '@/redux/modules/uiStateSlice'; import { mapObject2QueryString } from '@/utils/mapObject2QueryString'; import { selectGroupIcons } from '@/redux/modules/groupSlice'; import { GroupDevices } from '@/api/getGroupDevices'; import { BindType } from '@/constant'; import styles from './index.module.less'; const groupTypes = [BindType.GroupLight, BindType.GroupCurtain]; interface Props { data: Array<{ bindType: BindType; bindGroupInfo: { code: string; order: number; localId: string; categoryCode: string; }; bindGroupDevices: GroupDevices; }>; } export const Group: React.FC<Props> = ({ data }) => { const iconList = useSelector(selectCoverList); const groupIcons = useSelector(selectGroupIcons); const isInitialized = useSelector(selectIsInitialized); const handleNavToGroup = () => ({}); // ... 在按键绑定设备章节中实现 return ( <View> <View className={styles.title}>{Strings.getLang('group')}</View> {data.length === 0 ? ( <Empty title={Strings.getLang('groupEmptyTip')} /> ) : ( <View className={styles.list}> {data.map((d, idx) => { const { bindType, bindGroupInfo } = d; const isBind = !!bindType; let itemText = Strings.getLang('defaultName'); let itemIcon: string; if (groupTypes.includes(bindType)) { itemText = Strings.getLang('groupNameDefault'); itemIcon = isInitialized ? iconList[groupIcons.find(v => v.code === bindGroupInfo.code)?.value] ?? '' : ''; } const style = { flex: data.length === 1 ? '0 0 100%' : '0 0 calc(50% - 6px)', height: data.length > 2 ? '68px' : '110px', }; return ( <View key={idx} style={style} className={styles.item} onClick={handleNavToGroup(d)} > <View className={clsx(!isBind && styles.invisible)}> <ColorImage width="28px" height="28px" color="rgba(25, 97, 206, 0.9)" src={itemIcon} /> </View> <View className={styles.content}> <View className={styles.textWrapper}> <Text className={styles.textNo}>{idx + 1}</Text> <Text className={styles.textScene}>{itemText}</Text> </View> </View> <Image className={styles.imageIcon} src="/images/icon_triangle.png" /> </View> ); })} </View> )} </View> ); };
在完成开关按键的渲染后,接下来需要实现开关按键的绑定设备功能,需要实现 群组设置、灯光/窗帘群组 编辑页、创建群组 三个页面的功能逻辑。
跳转设置或编辑页
可以通过实现 handleNavToGroup 来控制点击按键列表跳转到 群组设置 页或 灯光/窗帘群组 编辑页,需要根据 bindType 来判断跳转的页面。如果未绑定则跳转到 群组设置 页,如果已绑定则根据绑定设备品类跳转到 灯光/窗帘群组 编辑页。
const handleNavToGroup = React.useCallback(
  (d: (typeof data)[number]) => {
    return () => {
      const { bindType, bindGroupInfo } = d;
      if (!bindType) {
        router.push(`/group-setting?btnId=${d.btnId}`);
        return;
      }
      const path = mapObject2QueryString(
        bindType === BindType.GroupLight ? '/group-light-edit' : '/group-curtain-edit',
        {
          groupName: Strings.getLang('groupNameDefault'),
          groupIcon: iconList[groupIcons.find(v => v.code === bindGroupInfo.code)?.value] ?? '',
          code: bindGroupInfo.code,
          localId: bindGroupInfo.localId,
          categoryCode: bindGroupInfo.categoryCode,
        }
      );
      router.push(path);
    };
  },
  [iconList, groupIcons]
);
群组设置列表
群组设置列表的渲染功能逻辑较为简单,根据实际的业务场景需求来渲染即可。当前模板内仅用于区分遥控器群组可绑定的不同品类入口。
import React from 'react';
import { View, router, useQuery } from '@ray-js/ray';
import { TopBar } from '@/components';
import Strings from '@/i18n';
import { useHideMenuButton } from '@/hooks/useHideMenuButton';
import { useCreation } from 'ahooks';
import { useDevice } from '@ray-js/panel-sdk';
import { mapObject2QueryString } from '@/utils/mapObject2QueryString';
import { useSelector } from 'react-redux';
import { selectLocalIds } from '@/redux/modules/groupSlice';
import { selectCoverList } from '@/redux/modules/uiStateSlice';
import { SceneItem } from './components/scene-item';
import styles from './index.module.less';
import { GroupSettingQuery } from './index.type';

export function GroupSetting() {
  useHideMenuButton();
  const query: GroupSettingQuery = useQuery();
  const dpSchema = useDevice(d => d.dpSchema);
  const localIds = useSelector(selectLocalIds);
  const iconList = useSelector(selectCoverList);
  const dataSource = useCreation(() => {
    const groupInfo = localIds.find(d => d.code.slice(-1) === query.btnId);

    const handleNavToGroup = (location: string) => {
      const defaultParams = { groupIcon: iconList[0] };
      const path = mapObject2QueryString(location, {
        ...defaultParams,
        code: `switch_${query.btnId}`,
        localId: groupInfo?.localId,
        categoryCode: groupInfo?.categoryCode,
      });
      router.push(path);
    };

    return [
      {
        title: Strings.getLang('groupLight'),
        subTitle: Strings.getLang('groupLightDesc'),
        img: '/images/scene_setting_light.png',
        valid: !!groupInfo,
        onClick: () => handleNavToGroup('/group-light-edit'),
      },
      {
        title: Strings.getLang('groupCurtain'),
        subTitle: Strings.getLang('groupCurtainDesc'),
        img: '/images/scene_setting_curtain.png',
        valid: !!groupInfo,
        onClick: () => handleNavToGroup('/group-curtain-edit'),
      },
    ].filter(d => d.valid);
  }, [query, dpSchema, iconList]);

  return (
    <View className={styles.view}>
      <TopBar title={Strings.getLang('groupSetting')} isSubPage />
      <View className={styles.content}>
        {dataSource.map((item, index) => {
          return <SceneItem key={index} {...item} />;
        })}
      </View>
    </View>
  );
}

export default GroupSetting;
按键编辑
- 按键编辑的功能在灯光群组和窗帘群组完全一致,当单击图标时,会弹出一个内置的图标选择弹框,选择完毕以后可以通过设备维度的云端存储或者 App 维度的本地存储来进行保存,本模板采用的是设备维度的云端存储。
import React from 'react'; import clsx from 'clsx'; import { useBoolean, useDebounceFn } from 'ahooks'; import { Image, Text, View, navigateBack, openZigbeeLocalGroup, showToast, useAppEvent, useQuery, } from '@ray-js/ray'; import { useSelector } from 'react-redux'; import { useDevice } from '@ray-js/panel-sdk'; import { TopBar, DialogSelectIcon, ColorImage, FixedBottom } from '@/components'; import Strings from '@/i18n'; import { useHideMenuButton } from '@/hooks/useHideMenuButton'; import { ReduxState, useAppDispatch } from '@/redux'; import { selectCoverList, selectIsAdmin } from '@/redux/modules/uiStateSlice'; import { selectBindGroupDevices, updateGroupDevicesAsync, updateGroupIconsAsync, } from '@/redux/modules/groupSlice'; import styles from './index.module.less'; import { GroupEditQuery, Props } from './index.type'; import { TopBarHeight } from '../top-bar'; export const PageGroup: React.FC<Props> = props => { useHideMenuButton(); const { code, localId, categoryCode, groupIcon }: GroupEditQuery = useQuery(); const dispatch = useAppDispatch(); const devId = useDevice(d => d.devInfo.devId); const isAdmin = useSelector(selectIsAdmin); const iconList = useSelector(selectCoverList); const bindGroupDevices = useSelector((state: ReduxState) => selectBindGroupDevices(state, categoryCode) ); const [fixedBottomHeight, setFixedBottomHeight] = React.useState('180rpx'); // 默认为 iPhone 6 基准 const [curGroupIcon, setCurSelectIcon] = React.useState(groupIcon || iconList[0]); const [show, { setTrue, setFalse }] = useBoolean(); const initialParam = React.useRef({ bindGroupDevices }); // 用于重置 const isChanged = groupIcon !== curGroupIcon || initialParam.current.bindGroupDevices?.length !== bindGroupDevices?.length; const isValid = !!curGroupIcon && bindGroupDevices.length > 0; const isSaveDisabled = !isValid || !isChanged; // 只有在数据有效且数据有变化时才可保存 useAppEvent('onShow', () => { dispatch(updateGroupDevicesAsync(categoryCode)); }); const handleNavToZigbeePair = ({}); // ... 详见绑定设备 const handleSelect = React.useCallback(data => { setFalse(); setCurSelectIcon(data); }, []); const { run: handleSave } = useDebounceFn( () => { const curGroupIconIdx = iconList.findIndex(v => v === curGroupIcon); dispatch(updateGroupIconsAsync({ code, value: `${curGroupIconIdx}` })).then(() => { showToast({ title: Strings.getLang('groupEditSuccessTip'), icon: 'success', success: () => { navigateBack({ delta: 2 }); // 直接跳转回首页 }, }); }); }, { wait: 500 } ); return ( <View className={styles.view} style={{ background: props.background }}> <TopBar title={props.title} position="absolute" theme={props.theme} isSubPage /> <View className={styles.gradient} style={{ top: `${TopBarHeight + 52}px`, background: props.background }} /> <View style={{ backgroundImage: props.backgroundImage, marginBottom: isAdmin ? fixedBottomHeight : 0, paddingBottom: !isAdmin ? fixedBottomHeight : 0, }} className={styles.content} > <View style={{ marginTop: `${TopBarHeight + 104}px` }} className={clsx(styles.icon, !isAdmin && styles.disabled)} onClick={setTrue} > <ColorImage width="84rpx" height="84rpx" src={curGroupIcon} color="#1961CE" /> </View> <View className={styles.item} style={{ marginTop: '8px', paddingBottom: '10rpx' }}> <View className={clsx(styles.itemRow, !isAdmin && styles.disabled)} onClick={handleNavToZigbeePair} > <Text>{Strings.getLang('groupSelect')}</Text> <Image className={styles.imageIcon} src="/images/icon_arrow.png" /> </View> <View className={styles.deviceList}> {bindGroupDevices .filter(item => item.devId !== devId) .map(item => { return ( <View key={item.devId} className={styles.deviceItem}> <Image src={item.iconUrl} /> <Text>{item.devName}</Text> </View> ); })} </View> </View> </View> <FixedBottom contentHeight="100rpx" getFixedBottomHeight={setFixedBottomHeight}> {isAdmin && ( <View className={clsx(styles.button, isSaveDisabled && styles.button__disabled)} onClick={handleSave} > {Strings.getLang('save')} </View> )} </FixedBottom> <DialogSelectIcon show={show} currentSelectIcon={curGroupIcon} title={Strings.getLang('groupIcon')} onSelect={handleSelect} onClose={setFalse} /> </View> ); }; - 选择完图标并单击 保存 时,会调用
Redux updateGroupIconsAsync异步 Action 来保存当前设备的群组图标至云端。export const updateGroupIconsAsync = createAsyncThunk<boolean, { code: string; value: string }>( 'group/updateGroupIconsAsync', async (param, thunkApi) => { const state = thunkApi.getState() as ReduxState; const { code, value } = param; const groupIcons = _.cloneDeep(state.group.groupIcons) as Group['groupIcons']; const targetGroup = groupIcons.find(item => item.code === code); if (!targetGroup) { return false; } targetGroup.value = value; const res = await saveDevProperty({ devId: deviceId, bizType: 0, propertyList: JSON.stringify([{ code: DEV_PROPERTIES.GROUP_ICONS, value: groupIcons }]), }); thunkApi.dispatch(groupSlice.actions.updateGroupIcons({ groupIcons })); return res; } );
绑定设备
接下来介绍遥控器群组最核心的功能,即如何进行按键和设备的绑定。
关于在面板小程序应用层的逻辑非常简单,只需要我们调用 openZigbeeLocalGroup API 即可,其中:
deviceId传入当前遥控器开关的设备 ID。localId传入当前遥控器开关按键对应的本地 ID。categoryCode传入当前遥控器开关按键对应的分组编码,注意不是品类编码。codes传入二级品类 Code,用于进行设备列表筛选过滤,比如灯光群组只展示灯光设备。
const handleNavToZigbeePair = React.useCallback(() => {
  openZigbeeLocalGroup({ deviceId: devId, localId, categoryCode, codes: props.codes });
}, []);
- 恭喜你 🎉 完成了本教程的学习!
- 有任何问题可以联系涂鸦智能小程序团队。