Prerequisites
- Have read the Ray Novice Village Tasks to get to know the basics of the Ray framework.
- Have read Develop Universal Panel Based on Ray to get to know the basics of Ray panel development.
- Have read Laser Cleaner APIs to get to know the APIs of robot vacuums.
- The laser robot vacuum template is developed with the Smart Device Model (SDM). For more information, see the documentation of Smart Device Model.
Development environment
For more information, see Panel MiniApp > Set up environment.
Product name: Robot vacuum
Requirement prototype
- Homepage features:
- Show the map
- Cleaning (start cleaning, pause, resume, and recharge)
- Multiple cleaning modes (entire house, selected area, selected spot, and selected zone)
- Video surveillance
- Settings page:
- Manage multiple maps
- Edit maps (restricted area, virtual wall, and floor materials)
- Edit rooms (merge, split, and name rooms, and set cleaning sequence)
- Timer
- Do Not Disturb (DND) mode
- Cleaning records
- Voice package
- Manual control
A product defines the DPs of the associated panel and device. Before you develop a panel, you must create a laser robot vacuum product, define the required DPs, and then implement these DPs on the panel.
Register and log in to the Tuya Developer Platform and create a product.
- Choose Product > Development > Create.
- In the Standard Category tab, choose Small Home Appliances > Cleaning > Robot Vacuum.
- Select a smart mode, select Laser Robot solution, and complete product information. For example, specify Product Name as Robot.

- Click Create.
- After your product is created, the Add Standard Function dialog box appears. You can add the desired functions and click OK. The video preview feature is still supported if these standard functions are not added.
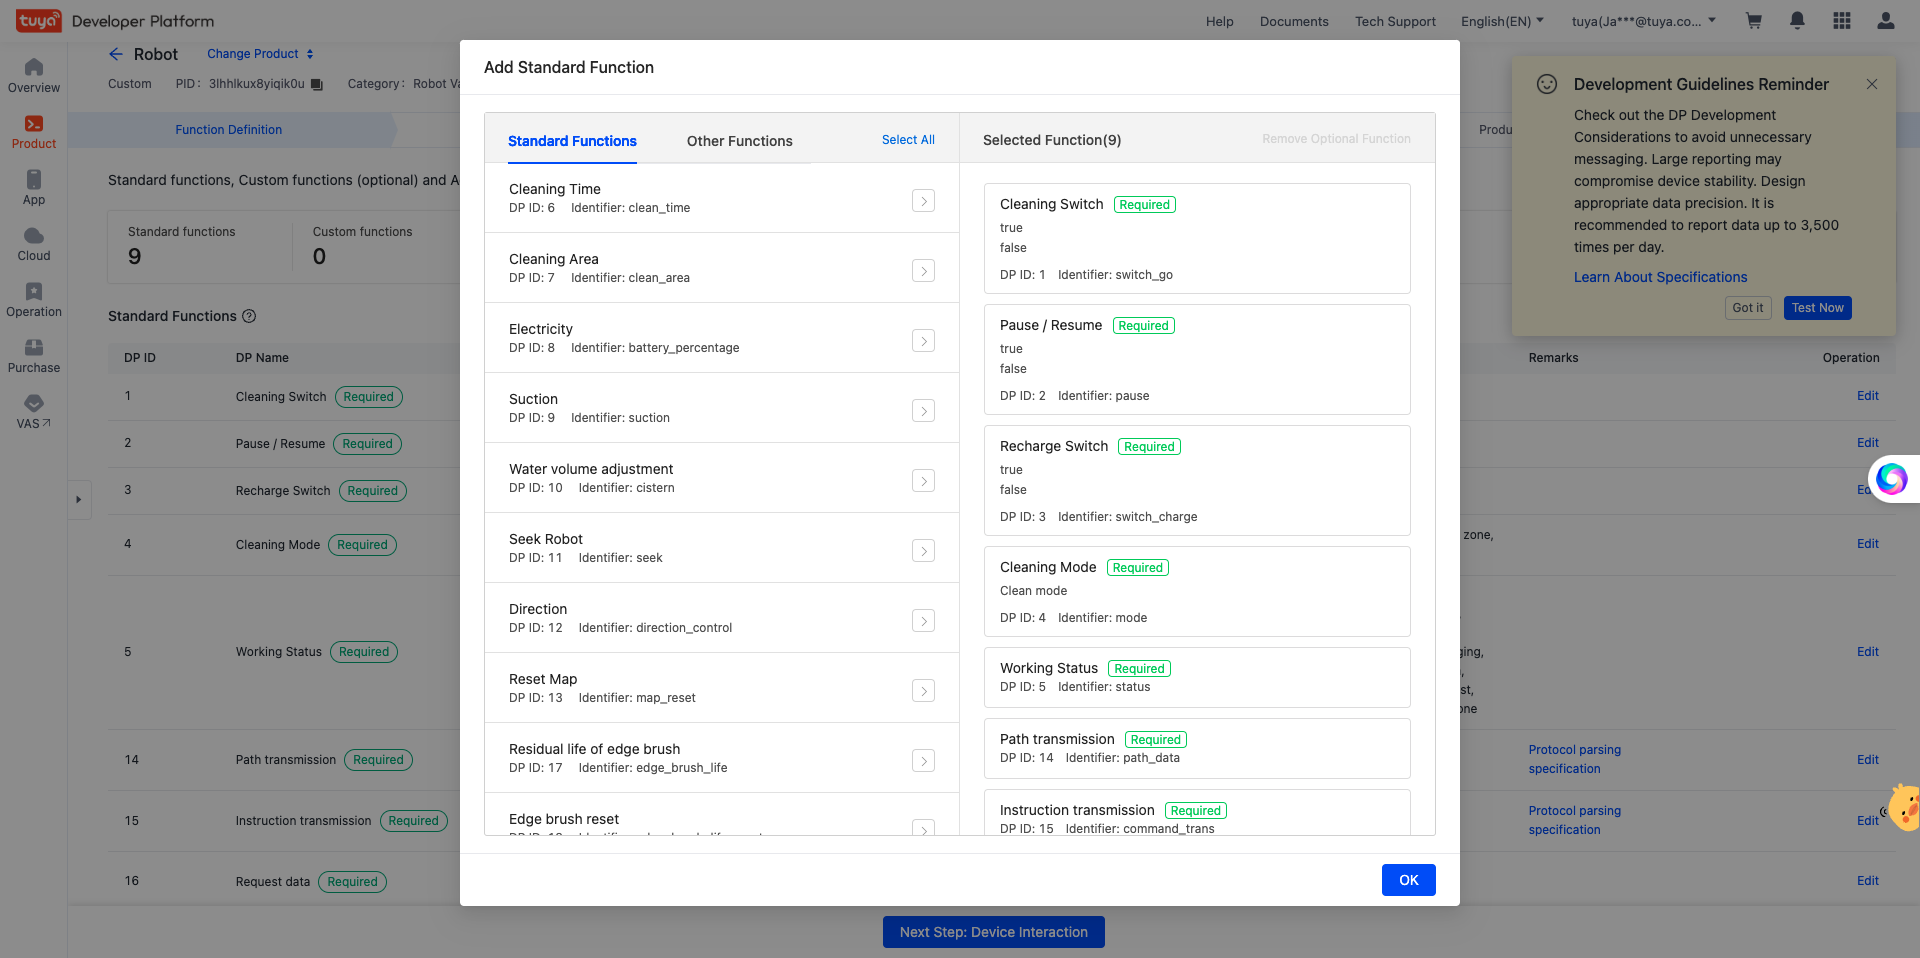
🎉 After the above steps are completed, a robot vacuum product named Robot is created.
Create panel miniapp on Smart MiniApp Developer Platform
Register and log in to the Smart MiniApp Developer Platform. For more information, see Create panel miniapp.
Create a project based on a template
Open Tuya MiniApp IDE and create a panel miniapp project based on the Sweep Robot Template. For more information, see Initialize project.
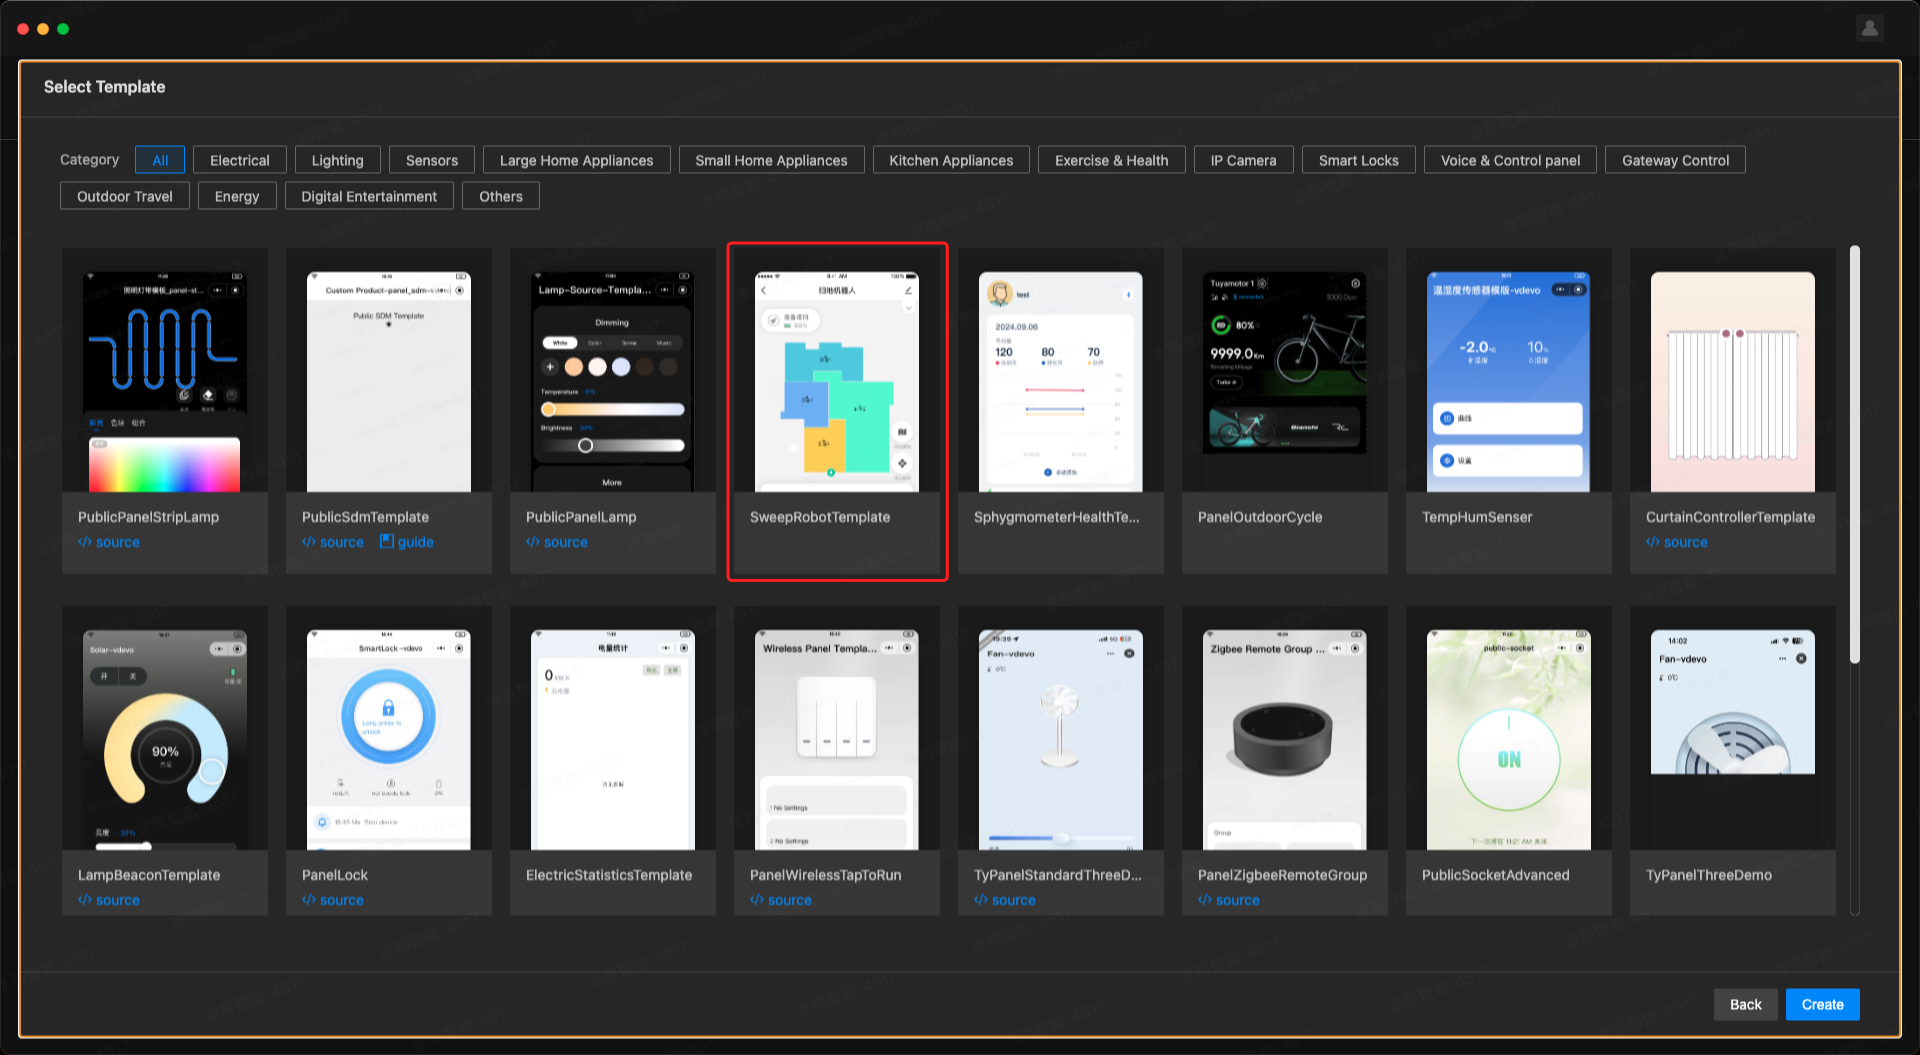
A panel miniapp template has already been initialized through the previous steps. The following section shows the project directories.
├── src
│  	├── api
│  	│   └── ossApi.ts // APIs related to OSS map download
│  	├── components
│  	│   ├── DecisionBar // Confirmation box component
│  	│   ├── EmptyMap // Empty map component
│  	│   ├── HomeTopBar // Top bar component on the homepage
│  	│   ├── IpcRecordTimer // IPC recording timer component
│  	│   ├── IpcRecordTip // IPC recording prompt component
│  	│   ├── Loading // Map loading component
│  	│   ├── Map // Map components (WebViewMap, RjsMap)
│  	│   ├── RoomNamePopLayout // Room naming dialog component
│  	│   ├── RoomPreferencePopLayout // Room cleaning preference dialog component
│  	│   ├── Selector // Selector component
│  	├── constant
│  	│   ├── dpCodes.ts // dpCode constant
│  	│   ├── index.ts // Stores all constant configurations
│  	├── devices // Device model
│  	├── hooks // Hooks
│  	├── i18n // Multilingual settings
│  	├── iconfont // IconFont file
│  	├── pages
│   │   ├── addTiming // The page to add a timer
│   │   ├── cleanPreference // Cleaning preference page
│   │   ├── cleanRecordDetail // Cleaning record details page
│   │   ├── cleanRecords // Cleaning record list page
│   │   ├── doNotDisturb // DND page
│   │   ├── home // Homepage
│   │   ├── ipc // Video surveillance page
│   │   ├── manual // Manual control page
│   │   ├── mapEdit // Map editing page
│   │   ├── multiMap // Multi-map management page
│   │   ├── roomEdit // Room editing page
│   │   ├── roomFloorMaterial // Room floor material page
│   │   ├── setting // Setting page
│   │   ├── timing // Timer list page
│   │   ├── voicePack // Voice package page
│  	├── redux // Redux
│   ├── res // Resources, such as pictures and SVG
│   ├── styles // Global style
│   ├── utils
│   │   ├── index.ts // Common utilities and methods
│   │   ├── ipc.ts // Utilities and methods related to IPC
│   │   ├── robotStatus.ts // Method for determining the status of the robot vacuum
│   ├── app.config.ts
│   ├── app.less
│   ├── app.tsx
│   ├── composeLayout.tsx // Handle and listen for the adding, unbinding, and DP changes of sub-devices
│   ├── global.config.ts
│   ├── mixins.less // Less mixins
│   ├── routes.config.ts // Configure routing
│   ├── variables.less // Less variables
├── typings // Define global types
The robot vacuum is modularized and the underlying implementation is separated from the service calls, so you can focus more on the UI processing without worrying too much about processing other process logic. Currently, the robot vacuum panel mainly relies on the following packages:
@ray-js/robot-map: Directly called by the service layer. This package provides RobotMap and RjsRobotMap components, and exposes common methods of map operations.@ray-js/robot-data-stream: Directly called by the service layer. This package encapsulates the P2P transmission method between the panel and the device. You can ignore the complex process of P2P communication and only need to focus on the business logic.@ray-js/robot-protocol: Directly called by the service layer. This package provides a standard capability for complete protocol parsing, and encapsulates the parsing and encoding process of relatively complex raw type data points (DPs) in the protocol.
For general requirements of robot vacuums, you can focus on the application business logic and UI display without worrying about the implementation in the internal dependency package. Upgrades of the dependency packages will be backward compatible, and you can upgrade the dependency package separately in the project.
Displaying live maps is a core feature of a robot vacuum application. So, how to render the first map on the homepage?
Map components
@ray-js/robot-map provides two types of map components:
- WebView map component
- Rjs map component
You can choose a WebView component or Rjs component to suit scenario requirements.
The homepage is usually a live map. It is recommended to use the WebView component, which can be imported as follows:
import WebViewMap from "@/components/Map/WebViewMap";

// Add your custom logic here

return (
  <WebViewMap
    map={map}
    path={path}
    roomProperties={roomProperties}
    virtualWalls={virtualWalls}
    forbiddenSweepZones={forbiddenSweepZones}
    forbiddenMopZones={forbiddenMopZones}
    cleanZones={cleanZones}
    spots={spots}
    runtime={{
      enableRoomSelection: false,
      selectRoomIds,
      editingCleanZoneIds,
    }}
    onMapReady={handleMapReady}
    onMapDrawed={handleMapDrawed}
    onClickRoom={handleClickRoom}
    onClickRoomProperties={handleClickRoom}
  />
);
You can view more details about @ray-js/robot-map in the documentation:
$ npx serve node_modules/@ray-js/robot-map-sdk/dist-docs
Data integration
At this moment, you might have a question: how is the map and route data injected into this component?
The template encapsulates the @ray-js/robot-data-stream tool library, which has built-in processes such as P2P initialization, connection establishment, data stream download, and destruction. You only need to call the useP2PDataStream hook to get the map and route data transmitted from the robot vacuum in real time, provided that your robot vacuum supports P2P data transmission.
import { useP2PDataStream } from "@ray-js/robot-data-stream";
import { useMapData, usePathData } from "@/hooks";

// useMapData is a hook that handles and injects map data into Map Component
const { onMapData } = useMapData();
// usePathData is a hook that handles and injects route data into Map Component
const { onPathData } = usePathData();

useP2PDataStream(getDevInfo().devId, onMapData, onPathData);
Map debugging in IDE
If all goes well, you might have successfully seen the map on your phone. However, it is a little inconvenient if you need to scan the QR code with your phone to debug during the development stage. So, is there a way to display a live map on the IDE as well?
The IDE doesn't support P2P connections, but you can do this using the Robot Vacuum Debugger plugin. For detailed usage, refer to the documentation.
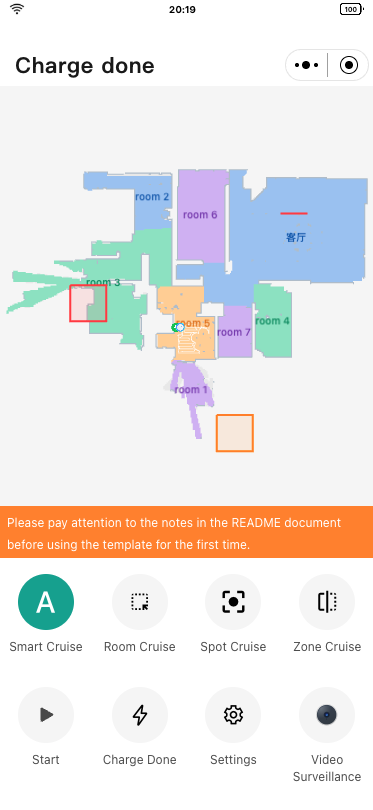
Cleaning Modes
Cleaning is the most fundamental feature of robot vacuums. The template includes 4 built-in cleaning modes: Smart (whole house), Room Selection, Spot, and Zone.
All cleaning mode states are managed through Redux and stored in mapStateSlice. The currently active cleaning mode is saved in the currentMode field.
Switching Cleaning Modes
Switching cleaning modes is straightforward - simply update the currentMode state through Redux:
import { useDispatch } from "react-redux";
import { updateMapState } from "@/redux/modules/mapStateSlice";

const dispatch = useDispatch();

/**
 * Switch cleaning mode
 * @param mode - Cleaning mode: 'smart' | 'select_room' | 'pose' | 'zone'
 */
const handleSwitchMode = async (mode: Mode) => {
  // Get viewport center point (for spot cleaning)
  let spotPoint = { x: 0, y: 0 };
  if (mode === "pose") {
    spotPoint = await mapApi.getSpotPointByViewportCenter();
  }

  dispatch(
    updateMapState({
      currentMode: mode,
      selectRoomIds: [],
      spots: mode === "pose" ? [{ id: "0", point: spotPoint }] : [],
      cleanZones: mode === "zone" ? [] : [],
    })
  );
};
Spot Cleaning (Point and Clean)
Spot cleaning mode allows users to add a movable cleaning point on the map. The new template implements this functionality through the MapApi instance and Redux state.
Getting the MapApi Instance
The MapApi instance is returned through the onMapReady callback after the map component loads, and is stored in Redux:
import { setMapApi } from "@/redux/modules/mapApisSlice";

const handleMapReady = (mapApi: MapApi) => {
  // Store mapApi instance in Redux for access by other components
  dispatch(setMapApi({ key: "home", mapApi }));
};
Adding a Spot Cleaning Point
In other components, you can retrieve the mapApi instance through Redux selector and use it to get the spot coordinates at viewport center:
import { useSelector, useDispatch } from "react-redux";
import { selectMapApiByKey } from "@/redux/modules/mapApisSlice";
import { updateMapState } from "@/redux/modules/mapStateSlice";

const mapApi = useSelector(selectMapApiByKey("home"));
const dispatch = useDispatch();

/**
 * Add a movable spot cleaning point
 */
const handleAddSpot = async () => {
  // Get viewport center point coordinates
  const spotPoint = await mapApi.getSpotPointByViewportCenter();

  dispatch(
    updateMapState({
      currentMode: "pose",
      spots: [
        {
          id: "0",
          point: spotPoint,
        },
      ],
    })
  );
};
Spot Cleaning Configuration in Map Component
Spot cleaning interaction is controlled by WebViewMap component props:
<WebViewMap
  // Spot cleaning point data
  spots={spots}
  runtime={{
    // Allow editing spot position when robot is not working and in pose mode
    editingSpotIds:
      robotIsNotWorking(dpStatus) && currentMode === "pose"
        ? spots.map((spot) => spot.id)
        : [],
  }}
  // Spot update callback
  onUpdateSpot={(spot: SpotParam) => {
    dispatch(updateMapState({ spots: [spot] }));
  }}
/>
Zone Cleaning
Zone cleaning mode allows users to draw multiple rectangular areas on the map for cleaning.
Adding Clean Zones
Use the mapApi.getCleanZonePointsByViewportCenter() method to generate a zone at viewport center:
import { useSelector, useDispatch } from "react-redux";
import { selectMapApiByKey } from "@/redux/modules/mapApisSlice";
import {
  selectMapStateByKey,
  updateMapState,
} from "@/redux/modules/mapStateSlice";
import { nanoid } from "@reduxjs/toolkit";
import { offsetPointsToAvoidOverlap } from "@ray-js/robot-map";

const mapApi = useSelector(selectMapApiByKey("home"));
const cleanZones = useSelector(selectMapStateByKey("cleanZones"));
const dispatch = useDispatch();

/**
 * Add a new clean zone
 */
const handleAddCleanZone = async () => {
  // Generate a clean zone at viewport center with size 1.6m
  const zonePoints = await mapApi.getCleanZonePointsByViewportCenter({
    size: 1.6,
  });

  // Avoid overlap with existing zones
  offsetPointsToAvoidOverlap(
    zonePoints,
    cleanZones.map((zone) => zone.points)
  );

  const newId = nanoid();

  dispatch(
    updateMapState({
      cleanZones: [
        ...cleanZones,
        {
          points: zonePoints,
          id: newId,
        },
      ],
      // Set to editable state
      editingCleanZoneIds: [newId],
    })
  );
};
Zone Cleaning Configuration in Map Component
<WebViewMap
  // Clean zone data
  cleanZones={cleanZones}
  runtime={{
    // Currently editable zone ID list
    editingCleanZoneIds,
  }}
  // Triggered when clicking a clean zone
  onClickCleanZone={(data: ZoneParam) => {
    dispatch(updateMapState({ editingCleanZoneIds: [data.id] }));
  }}
  // Triggered when zone is updated (drag, resize)
  onUpdateCleanZone={(cleanZone: ZoneParam) => {
    dispatch(
      updateMapState({
        cleanZones: cleanZones.map((zone) =>
          zone.id === cleanZone.id ? cleanZone : zone
        ),
      })
    );
  }}
  // Triggered when zone is removed
  onRemoveCleanZone={(id: string) => {
    dispatch(
      updateMapState({
        cleanZones: cleanZones.filter((zone) => zone.id !== id),
      })
    );
  }}
/>
Room Selection Cleaning
Room selection cleaning allows users to tap rooms on the map to select areas for cleaning.
Room Selection Configuration in Map Component
<WebViewMap
  runtime={{
    // Enable room selection mode
    enableRoomSelection: currentMode === "select_room",
    // Selected room ID list
    selectRoomIds,
  }}
  // Triggered when clicking a room
  onClickRoom={(data: RoomData) => {
    if (robotIsNotWorking(dpStatus) && currentMode === "select_room") {
      const { selectRoomIds } = store.getState().mapState;

      if (selectRoomIds.includes(data.id)) {
        // Deselect
        dispatch(
          updateMapState({
            selectRoomIds: selectRoomIds.filter((id) => id !== data.id),
          })
        );
      } else {
        // Select
        dispatch(
          updateMapState({
            selectRoomIds: [...selectRoomIds, data.id],
          })
        );
      }
    }
  }}
/>
Sending Cleaning Commands
When users tap the start cleaning button, send the appropriate command based on the current cleaning mode:
import {
  encodeZoneClean0x3a,
  encodeSpotClean0x3e,
  encodeRoomClean0x14,
} from "@ray-js/robot-protocol";
import { PROTOCOL_VERSION } from "@/constant";

/**
 * Send zone cleaning command
 */
const handleZoneStart = async () => {
  const { cleanZones } = store.getState().mapState;

  const command = encodeZoneClean0x3a({
    version: PROTOCOL_VERSION,
    protocolVersion: 2,
    cleanMode: 0,
    suction: 1,
    cistern: 1,
    cleanTimes: 1,
    origin: { x: 0, y: 0 },
    zones: cleanZones.map((item) => ({
      name: "",
      points: item.points,
    })),
  });

  await dpActions[commandTransCode].set(command);
  await dpActions[modeCode].set("zone");
  await dpActions[switchGoCode].set(true);
};

/**
 * Send spot cleaning command
 */
const handlePoseStart = async () => {
  const { spots } = store.getState().mapState;

  const command = encodeSpotClean0x3e({
    version: PROTOCOL_VERSION,
    protocolVersion: 1,
    cleanMode: 0,
    suction: 4,
    cistern: 0,
    cleanTimes: 2,
    origin: { x: 0, y: 0 },
    points: spots.map((item) => item.point),
  });

  await dpActions[commandTransCode].set(command);
  await dpActions[modeCode].set("pose");
  await dpActions[switchGoCode].set(true);
};

/**
 * Send room selection cleaning command
 */
const handleSelectRoomStart = async () => {
  const { version, selectRoomIds } = store.getState().mapState;

  const data = encodeRoomClean0x14({
    cleanTimes: 1,
    roomIds: selectRoomIds,
    mapVersion: version,
  });

  dpActions[commandTransCode].set(data);
  dpActions[modeCode].set("select_room");
  dpActions[switchGoCode].set(true);
};
Core Concepts Summary
- State Management: All cleaning-related states are stored in Redux's
mapStateSlice - MapApi Instance: Stored and accessed through
mapApisSlice, providing core methods for map operations - Map Component: The
WebViewMapcomponent receives state through props and notifies state changes through callback functions - Cleaning Modes: Controlled by the
currentModefield, combined with differentruntimeconfigurations to implement different interaction modes
Overview
The multi-map feature allows robot vacuums to save and manage multiple different maps (e.g., different floors). The template uses a snapshot image approach to implement multi-map list display, which provides better performance compared to directly rendering multiple map component instances.
Implementation Comparison
Two recommended multi-map implementation approaches:
Approach | Advantages | Disadvantages | Use Cases |
Snapshot Image (Recommended) | Excellent performance, low memory usage, fast loading | Static snapshots, no interaction | Multi-map list display |
RjsMap Component | Interactive, full functionality | Creating multiple instances causes high performance overhead and memory usage | Scenarios requiring interaction |
The template uses the snapshot image approach, generating map snapshots using the MapApi.snapshotByData() method.
Core Implementation
The core logic of multi-map functionality is encapsulated in multiMapsSlice, mainly including the following parts:
1. Fetching Map List
Use the fetchMultiMaps async action to get device-stored multi-map data:
import { useDispatch, useSelector } from "react-redux";
import {
  fetchMultiMaps,
  selectMultiMaps,
} from "@/redux/modules/multiMapsSlice";

const dispatch = useDispatch();
const multiMaps = useSelector(selectMultiMaps);

useEffect(() => {
  // Fetch multi-map list
  dispatch(fetchMultiMaps());
}, []);
Execution flow of fetchMultiMaps:
- Read generated snapshot images from local cache
- Call
getMultipleMapFilesAPI to get cloud map file list - Compare cache and cloud data, clean up deleted map snapshots
- Add maps without snapshots to async queue for processing
- Return map list data
2. Generating Map Snapshots
The template uses an async task queue createAsyncQueue to serially process snapshot generation tasks, avoiding performance issues from processing too many maps simultaneously:
const taskQueue = createAsyncQueue(
  async (params: { filePathKey: string; bucket: string; file: string }) => {
    try {
      const { filePathKey, bucket, file } = params;

      // 1. Download map data from cloud
      const data = await getMapInfoFromCloudFile({
        bucket,
        file,
      });

      const {
        virtualState: { virtualWalls, forbiddenMopZones, forbiddenSweepZones },
      } = data;

      // 2. Get MapApi instance from home page
      const homeMapApi = store.getState().mapApis.home;

      if (homeMapApi) {
        // 3. Generate snapshot image using snapshotByData
        const snapshotImage = await homeMapApi.snapshotByData({
          map: data.originMap,
          roomProperties: decodeRoomProperties(data.originMap),
          virtualWalls,
          forbiddenMopZones,
          forbiddenSweepZones,
        });

        // 4. Store snapshot in Redux
        store.dispatch(
          upsertSnapshotImage({ key: filePathKey, snapshotImage })
        );
      }
    } catch (err) {
      console.error(err);
    }
  },
  // After queue processing completes, save all snapshots to local cache
  () => {
    const { snapshotImageMap } = store.getState().multiMaps;
    setStorage({
      key: `snapshotImageMap_${devices.common.getDevInfo().devId}`,
      data: JSON.stringify(snapshotImageMap),
    });
  }
);
Key points:
- Uses home page MapApi instance to generate snapshots for all maps, no need to create multiple map instances
snapshotByData()method receives map raw data, returns base64 format image- Snapshot generation is asynchronous, processed serially through queue
3. Displaying Map Snapshots
In the multi-map list page, directly use Image component to display snapshots:
import { Image } from "@ray-js/ray";
import { useSelector } from "react-redux";
import { ReduxState } from "@/redux";

const Item: FC<{ data: MultiMap }> = ({ data }) => {
  const { filePathKey } = data;

  // Get snapshot image from Redux
  const snapshotImage = useSelector(
    (state: ReduxState) => state.multiMaps.snapshotImageMap[filePathKey]
  );

  return (
    <View className={styles.mapWrapper}>
      {snapshotImage && (
        <Image
          className={styles.mapImage}
          src={snapshotImage}
          mode="aspectFit"
        />
      )}
      {/* Show Loading when snapshot not yet generated */}
      <Loading isLoading={!snapshotImage} />
    </View>
  );
};
4. Map Operations
Multi-map supports two operations: Use Map and Delete Map.
Use Map
import { encodeUseMap0x2e } from "@ray-js/robot-protocol";
import { commandTransCode } from "@/constant/dpCodes";

const handleUseMap = async () => {
  const { bucket, robotUseFile, mapId } = data;

  // Get complete URL of cloud file
  const { data: url } = await ossApiInstance.getCloudFileUrl(
    bucket,
    robotUseFile
  );

  // Send use map command
  actions[commandTransCode].set(
    encodeUseMap0x2e({
      mapId,
      url,
    })
  );
};
Delete Map
import { encodeDeleteMap0x2c } from "@ray-js/robot-protocol";

const handleDelete = () => {
  const { id } = data;

  // Send delete map command
  actions[commandTransCode].set(encodeDeleteMap0x2c({ id }));
};
Using RjsMap Component Approach (Alternative)
If you need interactive functionality in the multi-map list, you can use the RjsMap component to render maps directly:
import RjsMap from "@/components/Map/RjsMap";

const Item: FC<{ data: MultiMap }> = ({ data }) => {
  return (
    <RjsMap
      map={map}
      path={path}
      roomProperties={roomProperties}
      virtualWalls={virtualWalls}
      forbiddenSweepZones={forbiddenSweepZones}
      forbiddenMopZones={forbiddenMopZones}
      cleanZones={cleanZones}
      spots={spots}
      // ... other configurations
    />
  );
};
Core APIs
API | Description |
| Fetch multi-map list (async thunk) |
| Download map data from cloud |
| Generate snapshot image from map data |
| Update snapshot image to Redux |
| Select all map list |
| Select snapshot image by key |
Overview
Map editing functionality allows users to set virtual restricted areas on the map, including virtual walls, no-go zones, and no-mop zones. These areas restrict the robot vacuum's cleaning range and protect specific areas from being disturbed.
Page State Management
The map editing page uses local state to manage all editing states, not directly modifying Redux data. Commands are only sent when the user clicks "Confirm":
const [virtualWalls, setVirtualWalls] = useState<VirtualWallParam[]>(
  () => store.getState().mapState.virtualWalls
);
const [forbiddenSweepZones, setForbiddenSweepZones] = useState<ZoneParam[]>(
  () => store.getState().mapState.forbiddenSweepZones
);
const [forbiddenMopZones, setForbiddenMopZones] = useState<ZoneParam[]>(
  () => store.getState().mapState.forbiddenMopZones
);

// Editing state
const [editingVirtualWallIds, setEditingVirtualWallIds] = useState<string[]>(
  []
);
const [editingForbiddenMopZoneIds, setEditingForbiddenMopZoneIds] = useState<
  string[]
>([]);
const [editingForbiddenSweepZoneIds, setEditingForbiddenSweepZoneIds] =
  useState<string[]>([]);
Core Feature Implementation
1. Adding Virtual Walls
A virtual wall is a line segment with two draggable endpoints, generated using mapApi.getWallPointsByViewportCenter() at viewport center:
import { useThrottleFn } from "ahooks";
import { nanoid } from "@reduxjs/toolkit";
import { offsetPointsToAvoidOverlap } from "@ray-js/robot-map";

const { run: handleVirtualWall } = useThrottleFn(
  async () => {
    if (!mapApi) return;

    // Generate virtual wall at viewport center with width 1.2m
    const wallPoints = await mapApi.getWallPointsByViewportCenter({
      width: 1.2,
    });

    // Automatically offset to avoid overlap with existing virtual walls
    offsetPointsToAvoidOverlap(
      wallPoints,
      virtualWalls.map((wall) => wall.points)
    );

    const newId = nanoid();
    setVirtualWalls([...virtualWalls, { id: newId, points: wallPoints }]);
    setEditingVirtualWallIds([newId]);
  },
  { wait: 300, leading: true, trailing: false }
);
Key points:
- Use
useThrottleFnfor throttling to prevent rapid clicking offsetPointsToAvoidOverlapautomatically offsets to avoid overlap- Newly created virtual wall immediately enters editing state
2. Adding No-Go Zones
A no-go zone is a draggable, resizable rectangular area:
const { run: handleNoGo } = useThrottleFn(
  async () => {
    // Generate no-go zone at viewport center, size 1.6m x 1.6m
    const points = await mapApi.getForbiddenSweepZonePointsByViewportCenter({
      size: 1.6,
    });

    // Automatically offset to avoid overlap with existing no-go and no-mop zones
    offsetPointsToAvoidOverlap(points, [
      ...forbiddenSweepZones.map((zone) => zone.points),
      ...forbiddenMopZones.map((zone) => zone.points),
    ]);

    const newId = nanoid();
    setForbiddenSweepZones([...forbiddenSweepZones, { id: newId, points }]);
    setEditingForbiddenSweepZoneIds([newId]);
  },
  { wait: 300, leading: true, trailing: false }
);
3. Adding No-Mop Zones
No-mop zone implementation is similar to no-go zones, just using a different API method:
const { run: handleNoMop } = useThrottleFn(
  async () => {
    // Generate no-mop zone at viewport center
    const points = await mapApi.getForbiddenMopZonePointsByViewportCenter({
      size: 1.6,
    });

    offsetPointsToAvoidOverlap(points, [
      ...forbiddenSweepZones.map((zone) => zone.points),
      ...forbiddenMopZones.map((zone) => zone.points),
    ]);

    const newId = nanoid();
    setForbiddenMopZones([...forbiddenMopZones, { id: newId, points }]);
    setEditingForbiddenMopZoneIds([newId]);
  },
  { wait: 300, leading: true, trailing: false }
);
4. Map Component Configuration
Configure virtual walls and forbidden zones interaction in WebViewMap component:
<WebViewMap
  onMapReady={handleMapReady}
  // Data
  virtualWalls={virtualWalls}
  forbiddenSweepZones={forbiddenSweepZones}
  forbiddenMopZones={forbiddenMopZones}
  runtime={{
    // Editing state
    editingVirtualWallIds,
    editingForbiddenMopZoneIds,
    editingForbiddenSweepZoneIds,
    // Hide path
    showPath: false,
  }}
  // Virtual wall events
  onUpdateVirtualWall={handleUpdateVirtualWall}
  onClickVirtualWall={handleClickVirtualWall}
  onRemoveVirtualWall={handleRemoveVirtualWall}
  // No-mop zone events
  onUpdateForbiddenMopZone={handleUpdateForbiddenMopZone}
  onClickForbiddenMopZone={handleClickForbiddenMopZone}
  onRemoveForbiddenMopZone={handleRemoveForbiddenMopZone}
  // No-go zone events
  onUpdateForbiddenSweepZone={handleUpdateForbiddenSweepZone}
  onClickForbiddenSweepZone={handleClickForbiddenSweepZone}
  onRemoveForbiddenSweepZone={handleRemoveForbiddenSweepZone}
/>
5. Event Handling
Update: Triggered when dragging or resizing
const handleUpdateVirtualWall = (wall: VirtualWallParam) => {
  setVirtualWalls(virtualWalls.map((w) => (w.id === wall.id ? wall : w)));
};

const handleUpdateForbiddenSweepZone = (zone: ZoneParam) => {
  setForbiddenSweepZones(
    forbiddenSweepZones.map((z) => (z.id === zone.id ? zone : z))
  );
};
Click: Toggle editing state
const handleClickVirtualWall = (wall: VirtualWallParam) => {
  setEditingVirtualWallIds([wall.id]);
};

const handleClickForbiddenSweepZone = (zone: ZoneParam) => {
  setEditingForbiddenSweepZoneIds([zone.id]);
};
Delete: Remove forbidden zone or virtual wall
const handleRemoveVirtualWall = (removedId: string) => {
  setVirtualWalls(virtualWalls.filter((w) => w.id !== removedId));
  setEditingVirtualWallIds(
    editingVirtualWallIds.filter((id) => id !== removedId)
  );
};
6. Save and Cancel
Cancel button: Restore to state when entering page
const handleReset = () => {
  // Retrieve initial data from Redux store
  const initialState = store.getState().mapState;

  // Reset all data to initial state
  setVirtualWalls(initialState.virtualWalls);
  setForbiddenSweepZones(initialState.forbiddenSweepZones);
  setForbiddenMopZones(initialState.forbiddenMopZones);

  // Clear all editing states
  setEditingVirtualWallIds([]);
  setEditingForbiddenMopZoneIds([]);
  setEditingForbiddenSweepZoneIds([]);
};
Confirm button: Send command to save to device
import {
  encodeVirtualArea0x38,
  encodeVirtualWall0x12,
} from "@ray-js/robot-protocol";
import { PROTOCOL_VERSION } from "@/constant";

const handleConfirm = async () => {
  // Encode forbidden zone command (no-go + no-mop zones)
  const zonesCommand = encodeVirtualArea0x38({
    version: PROTOCOL_VERSION,
    protocolVersion: 1,
    virtualAreas: forbiddenSweepZones
      .map((item) => ({
        points: item.points,
        mode: 1, // No-go zone
        name: "",
      }))
      .concat(
        forbiddenMopZones.map((item) => ({
          points: item.points,
          mode: 2, // No-mop zone
          name: "",
        }))
      ),
    origin: { x: 0, y: 0 },
  });

  // Encode virtual wall command
  const virtualWallsCommand = encodeVirtualWall0x12({
    version: PROTOCOL_VERSION,
    origin: { x: 0, y: 0 },
    walls: virtualWalls.map((item) => item.points),
  });

  // Send commands
  actions[commandTransCode].set(zonesCommand);
  actions[commandTransCode].set(virtualWallsCommand);

  // Clear editing states
  setEditingForbiddenMopZoneIds([]);
  setEditingForbiddenSweepZoneIds([]);
  setEditingVirtualWallIds([]);
};
Best Practices
- Prevent Overlap: Use
offsetPointsToAvoidOverlapto automatically offset newly created zones - Throttling: Use
useThrottleFnto prevent users from rapidly clicking and creating multiple zones - Local State: Use local state during editing, only send commands on confirmation
- Undo Support: Provide cancel button allowing users to restore to initial state
Overview
Room editing functionality allows users to manage rooms on the map, including room merging, room splitting, room renaming, and cleaning sequence settings. These features help users better organize and control cleaning tasks.
State Management
Room editing uses multi-layer state management, with temporary states only committed on confirmation:
type RoomEditStatus = "normal" | "split" | "merge" | "reName" | "order";

// Editing state
const [roomEditStatus, setRoomEditStatus] = useState<RoomEditStatus>("normal");
const [enableRoomSelection, setEnableRoomSelection] = useState(false);
const [selectRoomIds, setSelectRoomIds] = useState<number[]>([]);
const [dividingRoomId, setDividingRoomId] = useState<number | null>(null);

// Room selection mode
const [roomSelectionMode, setRoomSelectionMode] = useState<
  "checkmark" | "order"
>("checkmark");

// Temporary state (uncommitted)
const [tempCleaningOrder, setTempCleaningOrder] = useState<
  Record<number, number>
>({});
const [tempName, setTempName] = useState<Record<number, string>>({});

// Merge original data and temporary state
const finalRoomProperties = useMemo(() => {
  return roomProperties.map((room) => ({
    ...room,
    order: tempCleaningOrder[room.id] ?? room.order ?? 0,
    name: tempName[room.id] ?? room.name ?? "",
  }));
}, [roomProperties, tempCleaningOrder, tempName]);
Core Feature Implementation
1. Room Merging
Merge two adjacent rooms into one:
/**
 * Enter merge mode
 */
const handleMerge = async () => {
  setEnableRoomSelection(true);
  setSelectRoomIds([]);
  setRoomEditStatus("merge");
  setRoomSelectionMode("checkmark");
};

/**
 * Room selection click logic
 */
const handleClickRoom = (room: RoomData) => {
  if (roomEditStatus === "merge") {
    if (selectRoomIds.includes(room.id)) {
      // Deselect
      const newSelectRoomIds = selectRoomIds.filter((id) => id !== room.id);
      setSelectRoomIds(newSelectRoomIds);
      setActiveConfirm(newSelectRoomIds.length === 2);
    } else {
      if (selectRoomIds.length >= 2) {
        // Can only merge two rooms
        ToastInstance("Can only select two rooms to merge");
        return;
      }
      const newSelectRoomIds = [...selectRoomIds, room.id];
      setSelectRoomIds(newSelectRoomIds);
      setActiveConfirm(newSelectRoomIds.length === 2);
    }
  }
};

/**
 * Confirm merge
 */
const handleConfirmMerge = async () => {
  // Check if rooms are adjacent
  const isAdjacent = await mapApi.areRoomsAdjacent(selectRoomIds);

  if (!isAdjacent) {
    ToastInstance.fail("Can only merge adjacent rooms");
    return;
  }

  showLoading({ title: "" });

  // Encode merge command
  const command = encodePartitionMerge0x1e({
    roomIds: selectRoomIds,
    version: PROTOCOL_VERSION,
  });

  actions[commandTransCode].set(command);

  // Set timeout reminder
  timerRef.current = setTimeout(() => {
    hideLoading();
    ToastInstance.fail({ message: "Merge failed" });
  }, 20 * 1000);
};
Key points:
- Use
mapApi.areRoomsAdjacent()to check if rooms are adjacent - Maximum of two rooms can be selected
- Monitor device response, handle success/failure results
2. Room Splitting
Draw a dividing line within a room to split it into two rooms:
/**
 * Enter split mode
 */
const handleSplit = () => {
  setActiveConfirm(false);
  setRoomEditStatus("split");
  setEnableRoomSelection(true);
  setSelectRoomIds([]);
  setRoomSelectionMode("checkmark");
};

/**
 * Click room to select room for splitting
 */
const handleClickRoom = (room: RoomData) => {
  if (roomEditStatus === "split") {
    setSelectRoomIds([room.id]);
    setDividingRoomId(room.id); // Enable divider drawing
    setActiveConfirm(true);
  }
};

/**
 * When divider updates, check if valid
 */
const handleUpdateDivider = async () => {
  const effectiveDividerPoints = await mapApi.getEffectiveDividerPoints();

  if (!effectiveDividerPoints) {
    setActiveConfirm(false); // Invalid divider, disable confirm button
  } else {
    setActiveConfirm(true);
  }
};

/**
 * Confirm split
 */
const handleConfirmSplit = async () => {
  // Get valid divider points
  const points = await mapApi.getEffectiveDividerPoints();

  const command = encodePartitionDivision0x1c({
    roomId: dividingRoomId,
    points,
    origin: { x: 0, y: 0 },
    version: PROTOCOL_VERSION,
  });

  actions[commandTransCode].set(command);
};
Key points:
- After setting
dividingRoomId, map component displays divider - Use
mapApi.getEffectiveDividerPoints()to get divider points - Check if room count exceeds limit (V1: 32, V2: 28)
3. Room Renaming
Set custom names for rooms:
/**
 * Enter rename mode
 */
const handleRename = () => {
  setRoomEditStatus("reName");
  setEnableRoomSelection(true);
  setSelectRoomIds([]);
  setRoomSelectionMode("checkmark");
};

/**
 * Click room to show rename dialog
 */
const handleClickRoom = (room: RoomData) => {
  if (roomEditStatus === "reName") {
    setSelectRoomIds([room.id]);
    setShowRenameModal(true);
  }
};

/**
 * Rename dialog confirm
 */
const handleRenameConfirm = (name: string) => {
  setShowRenameModal(false);
  setTempName({ ...tempName, [selectRoomIds[0]]: name });
  setActiveConfirm(true);
};

/**
 * Confirm rename
 */
const handleConfirmRename = async () => {
  const { version } = store.getState().mapState;

  const command = encodeSetRoomName0x24({
    mapVersion: version,
    version: PROTOCOL_VERSION,
    rooms: Object.entries(tempName).map(([roomId, name]) => ({
      roomId: Number(roomId),
      name,
    })),
  });

  actions[commandTransCode].set(command);
  showLoading({ title: "" });
};
Key points:
- Use
tempNameto store uncommitted room names - Support batch renaming (can name multiple rooms consecutively then submit at once)
- Provide preset tags (kitchen, bathroom, living room, etc.)
4. Cleaning Sequence
Set the cleaning order of rooms:
/**
 * Enter order mode
 */
const handleOrder = async () => {
  setRoomEditStatus("order");
  setEnableRoomSelection(true);
  setSelectRoomIds([]);
  setRoomSelectionMode("order"); // Use order selection mode
};

/**
 * Click room to set/cancel order
 */
const handleClickRoom = (room: RoomData) => {
  if (roomEditStatus === "order") {
    const currentOrder =
      finalRoomProperties.find((r) => r.id === room.id)?.order || 0;

    setTempCleaningOrder((prev) => {
      if (currentOrder > 0) {
        // Cancel order, decrement other room orders
        const updates = { ...prev, [room.id]: 0 };
        finalRoomProperties.forEach((r) => {
          if (r.order > currentOrder) {
            const originalOrder =
              roomProperties.find((orig) => orig.id === r.id)?.order || 0;
            updates[r.id] = (prev[r.id] ?? originalOrder) - 1;
          }
        });
        return updates;
      }

      // Set new order (append to end)
      const maxOrder = Math.max(0, ...finalRoomProperties.map((r) => r.order));
      return { ...prev, [room.id]: maxOrder + 1 };
    });
  }
};

/**
 * Confirm order
 */
const handleConfirmOrder = async () => {
  const { version } = store.getState().mapState;

  // Sort room IDs by order
  const roomIds = finalRoomProperties
    .sort((a, b) => a.order - b.order)
    .map((room) => room.id);

  const command = encodeRoomOrder0x26({
    version: PROTOCOL_VERSION,
    roomIds,
    mapVersion: version,
  });

  actions[commandTransCode].set(command);
  showLoading({ title: "" });
};
Key points:
- Use
roomSelectionMode: 'order'to display order numbers - Clicking ordered room can cancel
- Automatically handle order increment and decrement
5. Map Component Configuration
<WebViewMap
  roomProperties={finalRoomProperties}
  runtime={{
    // Enable room selection
    enableRoomSelection,
    selectRoomIds,
    // Show room order numbers
    showRoomOrder: true,
    // Room ID in split mode
    dividingRoomId,
    // Selection mode: checkmark (select) or order (sequence)
    roomSelectionMode,
    // Hide path
    showPath: false,
  }}
  onMapReady={handleMapReady}
  onMapFirstDrawed={handleMapFirstDrawed}
  onClickRoom={handleClickRoom}
  onClickRoomProperties={handleClickRoom}
  onUpdateDivider={handleUpdateDivider}
/>
6. Device Response Handling
Monitor device command responses, handle success/failure states:
useEffect(() => {
  const handleRoomEditResponse = ({ cmd, command }) => {
    if (timerRef.current) {
      // Room split response
      if (cmd === PARTITION_DIVISION_CMD_ROBOT_V1) {
        const splitResponse = decodePartitionDivision0x1d({ command });
        if (splitResponse) {
          clearTimeout(timerRef.current);
          hideLoading();
          handleNormal(); // Restore normal state

          if (splitResponse.success) {
            ToastInstance.success({ message: "Split successful" });
          } else {
            ToastInstance.fail({ message: "Split failed" });
          }
        }
      }

      // Room merge response
      if (cmd === PARTITION_MERGE_CMD_ROBOT_V1) {
        const mergeResponse = decodePartitionMerge0x1f({ command });
        // ... similar handling
      }

      // Room rename response
      if (cmd === SET_ROOM_NAME_CMD_ROBOT_V1) {
        const roomNameResponse = decodeSetRoomName0x25({
          command,
          version: PROTOCOL_VERSION,
          mapVersion: store.getState().mapState.version,
        });
        // ... similar handling
      }
    }
  };

  emitter.on("receiveRoomEditResponse", handleRoomEditResponse);

  return () => {
    emitter.off("receiveRoomEditResponse", handleRoomEditResponse);
  };
}, []);
Use the device_timer DP to set the timer functionality.
Timer list
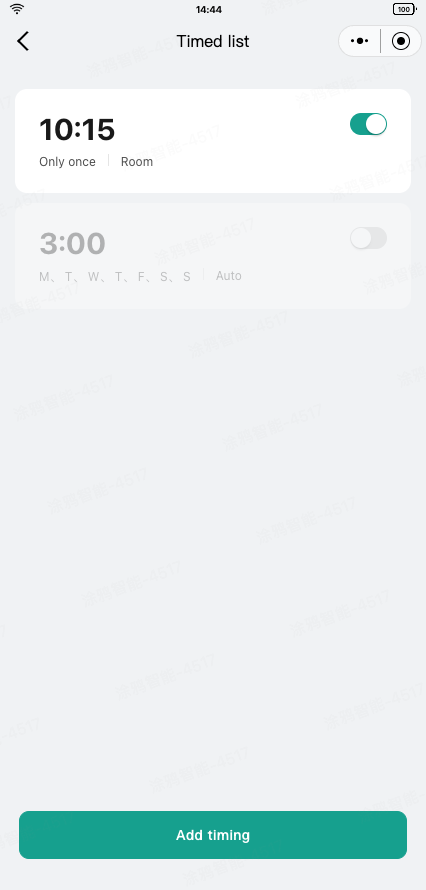
Use decodeDeviceTimer0x31 to parse the timer DP into the timer list data.
import { decodeDeviceTimer0x31 } from "@ray-js/robot-protocol";

type TimerData = {
  effectiveness: number;
  week: number[];
  time: {
    hour: number;
    minute: number;
  };
  roomIds: number[];
  cleanMode: number;
  fanLevel: number;
  waterLevel: number;
  sweepCount: number;
  roomNum: number;
};

const [timerList, setTimerList] = useState<TimerData[]>([]);

const dpDeviceTimer = useProps((props) => props[deviceTimerCode]);

useEffect(() => {
  if (dpDeviceTimer) {
    const { list } = decodeDeviceTimer0x31({
      command: dpDeviceTimer,
      version: PROTOCOL_VERSION,
    }) ?? { list: [] };

    setTimerList(list);
  }
}, [dpDeviceTimer]);
You can delete, enable, or disable the timers, and use encodeDeviceTimer0x30 to convert the new timer list into commands and send them.
import { encodeDeviceTimer0x30 } from "@ray-js/robot-protocol";
import produce from "immer";

type TimerData = {
  effectiveness: number;
  week: number[];
  time: {
    hour: number;
    minute: number;
  };
  roomIds: number[];
  cleanMode: number;
  fanLevel: number;
  waterLevel: number;
  sweepCount: number;
  roomNum: number;
};

const [timerList, setTimerList] = useState<TimerData[]>([]);

// Delete a timer
const deleteTimer = (index: number) => {
  const newList = [...timerList];
  newList.splice(index, 1);
  const command = encodeDeviceTimer0x30({
    list: newList,
    version: PROTOCOL_VERSION,
    number: newList.length,
  });
  actions[deviceTimerCode].set(command);
};

// Enable or disable a timer
const toggleTimer = (index: number, enable: boolean) => {
  const newList = produce(timerList, (draft) => {
    draft[index].effectiveness = enable;
  });

  const command = encodeDeviceTimer0x30({
    list: newList,
    version: PROTOCOL_VERSION,
    number: newList.length,
  });
  actions[deviceTimerCode].set(command);
};
Add a timer
You can add a timer, and use encodeDeviceTimer0x30 to assemble the commands.
// Add a timer
const addTimer = (newTimer: TimerData) => {
  const newList = [newTimer, ...timerList];

  const command = encodeDeviceTimer0x30({
    list: newList,
    version: PROTOCOL_VERSION,
    number: newList.length,
  });
  actions[deviceTimerCode].set(command);
};
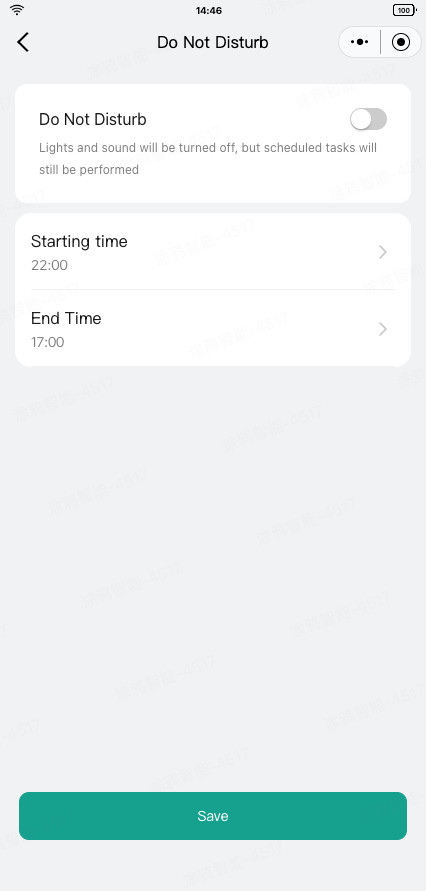
Use the disturb_time_set DP to set up the DND mode.
After setting the on/off, start time, and end time information, click Save to send the DND mode. You can use encodeDoNotDisturb0x40 to assemble the relevant information into a DP command.
import { encodeDoNotDisturb0x40 } from "@ray-js/robot-protocol";

// Add your custom logic here

// Save and send the DND mode information
const handleSave = () => {
  const command = encodeDoNotDisturb0x40({
    // Enable or disable DND
    enable,
    // The start time (hour)
    startHour,
    // The start time (minute)
    startMinute,
    // The end time (hour)
    endHour,
    // The end time (minute)
    endMinute,
  });

  actions[commandTransCode].set(command);
};
Similarly, you can use decodeDoNotDisturb0x41 to parse the DND mode DP reported by the device and present it on the page.
import { decodeDoNotDisturb0x41 } from "@ray-js/robot-protocol";

const dpDisturbTimeSet = useProps((props) => props[disturbTimeSetCode]);
// Parse the DND DP into structured data
const { enable, startHour, startMinute, endHour, endMinute } =
  decodeDoNotDisturb0x41(dpDisturbTimeSet) ?? DEFAULT_VALUE;

// Add your custom logic here
List of cleaning records
To get cleaning records data, see Cleaning Records APIs.
The template has encapsulated cleanRecordsSlice in Redux to delete, modify, and query the cleaning records data. You can refer to the relevant code.
import {
  deleteCleanRecord,
  fetchCleanRecords,
  selectCleanRecords,
} from "@/redux/modules/cleanRecordsSlice";

const records = useSelector(selectCleanRecords);

const handleDelete = (id: number) => {
  dispatch(deleteCleanRecord(id));
};

useEffect(() => {
  (dispatch as AppDispatch)(fetchCleanRecords());
}, []);

return (
  <View className={styles.container}>
    {records.map((record) => (
      <Item key={record.id} data={record} onDeleted={handleDelete} />
    ))}
  </View>
);
Details of cleaning records
The cleaning record details page displays complete information for a single cleaning task, including cleaning time, cleaning area, cleaning mode, and corresponding map and path.
Data Fetching
Retrieve cleaning records from Redux store and download corresponding map files from cloud:
// Get cleaning record
const { bucket, file, extendInfo } = useSelector((state: ReduxState) =>
  selectCleanRecordById(state, Number(id))
);

const { mapLength, pathLength, cleanMode, time, area } = extendInfo;

// Load map data from cloud
useEffect(() => {
  const fetchHistoryMap = async () => {
    const mapData = await getMapInfoFromCloudFile({
      bucket,
      file,
      mapLen: mapLength,
      pathLen: pathLength,
    });

    if (mapData) {
      const { originMap, originPath, virtualState } = mapData;

      setMap(originMap);
      setPath(originPath);

      // Parse virtual walls and forbidden zones
      setVirtualWalls(
        virtualState.virtualWallData.map((points) => ({
          points,
          id: nanoid(),
        }))
      );
      setForbiddenSweepZones(
        virtualState.virtualAreaData.map(({ points }) => ({
          points,
          id: nanoid(),
        }))
      );
      setForbiddenMopZones(
        virtualState.virtualMopAreaData.map(({ points }) => ({
          points,
          id: nanoid(),
        }))
      );
    }
  };

  fetchHistoryMap();
}, [bucket, file, mapLength, pathLength]);
Map Rendering
Use the WebViewMap component to render historical map and path:
<WebViewMap
  map={map} // Map data
  path={path} // Cleaning path
  virtualWalls={virtualWalls} // Virtual walls
  forbiddenSweepZones={forbiddenSweepZones} // No-go zones
  forbiddenMopZones={forbiddenMopZones} // No-mop zones
/>
Key points:
- Directly pass historical data through
mapandpathprops, not real-time data - Map component automatically renders virtual walls and forbidden zones
- Map and path in historical records are static snapshots, will not update
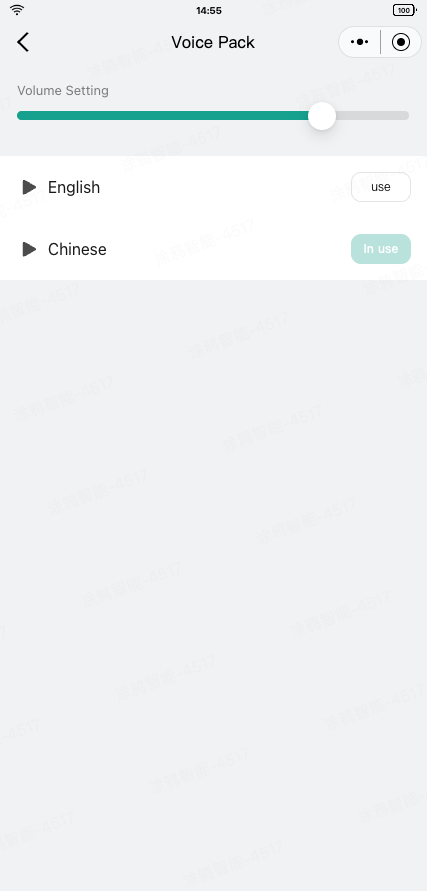
To get the voice package data, see Robot Voice APIs.
import { getVoiceList } from "@ray-js/ray";

type Voice = {
  auditionUrl: string;
  desc?: string;
  extendData: {
    extendId: number;
    version: string;
  };
  id: number;
  imgUrl: string;
  name: string;
  officialUrl: string;
  productId: string;
  region: string[];
};

const [voices, setVoices] = useState<Voice[]>([]);

useEffect(() => {
  const fetchVoices = async () => {
    const res = await getVoiceList({
      devId: getDevInfo().devId,
      offset: 0,
      limit: 100,
    });

    setVoices(res.datas);
  };

  fetchVoices();
}, []);

return (
  <View className={styles.container}>
    {voices.map((voice) => (
      <Item key={voice.id} data={voice} deviceVoice={deviceVoice} />
    ))}
  </View>
);
The voice_data DP is used for sending and reporting voice packages. You can use encodeVoice0x34 and decodeVoice0x35 provided by @ray-js/robot-protocol to assemble and parse the DP data.
Send a command to use a voice package:
import { useActions } from "@ray-js/panel-sdk";

const actions = useActions();

const handleUse = () => {
  actions[voiceDataCode].set(
    encodeVoice0x34({
      // The id, url, and md5 data all come from the Robot Voice APIs
      id: extendData.extendId,
      url: officialUrl,
      md5: desc,
    })
  );
};
Parse the data reported by the voice package to get voice package information, download progress, and usage status:
import { useProps } from "@ray-js/panel-sdk";

const dpVoiceData = useProps((props) => props[voiceDataCode]);

const { languageId, status, progress } = decodeVoice0x35({
  command: dpVoiceData,
});
To try out the voice package, see methods in Audio Capabilities.
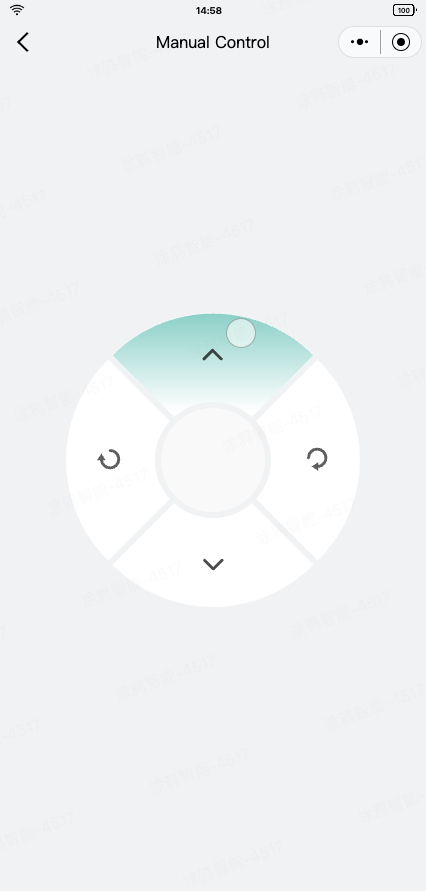
As a general DP sending feature, manual control is implemented using the direction_control DP.
The template has encapsulated simple manual control components and pages. For more information, see the src/pages/manual page.
import React, { FC, useEffect } from "react";
import {
  View,
  navigateBack,
  onNavigationBarBack,
  setNavigationBarBack,
} from "@ray-js/ray";
import Strings from "@/i18n";
import { Dialog, DialogInstance } from "@ray-js/smart-ui";
import { useActions } from "@ray-js/panel-sdk";
import { directionControlCode, modeCode } from "@/constant/dpCodes";
import ManualPanel from "@/components/ManualPanel";

import styles from "./index.module.less";

const Manual: FC = () => {
  const actions = useActions();

  useEffect(() => {
    ty.setNavigationBarTitle({
      title: Strings.getLang("dsc_manual"),
    });

    // To enter the remote control, you need to send the manual mode
    actions[modeCode].set("manual");

    setNavigationBarBack({ type: "custom" });

    onNavigationBarBack(async () => {
      try {
        await DialogInstance.confirm({
          context: this,
          title: Strings.getLang("dsc_tips"),
          icon: true,
          message: Strings.getLang("dsc_exit_manual_tips"),
          confirmButtonText: Strings.getLang("dsc_confirm"),
          cancelButtonText: Strings.getLang("dsc_cancel"),
        });

        actions[directionControlCode].set("exit");
        setNavigationBarBack({ type: "system" });

        setTimeout(() => {
          navigateBack();
        }, 0);
      } catch (err) {
        // do nothing
      }
    });

    return () => {
      setNavigationBarBack({ type: "system" });
    };
  }, []);

  return (
    <View className={styles.container}>
      <ManualPanel />
      <Dialog id="smart-dialog" />
    </View>
  );
};

export default Manual;
The template has a built-in Video Surveillance page.
For more information, see the IPC Generic Template tutorial.
- Congrats! 🎉You have finished learning this guide.
- If you have any problem during the development, you can contact Tuya's Smart MiniApp team for troubleshooting.