iOS 版智能生活 App SDK 开发入门教程
涂鸦智能生活 App SDK iOS 版提供了即全面又灵活的 Smart App 开发模式。您可以通过本教程在两小时内快速开发一款自己的 Smart App,并实现如下功能:
- 使用手机号码注册并登录一个用户账号。
- 在登录状态下创建一个家庭,并查看和修改家庭信息。
- 以智能灯泡为例,通过 App 连接一个智能设备。
- 使用这款创建的 App 控制灯泡的开关和亮度。
您可以点击下方按钮下载 Sample 查看本教程中的示例代码。本次教程按功能模块进行分类,您可以快速找到对应的代码参考学习。
效果展示
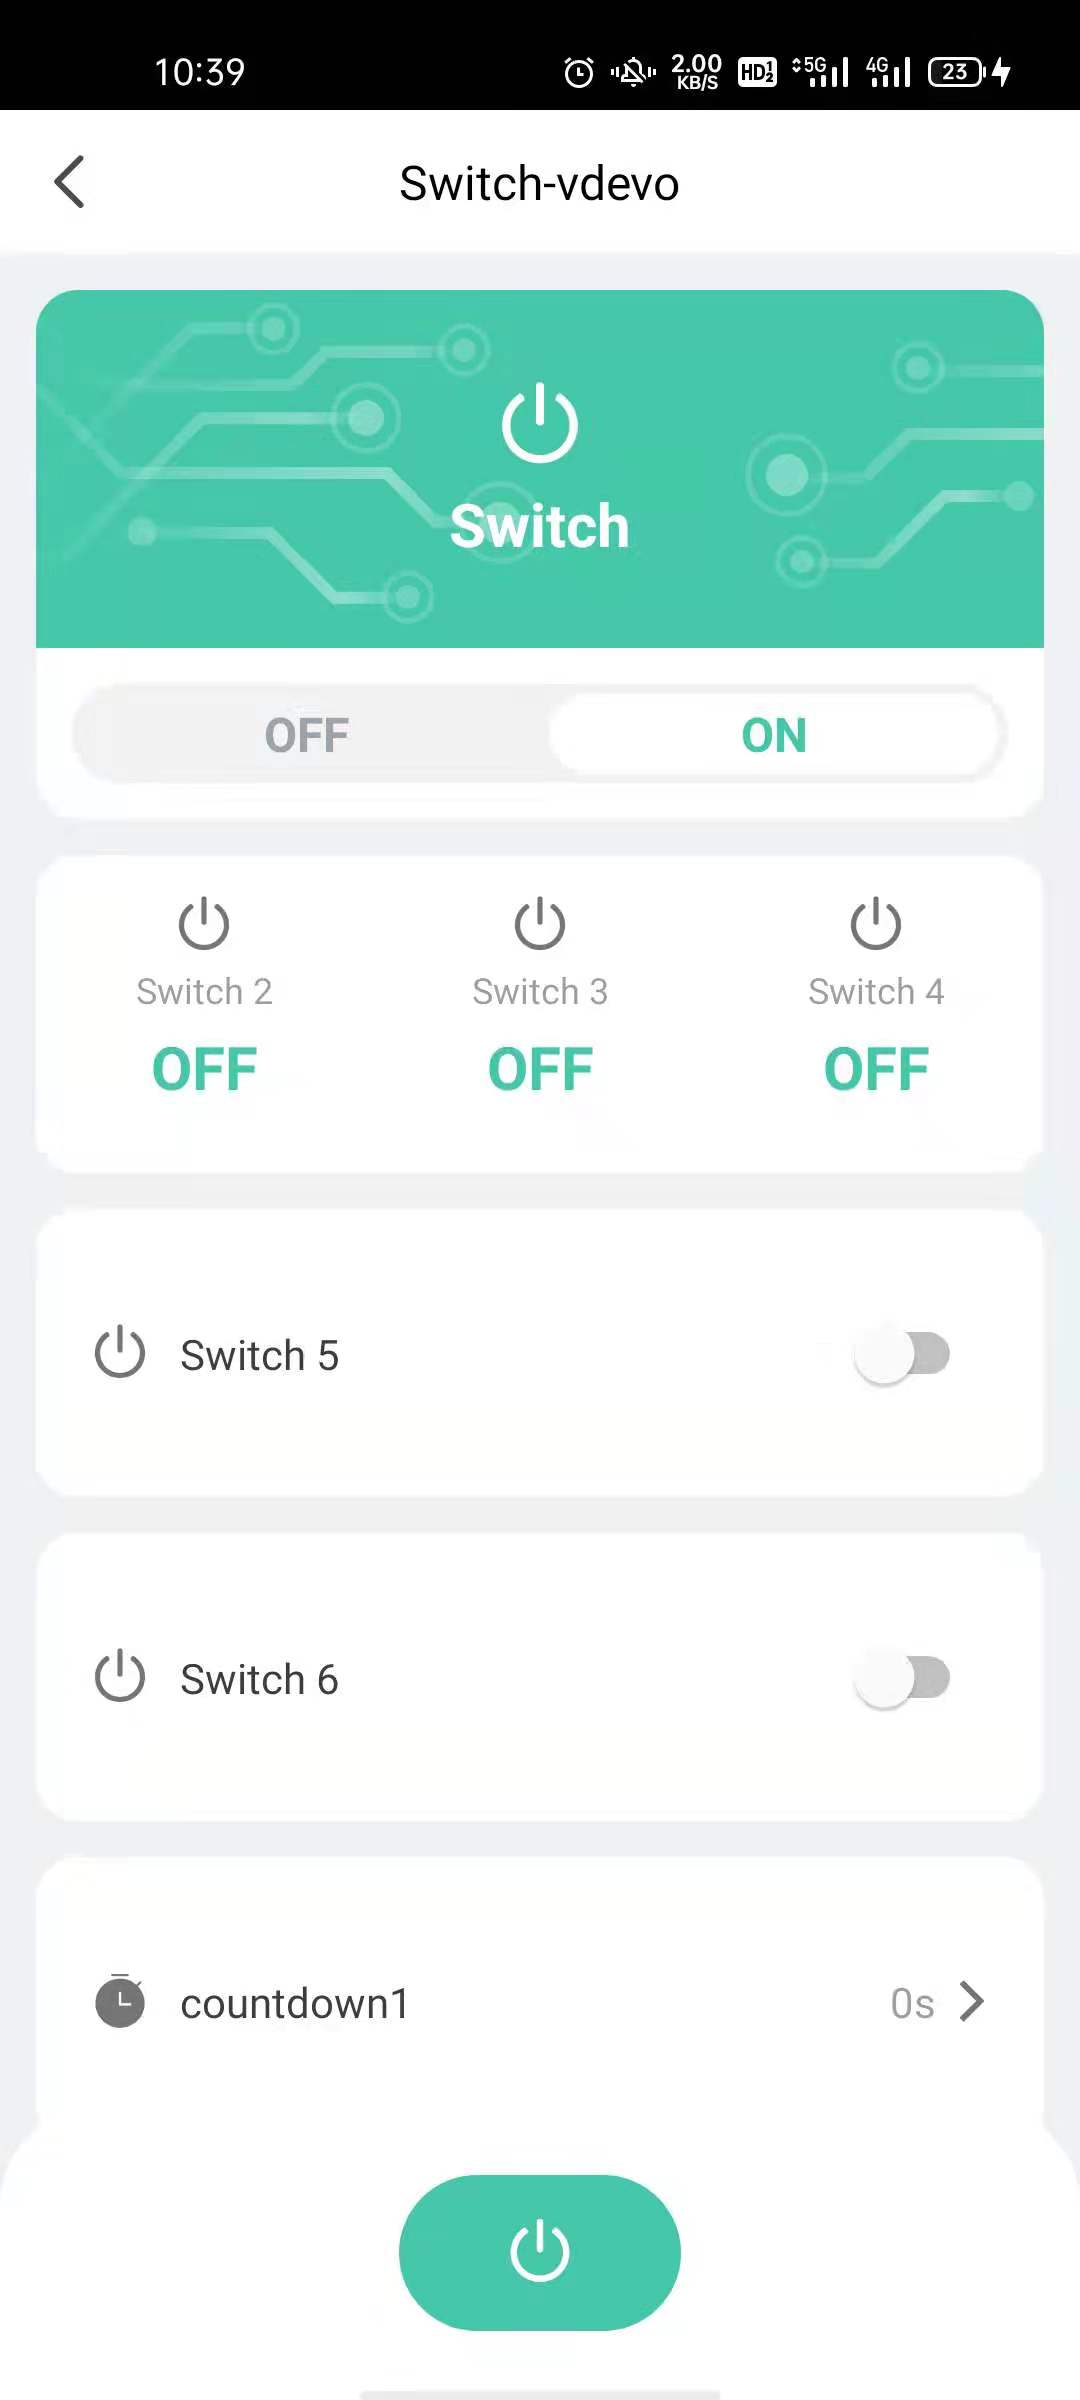
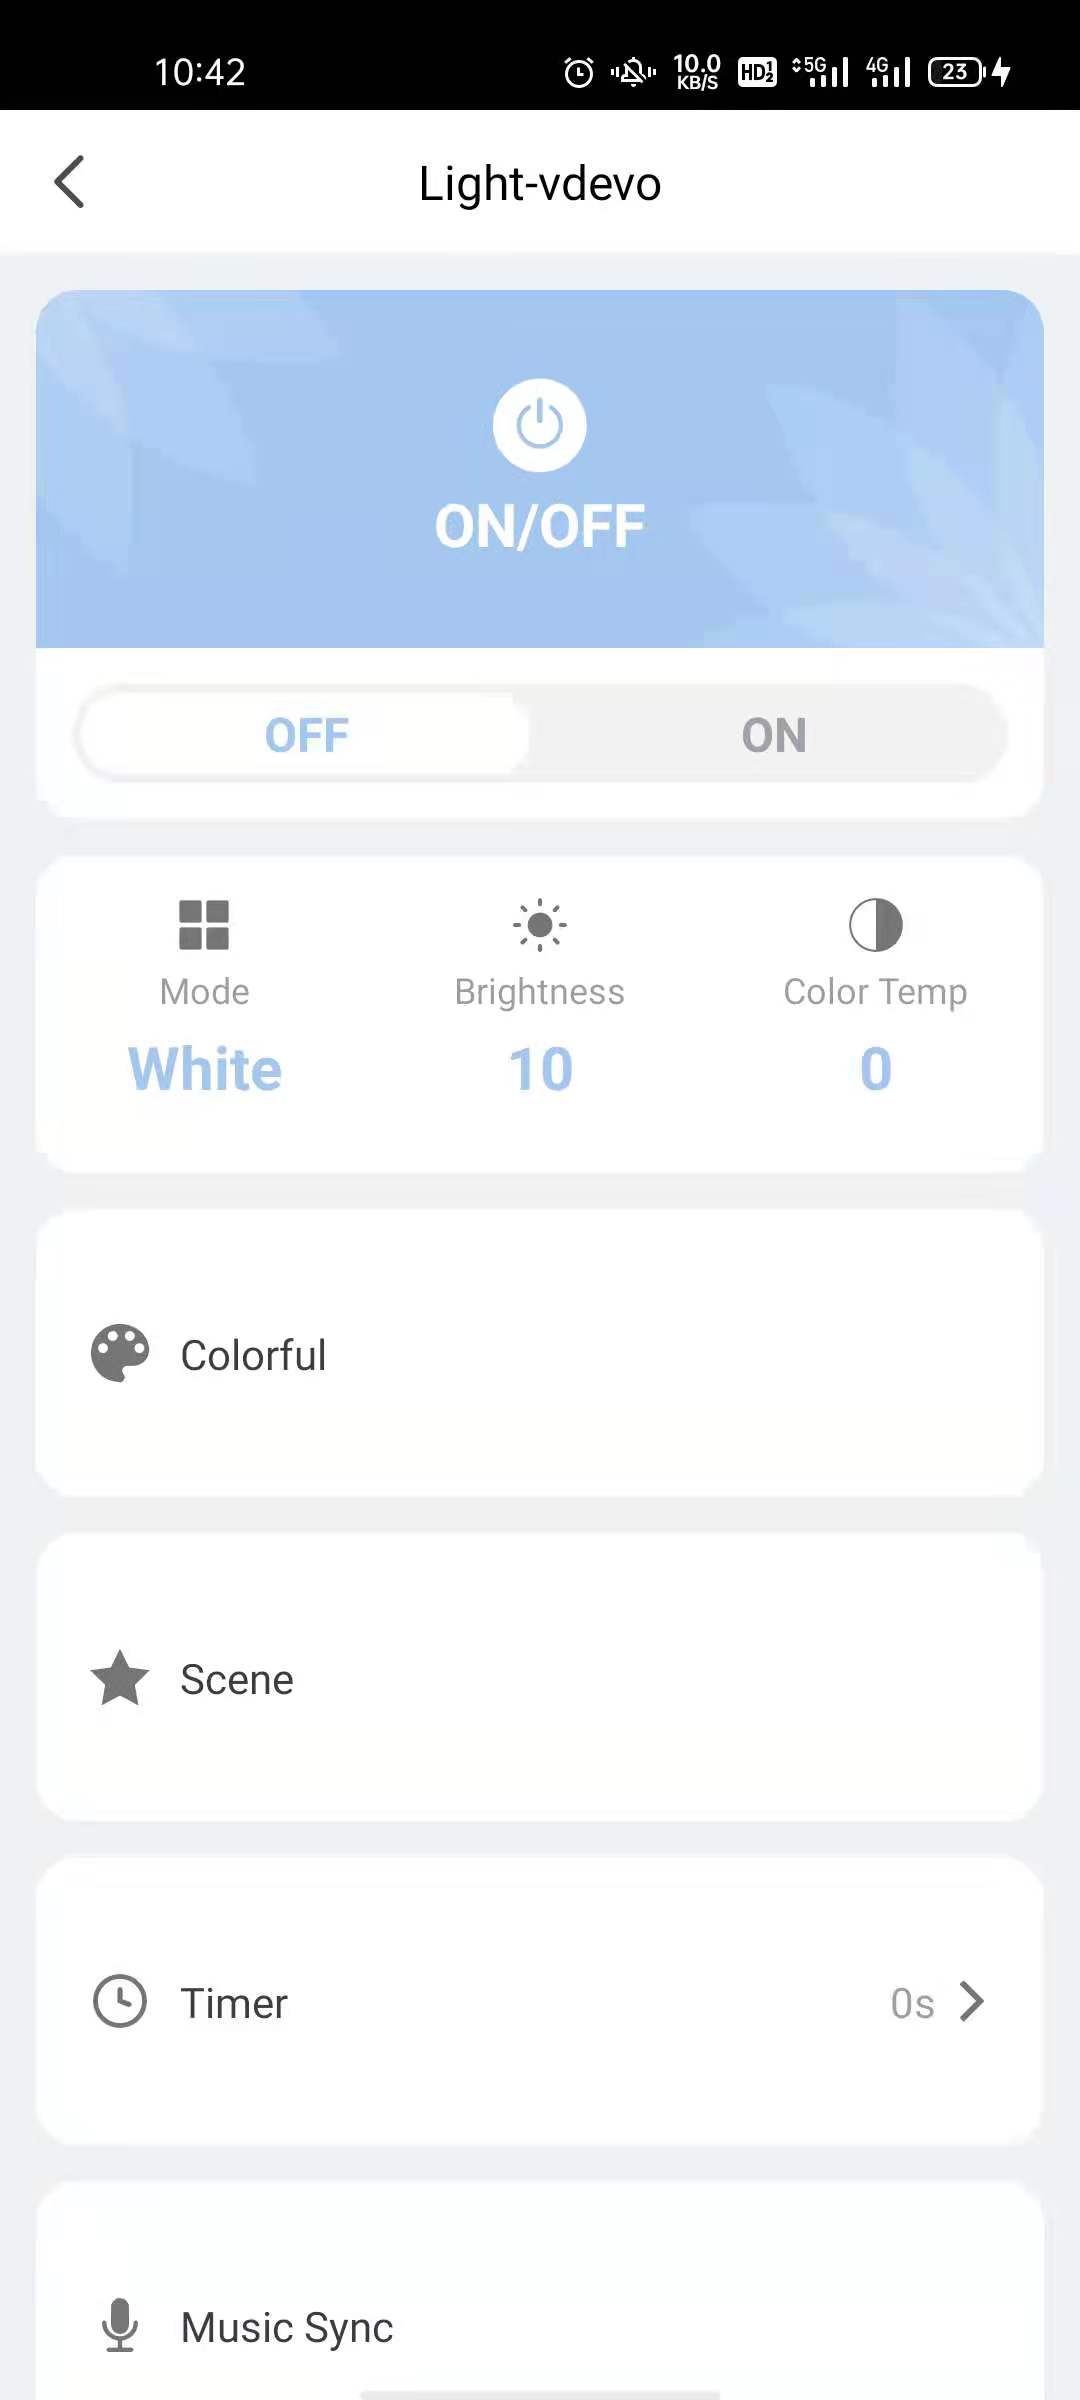
学习完本教程,并且结合一定的面板开发后,您可以创建一个类似以下 iOS App 的 Demo。

准备工作
在您开始本教程前,请先确保您已经 :
- 在涂鸦开发者平台,注册账号并创建 App,获取 SDK 的 AppKey,AppSecret。参考 准备工作。
- 准备一个涂鸦赋能的智能产品,本教程以智能灯泡为例。关于如何获取涂鸦赋能的产品,可参考 涂鸦智选。
- 使用 CocoaPods 将涂鸦智能生活App SDK 集成到您的项目中。参考 快速集成。
第一步:注册用户账号
本模块中,仅演示使用手机号注册登录。除此以外,涂鸦智能生活 App SDK 还提供了邮箱、第三方、匿名等多种注册登录方式。详情请参考 用户账户系统。
注册用户账号时:
- 您需要提供
countryCode参数来区分注册地区,用于就近选择涂鸦开发者平台的可用区。如中国大陆为86,美国为1。有关可用区相关概念,请参考 云服务介绍。各个可用区的数据是相互独立的,因此在 中国大陆(86) 注册的账号,在 美国(1) 地区无法使用(提示用户不存在)。
- 您将频繁地调用对象
TuyaSmartUser。它是一个单例,存储了当前用户的所有信息及相关的登录注册方法。详情请参考 用户数据模型。
查询验证码服务可用地区
为了加强用户信息的数据安全,涂鸦优化验证码和添加了账号限制。只有验证码服务可用的地区,才可以发送验证码。您需要先查询您的开发者账号是否已经在从涂鸦开发者平台开通验证码服务的可用地区列表。
[[TuyaSmartUser sharedInstance] getWhiteListWhoCanSendMobileCodeSuccess:^(NSString *regions) {

} failure:^(NSError *error) {

}];
返回值 regions 表示一个或多个国家或地区,以 , 隔开的字符串,例如 86 和 01。可用区编号列表,请参考 涂鸦云服务介绍。
目前中国大陆默认已开通验证码服务。若您希望自己的应用发布在其他国家或地区,则必须验证开通地区,并联系您的涂鸦客户经理或 提交工单 开通该服务。
获取注册账号的验证码
与大部分注册流程类似,用户必须先获取验证码。无论是手机或是邮箱,您都可以使用统一的获取验证码接口在注册及后续密码修改,验证码登录,信息完善等操作中获取相应的验证码。
NSString * region = [[TuyaSmartUser sharedInstance] getDefaultRegionWithCountryCode:countryCode];

[[TuyaSmartUser sharedInstance] sendVerifyCodeWithUserName:userName // phone number or email address
											region:region
										countryCode:countryCode // NSString ,like 86 or 01
												type:1     // code type , 1: verification code register,
											success:^{
											// request success
											} failure:^(NSError *error) {
										// request fail
										// get error details  from   error.localizedDescription
	}];
请确保所传参数 type 为 1,否则将无法正常注册。
使用手机号码注册账号
使用手机号码注册账号需要上传国家码、手机号码、密码、获取到的验证码等信息。详情请参考 手机号注册。
[[TuyaSmartUser sharedInstance] registerByPhone:countryCode //country code ,like 86 or 1
							phoneNumber:phone
								password:password
									code:code  // VerifyCode
								success:^{

								// register success

								} failure:^(NSError *error) {

						// register fail
							// get error details  from   error.localizedDescription
										}

];
使用手机号码登录账号
账号注册成功后,用户就可以使用手机号码登录账号。详情请参考 手机号登录。
[[TuyaSmartUser sharedInstance] loginByPhone:countryCode
							phoneNumber:phone
							password:password
								success:^{

							// login successfully

							} failure:^(NSError *error) {

							// login fail

	}];
第二步:创建和管理家庭
家庭是智能生活 App SDK 开发下实际场景的最大单位。智能设备的添加、编辑、移除、状态变化的监听基于家庭下。用户可以在用户账号下创建任意多个家庭。在指定家庭下,用户还可以添加并管理多个房间和家庭成员。
操作家庭模块时,您将频繁调用对象 TuyaSmartHomeModel 和 TuyaSmartHome。
| 对象 | 说明 |
|---|---|
| TuyaSmartHomeModel | 存放了家庭的基本信息,如 ID、名字、位置等。 |
| TuyaSmartHome | 存放了家庭相关的所有功能,如单个家庭信息管理、家庭下的家庭成员管理、房间管理等。TuyaSmartHome 需要使用正确的 homeId 进行初始化。 |
请确保 ViewController 或其他对象中持有的 TuyaSmartHome 为全局变量(@property)。临时的 TuyaSmartHome 变量可能会因为作用域问题,在初始化时被提前释放,而返回 nil。
创建家庭
在登录状态下,用户可以创建家庭。之后对于房间、成员、设备等对象的管理都基于家庭下。创建家庭需要通过 TuyaSmartHomeManager 调用 创建家庭 接口。
[self.homeManager addHomeWithName:name
                  geoName:city
                  rooms:@[@""]  // we could add rooms after creating the home , so pass a null list firstly .
                  latitude:self.latitude
                  longitude:self.longitude
                  success:^(long long result) {

                       //add success, result here is the homeID .

                  } failure:^(NSError *error) {

                        //add failed

                  }];
查询家庭列表
在登录状态下您可以直接获取家庭列表。如还没创建过家庭,将返回 空数组。
    //get home list and refresh the TableView
    [self.homeManager getHomeListWithSuccess:^(NSArray<TuyaSmartHomeModel *> *homes) {
      // get success , refresh UI
      //  [self.tableView reloadData];
    } failure:^(NSError *error) {

    // get failed

    }];
最佳实践
在创建了家庭后,后续房间成员、用户配网等相关操作均需要基于某一特定家庭。因此建议您将这一特定家庭作为 App 的全局变量存储。当然,您也可以在本地随时切换当前家庭,涂鸦开发者平台并不会记录这一信息。在本教程和配套的 Sample 中,默认将列表的第一个家庭设为当前家庭。
+ (TuyaSmartHomeModel *)getCurrentHome {

    NSUserDefaults *defaults = [NSUserDefaults standardUserDefaults];
    if (![defaults valueForKey:@"CurrentHome"]) {
        return nil;
    }

    long long homeId = [[defaults valueForKey:@"CurrentHome"] longLongValue];

    if (![TuyaSmartHome homeWithHomeId:homeId]) {
        return nil;
    }

    return [TuyaSmartHome homeWithHomeId:homeId].homeModel;
}

+ (void)setCurrentHome:(TuyaSmartHomeModel *)homeModel {

    NSUserDefaults *defaults = [NSUserDefaults standardUserDefaults];
    [defaults setValue:[NSString stringWithFormat:@"%lld", homeModel.homeId] forKey:@"CurrentHome"];

}
实现以上逻辑后,家庭的操作就可以被简化:
-
查询家庭列表:
self.home = [TuyaSmartHome homeWithHomeId:[TYHome getCurrentHome].homeId]; -
设置家庭 ID:
[TYHome setCurrentHome:xxx];
第三步:设备配网
简单来说,配网就是将设备连接并注册到云端,使其拥有与云端远程通信的能力。涂鸦智能生活 App SDK 提供了丰富的配网方式以支持大部分智能设备。如 Wi-Fi 连接,蓝牙连接等。详情请参考 设备配网 和 蓝牙体系。
配网方式介绍
本模块以 Wi-Fi 配网为例介绍如何使用SDK 将设备配置到云端。
Wi-Fi 配网方式包括 EZ、AP、扫 App 二维码三种方式。在之后的 iOS 版本 SDK 中,推荐使用 AP 热点模式 代替 Wi-Fi 快连模式(即EZ模式)。主要原因如下:
- 相比 EZ 模式,AP 模式成功率高、可靠性好,对手机和路由器有兼容性要求小。AP 模式配网成功率高于 EZ 模式。
- 当 Xcode 升级至 12.5 版本后,编译出来的 App 无法在大于等于 14.5 版本的 iOS 系统的设备上发出 EZ 配网的数据包。此时,App 需要额外开启一个 com.apple.developer.networking.multicast 的权限。这个权限需要向苹果额外申请,等审批通过后才能够使用。目前临时的解决方案是降低 Xcode 版本,但仍推荐使用 AP 模式。
获取配网 Token
开始配网之前,SDK 需要在联网状态下从涂鸦 获取配网 Token,然后才可以开始热点模式配网。Token 的有效期为 10 分钟,且配置成功后就会失效,再次配网需要重新获取。获取 Token 需要上传当前的 homeId,因此您需要确保处于登录状态并至少创建了一个家庭。
[[TuyaSmartActivator sharedInstance] getTokenWithHomeId:homeId
                                                success:^(NSString *token) {
		                                    //  NSLog(@"getToken success: %@", token);
		                                   // you could start ConfigWiFi now
	                                      } failure:^(NSError *error) {
		                                 //NSLog(@"getToken failure: %@", error.localizedDescription);
	                                     }
];
iOS 版本适配
iOS 14 版本适配
从 iOS 14 版本开始,在设备配网、局域网本地控制时会触发 本地网络 权限弹窗。
- 如果用户点击了允许,App 才能够向本地局域网发送数据。
- 如果用户点击了拒绝,将无法使用相关功能。
目前苹果没有提供任何 API 对此权限进行判断,建议您在相关功能无法正常使用时提示、引导用户检查 系统设置 中的 app设置,确认是否开启了 本地网络 权限。
iOS 13 版本适配
从 iOS 13 版本开始,如果用户没有开启地理位置权限,在已开启 Wi-Fi 权限的前提下,[[TuyaSmartActivator sharedInstance] currentWifiSSID] 将获取不到有效的 Wi-Fi SSID 或 BSSID。在此情况下,iOS 会返回下列默认值:
- SSID:WLAN 或 Wi-Fi,针对中国大陆地区则是 WLAN
- BSSID:"00:00:00:00:00:00"
开始设备配网
开始配网前,请确保设备处于待配网状态。操作方法可参考设备的使用说明书。
调用 配网接口,需要提供路由器的 SSID(即 Wi-Fi 名称)、密码、从云端获取的 Token 等。
[TuyaSmartActivator sharedInstance].delegate = self;
[[TuyaSmartActivator sharedInstance] startConfigWiFi:TYActivatorModeAP
                                                ssid:ssid
                                            password:password
                                               token:token
                                             timeout:100];
timeout 单位为秒,默认为 100,您可以设置为任意值。但不建议将此值设置得过小,否则将影响配网结果。
使用 AP 模式配网时,您需要实现 TuyaSmartActivatorDelegate 协议,以监听配网结果的回调。
@interface xxxViewController () <TuyaSmartActivatorDelegate>
- (void)activator:(TuyaSmartActivator *)activator didReceiveDevice:(TuyaSmartDeviceModel *)deviceModel error:(NSError *)error {
    if (deviceModel && error == nil) {
             //success
            // NSLog(@"connected success: %@", deviceModel.name);
    }

    if (error) {
        //fail
    }

   // stop config
}
(可选)停止配网
开始配网操作后,App 会持续广播配网信息,直到配网成功或是超时才停止。如果需要中途取消操作或配网完成,需要调用 停止配网 接口。
 [TuyaSmartActivator sharedInstance].delegate = nil;
 [[TuyaSmartActivator sharedInstance] stopConfigWiFi];
第四步:控制设备
本章节主要操作对象包含 TuyaSmartDeviceModel 和 TuyaSmartDevice。
| 对象 | 说明 | 参考链接 |
|---|---|---|
| TuyaSmartDeviceModel |
|
设备功能点 |
| TuyaSmartDevice | TuyaSmartDevice 存放了设备相关的所有功能,如功能控制,设备固件管理等。您需要用正确的 deviceId 初始化一个 TuyaSmartDevice。 |
设备管理 |
请确保 ViewController 或其他对象中持有的 TuyaSmartDevice 为全局变量(@property)。临时的 TuyaSmartDevice 变量可能会因为作用域问题,在初始化时被提前释放,而返回 nil。
查询设备列表
设备成功配网后,您可以在对应的家庭下查看对应的设备列表。
self.home = [TuyaSmartHome homeWithHomeId:#your homeId];
self.deviceList = [self.home.deviceList copy];
您必须先调用 获取家庭详细信息 接口。否则即使配网成功也无法成功获取。
查看设备信息
-
设备的功能点信息存放在
deviceModel的schemaArray中。TuyaSmartDevice *device = self.device; NSArray *schemas = device.deviceModel.schemaArray; -
schemaArray存放了该设备的所有功能点信息,每个功能点被封装成一个TuyaSmartSchemaModel对象。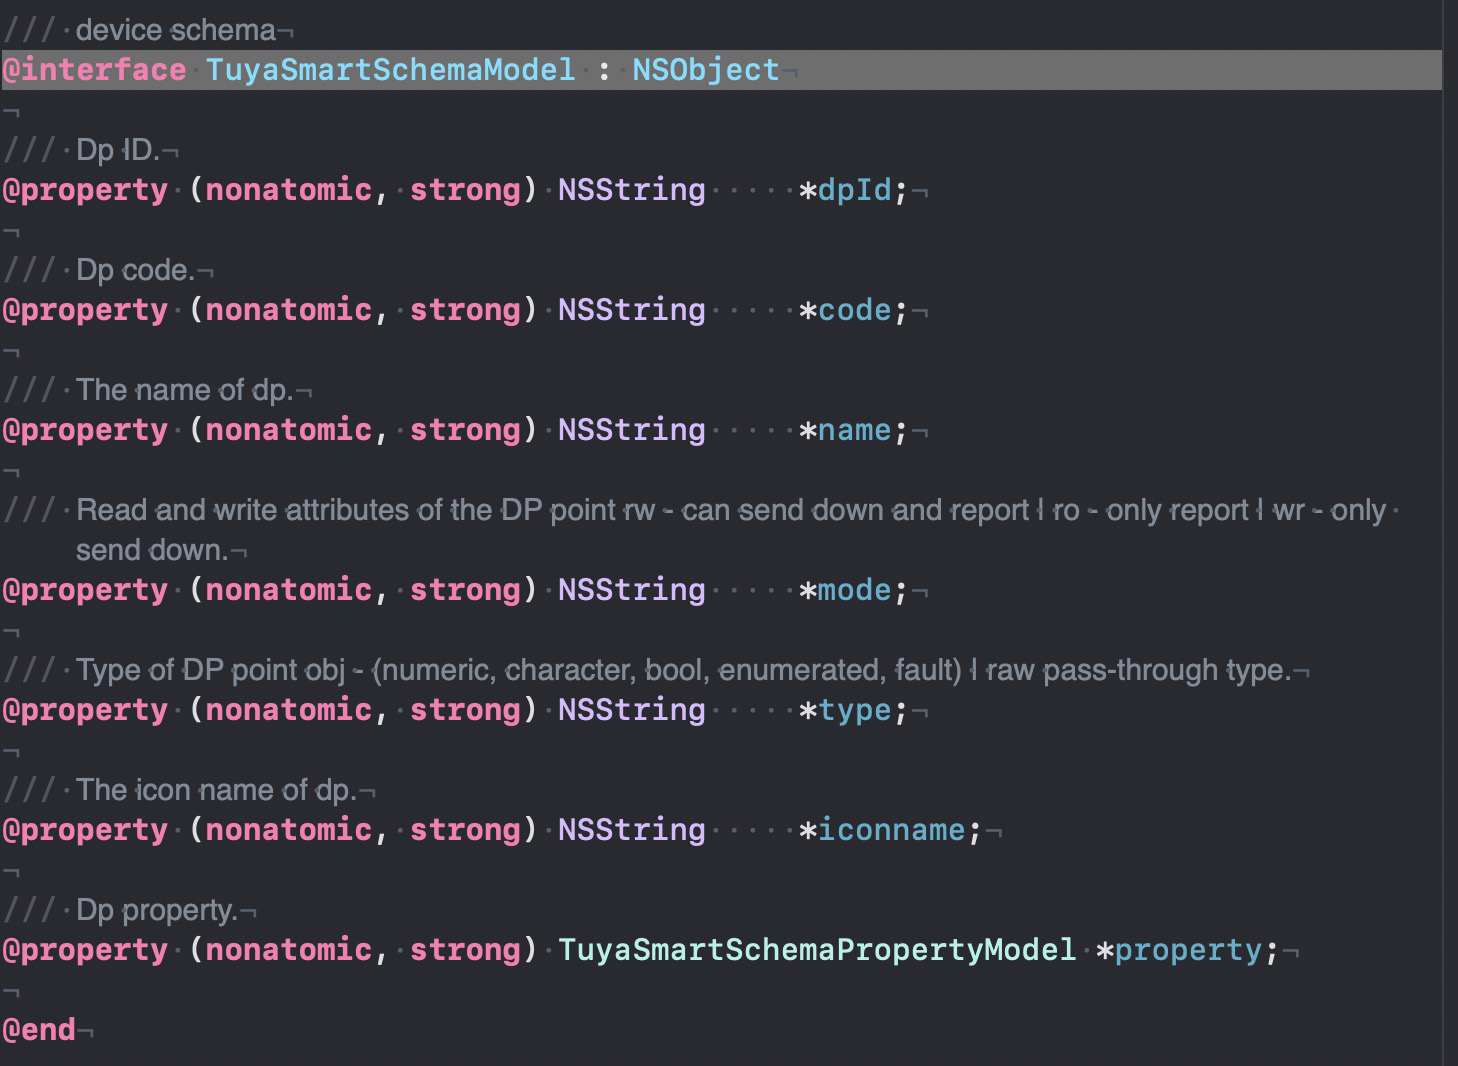
-
对于部分功能点信息复杂的设备,涂鸦将功能点再一次封装在
TuyaSmartSchemaModel的property属性中。具体判断方式如下:NSString *type = [schema.type isEqualToString:@"obj"] ? schema.property.type : schema.type; if ([type isEqualToString:@"bool"]) { SwitchTableViewCell *cell = [tableView dequeueReusableCellWithIdentifier:@"switchCell"]; if (cell == nil){ cell = [[[NSBundle mainBundle] loadNibNamed:@"SwitchTableViewCell" owner:self options:nil] lastObject]; cell.label.text = schema.name; [cell.switchButton setOn:[dps[schema.dpId] boolValue]]; }; } return cell; } else if ([type isEqualToString:@"value"]) { SliderTableViewCell *cell = [tableView dequeueReusableCellWithIdentifier:@"valueCell"]; if (cell == nil){ cell = [[[NSBundle mainBundle] loadNibNamed:@"SliderTableViewCell" owner:self options:nil] lastObject]; cell.label.text = schema.name; cell.detailLabel.text = [dps[schema.dpId] stringValue]; cell.slider.minimumValue = schema.property.min; cell.slider.maximumValue = schema.property.max; cell.slider.value = [dps[schema.dpId] floatValue]; }; }; return cell; } else if ([type isEqualToString:@"enum"]) { //... } //...
在上述代码中,以智能灯泡为例将其功能点信息展示在 TableView 上。其中:
type为 bool 的cell展示了开关的信息。type为 value 的cell展示了其亮度的信息。
控制设备
控制设备需要将对应的 DP 以 NSDictionary 形式通过 设备控制 接口改变设备状态或功能。
参数 dps 中可以包含多个功能点,您可以一次同时改变设备的多个状态。
同样以灯泡为例,以下代码分别修改了其开关状态和亮度值。
if ([type isEqualToString:@"bool"]) {

        SwitchTableViewCell *cell = [tableView dequeueReusableCellWithIdentifier:@"switchCell"];
        if (cell == nil){
            cell = [[[NSBundle mainBundle] loadNibNamed:@"SwitchTableViewCell" owner:self options:nil] lastObject];

            cell.label.text = schema.name;
            [cell.switchButton setOn:[dps[schema.dpId] boolValue]];
            cell.isReadOnly = isReadOnly;
           // turn on/off when click the UISwitch
            cell.switchAction = ^(UISwitch *switchButton) {
                [weakSelf publishMessage:@{schema.dpId: [NSNumber numberWithBool:switchButton.isOn]}];
            };

        }
        return cell;

    }

else if ([type isEqualToString:@"value"]) {

        SliderTableViewCell *cell = [tableView dequeueReusableCellWithIdentifier:@"valueCell"];
        if (cell == nil){
            cell = [[[NSBundle mainBundle] loadNibNamed:@"SliderTableViewCell" owner:self options:nil] lastObject];

            cell.label.text = schema.name;
            cell.detailLabel.text = [dps[schema.dpId] stringValue];
            cell.slider.minimumValue = schema.property.min;
            cell.slider.maximumValue = schema.property.max;
            [cell.slider setContinuous:NO];
            cell.slider.value = [dps[schema.dpId] floatValue];

            // change the value when tap the UISlider
            cell.sliderAction = ^(UISlider * _Nonnull slider) {
                float step = schema.property.step;
                float roundedValue = round(slider.value / step) * step;
                [weakSelf publishMessage:@{schema.dpId : [NSNumber numberWithInt:(int)roundedValue]}];
            };
         };
        return cell;

    }
- (void)publishMessage:(NSDictionary *) dps {
    [self.device publishDps:dps success:^{
            // change success
    }
    failure:^(NSError *error) {
         // change failed
    }];
}
如果您需要监听设备状态的改变,如在线状态、移除通知、功能点状态改变等。需要实现 TuyaSmartDeviceDelegate 协议。
self.device = [TuyaSmartDevice deviceWithDeviceId:## your deviceId];
self.device.delegate = self;
#pragma mark - TuyaSmartDeviceDelegate

/// Device information updates, such as the name and online status.
/// @param device The device instance.
- (void)deviceInfoUpdate:(TuyaSmartDevice *)device;

/// Device online status updates
/// @param device The device instance.
- (void)deviceOnlineUpdate:(TuyaSmartDevice *)device;

/// Indicates whether the device is removed.
/// @param device The device instance.
- (void)deviceRemoved:(TuyaSmartDevice *)device;

/// The DP data updates.
/// @param device The device instance.
/// @param dps The command dictionary.
- (void)device:(TuyaSmartDevice *)device dpsUpdate:(NSDictionary *)dps;

/// The DP data updates.
/// @param device The device instance.
/// @param dpCodes The DP codes.
- (void)device:(TuyaSmartDevice *)device dpCommandsUpdate:(NSDictionary *)dpCodes;

/// The group OTA task progress.
/// @param device The gateway instance.
/// @param groupId group OTA task id.
/// @param type The firmware type.
/// @param progress The update progress.
- (void)device:(TuyaSmartDevice *)device groupOTAId:(long)groupId firmwareType:(NSInteger)type progress:(double)progress;

/// The group OTA task status.
/// @param device The gateway device instance.
/// @param upgradeStatusModel The model of the update status.
- (void)device:(TuyaSmartDevice *)device
    groupOTAStatusModel:(TuyaSmartFirmwareUpgradeStatusModel *)upgradeStatusModel;

/// The callback of Wi-Fi signal strength.
/// @param device The device instance.
/// @param signal The signal strength.
- (void)device:(TuyaSmartDevice *)device signal:(NSString *)signal;

/// Receives MQTT custom messages.
/// @param device The device instance.
/// @param message The custom message.
- (void)device:(TuyaSmartDevice *)device didReceiveCustomMessage:(TuyaSmartMQTTMessageModel *)message;

/// Receives LAN custom messages.
- (void)device:(TuyaSmartDevice *)device didReceiveLanMessage:(TuyaSmartLanMessageModel *)message;

/// The delegate of warning information updates.
/// @param device The device instance.
/// @param warningInfo The warning information.
- (void)device:(TuyaSmartDevice *)device warningInfoUpdate:(NSDictionary *)warningInfo;

/// The delegate of changes in device normal firmware/pid version update's status/progress
/// Notice: sometimes the progress may <0, when it occured please ignore the progress.
/// @param device The device instance.
/// @param statusModel status/progress model.
- (void)device:(TuyaSmartDevice *)device otaUpdateStatusChanged:(TuyaSmartFirmwareUpgradeStatusModel *)statusModel;

/// The thing message data update.
/// Example:
///     type == property:
///         payload = {
///           "code_name1": {
///             "value": "code_value1",
///             "time": 1234567890
///           },
///           "code_name2": {
///             "value": 50,
///             "time": 1234567890
///           }
///         }
///     type == action:
///         payload = {
///            "actionCode": "testAction",
///            "outputParams": {
///              "outputParam1":"outputValue1",
///              "outputParam2":50
///            }
///         }
///     type == event:
///         payload = {
///            "eventCode": "testEvent",
///            "outputParams": {
///              "outputParam1":["outputValue1", "outputValue2"],
///              "outputParam2":false
///            }
///         }
/// @param device The device instance.
/// @param thingMessageType The message type.
/// @param payload The message payload.
- (void)device:(TuyaSmartDevice *)device didReceiveThingMessageWithType:(TuyaSmartThingMessageType)thingMessageType payload:(NSDictionary *)payload;
(可选)移除设备
调用 移除设备 接口,可以将当前设备从对应家庭下移除。
[self.device remove:^{
		NSLog(@"remove success");
	  } failure:^(NSError *error) {
		NSLog(@"remove failure: %@", error);
	  }];
(推荐)集成设备面板
为了减少您的开发成本,涂鸦针对特定设备提供了一系列的设备控制面板。详情请参考 全品类控制面板 和 空调品类控制面板。
实践结果
学习完本次教程,相信您已经创建了一个自己的 App,它可以进行用户账号注册、家庭创建、家庭查询、设备配网、设备控制等。
下一步
为了降低您的开发成本,涂鸦将 SDK 中按模块进行了功能抽离和 UI 封装,为您提供了一整套一键接入的 UI 业务包。您可以根据需要自由选择需要的业务模块。
该内容对您有帮助吗?
是意见反馈该内容对您有帮助吗?
是意见反馈