Quick Development of an iOS IoT App Based on Tuya App SDK

Overview
With IoT being popular and welcomed to a great extent today, the Internet of Everything is an unstoppable trend. For enterprises seeking IoT-enabled opportunities, app-based smart device control and scenario linkage are the golden keys to a perfect end-to-end solution. Manufacturers of smart devices are appearing increasingly, whereas the DNA of IoT, namely device, connection, and management, makes IoT app indispensable. Smart devices exert better performance coupled with an app. For example,
- with an app, users can easily adjust the light brightness, control air conditioners, and view the IP camera’s video.
- Smart home devices can be interconnected for an automation scenario. For instance, when you are back home from work, you tap the preset coming-home scenario on the app, and everything will be ready for you. Lights are on and home appliances like kettle and air conditioner start working.****
However, IoT app development is innovative as well as challenging for most enterprises. This demo sets an example of smart home app development with Tuya App SDK, based on which you can create App SDK, integrate SDK, create a smart home, pair and control the devices, completing the whole process of smart home app development.
Materials
One smart device (optional)
Count:1Any Powered by Tuya devices are applicable. Find more in our TuyaGo.more
Steps
Step 1: Create an App SDK
Make sure a smart device is already created before development. For more information, see Quick Start in 5 Minutes.
-
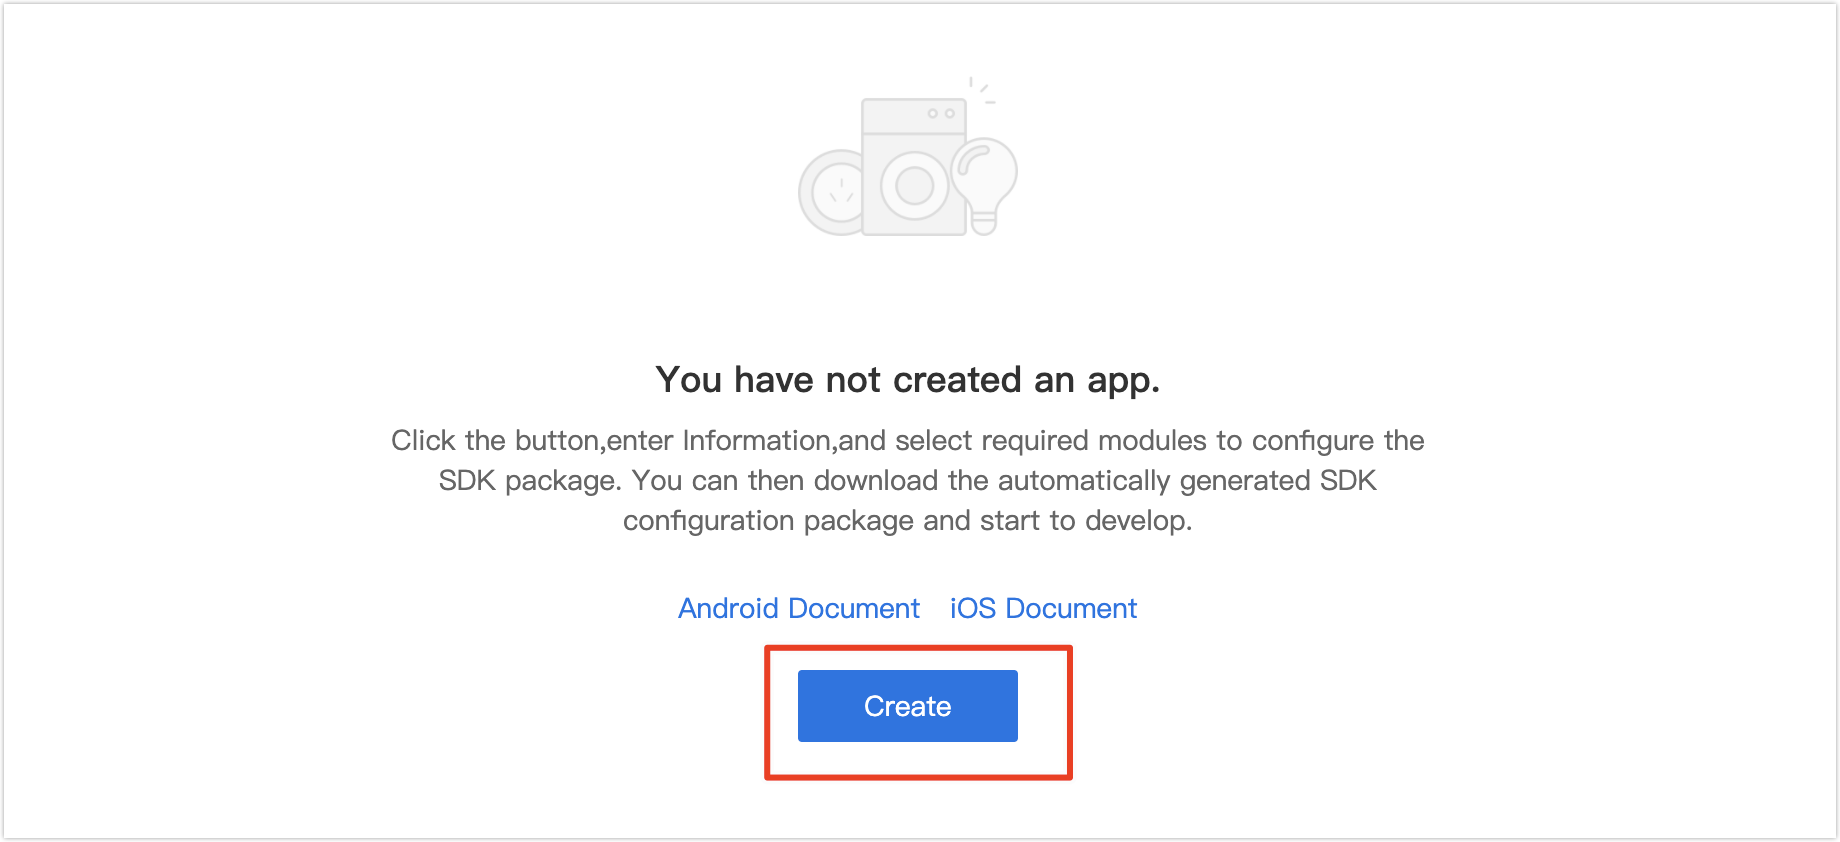
On the page of App SDK in Tuya IoT Platform, click Create.
-
Enter app related information, and click Ok.
- App Name: Enter the app name.
- iOS Bundle ID: Enter the iOS app bundle ID. The recommended format is com.xxxxx.xxxxx.
- Android Package Name: Enter the Android app package name. It is optional to be consistent with iOS bundle ID.
- URL ID: It is not required. If it is not entered, the system will automatically generate one according to the package name.
-
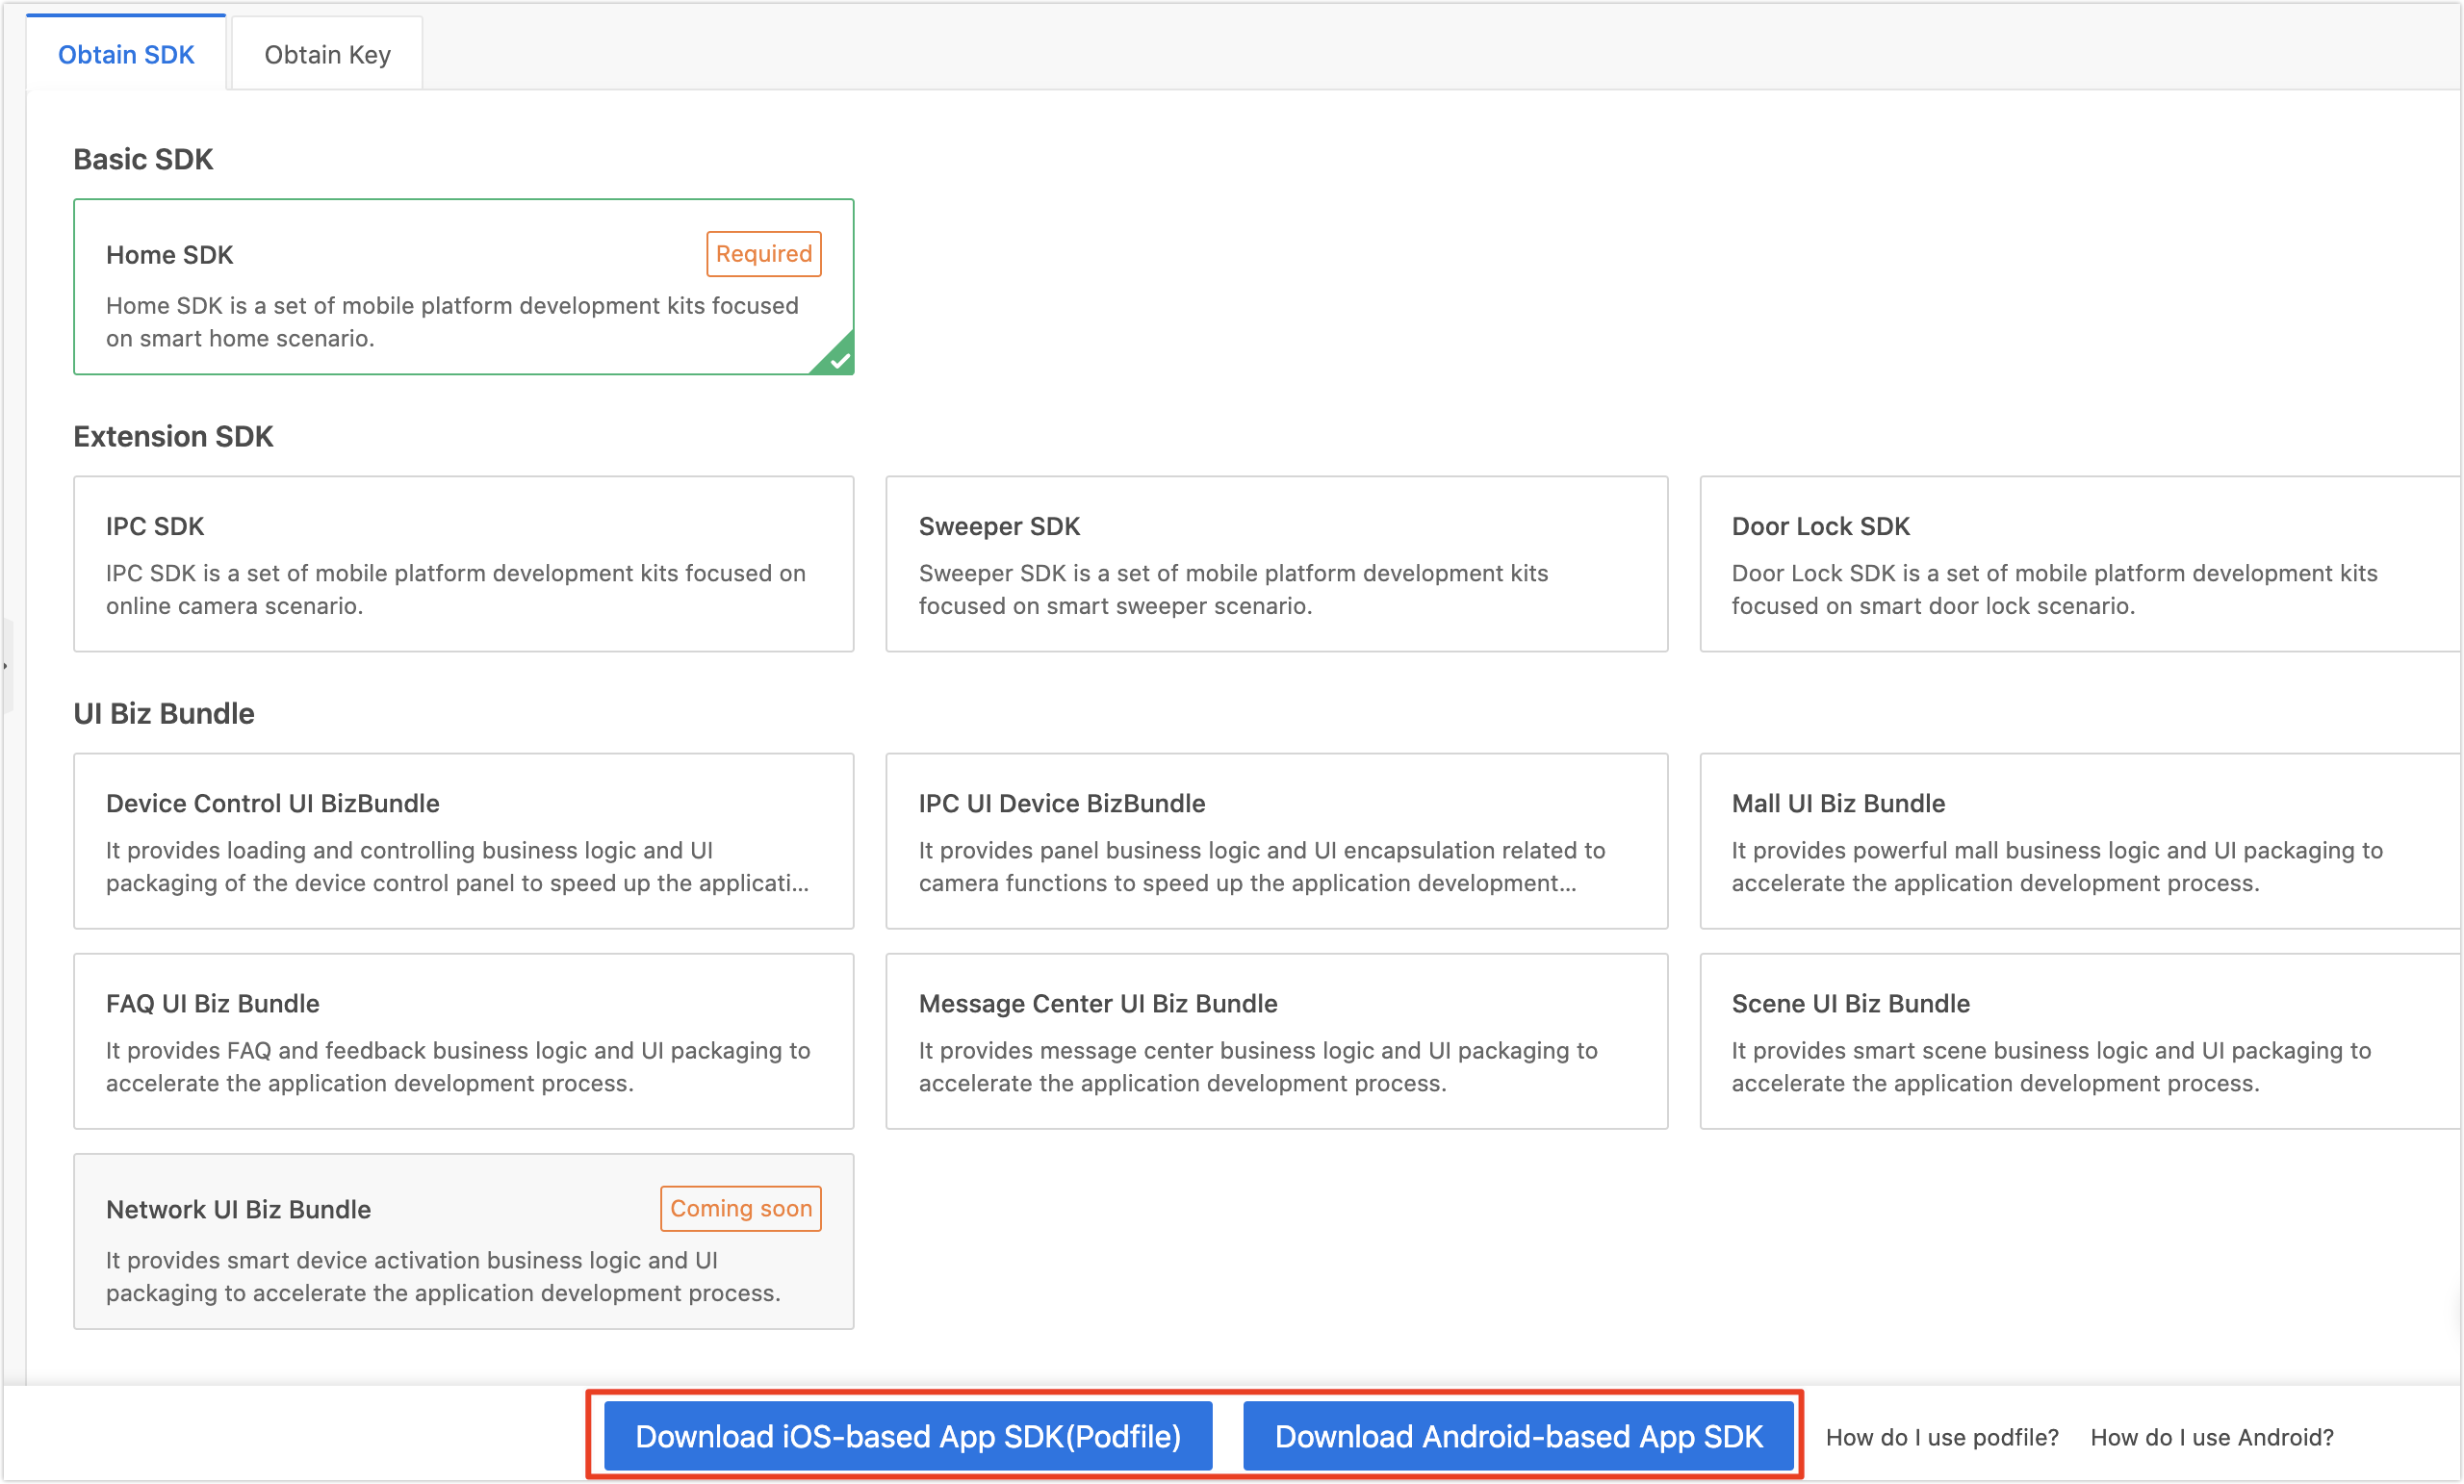
Select one or multiple solutions as per your actual requirements and integrate SDK according to Podfile and Gradle.
-
Click Obtain Key to get SDK information including
AppKey,AppSecret, and Security Image, which you would use in subsequent steps.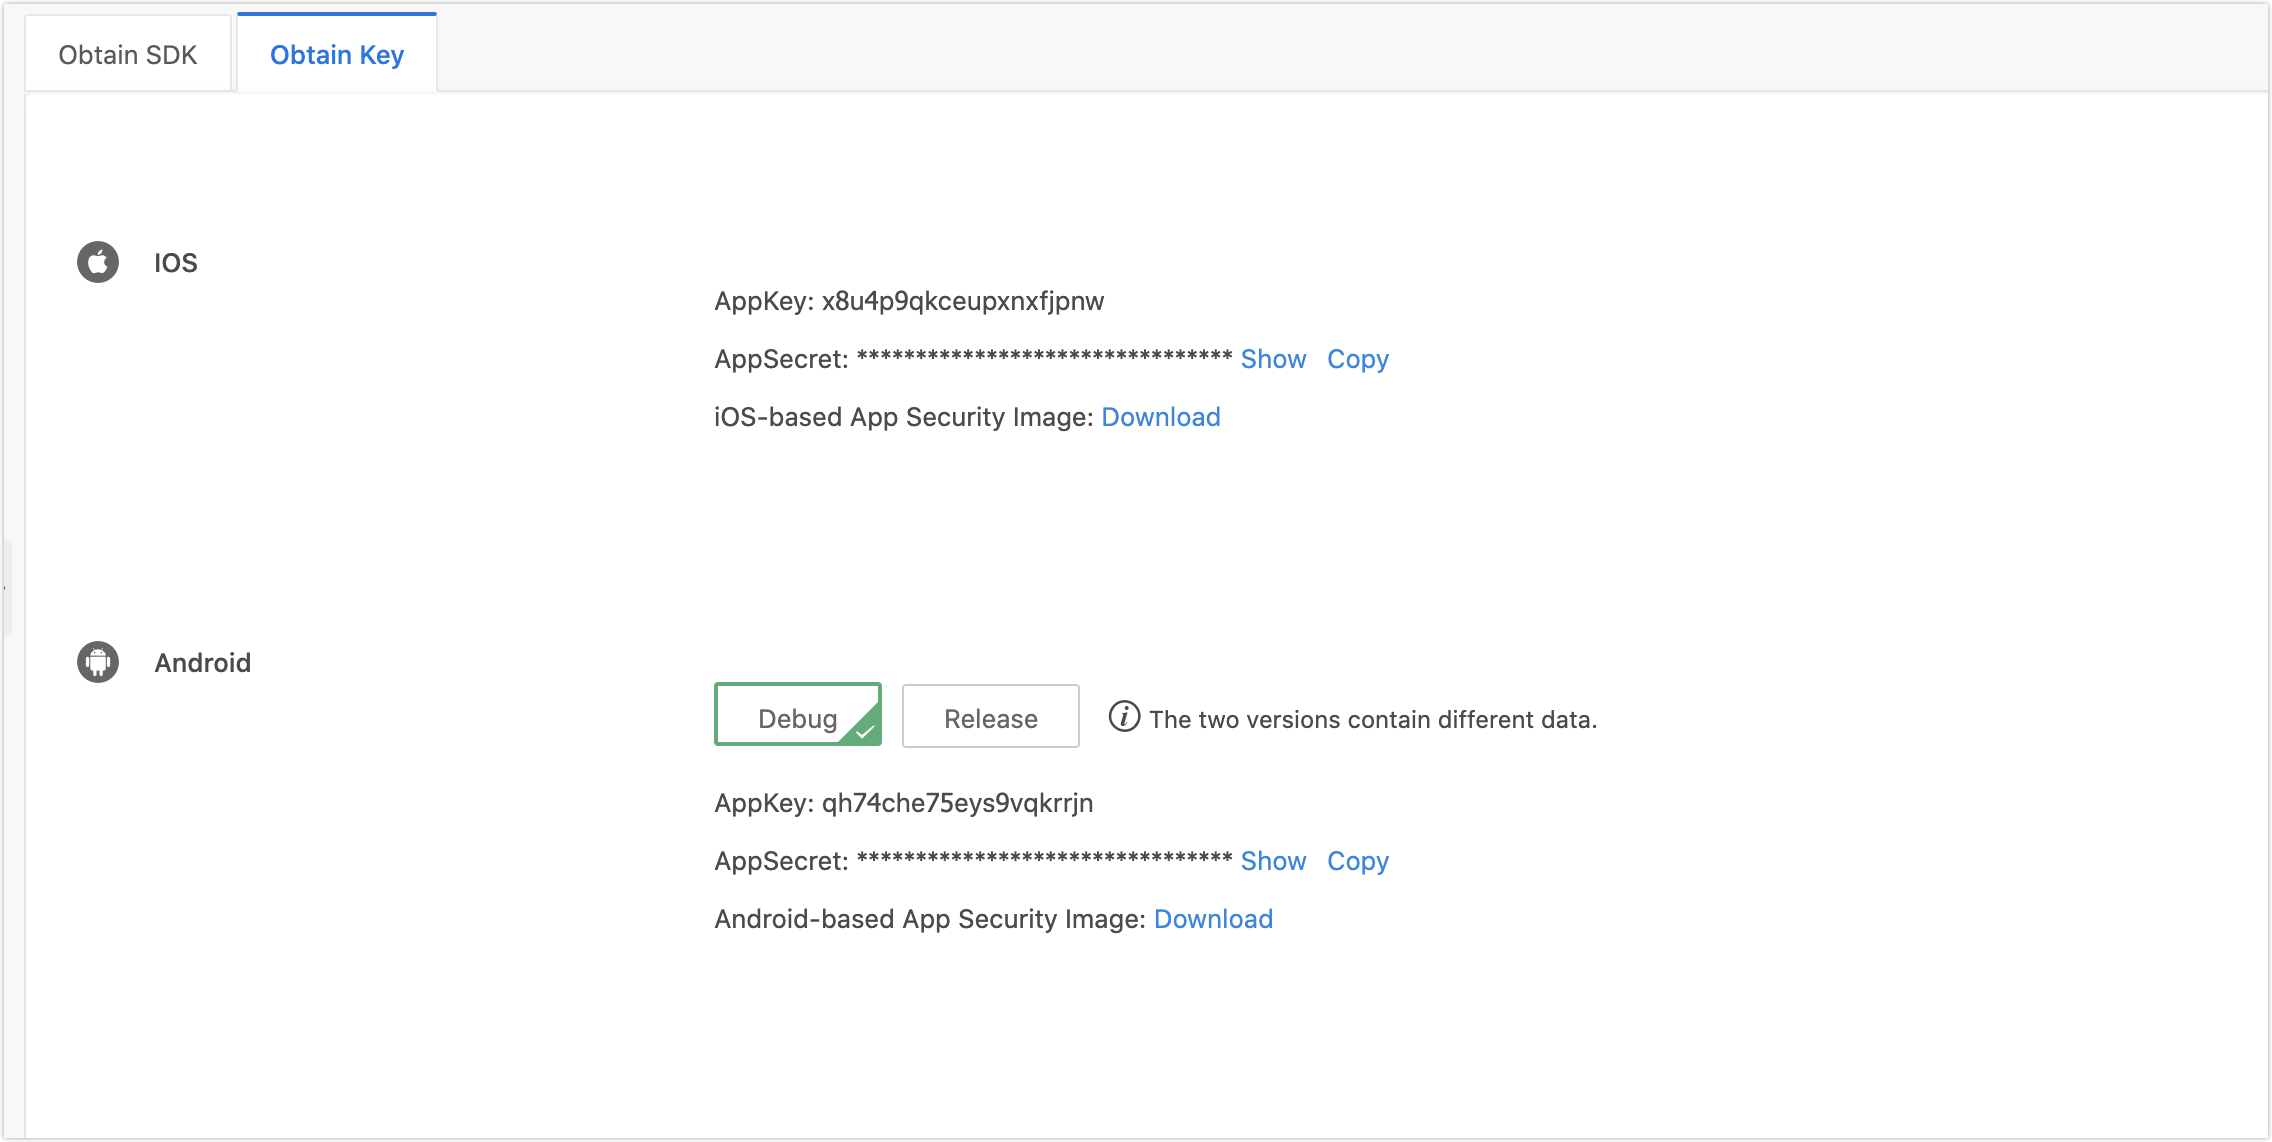
-
Step 2: Use CocoaPods to integrate SDK
Note: The minimum system version supported by Tuya App SDK is 9.0.
-
Add the following to the
Podfilefile:platform :ios, '9.0' target 'Your_Project_Name' do pod "TuyaSmartHomeKit" end -
Execute the
pod updatecommand in the root directory of the project for integration. -
Initialize the SDK.
-
Open the project settings, click Target > General, and modify
Bundle Identifierto the corresponding iOS Bundle ID set on the Tuya IoT platform. -
Import the security image to the root directory of the project, rename it as
t_s.bmp. Go to Project Settings > Target > Build Phases, and add this image to Copy Bundle Resources. -
Add the following to the
PrefixHeader.pchfile of the project.#import <TuyaSmartHomeKit/TuyaSmartKit.h> -
Open the
AppDelegate.mfile and initialize the SDK inAppDelegate application:didFinishLaunchingWithOptions:.SDK API:
- (void)startWithAppKey:(NSString *)appKey secretKey:(NSString *)secretKey;Parameter description:
appKey: App’s verification information, equivalent to the ID. You can get it from the IoT Platform.secretKey: App’s secret key. You can get it from the IoT Platform.
Sample code:
[[TuyaSmartSDK sharedInstance] startWithAppKey:<#your_app_key#> secretKey:<#your_secret_key#>];
-
-
Enable debug mode
During the development process, you can enable the debug mode and print logs for problem analysis. It is recommended to disable debug mode after the development is completed.
#ifdef DEBUG
   [[TuyaSmartSDK sharedInstance] setDebugMode:YES];
#else
#endif
-
Step 3: User registration and login
Tuya IoT Platform supports multiple user systems, including mobile phones, email addresses, UIDs, and more. Regarding mobile phone, login with verification code and password are both available. Login with UID is used when you have established an account system. In this demo, the verification code is used to register and log in.
Class name Description TuyaSmartUser Classes related to Tuya users. countryCodeparameter (international calling codes) is required in the registration and login method for selecting the nearest availability zone deployed by Tuya IoT Platform. The data in each availability zone is isolated. Therefore, accounts registered in Mainland China (+86) cannot be used in the United States (+1). Users will receive “account does not exist” error message.-
Get verification code and register with phone number.
// Send verification code [[TuyaSmartUser sharedInstance] sendVerifyCode:@"86" phoneNumber:@"1300****" type:1 success:^{ [TPDemoProgressUtils showSuccess:@"Verification code sent successfully" toView:nil]; } failure:^(NSError *error) { [TPDemoProgressUtils showError:error.localizedDescription]; }]; // Register with verification code [[TuyaSmartUser sharedInstance] registerByPhone:@"86" phoneNumber:@"1300****" password:@"***" code:@"code" success:^{ // Registration is completed. Jump to the homepage [[TYDemoApplicationImpl sharedInstance] resetRootViewController:[TYDemoTabBarViewController class]]; } failure:^(NSError *error) { [TPDemoProgressUtils showError:error.localizedDescription]; }]; -
Determine whether user has logged in.
If users have already logged in, when the program is opened, it directly enters the device list page. The session is valid for 45 days. If users have not logged in before, they need to log in first and the program will jump to the device list page.
// Determine whether user has logged in if ([TuyaSmartUser sharedInstance].isLogin) { // Homepage [self resetRootViewController:[TYDemoTabBarViewController class]]; } else { // Login page [[TYDemoRouteManager sharedInstance] openRoute:kTYDemoPopLoginVC withParams:nil]; } -
Session expires.
If users have not logged in for a long period or changed their passwords, they will get “session expired” error when calling server APIs. Monitoring
TuyaSmartUserNotificationUserSessionInvalidnotification is necessary to jump to the login page for log back in.- (void)loadNotification { [[NSNotificationCenter defaultCenter] addObserver:self selector:@selector(sessionInvalid) name:TuyaSmartUserNotificationUserSessionInvalid object:nil]; } - (void)sessionInvalid { NSLog(@"sessionInvalid"); //Jump to the login page MyLoginViewController *vc = [[MyLoginViewController alloc] init]; self.window.rootViewController = vc; [self.window makeKeyAndVisible]; }
-
Step 4: Create a home for the user
After successful login, users get the whole home list through
TuyaSmartHomeManager, initialize aTuyaSmartHometo get home details, and implement smart device control.Class name Description TuyaSmartHomeManager Get and sort the home list, and add a home. TuyaSmartHomeManagerDelegate Add and delete a home. Callback of successful MQTT connection. -
Get the home list.
You get the home list on the device list page. If there is no home yet, you create a default home so that a newly activated device can be associated with it.
After getting the home list, you can initialize a home, get home details from Tuya Cloud, and reload the device list on the homepage.
- (void)initData { _homeManager = [[TuyaSmartHomeManager alloc] init]; _homeManager.delegate = self; // Get the current local home NSString *homeId = [[NSUserDefaults standardUserDefaults] objectForKey:kDefaultCurrentHomeId]; if ([homeId longLongValue] > 0) { self.home = [TuyaSmartHome homeWithHomeId:[homeId longLongValue]]; if (self.home) { self.home.delegate = self; self.topBarView.leftItem.title = [NSString stringWithFormat:@"%@ ∨", self.home.homeModel.name]; [TYDemoSmartHomeManager sharedInstance].currentHomeModel = self.home.homeModel; // Reload device list data [self reloadDataFromCloud]; } else { // If no data available, get the first home [self loadFirstHomeData]; } } else { // If no data available, get the first home [self loadFirstHomeData]; } } - (void)reloadDataFromCloud { WEAKSELF_AT [self.refreshControl beginRefreshing]; // Get the details of the current home, and reload the list [self.home getHomeDetailWithSuccess:^(TuyaSmartHomeModel *homeModel) { [weakSelf_AT reloadData]; } failure:^(NSError *error) { if ([error.localizedFailureReason isEqualToString:@"PERMISSION_DENIED"]) { [weakSelf_AT loadFirstHomeData]; } [weakSelf_AT.refreshControl endRefreshing]; }]; } -
Add a new home.
// add home - (void)rightBtnAction { NSString *homeName = [NSString stringWithFormat:@"Home_%@", @(self.homeManager.homes.count)]; WEAKSELF_AT [self.homeManager addHomeWithName:homeName geoName:@"hangzhou" rooms:@[@"room1"] latitude:0 longitude:0 success:^(long long homeId) { [TPDemoProgressUtils showSuccess:@"Add Success" toView:nil]; // witch to newly added home TuyaSmartHome *home = [TuyaSmartHome homeWithHomeId:homeId]; [weakSelf_AT swithCurrentHomeIdWithHomeModel:home.homeModel]; } failure:^(NSError *error) { [TPDemoProgressUtils showError:error.localizedDescription]; }]; } -
Callback of home list updates.
Once
TuyaSmartHomeManagerDelegateagency agreement is implemented, operation can be conducted in the callback of home list update.#pragma mark - TuyaSmartHomeManagerDelegate // Add a home - (void)homeManager:(TuyaSmartHomeManager *)manager didAddHome:(TuyaSmartHomeModel *)home { NSLog(@"Add a home %@", home.name); } // Delete a home - (void)homeManager:(TuyaSmartHomeManager *)manager didRemoveHome:(long long)homeId { // If current home is deleted, it will be switched to another one if ([TYDemoSmartHomeManager sharedInstance].currentHomeModel.homeId == homeId) { [self loadFirstHomeData]; } } // MQTT is successfully connected - (void)serviceConnectedSuccess { // et the details of the current home from the cloud, and then reload UI [self reloadDataFromCloud]; } -
The callback of information updates of a single home.
When
TuyaSmartHomeDelegateproxy protocol is implemented, callback of information update of a single home can be processed.#pragma mark - TuyaSmartHomeDelegate // Home information is updated, such as name - (void)homeDidUpdateInfo:(TuyaSmartHome *)home { [self.tableView reloadData]; } // Add a room - (void)home:(TuyaSmartHome *)home didAddRoom:(TuyaSmartRoomModel *)room { [self.tableView reloadData]; } // Delete a room - (void)home:(TuyaSmartHome *)home didRemoveRoom:(long long)roomId { [self.tableView reloadData]; } // The shared device list I received is updated - (void)homeDidUpdateSharedInfo:(TuyaSmartHome *)home { [self.tableView reloadData]; } // Room information is updated, such as name - (void)home:(TuyaSmartHome *)home roomInfoUpdate:(TuyaSmartRoomModel *)room { [self.tableView reloadData]; } // The relation between the room and devices and groups is changed - (void)home:(TuyaSmartHome *)home roomRelationUpdate:(TuyaSmartRoomModel *)room { [self.tableView reloadData]; } // Add a device - (void)home:(TuyaSmartHome *)home didAddDeivice:(TuyaSmartDeviceModel *)device { [self.tableView reloadData]; } // Remove a device - (void)home:(TuyaSmartHome *)home didRemoveDeivice:(NSString *)devId { [self.tableView reloadData]; } // Device information is updated, such as name - (void)home:(TuyaSmartHome *)home deviceInfoUpdate:(TuyaSmartDeviceModel *)device { [self.tableView reloadData]; } // Device's DP data is updated - (void)home:(TuyaSmartHome *)home device:(TuyaSmartDeviceModel *)device dpsUpdate:(NSDictionary *)dps { [self.tableView reloadData]; } // Add a group - (void)home:(TuyaSmartHome *)home didAddGroup:(TuyaSmartGroupModel *)group { [self.tableView reloadData]; } // Group's DP data is updated - (void)home:(TuyaSmartHome *)home group:(TuyaSmartGroupModel *)group dpsUpdate:(NSDictionary *)dps { [self.tableView reloadData]; } // Remove a group - (void)home:(TuyaSmartHome *)home didRemoveGroup:(NSString *)groupId { [self.tableView reloadData]; } // Group information is updated, such as name - (void)home:(TuyaSmartHome *)home groupInfoUpdate:(TuyaSmartGroupModel *)group { [self.tableView reloadData]; }
-
Step 5: Wi-Fi SmartConfig pairing
Device pairing refers to that a device is activated and registered in the cloud.
Class name Description TuyaSmartActivator (singleton) Providing multiple pairing methods including Wi-Fi SmartConfig (EZ), access point (AP), wired device activation, and sub-device activation. Call this class in main thread.
Wi-Fi SmartConfig paring, also called EZ pairing, enables a quick device pairing. After connecting the mobile phone to the home router, the user can pair the device via router broadcasting.
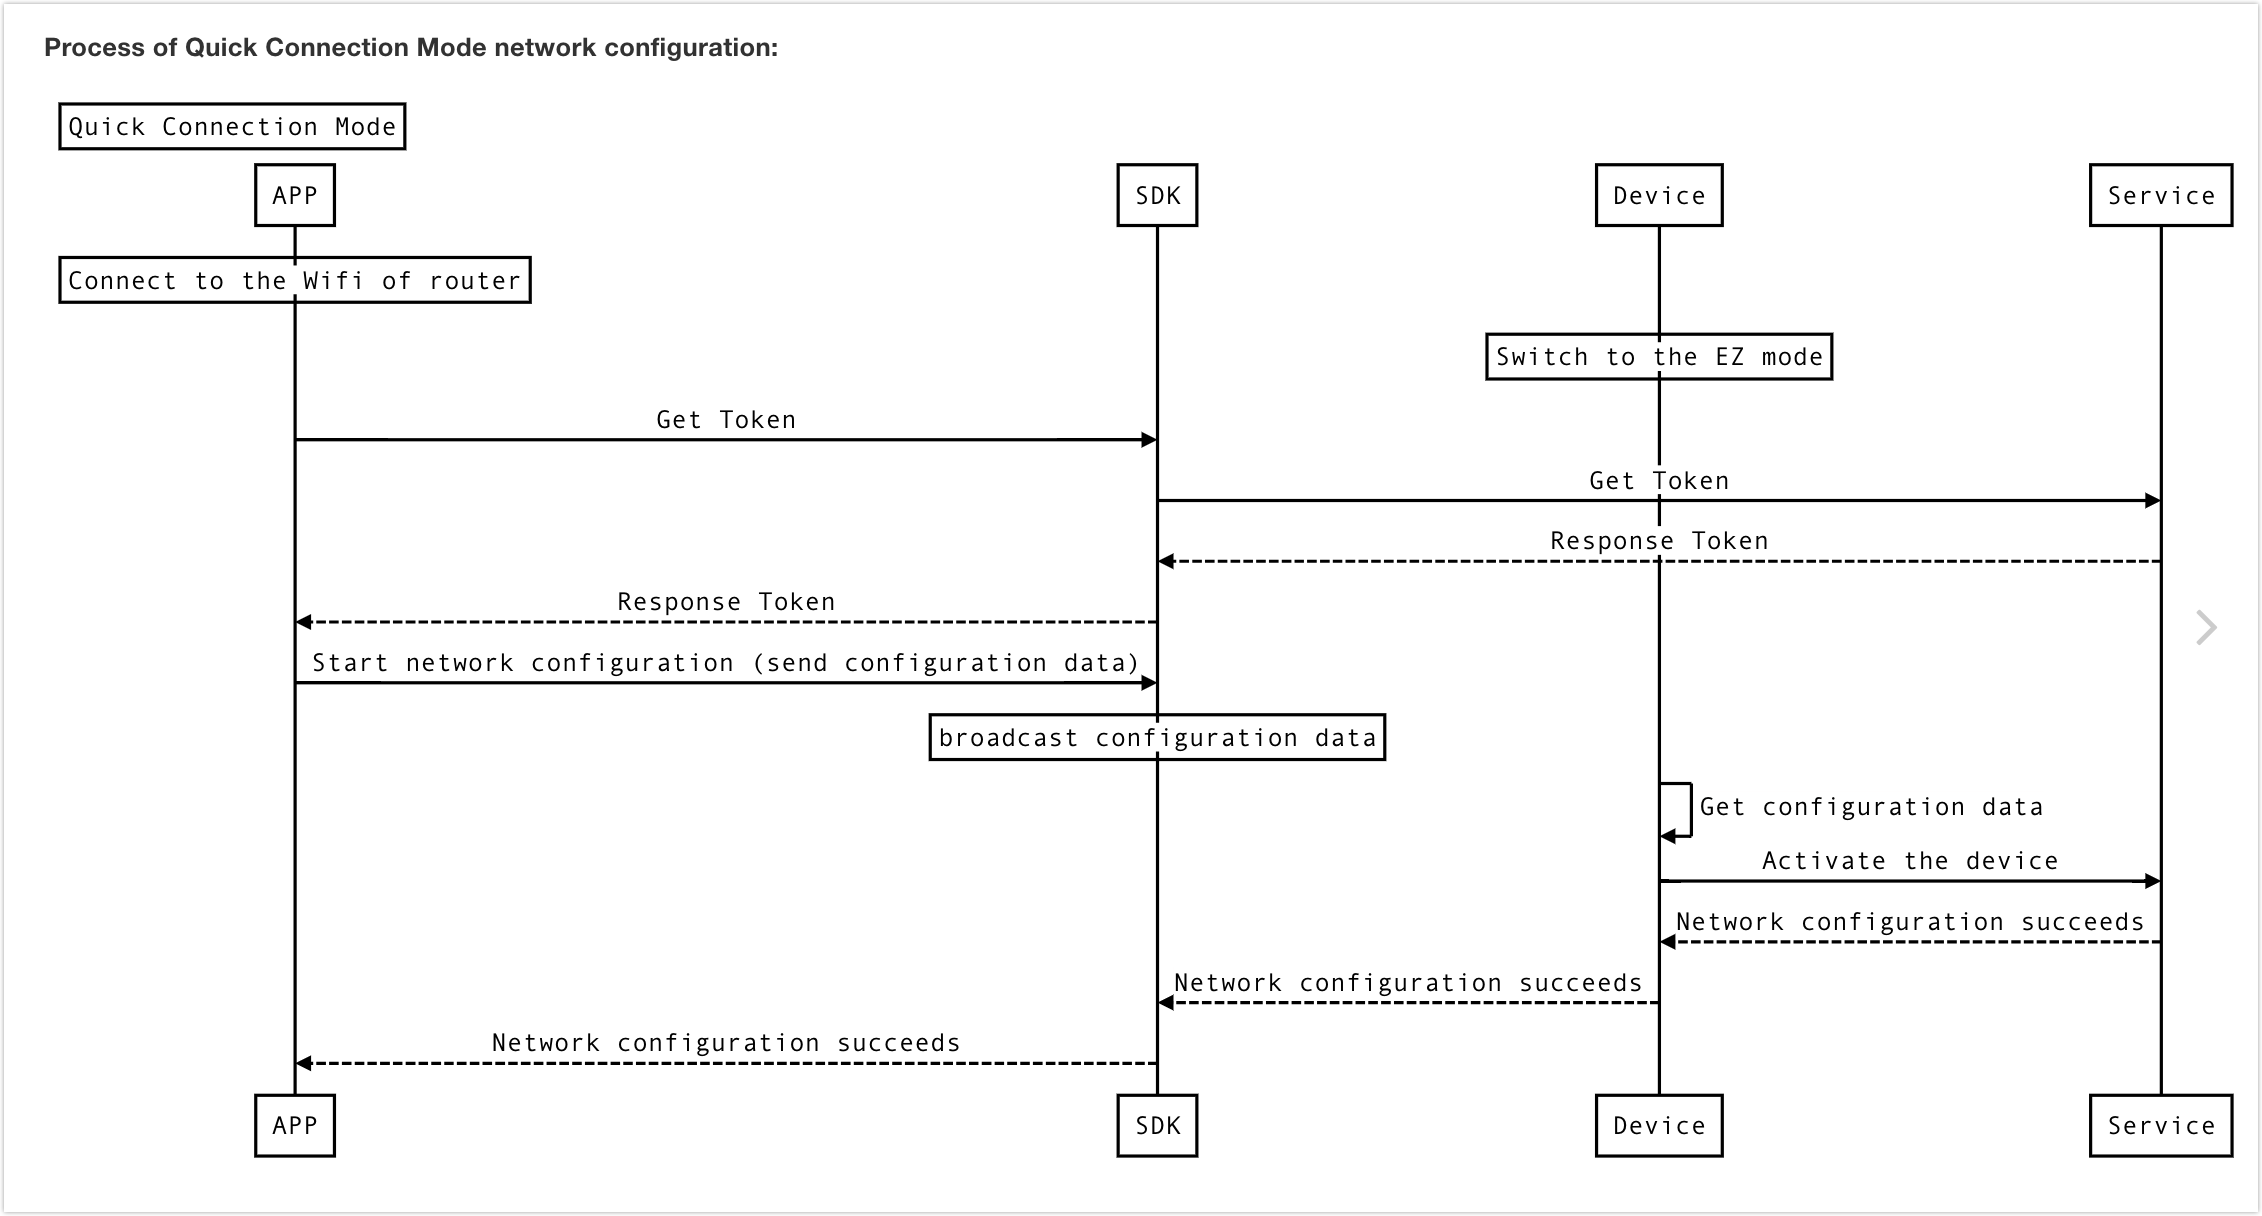
- (void)addDeviceWithEZMode {

    // Get a token
    WEAKSELF_AT
    id<TYDemoDeviceListModuleProtocol> impl = [[TYDemoConfiguration sharedInstance] serviceOfProtocol:@protocol(TYDemoDeviceListModuleProtocol)];
    long long homeId = [impl currentHomeId];
    [[TuyaSmartActivator sharedInstance] getTokenWithHomeId:homeId success:^(NSString *token) {

        // Start pairing
        [weakSelf_AT commitEZModeActionWithToken:token];
    } failure:^(NSError *error) {

        info = [NSString stringWithFormat:@"%@: token fetch failed, error message is %@",NSStringFromSelector(_cmd),error.localizedDescription];
        [weakSelf_AT appendConsoleLog:info];
    }];
}
// Start pairing
- (void)commitEZModeActionWithToken:(NSString *)token {
    [TuyaSmartActivator sharedInstance].delegate = self;
    [[TuyaSmartActivator sharedInstance] startConfigWiFi:TYActivatorModeEZ ssid:self.ssidField.text password:self.passwordField.text token:token timeout:timeout];
}

#pragma mark - TuyaSmartActivatorDelegate

- (void)activator:(TuyaSmartActivator *)activator didReceiveDevice:(TuyaSmartDeviceModel *)deviceModel error:(NSError *)error {

    [NSObject cancelPreviousPerformRequestsWithTarget:self selector:@selector(countDown) object:nil];
    timeout = timeLeft;
    [self hideProgressView];

    NSString *info = [NSString stringWithFormat:@"%@: Finished!", NSStringFromSelector(_cmd)];
    [self appendConsoleLog:info];
    if (error) {
        // Pairing failed
        info = [NSString stringWithFormat:@"%@: Error-%@!", NSStringFromSelector(_cmd), error.localizedDescription];
        [self appendConsoleLog:info];
    } else {
        // Pairing succeeded
        info = [NSString stringWithFormat:@"%@: Success-You've added device %@ successfully!", NSStringFromSelector(_cmd), deviceModel.name];
        [self appendConsoleLog:info];
    }
}
Step 6: Control smart device
When the device is activated and connected, it can be controlled, and monitor the callback of control status.
Class name Description TuyaSmartDevice Class of device management TuyaSmartDeviceModel Class of device data model It is recommended to learn device data points before starting device control. The data point (DP) is the abstraction of a smart device function, describing product functions and parameters. For more information, see Overview section in Custom Functions. Note the following items in terms of functional data types.
-
The data type should be handled with special care in sending control commands.
For example, if a DP type is a value, then the control command should be sent as
@{@"2": @(25)}instead of@{@"2": @"25"}. -
The byte array that raw DPs transfer is in hexadecimal string. Letters should be lower-cased and in even bit.
For example, the correct format is:
@{@"1": @"011f"}instead of@{@"1": @"11f"}.
Thedpsattribute (NSDictionarytype) of the TuyaSmartDeviceModelclass defines the status of a smart device, which is called a data point (DP) or function point.Each key in the dpsdictionary corresponds to a DP ID, and avaluecorresponds to a DP value. For more information about data points, see function definition on Tuya IoT Platform. As shown in the following figure.``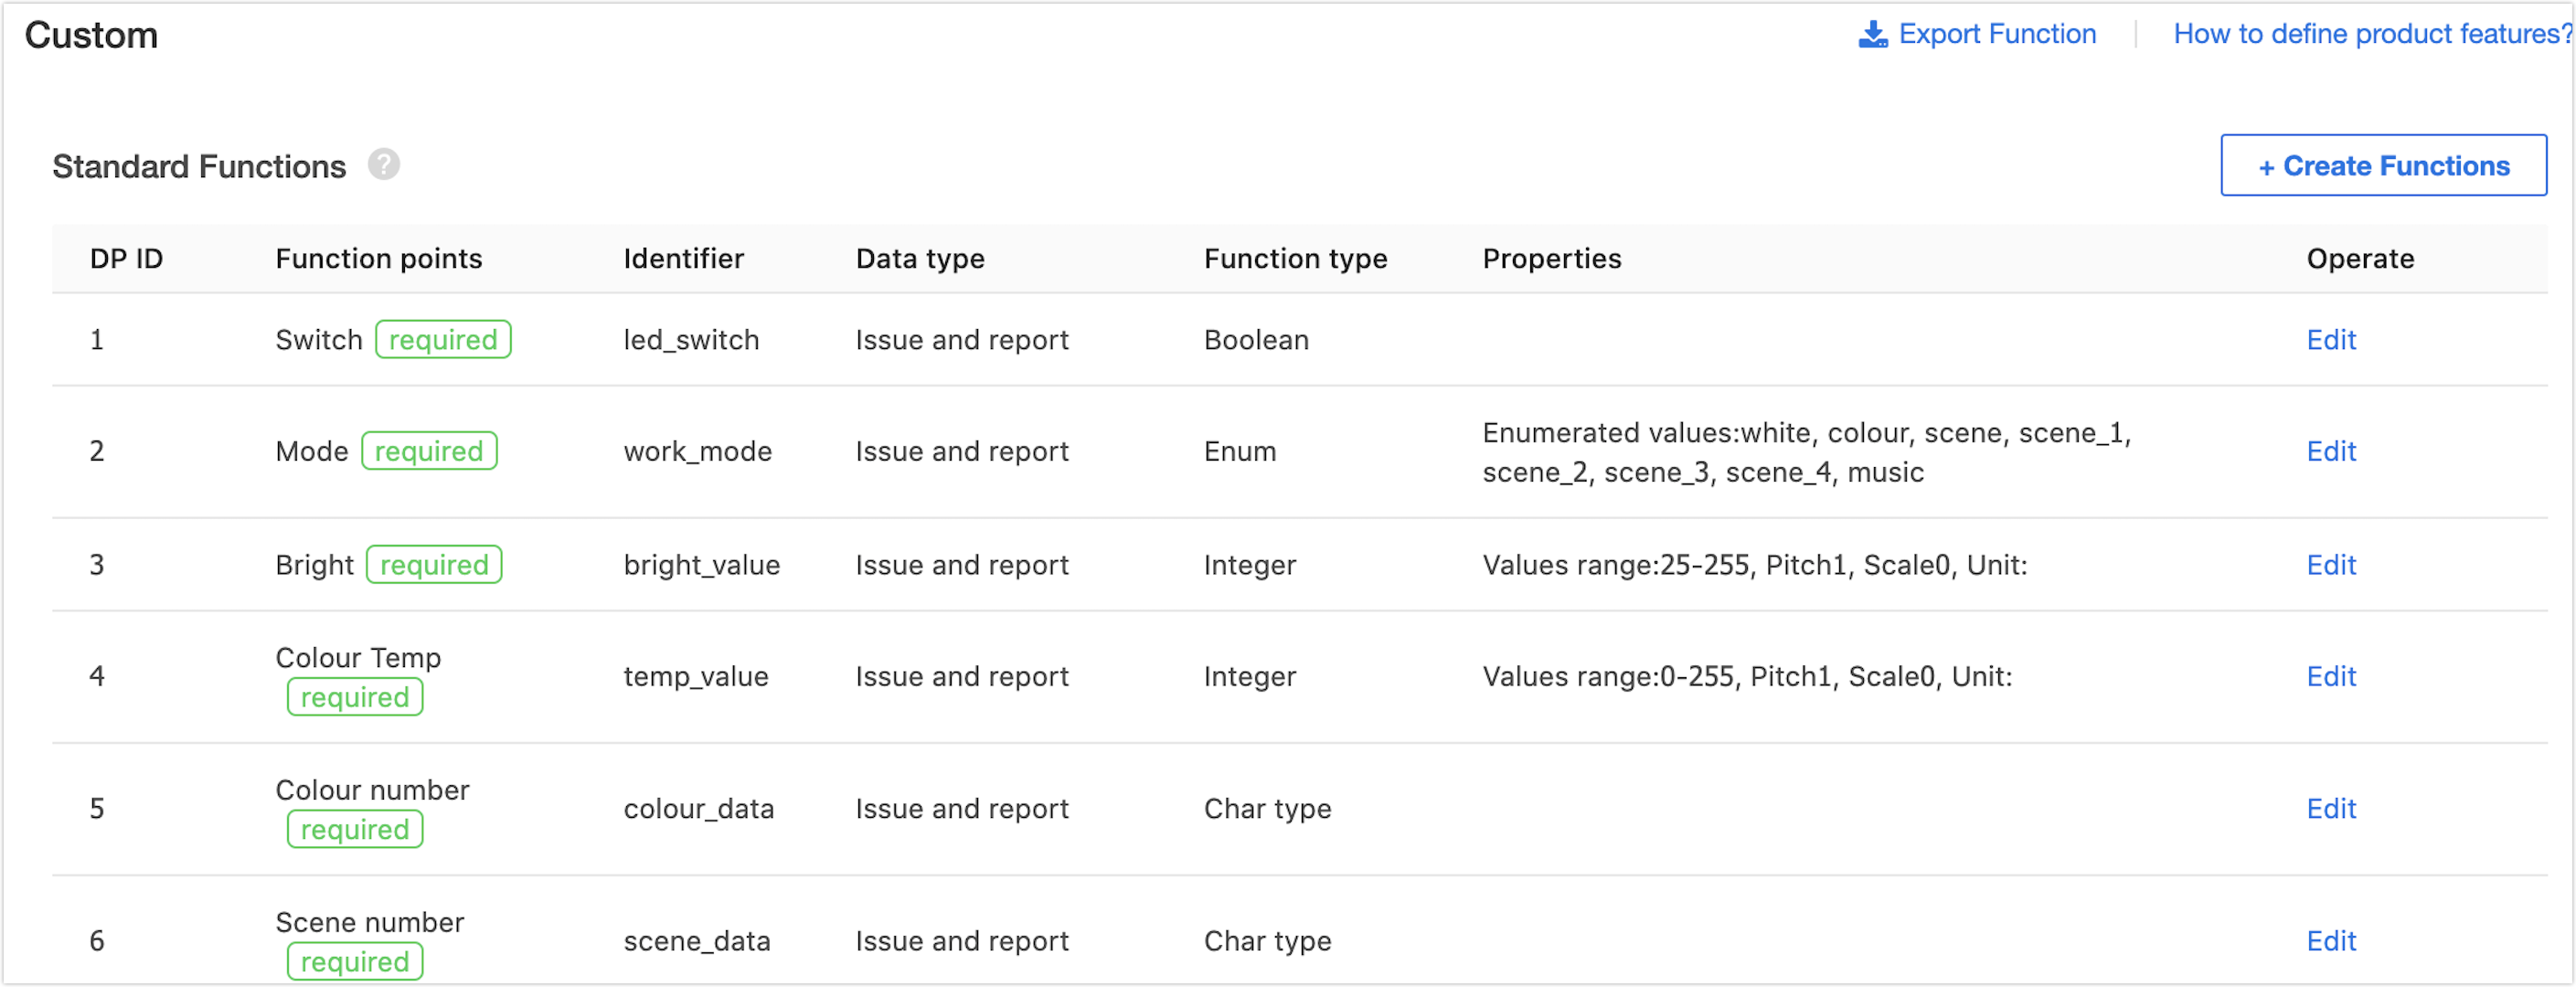
Control command is sent according to the format of
{"<dpId>":"<dpValue>"}. The following control logic is based on the product DPs defined on the IoT Platform.Sample code
- (void)publishDps { // self.device = [TuyaSmartDevice deviceWithDeviceId:@"your_device_id"]; // self.device.delegate = self; NSDictionary *dps; // Set the Boolean DP ID 1. Function: Turn on the switch dps = @{@"1": @(YES)}; // Set the string DP ID 4. Function: Set RGB to ff5500 dps = @{@"4": @"ff5500"}; // Set the enumeration DP ID 5. Function: Set the level to 2 dps = @{@"5": @"2"}; // Set the numeric DP ID 6. Function: Set the temperature to 20°C dps = @{@"6": @(20)}; // Set the raw DP ID 15 (byte array). Function: Raw infrared data is 1122 dps = @{@"15": @"1122"}; // Multiple data points are sent together dps = @{@"1": @(YES), @"4": @(ff5500)}; [self.device publishDps:dps success:^{ NSLog(@"publishDps success"); // Send successfully. Callback of status report is implemented through deviceDpsUpdate } failure:^(NSError *error) { NSLog(@"publishDps failure: %@", error); }]; }-
Step 7: Device initialization and device status proxy monitoring
You need to initialize a home instance through
TuyaSmartHome, and then call APIgetHomeDetailWithSuccess:failure:to get home details. When home details are synchronized, the device can be initialized successfully. Wrong device ID may cause initialization failure, in which case the device instance returnsnil.- (void)publishDps { self.device = [TuyaSmartDevice deviceWithDeviceId:@"your_device_id"]; self.device.delegate = self; [self.device publishDps:@{@"1" : @{YES}} success:^{ NSLog(@"publishDps success"); // Send successfully. Callback of status report is implemented through deviceDpsUpdate } failure:^(NSError *error) { NSLog(@"publishDps failure: %@", error); }]; } #pragma mark - TuyaSmartDeviceDelegate /// DP data is updated - (void)device:(TuyaSmartDevice *)device dpsUpdate:(NSDictionary *)dps { [self.tableView reloadData]; } /// Device information is updated - (void)deviceInfoUpdate:(TuyaSmartDevice *)device { } /// The device is removed - (void)deviceRemoved:(TuyaSmartDevice *)device { }
Summary
You have completed the smart device activation, network access, ann device control with an IoT app. Try more interesting and novel smart functions.
Is this page helpful?
YesSuggestions


