Build a Smart Light App for Android with Tuya App SDK
Overview
Occasionally, you get home from a long day and feel the fatigue hit you when you walk in the door. Wouldn’t it be comfortable if your home is bright and warm when you arrive, waiting for you to settle in?
With the Tuya IoT Platform, you can easily build a smart light app, the key to smart lighting. A smart light app enables control of smart lights with ease and comfort and gives an innovative lifestyle. Image this beautiful scene: In the morning, when you get up and go into the kitchen, the cool white light automatically turns on. In the evening, you could have a warm white light go on when you arrive home from work so you don’t have to walk into a dark house.
Materials
One smart product
Count:1In this demo, we assume that you already have a smart product. It could be created on the Tuya IoT Platform or purchased from TuyaGo.more
Steps
Step 1: What is smart light app?
Before getting into developing a smart light app, let’s find out what innovative features a smart light offers these days.
Basic functionality
-
Smart timer: You can set a daily or weekly schedule when lights turn on or off. It could be a once or repeating schedule. You can also apply a schedule to a group of lights.
-
Remote control: The smart light can communicate with a mobile phone or tablet via a wireless router. This allows you to remotely control a light, such as on/off, dimming, multi-color, and scenes.
-
Color adjustment: Play with more than 16 million colors or any shade of white light.
-
Geofencing: With the geofencing function, a smart light app can achieve At Home Mode and Away Mode.
-
Music sync: Immerse yourself in your favorite music and sync your lights to any song. Simply set up your entertainment area in a smart light app.
-
Smart scenes: Feature four scenes handpicked by lighting designers. The soft, colorful, dazzling, and gorgeous modes let you always get the right light to match every moment of your daily life.
Application scenarios
-
Working: Provide the best white light to support your focus.
-
Reception: Switch to a more relaxing setting and wind down with your friends.
-
Bedroom: Warm white light for the bedroom helps you relax.
-
Wake up: Set a timer to activate your lights in the morning to gently wake you up with music.
-
Step 2: Get Tuya App SDK
-
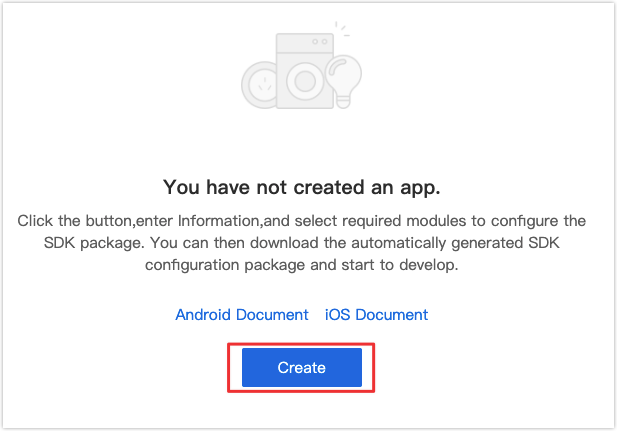
Go to App SDK on the Tuya IoT Platform and click Create.
-
Complete app details and click Ok.
- App Name: Enter your app name.
- iOS Bundle ID: Enter your iOS app bundle ID. The recommended format is
com.xxxxx.xxxxx. - Android Package Name: Enter your Android app package name. It is not necessary to be consistent with the iOS app bundle ID.
- URL Scheme: It is not required. If it is left empty, the system will automatically generate one according to the package name.
-
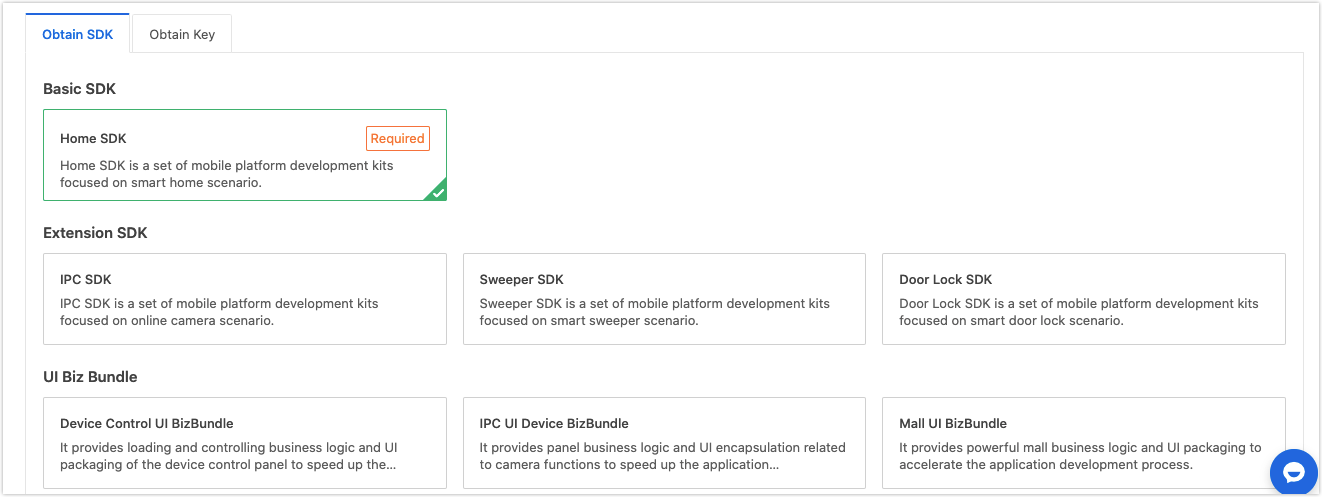
Select SDK solutions as per your actual requirements, and integrate SDK according to Podfile and Gradle. The Podfile and Gradle file will be created for the iOS SDK and Android SDK respectively.
-
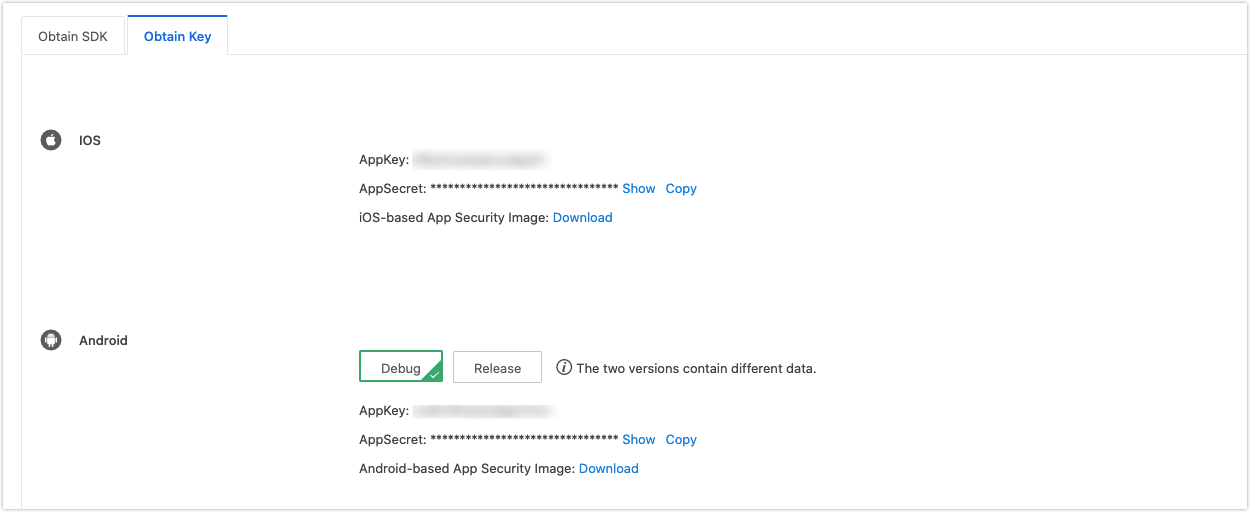
Click Obtain Key to get AppKey, AppSecrete, and security image.
-
Step 3: Create a project in Android Studio
-
Create a project in Android Studio.
-
Configure the
build.gradlefile.-
Add dependencies to the
build.gradlefile.android { defaultConfig { ndk { abiFilters "armeabi-v7a", "arm64-v8a" } } packagingOptions { pickFirst 'lib/*/libc++_shared.so' // This .so file exists in multiple .aar files. Select the first one. } } dependencies { implementation 'com.alibaba:fastjson:1.1.67.android' implementation 'com.squareup.okhttp3:okhttp-urlconnection:3.14.9' // The latest version of the Tuya Home: implementation 'com.tuya.smart:tuyasmart:3.20.0' } -
Add the
jcenter()repository to thebuild.gradlefile.repositories { jcenter() }Note:
- The Tuya Smart SDK earlier than 3.10.0 only supports
armeabi-v7a. - The SDK V3.11.0 and the later version have integrated
armeabi-v7aandarm64-v8a. If you have added.solibraries to the project, you need to remove them and only use the library included in the SDK. - If you want to integrate the
.solibrary of a new version, you must remove the library of an earlier version to avoid conflicts or other possible issues. - Find more in GitHub.
- The Tuya Smart SDK earlier than 3.10.0 only supports
-
-
Integrate a security image
-
Click Download > Download Security Image.
-
Rename the security image as
t_s.bmpand put the image in theassetsfolder of your project.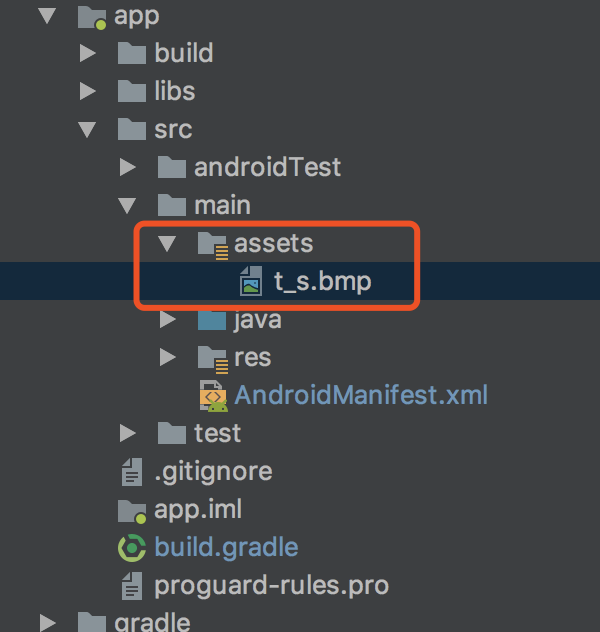
-
-
Configure
appkeyandappSecretinAndroidManifest.xmland set permissions for the app.<meta-data android:name="TUYA_SMART_APPKEY" android:value="Appkey" /> <meta-data android:name="TUYA_SMART_SECRET" android:value="AppSecret" /> -
Configure obfuscation in
proguard-rules.pro#fastJson -keep class com.alibaba.fastjson.**{*;} -dontwarn com.alibaba.fastjson.** #mqtt -keep class com.tuya.smart.mqttclient.mqttv3.** { *; } -dontwarn com.tuya.smart.mqttclient.mqttv3.** #OkHttp3 -keep class okhttp3.** { *; } -keep interface okhttp3.** { *; } -dontwarn okhttp3.** -keep class okio.** { *; } -dontwarn okio.** -keep class com.tuya.**{*;} -dontwarn com.tuya.**
-
Step 4: Integrate and initialize Home SDK
-
Initialize Home SDK in your Application. Make sure all processes are initialized. Sample code:
public class TuyaSmartApp extends Application { @Override public void onCreate() { super.onCreate(); TuyaHomeSdk.init(this); } } -
Configure
appIdandappSecretinAndroidManifest.xml, or run initialization code.TuyaHomeSdk.init(Application application, String appkey, String appSerect) -
Before you exit the application, you need to call the following operation to disable the cloud connection.
TuyaHomeSdk.onDestroy(); -
In debug mode, you can enable SDK logging to facilitate troubleshooting. It is recommended to disable logging in the release mode.
TuyaHomeSdk.setDebugMode(true);
-
Step 5: Integrate light control SDK
Before you proceed with integration, you need to try and successfully run the light demo app. The light control SDK depends on part of the Home SDK, which will be described in this step.
Dependency description
// Home SDK dependencies. You must use SDK 3.20.0 or later versions. implementation 'com.tuya.smart:tuyasmart:3.20.0' // Control SDK dependencies implementation 'com.tuya.smart:tuyasmart-centralcontrol:1.0.2'Note:
tuyasmart-centralcontrolis compiled in Kotlin, so you need to import the Kotlin library to ensure dependencies can be properly used. If you have imported the Kotlin library, you can ignore the following configuration.Integrate Kotlin
-
Import the dependencies of Kotlin plug-in to the
build.gradlefile.buildscript { ext.kotlin_version = '1.3.72' dependencies { ... classpath "org.jetbrains.kotlin:kotlin-gradle-plugin:$kotlin_version" } } -
Import the Kotlin plug-in and Kotlin package to the
build.gradlefile.apply plugin: 'kotlin-android' dependencies { implementation "org.jetbrains.kotlin:kotlin-stdlib-jdk7:$kotlin_version" }
Standard command description
If standard commands are not used to control a device, the following method is used alternatively.
ITuyaDevice mDevice = TuyaHomeSdk.newDeviceInstance(String devId);
// Register a device listener
mDevice.registerDevListener(new IDevListener() {
    @Override
    public void onDpUpdate(String devId, String dpStr) {

    }
    @Override
    public void onRemoved(String devId) {

    }
    @Override
    public void onStatusChanged(String devId, boolean online) {

    }
    @Override
    public void onNetworkStatusChanged(String devId, boolean status) {

    }
    @Override
    public void onDevInfoUpdate(String devId) {

    }
});
mDevice.publishDps("{\"101\": true}", new IResultCallback() {
    @Override
    public void onError(String code, String error) {
        Toast.makeText(mContext, "Failed", Toast.LENGTH_SHORT).show();
    }

    @Override
    public void onSuccess() {
        Toast.makeText(mContext, "Successful", Toast.LENGTH_SHORT).show();
    }
});
In this method, the cloud sends the data point ID (DPID), such as
101and102, to the device for device control.101is the DPID to turn device on/off.This control method has disadvantages. If the other device has a switch function that is not controlled by
101, you must pass in a different parameter to implement this function. Therefore, when this happens to multiple devices, you need to implement control logic one by one.To solve this problem, we introduce the idea of standard commands for the same function. A standard command is a standard number of a specific function. For example, the standard command for turning lights on/off is the fixed
switch_led. The commandswitch_ledcan turn ‘Powered by Tuya’ lights on/off. For more information, see Standard Instruction Set.Determine command applicability
-
You need to determine whether your product can be controlled by standard commands based on its product ID.
If the standard commands are not applicable, you can only proceed with the above-mentioned traditional method to implement device control.
Sample code:
boolean isStandard = TuyaHomeSdk.getDataInstance().isStandardProduct("your_product_id");your_product_idis the product ID (PID), which can be obtained fromDeviceBean. -
When you have finished integrating SDK, the invoking method is as follows:
ITuyaDevice mDevice = TuyaHomeSdk.newDeviceInstance(String devId); // Note: The method of registerDeviceListener is used, and IDeviceListener is registered. tuyaDevice.registerDeviceListener(new IDeviceListener() { @Override public void onDpUpdate(String devId, Map<String, Object> dpCodeMap) { } @Override public void onRemoved(String devId) { } @Override public void onStatusChanged(String devId, boolean online) { } @Override public void onNetworkStatusChanged(String devId, boolean status) { } @Override public void onDevInfoUpdate(String devId) { } }); HashMap<String, Object> dpCodeMap = new HashMap<>(); dpCodeMap.put("switch_led", true); // Send a standard command tuyaDevice.publishCommands(dpCodeMap, new IResultCallback() { @Override public void onError(String code, String error) { Toast.makeText(mContext, "Failed", Toast.LENGTH_SHORT).show(); } @Override public void onSuccess() { Toast.makeText(mContext, "Successful", Toast.LENGTH_SHORT).show(); } });Note: The method of
registerDeviceListeneris used for standard commands, andregisterDevListeneris used for non-standard commands.Note that the standard commands do not apply to all devices. The following step describes how to determine whether a device supports standard commands. If you want inapplicable devices to be controlled by standard commands, you can contact Tuya for further support.
You can find all available standard commands on the Tuya IoT Platform. For example,
- The standard instruction set of light (dj)
- The standard instruction set of switch, socket, and power strip (kg, cz, pc)
- The standard instruction set of scene switch (cjkg)
You can implement device control with the method of
tuyaDevice.publishCommandsand standard commands.Product category description
Each IoT product category on the Tuya IoT Platform has its unique
categoryvalue. For example, thedjin the light (dj) standard instruction set is thecategoryvalue of lights. You can use thecategoryfield to determine the category of your device and display different control panels.The following table lists the common applicable product categories.
Category category value Switch kg Socket cz Power strip pc Scene switch cjkg Curtain switch clkg Light dj Robot vacuum sd Electric tea kettle bh Diffuser xxj Humidifier jsq Air conditioner kt Air purifier kj Clothes hanger lyj Heater qn Air conditioner controller ktkzq Curtain cl Thermostat wk Fan fs Contact sensor mcs Water detector sj Temperature and humidity sensor wsdcg PIR sensor pir Vibration sensor zd Pressure sensor ylcg Luminance sensor ldcg Smoke detector ywbj Siren sgbj CO2 sensor co2bj CO sensor cobj PM2.5 sensor pm2.5 Gas detector rqbj SOS sensor sos Lock ms Get category value
You can get category value based on the product ID. The sample code is as follows:
String category = TuyaHomeSdk.getDataInstance().getStandardProductConfig("your_product_id").category;Light control
The light firmware has two versions, v1 and v2. You must develop two sets of control logic even though standard commands are used.
The packaged lighting functions include on/off, working mode, brightness, color temperature, multi-color, and four scenes.
Quick start
Create an
ITuyaLightDeviceobject, which packages all the light-related methods.ITuyaLightDevice lightDevice = new TuyaLightDevice(String devId);This object packages all data points (DPs) of the light, including command transmission.
Invoking samples:
// Create lightDevice ITuyaLightDevice lightDevice = new TuyaLightDevice("vdevo159793004250542"); // Register a listener lightDevice.registerLightListener(new ILightListener() { @Override public void onDpUpdate(LightDataPoint dataPoint) { // Return LightDataPoint, including all DP values Log.i("test_light", "onDpUpdate:" + dataPoint); } @Override public void onRemoved() { Log.i("test_light", "onRemoved"); } @Override public void onStatusChanged(boolean status) { Log.i("test_light", "onDpUpdate:" + status); } @Override public void onNetworkStatusChanged(boolean status) { Log.i("test_light", "onDpUpdate:" + status); } @Override public void onDevInfoUpdate() { Log.i("test_light", "onDevInfoUpdate:"); } }); // Turn the light on lightDevice.powerSwitch(true, new IResultCallback() { @Override public void onError(String code, String error) { Log.i("test_light", "powerSwitch onError:" + code + error); } @Override public void onSuccess() { Log.i("test_light", "powerSwitch onSuccess:"); } }); // Sleep scene lightDevice.scene(LightScene.SCENE_GOODNIGHT, new IResultCallback() { @Override public void onError(String code, String error) { Log.i("test_light", "scene onError:" + code + error); } @Override public void onSuccess() { Log.i("test_light", "scene onSuccess:"); } }); // Set a color lightDevice.colorHSV(100, 100, 100, new IResultCallback() { @Override public void onError(String code, String error) { Log.i("test_light", "colorHSV onError:" + code + error); } @Override public void onSuccess() { Log.i("test_light", "colorHSV onSuccess:"); } });-
Step 6: Learn more APIs
This step describes more App SDK APIs to implement diverse functions.
API: Register a listener
Description
/**
 * Register a listener
 */
void registerLightListener(ILightListener listener);
The callback of ILightListener is as follows:
public interface ILightListener {
    /**
     * The listener of the light DP change
     *
     * @param dataPoint   All DP status of the light
     */
    void onDpUpdate(LightDataPoint dataPoint);

    /**
     * Remove the light
     */
    void onRemoved();

    /**
     * The light goes online or offline
     */
    void onStatusChanged(boolean online);

    /**
     * Network status
     */
    void onNetworkStatusChanged(boolean status);

    /**
     * Update light information, such as light name
     */
    void onDevInfoUpdate();
}
Parameter description
The
LightDataPointobject packages all DPs of the current light. When a DP changes, a callback will be invoked. The complete object is called back.The following specifies object parameters:
public class LightDataPoint {
    /**
     * On/off
     */
    public boolean powerSwitch;
    /**
     * Working mode
     * <p>
     * MODE_WHITE is the white light mode
     *  MODE_COLOUR is the multi-color light mode
     * MODE_SCENE is the scene mode
     */
    public LightMode workMode;

    /**
     * Brightness percentage, ranging from 0 to 100
     */
    public int brightness;

    /**
     * Color temperature percentage, ranging from 0 to 100
     */
    public int colorTemperature;

    /**
     * HSV value
     * <p>
     * H is the hue, ranging from 0 to 360
     * S is the saturation, ranging from 0 to 100
     * V is the value, ranging from 0 to 100
     */
    public LightColourData colorHSV;
    /**
     * Multi-color light scene
     *
     * SCENE_GOODNIGHT is the sleep scene
     * SCENE_WORK is the working scene
     * SCENE_READ is the reading scene
     * SCENE_CASUAL is the casual scene
     */
    public LightScene scene;
}
API: Get the light type
Five types of light: cool white light ( C), cool and warm white light (CW), multi-color light (RGB), cool white and multi-color light (RGBC), as well as cool and warm white and multi-color light (RGBCW).
These five types of light differ in the function definition. Take the difference into account during UI design and control method development.
The following method can get the light type.
/**
 * Get the light type
 *
 * @return {@link LightType}
 */
LightType lightType();
The LightType is defined as follows:
/**
 * For cool white light, dpCode is bright_value
 */
TYPE_C,
/**
 * For cool and warm light, dpCode is bright_value + temp_value
 */
TYPE_CW,
/**
 * For multi-color light, dpCode is colour_data
 */
TYPE_RGB,
/**
 * For cool white and multi-color light, dpCode is bright_value + colour_data
 */
TYPE_RGBC,
/**
 * For cool and warm white and multi-color light, dpCode is bright_value + temp_value + colour_data
 */
TYPE_RGBCW
API: Get all DP values
When a control panel is opened, all DP values are required to be obtained. This API is used to get the
LightDataPointobject./** * Get all DP values */ LightDataPoint getLightDataPoint();API: On/off
This API is used to turn a light on or off.
Description
/**
 * Turn light on or off
 *
 * @param status         true or false
 * @param resultCallback callback
 */
void powerSwitch(boolean status, IResultCallback resultCallback);
Parameter description
Field Description status trueindicates the light is turned on.resultCallback It indicates whether the command is sent successfully. The DP status in the ILightListenerindicates whether the control is successful.API: Working mode
This API is used to switch a working mode.
Description
/**
 * Switch a working mode
 *
 * @param mode           Working mode
 * @param resultCallback callback
 */
void workMode(LightMode mode, IResultCallback resultCallback);
Parameter description
Field Description mode The values of working mode include: MODE_WHITE(white light),MODE_COLOUR(multi-color light), andMODE_SCENE(scene mode).resultCallback It indicates whether the command is sent successfully. The DP status in the ILightListenerindicates whether the control is successful.Call example
Switch to multi-color mode.
lightDevice.workMode(LightMode.MODE_COLOUR, new IResultCallback() { @Override public void onError(String code, String error) { Log.i("test_light", "workMode onError:" + code + error); } @Override public void onSuccess() { Log.i("test_light", "workMode onSuccess"); } });Note: For some lights, the color value can only be sent when the light is switched to the corresponding working mode. For example, to adjust the color value, the light must work in the multi-color mode.
API: Brightness
This API is used to adjust light brightness.
Description
/**
 * Adjust brightness
 *
 * @param status         Brightness percentage, ranging from 0 to 100
 * @param resultCallback callback
 */
void brightness(int status, IResultCallback resultCallback);
Parameter description
Field Description status Brightness percentage resultCallback It indicates whether the command is sent successfully. The DP status in the ILightListenerindicates whether the control is successful.API: Color temperature
This API is used to adjust color temperature.
Description
/**
 * Adjust color temperature
 *
 * @param status         Color temperature percentage, ranging from 0 to 100
 * @param resultCallback callback
 */
void colorTemperature(int status, IResultCallback resultCallback);
Parameter description
Field Description status Color temperature percentage resultCallback It indicates whether the command is sent successfully. The DP status in the ILightListenerindicates whether the control is successful.API: Multi-color
This API is used to adjust light colors.
Description
/**
 * Adjust light colors
 *
 * @param hue               Hue, ranging from 0 to 360
 * @param saturation     Saturation, ranging from 0 to 100
 * @param value            Value, ranging from 0 to 100
 * @param resultCallback callback
 */
void colorHSV(int hue, int saturation, int value, IResultCallback resultCallback);
API: Scene
This API is used to switch a scene. Four scenes are available:
LightScene.SCENE_GOODNIGHTis the sleep scene.LightScene.SCENE_WORKis the working scene.LightScene.SCENE_READis the reading scene.LightScene.SCENE_CASUALis the casual scene.
Description
/**
 * @param lightScene     {@link LightScene}
 * @param resultCallback callback
 */
void scene(LightScene lightScene, IResultCallback resultCallback);
Appendix: All light data points
code Name Data type Value description Remark switch_led Switch Boolean {} work_mode Mode Enum {“range”:[“white”, “colour”, “scene”, “music”, “scene_1”, “scene_2”, “scene_3”, “scene_4”]} bright_value Brightness Integer {“min”:25,“scale”:0,“unit”:"", “max”:255,“step”:1} bright_value_v2 Brightness Integer {“min”:10,“scale”:0,“unit”:"", “max”:1000,“step”:1} temp_value Color temperature Integer {“min”:0,“scale”:0,“unit”:"", “max”:255,“step”:1} temp_value_v2 Color temperature Integer {“min”:0,“scale”:0,“unit”:"", “max”:1000,“step”:1} colour_data The number of multi-color modes Json {} colour_data_v2 The number of multi-color modes Json {} scene_data The number of scene modes Json {} scene_data_v2 The number of scene modes Json {} flash_scene_1 Soft mode Json {} flash_scene_2 Colorful mode Json {} flash_scene_3 Dazzling mode Json {} flash_scene_4 Gorgeous mode Json {} music_data Music sync mode Json {} control_data Control DP Json {} countdown_1 Countdown Integer {“unit”:"", “min”:0,“max”:86400,“scale”:0,“step”:1} scene_select Select a scene Enum {“range”:[“1”, “2”, “3”, “4”, “5”]} Legacy version switch_health_read Healthy reading on/off Boolean {} Legacy version read_time Healthy reading: reading time setting Integer {“unit”:“minute”, “min”:1,“max”:60,“scale”:0,“step”:1} Legacy version rest_time Healthy reading: rest time setting Integer {“unit”:“minute”, “min”:1,“max”:60,“scale”:0,“step”:1} Legacy version
Is this page helpful?
YesSuggestions


