Practice on smart multi-color product by using Tuya sandwich borad, Arduino, and Wi_Fi solution

Overview
This tutorial describes some code samples and best practice for developing a smart multi-color product.
For more information about how to set up environment, SDK porting, downloading and debugging, see the following topics.
Steps
Step 1: Downloading the verification
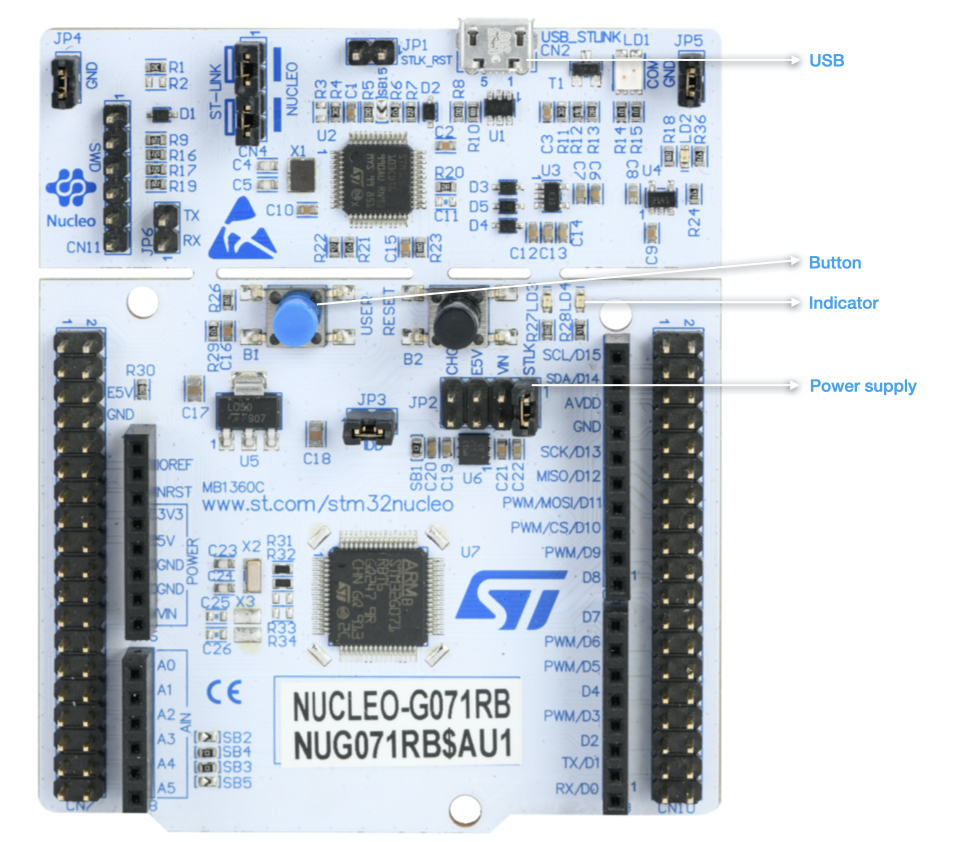
The following picture shows the layout of a ST Nucleo board.
- Button: Press and hold the button for network configuration.
- The black button next to the indicator: The reset port of the development board.
- USB: The port where you can download programs.
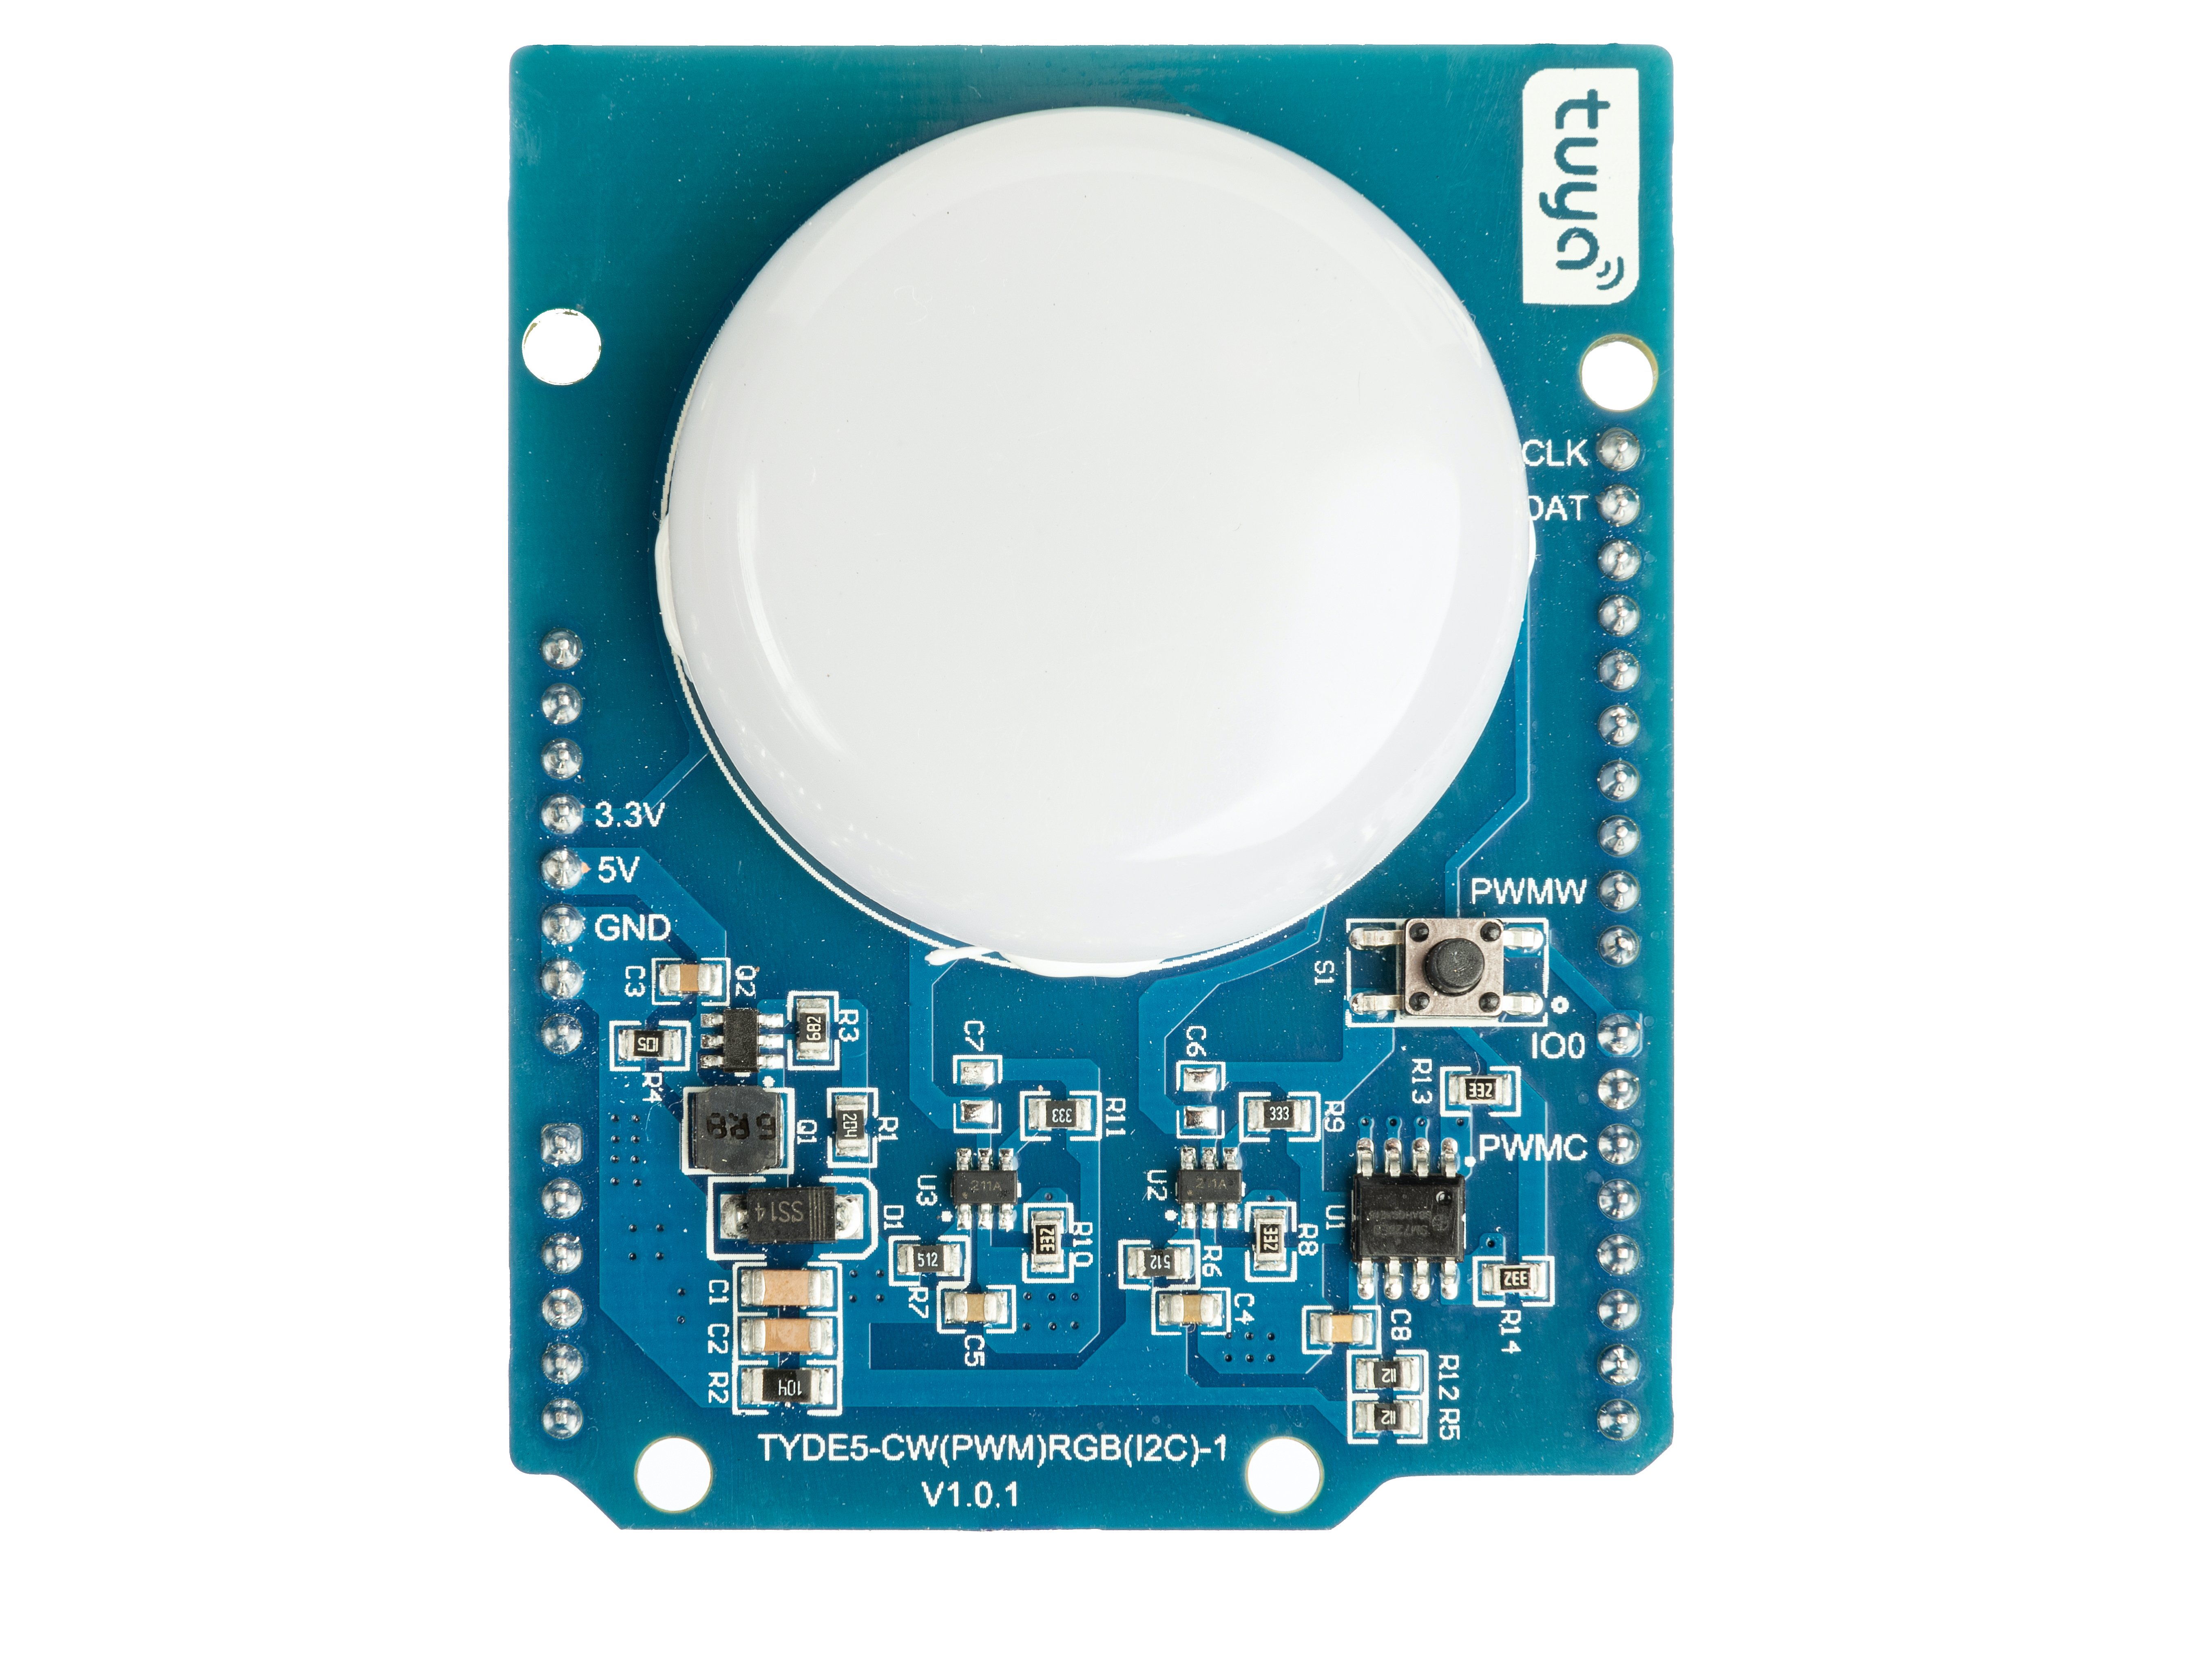
The following picture shows the layout of a Tuya sandwich lighting board.
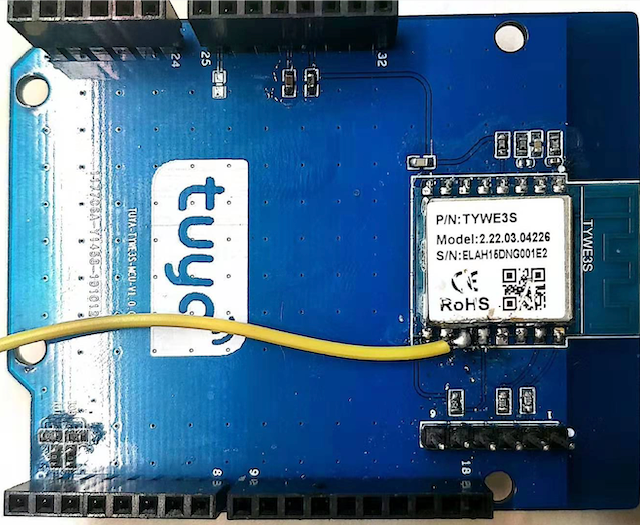
The following picture shows the layout of a Tuya Sandwich Wi-Fi board.
The following picture shows the layout of a connected module. From the top to bottom, you can see Tuya sandwich lighting board, ST Nucleo, Tuya Sandwich Wi-Fi board
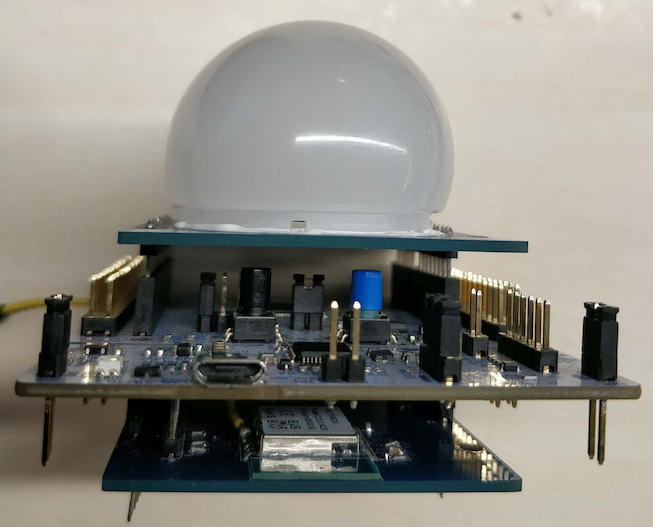
Note: In order to prevent the development board from constantly restarting after the download is completed due to insufficient USB power supply of the computer, it is recommended that you use an independent power board to supply power. Alternatively, you can remove the RGB board during download and connect it after download is complete.
Step 2: Program implementing
You must focus on three functions:
setup (),loop (), anddp_download_handle ().- The
setup ()function performs initialization content, it is executed only once.
void setup () { pinMode (PC13, INPUT); // Initialization of network configuration mySerial.begin (9600); // Software serial port initialization mySerial.println ("myserial init successfully!"); Serial.begin (115200); // PA3 RX PA2 TX Serial.println ("serial init successfully! \ R \ n"); light_data_int (); // Initialization of RGB cold and warm lights IIC_Init (); // IIC initialization is used to drive RGB lights delay (10); rgb_init (0, 0, 0); wifi_protocol_init (); // Protocol serial port initialization function timer_init (); // Timer initialization Hue_shade_start (& a); }- The
loop ()function repeats through the contents of the function body.
void loop () {
  if (init_flag == 0) {
    time_cnt ++;
    if (time_cnt% 6000 == 0) {
      time_cnt = 0;
      cnt ++;
    }
    wifi_stat_led (& cnt); // Wi-Fi status processing
  }
  wifi_uart_service (); // Wi-Fi serial port processing service
  myserialEvent (); // Serial port receiving processing
  key_scan (); // The button for network reset detection
}
/ ************************************************* **************************** Function Name: dp_download_handle Function description: dp release processing function Input parameters: dpid: DP value: dp data buffer address length: dp data length Return parameter: Success return: SUCCESS / Failure return: ERRO Instructions for use: This function cannot be modified by the user ********************************************** *************************** / unsigned char dp_download_handle (unsigned char dpid, const unsigned char value [], unsigned short length) { / ********************************* Current function processing can be issued / reportable data call The specific function needs to implement the issued data processing To complete the application, the processing result needs to be fed back to the APP.Otherwise, the APP will consider that the delivery fails. *********************************** / unsigned char ret; printf ("dpid =% d \ r \ n", dpid); switch (dpid) { case DPID_SWITCH_LED: // Switch processing function ret = dp_download_switch_led_handle (value, length); break; case DPID_WORK_MODE: // Pattern processing function ret = dp_download_work_mode_handle (value, length); break; case DPID_BRIGHT_VALUE: // White light brightness processing function ret = dp_download_bright_value_handle (value, length); break; case DPID_TEMP_VALUE: // White light color temperature processing function ret = dp_download_temp_value_handle (value, length); break; case DPID_COLOUR_DATA: // Color light color processing function ret = dp_download_colour_data_handle (value, length); break; case DPID_CONTROL_DATA: // Adjust processing function ret = dp_download_control_data_handle (value, length); break; default: break; } return ret; }- The
dp_download_handle ()processes DP data issued by the cloud, you should implement the corresponding functions according to the corresponding DP release.
Capability Function Processing the RGB Data of panel dp_download_colour_data_handle () Processing the cold light Data of panel dp_download_bright_value_handle () Processing the warm light Data of panel dp_download_temp_value_handle () The following code sample call several APIs to implementc capabilities listed in the preceding table.
/ ************************************************* **************************** Function Name: dp_download_handle Function description: dp release processing function Input parameters: dpid: DP value: dp data buffer address length: dp data length Return parameter: Success return: SUCCESS / Failure return: ERRO Instructions for use: This function cannot be modified by the user ********************************************** *************************** / unsigned char dp_download_handle (unsigned char dpid, const unsigned char value [], unsigned short length) { / ********************************* Current function processing can be issued / reportable data call The specific function needs to implement the issued data processing To complete the application, the processing result needs to be fed back to the APP.Otherwise, the APP will consider that the delivery fails. *********************************** / unsigned char ret; printf ("dpid =% d \ r \ n", dpid); switch (dpid) { case DPID_SWITCH_LED: // Switch processing function ret = dp_download_switch_led_handle (value, length); break; case DPID_WORK_MODE: // Pattern processing function ret = dp_download_work_mode_handle (value, length); break; case DPID_BRIGHT_VALUE: // White light brightness processing function ret = dp_download_bright_value_handle (value, length); break; case DPID_TEMP_VALUE: // White light color temperature processing function ret = dp_download_temp_value_handle (value, length); break; case DPID_COLOUR_DATA: // Color light color processing function ret = dp_download_colour_data_handle (value, length); break; case DPID_CONTROL_DATA: // Adjust processing function ret = dp_download_control_data_handle (value, length); break; default: break; } return ret; }Note: The color data sent from the cloud is in HSV format. You must convert it to RGB format and modify the RGB data to get the correct RGB value for display.
Several important APIs for RGB dimming used in the preceding code snippets are as follows.
Capability Interface Converting HSV to RGB format hsv2rgb (); RGB data correction tuya_light_gamma_adjust (); RGB color setting rgb_init (); - The
Step 3: References on Arduino-API usage
The Tuya Sandwich development board is programmed by calling Arduino standard API. For detailed instruction on Arduino-API usage, visit Arduino Reference.
You can also find user guide and code samples under File > Sample within the ArduinoIDE.
Is this page helpful?
YesSuggestions


