Use and Develop Tuya Homebridge Plugin

Overview
This tutorial describes how to install Tuya official Homebridge plugin on macOS to connect smart devices and develop Homebridge plugins.
What is HomeKit?
HomeKit is Apple’s smart home platform introduced in 2014. It allows users of Apple devices to securely and easily control any devices with Works with Apple HomeKit badges, such as lights, door locks, thermostats, outlets, and many more.
What is Homebridge?
Homebridge is a lightweight NodeJS server you can run on your home network that emulates the iOS HomeKit API. It supports plugins that provide a basic bridge from HomeKit to various third-party APIs provided by manufacturers of smart home devices. We recommend you check the official Homebridge docs before getting started with Homebridge plugins.
Users
If you are a smart home geek and have a bundle of devices from different platforms, this step-by-step tutorial will help you make devices HomeKit-enabled and then develop Tuya Homebridge plugins.
Materials
Mac computer
Count:1Used to install plugins and start Homebridge service.
iOS device
Count:1It can be iPhone, iPad, and Apple Watch, used to control HomeKit-enabled devices.
Smart device
Count:1It can be a smart light, switch, or socket, used to demonstrate device integration and control.
Android device
Count:1Used to install the Device Manager app to pair devices.
Steps
Step 1: Preparation
Registration
See the section Before use in tuya-iot-app-sdk-python, register an account on the Tuya IoT Platform, and get the required information. Basically, you need to create a Cloud project and complete the configuration of asset, user, and application. Then, you will get the username, password, Access ID, and Access Secret.
Hardware preparation
Hardware Description A computer, Raspberry Pi, or server Install plugins and start Homebridge service. This demonstration runs on macOS. Smart devices Demonstrate device integration and control. An iOS device with the Home app installed Control HomeKit-enabled devices. Software preparation
Software Description Command line interface Use the one you like. We use the built-in Terminal on macOS. Pairing tool Device Manager app or WeChat Mini Program (mainland China only). Step 2: Installation
-
Open the Terminal.
-
See the official Homebridge docs and install Homebridge on your system.
-
Install Tuya Homebridge plugin.
Note: If you encounter any problems with the installation, you may need to preface this command with
sudoto make it run as an administrator.-
Install plugins.
npm install homebridge-tuya-platform -
Wait for the plugin to install and check whether the installation is successful. For more information, see the video below.

-
-
Step 3: Configuration
Before use, you need to configure the
config.jsonfile in the Homebridge plugin.-
Go to the directory
homebridge-tuya-platform.cd ./node_modules/homebridge-tuya-platform -
Go to the directory
config.cd ./config -
Edit the
config.jsonfile.vim config.json -
In
options, enter theusername,password,accessId, andaccessKeythat you get from the Tuya IoT Platform. Thelangdefaults toen. TheendPointis the domain name of the currently used Tuya Open API.Region endPoint America https://openapi.tuyaus.com China https://openapi.tuyacn.com Europe https://openapi.tuyaeu.com India https://openapi.tuyain.com Eastern America https://openapi-ueaz.tuyaus.com Western Europe https://openapi-weaz.tuyaeu.com 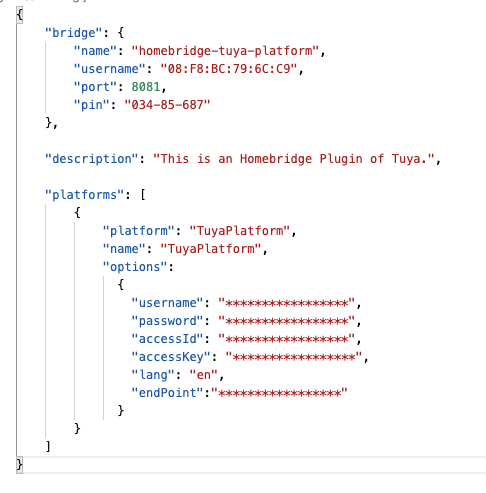
-
Save and exit.
-
Step 4: Start Tuya Homebridge plugin
- Go back to the directory
homebridge-tuya-platform.cd .. - Start the plugin.
homebridge -D -U ./config/ -P ./
- Go back to the directory
Step 5: Bridge to HomeKit
Open the Home app on your Apple device. Pair with Homebridge by scanning the QR code printed in the step of starting the plugin, or entering the 8-digit PIN code. You can find the PIN code in the
config.jsonfile.Step 6: Contribution guide
Fork Tuya’s Homebridge repo in GitHub and follow the step-by-step tutorial to start the plugin service.
Set up development environment
—-VSCode
—-engines
    "node": “>=0.12.0”
    "homebridge": ">=0.2.0"
—-dependencies
    "axios": “^0.21.1",
    "crypto-js": “^4.0.0”,
    "mqtt": “^4.2.6",
    "uuid": "^8.3.2"
Support more accessory types
How a plugin works
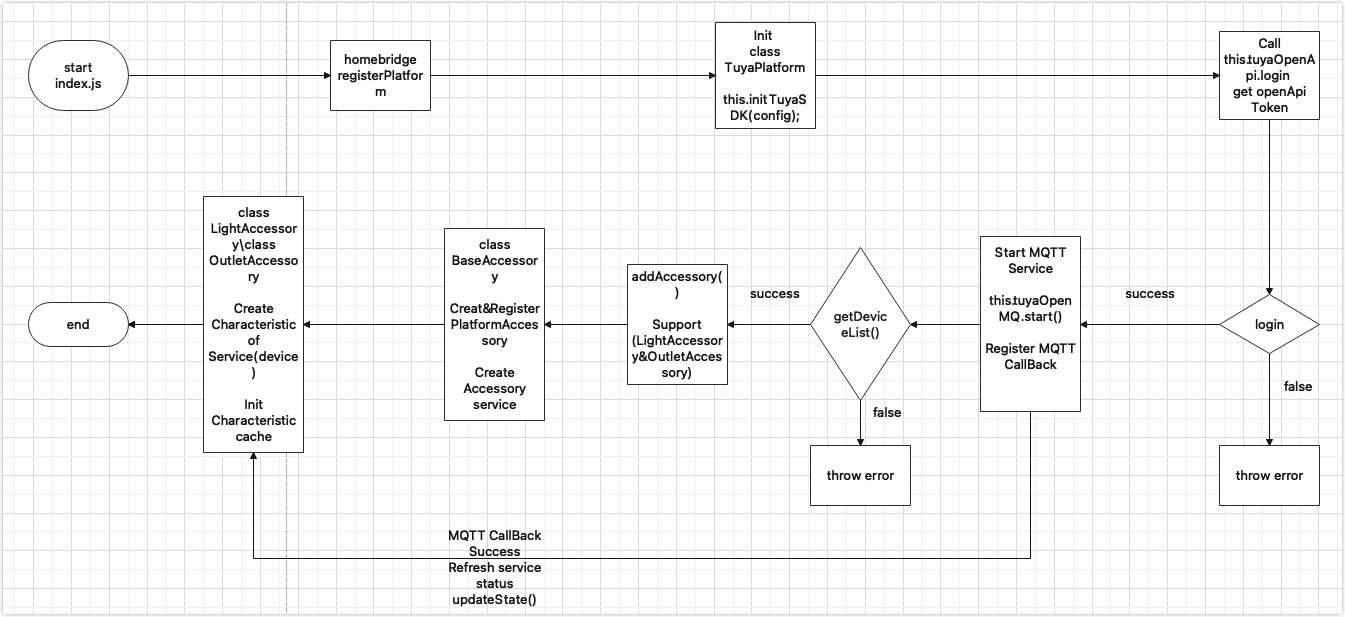
Important JSON files
-
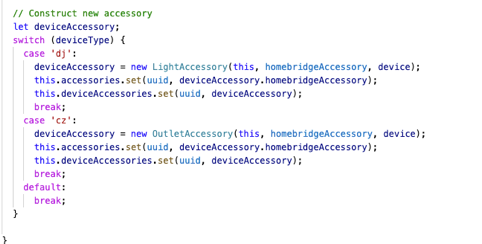
The entry file
index.js. Add your desired accessory type to theaddAccessory()function and create thexx_accessy.jsfile.
-
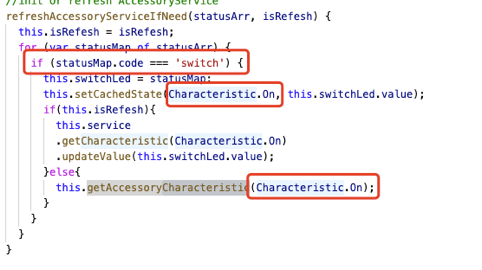
The
xx_accessory.jsfile. In this file, traverse your newly created function inrefreshAccessoryServiceIfNeed()and get theCharacteristiccorresponding to a service.
-
The
tuyaopenapi.jsfile contains device related APIs. -
The
tuyamqttapi.jsfile supports the MQTT service.
Common issues
For more information about Homebridge installation, see the Common Issues in the Homebridge repo.
Tuya Open API
login(username, password): Login to the Tuya IoT Platform.getDeviceList(): Gets all the devices under an account’s asset. (The term device corresponds to the term accessory in the HomeKit ecosystem)get_assets(): Gets the available assets.getDeviceIDList(assetID): Queries the list of device IDs under an asset.getDeviceFunctions(deviceID): Gets the instruction set.getDeviceInfo(deviceID): Gets the information of a single device.getDeviceListInfo(devIds = []): Gets the information of multiple devices.getDeviceStatus(deviceID): Gets the status of a single device.getDeviceListStatus(devIds = []): Gets the status of multiple devices.sendCommand(deviceID, params): Sends commands to a device.
MQTT
start(): Starts MQTT.stop(): Stops MQTT.addMessageListener(listener): Adds callbacks.removeMessageListener(listener): Removes callbacks.
-
Is this page helpful?
YesSuggestions


