集成 vivo 推送
更新时间:2025-10-30 10:17:25下载pdf
本文介绍如何为 Android App 集成 vivo 平台的消息推送。
配置信息
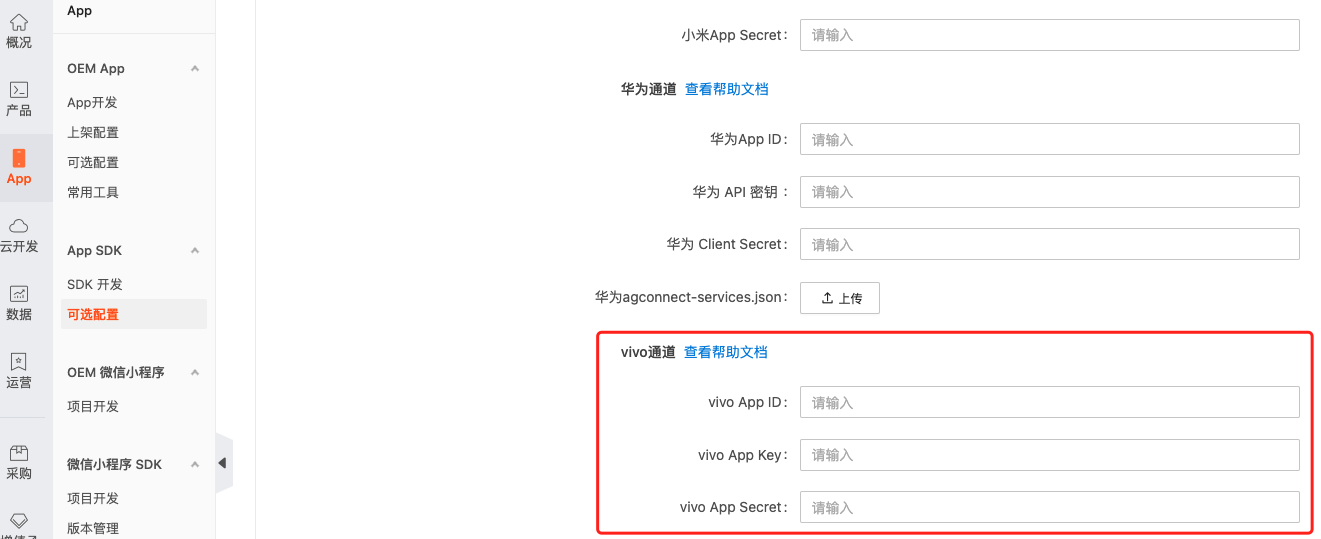
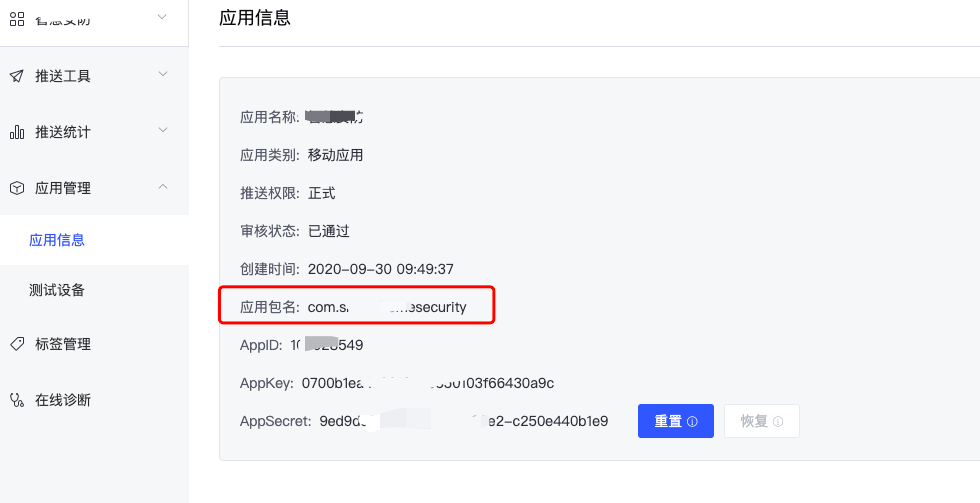
申请 vivo 推送的方式,请参考 申请 vivo 推送。您需要将申请到的 AppID、AppKey 等信息复制到 涂鸦开发者平台 中对应应用的配置中。

请勿将信息配置错误,请确认 vivo 后台包名与 SDK 应用包名一致。

集成 vivo SDK
涂鸦使用 vivo 推送的 regId 方式进行推送。请参照 vivo 开发文档,执行 vivo 推送的 SDK 接入、初始化,并完成 《集成 SDK》、《配置信息》、《启动推送》等步骤。
创建推送使用的 channel
参考如下代码,在 Android O 以上创建涂鸦使用的推送 channel。
// channel id
public static final String[] channelIds = {
  "tuya_common",
  "tuya_shortbell",
  "tuya_longbell",
  "tuya_doorbell"
};
// channel name
public static final String[] channelNames = {
  context.getString(R.string.push_channel_common),
  context.getString(R.string.push_channel_shortbell),
  context.getString(R.string.push_channel_longbell),
  context.getString(R.string.push_channel_doorbell)
};
// 通知渠道的自定义声音文件
public static final String[] channelSounds = {
  "android.resource://" + context.getPackageName() + "/" + R.raw.tuya_common,
  "android.resource://" + context.getPackageName() + "/" + R.raw.tuya_shortbell,
  "android.resource://" + context.getPackageName() + "/" + R.raw.tuya_longbell,
  "android.resource://" + context.getPackageName() + "/" + R.raw.tuya_doorbell
};
for (int i = 0; i <channelIds.length; i++) {
  createNotificationChannel(channelIds[i], channelNames[i], importance, soundPath);
}
@TargetApi(Build.VERSION_CODES.O)
private static void createNotificationChannel(String channelId, String channelName, int importance, String soundPath) {
    NotificationChannel channel = new NotificationChannel(channelId, channelName, importance);
    channel.setSound(Uri.parse(soundPath), Notification.AUDIO_ATTRIBUTES_DEFAULT);
    channel.setVibrationPattern(new long[]{
            300, 1000, 300, 1000
    });
    channel.canBypassDnd();
    channel.setBypassDnd(true);
    channel.setLockscreenVisibility(VISIBILITY_SECRET);
    NotificationManager notificationManager = (NotificationManager) MicroContext.getApplication().getSystemService(
            NOTIFICATION_SERVICE);
    notificationManager.createNotificationChannel(channel);
}
注册 regId 到涂鸦
vivo 平台使用别名进行推送:
// 在当前工程入口函数,建议在Application的onCreate函数中,添加以下代码:
PushClient.getInstance(context).initialize();

// 当需要打开推送服务时,调用以下代码:
PushClient.getInstance(context).turnOnPush(new IPushActionListener() {
    @Override
    public void onStateChanged(int state) {
        if (state != 0) {
            L.e(TAG, "open vivo push error [" + state + "]");
        } else {
            L.i(TAG, "open vivo push success " + state);
            String regId = PushClient.getInstance(context).getRegId();
            L.d(TAG, "regid : " + regId);
            registerDevice(context, regId);
        }
    }
});
public void registerDevice(final Context context, final String regId) {
    PushClient.getInstance(context).bindAlias(regId, new IPushActionListener() {
        @Override
        public void onStateChanged(int state) {
            if (state != 0) {
                L.d(TAG, "set regId error [" + state + "]");
            } else {
                registerAilasToTuya(regId);
                L.i(TAG, "set regId success");
            }
        }
    });
}
public static final String PUSH_PROVIDER_VIVO = "vivo";
private void registerAilasToTuya(String regId) {
    ThingHomeSdk.getPushInstance().registerDevice(regId, PUSH_PROVIDER_VIVO, new IResultCallback() {
        @Override
        public void onError(String s, String s1) {
            L.e(TAG, "register device failed" + s + "   " + s1);
        }

        @Override
        public void onSuccess() {
            L.d(TAG, "register device success");
        }
    });
}
在应用的启动页的 activity(例如 Splash Activity)配置:
<intent-filter>
  <action android:name="android.intent.action.VIEW" />
  <category android:name="android.intent.category.DEFAULT" />
  <category android:name="android.intent.category.BROWSABLE" />
  <data
        android:host="包名"
        android:path="/deeplink"
        android:scheme="@string/tuya_jump_scheme" />
</intent-filter>
-
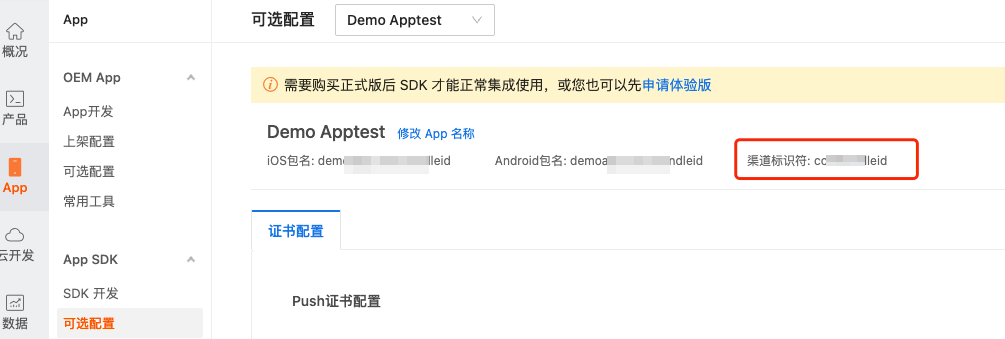
包名:填写您应用的包名。
-
tuya_jump_scheme:填写 涂鸦开发者平台 上渠道标识符的内容。
完成后,在设备等触发消息推送后,通知栏就会有相应的推送显示。
vivo 手机的通知栏权限默认是关闭的,需要进入手机设置中,将通知栏权限手动打开。
解析自定义数据
当点击通知栏的通知后,在 vivo extends OpenClientPushMessageReceiver 的 onNotificationMessageClicked 中获取自定义消息:
@Override
public void onNotificationMessageClicked(Context context, UPSNotificationMessage msg) {
    Log.d(TAG, "onNotificationMessageClicked:" + msg.toString());
    String skipContent = msg.getSkipContent();
    if (!TextUtils.isEmpty(skipContent)) {
    	Log.d(TAG, "vivo skipContent: " + skipContent);
    }
}
该内容对您有帮助吗?
是意见反馈该内容对您有帮助吗?
是意见反馈


