Prototype a Smart Kettle with Wi-Fi and Bluetooth

Overview
As IoT technology advances, even the most commonplace of home appliances get the smart recipe. When the act of boiling water is powered with IoT innovations, the smart kettles come into play, adding convenience to an otherwise mundane routine. A smart kettle lets you set it boiling remotely with your phone anywhere, anytime, and at the right temperature. It can even be integrated with Google Assistant or Alexa to let you control it with your voice. If you’re heavy into drinking tea or using hot water in general, a smart kettle would certainly be a godsend.
Features
-
Remote control with the mobile app and touch control.
-
Keep water at the desired temperature. Schedule operations. Customize temperature modes.
-
Provide dry boiling protection and fault warning.
Hardware
Materials
Wi-Fi and Bluetooth LE combo module
Count:1Applies to the kettle communicating over Wi-Fi and Bluetooth.more
Bluetooth LE module
Count:1Applies to the kettle communicating over Bluetooth.more
NTC thermistor
Count:1NTC thermistor from Shibaura Electronics or HGTECH, with an accuracy of ± 1% of the measured temperature.
Strix thermostat
Count:1Buzzer
Count:1When the kettle has heated the water to the selected temperature, the buzzer will sound a beep.
Touch keys
Count:1Touch sensor IC
Count:1Capacitive touch sensor TS02N.
Steps
Step 1: Hardware design
We provide two solutions to develop the smart kettle, using the Wi-Fi and Bluetooth LE combo module and Bluetooth LE module respectively. These two solutions share the same hardware design but differ in software design.
Power supply design
Schematic diagram
Microcontroller
Schematic diagram
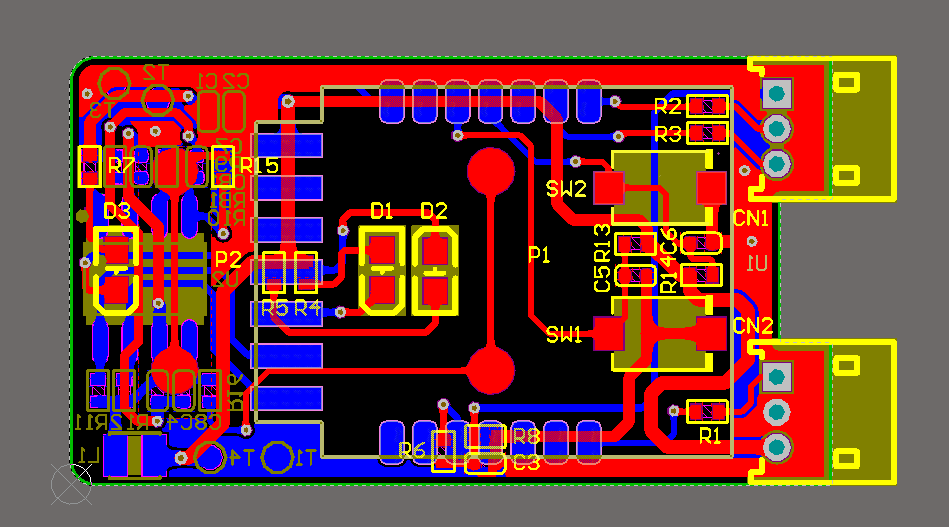
PCB
Feature units
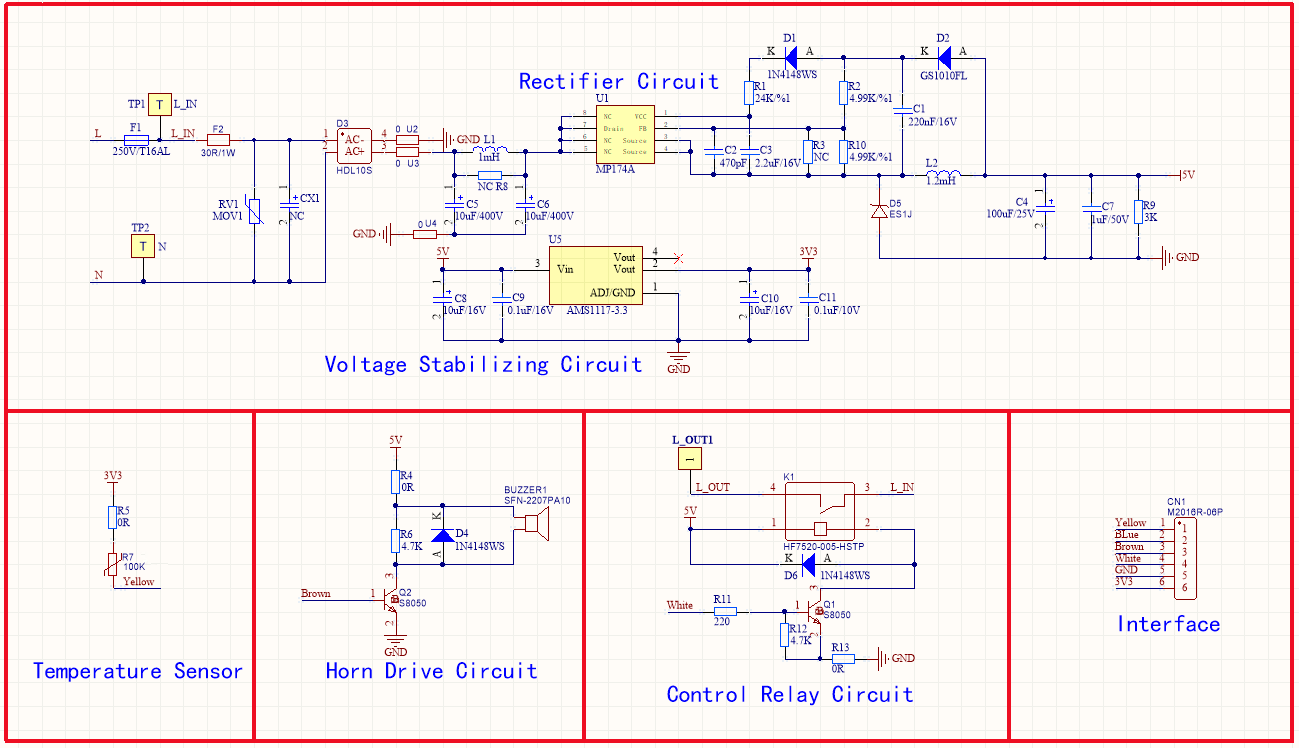
Power supply
The power system has various protection circuits including over-temperature protection (OTP), VCC under-voltage lockout (UVLO), overload protection (OLP), short circuit protection (SCP), and open control loop protection. The power circuit consists of a 220V to 5V buck converter. The input stage comprises fusible resistor F2, lightning-proof varistor RV1, diode bridge D3, EMI filter capacitor C5 and C6, and filter inductance L1. The resistor F2 is a flame-proof, fusible, wire wound resistor. It has the following features.
- Inrush current limitation to safe levels for the diode bridge D3.
- Differential mode noise attenuation.
- Work as the input fuse if any other components are short-circuited.
- When components fail, make sure a safe open circuit without emitting smoke, fire, or incandescent material.
- The varistor RT1 is used for lightning-proof.
- The power processing stage comprises a primary-side regulator MP174A, flyback diode D5, output inductance L2, and output capacitor C4.
Circuit features
No noise and low heating.
NTC thermistor
To have accurate temperature control, we use an NTC thermistor from Shibaura Electronics or HGTECH, with an accuracy of ± 1% of the measured temperature.

Temperature detection circuit
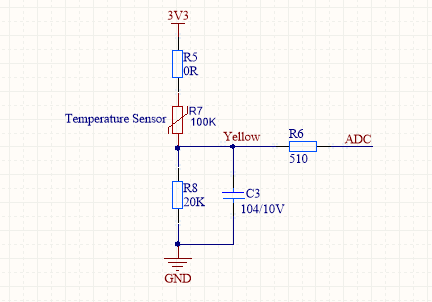
- The kettle uses an NTC 100K temperature probe. When the temperature reaches 100°C, 0°C, and room temperature, the resistance is 6.6 KΩ, 300 KΩ, and 100 KΩ respectively.
- R5 and R7 are connected to the power supply board and other resistors are connected to the microcontroller board. We use an NTC thermistor to collect temperature data. A thermistor will restrict current depending on the surrounding temperature and subscribes to Ohm’s Law. After the module reads the voltage from the resistor via the ADC channel, it calculates the resistance of the thermistor. That calculated resistance corresponds to a respective temperature.
- R8 is a 20 KΩ fixed resistor. R7 is a thermistor with a resistance of 100 KΩ at room temperature. ADC is where we collect the voltage.
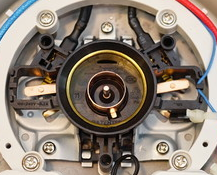
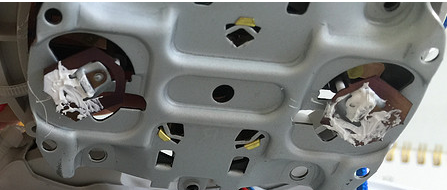
Strix thermostat
Add a thermostat or a magnetic thermostat switch to the ordinary electric kettle so that water vapor produced when water is boiling will make the bimetallic strip bend to break a circuit. The automatic thermostats with shape memory alloys are used in some premium electric kettles. When the water level is under the electric heating pipe, the thermostat will shut off power to avoid dry boiling.
The front and back images of the thermostat.
Buzzer
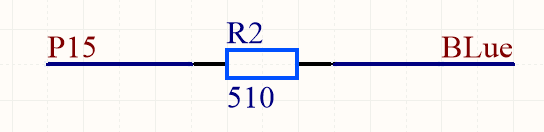
A passive buzzer is used to sound beeps. It requires an oscillating signal to produce sound.

Buzzer circuit design
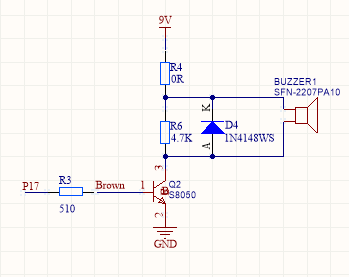
- The resistor R3 is connected to the microcontroller board and other resistors are connected to the power supply board. R3 can reduce the current in the circuit and shield EMI.
- The passive buzzer does not have an internal oscillation source. To make it sound, it must be driven by a pulse frequency signal between 500 Hz and 4.5 kHz. Since the passive buzzer needs to be driven by a waveform with enough drive current capability to create the desired sound, we use a triode to drive the buzzer and add a 510Ω current limiting resistor R3.
- D4 is a flyback diode and is used to eliminate flyback, which is the sudden voltage spike seen across an inductive load when its supply current is suddenly reduced or interrupted. It protects the circuit from damage.
Reserved pins
The pin is reserved for adding features.
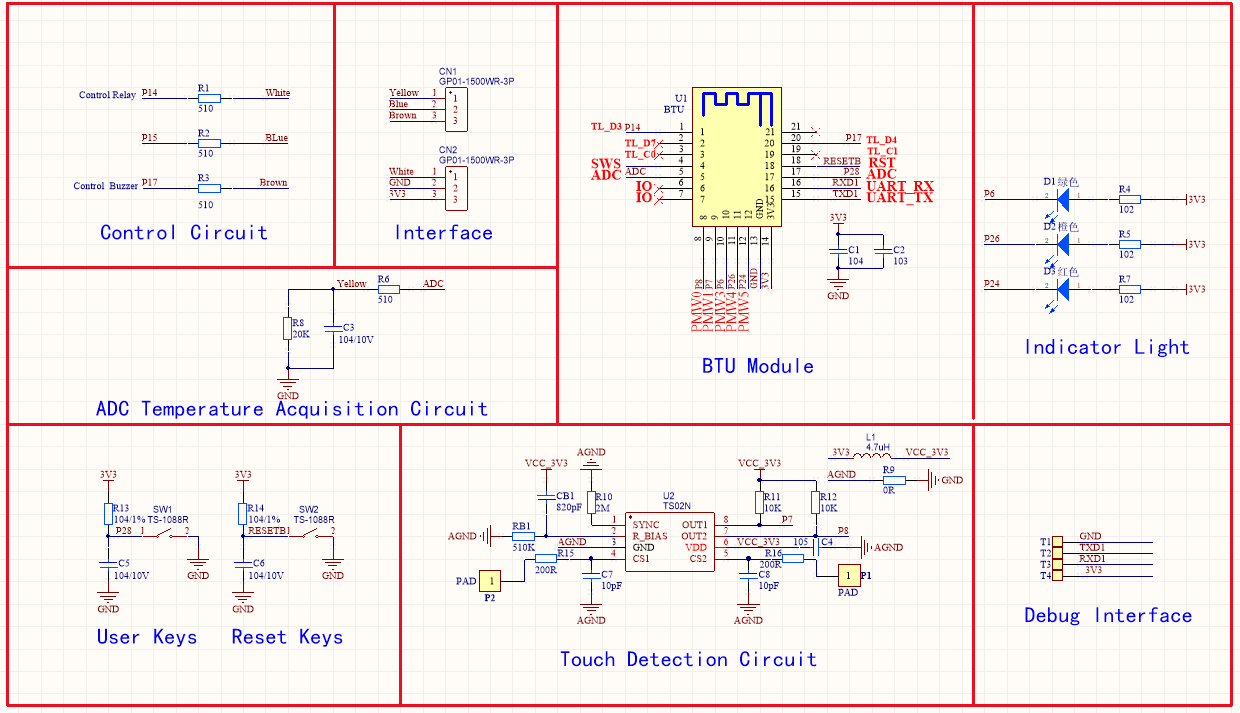
Touch keys
We use the conductive foam on the touchpad to shield various frequencies.
Conductive foam

Touch keys
Touch sensor IC
The TS02N is 2-channel capacitive sensor with auto sensitivity calibration. And the supply voltage range is from 2.5V to 5.5V. The parallel output ports (OUT1 and OUT2) can be used to detect the operation on touch keys. Two TS02N can work on one application at the same time thanks to the SYNC function.
Pin configuration
Pin Function P7 Boil key P8 Keep Warm key How TS02N works
When P1 is touched, P8 outputs low, and when P2 is touched, P7 outputs low.
Touch sensor circuit
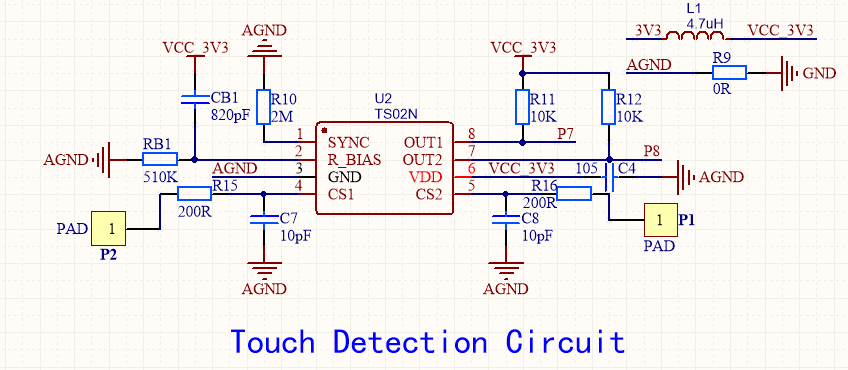
Schematic diagram
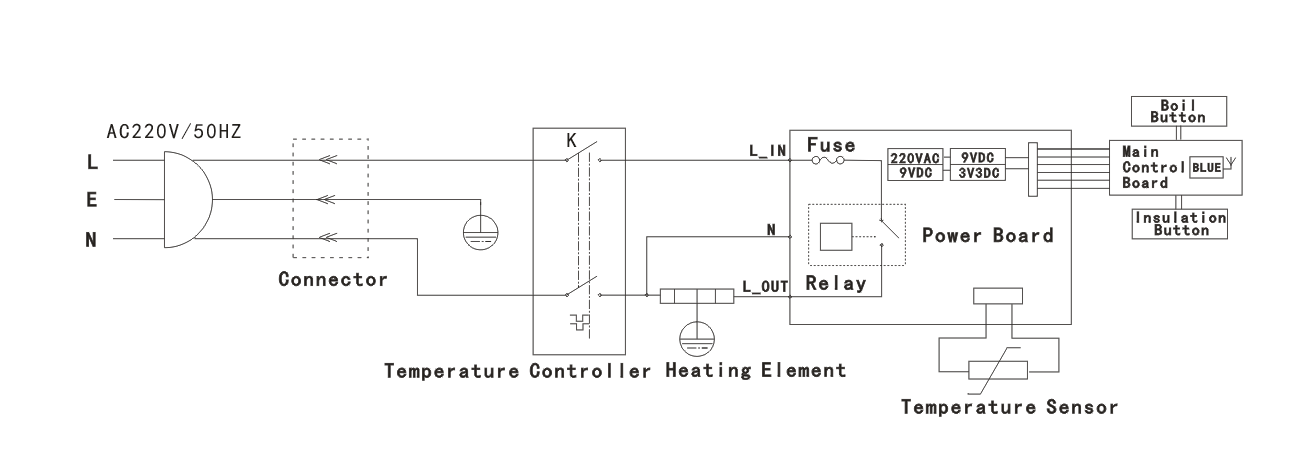
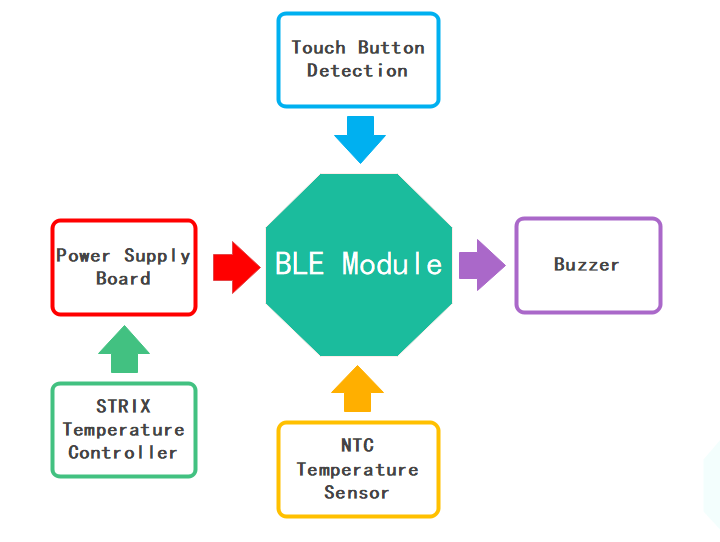
The wireless signal receiver and transmitter are integrated with the microcontroller.
The touch sensor is connected to the microcontroller.
The power supply board has a relay mounted. The relay coil is connected to the microcontroller board via the power supply board and the relay switch is connected to the heating circuit with electrical connectors and controls the heating on/off.
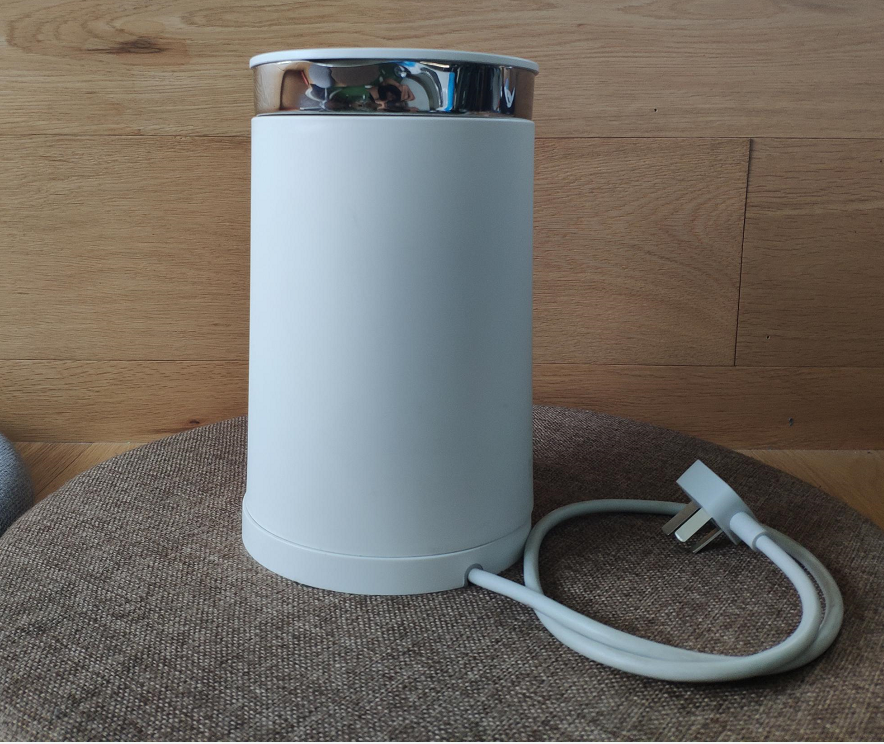
Picture of the smart kettle
Step 2: Creates a product
-
Log in to the Tuya IoT Platform.
-
Click Create.
-
Scroll down the page and click Can’t find the category? in the lower-left corner.
-
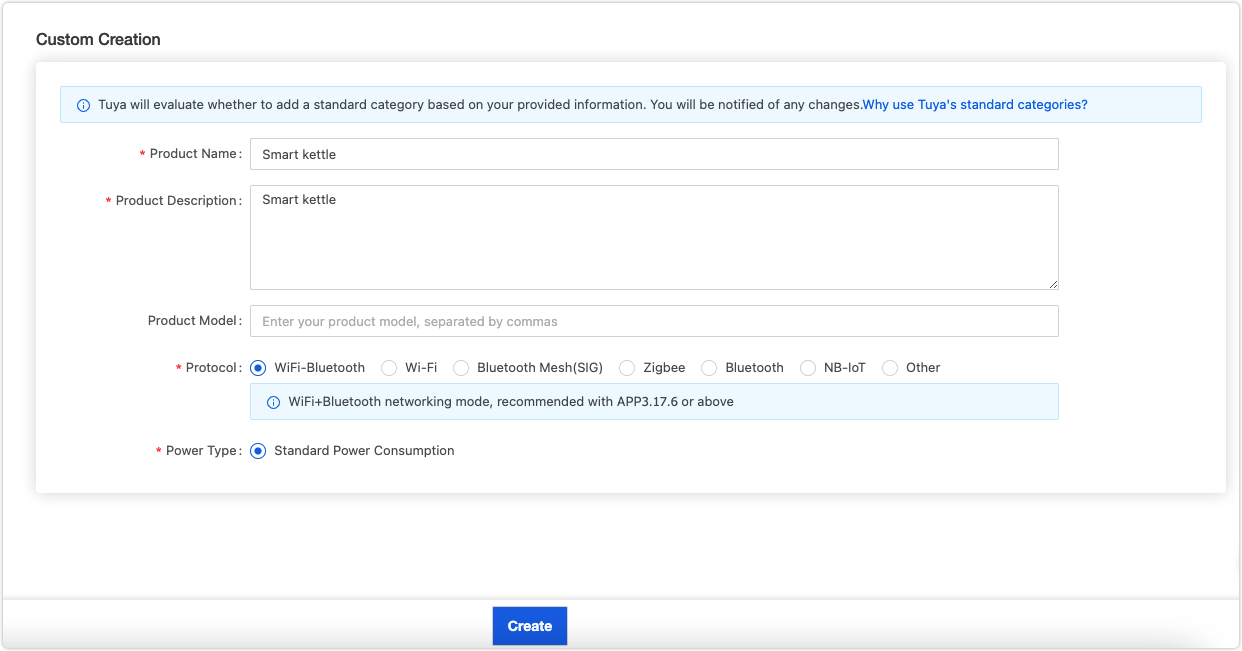
Complete the required information and click Create.
- Product Name, Product Description, and Product Model are user-defined.
- Protocol: Select Wi-Fi-Bluetooth or Bluetooth.
-
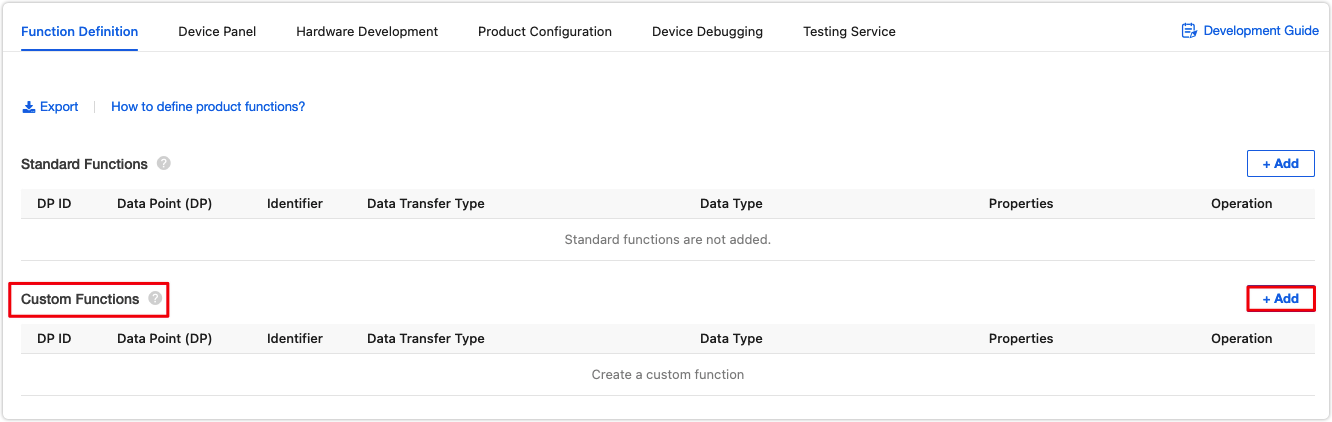
In the Custom Functions section, click Add to create required functions.
According to the features we want to implement in this project, we need to add six custom functions, namely boil, temperature setting, current temperature, keep-warm temperature, preset temperature modes, and fault warning.
-
In the second step of the Device Panel tab, select the desired panel. In the second step of Device Panel, you can select the debugging-friendly DIY Style Panel.
-
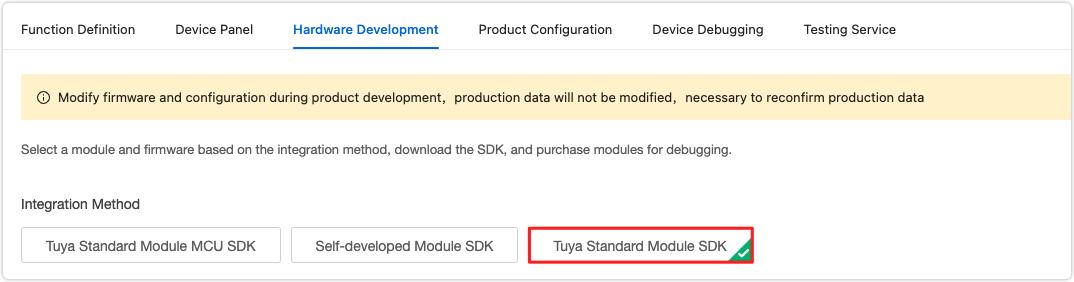
In the third step of Hardware Development, select Tuya Standard Module SDK.
-
Click Get 10 Free Licenses on the right side of the screen. You will get the UUID and key used in coding.

-
Step 3: Set up the development environment
Environment for Wi-Fi and Bluetooth LE combo solution
The Wi-Fi and Bluetooth LE combo module is built on a BK7231N chip. We run the SDK on Linux. First, set up the Linux development environment and then clone the demo from GitHub.
-
Download Tuya IoTOS Embedded Wi-Fi & Bluetooth LE SDK.
Clone the demo to your directory. The demo includes the development environment. The
appsfolder includes several samples and we useapps/tuya_demo_templateto build an embedded system.$ cd "your directory" $ git clone https://github.com/tuya/tuya-iotos-embeded-sdk-wifi-ble-bk7231n -
Build the system on the demo infrastructure.
The directory of
tuya_demo_templateis as follows.├── src | └── tuya_device.c // Entry file of application layer | ├── include // Header file directory | └── tuya_device.h | └── output // Compiled files -
Rename
tuya_demo_templatetobk7231n_smart_kettle_demo. -
Open the
tuya_device.hfile. Change the defined value of macroPRODECT_IDto the product ID (PID) of your product created on the Tuya IoT Platform in the previous step.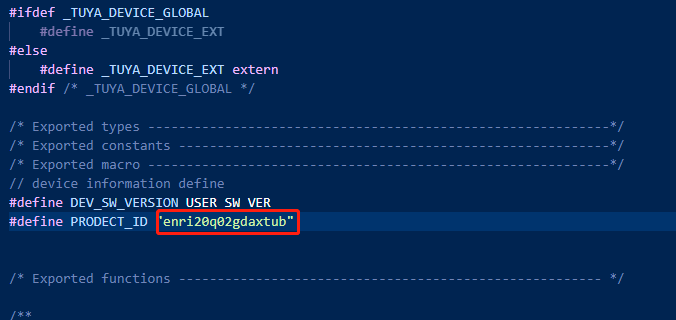

Compile and flash
-
In the Linux terminal, run
build_app.shscript to compile code.sh build_app.sh apps/bk7231n_smart_kettle_demo bk7231n_smart_kettle_demo 1.0.0After successful compilation, you will find the output binary file (with the
. binextension) in theapps/bk7231n_smart_kettle_demo/outputdirectory. The binary file withUAis the one to be flashed to the board. -
Install and open the BK7231T Writer and write the binary to your board.
Note: Touch the reset button until you click Flash to start flashing, as shown below.
For more information, see Flash Firmware to and Authorize WB Series Modules.
Environment for Bluetooth LE solution
The Bluetooth LE module is built on the Telink TLSR825x chip. To develop a Bluetooth LE smart kettle, you will use the Bluetooth LE SDK and set up the Telink IDE.
Get the Tuya Bluetooth LE SDK
Download the Bluetooth LE SDK demo from GitHub.
We code in
\ble_sdk_multimode\tuya_ble_appto implement applications.Install IDE
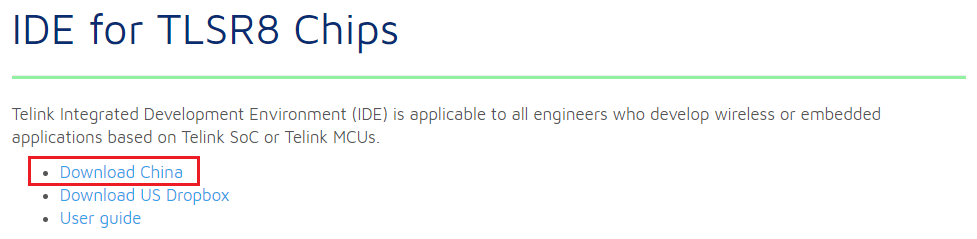
Download the official Telink IDE for TLSR8 Chips. Must install this software on C drive.
Edit and compile code
You can import the file into Eclipse IDE to edit the code.
-
Change the PID.
In
tuya_ble_app_demo.h, specifyAPP_PRODUCT_IDas the PID of your product created on the Tuya IoT Platform in the previous step.#define APP_PRODUCT_ID "ihqaiy9c" -
Change the
uuid,auth key, andMAC.In
tuya_ble_app_demo.c, specify theauth_key_testanddevice_id_testas any of the sets in the license list you requested on the Tuya IoT Platform. Setmac_testas the real MAC address.static const char auth_key_test[] = "CuvQxKaA5ccA2QBLY2M2sgZr69kUrmLi"; static const char device_id_test[] = "tuya4fea76a9b3f0"; static const uint8_t mac_test[6] = {0xCA, 0x4F, 0x62, 0x4D, 0x23, 0xDC}; /* The real MAC address -- DC:23:4D:62:4F:CA */ -
Make the specified license take effect.
Find
tuya_ble_app_init()intuya_ble_app_demo.cand changedevice_param.device_id_len = 0;todevice_param.device_id_len = 16;. -
Change the GPIO for log printing.
Since we do not have enough I/Os, we change the GPIO for log printing to
GPIO_PD7invendor\8258_module\app_config.h.#define UART_PRINT_DEBUG_ENABLE 1 #define PRINT_BAUD_RATE 230400 /* Baud rate */ #define DEBUG_INFO_TX_PIN GPIO_PD7 /* GPIO for log printing. Change the names of the following four macros accordingly. */ #define PD7_FUNC AS_GPIO #define PD7_INPUT_ENABLE 0 #define PD7_OUTPUT_ENABLE 1 #define PD7_DATA_OUT 1 -
Compile code.
Compile code in Eclipse IDE. The output is located in
ble_sdk_multimode\8258_module\8258_module.bin. Before compilation, you need to set up the include path of header files in Eclipse. Choose Project > Properties and find C/C++ General > Paths and Symbols, as shown below.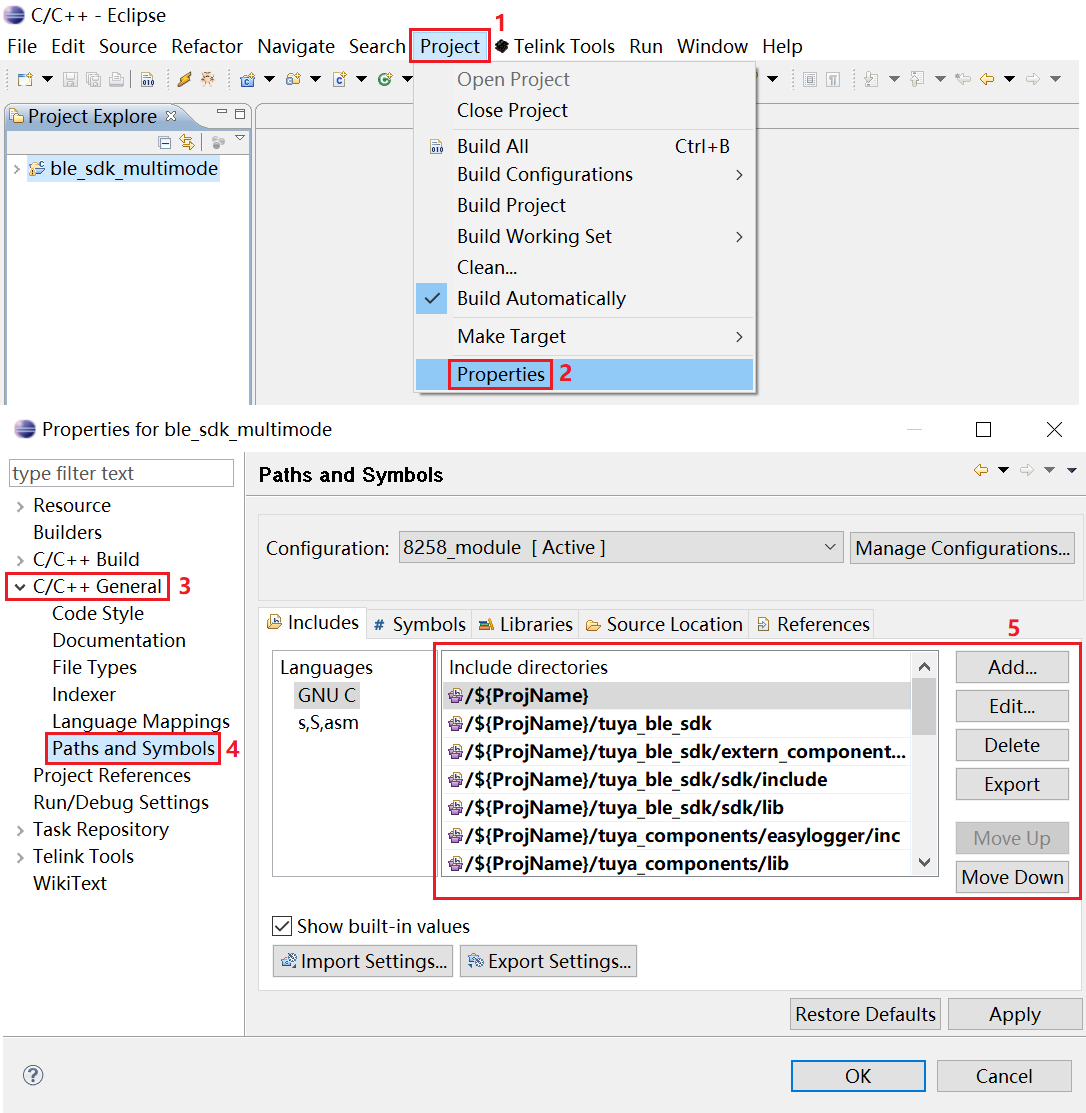
Install the flashing tool
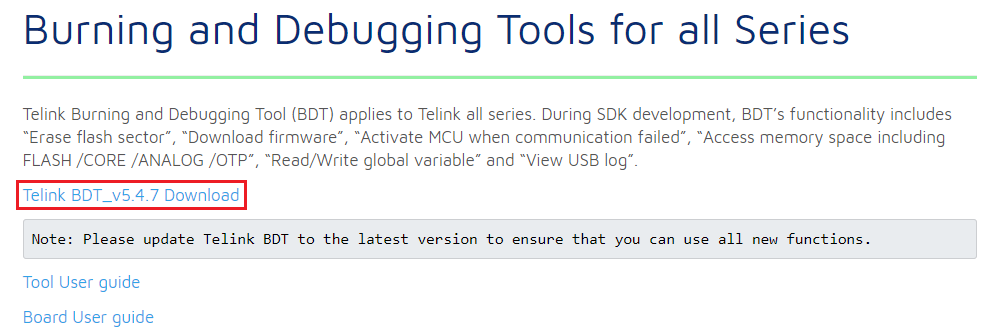
Install Telink Burning and Debugging Tools for all Series.
Download and debug code
-
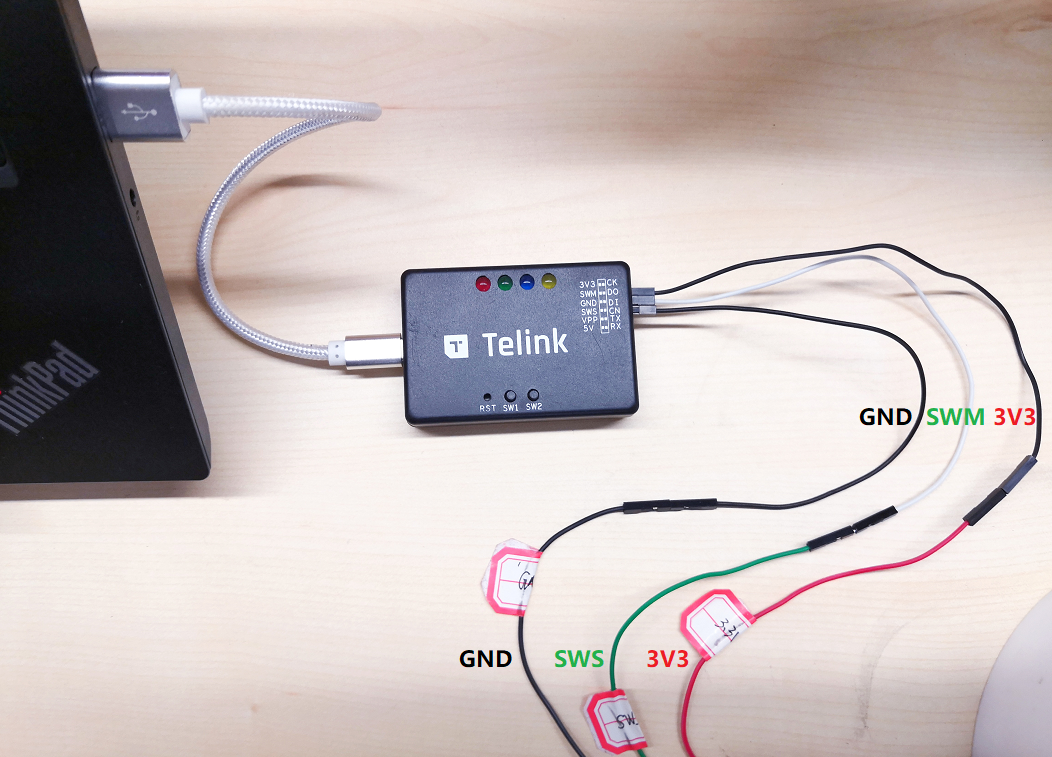
Connect your board to the Telink Writer as shown below.
-
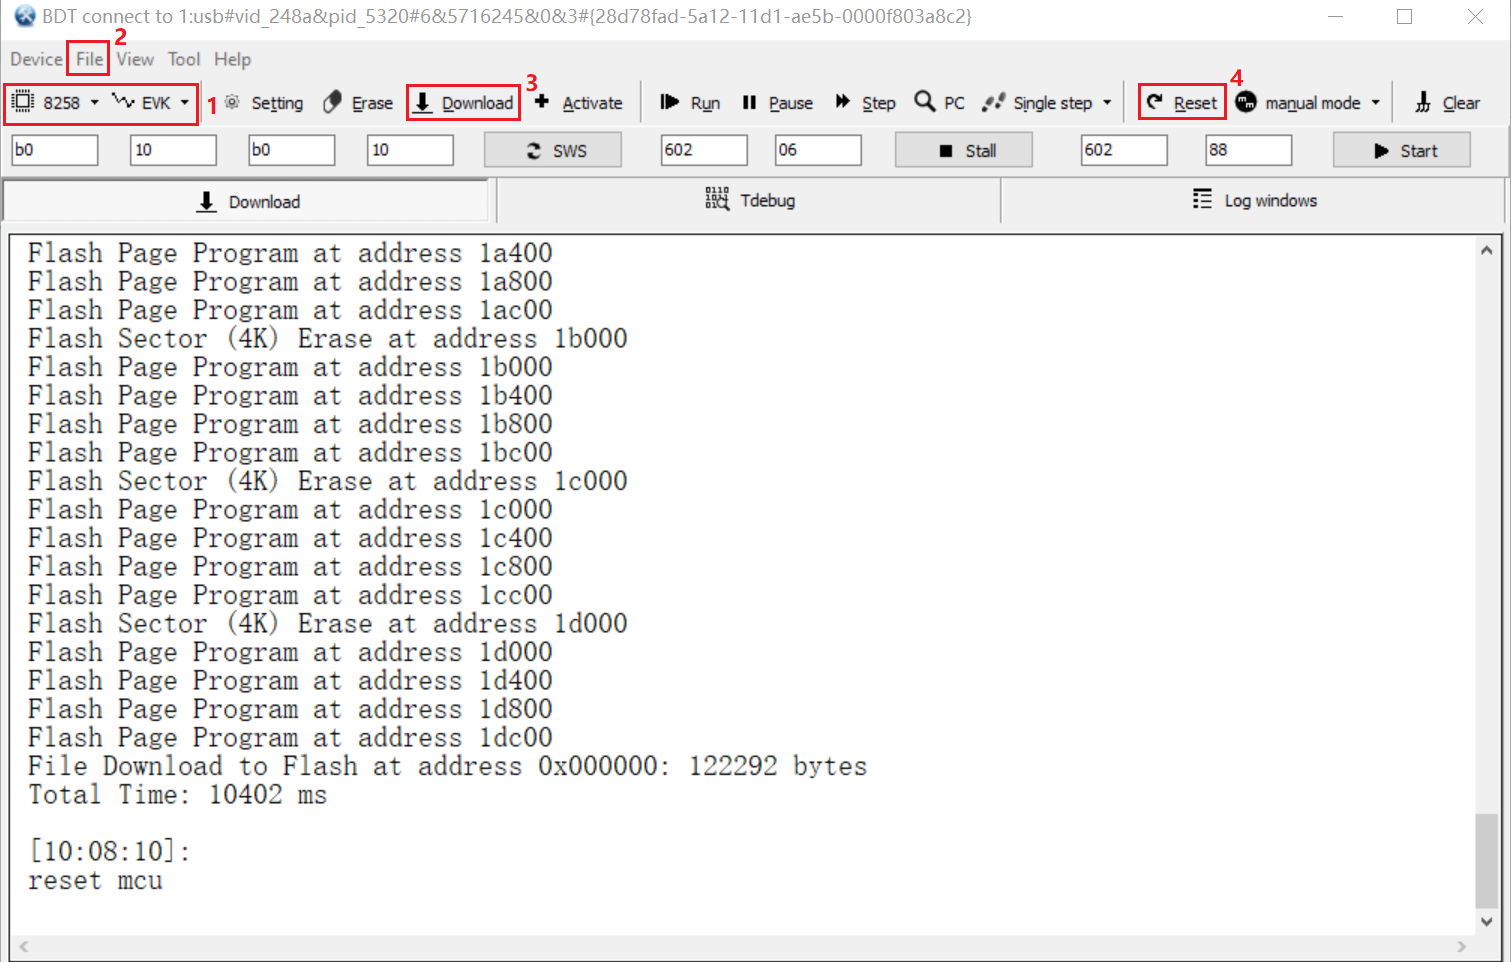
Open the flashing tool. Choose the chip, open the file, download the code, and reset, as shown below.
Important:
- After you recompile the code, if the file path is not changed, you do not need to repeat the step of opening the file.
- If you are prompted with a message saying
Swire err, click SWS to refresh.
After downloading, connect the board to your computer using a USB To TTL converter according to the current I/O for log printing, set the baud rate to
230400in the debugging software, and check the log.The log includes information such as
PID,uuid,Auth key, andMAC.
-
After you start the program, you can open the Tuya Smart app, scan and bind your device.
The preparation is completed and next, we can implement the required features.
-
Step 4: Software design
We will implement five features including the basic full boil and keep-warm as well as the IoT-enabled remote control of temperature setting, mode selection, water heating schedules, and dry boiling protection.
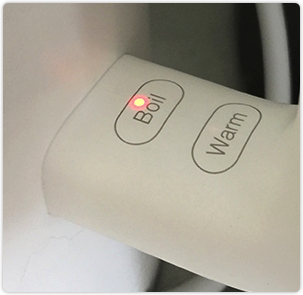
The retrofitted kettle has two touch keys for boil and keep-warm, three LED indicators, and one buzzer, and supports both local and remote control.
Features Description Boil When you touch the Boil key, the buzzer will sound a beep and you can turn on or off boiling water.
When water is boiling, the red light is on until the water is boiled.
When the boil mode is off or water is boiled, the red light is off and heating is stopped.Keep warm When you touch the Keep Warm key, the buzzer will sound a beep and you can turn on or off the keep-warm mode.
When the keep-warm mode is on but the set temperature is not reached, the amber light is on and the green light is off. Water heating is on or off depending on the current temperature.
When the keep-warm mode is off or the set temperature is reached, the amber light is off and the green light is on. Water heating is off.
If you use tap water, water is boiled first and then kept warm at the set temperature.
If you use purified water, water is heated to the set temperature.
The keep-warm temperature defaults to 55°C and can be adjusted between 45°C to 90°C on the mobile app.
The water source defaults to tap water and can be set on the mobile app.Dry boiling protection When dry boiling is detected, the kettle will be switched off and the buzzer will keep beeping. Device pairing Auto pairing after power-on. If the kettle is not paired within three minutes, only local control is available.
When you touch and hold the Keep Warm key for five seconds, the kettle will enter pairing mode. If it is not paired within three minutes, only local control is available.
The green light flickers quickly when the kettle enters pairing mode.Remote control Features that can be controlled on the mobile app include: turn on or off the boil and keep-warm mode, set the keep-warm temperature and water source, view the current temperature and faults, and schedule water heating. Next, we will show you how to implement these features.
Software design for Wi-Fi and Bluetooth LE combo solution
Download the full sample code.
Temperature display and dry boiling protection
Collect temperature
The schematic diagram is as follows.
We use an NTC thermistor to collect temperature data. A thermistor will restrict current depending on the surrounding temperature and subscribes to Ohm’s Law. After the module reads the voltage from the resistor via the ADC channel, it calculates the resistance of the thermistor. That calculated resistance corresponds to a respective temperature.
R8 is a 20 KΩ fixed resistor. R7 is a thermistor with a resistance of 100 KΩ at room temperature. ADC is where we collect the voltage.
-
With the collected resistance of the thermistor, we can calculate the current temperature based on the B3950 thermistor characteristics curve.
The following table lists the description of parameters in the thermistor characteristics curve.
Parameters Description R0 The resistance at 25°C. The resistance of our thermistor at 25°C is 10 KΩ. R The resistance at the current temperature. T0 Temperature in kelvin (273.15 + 25) T Temperature in kelvin (273.15 + current temperature) B Material-specific constant of NTC thermistor. exp e raised to the power of a given number (e^n). -
With the voltages on the two ends of the thermistor, we can calculate the resistance and then get the current temperature.
R=R0 expB (1/T-1/T0)
        ||
        \/
T=1/(ln(R/R0)/B+1/T0) approximate to T=1/(log(R/R0)/B+1/T0)
Convert kelvin to celsius: temp = T − 273.15
Sample code for temperature collection
Initialize the ADC and then start temperature collection.
// Initialize the ADC.
void b3950_init(void)
{
    /*create adc device,get handle*/
    temper_adc = (tuya_adc_t *)tuya_driver_find(TUYA_DRV_ADC, TUYA_ADC2);
    /*adc_dev cfg*/
    TUYA_ADC_CFG(temper_adc, TUYA_ADC2, 0);
    /*adc_dev init*/
    tuya_adc_init(temper_adc);
}
// Get the temperature value.
int  cur_temper_get()
{
    int Rt = 0;
    float Rp = 100000;
    float T2 = 273.15 + 25;
    float Bx = 3950;
    float Ka = 273.15;
    int temp = 0;
    /*Collect AD data and store it in adc_buffer*/
    tuya_adc_convert(temper_adc, &adc_buf, 1);
    /*req_val(0-4096) - V(0-2.4)*/
    volt = (float)adc_buf *2.4/ 4096;
    //volt = adc_buf;
    Rt = (3.3 - volt)*20000/volt;
    PR_DEBUG("Rt:%d", Rt);
    temp = (int)(1/(1/T2+log(Rt/Rp)/Bx)-Ka+0.5);
    PR_DEBUG("volt:%f", volt);
    return temp;


}
Sample code for temperature display
The temperature is collected every two seconds and reported to the cloud.
// Thread initialization. Create a timer thread to collect the temperature every two seconds. Create the main application thread and mutual exclusion.
void thread_init(void)
{
    int rt = OPRT_OK;
    // Create mutex
    if(NULL == mutex) {
        rt = tuya_hal_mutex_create_init(&mutex);
        if(OPRT_OK != rt) {
            PR_ERR("tuya_hal_mutex_create_init err:%d",rt);
            return rt;
        }
    }
    // A timer with a period of five seconds is used to capture the temperature.
    rt = sys_add_timer(get_temper_timer_cb, NULL, &get_temper_timer);
    if(rt != OPRT_OK) {
        PR_ERR("add timer error!: %d", rt);
        return;
    }else {
        rt = sys_start_timer(get_temper_timer,2000,TIMER_CYCLE);
        if(rt != OPRT_OK) {
            PR_ERR("start timer error!: %d", rt);
            return;
        }
    }

    rt = tuya_hal_thread_create(NULL, "app_kettle_thread", 512*4, TRD_PRIO_4, app_kettle_thread, NULL);
    if (rt != OPRT_OK) {
        PR_ERR("Create update_dp_thread error!: %d", rt);
        return;
    }
}
// Software timer callback to collect and report the temperature.
void get_temper_timer_cb(void)
{
        static int last_temper = 0;
        last_temper = cur_temper_get();
        if(last_temper > 150) {
            last_temper = 150;
        }
        else if(last_temper < 0) {
            last_temper = 0;
        }
        set_current_temperature(last_temper);
        tuya_hal_mutex_lock(mutex);
        temper_s.value = last_temper;
        tuya_hal_mutex_unlock(mutex);
        PR_DEBUG("last_temper : %d",last_temper);
        report_one_dp_status(DP_TEMPER);// Report the temperature to the mobile app.
}
Sample code for dry boiling protection
When the detected temperature is over 105°C, it indicates dry boiling occurs. The buzzer will sound beeps for warning and report the dry boiling event to the cloud.
// Initialize the timer and start the timer function to generate pulses for driving the buzzer.
void timer_init(void)
{
    timer = (tuya_timer_t *)tuya_driver_find(TUYA_DRV_TIMER, TUYA_TIMER1);
    // The timer uses cycle mode.
    TUYA_TIMER_CFG(timer, TUYA_TIMER_MODE_PERIOD, tuya_timer0_cb, NULL);
    tuya_timer_init(timer);
    // Start the timer. 100 μs is a counting cycle.
    tuya_timer_start(timer, 100);
    buzzer_set(1);


}
void tuya_timer0_cb(void *arg)
{
    static uint32_t s_tick;
    static int level = 1;
    level = ~level;
    buzzer_set(level);// Set the level of the I/O used for the buzzer driver.
    if (s_tick++ >= 700) {
        s_tick = 0;
        tuya_timer_stop(timer);
        buzzer_set(0);
    }

}
// The main application thread.
void app_kettle_thread(void)
{
        // Dry boiling protection. `Limiting_Temperature`: 105°C
        if(get_water_temperature() > Limiting_Temperature) {
            timer_init(); // Buzzer is on.
            set_dp_fault_status(TRUE);// Update fault status, from normal to dry boiling.
            report_one_dp_status(DP_FAULT);// Display fault information on the mobile app.
            relay_set(OFF);
        }else {
            if(get_dp_fault_status() == TRUE) {
                set_dp_fault_status(FALSE);// Update fault status, from dry boiling to normal.
                report_one_dp_status(DP_FAULT);// Display fault information on the mobile app.
            }
        }

        tuya_hal_system_sleep(1000);

    }

}
Offline control
Feature description
The kettle has two touch keys for Boil and Keep Warm respectively.
- If the kettle is offline, you can touch the Boil key to turn on or off water boiling.
- Touch the Keep Warm key to keep the water temperature at 55°C.
Features Description Boil - Touch key 1. Touching the key will boil water by default.
- Touching the key will turn on water boiling and touching again will turn off water boiling.
- Control by using the mobile app: Boil
Keep Warm key - Touch key 2.
- Touching the key will enable the kettle to keep water at 55°C in the mode of tap water by default.
- Touch and hold the key for five seconds to enter pairing mode.
- If no operation is performed on the physical key or the mobile app, the keep-warm mode is off by default.
Read data from the touch sensor
The schematic diagram of reading data from the touch sensor TS02N is as follows.
Pin configuration
Pin Description P7 Boil key P8 Keep Warm key How TS02N works:
-
Input on P1 or P2: low-level trigger
-
OUT1 outputs low when P1 is triggered.
-
OUT2 outputs low when P2 is triggered.
Sample code for offline control
To facilitate adding more features later, we use callback registration to implement key control.
- When the key is touched or released, the key indicator is on or off. The buzzer sounds a beep each time the key is touched.
- You can register the used I/O as well as the key-triggered callback.
- You can set the touch-and-hold time and configure triggered callbacks.
Sample code for key driver
/* Use the `ts02n_key_init(TS02N_KEY_DEF_S* user_key_def)` to register callbacks. Then, a scheduled task will be enabled to scan key events and this callback will be triggered when a key event is detected. */
typedef VOID(* KEY_CALLBACK)();
typedef struct {   // User-defined
    unsigned int key_pin1; // TS02N CH1 PIN
    unsigned int key_pin2; // TS02N CH2 PIN
    KEY_CALLBACK key1_cb;  // Touching key 1 callback
    KEY_CALLBACK key2_cb;  // Touching key 2 callback
    KEY_CALLBACK key1_long_press_cb;  // Touching and holding key 1 callback
    KEY_CALLBACK key2_long_press_cb;  // Touching and holding key 2 callback
    KEY_CALLBACK key1_Low_level_cb;  // Key1 low level process callback function
    KEY_CALLBACK key2_Low_level_cb;  // Key2 low level process callback function
    unsigned int long_time_set; // Set the touch-and-hold time.
    unsigned int scan_time; // Scan cycle set. Unit: ms

}TS02N_KEY_DEF_S;

// Initialize keys.
int ts02n_key_init(TS02N_KEY_DEF_S* user_key_def)
{
    int op_ret = 0;
    key_mag = (TS02N_KEY_MANAGE_S *)Malloc(SIZEOF(TS02N_KEY_MANAGE_S));
    memset(key_mag, 0, SIZEOF(TS02N_KEY_MANAGE_S));
    // No callback function is registered. Key init err.
    if((user_key_def->key1_cb == NULL) && (user_key_def->key2_cb == NULL) && \
    (user_key_def->key1_long_press_cb == NULL) && (user_key_def->key2_long_press_cb == NULL)){
        return KEY_INIT_ERR;
    }
    // Key pin init
    tuya_pin_init(user_key_def->key_pin1, TUYA_PIN_MODE_IN_PU);
    tuya_pin_init(user_key_def->key_pin2, TUYA_PIN_MODE_IN_PU);
    // Get user-defined
    key_mag->ts02n_def_s = user_key_def;
    // Create key scan handle timer.
    op_ret = sys_add_timer(key_timer_cb,NULL,&key_timer);
    if(op_ret != KEY_INIT_OK) {
        return KEY_INIT_ERR;
        PR_ERR("add timer err");
    }
    op_ret = sys_start_timer(key_timer,key_mag->ts02n_def_s->scan_time,TIMER_CYCLE);
    if(op_ret != KEY_INIT_OK) {
        return KEY_INIT_ERR;
        PR_ERR("start timer err");
    }

}
// The function for scanning and processing key events. The triggered function depends on the trigger method. The triggered function must be registered before you use it.
static void key_timer_cb()
{
    int ret = -1;
    // Get status of the key.
    ret = key_scan();
    switch (ret) {

    case KEY1_NORMAL_PRESS: {
        key_mag->ts02n_def_s->key1_cb();
    }
    break;

    case KEY1_LONG_PRESS: {
        key_mag->ts02n_def_s->key1_long_press_cb();
    }
    break;

    case KEY2_NORMAL_PRESS: {
        key_mag->ts02n_def_s->key2_cb();
    }
    break;

    case KEY2_LONG_PRESS: {
        key_mag->ts02n_def_s->key2_long_press_cb();
    }
    break;
    default:
    break;
    }
}
// The function for scanning key events, which is called in `key_timer_cb`.
static int key_scan()
{
    if((tuya_pin_read(key_mag->ts02n_def_s->key_pin1) == 0) && (tuya_pin_read(key_mag->ts02n_def_s->key_pin2) == 0 )) {
        return NO_KEY_PRESS;
    }
    if(tuya_pin_read(key_mag->ts02n_def_s->key_pin1) == 0 ) {

        key_mag->ts02n_def_s->key1_Low_level_cb();
        key_mag->key_status.status = KEY1_DOWN;
        key_mag->key_status.down_time += key_mag->ts02n_def_s->scan_time;
        if(key_mag->key_status.down_time >= key_mag->ts02n_def_s->long_time_set) {
            key_mag->key_status.status = KEY1_FINISH;
        }
    }else {
        if(key_mag->key_status.status == KEY1_DOWN) {
            key_mag->key_status.status = KEY1_FINISH;
        }
    }

    if(tuya_pin_read(key_mag->ts02n_def_s->key_pin2) == 0 ) {

        key_mag->ts02n_def_s->key2_Low_level_cb();
        key_mag->key_status.status = KEY2_DOWN;
        key_mag->key_status.down_time += key_mag->ts02n_def_s->scan_time;
        if(key_mag->key_status.down_time >= key_mag->ts02n_def_s->long_time_set) {
            key_mag->key_status.status = KEY2_FINISH;
        }
    }else {
        if(key_mag->key_status.status == KEY2_DOWN) {
            key_mag->key_status.status = KEY2_FINISH;
        }
    }

    switch (key_mag->key_status.status) {

    case (KEY1_FINISH): {
        if(key_mag->key_status.down_time >= key_mag->ts02n_def_s->long_time_set) {
            PR_DEBUG("key_pin1 long press");
            key_mag->key_status.down_time = 0;
            key_mag->key_status.status = KEY1_UP;
            return KEY1_LONG_PRESS;
        }else {
            key_mag->key_status.status = KEY1_UP;
            key_mag->key_status.down_time = 0;
            PR_DEBUG("key_pin1 press");
            return KEY1_NORMAL_PRESS;
        }
    }
    break;

    case (KEY2_FINISH): {
        if(key_mag->key_status.down_time >= key_mag->ts02n_def_s->long_time_set) {
            PR_DEBUG("key_pin2 long press");
            key_mag->key_status.down_time = 0;
            key_mag->key_status.status = KEY2_UP;
            return KEY2_LONG_PRESS;
        }else {
            key_mag->key_status.status = KEY2_UP;
            key_mag->key_status.down_time = 0;
            PR_DEBUG("key_pin2 press");
            return KEY2_NORMAL_PRESS;
        }
    }
    break;
    default:
        return NO_KEY_PRESS;
    break;

    }

}
Sample code for key configuration
// Key configurations.
TS02N_KEY_DEF_S kettle_key_def_s = {
    .key_pin1 = TY_GPIOA_8,
    .key_pin2 = TY_GPIOA_7,
    .key1_cb = key1_cb_fun,
    .key2_cb = key2_cb_fun,
    .key1_long_press_cb = NULL,
    .key2_long_press_cb = key2_long_press_cb_fun,
    .key1_Low_level_cb = key1_Low_level_cb_fun,
    .key2_Low_level_cb = key2_Low_level_cb_fun,
    .long_time_set = 5000,
    .scan_time = 100,
};
// Initialization functions.
VOID_T kettle_init()
{
    b3950_init();
    thread_init();
    kettle_gpio_init();
    ts02n_key_init(&kettle_key_def_s);// Register keys and perform initialization.
}
// The Boil key. Touch this key to enable the boil mode and touch it again to cancel water boiling and the kettle will work in nature mode.
void key1_cb_fun()
{
    // Touching key prompt
    led1_set(OFF);
    buzzer_flag = 1;
    // Touching key prompt

    if(get_kettle_work_status() == boil) { // If current status is boil, turn off boiling.
        set_kettle_work_status(nature);
        set_dp_boil_value(FALSE);
        report_one_dp_status(DP_BOIL);
    }else {
        set_kettle_work_status(boil);
        set_dp_boil_value(TRUE);
        report_one_dp_status(DP_BOIL);
    }


}
// The Keep Warm key. Touch this key to enable the keep-warm mode and touch it again to cancel keeping warm and the kettle is in nature mode.
void key2_cb_fun()
{
    // Touching key prompt
    led2_set(OFF);
    buzzer_flag = 1;
    // Touching key prompt
    if(get_kettle_work_status() == keep_warm_mode1) {// If current status is keep_warm_mode1, turn off insulation function.
        set_kettle_work_status(nature);
        set_dp_keep_warm_switch(0);
        report_one_dp_status(DP_KEEP_WARM);
    }else {
        set_kettle_work_status(keep_warm_mode1);
        // Touch the Keep Warm key: 1. boil -> 2. keep warm
        set_kettle_keep_warm_temper(Default_Warm_Temperature);
        set_dp_keep_warm_switch(1);
        report_one_dp_status(DP_KEEP_WARM);
        report_one_dp_status(DP_TEMP_SET);
    }


}
// Touch and hold the Keep Warm key for five seconds to enter pairing mode.
void key2_long_press_cb_fun()
{

    led2_set(OFF);
    tuya_iot_wf_gw_unactive();
    buzzer_flag = 1;

}
// Triggered when the key is touched.
void key1_Low_level_cb_fun()
{
    PR_DEBUG("key1_Low_level_cb");
    led1_set(ON);
    if(buzzer_flag) {
        timer_init();// The buzzer sounds one beep.
        buzzer_flag = 0;
    }

}
// Triggered when the key is touched.
void key2_Low_level_cb_fun()
{
    led2_set(ON);
    PR_DEBUG("key2_Low_level_cb");
    if(buzzer_flag) {
        timer_init();// The buzzer sounds one beep.
        buzzer_flag = 0;
    }
}
Sample code for mode control
Touching physical keys or controlling with the mobile app can change the working mode of the kettle and the main thread will process events accordingly.
// In the boil mode, when the temperature is close to the boiling point, the scheduled task will be started. After another five-second heating, water heating and corresponding LED indicator will be turned off.
STATIC VOID boil_time_task(VOID)
{
    /* Water is close to the boiling point and is heated for another five seconds. Then turn off the device */
    set_kettle_work_status(nature); // Switch to cool mode
    relay_set(OFF);
    led1_set(OFF);
    led2_set(OFF);
    state_led_set(OFF);
    set_dp_boil_value(0);
    report_one_dp_status(DP_BOIL);
    PR_DEBUG("boil->nature");
}
// Main application thread to get the current mode and process events accordingly.
void app_kettle_thread(void)
{
    static int temp_work_status = 0;
    while(1)
    {
        temp_work_status = get_kettle_work_status();


        // According to the different settings of the corresponding processing
        switch (temp_work_status) {

        case nature: {
			led1_set(OFF);// The kettle is in nature mode after power-on and all LED indicators are off.
            led2_set(OFF);
            state_led_set(OFF);
            relay_set(OFF);
        }
        break;
        case boil: {
            if(get_water_temperature() >= Boil_Temperature) {
                int op_ret = -1;
                // When the temperature is close to the boiling point, the software timer will be started. After another five-second heating, water heating will be turned off.
                op_ret = sys_add_timer(boil_time_task,NULL,&boil_timer);
                if(op_ret != 0) {
                    PR_ERR("add timer err");
                    return;
                }
                // If the timer fails to be started, water heating will be turned off immediately to avoid dry boiling.
                op_ret = sys_start_timer(boil_timer,5000,TIMER_ONCE);
                if(op_ret != 0) {
                    PR_ERR("start timer err");
                    set_kettle_work_status(nature); //Switch to cool mode
                    relay_set(OFF);
                    led1_set(OFF);
                    led2_set(OFF);
                    state_led_set(OFF);
                    set_dp_boil_value(0);
                    report_one_dp_status(DP_BOIL);
                    PR_DEBUG("boil->nature");
                    return;
                }

            }else {
                relay_set(ON);
                led1_set(ON);// Turn on the LED indicator for boiled water.
                led2_set(OFF);
                state_led_set(OFF);
            }
        }
        break;
        // Touch the keep Warm key.
        case keep_warm_mode1: {

            state_led_set(OFF);
            led1_set(ON);
            if(get_water_temperature() >= Boil_Temperature) {
                set_kettle_work_status(keep_warm_mode2);
                led1_set(OFF);
                led2_set(ON);// Turn on the LED indicator for the keep-warm mode. If the current temperature does not reach the set one, the amber light is on.
                state_led_set(OFF);
                relay_set(OFF);
                PR_DEBUG("keep_warm_mode1->keep_warm_mode2");
            }else {
                relay_set(ON);
                led1_set(OFF);
                led2_set(ON);// Turn on the LED indicator for the keep-warm mode. If the current temperature does not reach the set one, the amber light is on.
                state_led_set(OFF);
                PR_DEBUG("keep_warm_mode1 relay_set on");
            }

        }
        break;
        //clear water keep warm
        case keep_warm_mode2: {
        //cur_temp > set temperature  Turn off the heating
            if(get_water_temperature() > get_keep_wram_temperature() - 3) {
                relay_set(OFF);
                led1_set(OFF);
                led2_set(ON);// Turn on the LED indicator for the keep-warm mode. If the current temperature does not reach the set one, the amber light is on.
                state_led_set(OFF);
                PR_DEBUG("keep_warm_mode2 relay_set 0");
                //cur_temp < set temperature  turn on the heating
            }else if(get_water_temperature() < (get_keep_wram_temperature() - 5)) {
                relay_set(ON);
                led1_set(OFF);
                led2_set(ON);// Turn on the LED indicator for the keep-warm mode. If the current temperature does not reach the set one, the amber light is on.
                state_led_set(OFF);
                PR_DEBUG("keep_warm_mode2 relay_set 1");
            }else {
            // cur_temp == set temperature
            //It indicates that the temperature has reached the insulation value.
                led1_set(OFF);
                led2_set(OFF);
                state_led_set(ON);// Turn on the LED indicator for the keep-warm mode. If the current temperature reaches the set one, the green light is on.
                relay_set(OFF);
            }
        }
        break;
        default:
        break;
        }

        // Dry boiling protection
        // Dry boiling protection. Limiting_Temperature: 105°C. Dry boiling warning
        if(get_water_temperature() > Limiting_Temperature) {
            timer_init(); // Buzzer is on. Voice call the police
            set_dp_fault_status(TRUE); // App display warning
            report_one_dp_status(DP_FAULT);
            relay_set(OFF); // Turn off the relay.
        }else {
            if(get_dp_fault_status() == TRUE) {
                set_dp_fault_status(FALSE);
                report_one_dp_status(DP_FAULT);
            }
        }

        tuya_hal_system_sleep(1000);

    }

}
Device control from the cloud
We will implement the IoT-enabled remote control of temperature setting, mode selection, water heating schedules, and dry boiling protection.
Features Options Boil On/Off Keep-warm temperature setting 45°C to 90°C Keep warm On/Off Water source selection Tap water or purified water Temperature display Room temperature display Current temperature display User-defined Scheduled tasks User-defined Dry boiling warning Normal or dry boiling To achieve device control from the cloud, we must implement the execution functions that are triggered by specified data point (DP) data.
Implement the execution function to control the boil mode.
This function will execute specified operations according to the DP data received from the cloud.
Turn on:
- The kettle enters boil mode.
- Since the boil mode and the keep-warm mode are exclusive, the keep-warm mode will be turned off.
- Update the data of two DPs, namely boil and keep warm, and report the data to the cloud.
Turn off:
- The kettle enters nature mode, without any heating operation.
- Update the DP data of the boil mode and report it to the cloud.
You need to implement the specific execution function in
kettle_app.c.static void dp_boil_handle(IN BOOL_T bONOFF) { // Turn on the boil mode. if(bONOFF == TRUE) { set_kettle_work_status(boil);// Switch to boil mode. set_dp_boil_value(TRUE);// To turn on the boil mode, set the value of `dp_boil` to 1. set_dp_keep_warm_switch(FALSE);// To turn off the keep-warm mode, set the value of `dp_keep_warm` to 0. PR_DEBUG("dp_boil on"); }else {// Turn off the boil mode. set_kettle_work_status(nature);// Switch to nature mode. set_dp_boil_value(FALSE);// To turn off the boil mode, set the value of `dp_boil` to 0. PR_DEBUG("dp_boil off"); } report_one_dp_status(DP_BOIL);// Report the data of DP `dp_boil`. report_one_dp_status(DP_KEEP_WARM);// Report the data of DP `dp_keep_warm`. } // Set a mode. void set_kettle_work_status(int status) { tuya_hal_mutex_lock(mutex); kettle_work_information.status = status; tuya_hal_mutex_unlock(mutex); } // Set the value of `dp_boil`. void set_dp_boil_value(bool value) { tuya_hal_mutex_lock(mutex); boil_s.power = value; tuya_hal_mutex_unlock(mutex); } // Set the value of `dp_keep_warm`. void set_dp_keep_warm_switch(bool value) { tuya_hal_mutex_lock(mutex); keep_warm_s.power = value; tuya_hal_mutex_unlock(mutex); }The execution function to control the boil mode is implemented.
Implement the function to set the keep-warm temperature.
The temperature is set on the mobile app and the cloud sends the value to the kettle.
- The kettle will set the keep-warm temperature to the value that is received from the cloud.
- Update the value of
dp_keep_warm_setaccordingly and report the current data to the cloud.
You need to implement the specific execution function in
kettle_app.c.static void dp_keep_warm_set_handle(IN int value) { set_kettle_keep_warm_temper(value);// Set the keep-warm temperature. Note that this action will not trigger the keep-warm mode. report_one_dp_status(DP_TEMP_SET);// Report the current data of DP `dp_keep_warm_set` to the cloud. } // The keep-warm temperature ranges from 45°C to 90°C. void set_kettle_keep_warm_temper(int value) { if(44 < value < 91) { tuya_hal_mutex_lock(mutex); temp_set_s.value = value; kettle_work_information.warm_temperature = value; tuya_hal_mutex_unlock(mutex); PR_DEBUG("set keep warm temper:%d",value); } }The function to set the keep-warm temperature is implemented.
Implement the function to turn on or off the keep-warm mode.
Turn on or off the keep-warm mode on the mobile app.
Turn on:
- Determine the water source. For tap water, the kettle works in keep-warm mode 1. The water is boiled first and then kept warm.
- Determine the water source. For purified water, the kettle works in keep-warm mode 2. The water will be heated and kept at the set temperature without the boiling step.
- Turn off the boil mode and report the data of two DPs, namely boil and keep warm, to the cloud.
Turn off:
The kettle works in nature mode.You need to implement the specific execution function in
kettle_app.c.static void dp_keep_warm_handle(IN BOOL_T bONOFF) { // Turn on the keep-warm mode. Tap water is detected and the kettle works in keep-warm mode 1. The water is boiled first and then kept warm. if(bONOFF == TRUE && (get_water_type() == tap_water)) { set_kettle_work_status(keep_warm_mode1); set_dp_keep_warm_switch(TRUE); set_dp_boil_value(FALSE); PR_DEBUG("keep_warm_mode1"); // Turn on the keep-warm mode. Purified water is detected and the kettle works in keep-warm mode 2. The water will be heated and kept at the set temperature without the boiling step. }else if(bONOFF == TRUE && (get_water_type() == clear_water)){ set_kettle_work_status(keep_warm_mode2); set_dp_keep_warm_switch(TRUE); set_dp_boil_value(FALSE); PR_DEBUG("keep_warm_mode2"); }else { // Turn off the keep-warm mode. set_kettle_work_status(nature); set_dp_keep_warm_switch(FALSE); PR_DEBUG("close keep warm"); } // Report DP data. report_one_dp_status(DP_KEEP_WARM); report_one_dp_status(DP_BOIL); }The execution function to turn on or off the keep-warm mode is implemented.
Implement the function to select the water source.
Select the water source on the mobile app.
- The kettle sets the water source as tap water or purified water according to the received value from the cloud.
- If the water is kept warm in the mode of tap water, the kettle will change the water source to purified water on receiving the corresponding value.
- If the water is kept warm in the mode of purified water, the kettle will change the water source to tap water on receiving the corresponding value.
- Update the DP data of the water source and report it to the cloud.
You need to implement the specific execution function in
kettle_app.c.void dp_water_type_handle(int value) { if(value == tap_water || value == clear_water) { // Set the water source. tuya_hal_mutex_lock(mutex); kettle_work_information.water_mode = value; water_type_s.value = value; tuya_hal_mutex_unlock(mutex); // If the water is kept warm in the mode of tap water, the kettle will change the water source to purified water on receiving the corresponding value. if(get_kettle_work_status() == keep_warm_mode1 && get_water_type() == clear_water) { set_kettle_work_status(keep_warm_mode2); // If the water is kept warm in the mode of purified water, the kettle will change the water source to tap water on receiving the corresponding value. }else if(get_kettle_work_status() == keep_warm_mode2 && get_water_type() == tap_water) { set_kettle_work_status(keep_warm_mode1); } PR_DEBUG("water choose :%d",value); report_one_dp_status(DP_WATER_TYPE); } } // Get the current working mode of the kettle. int get_kettle_work_status() { return kettle_work_information.status; } // Get the current water source of the kettle. int get_water_type() { return kettle_work_information.water_mode; }The function to set the water source is implemented.
Schedule tasks
Schedule tasks of water boiling on the mobile app. When the preset time is reached, the cloud will send a command of DP
dp_boilto the kettle to turn on the boil mode.Schedule a task to turn on the boil mode automatically.
- When the preset time is reached, the cloud sends a command of DP
dp_boilto turn on the boil mode. - After this command is executed, the status of the scheduled task will be zeroed.
Next, we will implement sending a command with the mobile app to the kettle.
Sample code
// This callback is triggered when the kettle receives the command from the cloud. Then, `deal_dp_proc` will be triggered to implement remote control of water boiling.
VOID dev_obj_dp_cb(IN CONST TY_RECV_OBJ_DP_S *dp)
{
    PR_DEBUG("dp->cid:%s dp->dps_cnt:%d",dp->cid,dp->dps_cnt);
    UCHAR_T i = 0;

    for(i = 0;i < dp->dps_cnt;i++) {
        deal_dp_proc(&(dp->dps[i]));
        //dev_report_dp_json_async(get_gw_cntl()->gw_if.id, dp->dps, dp->dps_cnt);
    }
}
// This function is triggered to execute commands from the cloud according to the `DP_ID` and specified DP value.
VOID_T deal_dp_proc(IN CONST TY_OBJ_DP_S *root)
{
    UCHAR_T dpid;
    dpid = root->dpid;

    switch (dpid){
    // Turn on or off the boil mode.
    case DP_BOIL: {
        dp_boil_handle(root->value.dp_bool);

        }
        break;
	// Set the keep-warm temperature.
    case DP_TEMP_SET: {
        dp_keep_warm_set_handle(root->value.dp_value);
        }
        break;
	// Turn on or off the keep-warm mode.
    case DP_KEEP_WARM: {
        dp_keep_warm_handle(root->value.dp_bool);

        }
        break;
	// Set the water source.
    case DP_WATER_TYPE: {
        dp_water_type_handle(root->value.dp_enum);
        }
        break;

    default:

        break;
    }

}
Software design for Bluetooth LE solution
Download the full sample code.
Offline control
LED indicator
The LED indicator shows the kettle status and network status. The LED is driven by voltage level.
LED indicator Pin H L Indication mode Red light P_LED_REDP24/GPIO_PB5 Off On Steady on or off Amber light P_LED_ORANGEP26/GPIO_PB4 Off On Steady on or off Green light P_GREENP6/GPIO_PD2 Off On Steady on or off/Flicker at an interval of 0.2 seconds Sample code
#define P_LED_RED           GPIO_PB5    /* P24 */
#define P_LED_ORANGE        GPIO_PB4    /* P26 */
#define P_LED_GREEN         GPIO_PD2    /* P6 */
#define LED_TWINKLE_TIME	200			/* 0.2s */

LED_MODE_E g_led_green_mode = LED_MODE_FIX;
LED_MODE_E g_led_green_status = OFF;

/* Initialize the LED I/Os */
void led_init(void)
{
	gpio_set_func(P_LED_RED, AS_GPIO);
    gpio_set_output_en(P_LED_RED, 1);
    gpio_write(P_LED_RED, 1);
    gpio_set_func(P_LED_ORANGE, AS_GPIO);
    gpio_set_output_en(P_LED_ORANGE, 1);
    gpio_write(P_LED_ORANGE, 1);
    gpio_set_output_en(P_LED_GREEN, 1);
	gpio_set_func(P_LED_GREEN, AS_GPIO);
    gpio_write(P_LED_GREEN, 1);
}

/* Red light on/off */
void set_led_red(bool b_on_off)
{
    static bool s_last_status = 0;
    if (s_last_status != b_on_off) {
        if (b_on_off == ON) {
        	gpio_write(P_LED_RED, 0);
        } else {
        	gpio_write(P_LED_RED, 1);
        }
        s_last_status = b_on_off;
    }
}

/* Amber light on/off */
void set_led_orange(bool b_on_off)
{
    static bool s_last_status = 0;
    if (s_last_status != b_on_off) {
        if (b_on_off == ON) {
        	gpio_write(P_LED_ORANGE, 0);
        } else {
        	gpio_write(P_LED_ORANGE, 1);
        }
        s_last_status = b_on_off;
    }
}

/* Green light on/off */
void set_led_green(bool b_on_off)
{
    static bool s_last_status = 0;

    if (s_last_status != b_on_off) {
        if (b_on_off == ON) {
        	gpio_write(P_LED_GREEN, 0);
        } else {
        	gpio_write(P_LED_GREEN, 1);
        }
        s_last_status = b_on_off;
    }
}

/* Set the mode of the green light */
void set_led_green_mode(LED_MODE_E mode)
{
    g_led_green_mode = mode;
}

/* Set the status of the green light */
void set_led_green_status(uint8_t status)
{
    g_led_green_status = status;
}

/* Update the status of the green light */
void update_led_green_status(void)
{
    static bool s_status = 0;
    static uint32_t s_twinkle_tm = 0;

    switch (g_led_green_mode) {
    case LED_MODE_FIX:      /* The LED is on or off depending on the status */
        set_led_green(g_led_green_status);
        s_twinkle_tm = 0;
        break;
    case LED_MODE_TWINKLE:  /* The LED flickers at an interval of 0.2 seconds. */
        if (!clock_time_exceed(s_twinkle_tm, LED_TWINKLE_TIME*1000)) {
            break;
        }
        s_twinkle_tm = clock_time();
        s_status = !s_status;
        set_led_green(s_status);
        break;
    default:
        break;
    }
}
Relay driver control
The heating circuit is controlled by the relay, which is driven by voltage level.
Relay Pin H L Relay P_RELAYP14/GPIO_PD3 Switch on heating. Switch off heating. Sample code
#define P_RELAY	GPIO_PD3    /* P14 */

/* Initialize the relay I/O */
void relay_init(void)
{
	gpio_set_func(P_RELAY, AS_GPIO);
	gpio_set_output_en(P_RELAY, 1);
	gpio_write(P_RELAY, 0);
}

/* Relay on/off */
void set_relay(bool b_on_off)
{
    static bool s_last_status = 0;
    if (s_last_status != b_on_off) {
        if (b_on_off == ON) {
        	gpio_write(P_RELAY, 1);
        } else {
        	gpio_write(P_RELAY, 0);
        }
        s_last_status = b_on_off;
    }
}
Buzzer driver control
The buzzer can sound beeps for key prompt and fault warning, which is driven by PWM signals.
Buzzer Pin Mode Clock signals (PWM) Buzzer P_BUZZERP17/GPIO_PD4 Stop beeping/Sound a beep (70 ms)/Fault (keep beeping) Channel: PWM2
Cycle: 500 μs (2 kHz)
Duty cycle: 50%Sample code
#define P_BUZZER            GPIO_PD4    /* P17 */
#define PWM_ID_BUZZER       PWM2_ID		/* PWM2 */
#define BUZZER_ONCE_TIME    70			/* 70 ms */

typedef BYTE_T BUZZER_MODE_E;
#define BUZZER_MODE_STOP    0x00		/* Stop */
#define BUZZER_MODE_ONCE    0x01		/* Sound a beep */
#define BUZZER_MODE_FAULT   0x02		/* Fault */

static uint8_t sg_buzzer_timer = OFF;
static uint32_t sg_buzzer_tm = 0;

/* Initialize the buzzer I/O and PWM configuration */
void buzzer_pwm_init(void)
{
    pwm_set_clk(CLOCK_SYS_CLOCK_HZ, CLOCK_SYS_CLOCK_HZ);
	gpio_set_func(P_BUZZER, AS_PWM2_N);
    pwm_set_mode(PWM_ID_BUZZER, PWM_NORMAL_MODE);
    pwm_set_cycle_and_duty(PWM_ID_BUZZER, (uint16_t)(500 * CLOCK_SYS_CLOCK_1US), (uint16_t)(250 * CLOCK_SYS_CLOCK_1US));    /* 500 μs 2 kHz 50% */
    gpio_write(P_BUZZER, 0);
}

/* Buzzer on/off */
static void set_buzzer(bool b_on_off)
{
    static bool s_last_status = 0;
    if (s_last_status != b_on_off) {
        if (b_on_off == ON) {
        	pwm_start(PWM_ID_BUZZER);
        } else {
        	pwm_stop(PWM_ID_BUZZER);
            gpio_write(P_BUZZER, 0);
        }
        s_last_status = b_on_off;
    }
}

/* Set the buzzer mode */
void set_buzzer_mode(BUZZER_MODE_E mode)
{
    switch (mode) {
    case BUZZER_MODE_STOP:
        set_buzzer(OFF);
        break;
    case BUZZER_MODE_ONCE:
        set_buzzer(ON);
        sg_buzzer_timer = ON;
        sg_buzzer_tm = clock_time();
        break;
    case BUZZER_MODE_FAULT:
        set_buzzer(ON);
        break;
    default:
        break;
    }
}

/* Update the buzzer status */
void update_buzzer_status(void)
{
    if (sg_buzzer_timer == ON) {
        if (!clock_time_exceed(sg_buzzer_tm, BUZZER_ONCE_TIME*1000)) {
            return;
        }
        set_buzzer(OFF);
        sg_buzzer_timer = OFF;
    }
}
Key event detection and processing
To facilitate adding more features later, we use callback registration to implement key event detection and processing.
Sample code
Key registration and initialization
The registration contents are as follows.
typedef void(* KEY_CALLBACK)();
typedef struct {
    uint16_t key1_pin;                  /* I/O of key 1 */
    uint16_t key2_pin;                  /* I/O of key 2 */
    KEY_CALLBACK key1_short_press_cb;   /* Callback triggered by touching key 1 */
    KEY_CALLBACK key2_short_press_cb;   /* Callback triggered by touching key 2 */
    KEY_CALLBACK key1_long_press_cb;    /* Callback triggered by touching and holding key 1 */
    KEY_CALLBACK key2_long_press_cb;    /* Callback triggered by touching and holding key 2 */
    uint32_t key1_long_press_time;      /* Set the touch-and-hold time of key 1, in milliseconds */
    uint32_t key2_long_press_time;      /* Set the touch-and-hold time of key 2, in milliseconds */
    uint32_t scan_time;                 /* Set the interval of scanning key 1, in milliseconds */
} TS02N_KEY_DEF_T;
Define status variables for key event detection and implement the key initialization function.
/* Key status */
typedef struct {
    uint8_t cur_code;
    uint8_t prv_code;
    uint32_t cur_time;
    uint32_t prv_time;
} TS02N_KEY_STATUS_T;

/* Key management */
typedef struct {
    TS02N_KEY_DEF_T* ts02n_key_def_s;
    TS02N_KEY_STATUS_T ts02n_key_status_s;
} TS02N_KEY_MANAGE_T;
static TS02N_KEY_MANAGE_T *sg_key_mag = NULL;

/* Initialize keys */
uint8_t ts02n_key_init(TS02N_KEY_DEF_T* key_def)
{
    /* Initialize key information */
    sg_key_mag = (TS02N_KEY_MANAGE_T *)tuya_ble_malloc(sizeof(TS02N_KEY_MANAGE_T));
    memset(sg_key_mag, 0, sizeof(TS02N_KEY_MANAGE_T));
    sg_key_mag->ts02n_key_def_s = key_def;
    /* Check callbacks */
    if ((key_def->key1_short_press_cb == NULL) &&
    	(key_def->key2_short_press_cb == NULL) &&
        (key_def->key1_long_press_cb == NULL)  &&
        (key_def->key2_long_press_cb == NULL)) {
        tuya_ble_free((uint8_t *)sg_key_mag);
        return KEY_INIT_ERR;
    }

        /* Initialize I/Os */
    gpio_set_func(key_def->key1_pin, AS_GPIO);
    gpio_set_input_en(key_def->key1_pin, 1);
    gpio_setup_up_down_resistor(key_def->key1_pin, PM_PIN_PULLUP_10K);
    gpio_set_func(key_def->key2_pin, AS_GPIO);
    gpio_set_input_en(key_def->key2_pin, 1);
    gpio_setup_up_down_resistor(key_def->key2_pin, PM_PIN_PULLUP_10K);

    return KEY_INIT_OK;
}
Scan and process the key event
Define the key value for key 1 and key 2 as well as the touching time.
#define KEY1_CODE				0x01
#define KEY2_CODE				0x02
#define KEY_PRESS_SHORT_TIME    50
Implement the function for scheduled key event scanning and processing.
/* Get the current key value */
static uint8_t get_key_code(void)
{
    uint8_t key_code = 0;
    /* Key 1 */
    if (gpio_read(sg_key_mag->ts02n_key_def_s->key1_pin) == 0) {
        key_code |= KEY1_CODE;
    } else {
        key_code &= ~KEY1_CODE;
    }
    /* Key 2 */
    if (gpio_read(sg_key_mag->ts02n_key_def_s->key2_pin) == 0) {
        key_code |= KEY2_CODE;
    } else {
        key_code &= ~KEY2_CODE;
    }
    return key_code;
}

/* Scan key status */
static void update_key_status(uint32_t time_inc)
{
    uint8_t key_code;

    key_code = get_key_code();
    sg_key_mag->ts02n_key_status_s.prv_time = sg_key_mag->ts02n_key_status_s.cur_time;
    sg_key_mag->ts02n_key_status_s.cur_time += time_inc;

    if (key_code != sg_key_mag->ts02n_key_status_s.cur_code) {
        sg_key_mag->ts02n_key_status_s.prv_code = sg_key_mag->ts02n_key_status_s.cur_code;
        sg_key_mag->ts02n_key_status_s.cur_code = key_code;
        sg_key_mag->ts02n_key_status_s.prv_time = sg_key_mag->ts02n_key_status_s.cur_time;
        sg_key_mag->ts02n_key_status_s.cur_time = 0;
    } else {
        sg_key_mag->ts02n_key_status_s.prv_code = sg_key_mag->ts02n_key_status_s.cur_code;
    }
}

/* Determine whether `key_code` is touched over `press_time` */
static uint8_t is_key_press_over_time(uint8_t key_code, uint32_t press_time)
{
    if (sg_key_mag->ts02n_key_status_s.cur_code == key_code) {
        if ((sg_key_mag->ts02n_key_status_s.cur_time >= press_time) &&
            (sg_key_mag->ts02n_key_status_s.prv_time < press_time)) {
            return 1;
        }
    }
    return 0;
}

/* Determine whether the touch time is less than `press_time` before `key_code` is released */
static uint8_t is_key_release_to_release_less_time(uint8_t key_code, uint32_t press_time)
{
    if ((sg_key_mag->ts02n_key_status_s.prv_code == key_code) &&
        (sg_key_mag->ts02n_key_status_s.cur_code != key_code)) {
        if ((sg_key_mag->ts02n_key_status_s.prv_time >= KEY_PRESS_SHORT_TIME) &&
            (sg_key_mag->ts02n_key_status_s.prv_time < press_time)) {
            return 1;
        }
    }
    return 0;
}

/* Key event detection and processing */
static void detect_and_handle_key_event(void)
{
    /* Process events of key 1 */
    if (sg_key_mag->ts02n_key_def_s->key1_long_press_cb != NULL) {
        /* Touch and hold */
        if (is_key_press_over_time(KEY1_CODE, sg_key_mag->ts02n_key_def_s->key1_long_press_time)) {
            sg_key_mag->ts02n_key_def_s->key1_long_press_cb();
            TUYA_APP_LOG_DEBUG("key1 is long pressed");
        }
        /* Touch */
        if (sg_key_mag->ts02n_key_def_s->key1_short_press_cb != NULL) {
            if (is_key_release_to_release_less_time(KEY1_CODE, sg_key_mag->ts02n_key_def_s->key1_long_press_time)) {
                sg_key_mag->ts02n_key_def_s->key1_short_press_cb();
                TUYA_APP_LOG_DEBUG("key1 is pressed");
            }
        }
    } else {
        /* Touch */
        if (sg_key_mag->ts02n_key_def_s->key1_short_press_cb != NULL) {
            if (is_key_press_over_time(KEY1_CODE, KEY_PRESS_SHORT_TIME)) {
                sg_key_mag->ts02n_key_def_s->key1_short_press_cb();
                TUYA_APP_LOG_DEBUG("key1 is pressed");
            }
        }
    }
    /* Process events of key 2 */
    if (sg_key_mag->ts02n_key_def_s->key2_long_press_cb != NULL) {
        /* Touch and hold */
        if (is_key_press_over_time(KEY2_CODE, sg_key_mag->ts02n_key_def_s->key2_long_press_time)) {
            sg_key_mag->ts02n_key_def_s->key2_long_press_cb();
            TUYA_APP_LOG_DEBUG("key2 is long pressed");
        }
        /* Touch */
        if (sg_key_mag->ts02n_key_def_s->key2_short_press_cb != NULL) {
            if (is_key_release_to_release_less_time(KEY2_CODE, sg_key_mag->ts02n_key_def_s->key2_long_press_time)) {
                sg_key_mag->ts02n_key_def_s->key2_short_press_cb();
                TUYA_APP_LOG_DEBUG("key2 is pressed");
            }
        }
    } else {
        /* Touch */
        if (sg_key_mag->ts02n_key_def_s->key2_short_press_cb != NULL) {
            if (is_key_press_over_time(KEY2_CODE, KEY_PRESS_SHORT_TIME)) {
                sg_key_mag->ts02n_key_def_s->key2_short_press_cb();
                TUYA_APP_LOG_DEBUG("key2 is pressed");
            }
        }
    }
}

/* Scheduled key touch scanning */
void ts02n_key_loop(void)
{
    static uint32_t s_key_scan_tm = 0;
	/* Determine the scheduled time */
	if (!clock_time_exceed(s_key_scan_tm, (sg_key_mag->ts02n_key_def_s->scan_time)*1000)) {
		return;
	}
	s_key_scan_tm = clock_time();  /* Record the current time */
    update_key_status(sg_key_mag->ts02n_key_def_s->scan_time);  /* Scan key status */
    detect_and_handle_key_event();  /* Determination and processing */
}
Collect and process temperature
We use an NTC thermistor to collect temperature data. A thermistor will restrict current depending on the surrounding temperature and subscribes to Ohm’s Law. After the module reads the voltage from the resistor via the ADC channel, it calculates the resistance of the thermistor. That calculated resistance corresponds to a respective temperature. The chip on the Bluetooth LE module does not support floating-point operations. Alternatively, we use the lookup table to get the current temperature. Write a script to read the thermistor resistance-temperature table and convert it to the voltage. Then, we store these values into an array in order so we can retrieve this array to convert the voltage to the temperature. Get the script from tuya-iotos-embeded-demo-ble-temperature-alarm.
Collect temperature
Set the NTC I/O as follows.
Thermistor Pin NTC thermistor P_NTCADC/GPIO_PB6 Sample code
#define P_NTC               	GPIO_PB6	/* ADC */
#define TEMP_ARRAY_MIN_VALUE    0  		 /* The temperature corresponds to the first value in the array */
#define TEMP_ARRAY_SIZE         120  		 /* The number of data */

/* NTC (B3950/100K) thermistor voltage-temperature table */
const uint16_t vol_data_of_temp[TEMP_ARRAY_SIZE] = {
     190,  199,  209,  219,  229,  240,  251,  263,  275,  288,  301,  314,  328,  342,  357,  372,  388,  404,  420,  437, /* 0 ~ 19 */
     455,  473,  491,  510,  530,  549,  570,  591,  612,  634,  656,  679,  702,  725,  749,  774,  799,  824,  849,  875, /* 20 ~ 39 */
     902,  928,  955,  982, 1010, 1038, 1066, 1094, 1123, 1152, 1181, 1210, 1239, 1268, 1298, 1327, 1357, 1386, 1416, 1446, /* 40 ~ 59 */
    1475, 1505, 1535, 1564, 1593, 1623, 1652, 1681, 1710, 1738, 1767, 1795, 1823, 1851, 1878, 1906, 1933, 1959, 1986, 2012, /* 60 ~ 79 */
    2038, 2063, 2088, 2113, 2138, 2162, 2185, 2209, 2232, 2255, 2277, 2299, 2320, 2342, 2362, 2383, 2403, 2423, 2442, 2461, /* 80 ~ 99 */
    2480, 2498, 2516, 2534, 2551, 2568, 2584, 2600, 2616, 2632, 2647, 2662, 2676, 2690, 2704, 2718, 2731, 2744, 2757, 2769  /* 100 ~ 119 */
};

/* Initialize the NTC I/O and ADC */
void ntc_adc_init(void)
{
	adc_init();
	adc_base_init(P_NTC);
	adc_power_on_sar_adc(1);
}

/* Determine whether the voltage is between `data[num1]` and `data[num2]` */
static uint8_t is_vol_value_between(uint16_t value, uint8_t num1, uint8_t num2)
{
    if ((value >= vol_data_of_temp[num1]) && (value <= vol_data_of_temp[num2])) {
        return 1;
    } else {
        return 0;
    }
}

/* Determine the voltage is close to `data[num1]` or `data[num2]` */
static uint8_t get_closer_num(uint16_t value, uint8_t num1, uint8_t num2)
{
    if ((value - vol_data_of_temp[num1]) < (vol_data_of_temp[num2] - value)) {
        return num1;
    } else {
        return num2;
    }
}

/* Convert voltage to temperature value */
static uint8_t transform_vol_to_temp(uint16_t vol_value)
{
    uint8_t comp_num;
    uint8_t min = 0;
    uint8_t max = TEMP_ARRAY_SIZE - 1;
    uint8_t temp = 0;

    if (vol_value <= vol_data_of_temp[min]) {
        return TEMP_ARRAY_MIN_VALUE;
    }
    if (vol_value >= vol_data_of_temp[max]) {
        return (TEMP_ARRAY_MIN_VALUE + TEMP_ARRAY_SIZE - 1);
    }
    while (1) {
        comp_num = (max + min) / 2;
        if (vol_value == vol_data_of_temp[comp_num]) {
            temp = comp_num + TEMP_ARRAY_MIN_VALUE;
            break;
        } else if (vol_value < vol_data_of_temp[comp_num]) {
            if (is_vol_value_between(vol_value, comp_num-1, comp_num)) {
                temp = get_closer_num(vol_value, comp_num-1, comp_num) + TEMP_ARRAY_MIN_VALUE;
                break;
            } else {
                max = comp_num;
            }
        } else {
            if (is_vol_value_between(vol_value, comp_num, comp_num+1)) {
                temp = get_closer_num(vol_value, comp_num, comp_num+1) + TEMP_ARRAY_MIN_VALUE;
                break;
            } else {
                min = comp_num;
            }
        }
    }
    return temp;
}

/* Get the current temperature */
uint8_t get_cur_temp(void)
{
    uint8_t ntc_temp;
    uint16_t ntc_vol_value;
    /* Initialize the NTC I/O and ADC, which must be performed before each time the data is read.*/
    ntc_adc_init();
    /* Read the voltage (mV) from the ADC channel  */
    ntc_vol_value = (uint16_t)adc_sample_and_get_result();
    TUYA_APP_LOG_DEBUG("voltage: %d", ntc_vol_value);
    /* Convert voltage to temperature value */
    ntc_temp = transform_vol_to_temp(ntc_vol_value);
    TUYA_APP_LOG_DEBUG("temperature: %d", ntc_temp);
    return ntc_temp;
}
Implement applications
We have implemented the required driver and next we proceed with application implementation.
Implement the initialization function and main loop function.
/* Initialization function, which is called in `tuya_ble_app_init()` of `tuya_ble_app_demo.c`*/
void tuya_app_kettle_init(void)
{
    memset(&g_kettle, 0, sizeof(g_kettle));  			  /* Initialize variables */
    memset(&g_kettle_flag, 0, sizeof(g_kettle_flag));  /* Initialize flags */
    set_keep_warm_temp(TEMP_KEEP_WARM_DEFAULT);  		 /* Set the default keep-warm temperature */

    led_init();											/* Initialize the LED I/O */
    relay_init();										/* Initialize the relay I/O */
    buzzer_pwm_init();									/* Initialize the buzzer I/O and PWM */
    ntc_adc_init();										/* Initialize the NTC I/O and ADC */
    ts02n_key_init(&user_ts02n_key_def_s);				/* Register and initialize keys */
    ble_connect_status_init();							/* Initialize the Bluetooth connection status */
}

/* The main loop function, which is called in `app_exe()` of `tuya_ble_app_demo.c` */
void tuya_app_kettle_loop(void)
{
	update_ble_status();								/* Update Bluetooth connection status */
    update_cur_temp();									/* Update temperature */
    ts02n_key_loop();									/* The key loop */
    update_kettle_mode();								/* Update kettle mode */
    update_led_green_status();							/* Update LED indicator status */
    update_buzzer_status();								/* Update buzzer status */
}
Update temperature and detect faults
The kettle updates the temperature and detects faults every two seconds and reports the change of temperature or fault to the cloud if any.
#define TEMP_UPPER_LIMIT        105  		 /* Set temperature threshold of dry boiling  */
#define TIME_GET_TEMP           2000        /* Update temperature every two seconds */

typedef BYTE_T FAULT_E;   				   /* Fault */
#define FAULT_NORMAL            0x00  	/* Normal */
#define FAULT_LACK_WATER        0x01  	/* Dry boiling */

/* Update fault information */
static void update_fault(FAULT_E fault)
{
    g_kettle.fault = fault;
    report_one_dp_data(DP_ID_FAULT, g_kettle.fault);
    TUYA_APP_LOG_DEBUG("fault: %d", g_kettle.fault);
}

/* Switch off the kettle */
static void stop_kettle(void)
{
    set_boil_turn(OFF);
    set_keep_warm_turn(OFF);
    set_led_red(OFF);
    set_led_orange(OFF);
    set_led_green_status(OFF);
    set_relay(OFF);
}

/* Detect and process faults */
static void detect_and_handle_fault_event(void)
{
    if (g_kettle.fault == FAULT_NORMAL) {
        if (g_kettle.temp_cur >= TEMP_UPPER_LIMIT) {  /* When temperature exceeds the threshold */
            update_fault(FAULT_LACK_WATER);	 			  /* The fault status is updated to dry boiling */
            set_buzzer_mode(BUZZER_MODE_FAULT);	 		 /* Buzzer keeps beeping */
            stop_kettle();	 							      /* Kettle stops working */
        }
    } else {
        if (g_kettle.temp_cur < TEMP_UPPER_LIMIT) {  	/* After the temperature is below the threshold */
            update_fault(FAULT_NORMAL);	 				   /* The fault status is updated to normal */
            set_buzzer_mode(BUZZER_MODE_STOP);	 		 /* Buzzer stops beeping */
            set_work_mode(MODE_NATURE);  				   /* The work mode is switched to nature  */
        }
    }
}

/* Update the current temperature */
static void update_cur_temp(void)
{
    uint8_t temp;
    static uint32_t s_get_temp_tm = 0;
	/* A 2s timer */
    if (!clock_time_exceed(s_get_temp_tm, TIME_GET_TEMP*1000)) {
        return;
    }
    s_get_temp_tm = clock_time();
	/* Get the current temperature */
    temp = get_cur_temp();
    if (g_kettle.temp_cur != temp) {  	/* Temperature changed?  */
        g_kettle.temp_cur = temp;	 		/* Update the current temperature */
        report_one_dp_data(DP_ID_TEMP_CUR, g_kettle.temp_cur);
        detect_and_handle_fault_event();	 /* Detect and process faults */
    }
}
Key registration and response to events
Pin configuration
Button Pin Operation Response The Boil key P_KEY_BOILP7/GPIO_PC3 Touch Turn on or off the boil mode. The Keep Warm key P_KEY_KEEPP8/GPIO_PC2 Touch
Touch and hold the key for five seconds.Turn on or off the keep-warm mode.
The kettle enters pairing mode.Register keys
#define P_KEY_BOIL	GPIO_PC3
#define P_KEY_KEEP	GPIO_PC2

/* Register keys */
TS02N_KEY_DEF_T user_ts02n_key_def_s = {
    .key1_pin = P_KEY_BOIL,         					/* P7 */
    .key2_pin = P_KEY_KEEP,         					/* P8 */
    .key1_short_press_cb = key_boil_short_press_cb_fun,  /* Touch the Boil key */
    .key2_short_press_cb = key_keep_short_press_cb_fun,	 /* Touch the Keep Warm key */
    .key1_long_press_cb = NULL,	 						     /* The Boil key does not support the touch-and-hold trigger */
    .key2_long_press_cb = key_keep_long_press_cb_fun,  /* Touch and hold the Keep Warm key for five seconds */
    .key1_long_press_time = 0,      	 				     /* The Boil key does not support the touch-and-hold trigger */
    .key2_long_press_time = 5000,   					/* 5s */
    .scan_time = 10,                					/* 10ms */
};

/* Turn on or off the boil mode */
static void switch_boil_turn(void)
{
    if (g_kettle.boil_turn == ON) {
        set_boil_turn(OFF);  	/* Turn off the boil mode */
    } else {
        set_boil_turn(ON);  	/* Turn on the boil mode */
    }
}

/* Turn on or off the keep-warm mode */
static void switch_keep_warm_turn(void)
{
    if (g_kettle.keep_warm_turn == ON) {
        set_keep_warm_turn(OFF);/* Turn off the keep-warm mode */
    } else {
        set_keep_warm_turn(ON);  /* Turn on the keep-warm mode */
    }
}

/* Touch the Boil key */
void key_boil_short_press_cb_fun(void)
{
    if (g_kettle.fault != FAULT_NORMAL) {  /* This key is invalid when an fault occurs */
        return;
    }
    switch_boil_turn();  					    /* Turn on or off the boil mode */
    set_buzzer_mode(BUZZER_MODE_ONCE);  	/* The buzzer is set to sound a beep */
}

/* Touch the Keep Warm key */
void key_keep_short_press_cb_fun(void)
{
    if (g_kettle.fault != FAULT_NORMAL) {  /* This key is invalid when an fault occurs */
        return;
    }
    switch_keep_warm_turn();  			  /* Turn on or off the keep-warm mode */
    set_buzzer_mode(BUZZER_MODE_ONCE);  	/* The buzzer is set to sound a beep */
}

/* Touch and hold the Keep Warm key for five seconds */
void key_keep_long_press_cb_fun(void)
{
    if (F_BLE_BONDING == SET) {  			  /* This function is invalid if the kettle has been bound */
        return;
    }
    try_to_connect_ble();  				   /* Pairing attempt */
    set_buzzer_mode(BUZZER_MODE_ONCE);  	/* The buzzer is set to sound a beep */
}
Update and process the mode
We design four modes based on the feature design.
Mode Condition Status Nature mode Boil mode and keep-warm mode are turned off. LED indicators and water heating are turned off. Boil mode The boil mode is turned on. The red light is on, the amber and green lights are off, and water heating is turned on. Keep warm 1 The boil mode is turned off, and keep-warm is on in the mode of tap water. The red and green lights are off, the amber light is on, and water heating is turned on. Keep warm 2 The boil mode is turned off, and keep-warm is on in the mode of purified water. The red light is off, and the status of amber and green lights and water heating depends on the current temperature. Sample code
/* Working mode */
typedef BYTE_T MODE_E;
#define MODE_NATURE             0x00
#define MODE_BOIL               0x01
#define MODE_KEEP_WARM1         0x02
#define MODE_KEEP_WARM2         0x03
/* Water source */
typedef BYTE_T WATER_TYPE_E;
#define WATER_TYPE_TAP          0x00
#define WATER_TYPE_PURE         0x01
/* Temperature */
#define TEMP_BOILED             97  /* Set the temperature to heat the water to the desired temperature */
#define TEMP_KEEP_WARM_DEFAULT  55  /* The default keep-warm temperature */

/* The nature mode */
static void kettle_mode_nature(void)
{
    set_led_red(OFF);
    set_led_orange(OFF);
    set_led_green_status(OFF);
    set_relay(OFF);
}

/* The boil mode */
static void kettle_mode_boil(void)
{
    if (g_kettle.temp_cur >= TEMP_BOILED) {  /* When the set temperature is reached */
        set_water_type(WATER_TYPE_PURE);	 /* Update the water source to purified water */
        set_boil_turn(OFF);  				   /* Turn off the boil mode */
        set_relay(OFF);	 					    /* Turn off water heating */
    } else {
        set_relay(ON);	 					    /* Turn on water heating */
    }
}

/* Keep warm 1 */
static void kettle_mode_keep_warm1(void)
{
    if (g_kettle.temp_cur >= TEMP_BOILED) {  /* When the set temperature is reached */
        set_water_type(WATER_TYPE_PURE);	 /* Update the water source to purified water */
        set_relay(OFF);	 					    /* Turn off water heating */
    } else {
        set_relay(ON);	 					    /* Turn on water heating */
    }
}

/* Keep warm 2 */
static void kettle_mode_keep_warm2(void)
{
	/* When the set keep-warm temperature is not reached, the amber light is on and the green light is off. If the current temperature is over the preset one, heating is turned off. Otherwise, water heating is turned on. */
    if (g_kettle.temp_cur > g_kettle.temp_set) {
        set_led_orange(ON);
        set_led_green_status(OFF);
        set_relay(OFF);
    } else if (g_kettle.temp_cur < (g_kettle.temp_set - 3)) {
        set_led_orange(ON);
        set_led_green_status(OFF);
        set_relay(ON);
    /* When the set keep-warm temperature is reached, the amber light is off and green light is on and heating is turned off.*/
    } else {
        set_led_orange(OFF);
        set_led_green_status(ON);
        set_relay(OFF);
    }
}

/* The kettle runs in different modes  */
static void run_kettle(void)
{
    if (g_kettle.fault != FAULT_NORMAL) {
        return;
    }
    switch (g_kettle.mode) {
    case MODE_NATURE:
        kettle_mode_nature();
        break;
    case MODE_BOIL:
        kettle_mode_boil();
        break;
    case MODE_KEEP_WARM1:
        kettle_mode_keep_warm1();
        break;
    case MODE_KEEP_WARM2:
        kettle_mode_keep_warm2();
        break;
    default:
        break;
    }
}

/* Update mode */
static void update_kettle_mode(void)
{
    if (g_kettle.boil_turn == ON) {  				   /* When the boil mode is turned on */
        set_work_mode(MODE_BOIL);	 				   /* The kettle enters boil mode */
    } else if (g_kettle.keep_warm_turn == ON){  	/* When the boil mode is turned off and keep-warm mode is turned on */
        if (g_kettle.water_type == WATER_TYPE_TAP) {/* Tap water is used */
            set_work_mode(MODE_KEEP_WARM2);  		 /* The kettle enters keep warm 1. Water is boiled and then kept warm */
        } else {									/* Purified water */
            set_work_mode(MODE_KEEP_WARM2);	 		 /* The kettle enters keep warm 1. Water is kept warm */
        }
    } else {										/* When both the boil and keep-warm are turned off */
        set_work_mode(MODE_NATURE);					/* The kettle enters nature mode */
    }
    run_kettle();
}
Device control from the cloud
Detect pairing status
To achieve IoT-enabled features, the kettle must be paired with the mobile app to communicate with the cloud. The table below lists all the possible network status and corresponding actions.
Device status Actions Green light The kettle is bound. Not enter pairing mode No flickering The kettle is not bound. Pending pairing Flickering Touch and hold the Keep Warm key for five seconds and an unbound kettle is detected. Pending pairing Flickering The kettle is paired within three minutes after the kettle enters pairing mode. Stop waiting for pairing. Stop flickering The kettle is not paired within three minutes after the kettle enters pairing mode. Stop waiting for pairing and Bluetooth advertisement Stop flickering Next, we will show you how to implement detecting and processing network status.
When the kettle is initialized after power-on, the Bluetooth connection status will be detected and flagged.
/* Initialize the Bluetooth connection status */
static void ble_connect_status_init(void)
{
    tuya_ble_connect_status_t ble_conn_sta;
	/* Get the current Bluetooth connection status by calling the API provided by the Tuya Bluetooth LE SDK. */
    ble_conn_sta = tuya_ble_connect_status_get();
    TUYA_APP_LOG_DEBUG("ble connect status: %d", ble_conn_sta);
	/* Determine and flag */
    if ((ble_conn_sta == BONDING_UNCONN) ||
        (ble_conn_sta == BONDING_CONN)   ||
        (ble_conn_sta == BONDING_UNAUTH_CONN)) {
        F_BLE_BONDING = SET;	 				   /* Flagged as bound */
        F_WAIT_BLE_CONN = CLR;	 				   /* Flagged as no waiting required  */
        set_led_green_mode(LED_MODE_FIX);	 	/* The green light does not flicker */
    } else {
        F_BLE_BONDING = CLR;	 				   /* Flagged as unbound */
        F_WAIT_BLE_CONN = SET;	 				   /* Flagged as starting waiting  */
        set_led_green_mode(LED_MODE_TWINKLE);	 /* The green light starts flickering */
    }
}
In the main loop, wait for Bluetooth connection for three minutes and then stop Bluetooth advertisement.
#define TIME_ALLOW_CONNECT      (3*60*1000) /* 3 min */
static uint32_t sg_ble_tm = 0;
FLAG_BIT g_kettle_flag;
    #define F_BLE_BONDING       g_kettle_flag.bit0
    #define F_WAIT_BLE_CONN     g_kettle_flag.bit1

/* Pending Bluetooth connection */
static void wait_ble_connect(void)
{
	/* 3-minute timer */
    if (!clock_time_exceed(sg_ble_tm, TIME_ALLOW_CONNECT*1000)) {
        return;
    }
    F_WAIT_BLE_CONN = CLR;                  /* Flag of stopping waiting for pairing */
    set_led_green_mode(LED_MODE_FIX);       /* The green light stops flickering */
    bls_ll_setAdvEnable(0);                 /* Stop Bluetooth advertisement */
}

/* Update Bluetooth connection status */
static void update_ble_status(void)
{
    if (F_BLE_BONDING == CLR) {  			  /* Not bound?  */
        if (F_WAIT_BLE_CONN == SET) {  	/* Turn on waiting for Bluetooth connection?  */
            wait_ble_connect();	 			  /* Pending Bluetooth connection */
        }
    }
}
Implement the processing function when Bluetooth connection status changes.
/* Function executed when Bluetooth connection status changes. */
void tuya_app_kettle_ble_connect_status_change_handler(tuya_ble_connect_status_t status)
{
    if (status == BONDING_CONN) {               /* Bluetooth connected?  */
        report_all_dp_data();                   /* Report data of all DPs to sync with the mobile app */
        if (F_WAIT_BLE_CONN == SET) {           /* Wait for connection?  */
            F_BLE_BONDING = SET;                /* Flagged as bound */
            F_WAIT_BLE_CONN = CLR;              /* Stop waiting for pairing */
            set_led_green_mode(LED_MODE_FIX);   /* The green light stops flickering */
        }
    }
    if (status == UNBONDING_UNCONN) {           /* Kettle is unbound?  */
        F_BLE_BONDING = CLR;                    /* Flagged as unbound */
        bls_ll_setAdvEnable(0);                 /* Stop Bluetooth advertisement */
    }
}

/* Callback to process messages from the Bluetooth LE SDK `tuya_ble_app_demo.c` */
static void tuya_cb_handler(tuya_ble_cb_evt_param_t* event)
{
	...
    case TUYA_BLE_CB_EVT_CONNECTE_STATUS:  /* Called when status changes */
        tuya_app_kettle_ble_connect_status_change_handler(event->connect_status);
        TUYA_APP_LOG_INFO("received tuya ble conncet status update event, current connect status = %d", event->connect_status);
        break;
    ...
}
Touch and hold the Keep Warm key for five seconds to try pairing again.
/* Pairing attempt */
static void try_to_connect_ble(void)
{
    F_WAIT_BLE_CONN = SET;                  /* Turn on waiting for pairing */
    set_led_green_mode(LED_MODE_TWINKLE);   /* The green light flickers */
    bls_ll_setAdvEnable(1);                 /* Turn on Bluetooth advertisement */
    sg_ble_tm = clock_time();               /* Record the current time */
}
Report local data
After the device is paired, you can use the mobile app to control the kettle and view the device status.
/* DP ID */
#define DP_ID_BOIL              101
#define DP_ID_KEEP_WARM         102
#define DP_ID_TEMP_CUR          103
#define DP_ID_TEMP_SET          104
#define DP_ID_WATER_TYPE        105
#define DP_ID_FAULT             106
/* DP type */
#define DP_TYPE_BOIL            DT_BOOL
#define DP_TYPE_KEEP_WARM       DT_BOOL
#define DP_TYPE_TEMP_CUR        DT_VALUE
#define DP_TYPE_TEMP_SET        DT_VALUE
#define DP_TYPE_WATER_TYPE      DT_ENUM
#define DP_TYPE_FAULT           DT_ENUM

/* Used for data reporting */
typedef struct {
    uint8_t id;	 	/* DP ID */
    dp_type type;	 /* Data type of the DP */
    uint8_t len;	 /* The length of DP data */
    uint8_t value;	 /* DP data */
} DP_DATA_T;

/* Store the kettle mode and parameters of DPs*/
typedef struct {
    MODE_E mode;	 		 /* Mode */
    uint8_t boil_turn;	 	/* Turn on or off the boil mode */
    uint8_t temp_cur;	 	/* Current temperature */
    uint8_t temp_set;	 	/* Keep-warm temperature */
    uint8_t keep_warm_turn;	 /* Turn on or off the keep-warm mode */
    WATER_TYPE_E water_type;/* Water source */
    FAULT_E fault;  		 /* Fault */
} KETTLE_T;
KETTLE_T g_kettle;

/* Get the type of a DP */
static uint8_t get_dp_type(uint8_t dp_id)
{
    dp_type type = 0;
    switch (dp_id) {
    case DP_ID_BOIL:
        type = DP_TYPE_BOIL;
        break;
    case DP_ID_TEMP_CUR:
        type = DP_TYPE_TEMP_CUR;
        break;
    case DP_ID_TEMP_SET:
        type = DP_TYPE_TEMP_SET;
        break;
    case DP_ID_KEEP_WARM:
        type = DP_TYPE_KEEP_WARM;
        break;
    case DP_ID_WATER_TYPE:
        type = DP_TYPE_WATER_TYPE;
        break;
    case DP_ID_FAULT:
        type = DP_TYPE_FAULT;
        break;
    default:
        break;
    }
    return type;
}

/* Report data of a DP */
static void report_one_dp_data(uint8_t dp_id, uint8_t dp_value)
{
    DP_DATA_T dp_data_s;
    dp_data_s.id = dp_id;
    dp_data_s.type = get_dp_type(dp_id);
    dp_data_s.len = 0x01;
    dp_data_s.value = dp_value;
    /* Report DP data by calling the API provided by the Tuya Bluetooth LE SDK */
    tuya_ble_dp_data_report((uint8_t *)&dp_data_s, sizeof(DP_DATA_T));
}

/* Report data of all DPs */
static void report_all_dp_data(void)
{
    report_one_dp_data(DP_ID_BOIL, g_kettle.boil_turn);
    report_one_dp_data(DP_ID_KEEP_WARM, g_kettle.keep_warm_turn);
    report_one_dp_data(DP_ID_TEMP_CUR, g_kettle.temp_cur);
    report_one_dp_data(DP_ID_TEMP_SET, g_kettle.temp_set);
    report_one_dp_data(DP_ID_WATER_TYPE, g_kettle.water_type);
    report_one_dp_data(DP_ID_FAULT, g_kettle.fault);
}
Process the received data
When you control the kettle on the mobile app, the cloud will send the command to the kettle and the kettle will process the event accordingly on receiving this command.
/* Turn on or off the boil mode */
static void set_boil_turn(uint8_t on_off)
{
    if (g_kettle.fault != FAULT_NORMAL) {  /* Not executed when a fault occurs */
        return;
    }
    g_kettle.boil_turn = on_off;  		 /* Turn on or off the boil mode */
    report_one_dp_data(DP_ID_BOIL, g_kettle.boil_turn);
    TUYA_APP_LOG_DEBUG("boil turn: %d", g_kettle.boil_turn);
    set_led_red(on_off);  				   /* The red light is on or off */
}

/* Turn on or off the keep-warm mode */
static void set_keep_warm_turn(uint8_t on_off)
{
    if (g_kettle.fault != FAULT_NORMAL) {  /* Not executed when a fault occurs */
        return;
    }
    g_kettle.keep_warm_turn = on_off;  	/* Turn on or off the keep-warm mode */
    report_one_dp_data(DP_ID_KEEP_WARM, g_kettle.keep_warm_turn);
    TUYA_APP_LOG_DEBUG("keep warm turn: %d", g_kettle.keep_warm_turn);
    set_led_orange(on_off);  				   /* The amber light is on or off */
}

/* Set the keep-warm temperature */
static void set_keep_warm_temp(uint8_t temp)
{
    if (g_kettle.temp_set != temp) {
        if ((temp >= 45) && (temp <= 90)) {
            g_kettle.temp_set = temp;	 /* The parameter is updated only when the temperature is within the set temperature range */
        }
    }
}

/* Set the water source */
static void set_water_type(WATER_TYPE_E type)
{
    g_kettle.water_type = type;
}

/* Receive and process the DP data */
void tuya_app_kettle_dp_data_handler(uint8_t *dp_data)
{
    switch (dp_data[0]) {
    case DP_ID_BOIL:
        set_boil_turn(dp_data[3]);
        *(dp_data + 3) = g_kettle.boil_turn;
        break;
    case DP_ID_KEEP_WARM:
        set_keep_warm_turn(dp_data[3]);
        *(dp_data + 3) = g_kettle.keep_warm_turn;
        break;
    case DP_ID_TEMP_SET:
        set_keep_warm_temp(dp_data[6]);
        *(dp_data + 6) = g_kettle.temp_set;  /* The data length of DP of value type is four bytes */
        break;
    case DP_ID_WATER_TYPE:
        set_water_type(dp_data[3]);
        *(dp_data + 3) = g_kettle.water_type;
        break;
    case DP_ID_TEMP_CUR:
    case DP_ID_FAULT:
    default:
        break;
    }
}

/* Callback to process messages from the Bluetooth LE SDK `tuya_ble_app_demo.c` */
static void tuya_cb_handler(tuya_ble_cb_evt_param_t* event)
{
	...
    case TUYA_BLE_CB_EVT_DP_WRITE:  /* Called when DP data is received */
        dp_data_len = event->dp_write_data.data_len;
        memset(dp_data_array, 0, sizeof(dp_data_array));
        memcpy(dp_data_array, event->dp_write_data.p_data, dp_data_len);
        tuya_app_kettle_dp_data_handler(dp_data_array);
        TUYA_APP_LOG_HEXDUMP_DEBUG("received dp write data :", dp_data_array, dp_data_len);
        sn = 0;
        tuya_ble_dp_data_report(dp_data_array, dp_data_len);
        break;
	...
}
Implement scheduled tasks
Log in to the Tuya IoT Platform and find your created smart kettle product. Click the Function Definition tab, and enable Cloud Timing in Advanced Cloud Functions.
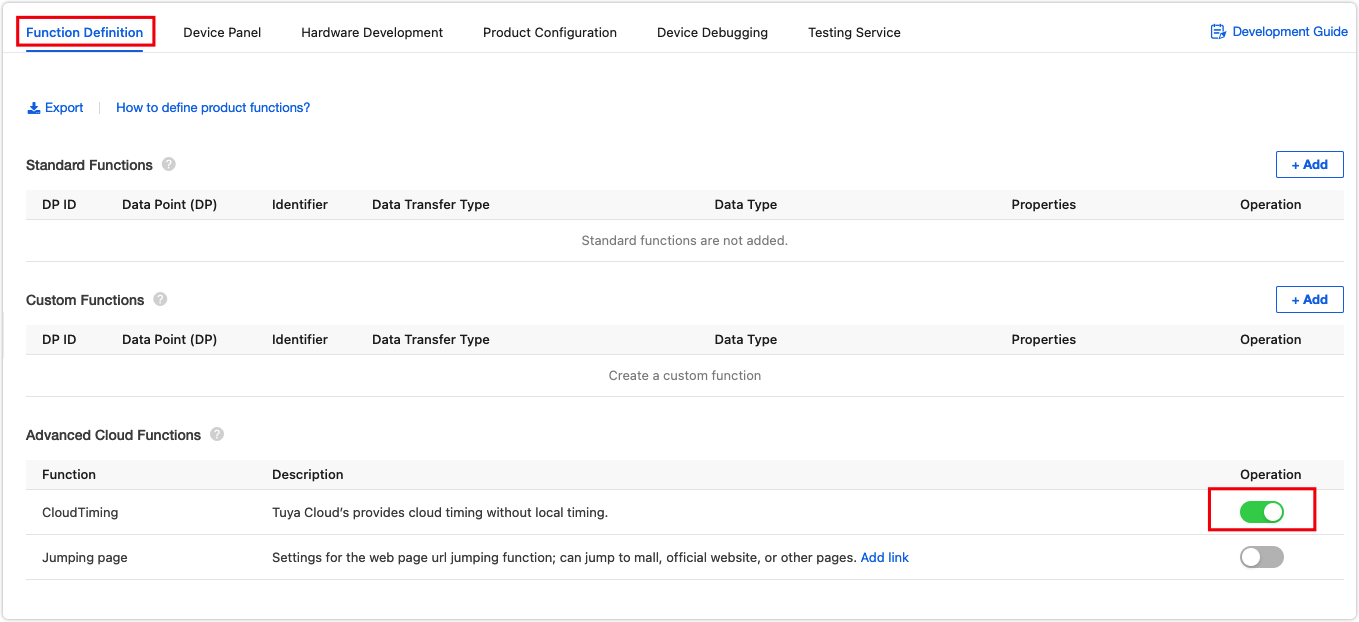
Then, edit the property of Cloud Timing on the device panel and configure the DP of
dp_boil. This way, you can schedule tasks of water boiling on the mobile app. When the preset time is reached, the cloud will send a command of DPdp_boilto the kettle to turn on the boil mode.-
Summary
Congratulations! You have prototyped a useful smart kettle now. Tuya IoT Platform provides convenient IoT development tools and services, which are designed to make your IoT projects much easier and more efficient. Check it out and discover more awesome ideas.
Is this page helpful?
YesSuggestions


