开发设备控制和消息订阅服务(GO SDK)
更新时间:2024-06-20 06:19:08下载pdf
本文介绍如何基于涂鸦云开发开放的能力和 SDK,开发一个控制 Powered by Tuya 的智能设备的程序。
前提条件
操作步骤
第一步:配置开发环境
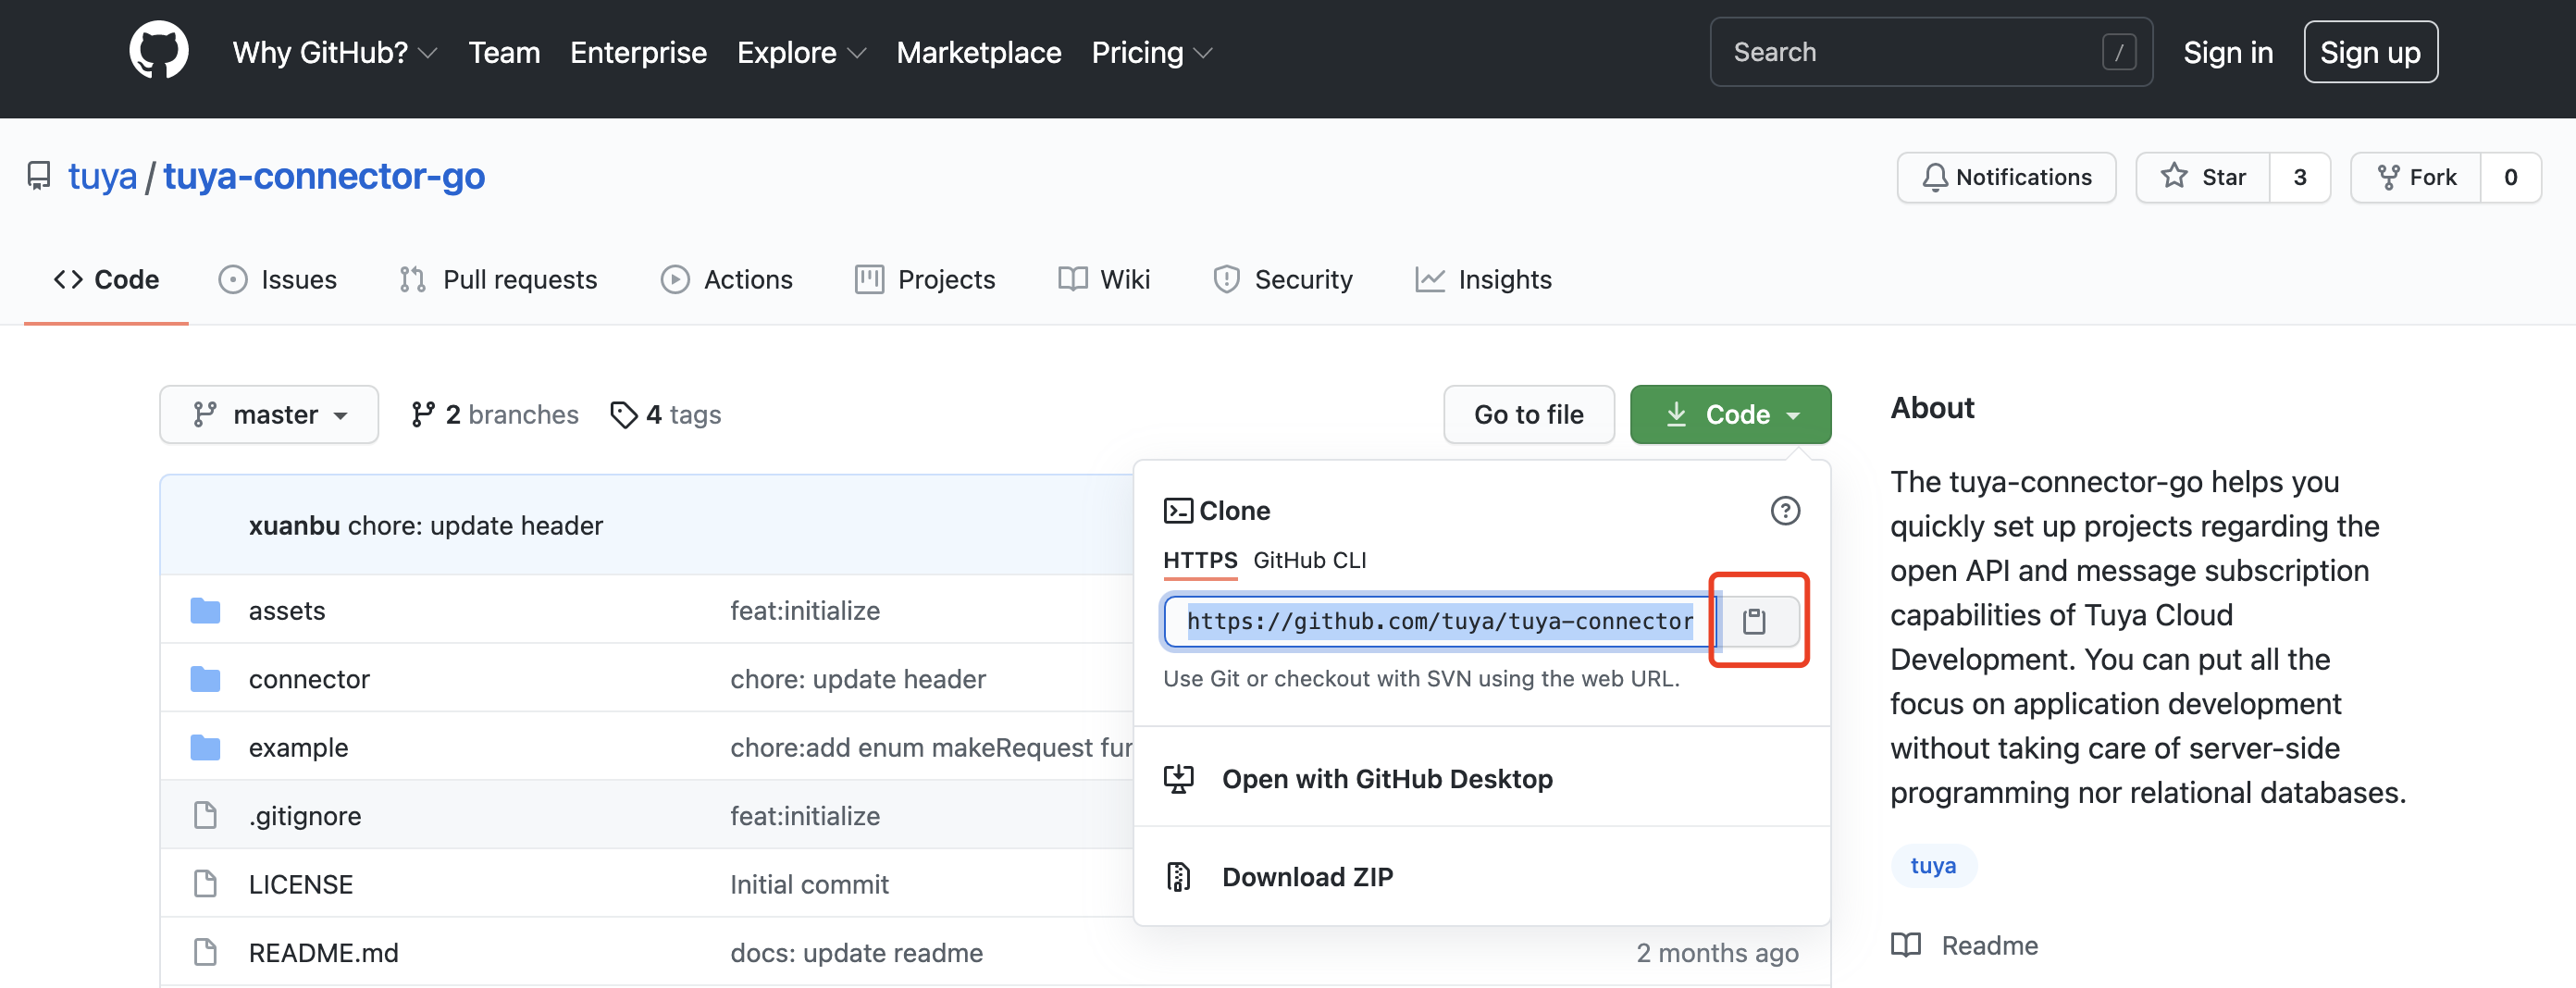
本步骤基于 Tuya-connector-Go SDK。Tuya-connector 集成了开发者在涂鸦云云对接(OpenAPI 或者消息订阅)项目过程中的云端连接和处理过程,可以让开发者如同本地开发一样,聚焦于自身的业务逻辑。克隆步骤如下:
-
在 Tuya-connector-Go 获取 SDK 地址。
-
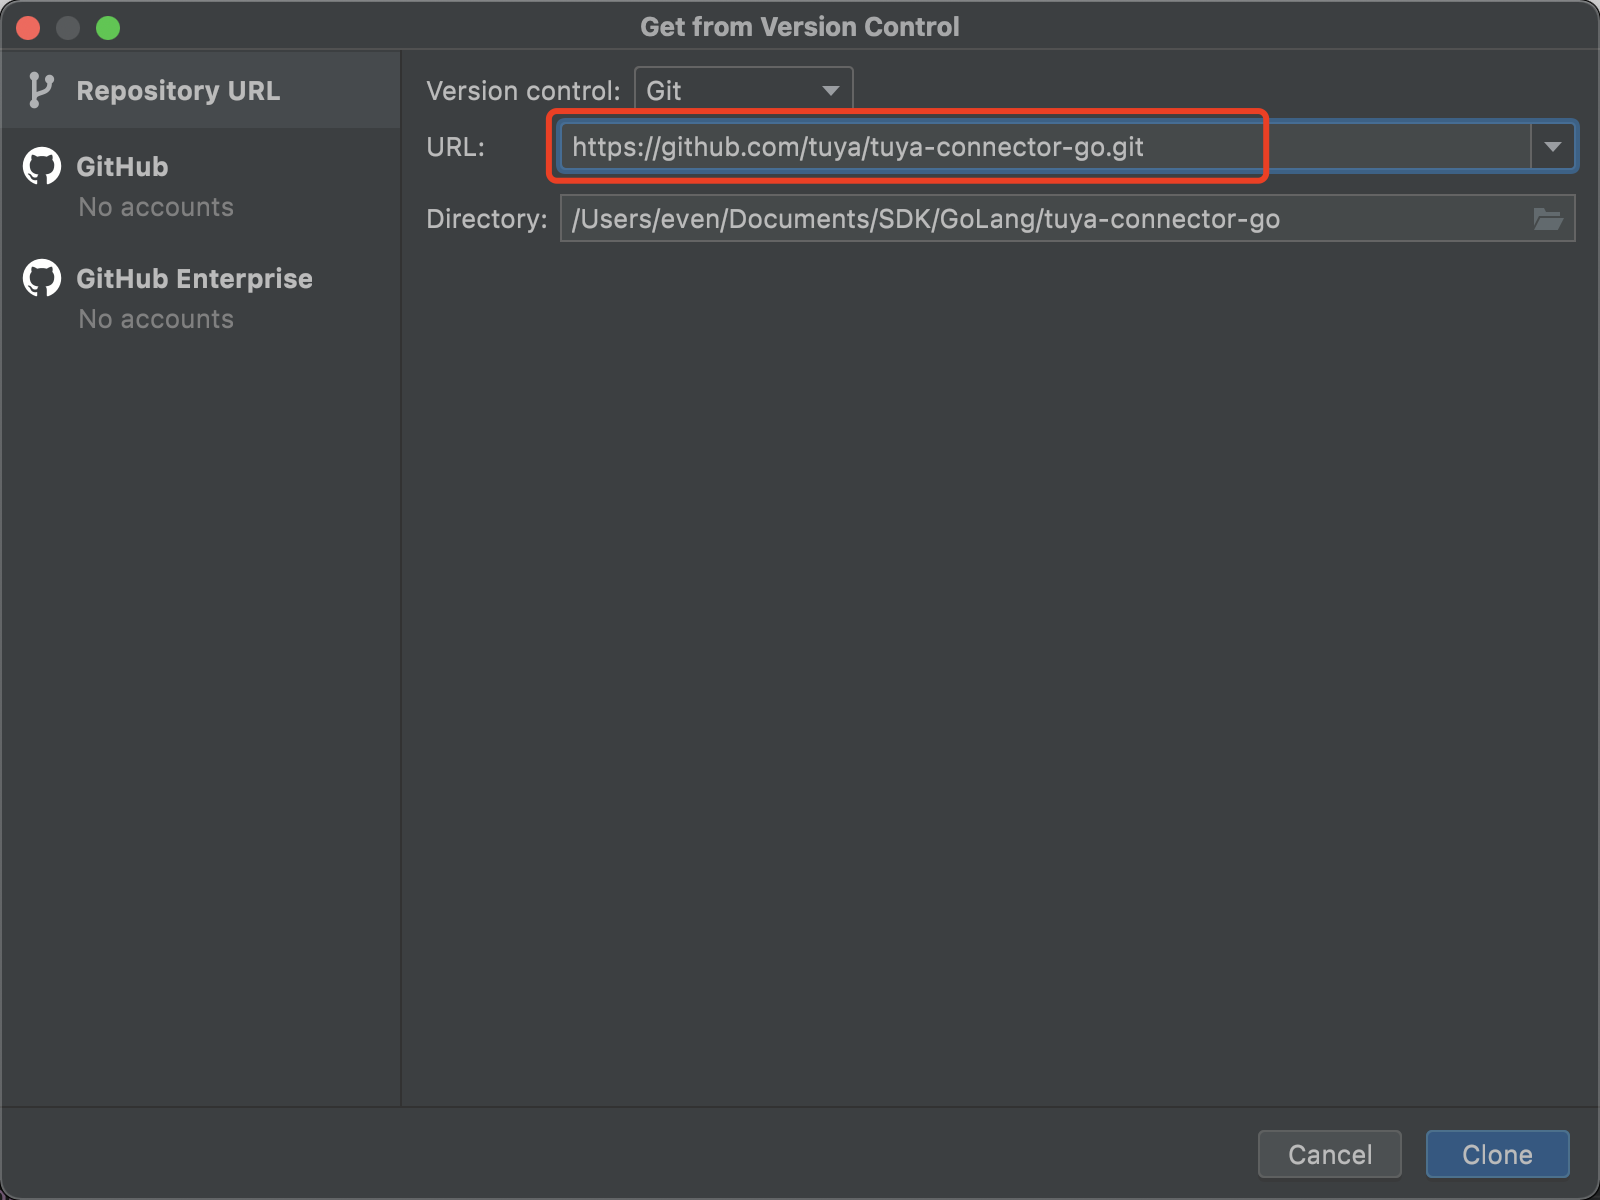
在 Projects > Get from VCS > URL,输入 SDK 地址,单击 Clone。
-
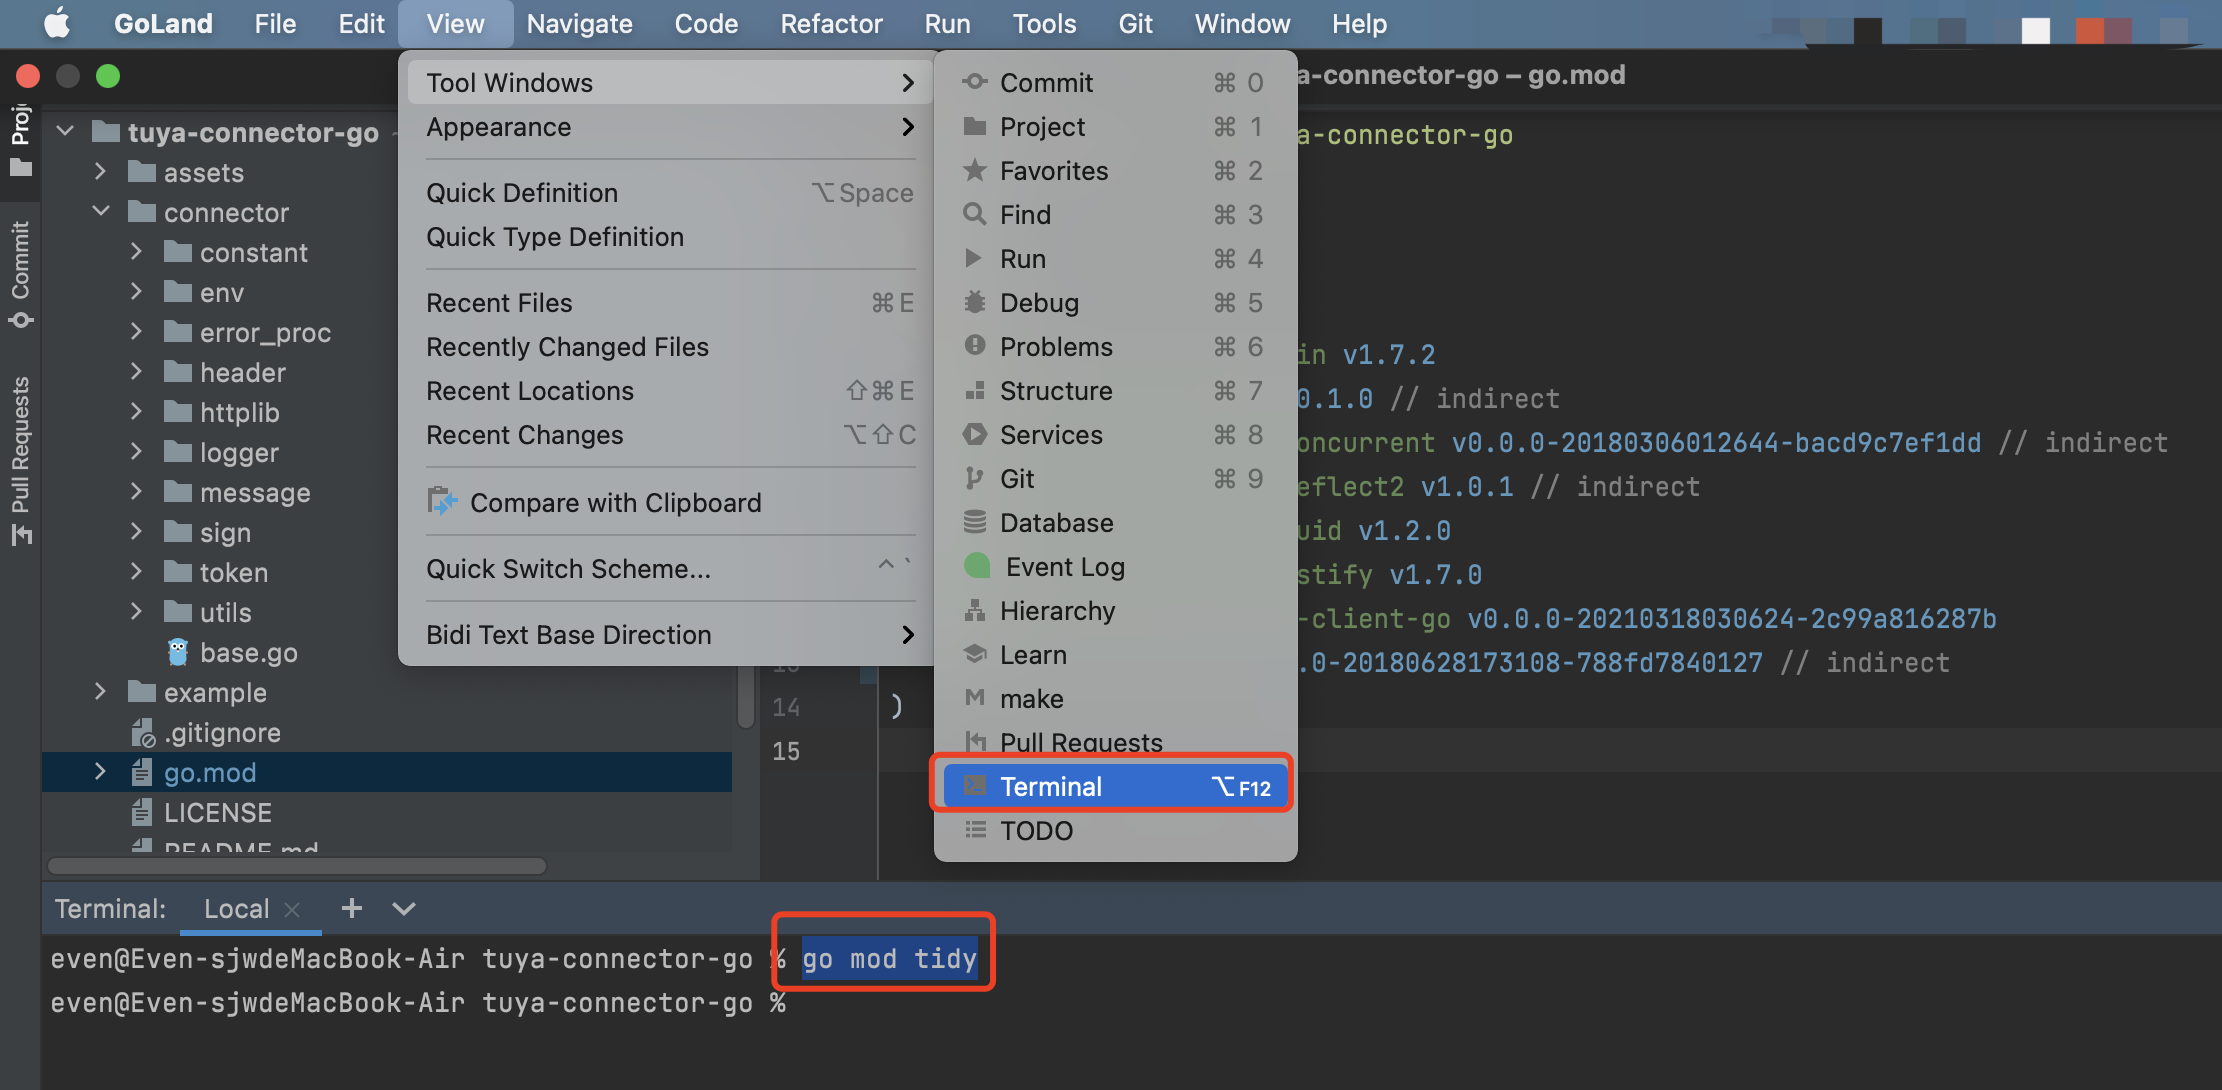
在 View > Tool Windows > Terminal,打开终端,输入go mod tidy ,下载依赖包。
可以通过查看 go.mod 文件,查看下载情况。
第二步:编辑配置文件
说明:本文使用自定义配置环境变量。
开发前您可以在 example > main.go文件中自定义配置环境变量。
-
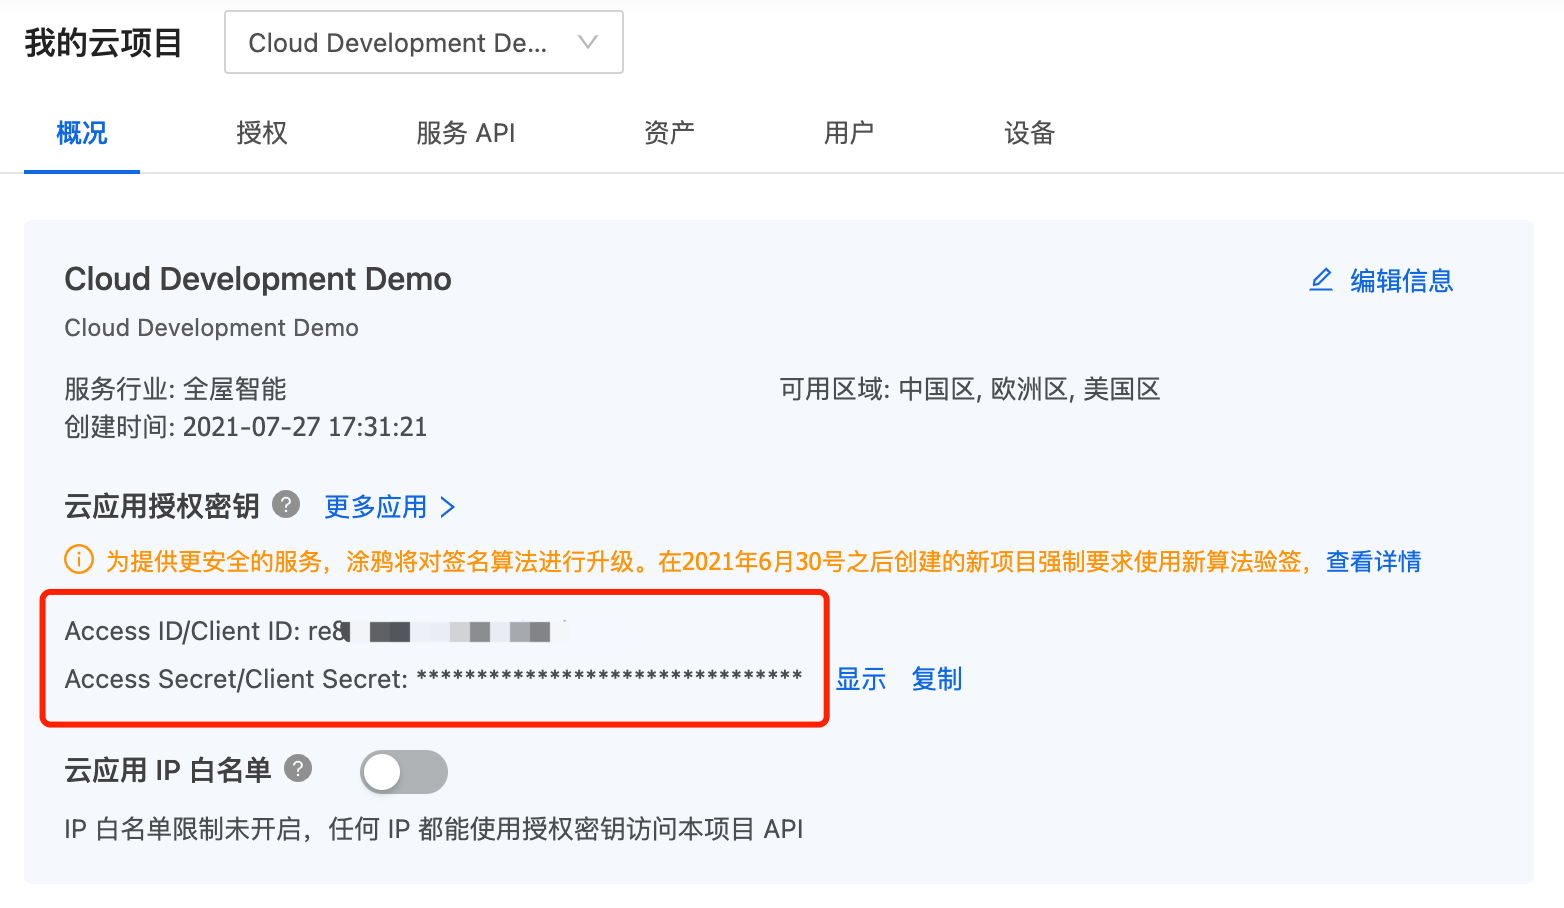
在已创建项目的 概览 页面,获取用于 API 调用的 授权密钥,即 Acccess ID 和 Access Secret。
-
在
main.go文件配置环境变量。- connector.InitWithOptions(env.WithApiHost(): API 请求 数据中心地址。
- env.WithMsgHost(): 消息订阅 请求地址。
- env.WithAccessID(): 授权密钥 中的 Acccess ID。
- env.WithAccessKey(): 授权密钥 中的 Access Secret。
- env.WithAppName(): 程序名称,用于生成日志文件。
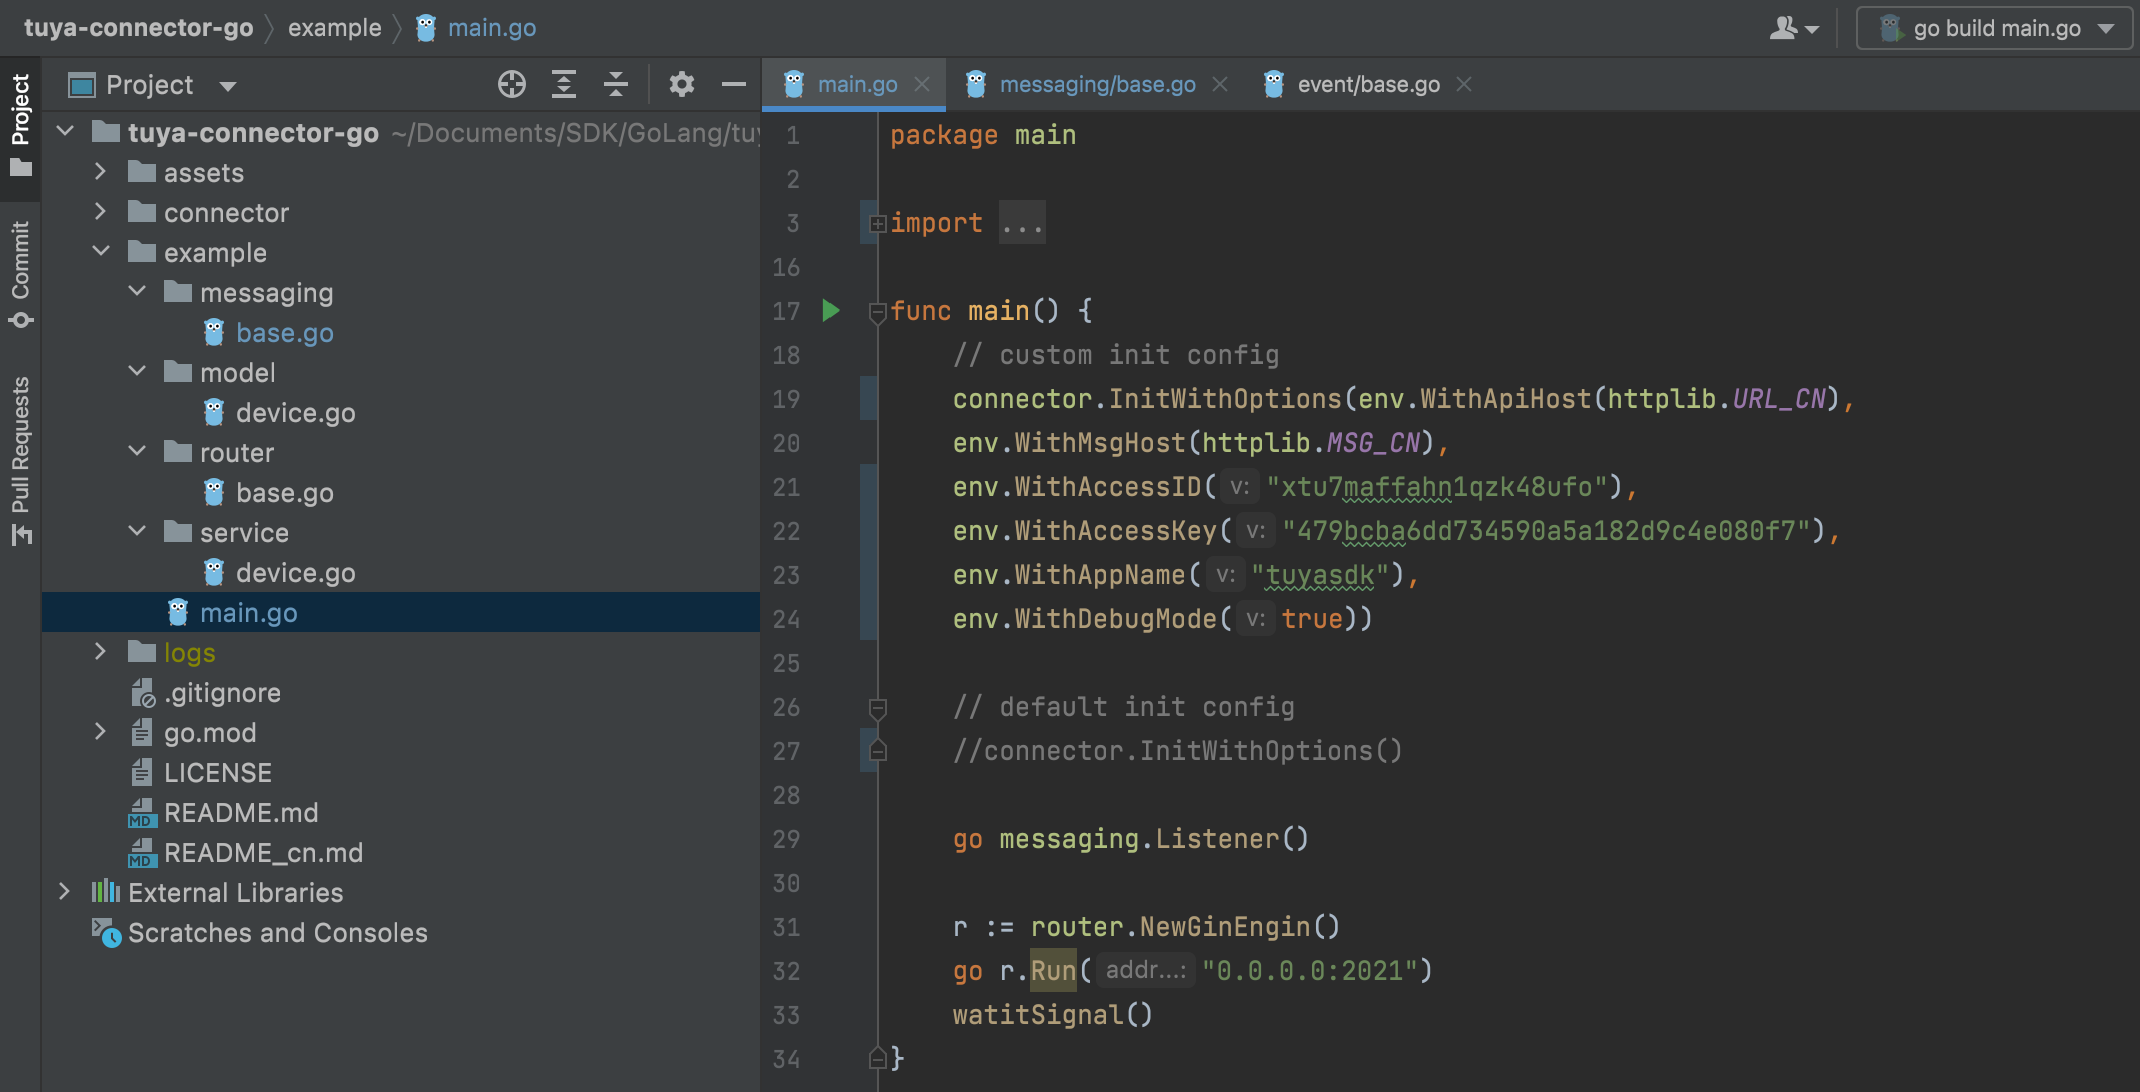
代码示例:
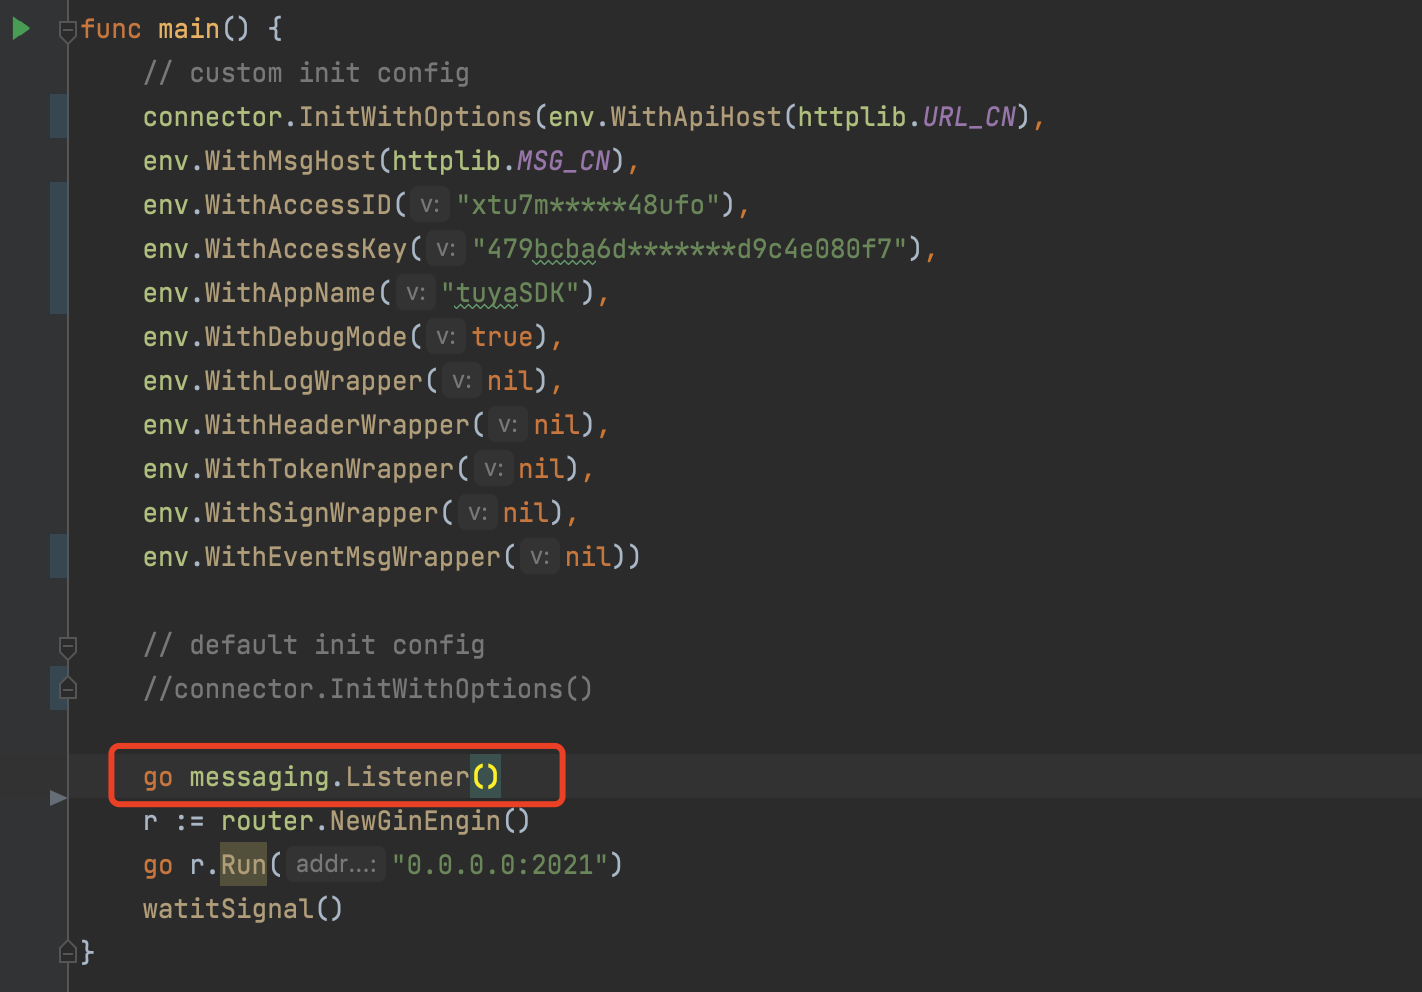
func main() { // 自定义配置 connector.InitWithOptions(env.WithApiHost(httplib.URL_CN), env.WithMsgHost(httplib.MSG_CN), env.WithAccessID("xtu7m*****48ufo"), env.WithAccessKey("479bcba6d*******d9c4e080f7"), env.WithAppName("tuyaSDK"), env.WithDebugMode(true) // 启动消息订阅服务 go messaging.Listener() // 启动API服务 r := router.NewGinEngin() go r.Run("0.0.0.0:2021") watitSignal() } -
(推荐)可以设置环境变量,项目启动时从环境变量读取配置,项目中启动默认配置。
环境变量:
export TUYA_API_HOST=https://xxxxx.com
export TUYA_ACCESSID=xxxxxx
export TUYA_ACCESSKEY=xxxxxxx
export TUYA_MSG_HOST=pulsar+ssl://xxxxxx
项目配置:
func main() {
   // 默认配置
   connector.InitWithOptions()
   // 启动消息订阅服务
   go messaging.Listener()
   // 启动API服务
   r := router.NewGinEngin()
   go r.Run("0.0.0.0:2021")
   watitSignal()
}
第三步:控制设备
完成环境编辑配置后,您可以开始代码开发。
说明: 本程序控制的设备为一个灯带,控制其开关的标准指令集为 switch_led。如果您是其它设备,需要查询标准指令集后修改代码。
-
创建 OpenAPI 接口。
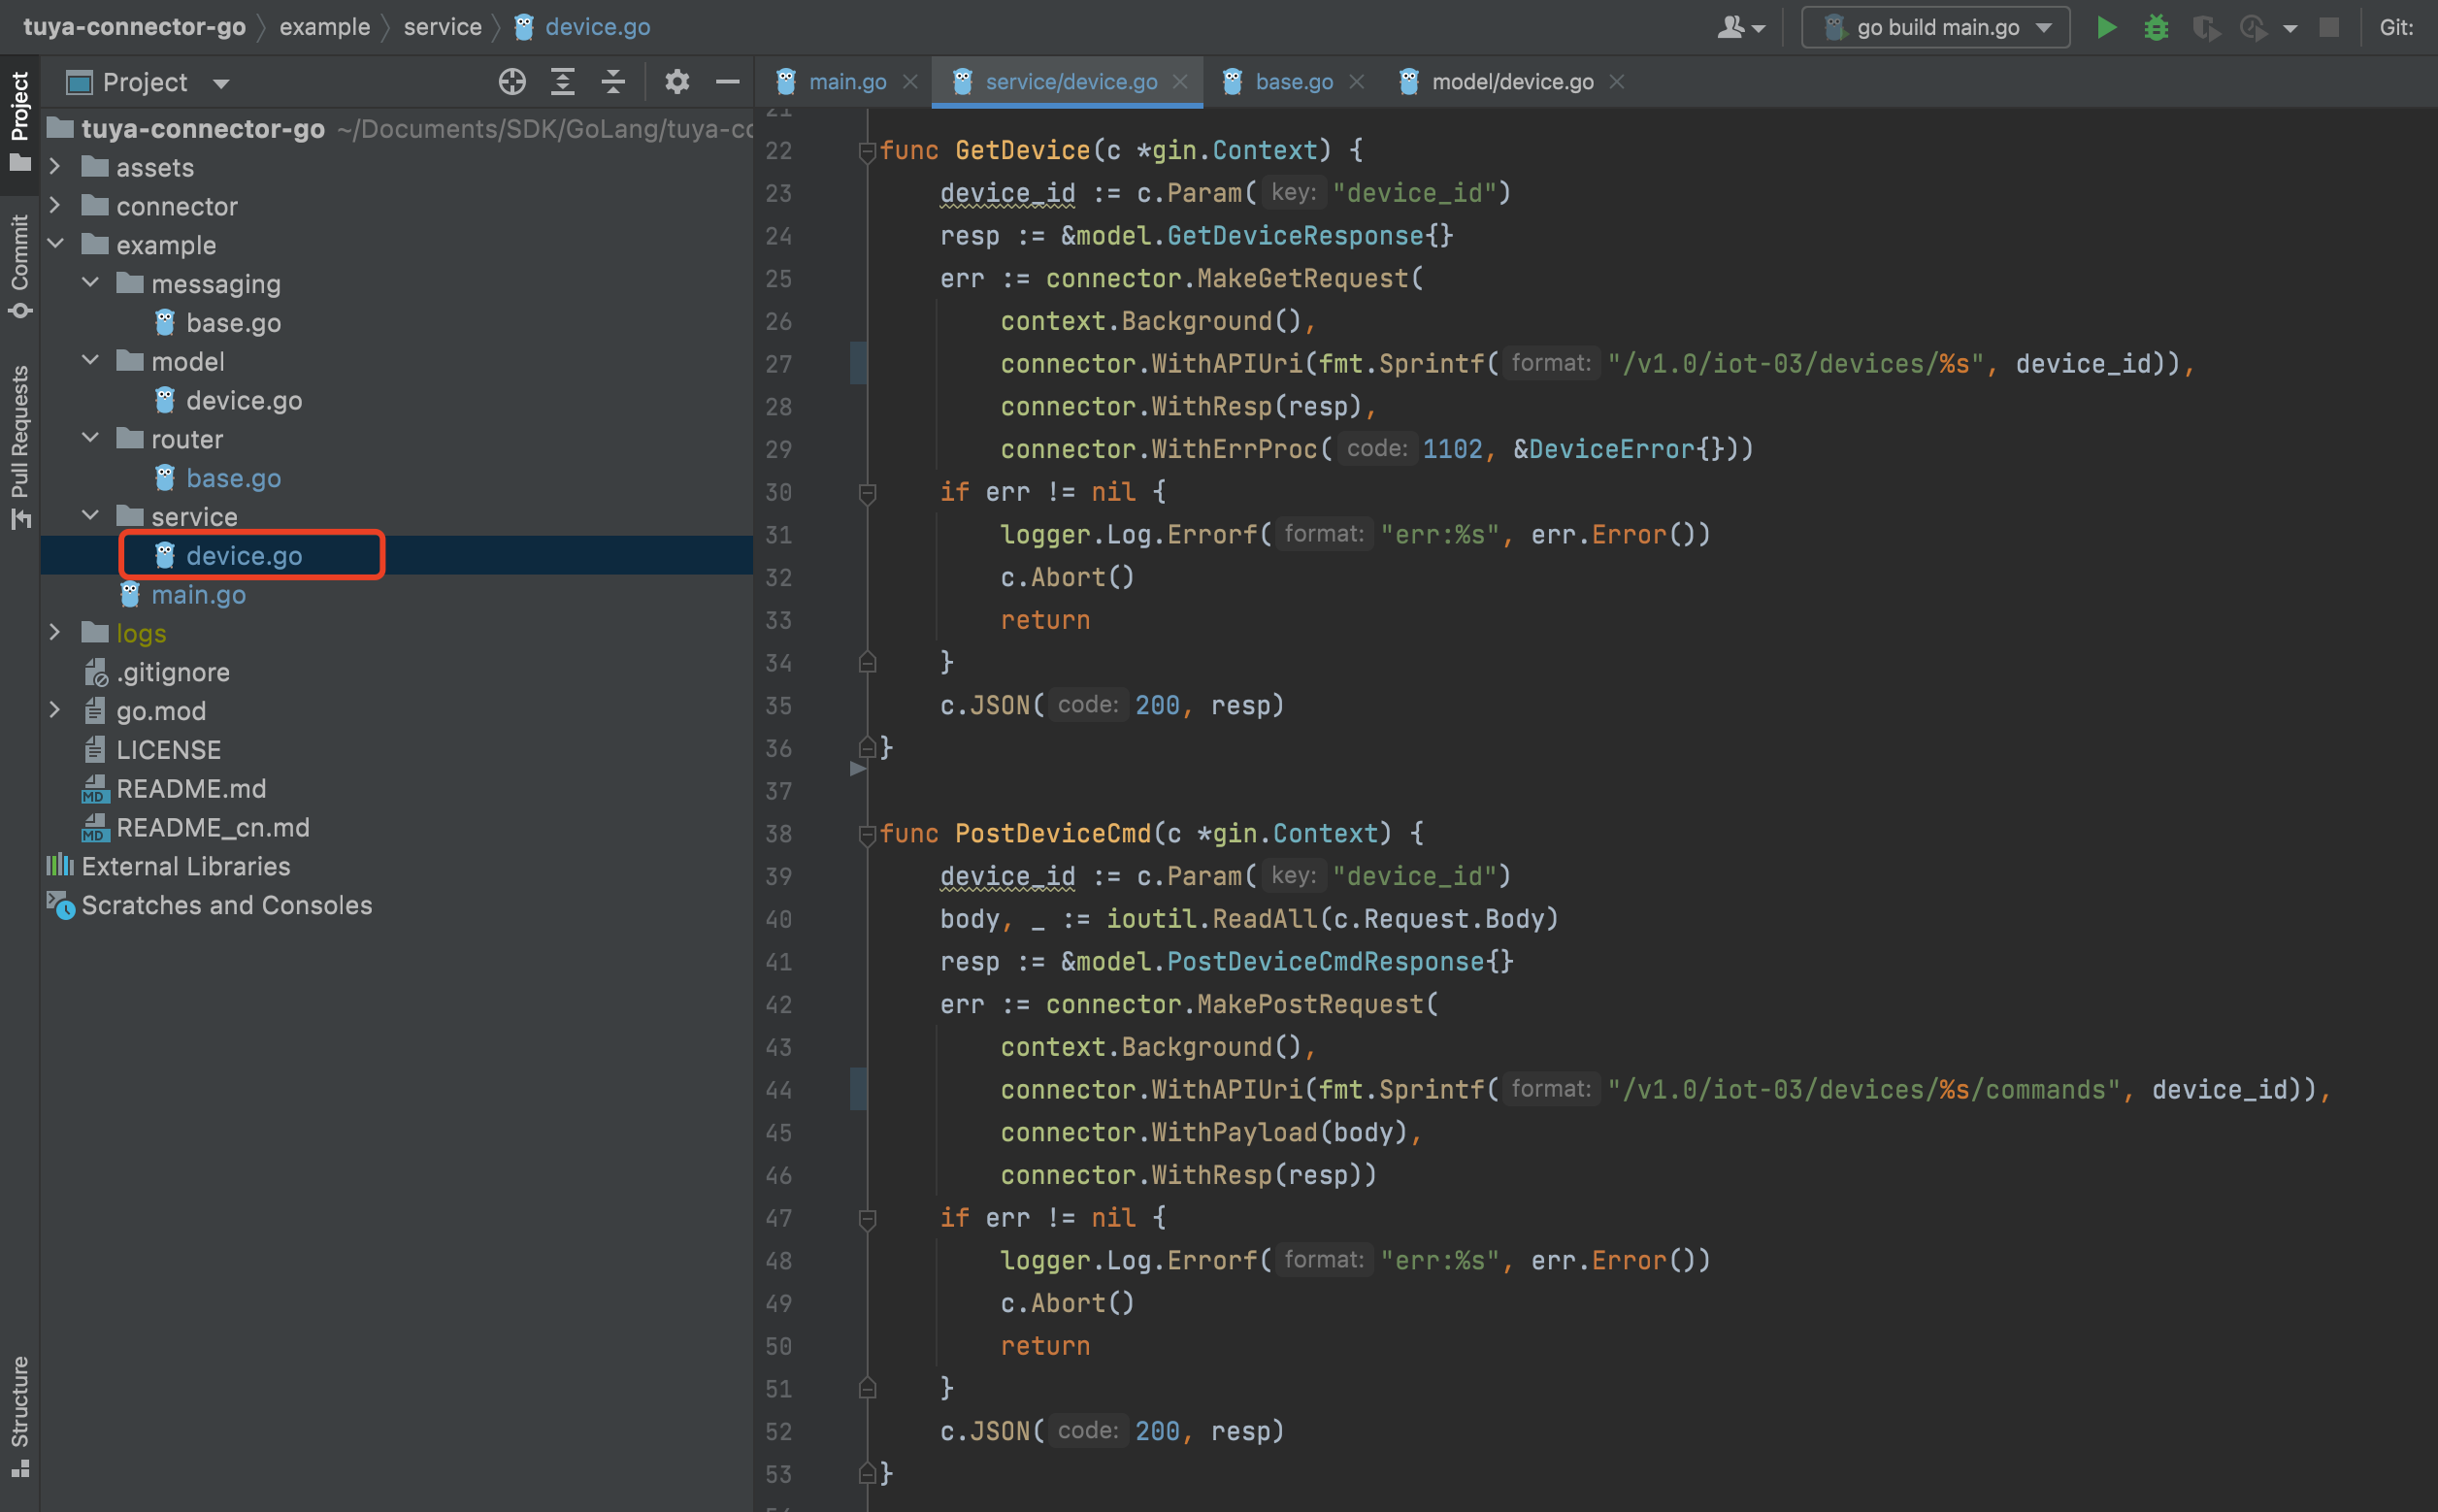
代码示例:
package service import ( "context" "fmt" "github.com/gin-gonic/gin" "github.com/tuya/tuya-connector-go/connector" "github.com/tuya/tuya-connector-go/connector/logger" "github.com/tuya/tuya-connector-go/example/model" "io/ioutil" ) type Response map[string]interface{} type DeviceError struct { } func (d *DeviceError) Process(ctx context.Context, code int, msg string) { logger.Log.Error(code, msg) } func GetDevice(c *gin.Context) { device_id := c.Param("device_id") resp := &model.GetDeviceResponse{} err := connector.MakeGetRequest( context.Background(), connector.WithAPIUri(fmt.Sprintf("/v1.0/iot-03/devices/%s", device_id)), connector.WithResp(resp), connector.WithErrProc(1102, &DeviceError{})) if err != nil { logger.Log.Errorf("err:%s", err.Error()) c.Abort() return } c.JSON(200, resp) } func PostDeviceCmd(c *gin.Context) { device_id := c.Param("device_id") body, _ := ioutil.ReadAll(c.Request.Body) resp := &model.PostDeviceCmdResponse{} err := connector.MakePostRequest( context.Background(), connector.WithAPIUri(fmt.Sprintf("/v1.0/iot-03/devices/%s/commands", device_id)), connector.WithPayload(body), connector.WithResp(resp)) if err != nil { logger.Log.Errorf("err:%s", err.Error()) c.Abort() return } c.JSON(200, resp) } -
构建 OpenAPI返回的 数据结构 。
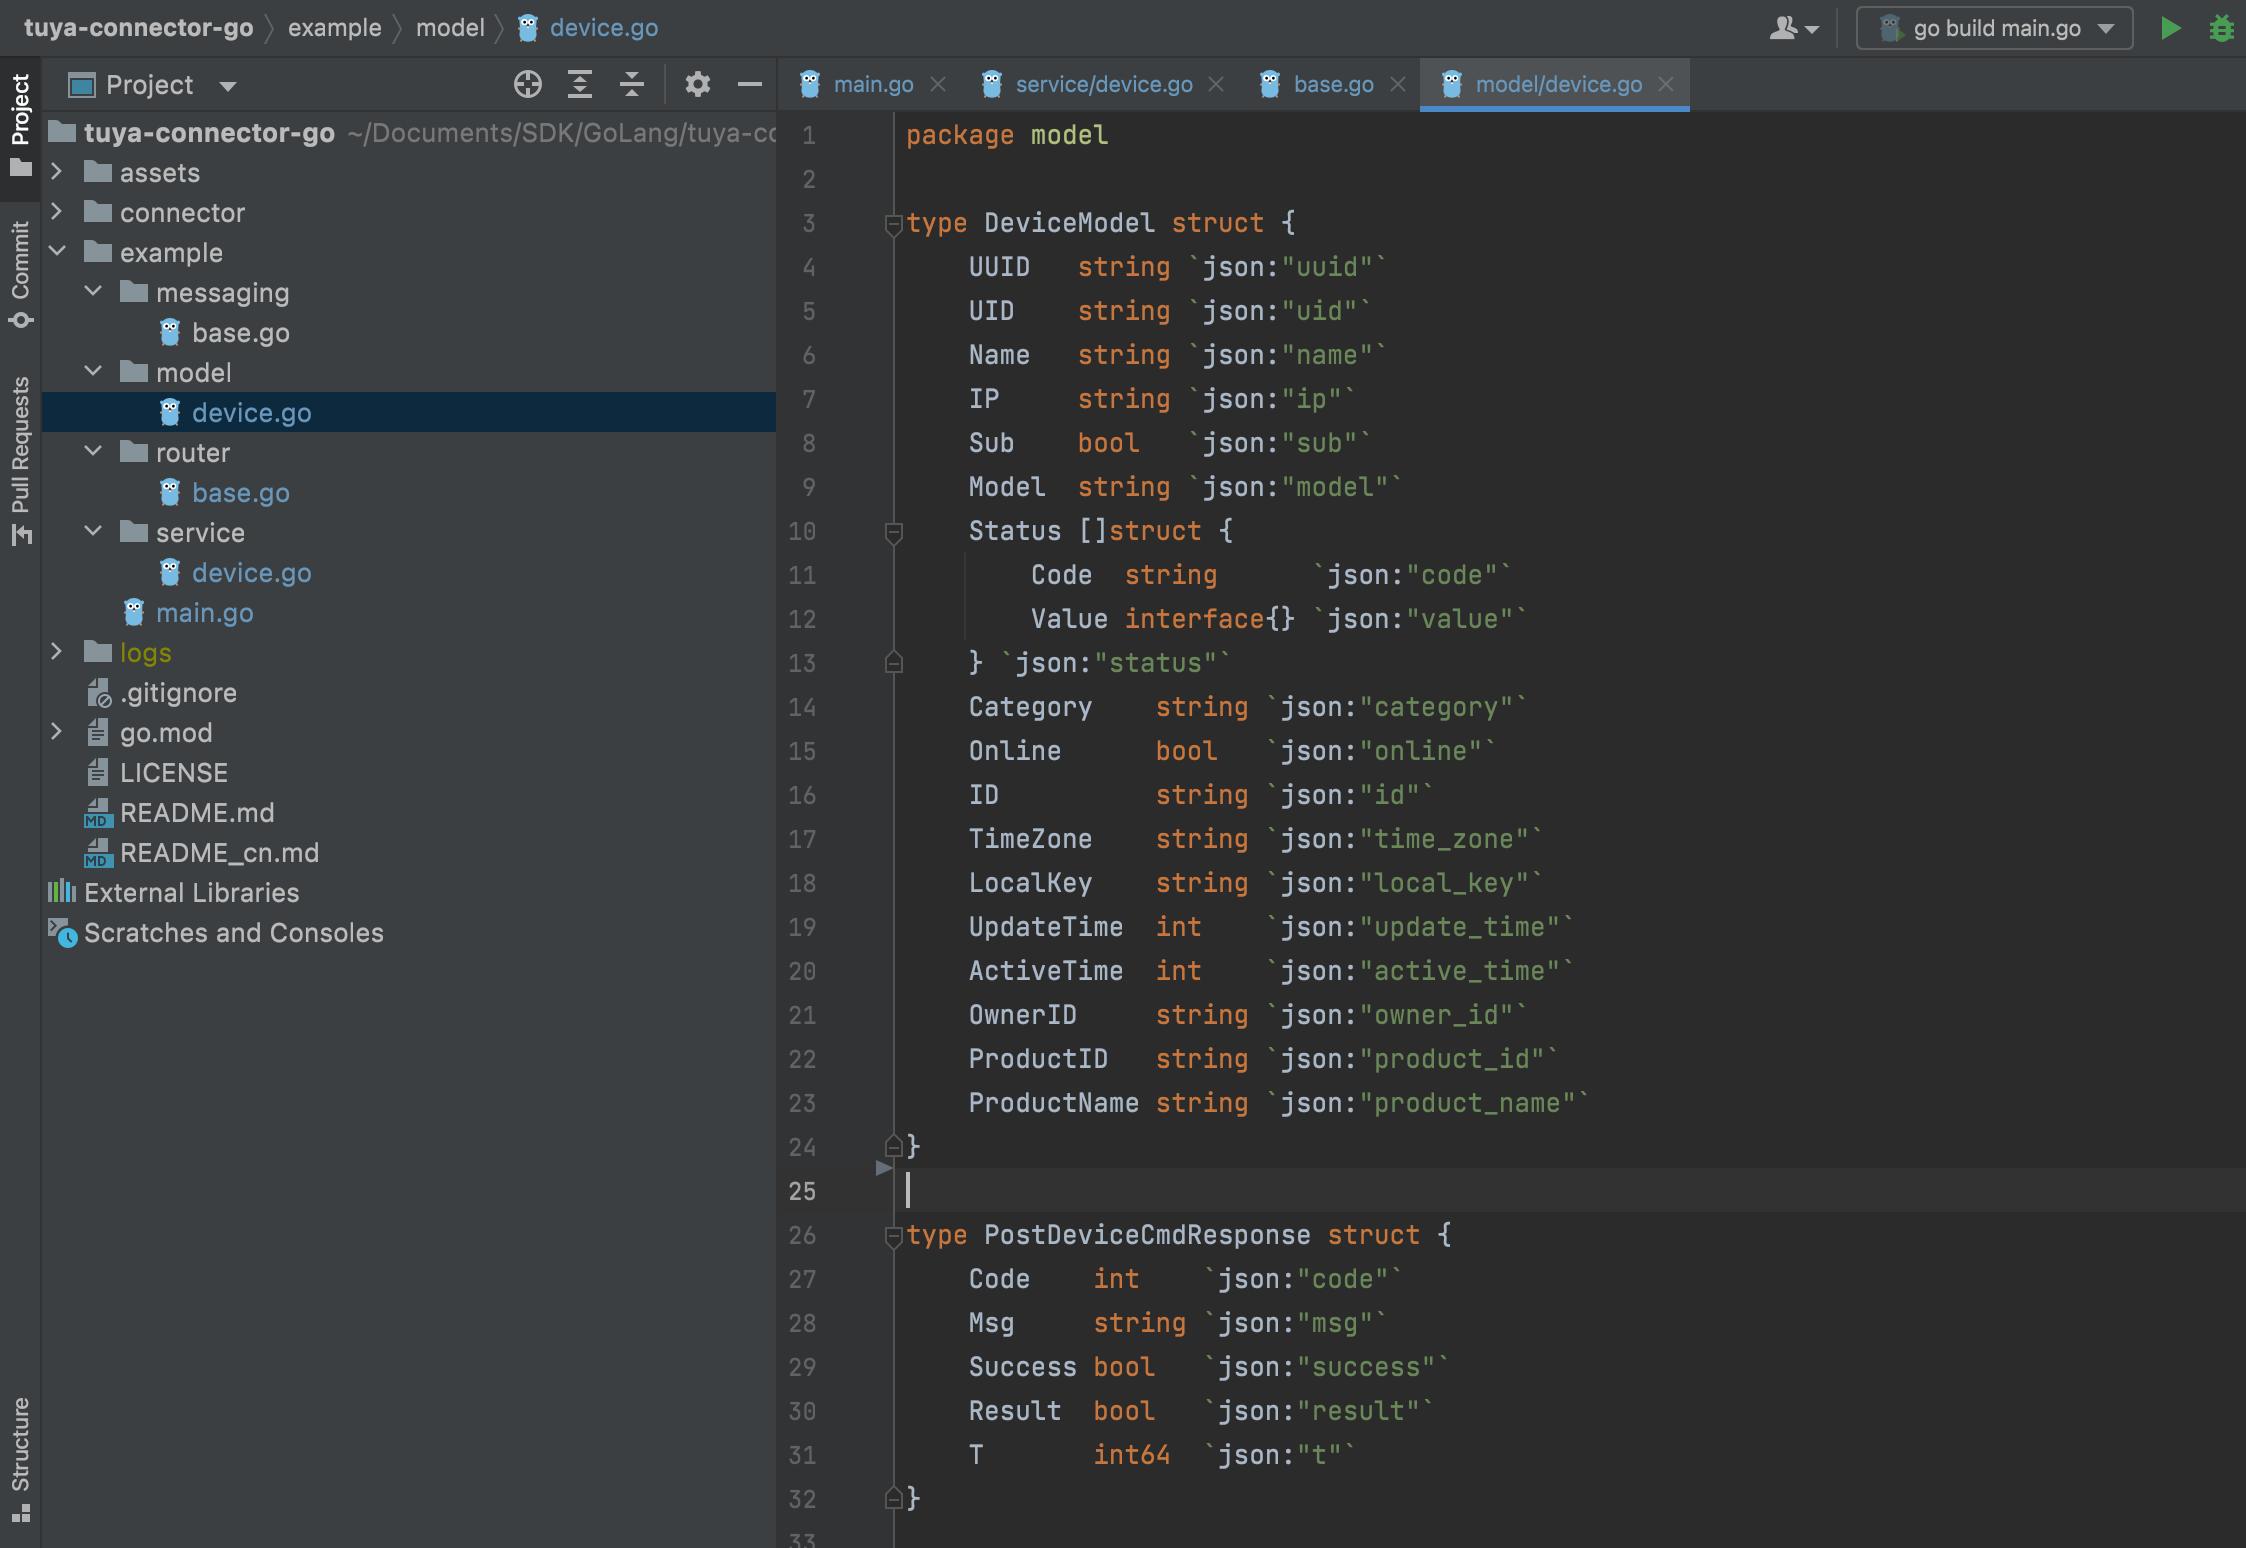
代码示例:
package model type DeviceModel struct { UUID string `json:"uuid"` UID string `json:"uid"` Name string `json:"name"` IP string `json:"ip"` Sub bool `json:"sub"` Model string `json:"model"` Status []struct { Code string `json:"code"` Value interface{} `json:"value"` } `json:"status"` Category string `json:"category"` Online bool `json:"online"` ID string `json:"id"` TimeZone string `json:"time_zone"` LocalKey string `json:"local_key"` UpdateTime int `json:"update_time"` ActiveTime int `json:"active_time"` OwnerID string `json:"owner_id"` ProductID string `json:"product_id"` ProductName string `json:"product_name"` } type GetDeviceResponse struct { Code int `json:"code"` Msg string `json:"msg"` Success bool `json:"success"` Result DeviceModel `json:"result"` T int64 `json:"t"` } type PostDeviceCmdResponse struct { Code int `json:"code"` Msg string `json:"msg"` Success bool `json:"success"` Result bool `json:"result"` T int64 `json:"t"` } -
接口调试
-
使用
gin创建路由。
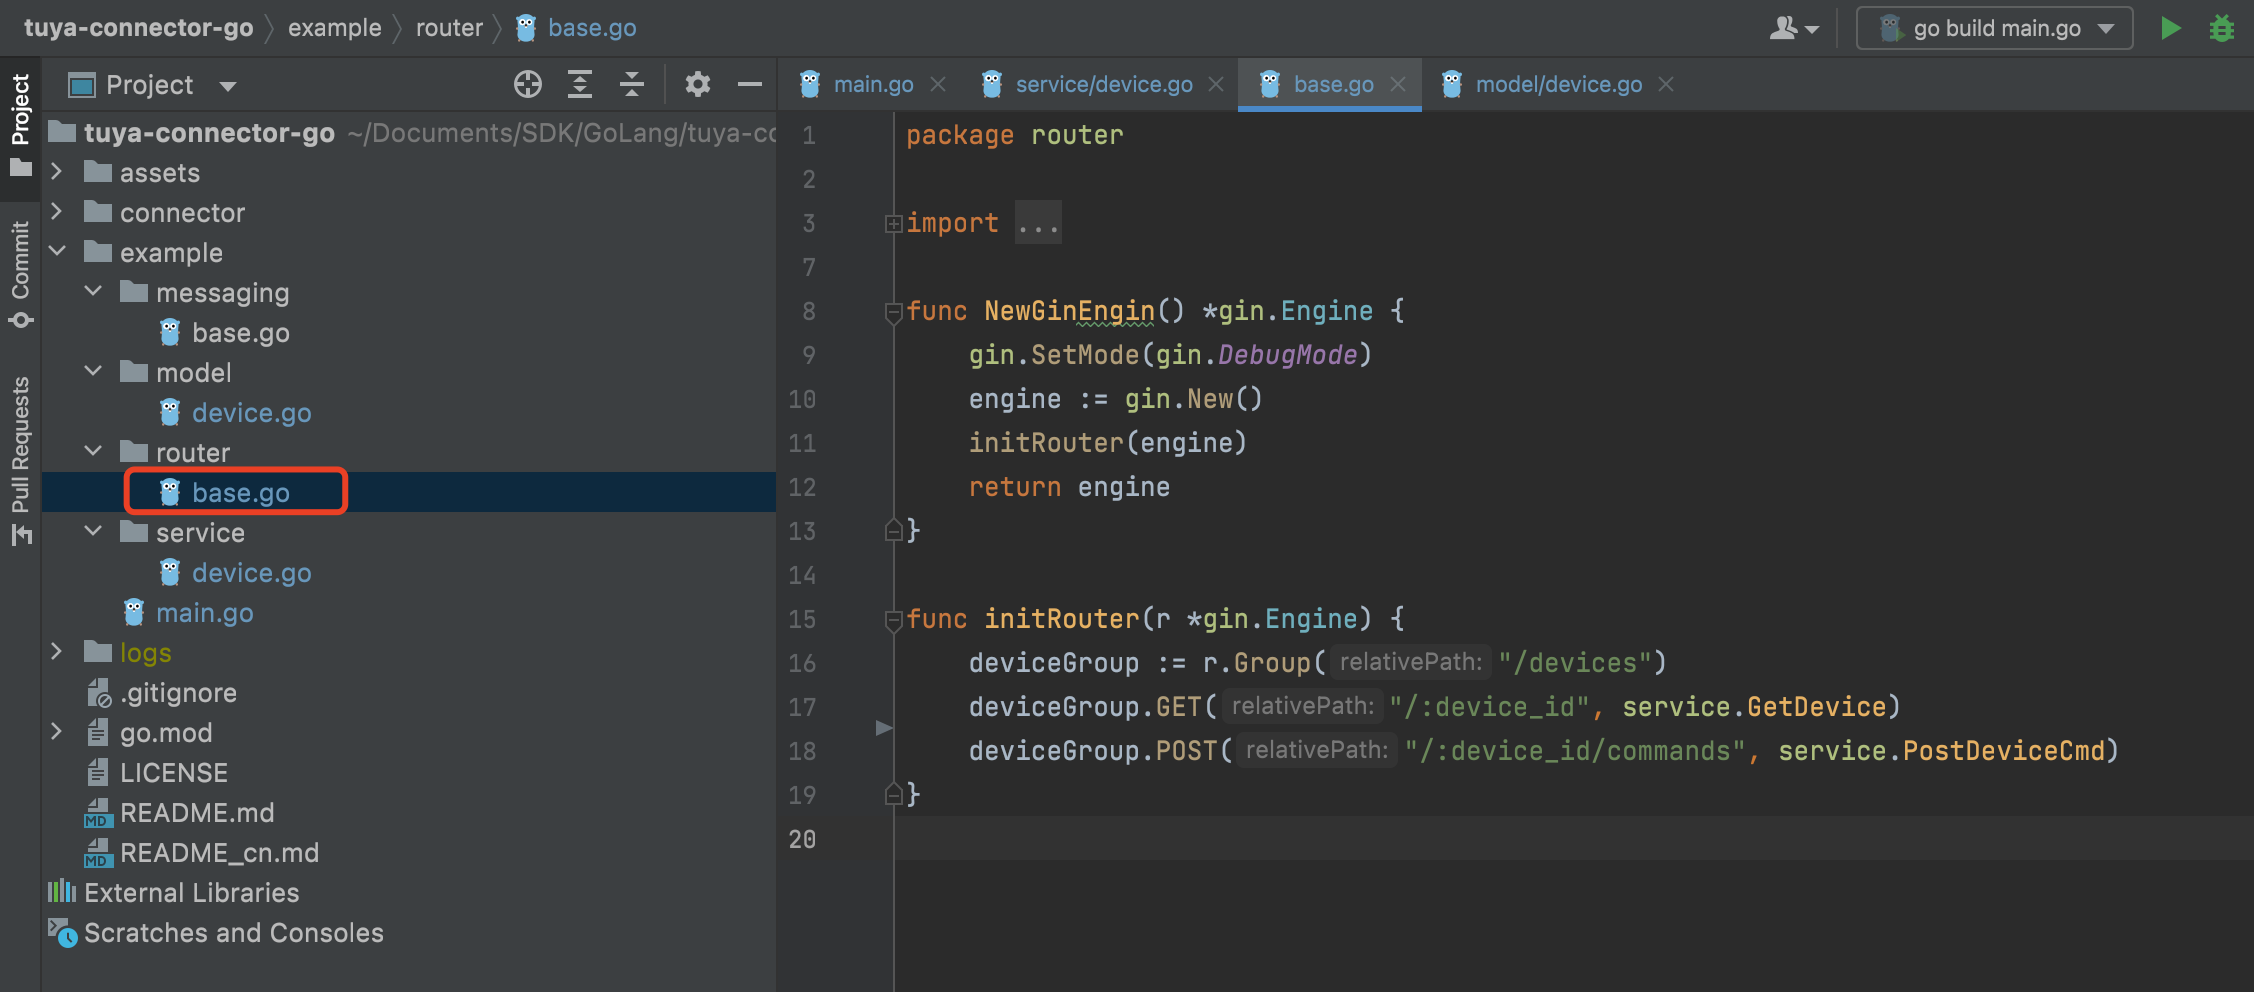
代码示例:
package router import ( "github.com/gin-gonic/gin" "github.com/tuya/tuya-connector-go/example/service" ) func NewGinEngin() *gin.Engine { gin.SetMode(gin.DebugMode) engine := gin.New() initRouter(engine) return engine } func initRouter(r *gin.Engine) { deviceGroup := r.Group("/devices") deviceGroup.GET("/:device_id", service.GetDevice) deviceGroup.POST("/:device_id/commands", service.PostDeviceCmd) } -
查看返回结果。
-
获取设备信息接口
GET 接口,可以使用浏览器进行获取,本文使用 Chrome 浏览器进行测试。
请求地址为 http://127.0.0.1:2021/devices/{设备的ID}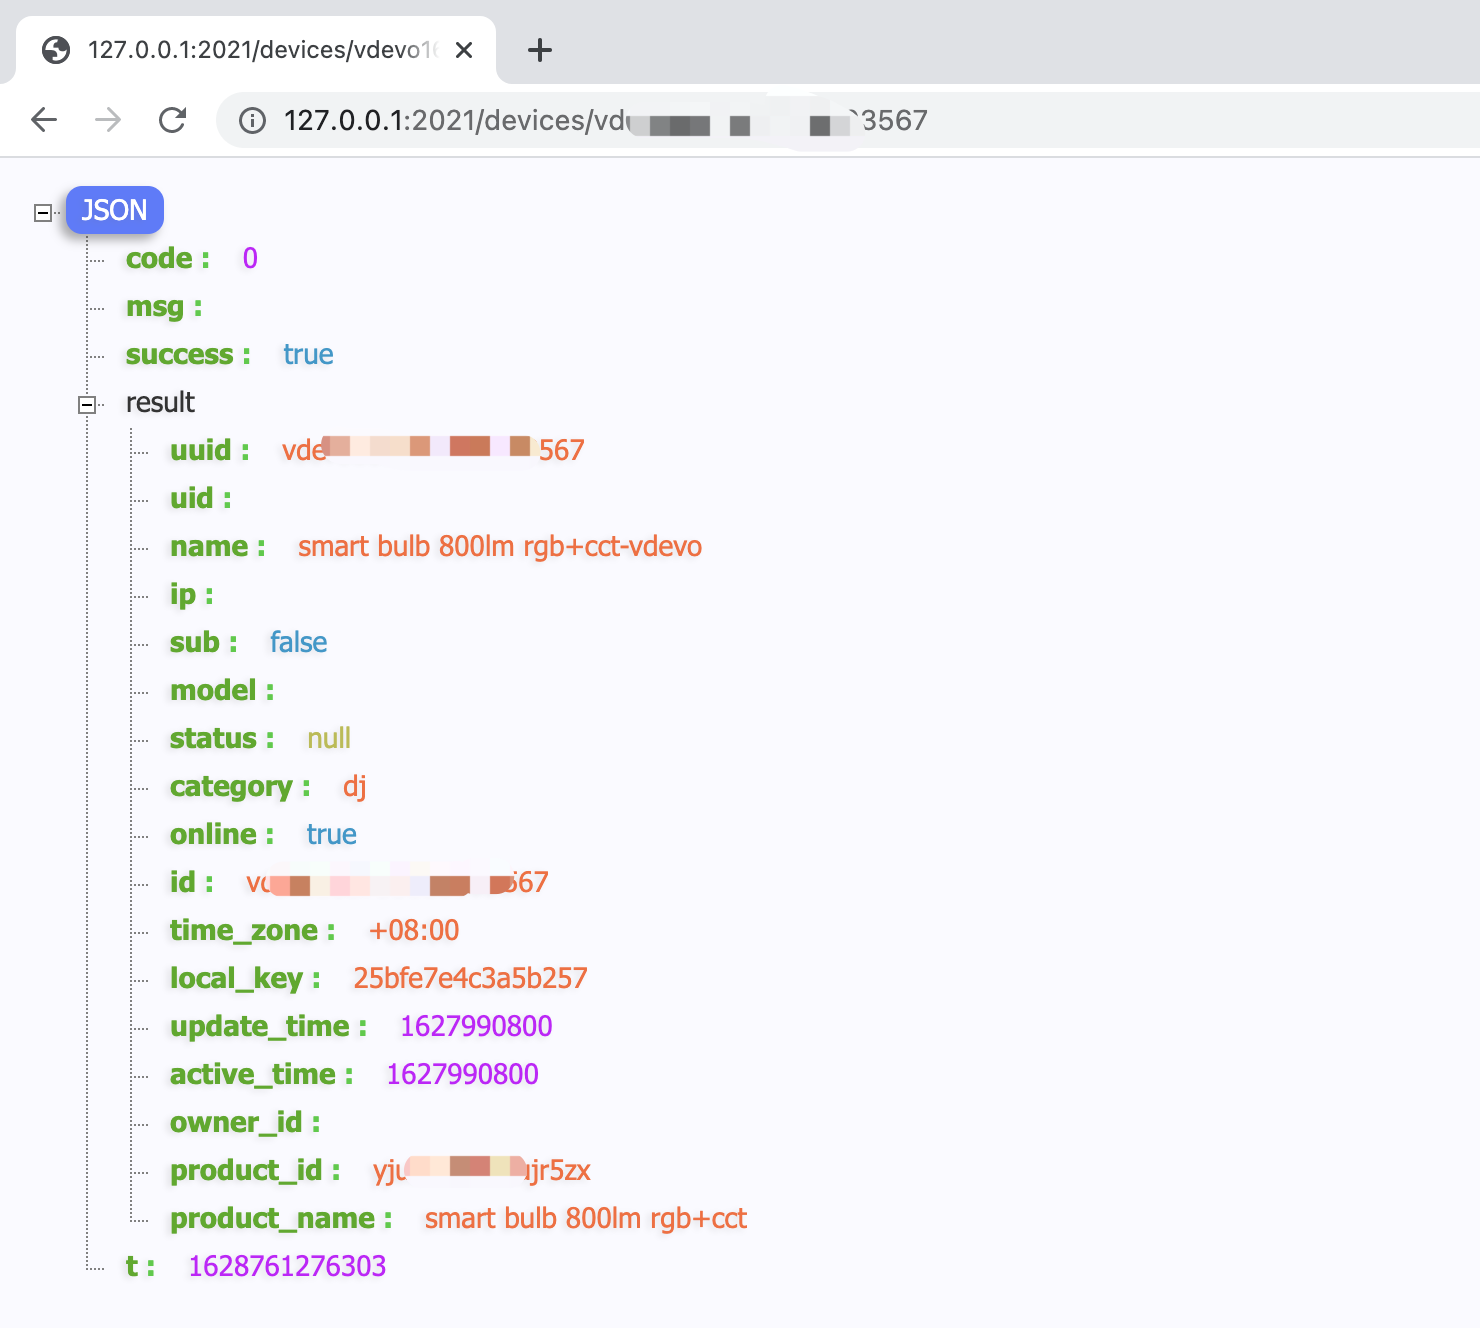
程序日志打印:
/v1.0/iot-03/devices/vdev******03567 2021/08/12 17:41:16 2021-08-12 17:41:16 [connector/base.go:68] [INFO] -> [ProxyHttp] success req:&{GET https://openapi.tuyacn.com/v1.0/iot-03/devices/vdev******03567 0 0 map[Access_token:[452f6864c1c5b0cf88155ff59a8fde48] Client_id:[xtu7******zk48ufo] Content-Type:[application/json] Dev_channel:[SaaSFramework] Dev_lang:[golang] Nonce:[a92f488e-d54d-4809-bce2-2404fa95510b] Sign:[46199E5CDFC290FCDD9D1CF4C90AA9AE110B2BE7A26242C0B7CB4F7315AE7EF3] Sign_method:[HMAC-SHA256] T:[1628761276116]] <nil> <nil> 0 [] false map[] map[] <nil> map[] <nil> <nil> <nil> <nil>}, resp:&{Code:0 Msg: Success:true Result:{UUID:vdev******03567 UID: Name:smart bulb 800lm rgb+cct-vdevo IP: Sub:false Model: Status:[] Category:dj Online:true ID:vdev******03567 TimeZone:+08:00 LocalKey:25bfe7******b257 UpdateTime:1627990800 ActiveTime:1627990800 OwnerID: ProductID:yju2e*****jr5zx ProductName:smart bulb 800lm rgb+cct} T:1628761276303} -
下发指令接口
POST 接口,macOS 系统可以使用终端执行 Curl 命令,Windows 系统需要按照
curl环境后使用 CMD 命令簿 执行。
执行指令:curl http://127.0.0.1:2021/devices/设备ID/commands -d '{"commands":[{"code":"switch_led","value":true}]}'
程序日志打印:
/v1.0/iot-03/devices/vdev******03567/commands
2021/08/12 17:53:18 2021-08-12 17:53:18 [connector/base.go:74] [INFO] -> [ProxyHttp] success req:&{POST https://openapi.tuyacn.com/v1.0/iot-03/devices/vdev******03567/commands  0 0 map[Access_token:[452f6864c1c5b0cf88155ff59a8fde48] Client_id:[xtu7******zk48ufo] Content-Type:[application/json] Dev_channel:[SaaSFramework] Dev_lang:[golang] Nonce:[210a6d2d-dd8e-41c4-b993-bfdf7f4e9ae7] Sign:[7989C4B8A2FCFA1D44FDBBD2E7537202352645CDC1C9C90C62F4803EFE5ABC10] Sign_method:[HMAC-SHA256] T:[1628761998388]] {} <nil> 0 [] false  map[] map[] <nil> map[]   <nil> <nil> <nil> <nil>}, resp:&{Code:0 Msg: Success:true Result:true T:1628761998619}
-
-
第四步:分发和订阅消息
本代码实现了 connector 框架消息分发接口,支持顺序订阅云端消息、数据解密、构建精确的具体消息类型并通过 Spring 事件机制分发。
说明: 该功能需要开通 消息订阅 服务,服务开通方式参见 开通云服务。
-
初始化应用时,添加 go messaging.Listener() 服务
-
订阅消息事件
开发者需要针对需要订阅的事件添加相应的 EventMessage 事件即可。框架内置了涂鸦所有云端消息事件类型,订阅的消息数据包括原始加密消息数据以及解密后的结构化的消息数据。
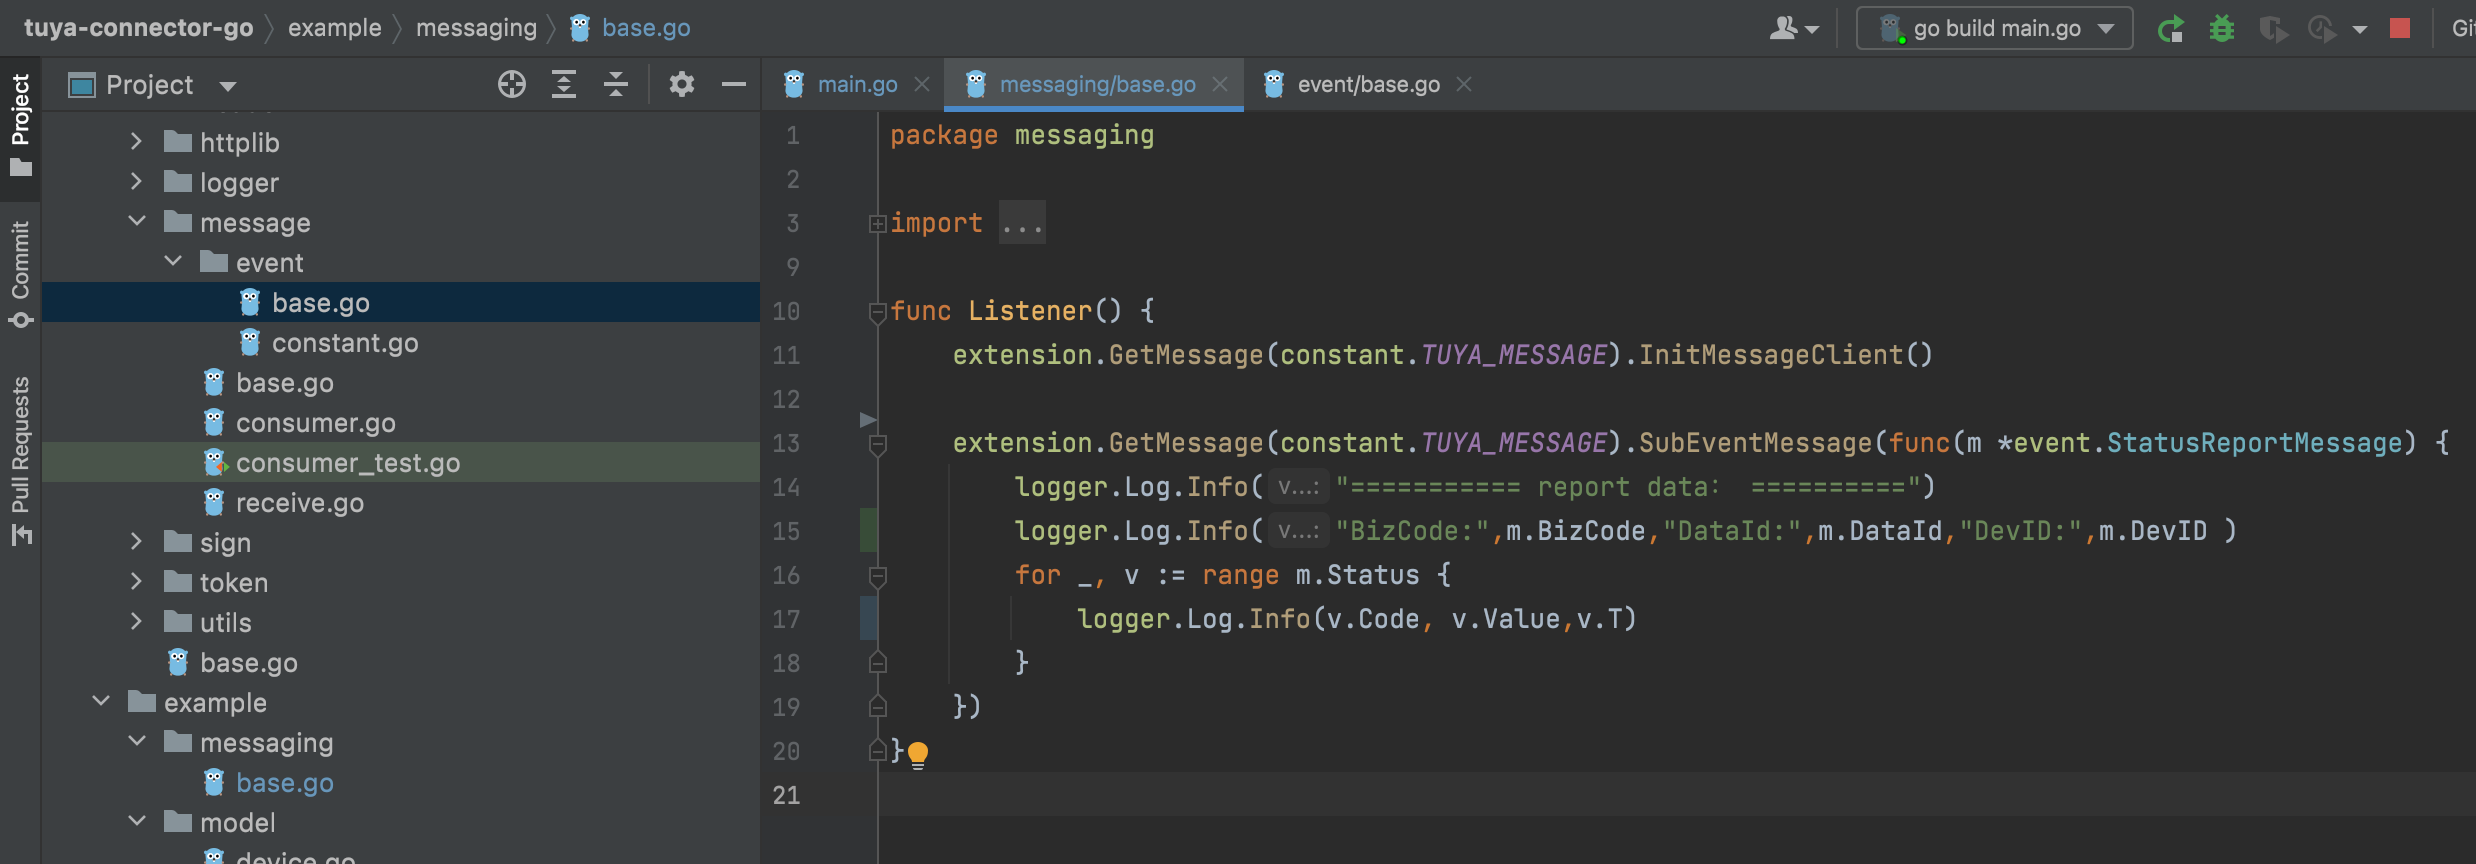
代码示例:
package messaging

import (
	"github.com/tuya/tuya-connector-go/connector/constant"
	"github.com/tuya/tuya-connector-go/connector/env/extension"
	"github.com/tuya/tuya-connector-go/connector/logger"
	"github.com/tuya/tuya-connector-go/connector/message/event"
)

func Listener() {
	extension.GetMessage(constant.TUYA_MESSAGE).InitMessageClient()

	extension.GetMessage(constant.TUYA_MESSAGE).SubEventMessage(func(m *event.StatusReportMessage) {
		logger.Log.Info("=========== report data: ==========")
		logger.Log.Info("BizCode:",m.BizCode,"DataId:",m.DataId,"DevID:",m.DevID )
		for _, v := range m.Status {
			logger.Log.Info(v.Code, v.Value, v.T)
		}
	})
}
返回结果示例:
2021/08/16 11:00:14 2021-08-16 11:00:14 [./.:0] [DEBUG] -> consumer receive message, topic=persistent://xtu7******zk48ufo/out/event-partition-41
2021/08/16 11:00:14 2021-08-16 11:00:14 [message/consumer.go:50] [DEBUG] -> Handler trace info, msgID=ledgerId:29477588 entryId:2 partition:41  , topic=persistent://xtu7******zk48ufo/out/event-partition-41 , decode spend=3.895375ms , Unactive spend=1.833µs , ConsumerID spend=1.083µs , HandlePayload spend=11.584µs , Ack spend=219.417µs , total spend=4.63325ms
2021/08/16 11:00:14 2021-08-16 11:00:14 [reflect/value.go:337] [INFO] -> =========== report data: ==========
2021/08/16 11:00:14 2021-08-16 11:00:14 [reflect/value.go:337] [INFO] -> BizCode:  DataId: 145193f4-fe3e-11eb-8396-02425b0322e7 DevID: vd*******4592450
2021/08/16 11:00:14 2021-08-16 11:00:14 [reflect/value.go:337] [INFO] -> switch_led true 1629084317815
小结
本文介绍了如何使用 GO SDK 基于涂鸦云开发,调用设备相关 API 控制一个智能设备和监听设备信息。基于 Powered by Tuya 设备体系严格的统一性,您可以将这个控制方式拓展到所有 Powered by Tuya 设备中。让您无需担心设备差异性,快速基于智能设备开发 SaaS 应用。
该内容对您有帮助吗?
是意见反馈该内容对您有帮助吗?
是意见反馈


