Fast Integration with SmartLife App SDK for iOS
This topic describes how to use CocoaPods to quickly integrate Tuya cube App SDK for iOS into your project. The SDK requires iOS 9.0 or later.
SDK versions
- If you have integrated cube App SDK versions earlier than v2.x.x into your project, follow the instructions in Upgrade Guide and upgrade to the latest version.
- If you have integrated legacy SDK versions into your project, after you upgrade to v2.0, delete the legacy security image file
t_s.bmpfrom your project, and get the app key information for v2.0 from the Tuya IoT Development Platform. - Starting from cube App SDK for Android v1.0.0, the SDK is classified into the development edition and official edition. For more information, see Pricing. The development edition is suitable for personal non-commercial scenarios only. Do not use it for commercial purposes. If your app is planned to be launched on app stores or in other commercial scenarios, go to the Tuya IoT Development Platform and purchase the official edition. After the official edition is purchased:
- Rebuild the SDK and download the package of the official edition on the platform.
- Integrate the SDK of the official edition into your project.
Integrate with the SDK
Build and download the SDK
-
Log in to the Tuya IoT Development Platform.
-
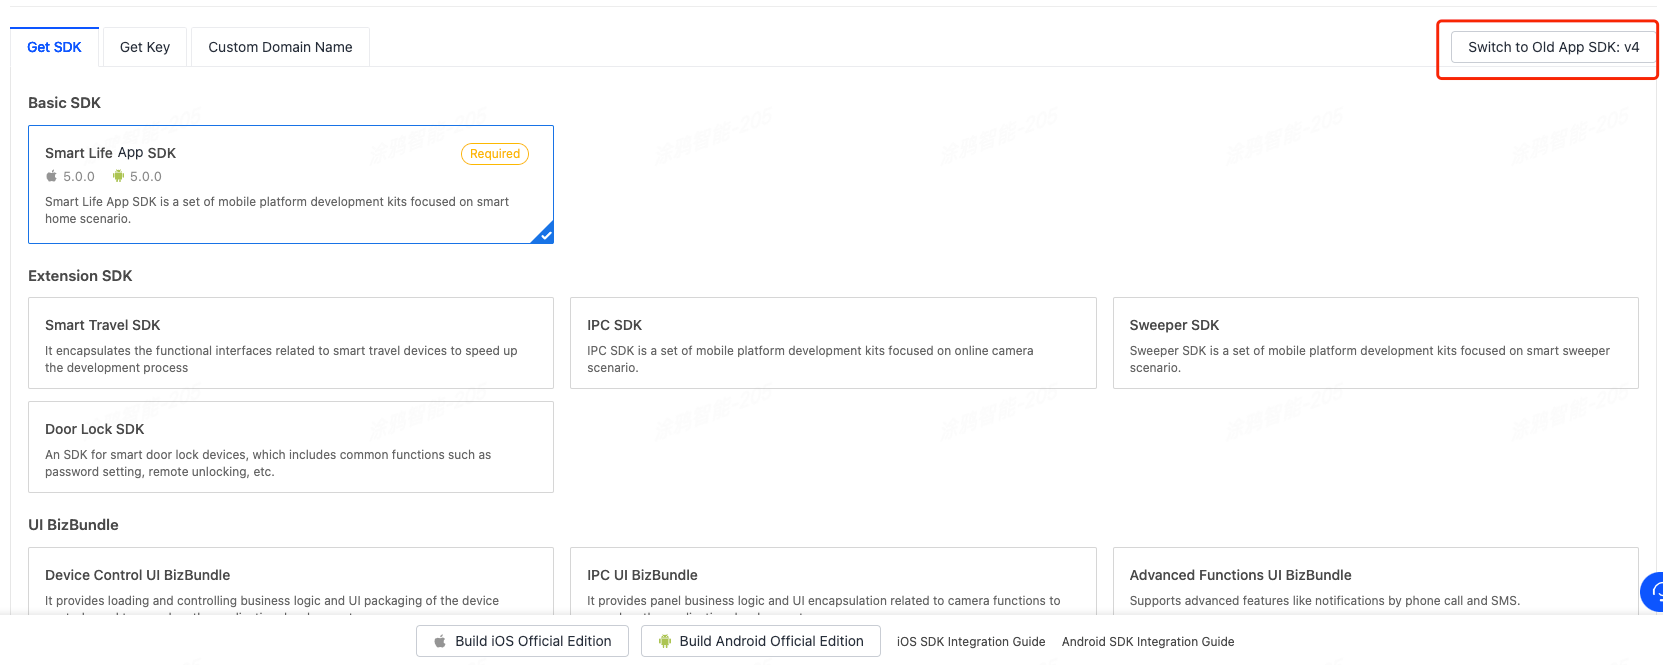
Select the required SDKs or UI BizBundles of v2.x.x.
If a legacy SDK version has been used, you can click the button in the top right corner to switch between the legacy and new versions.
-
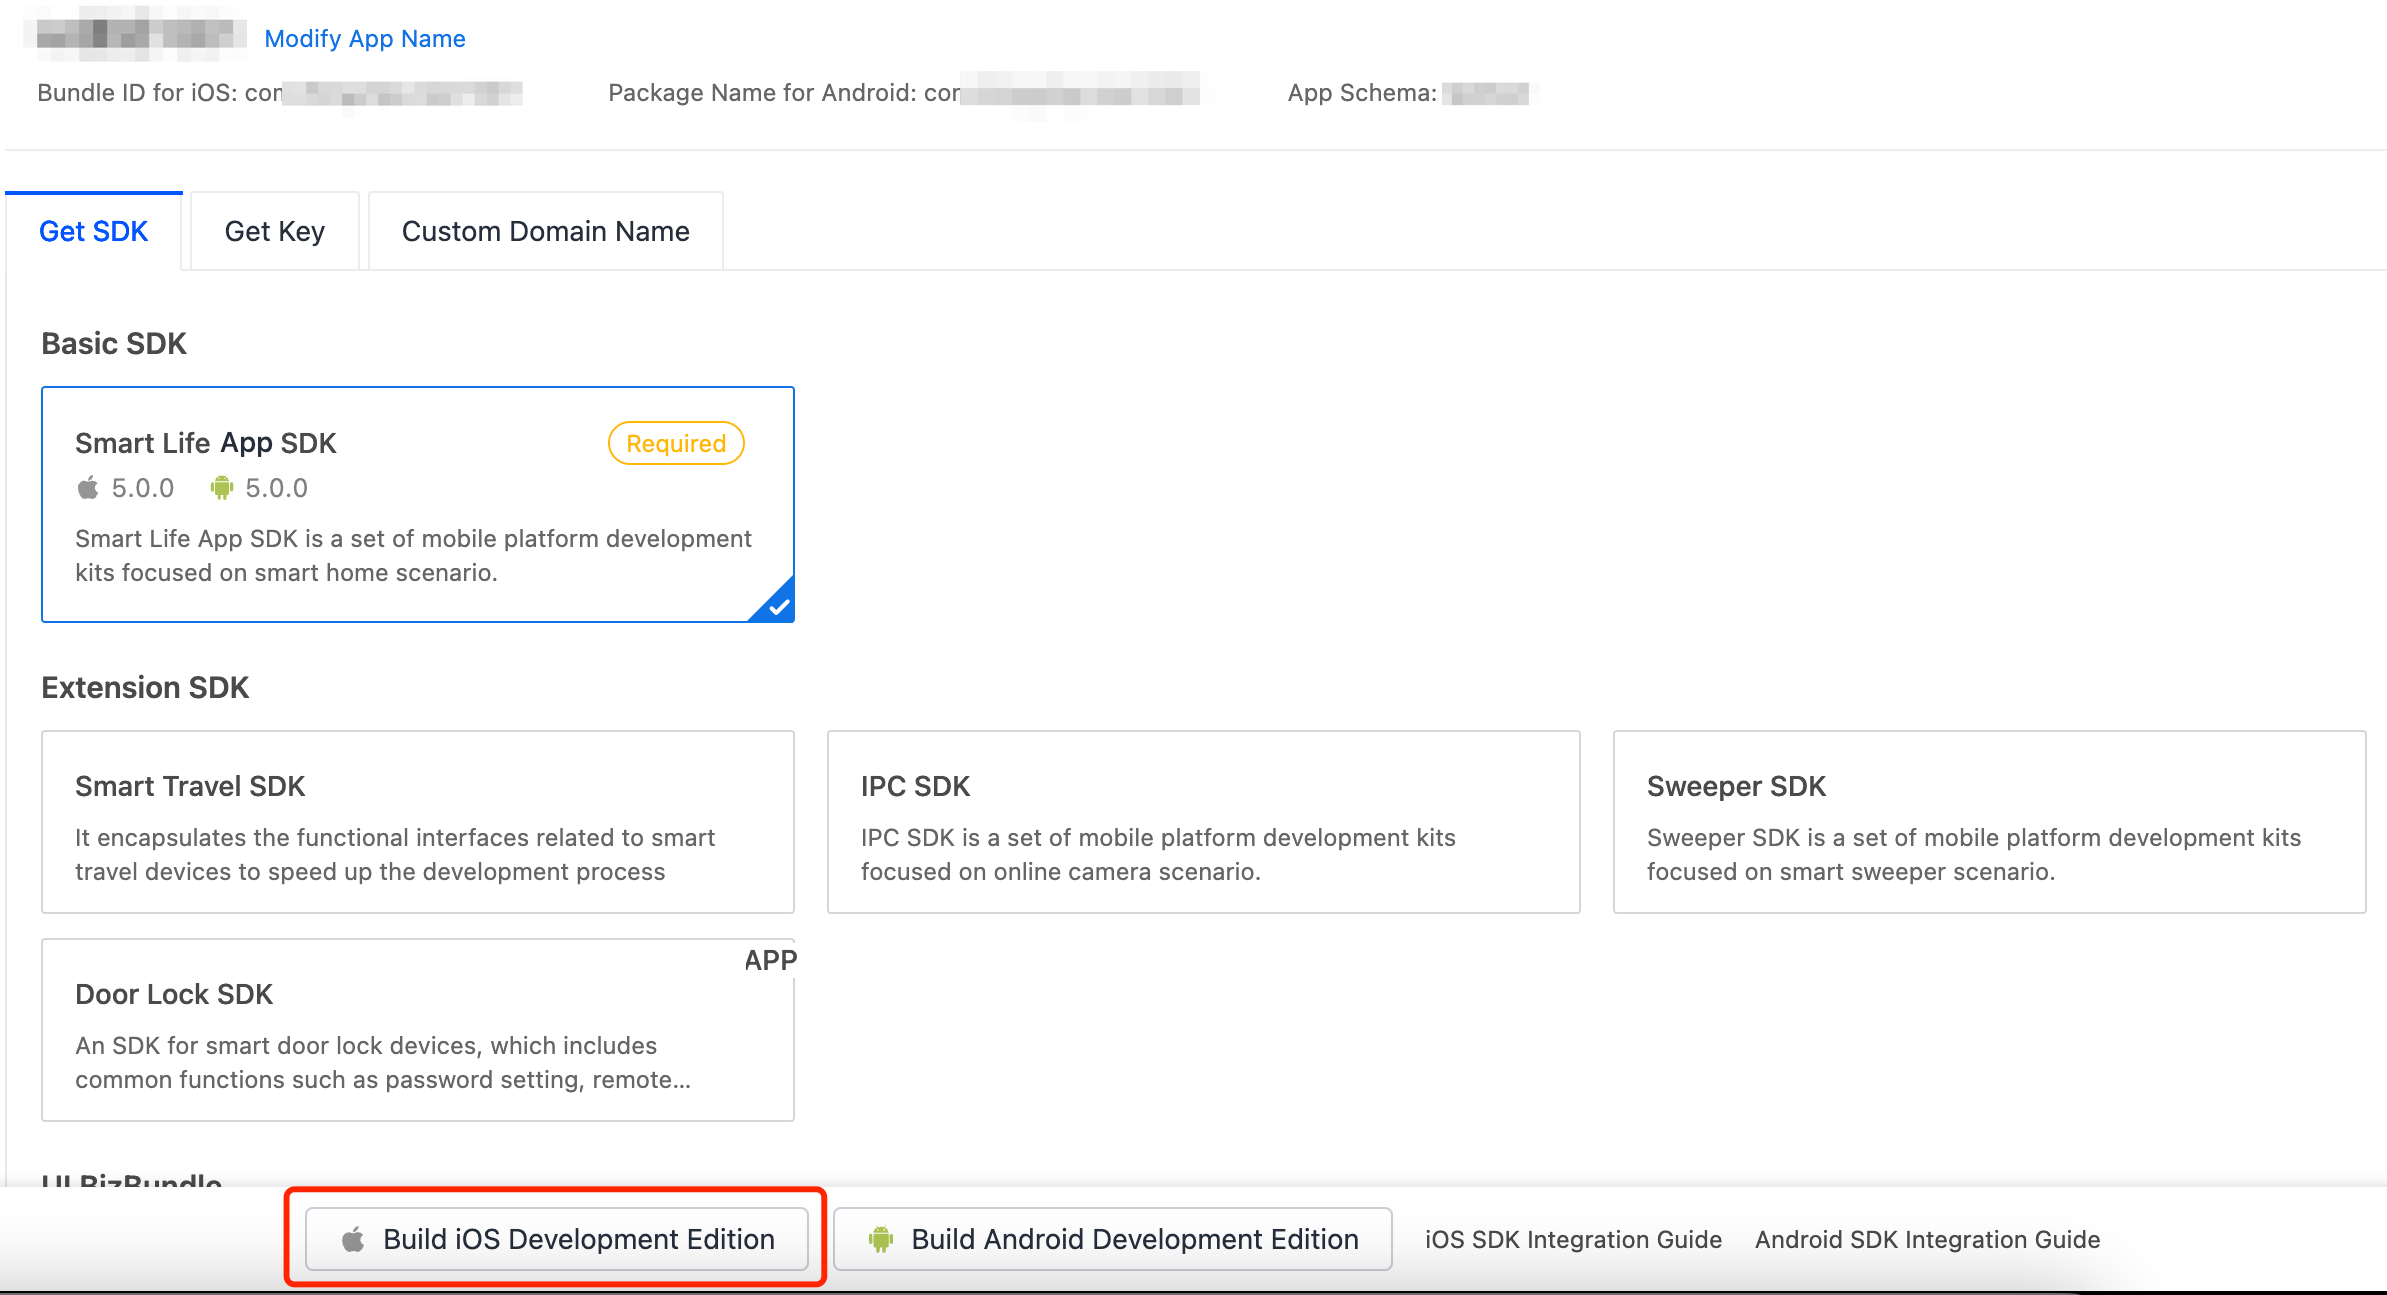
Select the required SDKs or BizBundles and build your SDK.
-
After the build is finished, download the SDK to be integrated.

-
Extract
ios_core_sdk.tar.gzand get the following important files:Build: stores the security SDK exclusive to your app. This file is as important as the app key information. Keep the file properly and do not disclose the information in it.ThingSmartCryption.podspec: used to reference and integrate with App SDK v2.0.
-
We recommend that you store both files at the same directory as
podfile, so they can be referenced easily during subsequent development.
Use CocoaPods for fast integration
-
Update CocoaPods to the latest version. For more information about CocoaPods, see CocoaPods Guides.
-
Add the following code block to the
Podfile:source 'https://github.com/tuya/tuya-private-specs.git' platform :ios, '11.0' target 'Your_Project_Name' do # Build and get ThingSmartCryption from the Tuya IoT Development Platform (iot.tuya.com). # After the official edition is purchased, rebuild the SDK on the Tuya IoT Development Platform and integrate it into your project. # The dot slash (./) notation represents that the files that are obtained after `ios_core_sdk.tar.gz` is extracted are put to the directory at the same directory as `podfile`. # To use another directory, change the `path` to your desired directory. pod "ThingSmartCryption", :path =>'./' pod "ThingSmartHomeKit", "2.0.0-cube.1" end -
In the root directory of your project, run
pod update.
Use configuration file for iOS
-
Import the domain configuration file.
-
Download
ThingSmartCryption.xcframeworkfrom the platform and place it in the project directory. -
Replace the
t_cdc.tcfgfiles in the following folders with thet_cdc.tcfgfiles provided by PM. -
Run
pod installorpod updateto install or update dependencies accordingly.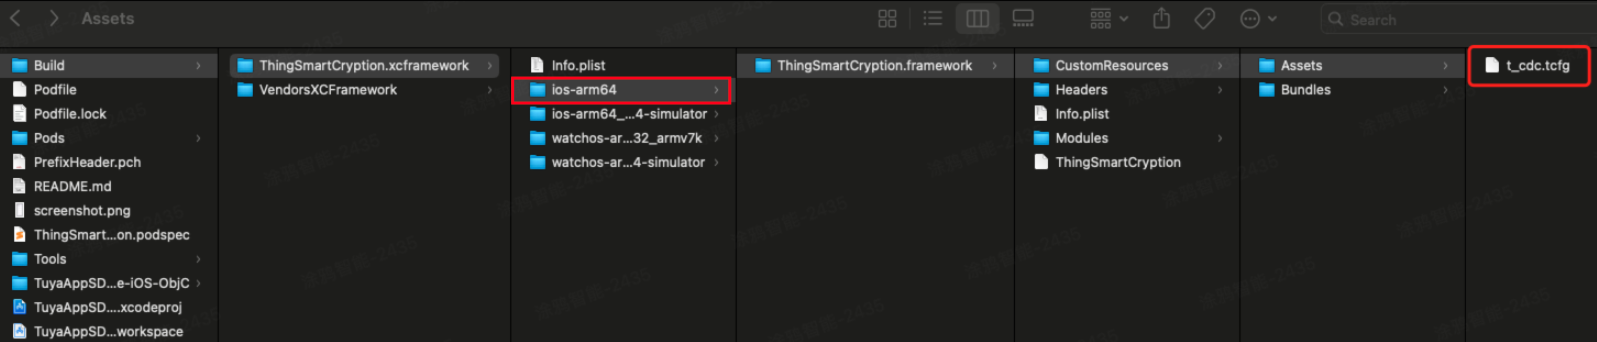
-
-
Verify the validity of the custom domain name.
Before this step, the steps in Fast Integration with SmartLife App SDK must be finished.
You can use this setting
[TuyaSmartSDK sharedInstance].debugMode = YESto enable the SDK debug log feature. After the app starts, search for the log entryread custom domain configin the console to check whether data can be read out from the domain configuration file.If so, disable the SDK debug log feature, repackage the app, and then upload the package to Apple’s App Store to launch the app.
FAQs
-
Question 1: Data cannot be read out from the domain configuration file.
-
Analytics: After the app starts, the following log entry is printed in the console:
Your project does not include a domain configuration file. To use a custom domain name, please go to the Tuya IoT Development Platform and download a domain configuration file. This log entry indicates that the domain configuration file is not found. -
Solution: Repeat the steps as specified in Use domain configuration file for iOS.
-
-
Question 2: Data can be read out from the domain configuration file, but an error has occurred while parsing the file.
Analytics: If the error
t_cdc.tcfg file load failed!has occurred, the following causes might be included.Possible cause Solution The domain configuration file and the SDK do not have identical secret information, and thus the system failed to parse the file. We recommend that you verify that the bundle ID and secret information are correct. The domain configuration file is damaged and cannot be parsed. We recommend that you download the domain configuration file again. The version of TuyaSmartNetworkKitis legacy. Make sure this version inPodfile.lockisv4.0.2 or later.Run the command pod update TuyaSmartNetworkKitto update this component.
Initialize the SDK
-
Choose Target > General to open the project settings, and modify
Bundle Identifierto the iOS Bundle ID of the app that is registered on the Tuya IoT Development Platform. -
Add the following content to the
PrefixHeader.pchfile:#import <ThingSmartHomeKit/ThingSmartKit.h>Add the following content to the bridging header file
xxx_Bridging-Header.hfor a Swift project:#import <ThingSmartHomeKit/ThingSmartKit.h> -
Open the
AppDelegate.mfile and initialize the SDK in[AppDelegate application:didFinishLaunchingWithOptions:].
Configure the SDK
- (void)startWithAppKey:(NSString *)appKey secretKey:(NSString *)secretKey;
Parameters
| Parameter | Description | Source |
|---|---|---|
| appKey | The credential information exclusive to the app. | Tuya IoT Development Platform > Details page of your SDK-based app > Get SDK |
| secretKey | AppSecret | Tuya IoT Development Platform > Details page of your SDK-based app > Get SDK |
| bundleId | Bundle ID for iOS | Tuya IoT Development Platform > Details page of your SDK-based app > Bundle ID for iOS |
Example
Objective-C:
[[ThingSmartSDK sharedInstance] startWithAppKey:<#your_app_key#> secretKey:<#your_secret_key#>];
Swift:
ThingSmartSDK.sharedInstance()?.start(withAppKey: <#your_app_key#>, secretKey: <#your_secret_key#>)
Now, you are ready for app development.
Enable the debug mode
During the development, you can enable the debug mode and print logs for troubleshooting.
Objective-C:
#ifdef DEBUG
    [[ThingSmartSDK sharedInstance] setDebugMode:YES];
#else
#endif
Swift:
#if DEBUG
   ThingSmartSDK.sharedInstance()?.debugMode = true
#else
#endif
Configure multilingual options
The returned error messages and other UI text are displayed in languages as configured in the multilingual settings of your project and users’ mobile phone system languages. To support a certain language, add it to Localization of your project.
In the following example, a demo app is used to describe the process of app development with the App SDK. Before the development of your app, we recommend that you run the demo app.
Create a widget
Perform the following steps:
-
Modify the Podfile.
post_install do | installer | installer.pods_project.targets.each do | target | target.build_configurations.each do | config | config.build_settings['APPLICATION_EXTENSION_API_ONLY'] = 'NO' end end end -
Set
AppGroups:- Grant permissions on
AppGroups. - Before the SDK is initialized, set the name of
AppGroupsfor the SDK. - Only paid developer accounts can be granted permissions on
AppGroups. Therefore, free developer accounts cannot be used to debug widget applications.
- Grant permissions on
-
Configure the AppKey, and AppSecret to initialize the SDK.
-
Before the SDK is initialized with
AppKey, setAppGroupName.[ThingSmartSDK sharedInstance].appGroupId = APP_GROUP_NAME; [[ThingSmartSDK sharedInstance] startWithAppKey:SDK_APPKEY secretKey:SDK_APPSECRET];
Use the SDK
- Set
homeIdin the main project. - Use
ThingSmartDeviceModel.switchDpto check whether a device supports quick toggles. - Use
viewWillAppearto check whether accounts and rooms are changed in the main project. If so, refresh the data.
Run the demo app
The demo app that is created in the sample project of cube App SDK is used for reference only. Do not use the demo app for commercial purposes. For more information, see Tuya Developing Service Agreement.
Prepare the demo
In the Preparation topic, get the AppKey and AppSecret for iOS.
Make sure that BundleId, AppKey, and AppSecret are consistent with those used on the Tuya IoT Development Platform. Any mismatch will cause the SDK development app to be failed.
If the SDK is switched from v2.0 to a legacy version, you must change the key information to that of the target version. The way the SDK is integrated is changed accordingly.
FAQs
SING_VALIDATE_FALED
-
Problem: When an API request is made, an error message is returned in the following response:
{ "success" : false, "errorCode" : "SING_VALIDATE_FALED", "status" : "error", "errorMsg" : "Permission Verification Failed", "t" : 1583208740059 } -
Solution: Make sure that BundleId, AppKey, and AppSecret are consistent with those used on the Tuya IoT Development Platform. Any mismatch will cause the authentication to be failed. For more information, see Preparation.
-
Note: After you purchase the official edition, rebuild the SDK and replace the key information with the new one on the Tuya IoT Development Platform.
Is this page helpful?
YesFeedbackIs this page helpful?
YesFeedback


