设备控制
随着智能设备的普及,如何安全、灵活地管理对设备的控制权限变得更加复杂。在以往简单的应用场景中,控制端 App 仅仅需要对一个设备进行控制。但随着家庭拥有的物联网设备愈加丰富,控制端 App 需要同时控制多个设备。
另外,某些终端设备还需要提供给多人控制。例如家具式的智能排插能够支持被所有的家人打开或者关闭,因此就出现一个控制端 App 能够控制多个设备端,或者多个用户能够相互控制多个设备的权限管理问题。由此出现了群组管理,智能场景等概念。
此章节介绍了关于设备控制的内容。
设备功能
-
ThingSmartDeviceModel类的dps属性(NSDictionary类型)定义了当前设备的状态,称作数据点(DP,Data Point)或功能点。 -
dps字典里的每个key对应一个设备功能的dpId,value对应一个设备功能的dpValue,dpValue为该设备功能的值。一款产品的设备功能定义可以在 涂鸦开发者平台 上查看。如下图:
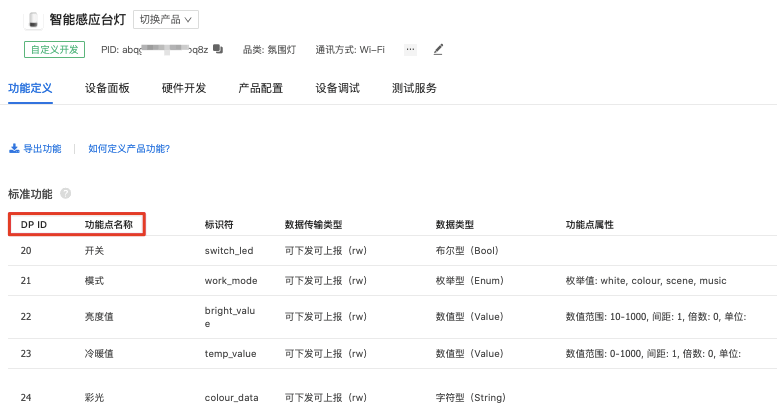
更多详情,请参考 产品功能。
指令格式
发送控制指令按照以下格式:
{
    "(dpId)":"(dpValue)"
}
假设您在涂鸦开发者平台上,查看到一款灯具产品的设备功能有 1、4、5、6、15。其示例代码可能为:
Objective-C:
- (void)publishDps {
    // self.device = [ThingSmartDevice deviceWithDeviceId:@"your_device_id"];

    NSDictionary *dps;
    // 设置 dpId 为 1 的布尔型设备功能示例,作用:开关打开
    dps = @{@"1": @(YES)};

    // 设置 dpId 为 4 的字符串型设备功能示例,作用:设置 RGB 颜色为 ff5500
    dps = @{@"4": @"ff5500"};

    // 设置 dpId 为 5 的枚举型设备功能示例,作用:设置档位为 2 档
    dps = @{@"5": @"2"};

    // 设置 dpId 为 6 的数值型设备功能示例,作用:设置温度为 20°
    dps = @{@"6": @(20)};

    // 设置 dpId 为 15 的透传型(byte 数组)设备功能示例,作用:透传红外数据为 1122
    dps = @{@"15": @"1122"};

    // 多个功能合并发送
    dps = @{@"1": @(YES), @"4": @(ff5500)};

    [self.device publishDps:dps success:^{
        NSLog(@"publishDps success");

        // 下发成功,状态上报通过 deviceDpsUpdate 方法回调

    } failure:^(NSError *error) {
        NSLog(@"publishDps failure: %@", error);
    }];

}
Swift:
func publishDps() {
    var dps = [String : Any]()

    // DP 可参考具体产品定义
    device?.publishDps(dps, success: {
         print("publishDps success")

        //下发成功,状态上报通过 deviceDpsUpdate 方法回调
    }, failure: { (error) in
        if let e = error {
            print("publishDps failure: \(e)")
        }
    })
}
发送控制命令时,注意数据类型。例如:
- 设备功能的数据类型是数值型(value)时,则发送的数据应该是类似于
{"2": 25},而不是类似于{"2": "25"}。 - 透传类型传输的 Byte 数组是 16 进制字符串格式,并且必须是偶数位,则发送的数据应该是类似于
@{@"1": @"011f"},而不是类似于@{@"1": @"11f"}。
设备控制
设备控制接口功能为向设备发送 DP,来改变设备状态或功能。
常规控制
支持 自动选择通道、局域网控制 和 云端控制 这三种控制通道,通常来说 建议使用自动选择通道 的方式。
-
自动选择通道控制:
根据设备模型
ThingSmartDeviceModel的communication.communicationModes顺序来依次检查通道是否可用,自动选择合适的通道进行控制。[self.device publishDps:dps success:^{ NSLog(@"publishDps success"); } failure:^(NSError *error) { NSLog(@"publishDps failure: %@", error); }]; // or use [self.device publishDps:dps mode:ThingDevicePublishModeAuto success:^{ NSLog(@"publishDps success"); } failure:^(NSError *error) { NSLog(@"publishDps failure: %@", error); }]; -
局域网控制:
仅通过局域网控制,需要设备局域网在线。
[self.device publishDps:dps mode:ThingDevicePublishModeLocal success:^{ NSLog(@"publishDps success"); } failure:^(NSError *error) { NSLog(@"publishDps failure: %@", error); }]; -
云端控制:
仅通过云端控制,需要设备云端在线。
[self.device publishDps:dps mode:ThingDevicePublishModeInternet success:^{
    NSLog(@"publishDps success");
} failure:^(NSError *error) {
    NSLog(@"publishDps failure: %@", error);
}];
低功耗设备离线下发配置类 DP
将需要下发给设备的 dps 缓存在云端,待设备唤醒后,设备主动拉取或接收云端推送。
仅适用于低功耗类设备,无需设备在线也可调用。
接口说明
/// Publish dps cached in the cloud, and then the device itself requests to pull OR receives push from cloud.
///
/// Note: Only suitable for low-power device.
/// When the device is dormant, sending dps through this API will be cached in the cloud for a period of time.
/// When the device wakes up within the validity period, the device can get the cached dps.
///
/// @param dps The DP dictionary.
/// @param validity The cached dps validity period. (Unit: second, Range: 1 ~ 172800).
/// @param dpCacheType The dps cache type. (0: device itself requests to pull, 1: device receives push from cloud).
/// @param success Called when the task is finished.
/// @param failure Called when the task is interrupted by an error.
- (void)sendCacheDps:(NSDictionary *)dps
            validity:(NSUInteger)validity
         dpCacheType:(NSUInteger)dpCacheType
             success:(ThingSuccessID)success
             failure:(ThingFailureError)failure;
参数说明
| 参数 | 说明 |
|---|---|
| dps | 数据点 |
| validity | 缓存有效期,单位:秒,范围:1 ~ 172800 |
| dpCacheType | DP 缓存类型
|
| success | 下发成功回调 |
| failure | 下发失败回调 |
示例代码
Objective-C:
- (void)sendCacheDPS {
    // validity = 10:在云端缓存 10 秒
    // dpCacheType = 0:设备主动拉取
    // 调用后,该 dps 在云端缓存 10 秒,设备在 10 秒内唤醒,设备主动调用接口拉取缓存的 dps

    // self.device = [ThingSmartDevice deviceWithDeviceId:devId];
    [self.device sendCacheDps:dps validity:10 dpCacheType:0 success:^(id result) {
        NSLog(@"send cache dps success");
    } failure:^(NSError *error) {
        NSLog(@"send cache dps failure");
    }];
}
Swift:
func sendCacheDPS() {
    // validity = 100:在云端缓存 100 秒
    // dpCacheType = 1:设备接收云端推送
    // 调用后,该 dps 在云端缓存 100 秒,设备在 100 秒内唤醒,会接收到云端推送缓存的 dps

    // device = ThingSmartDevice(deviceId: devId)
    device?.sendCacheDps(dps, validity: 100, dpCacheType: 1, success: { _ in
        print("send cache dps success")
    }, failure: { error in
        print("send cache dps failure")
    })
}
该内容对您有帮助吗?
是意见反馈该内容对您有帮助吗?
是意见反馈