业务拓展 SDK 开发教程
更新时间:2024-06-26 02:02:31LLM 副本以 Markdown 格式查看下载 PDF
本文提供手把手教程,介绍如何集成业务拓展 SDK,通过少量代码,从零开始实现一个简单的家庭、设备和家庭成员之间互动的 App。
准备工作
开始之前,按照以下要求准备开发环境:
- Xcode 14.1 或以上版本。
- Apple 开发者账号。
- 如需使用 CocoaPods 集成 SDK,则确保已安装 CocoaPods,或参考 Getting Started 进行安装。
- 一台 iOS 11 版本以上手机。
- 一个有效的智能生活 App SDK 项目。在涂鸦开发者平台,注册账号并创建 App。更多信息,参考 准备工作:
- 获取 SDK 的
AppKey和AppSecret。 - 解压
ios_core_sdk.tar.gz后得到的重要文件,请妥善保存。 - iOS 包名。
- 获取 SDK 的
创建项目
按照以下步骤,在 Xcode 中创建一个项目。
- 参考 Create a project 创建一个项目。Application 选择 App,Interface 选择 Storyboard,Language 选择 Swift,Bundle Identifier 填入在涂鸦开发者平台创建的 iOS 包名。
- 为您的项目设置 自动签名。
- 设置部署您的 App 的 目标设备。
- 在
info.plist文件中,添加项目需要的权限。
集成 SDK
- 使用 CocoaPods 将涂鸦智能生活 App SDK 集成到您的项目中。更多信息,参考 集成智能生活 App SDK。
- 使用 CocoaPods 将业务拓展 SDK 集成到您的项目中。更多信息,参考 集成业务拓展 SDK。
实现流程
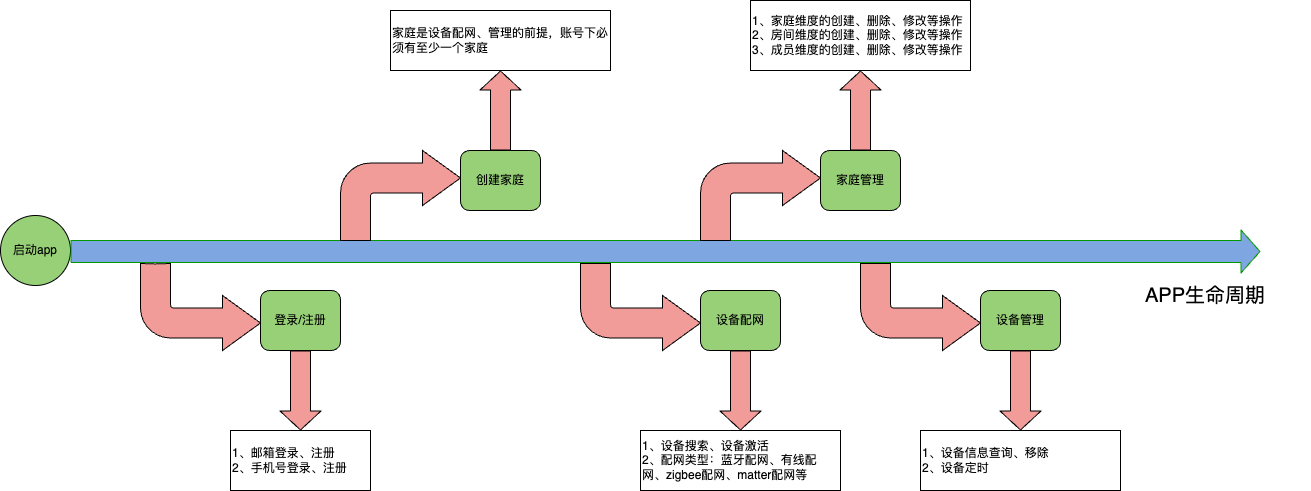
启动流程
在 application:didFinishLaunchingWithOptions: 中完成 App 的初始化配置流程。
-
初始化
ThingSmartSDK,传入涂鸦开发者平台上生成的AppKey和AppSecret。 -
初始化
ThingSmartBusinessExtensionKit。 -
如果您的 App 需要支持 Matter 设备,使用 CocoaPods 将 MatterSDK 集成到您的项目中。更多信息,参考 Matter 设备。
-
加载当前家庭信息,如果未选择任何家庭,默认以第一个家庭作为当前家庭。如果有
appGroupName,则传入项目的appGroupName。 -
App 启动后,判断用户是否登录。如果已登录,则进入 App 首页,没有登录则进入登录注册页面。
func application(_ application: UIApplication, didFinishLaunchingWithOptions launchOptions: [UIApplication.LaunchOptionsKey: Any]?) -> Bool {
    // Initialize ThingSmartSDK
    ThingSmartSDK.sharedInstance().start(withAppKey: AppKey.appKey, secretKey: AppKey.secretKey)

    // Initialize ThingSmartBusinessExtensionKit
    ThingSmartBusinessExtensionConfig.setupConfig()

    // Set your Matter Group ID if your app supports Matter
    ThingSmartMatterActivatorConfig.setMatterKey("your_group_id")

    // Load last current family info
    ThingSmartFamilyBiz.sharedInstance().launchCurrentFamily(withAppGroupName: "your_app_group_name")

    window = UIWindow(frame: UIScreen.main.bounds)

    if #available(iOS 13.0, *) {
        // Go into scene delegate
    } else {
        if ThingSmartUser.sharedInstance().isLogin {
            // User has already logged. Launch the app with the main view controller.
            let storyboard = UIStoryboard(name: "ThingSmartMain", bundle: nil)
            let vc = storyboard.instantiateInitialViewController()
            window?.rootViewController = vc
            window?.makeKeyAndVisible()
        } else {
            // There's no user logged. Launch the app with the login and register view controller.
            let storyboard = UIStoryboard(name: "Main", bundle: nil)
            let vc = storyboard.instantiateInitialViewController()
            window?.rootViewController = vc
            window?.makeKeyAndVisible()
        }
    }

    return true
}
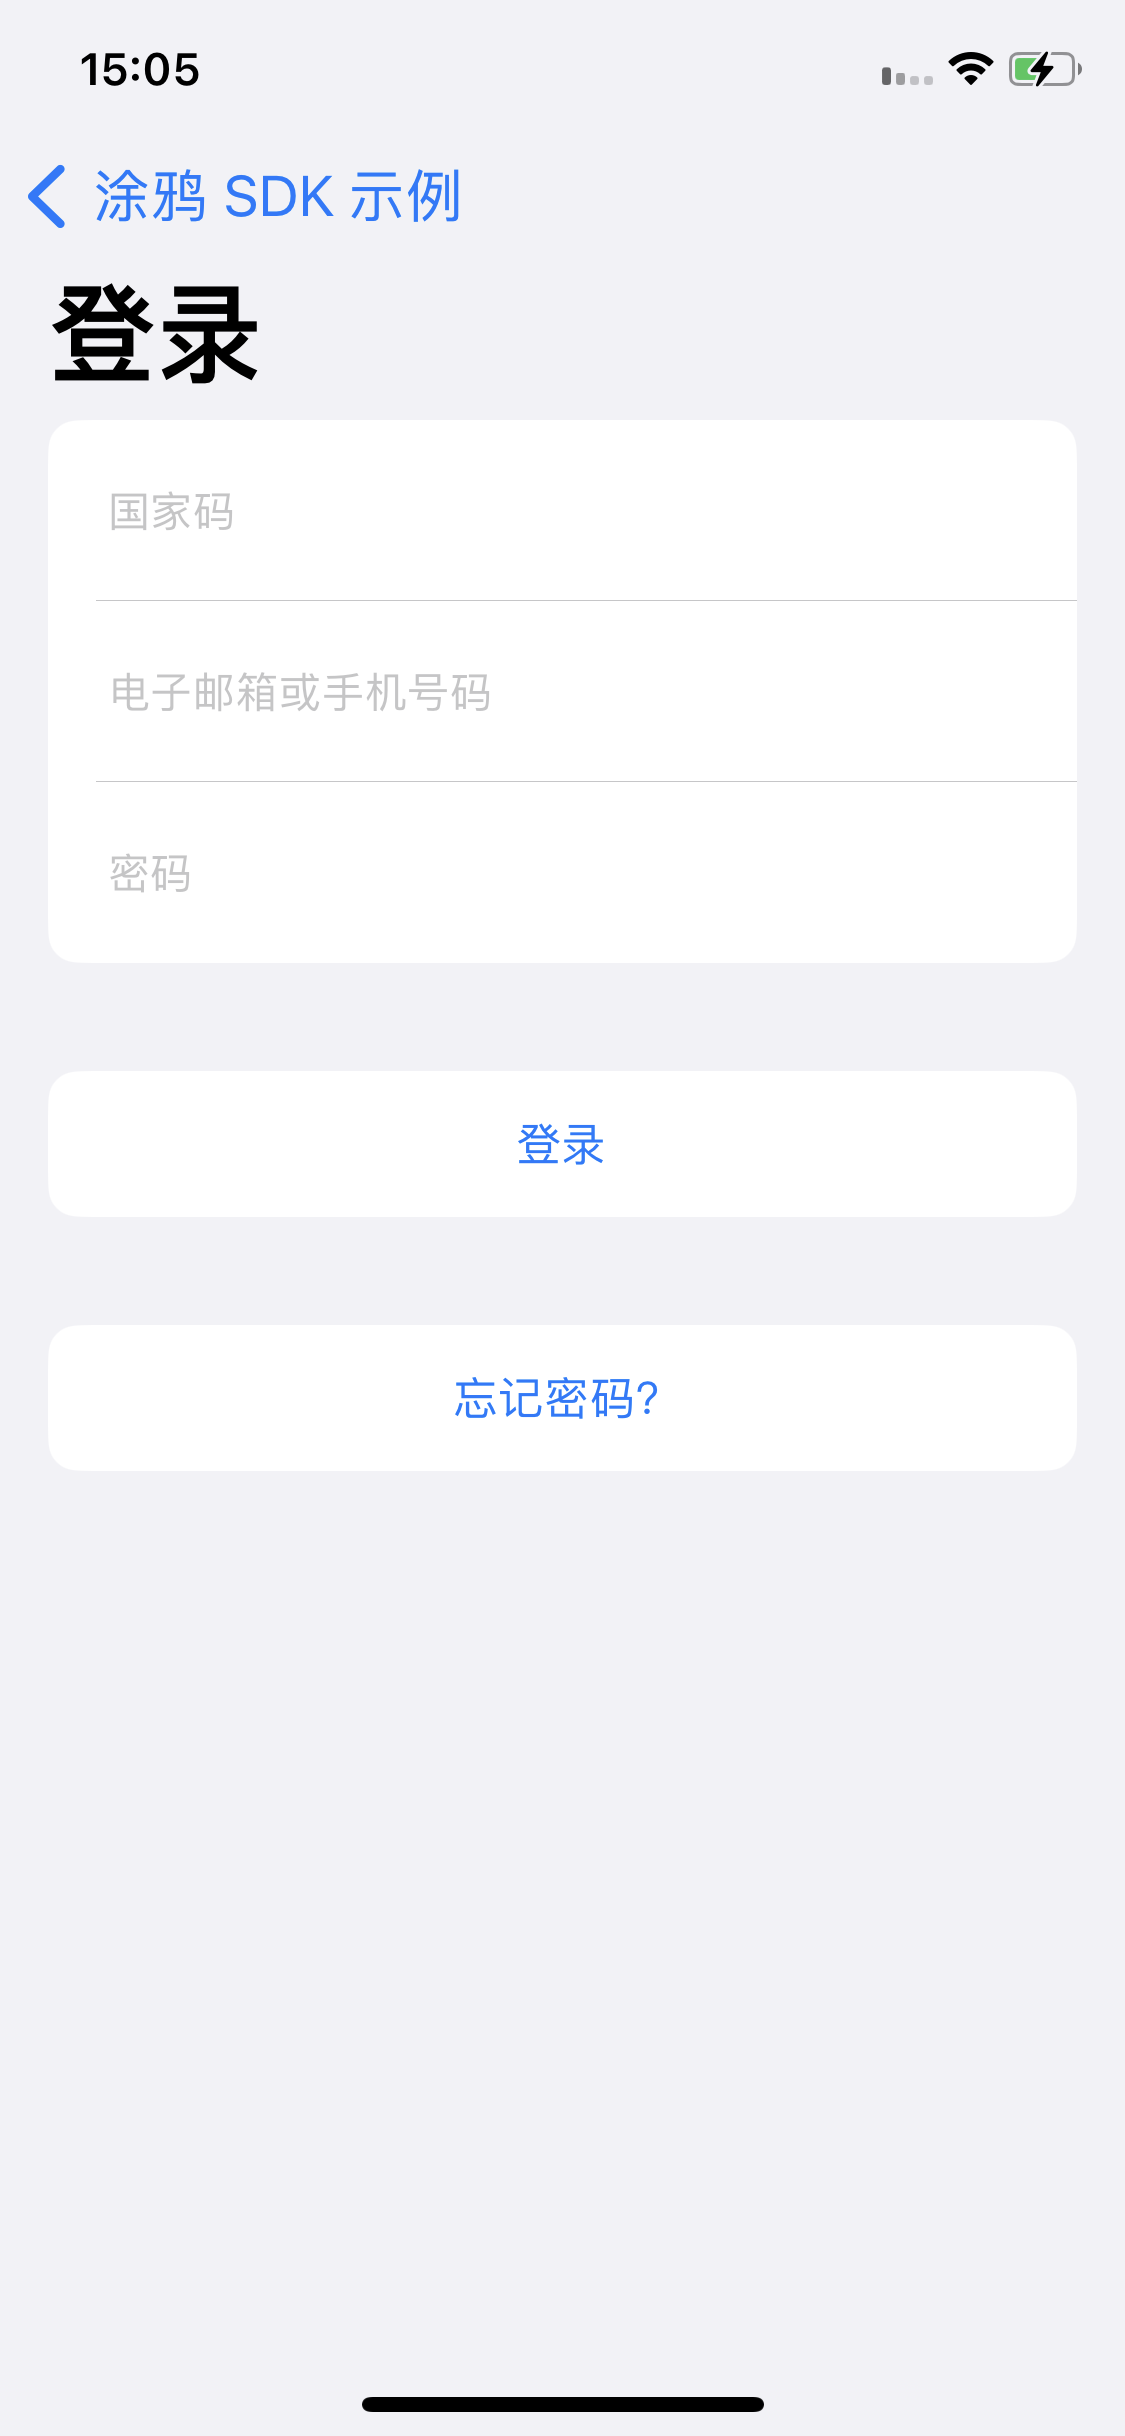
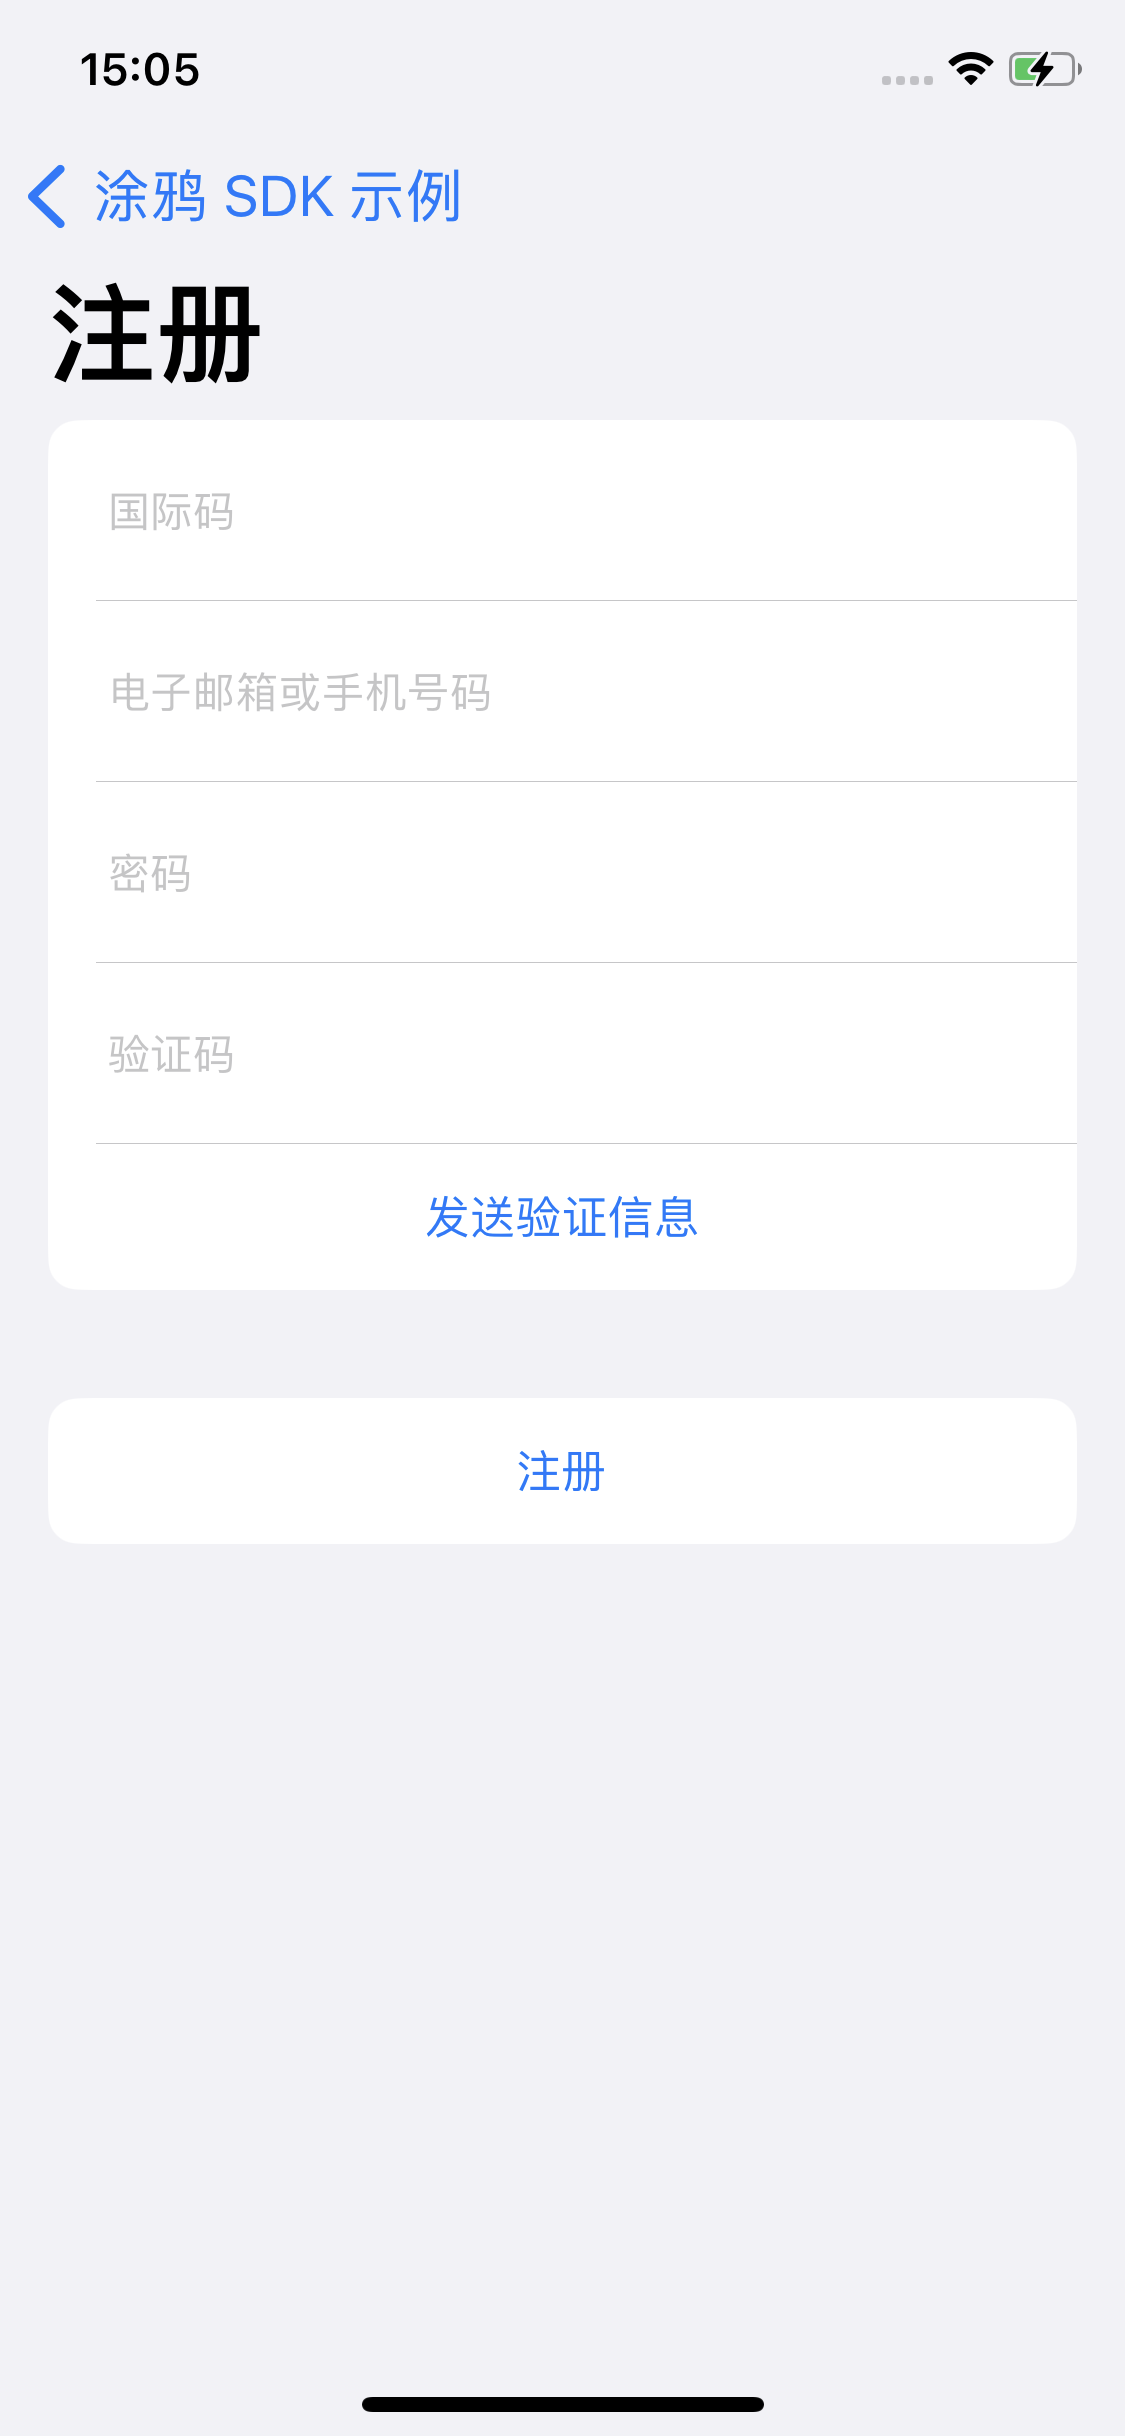
用户注册和登录
新建登录和注册页面 Login.storyboard 和 Register.storyboard,对应的 UI 如下:
-
输入账号、密码,单击 登录 按钮,调用
ThingSmartUser.login方法,登录成功跳转到 App 首页。ThingSmartUser.sharedInstance().login(byPhone: countryCode, phoneNumber: account, password: password) { [weak self] in guard let self = self else { return } let storyboard = UIStoryboard(name: "ThingSmartMain", bundle: nil) let vc = storyboard.instantiateInitialViewController() self.window?.rootViewController = vc } failure: { [weak self] (error) in guard let self = self else { return } Alert.showBasicAlert(on: self, with: NSLocalizedString("Failed to Login", comment: ""), message: error?.localizedDescription ?? "") } -
输入账号、密码、验证码,单击 登录 按钮,调用
ThingSmartUser.register方法,注册成功跳转到 App 首页。ThingSmartUser.sharedInstance().register(byPhone: countryCode, phoneNumber: account, password: password, code: verificationCode) { [weak self] in guard let self = self else { return } let action = UIAlertAction(title: NSLocalizedString("OK", comment: ""), style: .default) { _ in self.navigationController?.popViewController(animated: true) } Alert.showBasicAlert(on: self, with: NSLocalizedString("Registered Successfully", comment: ""), message: NSLocalizedString("Please navigate back to login your account.", comment: ""), actions: [action]) } failure: { [weak self] (error) in guard let self = self else { return } let errorMessage = error?.localizedDescription ?? "" Alert.showBasicAlert(on: self, with: NSLocalizedString("Failed to Register", comment: ""), message: errorMessage) }
该内容对您有帮助吗?
是意见反馈该内容对您有帮助吗?
是意见反馈
关注“涂鸦智能”
涂鸦服务尽在掌握

关注“全球智能商业”
第一时间获取物联网资讯