
Select and Change the Firmware Version
The constant software upgrade services ensure that the products can be operated properly with different firmware versions. Even if the products are being developed or have been produced, this services can help to ensure the delivery of quality products.
Prerequisites
You have created at least one product. For more information, see Create Products.
Background information
After you create a product in the Tuya IoT Console and select the corresponding hardware (chip, module or PCBA), the system will automatically match the firmware according to your development solution.
Due to market changes and development solution upgrades, Tuya will regularly upgrade the firmware. Tuya will deprecate some firmware of old versions based on the original chip iteration. In the Tuya IoT Console, higher or other available versions will be provided for selection and use.
Step 1: select firmware when product creation
This section describes how to select the firmware.
-
Log in to IoT Console and enter My Products.
-
Find a product in Developing, and click Entering to Develop.
-
Click Hardware Develop.

-
For the product developed by a custom solution, you need to select the cloud connection mode. You can also select the required hardware, such as module and PCBA.
- A device can be directly connected to the cloud through Tuya standard module MCU SDK and Tuya standard module SDK.
- The common gateway protocol connection modes are Tuya standard gateway module connection and gateway SDK connection.
-
Select the firmware and firmware version. For some connection modes, Tuya will provide you with the firmware.
When you select the firmware for the first time, the latest firmware version will be applied by default. After purchasing the hardware for debugging, you will get the module burned with the corresponding firmware.
Step 2: select firmware version
Method 1: upgrade firmware version according to system prompt
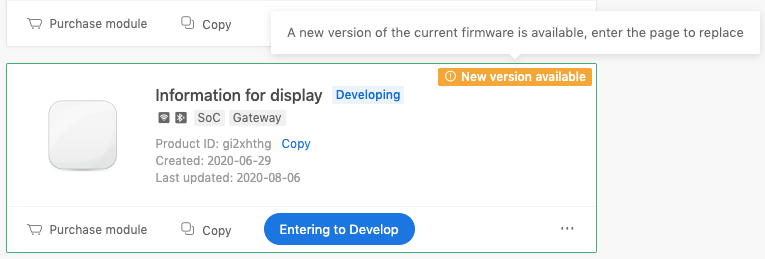
If your product has selected the hardware and firmware version, when a new version is available, you will receive a prompt in My Products of Product Management in the IoT Console.
-
Log in to IoT Console and enter My Products.
-
Find a product with upgrade prompt, and click Entering to Develop.
-
Click Hardware Develop.
-
In the firmware version management, select the corresponding firmware version.
The latest version usually optimizes the software solution. You can choose whether to upgrade to the latest version as needed.
Method 2: deprecate firmware version according to system prompt
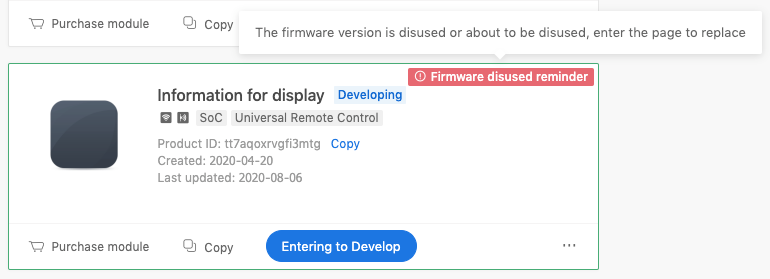
Due to unavoidable reasons, such as the iteration of original chips, Tuya will deprecate related firmware versions. You will receive a deprecation prompt in My Products of Product Management in the IoT Console. In order not to affect your production and delivery, the firmware needs to be upgraded timely.
-
Log in to IoT Console and enter My Products.
-
Find a product with depreciation prompt, and click Entering to Develop.
-
Click Hardware Develop.
-
In the firmware version management, select the corresponding firmware version.
The latest version usually optimizes the software solution. You can choose whether to upgrade to the latest version as needed.
Method 3: upgrade firmware version after product creation
-
Log in to IoT Console and enter My Products.
-
Find a product in Developing, and click Entering to Develop.
-
Click Hardware Develop.
-
In the Selected Firmware list, find the firmware to be changed.
-
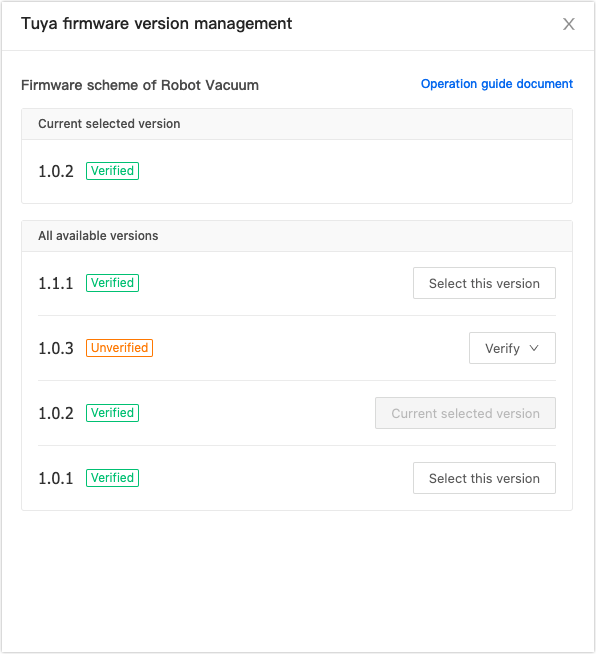
Click Change, and you can see all available versions and check their description in firmware version management.
-
You select a version in the list. If the version has not been verified, you need to verify it first and then confirm it is verified.
Step 3: verify firmware version
The IoT Console provides two online methods of verifying firmware.
- Method 1: Buy the debugging hardware (module, PCBA, or chip) burned with the upgraded firmware. You can use it to verify the firmware.
- Method 2: The existing hardware (module, PCBA, or chip) of the same model uses the same firmware, and its firmware version is lower than the target version. You can use over-the-air (OTA) method to upgrade this firmware to the target version and then verify the firmware.
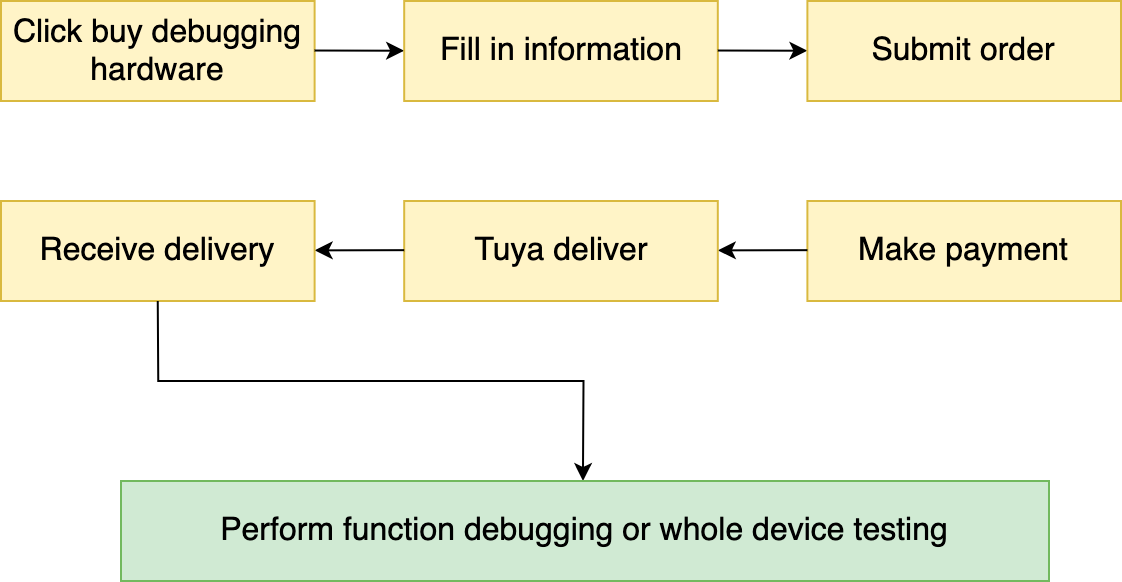
Method 1: buy debugging module to verify
-
Log in to IoT Console and enter My Products.
-
Find a product in Developing, and click Entering to Develop.
-
Click Hardware Develop.
-
In the firmware version management, find the target version and click Verify > Buy debugging module to verify.
The system will confirm whether your order is applicable (if there is a problem, you can check the error).
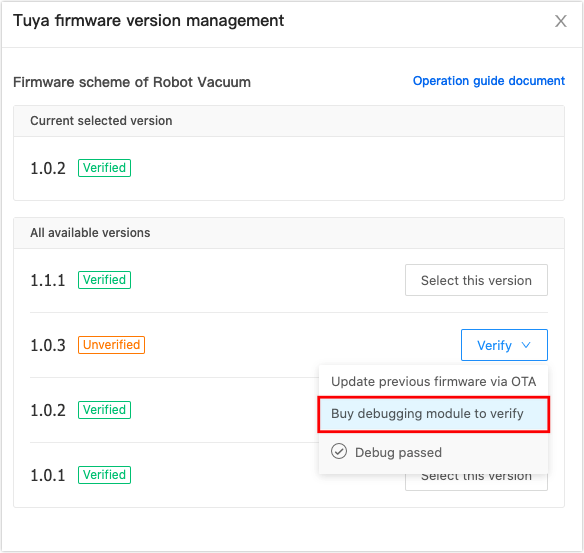
-
You create an order. If a module has multiple firmwares, you can change the version number for other firmwares as needed.
-
Fill in the recipient information, submit the order, and make payment. You will receive the sample burned with required firmware.
You can perform a complete functional test of the firmware on this hardware sample.
Method 2: upgrade previous firmware via OTA
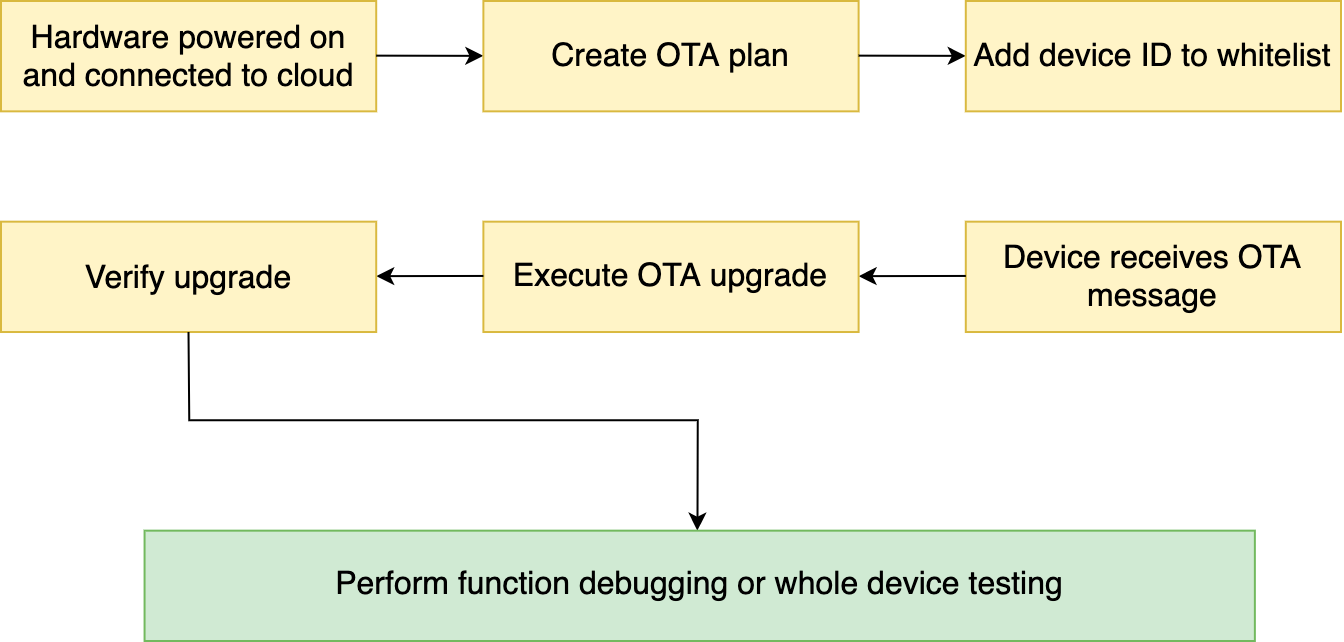
Before you perform OTA upgrades, you need to confirm the following:
- Consistent hardware: You already have the hardware of the same model as the hardware to be verified. The hardware can be module, PCBA, or chip.
- Consistent firmware: Your hardware is burned with the same firmware as that to be verified. You can check the previous purchase order and confirm whether the firmware key is consistent.
- Current version is lower than target version: The version number that has been burned to the hardware is lower than version number to be verified. You can check the version number in the previous purchase order or find it on the app after the hardware is powered on and has network access.
After confirmation, verify the firmware version as follows:
-
Connect the local device to the cloud and check the device ID in the device panel. You confirm the firmware version number.
-
Log in to IoT Console and enter My Products.
-
Find a product in Developing, and click Entering to Develop.
-
Click Hardware Develop.
-
In the firmware version management, find the target version and click Verify > Update previous firmware via OTA.
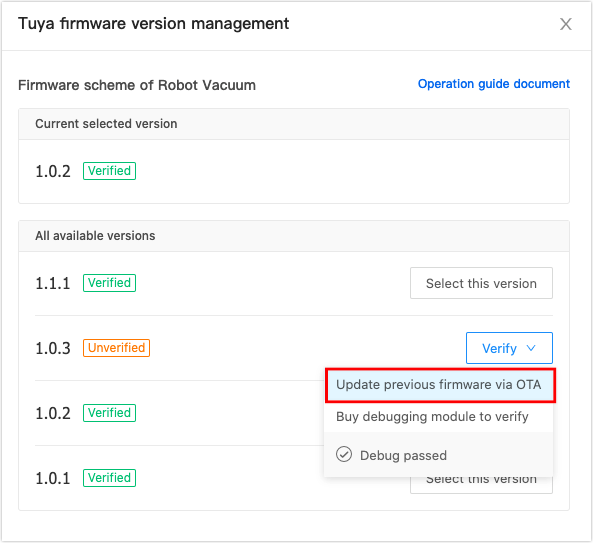
-
The system will send a prompt according to whether the OTA plan has been created for this version. You follow the prompts for further operations until the OTA plan is created.
Note: If a higher version of the OTA plan has been released, the device will be upgraded to this version by default. Therefore, if you want to specify a target version that the device is upgraded to, you need to firstly stop pushing the full OTA upgrade of the higher version. Ensure that the specified device ID is only added to the whitelist of the target version.
-
Click Verify to enter Test equipment verification list, add the device ID to the list, and save. Then, the device will receive an OTA message. You tap Upgrade on the app.
-
You can check whether the upgrade is successful by clicking Verify, or you check the firmware version on the app.
For now, you have the hardware with the target firmware and can perform a complete functional test of the firmware.
Step 4: test verification firmware
Assemble Tuya hardware on the PCB board or bare metal. After the device is connected to the cloud, you can start testing complete functions of the whole device.
Plug and play solution
Develop products based on the Tuya plug and play solution, that is, the firmware visualization configuration solution. It provides convenient, fast and accurate automation testing tools. If your product adopts a plug and play solution, you can use the Tuya Cloud Test app to perform automation test of the device. Scan the QR code below to download the Tuya Cloud Test app (Android only). Then, see the Help documentation for whole device testing.
Custom solution
Custom solution includes networking modules and MCU connection method. Currently, it does not support automation testing of the whole device. The IoT Console provides a module debugging tool "Tuya debugging assistant" and data point debugging files to facilitate the debugging of networking modules. See the module debugging assistant for debugging procedure.
To ensure the compatibility between the new firmware version and the MCU module, after completing the PCBA or bare mental assembly, and the device is connected to the cloud, you need to perform the whole device self-test again according to the actual product function.
-
Specific tips are provided for each product in steps of Hardware Develop. You can view them at any time.
-
After the whole device has passed the test, go back to the firmware version management list and mark the corresponding version as Debug passed. Then, you can select any Verified version and provide information for purchasers to place orders.
Is this page helpful?
YesFeedbackIs this page helpful?
YesFeedback