iOS App: Implement User Account Features
Tuya app SDK for iOS supports comprehensive and flexible management of smart app users. This tutorial walks you through multiple steps to get started with the Smart App SDK service and implement user account features of your app. For example, users can register an account of the app, log in to the app, log out of the app, reset the password of the app, and modify account information. In the following hands-on approaches, the sample code for Objective-C is used to describe the process.
In this tutorial, you will learn how to implement the following features:
- Register an account of the app with a mobile phone number, log in to the app with the account, and then bind an email address to the account.
- Register an account of the app with an email address and log in to the app with the account.
- Configure and sign in to the app with a Google account.
- View and modify account information, such as the password and nickname.
App SDK Development GitHub Sample
Environment requirements
Before you start, the following requirements must be met:
-
An account of the Tuya Developer Platform is registered, an app is built on the platform, and the values of
AppKeyandAppSecretof the Smart App SDK service are obtained. For more information, see Preparation. -
Tuya app SDK for iOS is integrated into your project with CocoaPods. For more information, see Fast Integration.
Note: If an error message is returned after you integrate the Smart App SDK service and use a simulator to compile code, you can troubleshoot the error. For more information, see Troubleshoot an error.
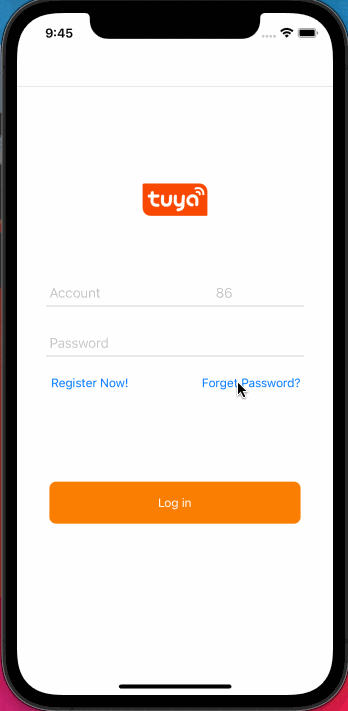
Preview
This tutorial helps you create the following sample app for iOS.

Background information
To implement registration with a mobile phone number or an email address, you must set the countryCode parameter to specify the country code. This way, the availability zone closest to users’ location can be selected to serve workloads in the Tuya Cloud. For example, countryCode for America is 1 and that for mainland China is 86. The data in different availability zones is isolated from each other. Therefore, an account that is registered in America (1) cannot be used in mainland China (86). Otherwise, an error message is returned to indicate that the account does not exist. For more information, see What is Tuya Cloud Platform?
In this tutorial, the ThingSmartUser object is frequently called. This object is a singleton that stores all information about the current user including login and registration methods. For more information, see User data model.
Register and login with a mobile phone number or email address
Query areas for the verification code service
To strengthen data security, Tuya has optimized the verification code service and placed limits on accounts. The verification code service is available only in limited areas. To query these areas, the following solution is recommended:
-
Solution: Query the areas in which the verification code service is enabled on the Tuya Developer Platform for your account.
-
API method: returns a list of areas in which the verification code service is enabled on the Tuya Developer Platform for your account.
- (void)getWhiteListWhoCanSendMobileCodeSuccess:(ThingSuccessString)success failure:(ThingFailureError)failure; -
Example:
[[ThingSmartUser sharedInstance] getWhiteListWhoCanSendMobileCodeSuccess:^(NSString *regions) { } failure:^(NSError *error) { }]; -
Return value: The value of
regionsindicates one or more countries or areas that are separated with commas (,). For example,86,01can be returned. For more information, see Availability zone. -
Activation: Currently, the verification code service is activated by default in mainland China. If you want to publish your application to other countries or areas, you must verify that the verification code service is available in a specific country or area and contact your account manager of Tuya or submit a ticket to activate the service.
Get a verification code to register with a mobile phone number
- Solution: Registration with a mobile phone number is similar to registration with an email address. To proceed with the registration, users must get a verification code.
- API method: In the latest version of the Smart App SDK service, the verification code sending API method
sendVerifyCodeByRegisterEmail:for earlier versions has been deprecated. The API method to send verification codes has been optimized. This allows you to use the same API method to send verification codes to an account that might be registered with a mobile phone number or an email address. The verification codes are required in multiple operations. For example, register an account, modify a password, log in to the app, or complete account information. - Example:
NSString * region = [[ThingSmartUser sharedInstance] getDefaultRegionWithCountryCode:countryCode]; [[ThingSmartUser sharedInstance] sendVerifyCodeWithUserName:userName // The mobile phone number or email address. region:region countryCode:countryCode // The NSString object, such as `86` or `01`. type:1 // The type of code. Set the value to `1` to enable registration with a verification code. success:^{ // The request is successful. } failure:^(NSError *error) { // The request failed. // Returns error details from error.localizedDescription. }];Note: The
typeparameter must be set to1. Otherwise, the registration failed.
Register an account with a mobile phone number
-
Solution: To register an account with a mobile phone number, users must provide the country code, mobile phone number, password, and the returned verification code. For more information, see Register with the mobile phone number and password.
-
Example:
[[ThingSmartUser sharedInstance] registerByPhone:countryCode // The country code, such as `86` or `1`.
		phoneNumber:phone
		password:password
		code:code  // The verification code.
		success:^{

				// The registration is successful.

		} failure:^(NSError *error) {

				// The registration failed.
			// Returns error details from error.localizedDescription.

	}];
Login to the account with a mobile phone number
-
Solution: After users register an account with mobile phone numbers, they can log in to the app with their phone numbers. For more information, see Login with the mobile phone number and password.
-
Example:
[[ThingSmartUser sharedInstance] loginByPhone:countryCode
		phoneNumber:phone
		password:password
		success:^{

				// Indicates successful login.

		} failure:^(NSError *error) {

			// Indicates a failed login attempt.
	}];
Bind an email address to the account
-
Solution: After users log in to the app with their mobile phone numbers, they can bind email addresses to their accounts. This enables login to the app with the email address. To enable binding an email address, you must call
sendBindingVerificationCodeWithEmailto get a verification code. Note that the API method to get a verification code that enables email address-based registration is independent of the API method for binding an email address. -
Example to get a verification code:
[[ThingSmartUser sharedInstance] sendBindingVerificationCodeWithEmail:userName countryCode:countryCode success:^{ // The request is successful. } failure:^(NSError *error) { // The request failed. }]; -
Example to bind an email address:
[[ThingSmartUser sharedInstance] bindEmail:account
		withCountryCode:countryCode
		code:code
		sId:[ThingSmartUser sharedInstance].sid
		success:^{

			// Indicates successful binding.

		} failure:^(NSError *error) {

			// Failed to bind the email address.

}];
Register an account with an email address
-
Solution: Similar to the registration with a mobile phone number, in this solution, users must provide the country code, email address, password, and the returned verification code. For more information, see Register with the email address and password.
-
Example:
[[ThingSmartUser sharedInstance] registerByEmail:countryCode
		email:email
		password:password
		code:code
		success:^{

		// Indicates a successful registration.

		} failure:^(NSError *error) {

			// Indicates a failed registration.

		}];
Login to the account with an email address
-
Solution: After users register an account with their email addresses, they can log in to the app with their email addresses. For more information, see Login with the email address and password.
-
Example:
[[ThingSmartUser sharedInstance] loginByEmail:countryCode email:email password:password success:^{ // Indicates successful login. } failure:^(NSError *error) { // Indicates a failed login attempt. }]; -
You can add
[ThingSmartUser sharedInstance]to the login page code to store login information for a short period after login. Therefore, if users start the app next time within this short period, the login process will be skipped.// If the user has logged in to the app, if ([ThingSmartUser sharedInstance].isLogin) { // navigate to the homepage without login. }
Login with third-party accounts
Tuya app SDK supports login with accounts of common third-party platforms, such as Google, Facebook, WeChat, and Tencent QQ. In the following examples, the accounts of Apple and Google are used for login.
Login with the Sign in with Apple feature
Note: If your application supports login with accounts of third-party platforms, such as Facebook, WeChat, and Tencent QQ, the Sign in with Apple feature must be enabled for your application. Otherwise, the application might fail the Apple App Store review.
You can configure the Sign in with Apple feature. For more information, see Create an iOS Certificate. To enable this feature, perform the following steps:
-
Sign in to your Apple Developer account and navigate to the Edit your App ID Configuration page. Select the Sign In with Apple option, regenerate the
Profilesconfiguration file, and then import the file toXcode.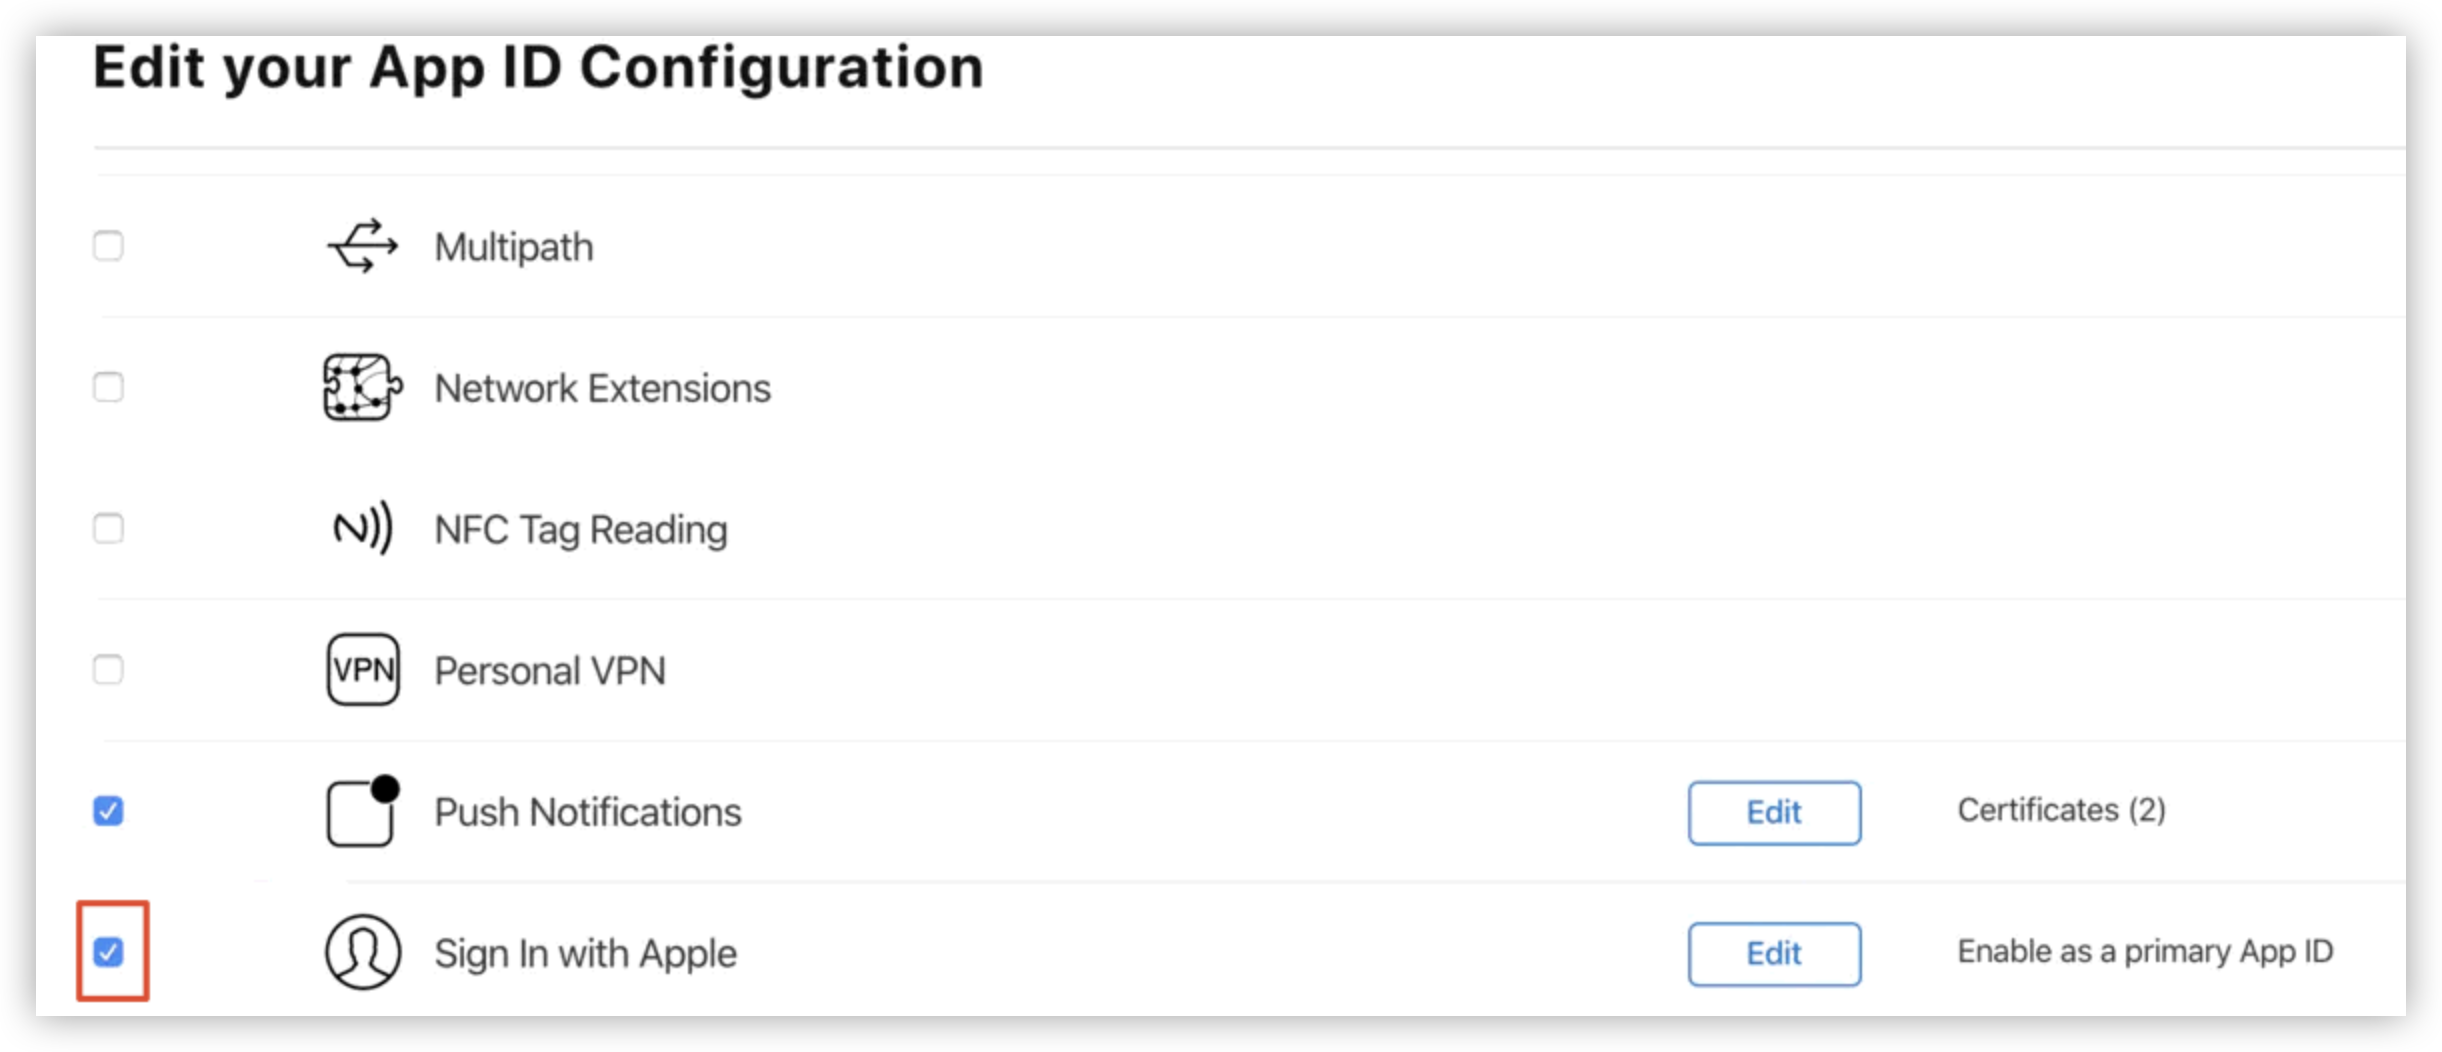
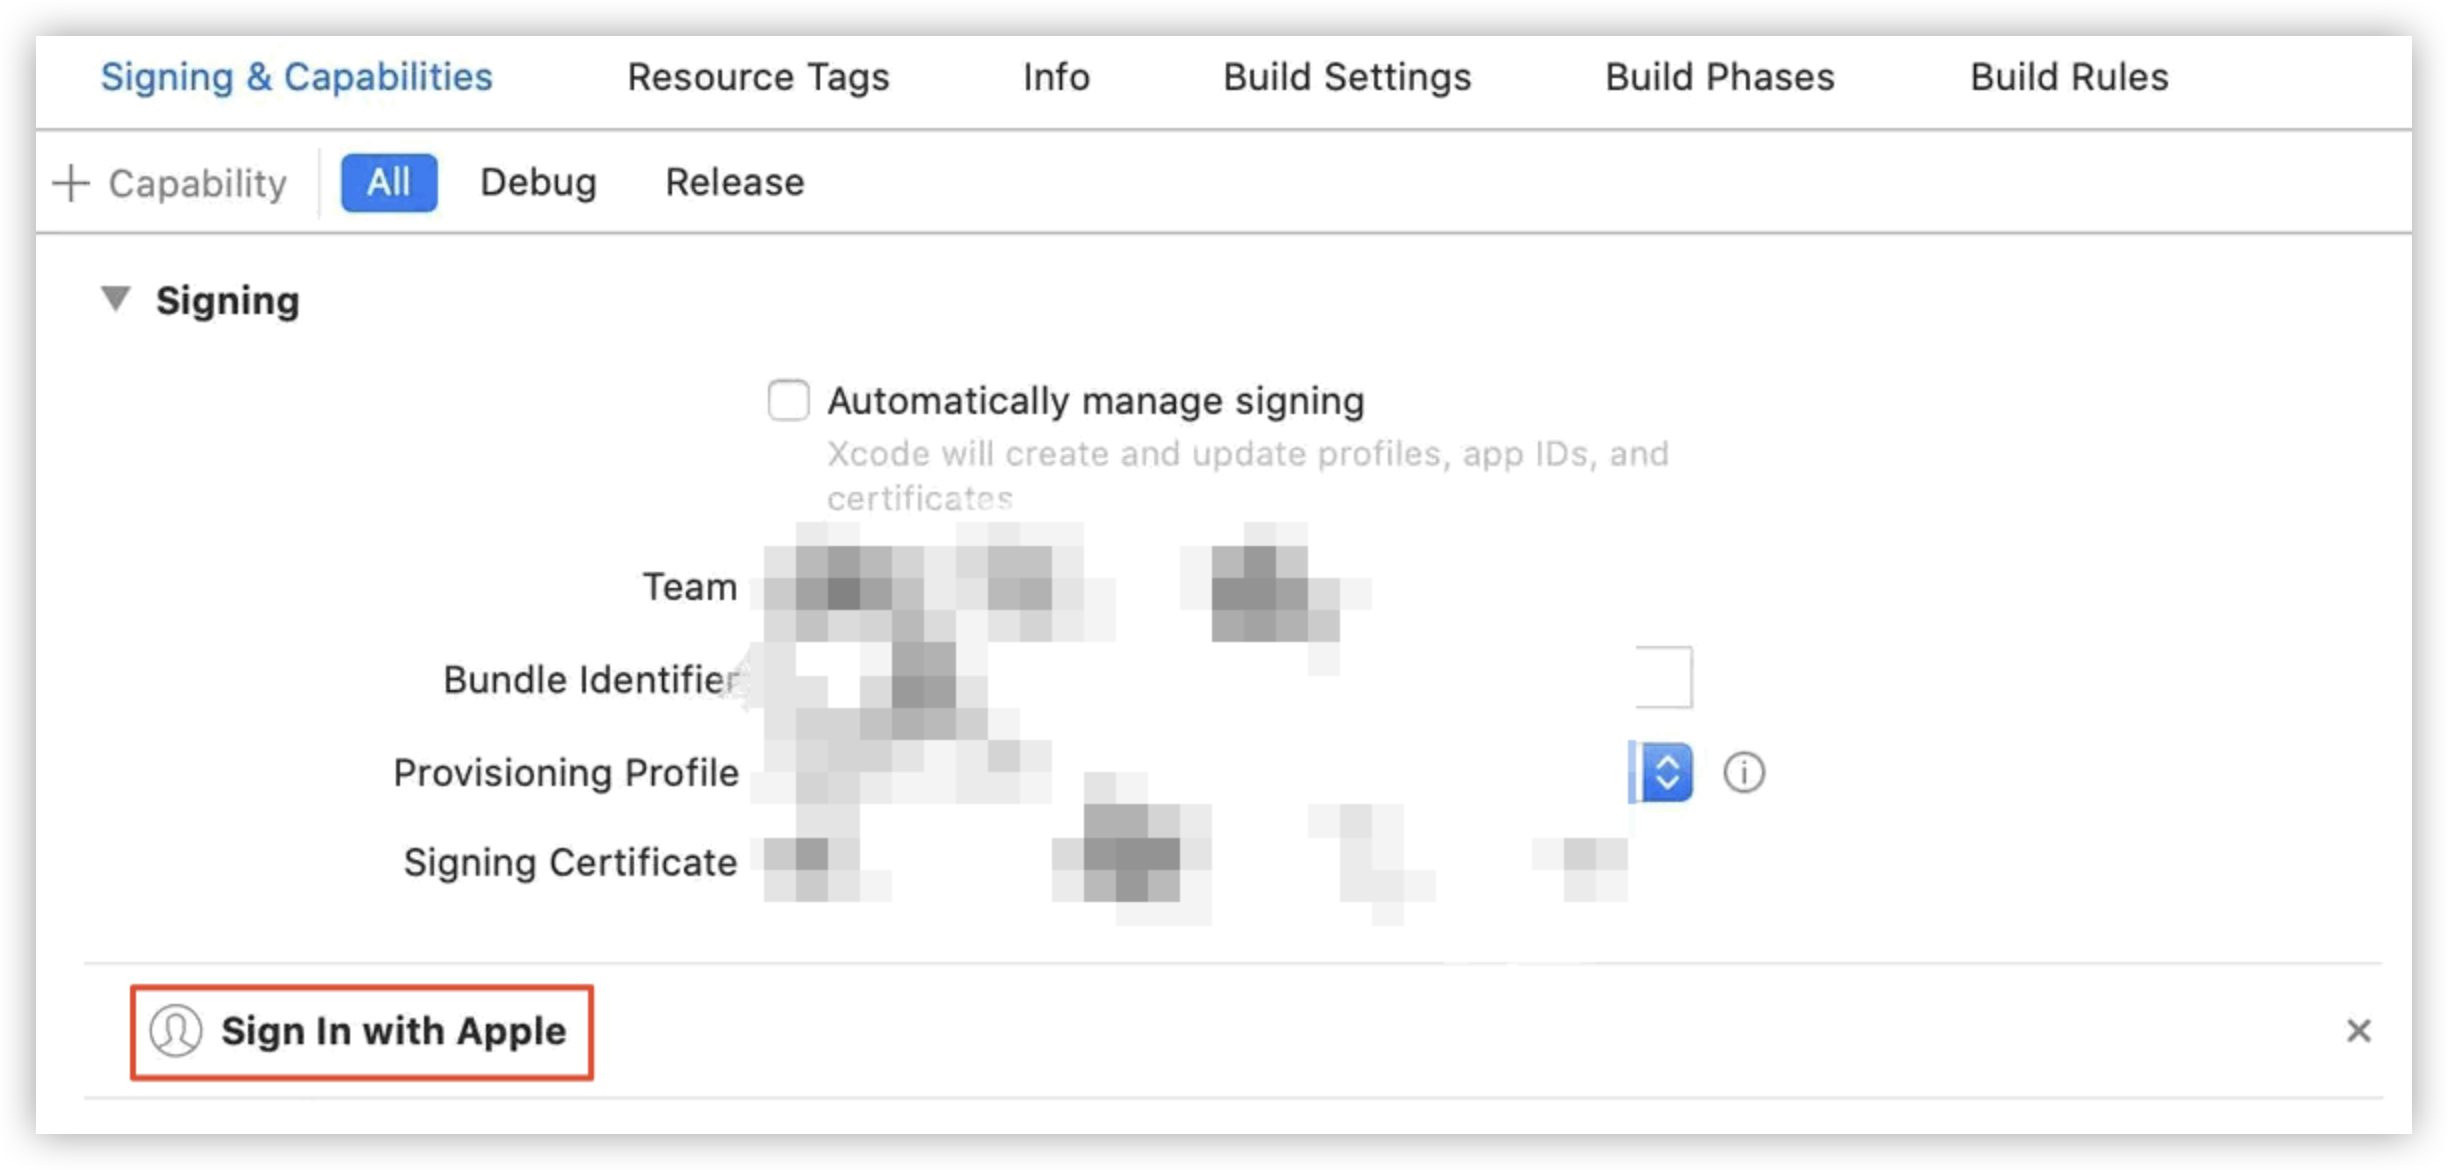
-
Click the Signing & Capabilities tab of your Xcode project and add the Sign In With Apple capability.
-
Get the authorization code and verify the login request.
Examples:
-
Add the Sign In with Apple login button, set the layout of
ASAuthorizationAppleIDButton, and then add events to respond to button taps. Apple allows customized styles of the login button. For more information, see Human Interface Guidelines.if (@available(iOS 13.0, *)) { // Sign In With Apple Button ASAuthorizationAppleIDButton *appleIDBtn = [ASAuthorizationAppleIDButton buttonWithType:ASAuthorizationAppleIDButtonTypeDefault style:ASAuthorizationAppleIDButtonStyleWhite]; // appleIDBtn.frame = CGRectMake(30, self.view.bounds.size.height - 180, self.view.bounds.size.width - 60, 100); [appleIDBtn addTarget:self action:@selector(handleAuthorizationAppleIDButtonPress) forControlEvents:UIControlEventTouchUpInside]; [self.view addSubview:appleIDBtn]; }- (void)handleAuthorizationAppleIDButtonPress{ if (@available(iOS 13.0, *)) { // A mechanism for generating user authorization requests based on the user's Apple ID ASAuthorizationAppleIDProvider *appleIDProvider = [[ASAuthorizationAppleIDProvider alloc] init]; // Create a new AppleID authorization request ASAuthorizationAppleIDRequest *appleIDRequest = [appleIDProvider createRequest]; // Contact information requested during the user authorization period appleIDRequest.requestedScopes = @[ASAuthorizationScopeFullName, ASAuthorizationScopeEmail]; // Founded by ASAuthorizationAppleIDProvider authorization request management authorization requests of the controller ASAuthorizationController *authorizationController = [[ASAuthorizationController alloc] initWithAuthorizationRequests:@[appleIDRequest]]; // Sets the authorization controller to notify the agent of the success and failure of the authorization request authorizationController.delegate = self; // Sets the agent that provides the presentation context in which the system can present the authorization interface to the user authorizationController.presentationContextProvider = self; // Start the authorization flow during controller initialization [authorizationController performRequests]; } } -
Get the authorization code.
In the sample code, implement the delegate callback
ASAuthorizationControllerDelegateto process successful authorization and the delegate callbackASAuthorizationControllerPresentationContextProvidingto process failed authorization. Then, load the authorization window to display the content.#pragma mark - delegate - (void)authorizationController:(ASAuthorizationController *)controller didCompleteWithAuthorization:(ASAuthorization *)authorization{ NSLog(@"finish:::%@", authorization.credential); NSLog(@"%s", __FUNCTION__); NSLog(@"%@", controller); NSLog(@"%@", authorization); if ([authorization.credential isKindOfClass:[ASAuthorizationAppleIDCredential class]]) { // Login by ASAuthorizationAppleIDCredential. ASAuthorizationAppleIDCredential *appleIDCredential = authorization.credential; NSString *user = appleIDCredential.user; NSString *familyName = appleIDCredential.fullName.familyName; NSString *givenName = appleIDCredential.fullName.givenName; NSString *email = appleIDCredential.email; // NSData *identityToken = appleIDCredential.identityToken; // NSData *authorizationCode = appleIDCredential.authorizationCode; // Create an account in your system. }else if ([authorization.credential isKindOfClass:[ASPasswordCredential class]]){ // Sign in using an existing iCloud Keychain credential. ASPasswordCredential *passwordCredential = authorization.credential; NSString *user = passwordCredential.user; NSString *password = passwordCredential.password; }else{ NSLog(@"Authorization information is inconsistent"); } } // Callback for an authorization failure. - (void)authorizationController:(ASAuthorizationController *)controller didCompleteWithError:(NSError *)error{ // The error log. NSLog(@"Error log: %@", error); switch (error.code) { case ASAuthorizationErrorCanceled: errorMsg = @"user canceled the authorization request"; break; case ASAuthorizationErrorFailed: errorMsg = @"Authorization request failed"; break; case ASAuthorizationErrorInvalidResponse: errorMsg = @"The authorization request response is invalid"; break; case ASAuthorizationErrorNotHandled: errorMsg = @"The authorization request could not be processed"; break; case ASAuthorizationErrorUnknown: errorMsg = @"The authorization request failed for unknown reason"; break; default: break; } } // The window to display content. - (ASPresentationAnchor)presentationAnchorForAuthorizationController:(ASAuthorizationController *)controller{ return self.view.window; }
In the successful authorization callback, the following data is returned:
- UserID: the unique, stable, and team-scoped user identifier for each Apple user. This value is the same for all apps under the same developer account. You can bind this unique ID to your account system. This binding process is similar to the login process with a Google account.
- Verification data: the identity token and verification code that are transmitted to your backend server and then to Apple’s verification server for authentication. Ensure the validity and authenticity of data in the login authorization request. For more information, see Sign in with Apple REST API.
- Account information: the Apple account information, such as the full name and verified email address.
Now, you are ready to call the loginWithApple API method to enable login with an Apple account. For more information, see Login with Apple.
[[ThingSmartUser sharedInstance] loginByAuth2WithType:@"ap"  // The fixed value.
		countryCode:@"your_country_code"
		accessToken:credential.identityToken extraInfo:{@"userIdentifier": credential.user, @"email": credential.email, @"nickname": credential.fullName.nickname, @"snsNickname": credential.fullName.nickname}   // You can get them from above code.
		success:^{
		// Indicates successful login.
	} failure:^(NSError *error) {
		// Indicates a failed login attempt.
	}];
Login with a Google account
To enable login with a Google account, you must log in to the Google Developers platform, configure information about your application, and then get the value of Client ID that is granted by Google’s authentication platform. Next, enter the value of Client ID to the field as shown in the following figure on the Tuya Developer Platform. For more information, see Configure Google Sign-In.

Now, you are ready to call the API method to enable login with a Google account.
[[ThingSmartUser sharedInstance] loginByAuth2WithType:@"gg"  // The fixed value.
		countryCode:countryCode // The country code, such as `86` or `01`.
		accessToken:accessToken  // The client ID.
		extraInfo:@{@"pubVersion": @1}
		success:^{
		// Indicates successful login.
	} failure:^(NSError *error) {
		// Indicates a failed login attempt.
	}];
Note: To enable login with a Google account in mainland China, make sure that the login device can access Google services.
Modify account information
After successful login, users can modify account information such as the nickname, password, and region. The following examples show how to modify the nickname and login password. For more information about the API method, see Modify user information.
Modify the nickname
If users log in to the app with their mobile phone numbers or email addresses. Then, you can call the API method updateNickname to modify the nicknames of their accounts. If a WeChat username is used as the default nickname for login with a WeChat account, the nickname cannot be modified. Example:
[[ThingSmartUser sharedInstance] updateNickname:nickName
		success:^{
				// Indicates a successful update.

		}failure:^(NSError *error) {
			// Indicates a failed update.

		}];
After the nickname is modified, [ThingSmartUser sharedInstance] immediately updates account information.
Reset the account password
If users want to reset the password or forgot passwords, the account verification and verification code can be used to reset the password. Similar to the registration process, you must call the API method to get a verification code. For more information, see Get a verification code to register with a mobile phone number. Note that the type parameter must be set to 3.
NSString * region = [[ThingSmartUser sharedInstance] getDefaultRegionWithCountryCode:countryCode];

[[ThingSmartUser sharedInstance] sendVerifyCodeWithUserName:userName // The phone number or email address.
		region:region
		countryCode:countryCode // The NSString object, such as `86` or `01`.
		type:3     // The type of verification code. Set the value to `3` to enable password resetting.
		success:^{
				// The request is successful.
		} failure:^(NSError *error) {
				// The request failed.
				// Returns error details from error.localizedDescription.
		}];
After users get the verification code, they can reset the password with the registered mobile phone number or email address.
Example of resetting the password with the mobile phone number
[[ThingSmartUser sharedInstance] resetPasswordByPhone:countryCode
		phoneNumber:phone
		newPassword:password
		code:code  // The verification code.
		success:^{

				// The password is successfully reset.

		} failure:^(NSError *error) {

				// Failed to reset the password.

		}];
Example of resetting the password with the email address
[[ThingSmartUser sharedInstance] resetPasswordByEmail:countryCode
		email:email
		newPassword:password
		code:code  // The verification code.
		success:^{

				// The password is successfully reset.

		} failure:^(NSError *error) {

				// Failed to reset the password.

		}];
Listen for session expiration notifications
If users reset the password or have not logged in for a long time, an error message is returned to indicate session expiration. For more information, see Process session expiration. In this case, you must listen for the notifications of ThingSmartUserNotificationUserSessionInvalid and navigate users to the login page.
[[NSNotificationCenter defaultCenter] addObserver:self selector:@selector(sessionInvalid) name:ThingSmartUserNotificationUserSessionInvalid object:nil];
-(void)sessionInvalid {

	// Return to the login page.

}
Log out of the app
- Solution: Log out of the app or switch to another account.
- API method: loginOut
- Example:
[[ThingSmartUser sharedInstance] loginOut:^{

			// Logout succeeded.

		} failure:^(NSError *error) {

			// Logout failed.

		}];
Cancel an account
- Solution: After users cancel their accounts, the accounts are permanently disabled. All information about the accounts is deleted from the app. Tuya reserves the accounts for seven days after the accounts are canceled. During this period, users can revoke the request to cancel the accounts by login to the app with the accounts.
- API method: cancelAccount
- Example:
[ThingSmartUser sharedInstance] cancelAccount:^{

				// The account is successfully canceled.

		} failure:^(NSError *error) {

		// Failed to cancel the account.

		}];
Troubleshoot an error
-
Problem: For the latest MacBook models that integrate the M1 chip, if you integrate the Smart App SDK service into Xcode 12 and use a simulator to compile code, the following error message is returned:
building for iOS Simulator, but linking in object ... file built for iOS, for architecture arm64 -
Cause: The settings of the compiling architecture are modified for Xcode 12.
-
Solution: To fix the error, you can set the compiling architecture of Xcode12. Perform the following steps:
- Choose PROJECT > Build Setting > Architectures > Excluded Architectures and specify arm64 as the excluded architecture.
Note: We recommend that you only set the Debug mode. Otherwise, if you set the Release mode, arm64 is still supported and the app cannot be built on a real device after packaging. You must exclude the arm64 architecture from both the main project and Pods.
- Choose PROJECT > Build Setting > User-Defined >, select VALID_ARCHS if it is included in the project, and then click Delete to delete VALID_ARCHS from User-Defined. VALID_ARCHS specifies a list of available architectures.
- Choose PROJECT > Build Setting > Architectures > Excluded Architectures and specify arm64 as the excluded architecture.
Is this page helpful?
YesFeedbackIs this page helpful?
YesFeedback


