Create Certificates and Provisioning Profiles for iOS
This topic describes how to generate certificates and provisioning profiles for iOS during the required settings to build your OEM app on the Tuya Developer Platform.
File types
| Certificate or provisioning profile | Apple’s file name | Description |
|---|---|---|
| Push certificate | Apple Push Notification service SSL Certificate | A certificate required to enable push notifications on mobile apps for iOS. |
| Distribution certificate | Apple distribution certificate | Used to sign your mobile app when you request to launch the mobile app on the App Store or when you get the app into TestFlight for testing. |
| Provisioning profiles | Provisioning profiles | Include the main application provisioning profile and application extension provisioning profile. |
You must create the certificates and provisioning profiles and upload them to the Tuya Developer Platform before your OEM app for iOS can be built and packaged. This allows you to test the app with TestFlight and launch it on the App Store.
Before you start
- Register and join the Apple Developer Program. This allows you to test the app with TestFlight or launch it on the App Store.
- If you are not involved in iOS development, we recommend that you still prepare a macOS computer. This helps you easily create the certificates and provisioning profiles.
- Then, create the App ID, App Group ID, and Extension App IDs for your app, as described in the following sections. These IDs are necessary for you to create the push certificate and provisioning profiles, and these certificates will be used to build and package your app.
Create App ID of main application
-
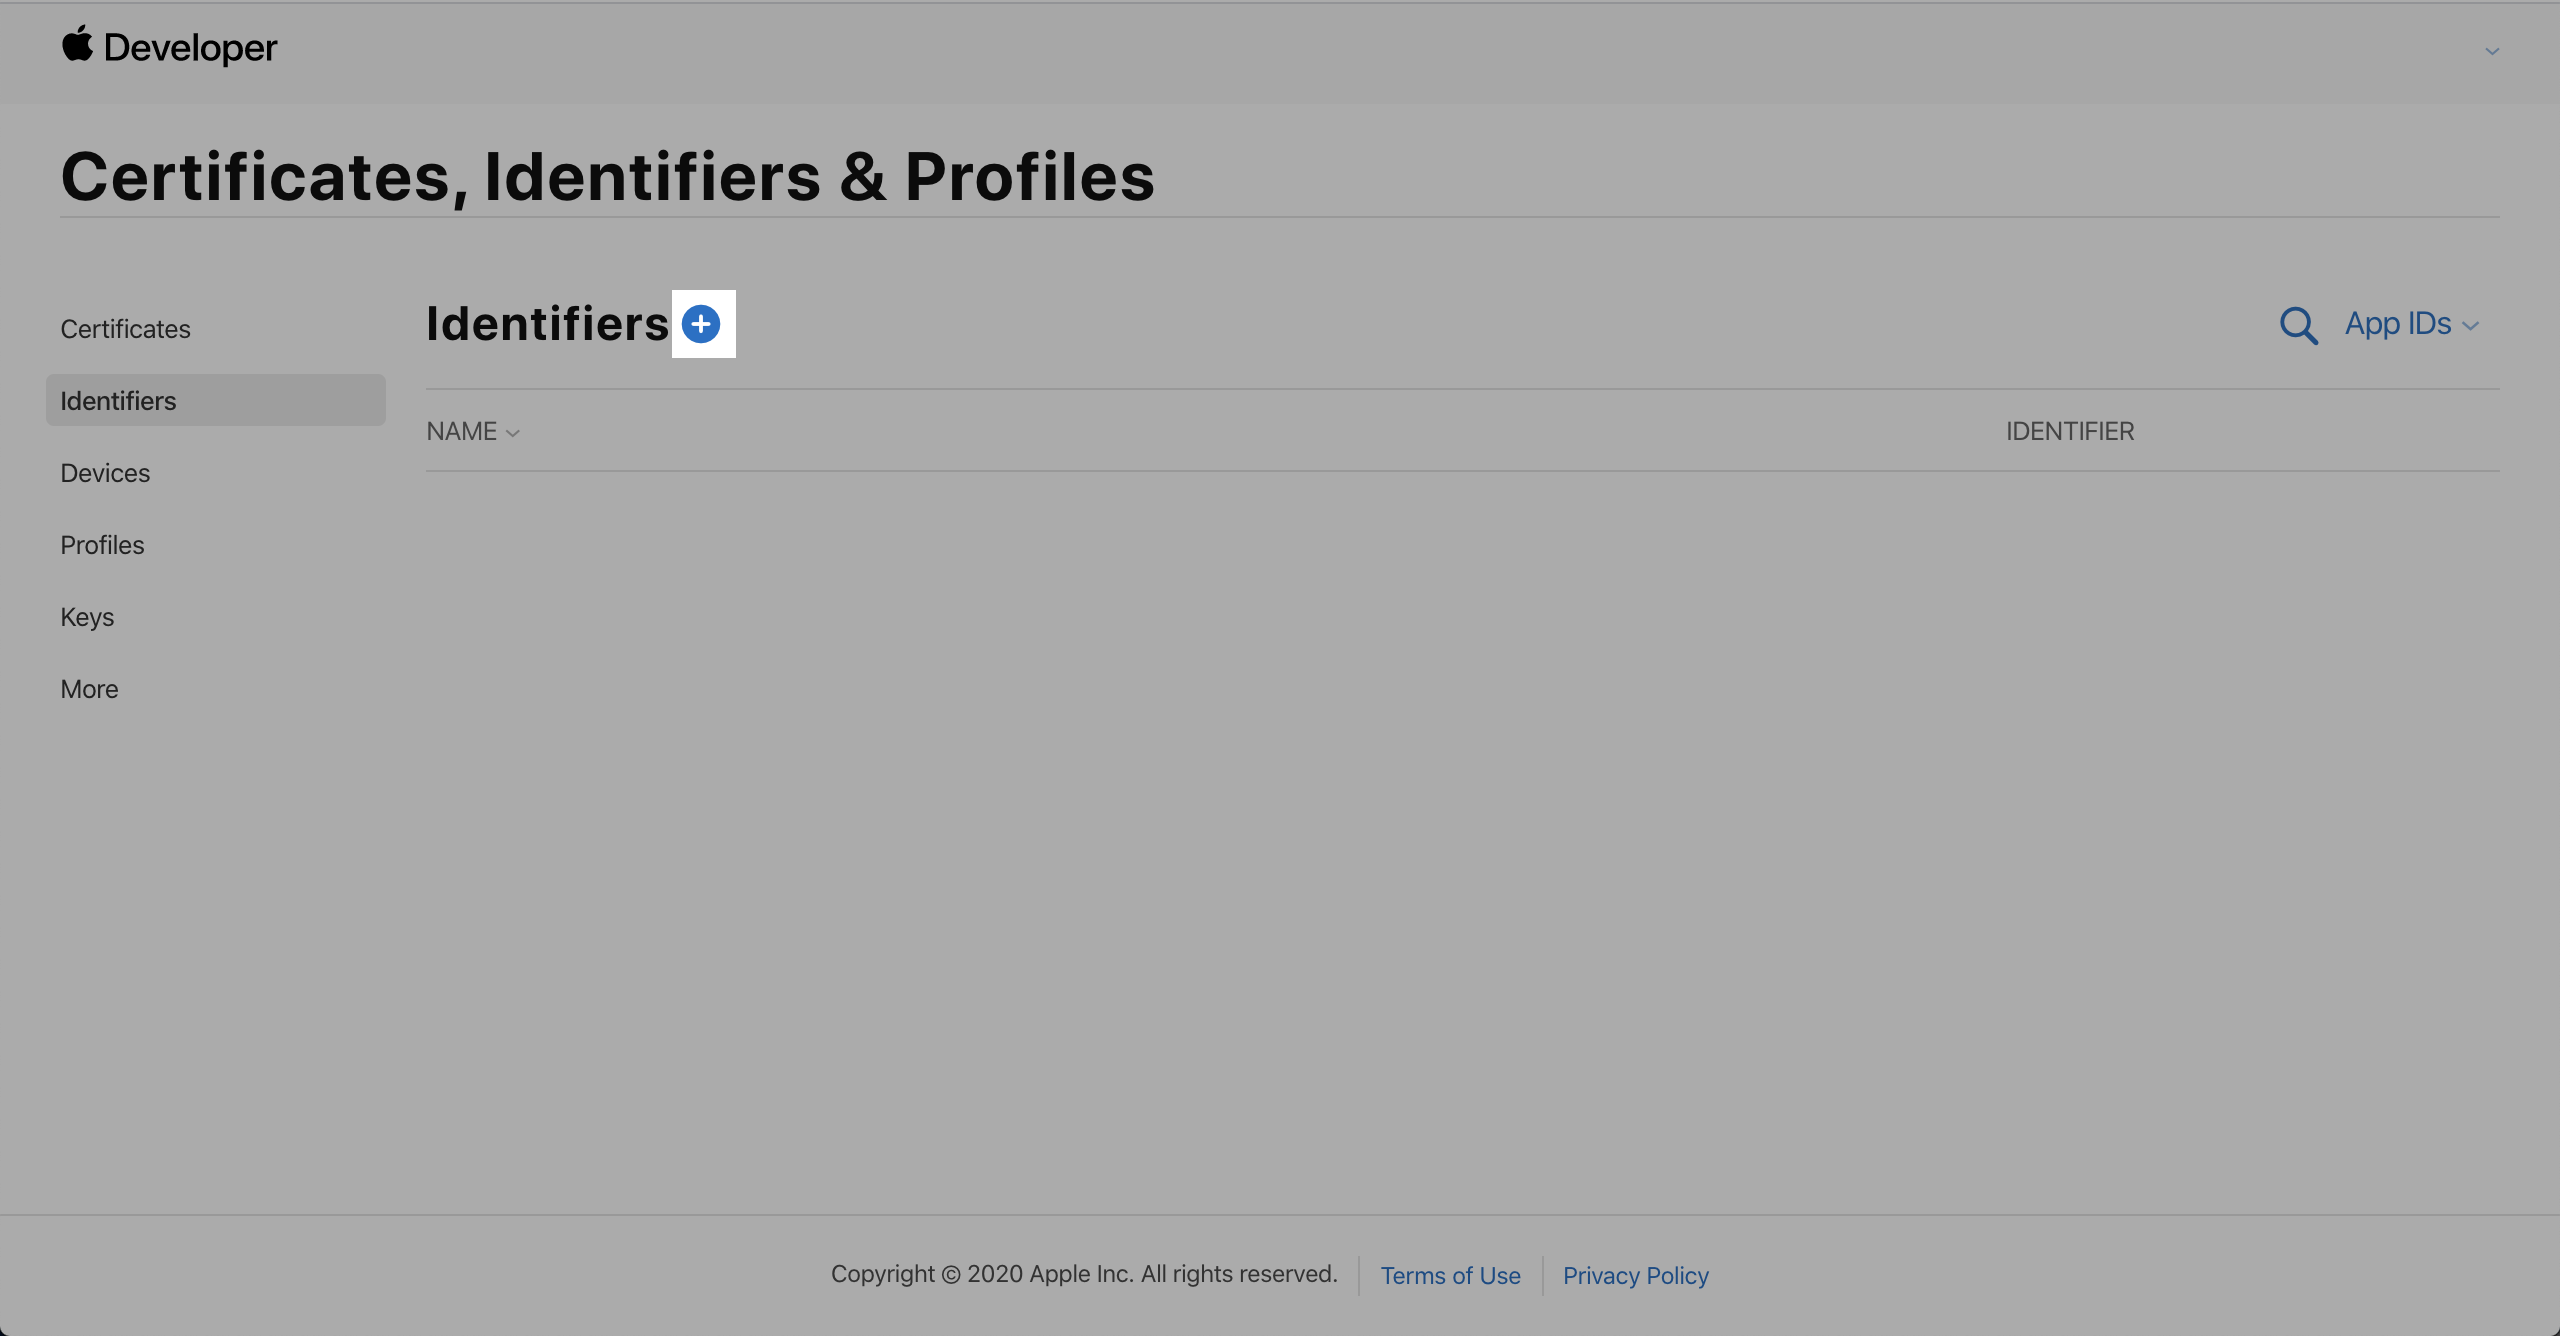
Log in to the Apple Developer platform and select Certificates, Identifiers & Profiles.

-
Go to the Identifiers page and click +.
-
Select the App IDs option and click Continue.

-
In the Description field, enter the description of your app, such as the app name. Set Bundle ID to Explicit and enter the bundle ID of your app.
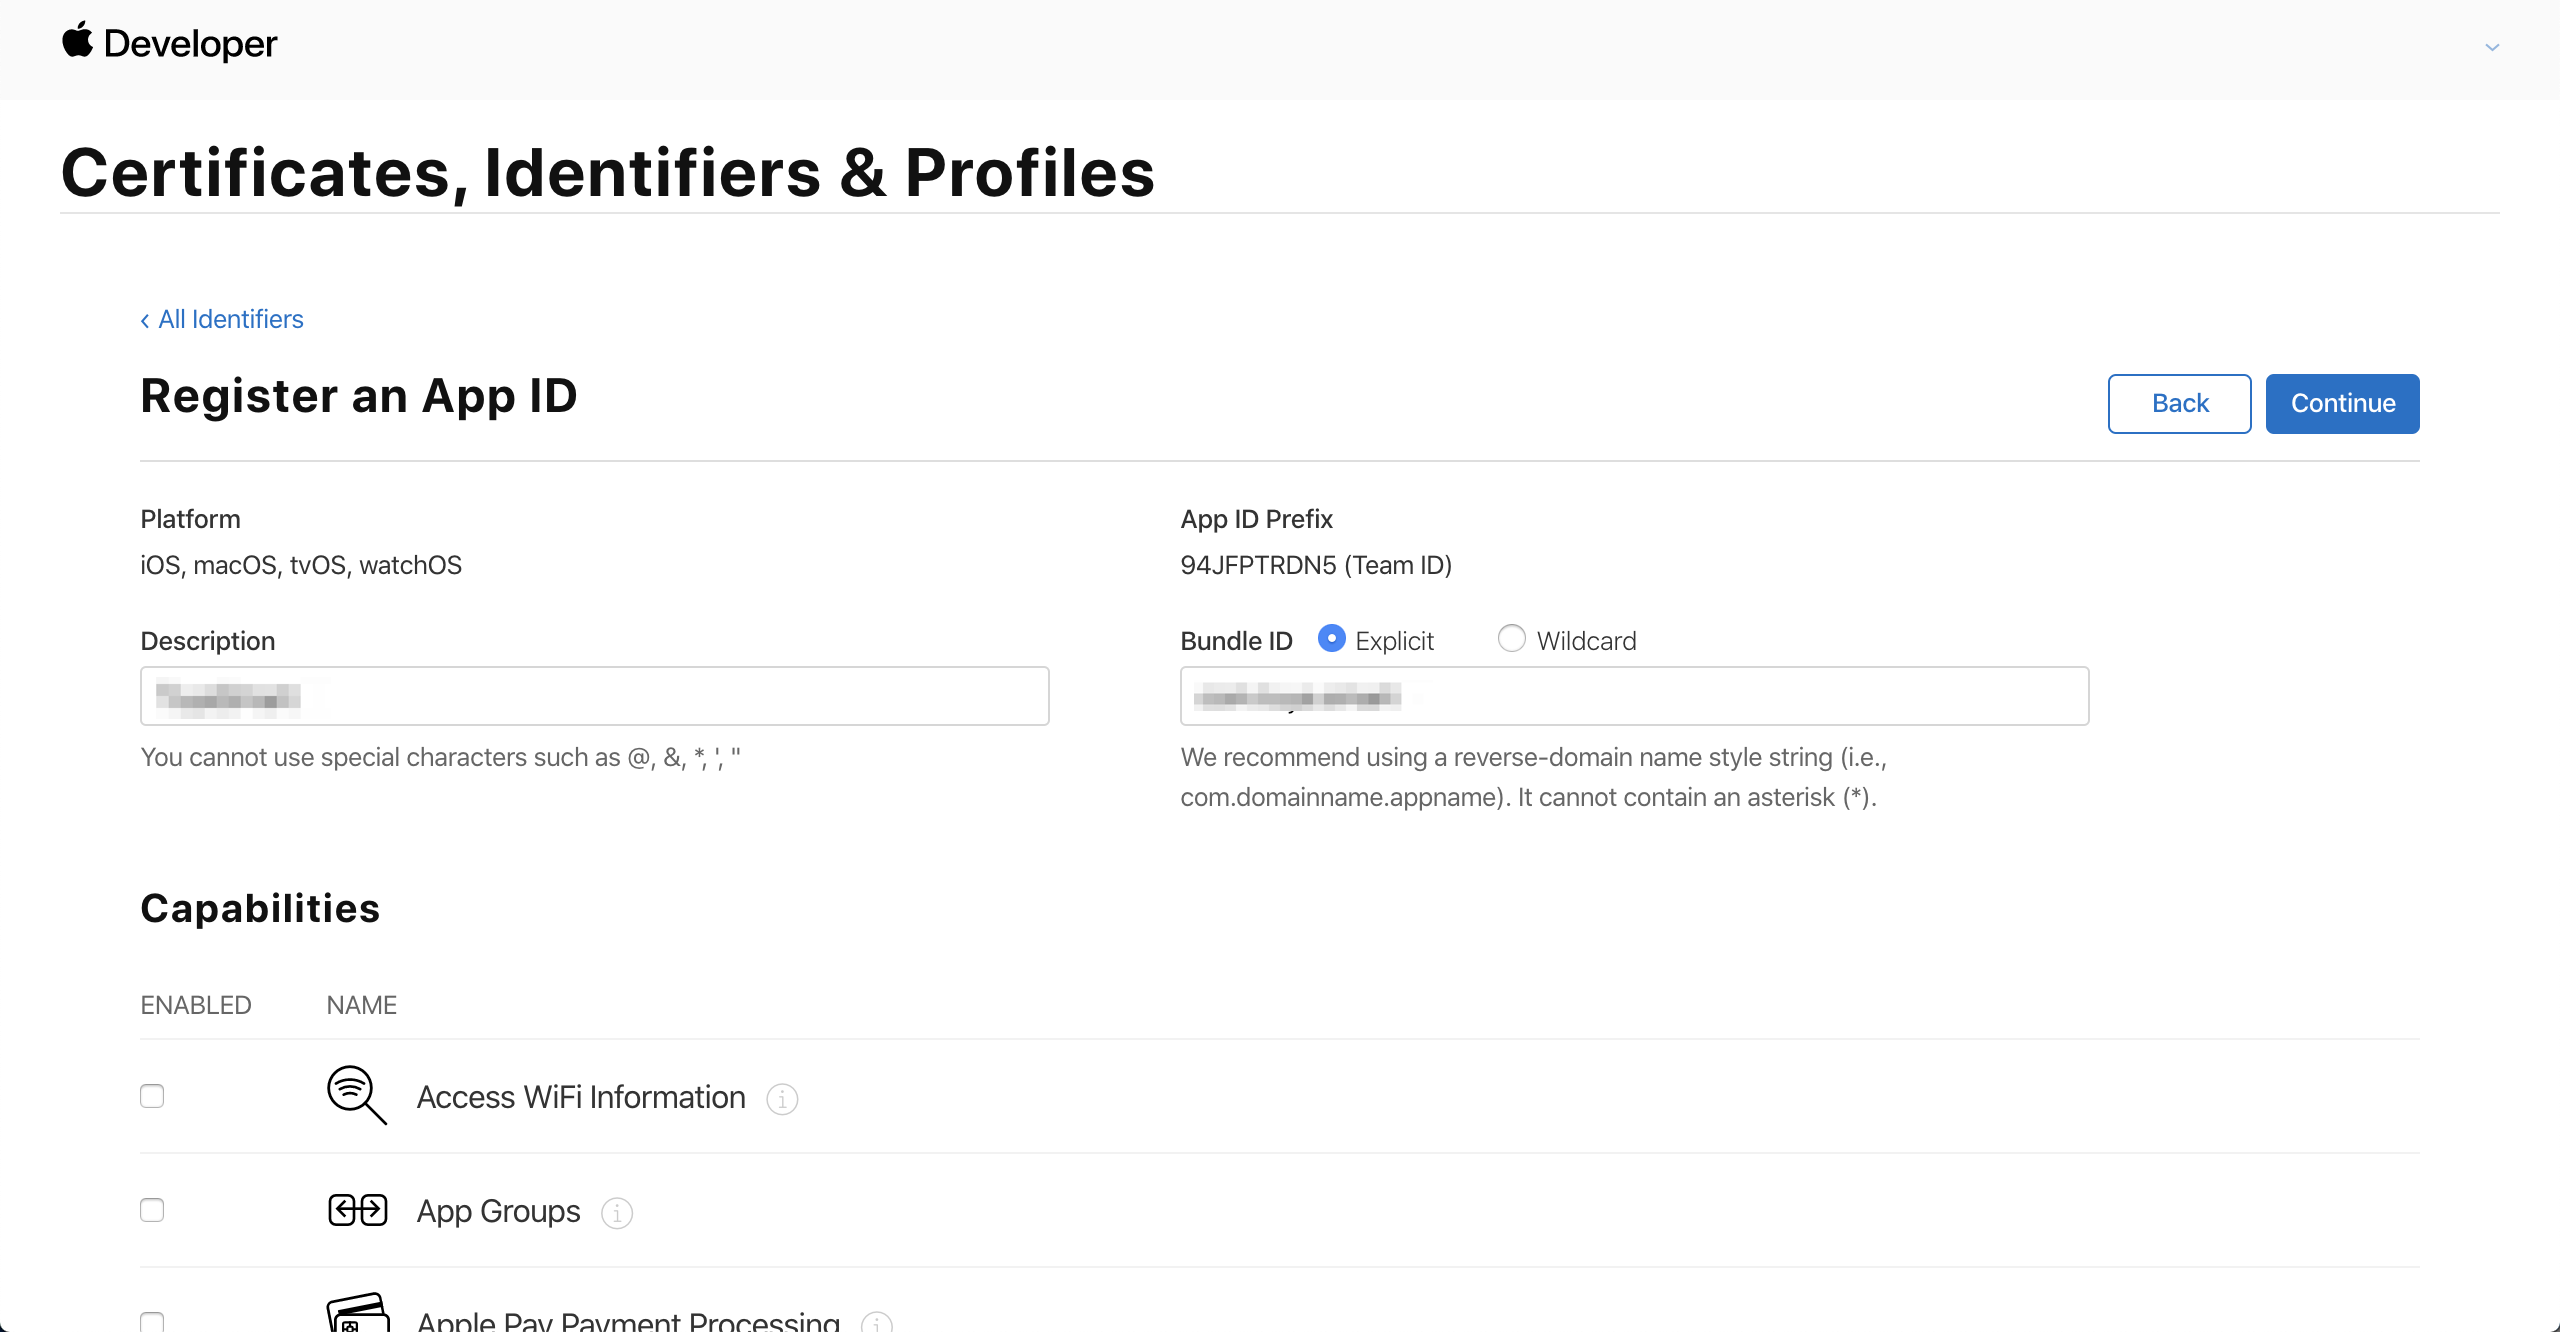
Setting the Capabilities is an important step to configure the App ID. These settings will be described in Enable and configure capabilities of App IDs and can be skipped in the current step.
-
Click Continue, confirm the settings, and then click Register.
If the error message "An App ID with Identifier 'com.xxx.xxx' is not available. Please enter a different string." is returned, the bundle ID has been used by other apps. Then, click Back and change the bundle ID.
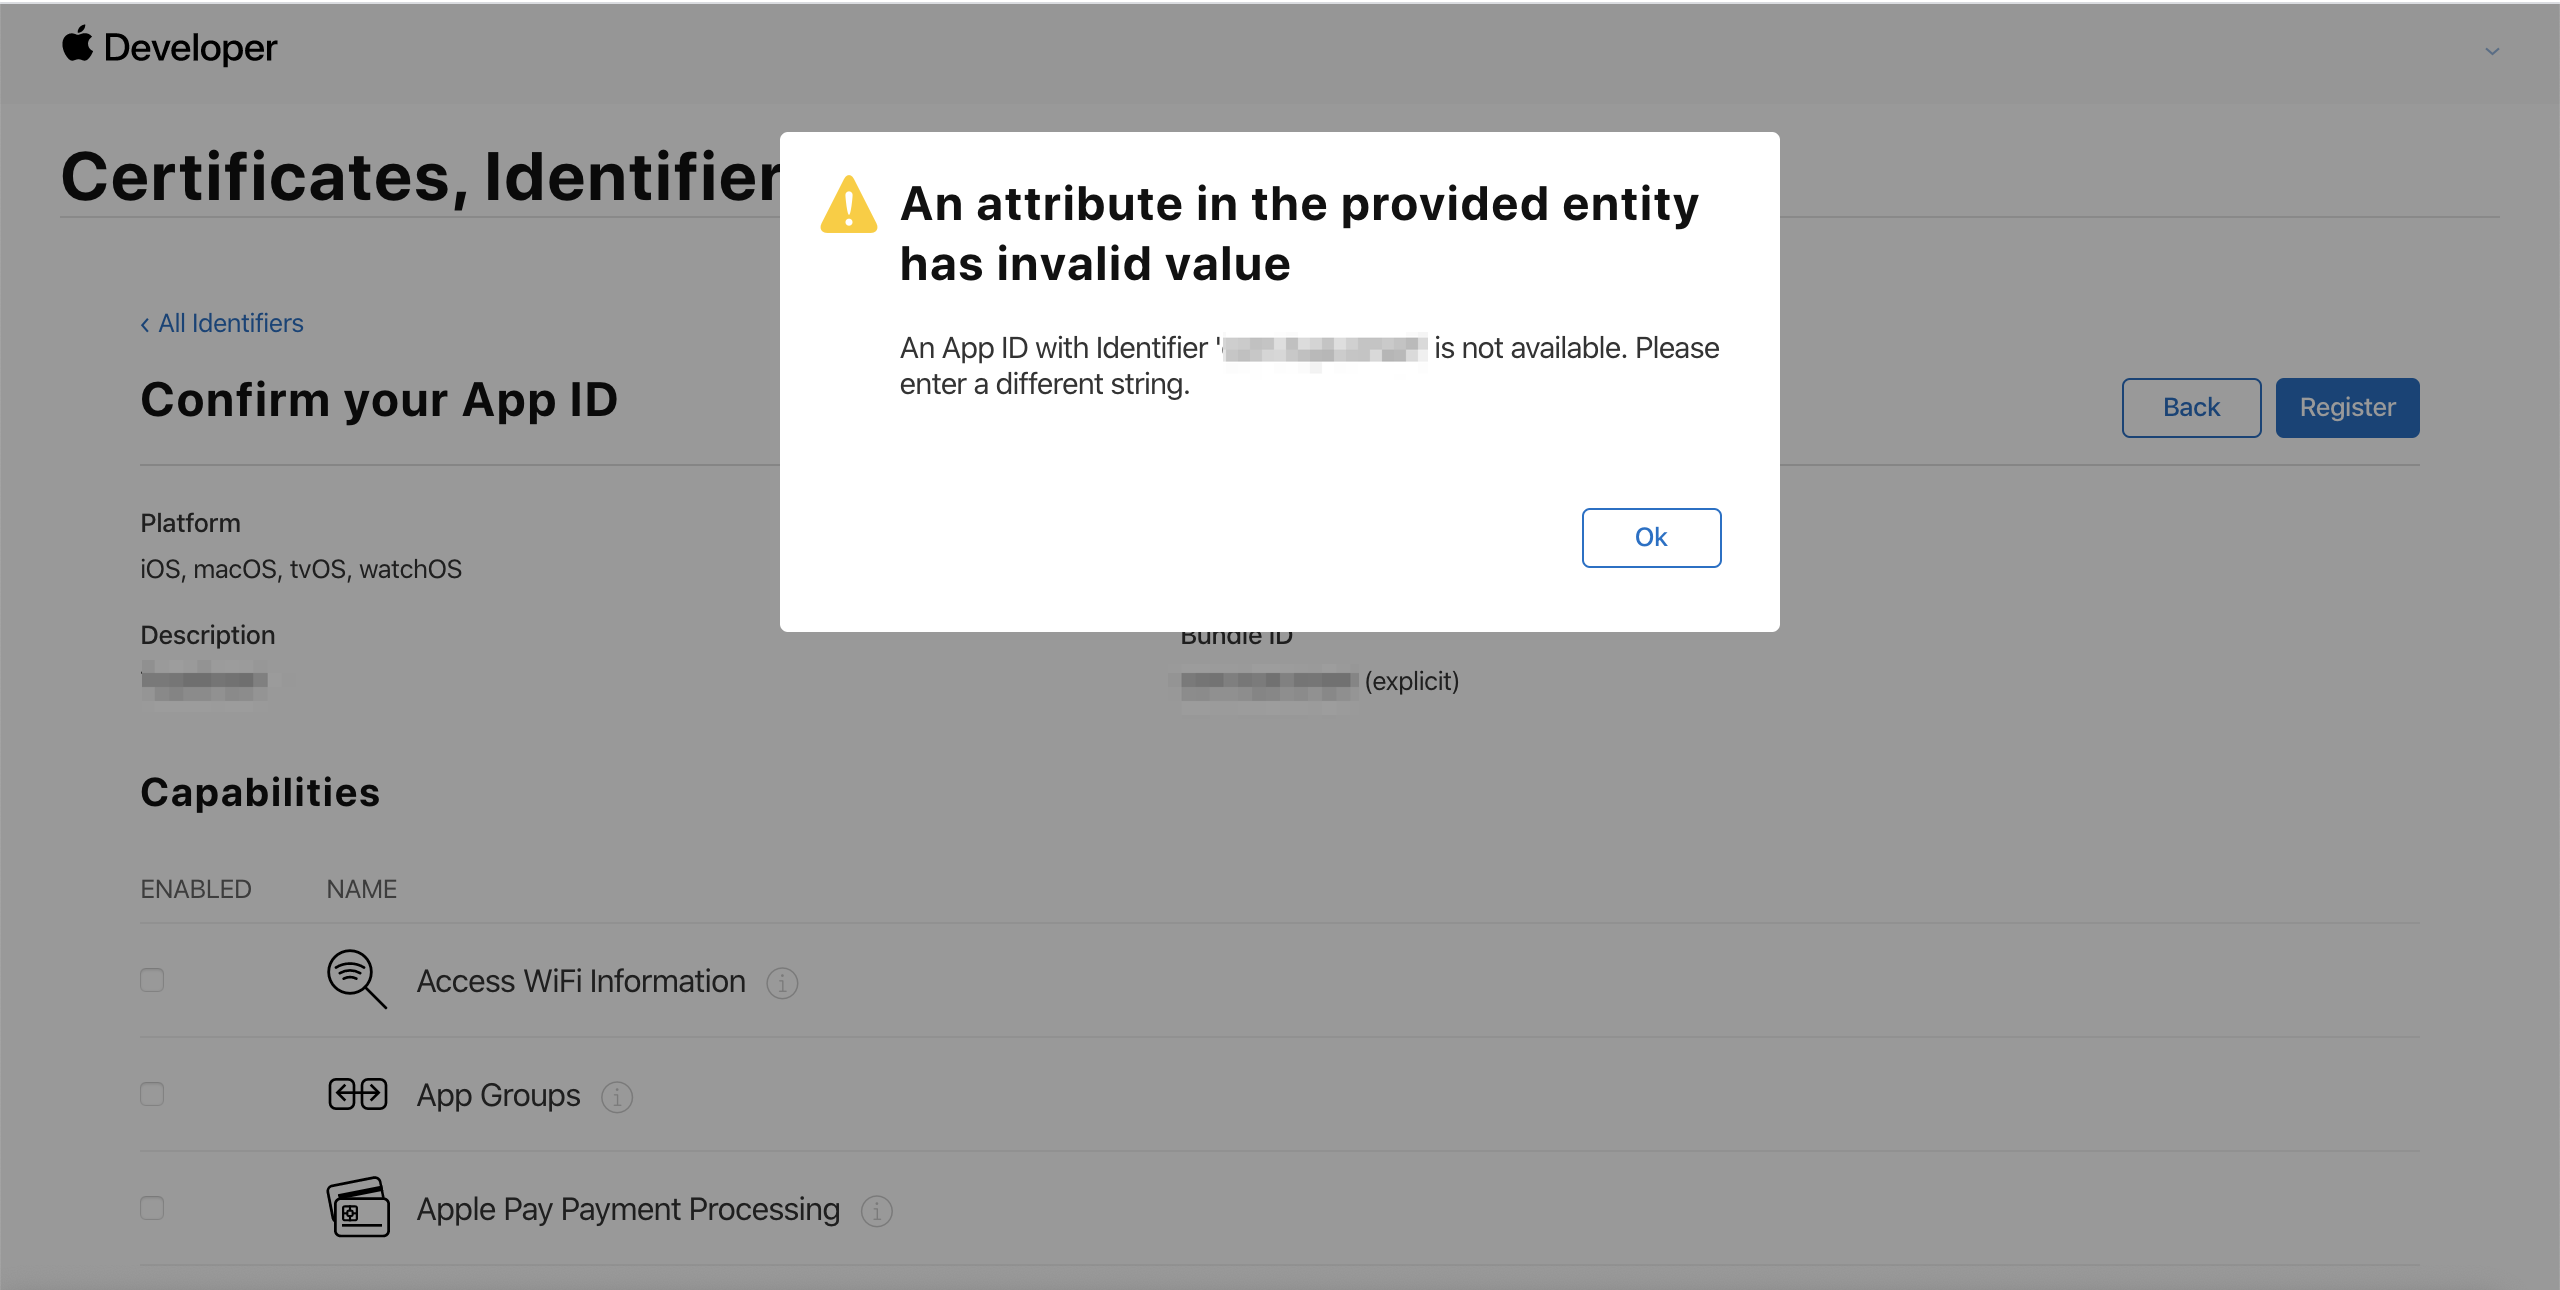
The registered bundle ID must be the same as the bundle ID of your OEM app specified on the Tuya Developer Platform. Otherwise, the respective push certificate and provisioning profiles cannot be used on the Tuya Developer Platform.
-
If no error message is returned and the App ID is displayed on the Identifiers list, the App ID is created.
Create App Group ID
App extensions such as Siri control and widgets run in different processes and sandboxes from the main application. As a result, the app extensions cannot directly access the data and resources of the main application without the help of the App Group ID.
To fix this problem, Apple provides the App Group feature. This feature allows the app extensions to access the data and resources of the main application in the same data container shared by them.
-
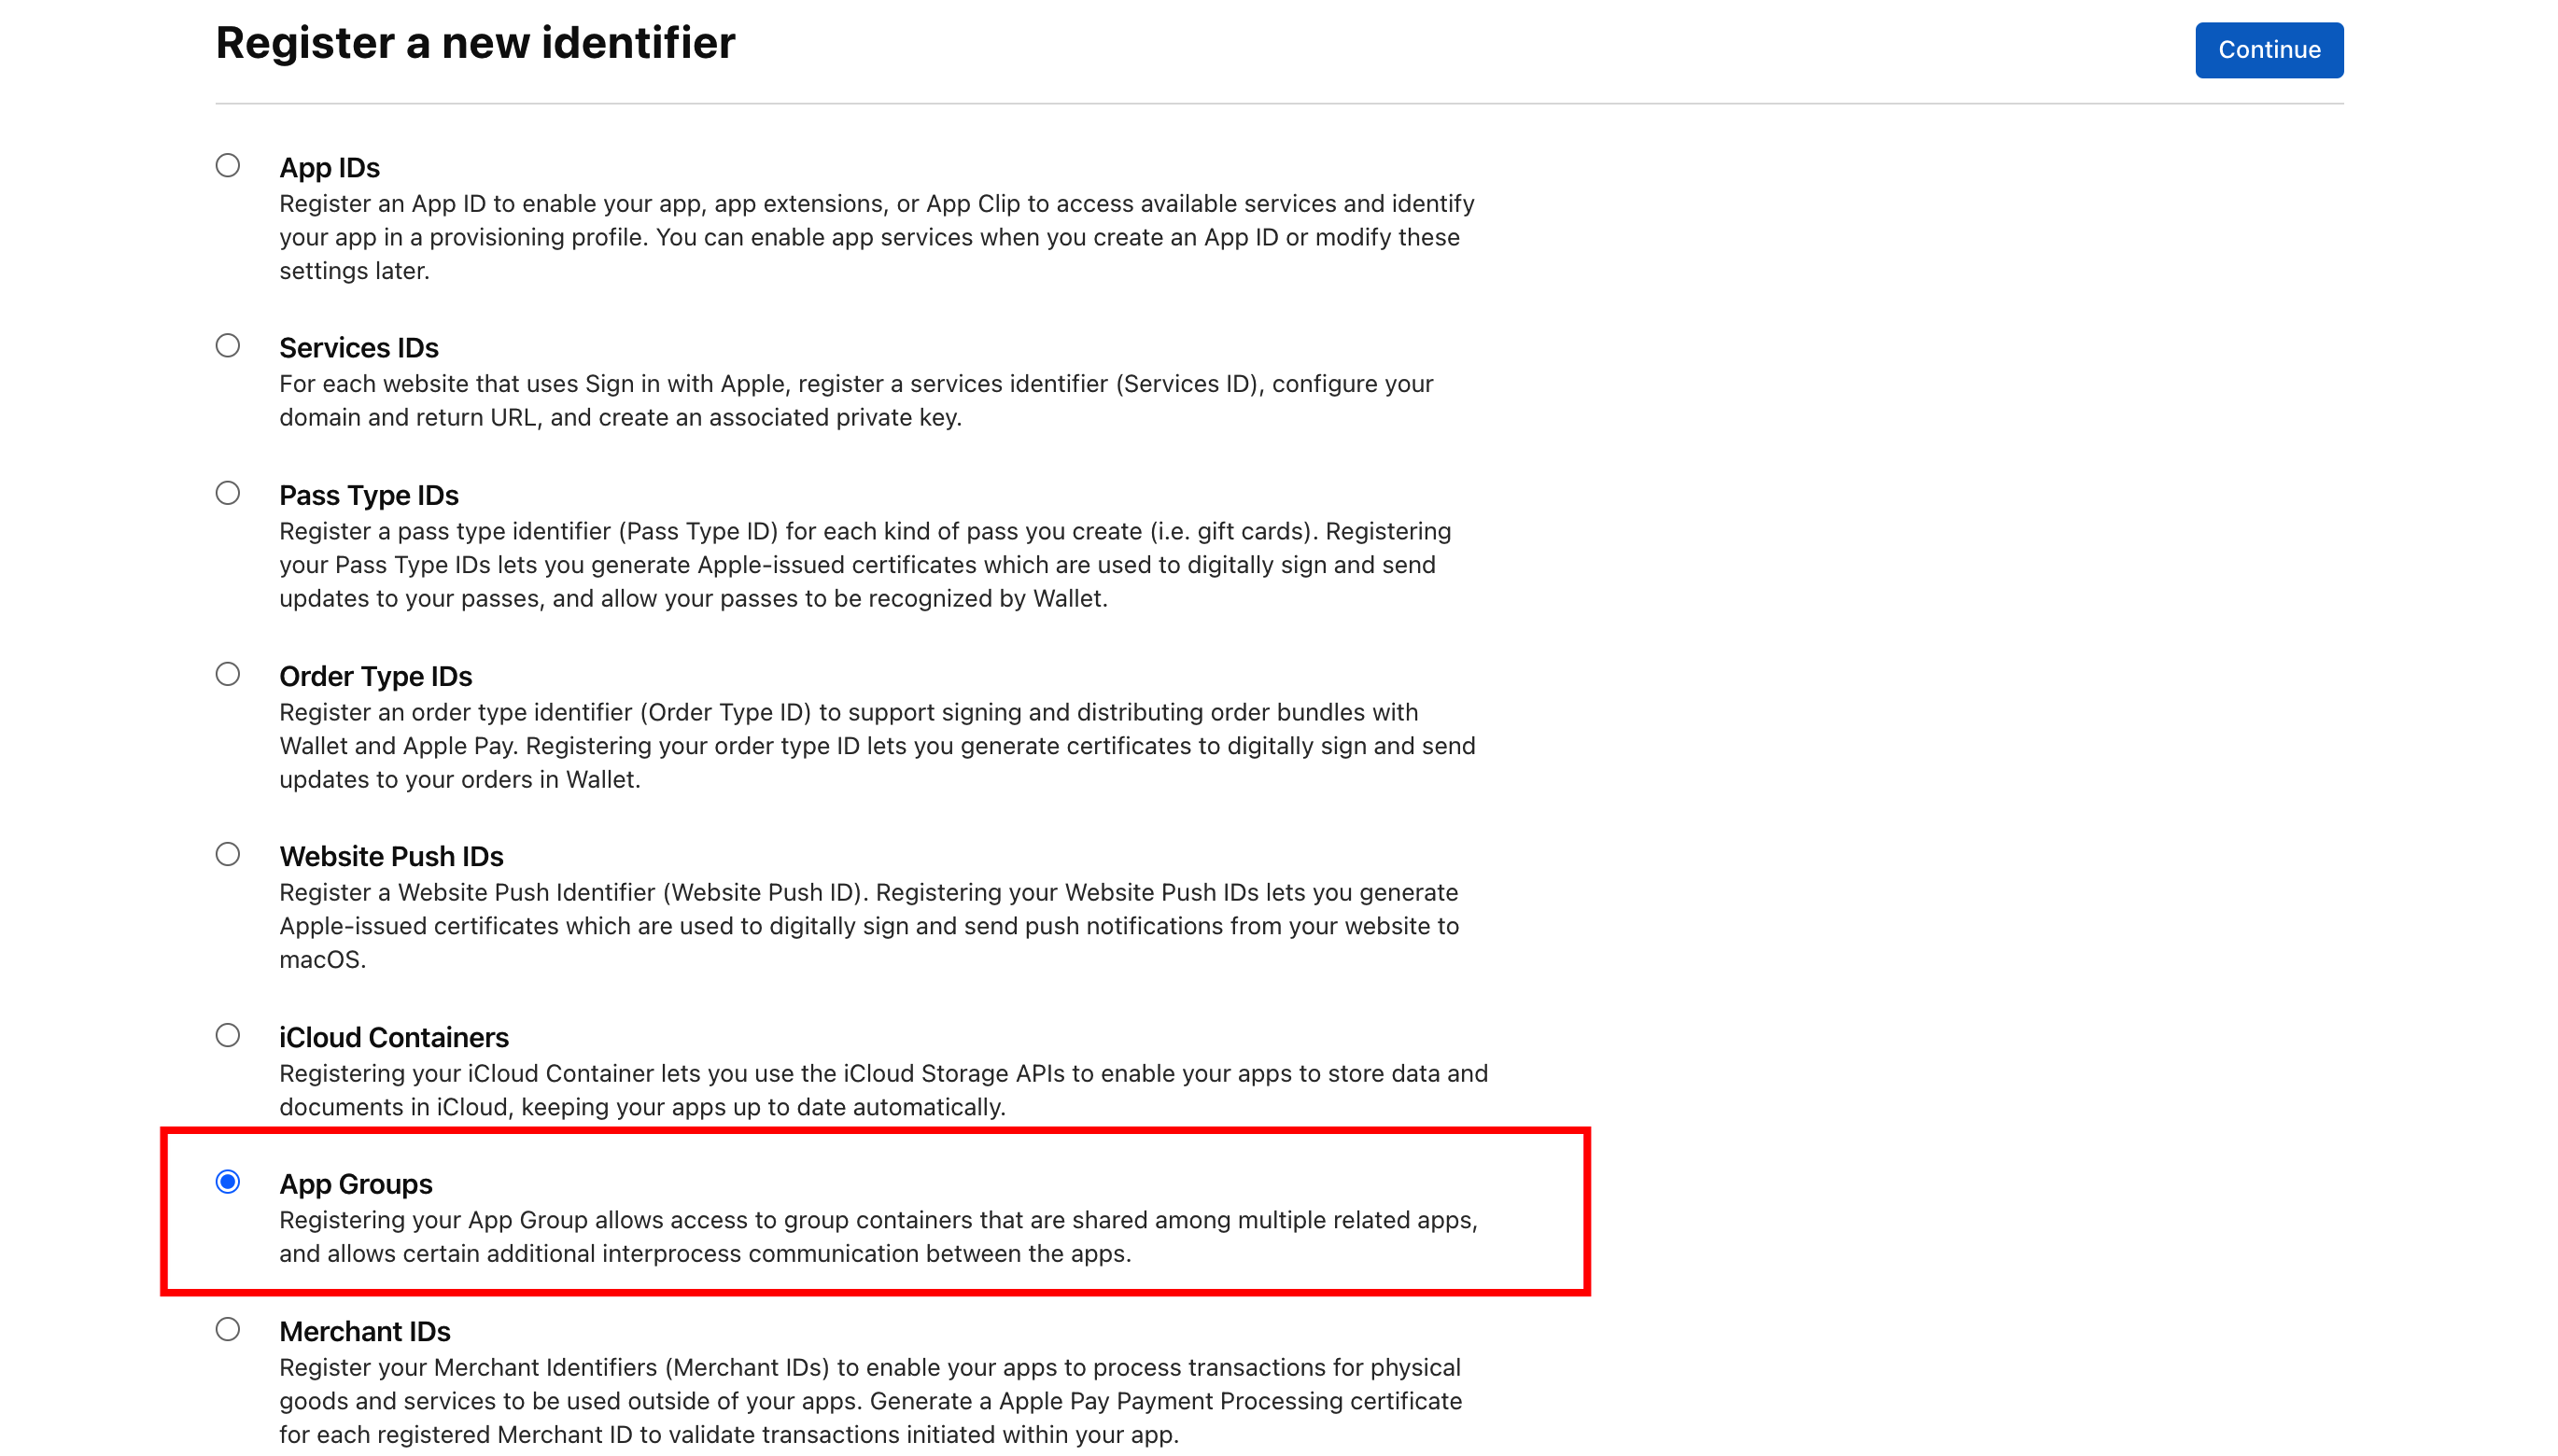
Go to the Identifiers page and click +.
-
Select App Groups and click Continue.
-
In the Description field, enter the description of your app, such as the app name. In the Identifier field, enter the Group ID.
The Group ID is your bundle ID that is prefixed by
group. For example, if your bundle ID iscom.example.app, the Group ID isgroup.com.example.app.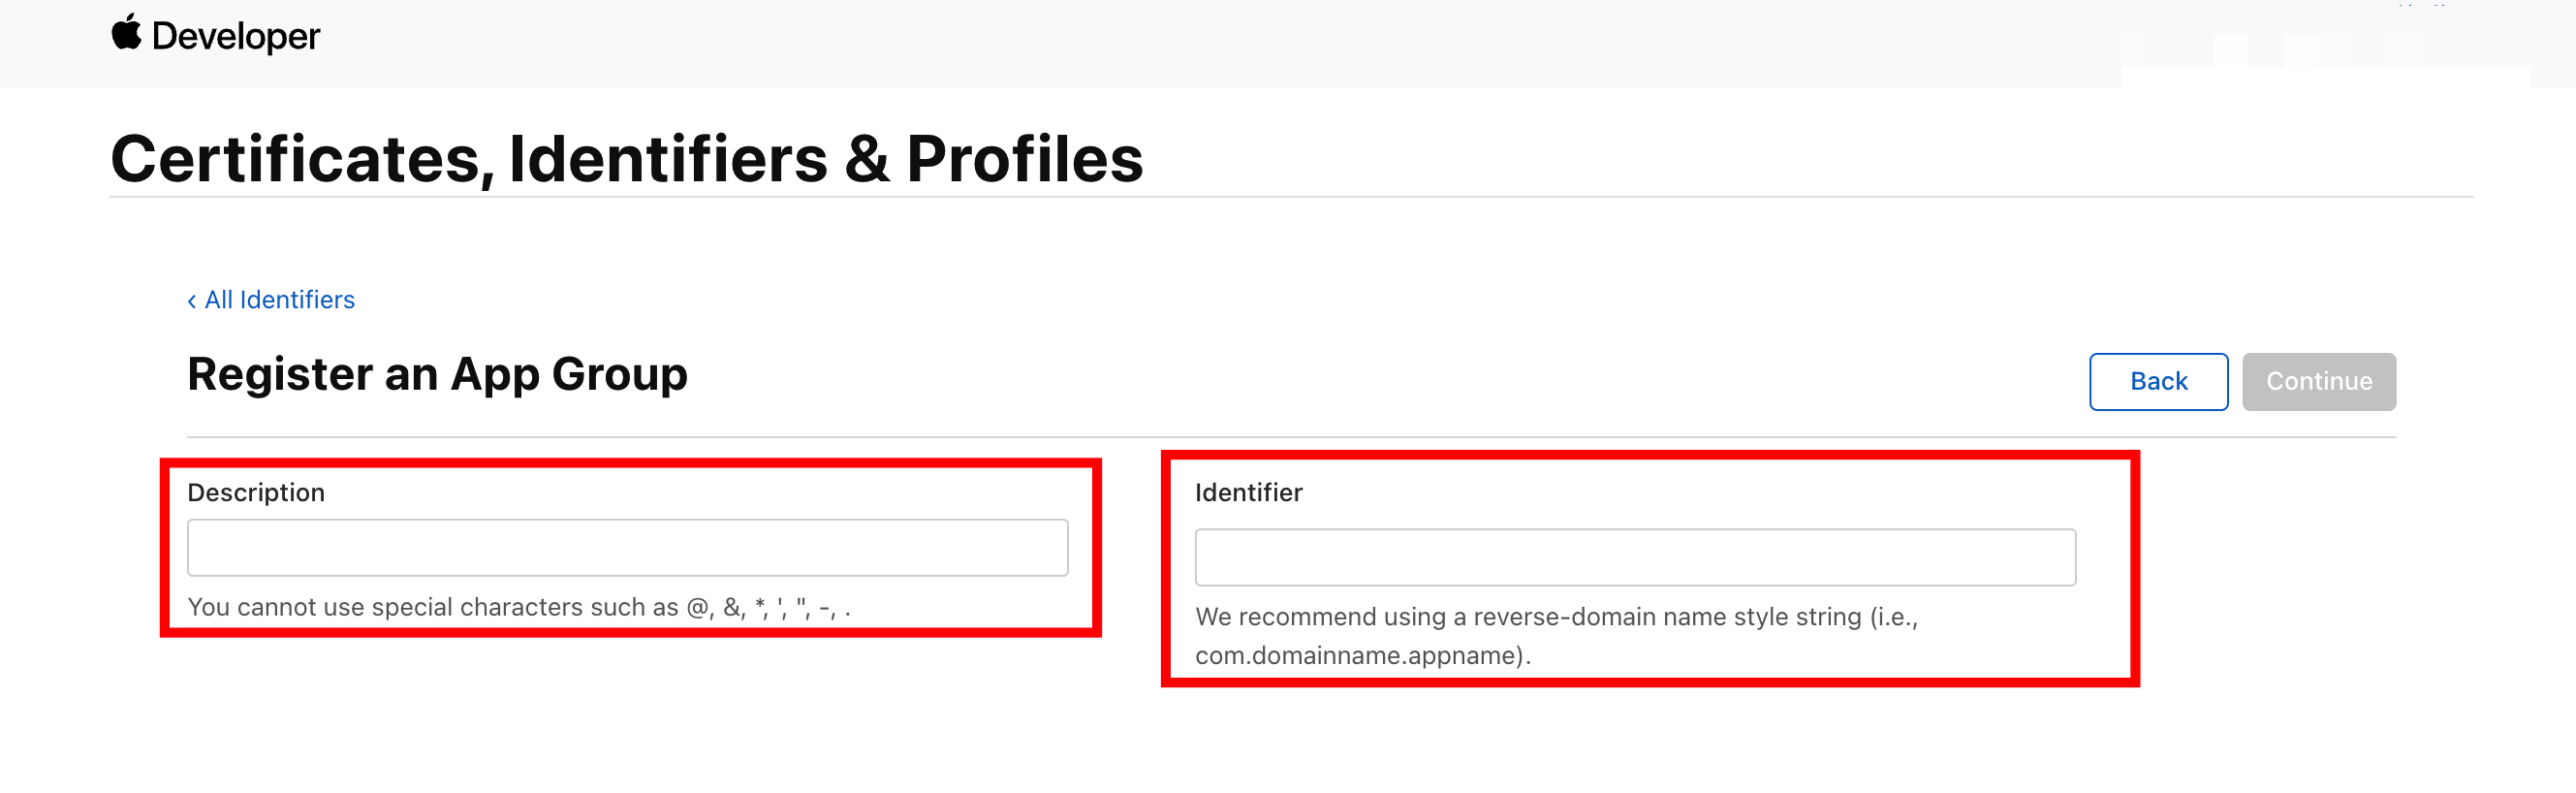
-
Click Continue, confirm the settings, and then click Register.
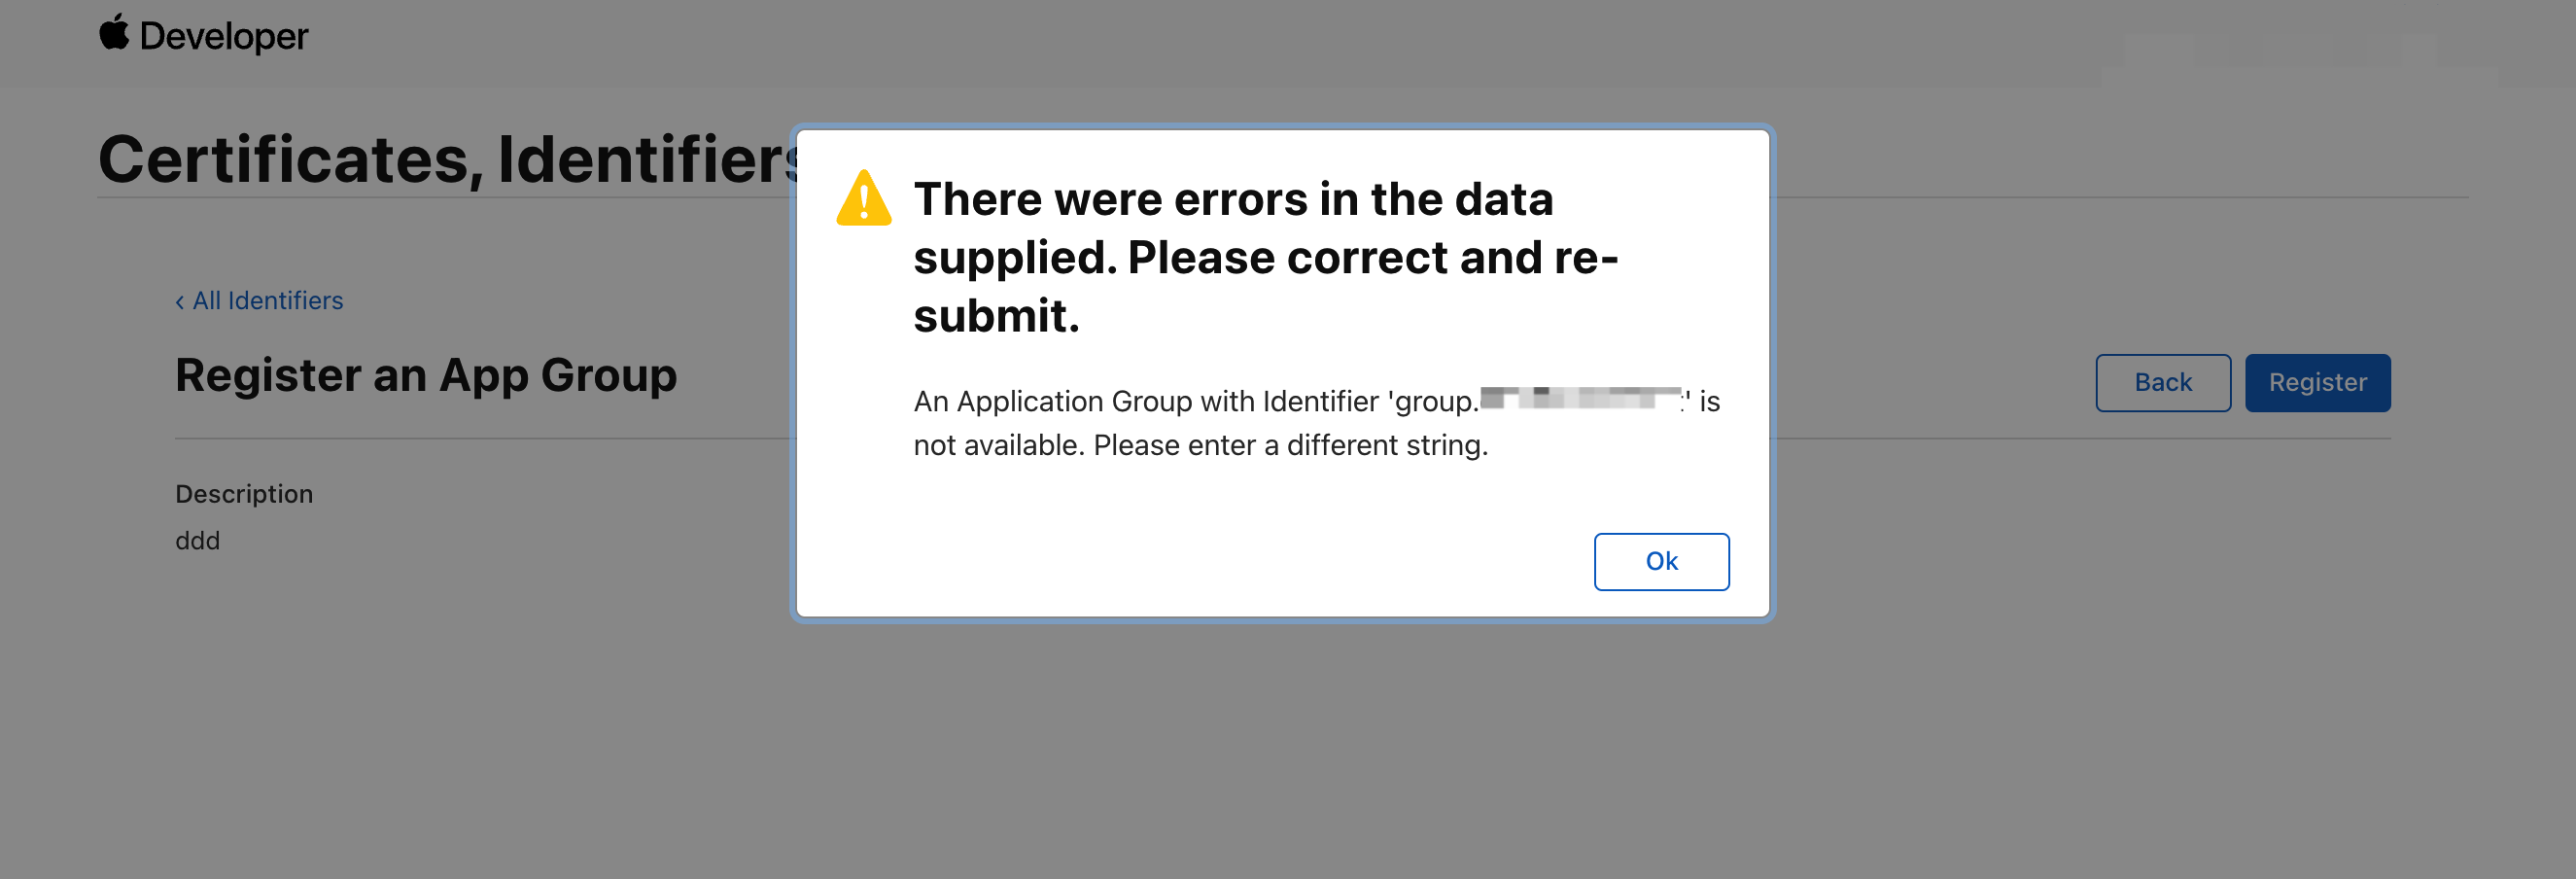
If the error message "An Application Group with Identifier 'group.xxx.xxx.xxx' is not available. Please enter a different string." is returned, the Identifier has been used by other apps. Then, click Back and change the Identifier.
The registered Identifier must be the App ID prefixed with
groupand the App ID must be the one created in the previous step. For example, if the App ID created in the previous step iscom.example.app, the Group ID Identifier must begroup.com.example.app. -
If no error message is returned and the App Group ID is displayed on the Identifiers list, the App Group ID is created.
Create App IDs of app extensions
Tuya’s OEM App provides a rich set of optional advanced features and value-added services, such as Siri control and widgets for iOS. These features are implemented as app extensions.
Each app extension is assigned a unique App ID that is created similarly as the App ID of the main application. For more information, see Create App ID of main application. However, the Bundle ID of each app extension must follow these rules:
- The Bundle ID is a unique string that identifies an app extension. It must be a valid domain name that cannot be used by other apps.
- The Bundle ID must have the same prefix as that of the Bundle ID of the main application. For example, if the Bundle ID of the main application is
com.companyname.appname, the Bundle ID of the app extensions must start withcom.companyname.appname.
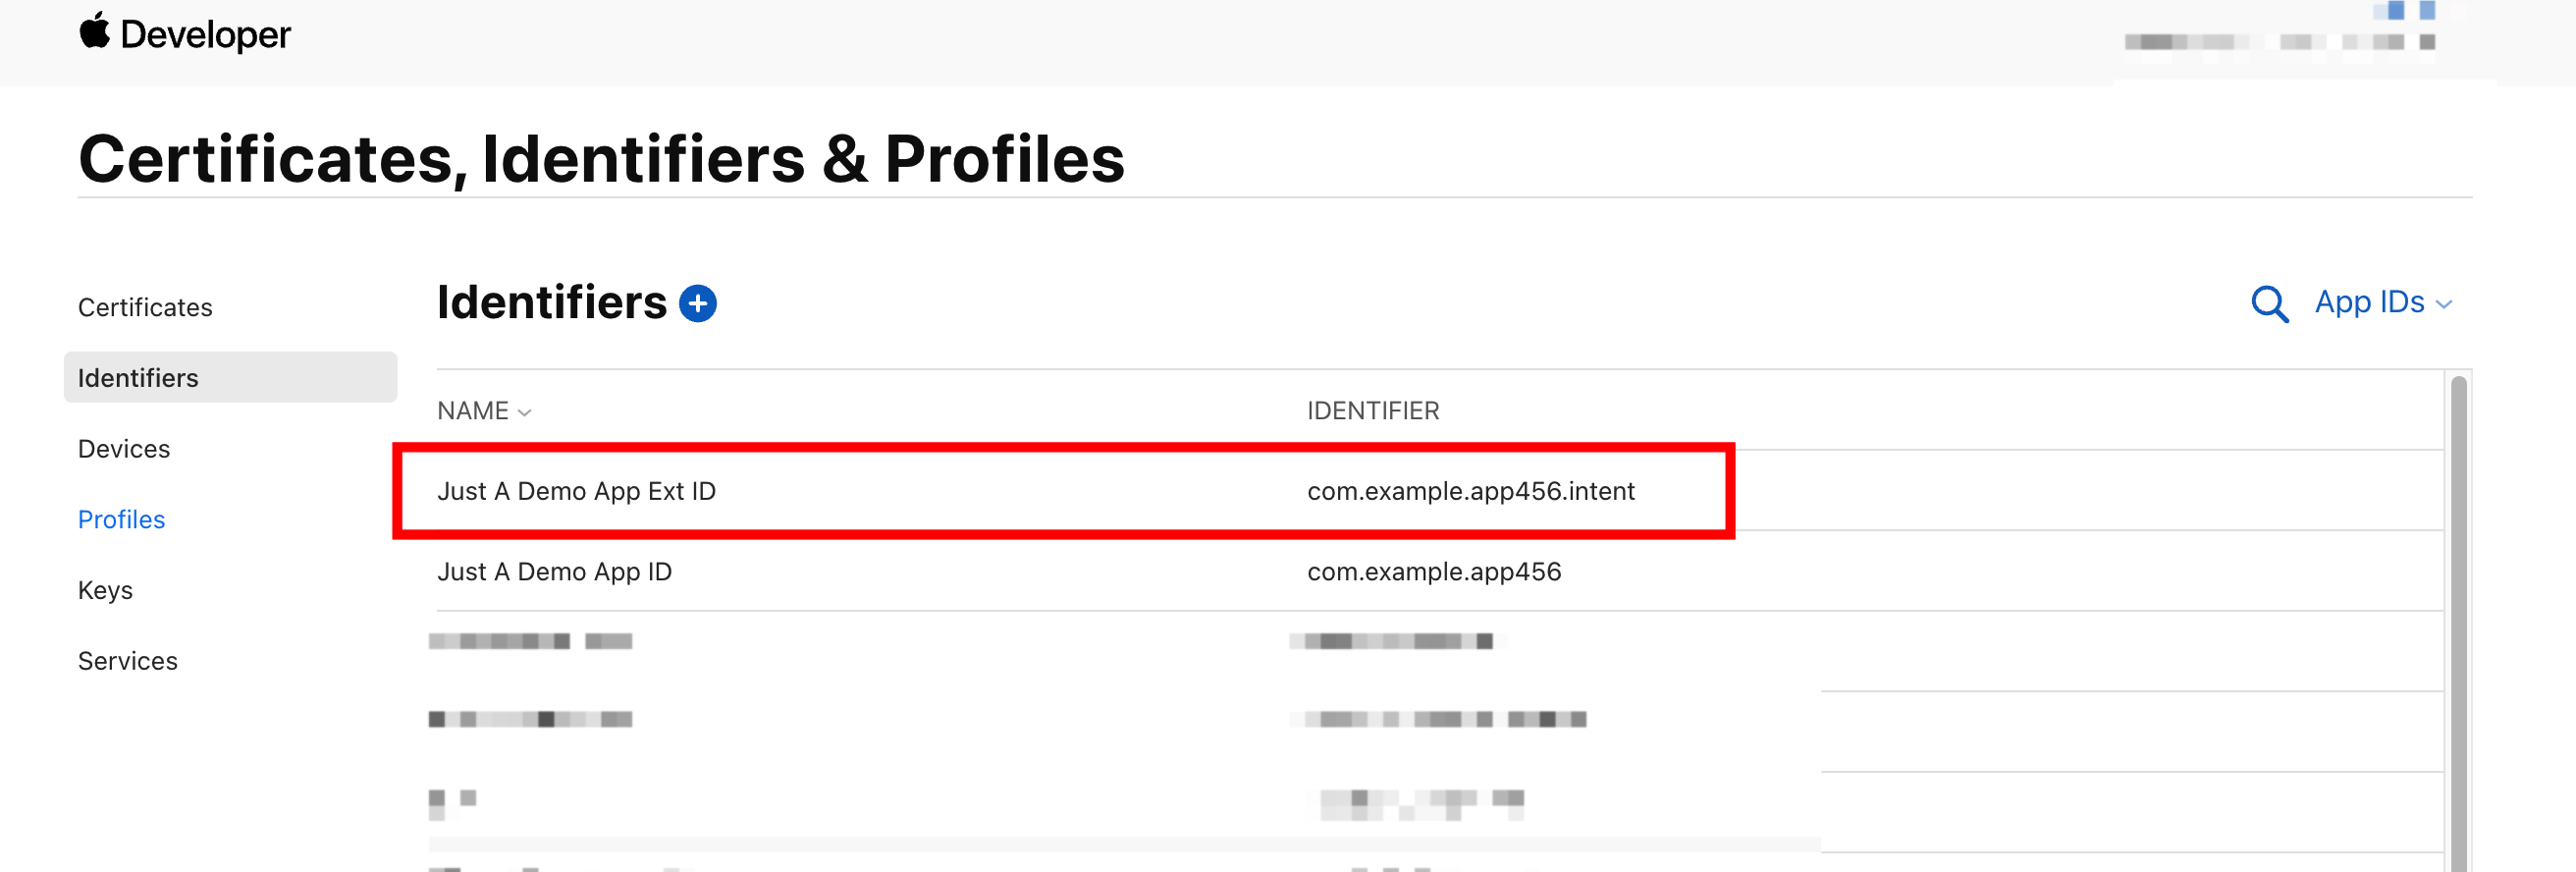
As instructed at Tuya Developer Platform > Certificate for iOS > Provisioning Profile and as recommended in the following table, create the App IDs for your app extensions.
| App extension provisioning profile | Recommended App ID (Assume that the App ID of your main application is com.example.app) |
Remarks |
|---|---|---|
| Push notification extension | com.example.app.notice | - |
| Siri Intent extension | com.example.app.intent | - |
| Siri Intent UI extension | com.example.app.intentui | - |
| Device and scene WidgeKit | com.example.app.controlWidgetExtension | Requires ODM template v5.15.0 and later, and only valid on iOS 17 and later |
| Device control widget extension | com.example.app.widgetdevice | Valid on iOS 17 and earlier, invalid on iOS 18 and later |
| Scene widget extension | com.example.app.widgetscene | Valid on iOS 17 and earlier, invalid on iOS 18 and later |
| Voice control widget extension | com.example.app.widgetspeech | Valid on iOS 14.1 and later |
| Watch app | com.example.app.watchkitapp | - |
| Watch app extension | com.example.app.watchkitapp. watchkitextension |
- |
| Matter extension | com.example.app.matter | Currently, OEM apps do not support self-service subscriptions to Matter features on the Tuya Developer Platform. To integrate your app with Matter, submit a ticket to let Tuya’s staff help you subscribe to it. |
Enable and configure capabilities of App IDs
When you create the App ID of the main application and App IDs of app extensions, the Capabilities tab appears on the configuration page. In this step, you can configure the capabilities as required by your OEM app. After the capabilities are configured for the App ID, the respective app can access the services and features provided by the configured capabilities.
Each App ID matches a list of capabilities that describe what the app is able to do. For example, you can enable the push notification feature on the Capabilities tab, so the app can send push notifications.
This way, you can control the functionality of your app and enable the services and features as required within your specified permissions.
In this section, you will configure the capabilities for the previously created App IDs of app extensions.
Step 1: Enable and configure App Groups capability of app extension
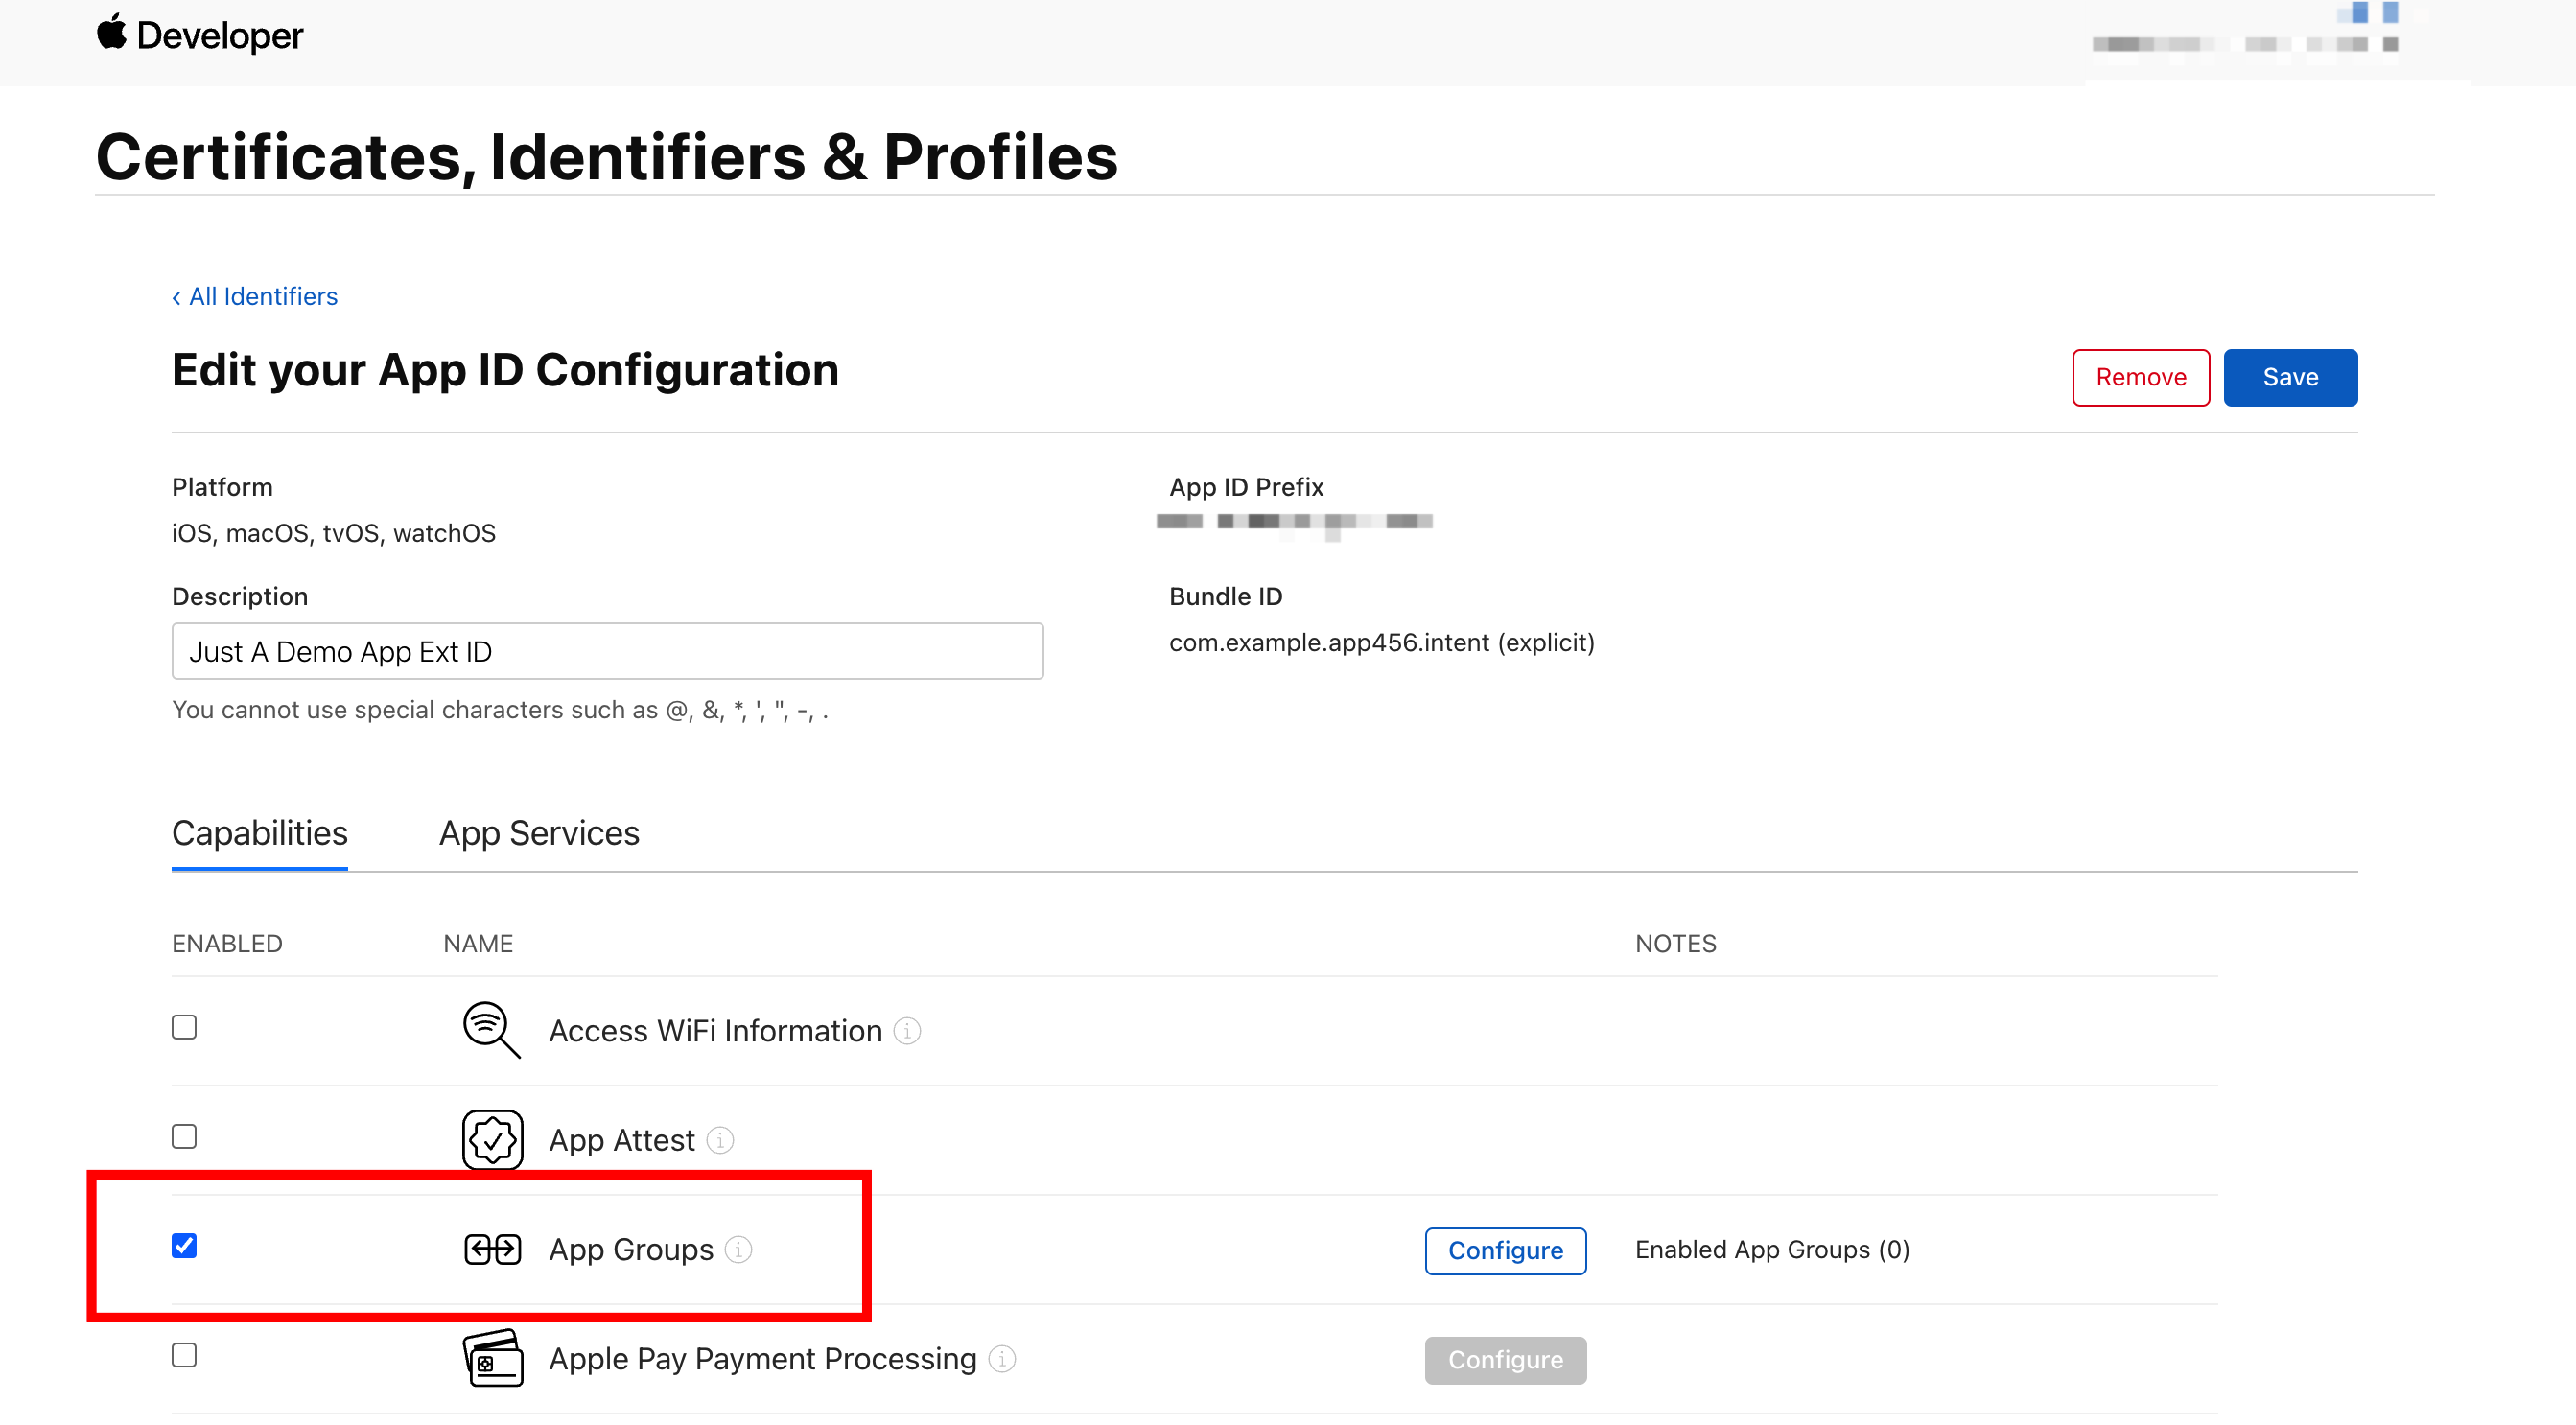
The App IDs of app extensions must be and only need to be configured with the App Groups capability. You must repeat the following steps to configure the App Groups capability for the App ID of each of your app extensions.
-
From the Identifier list, click the target App ID of the app extension to open the app extension details page.
-
Go to the Capabilities tab and select the App Groups option.
-
Click Configure on the right of App Groups. In the dialog box that appears, select the previously created App Group ID and click Continue.
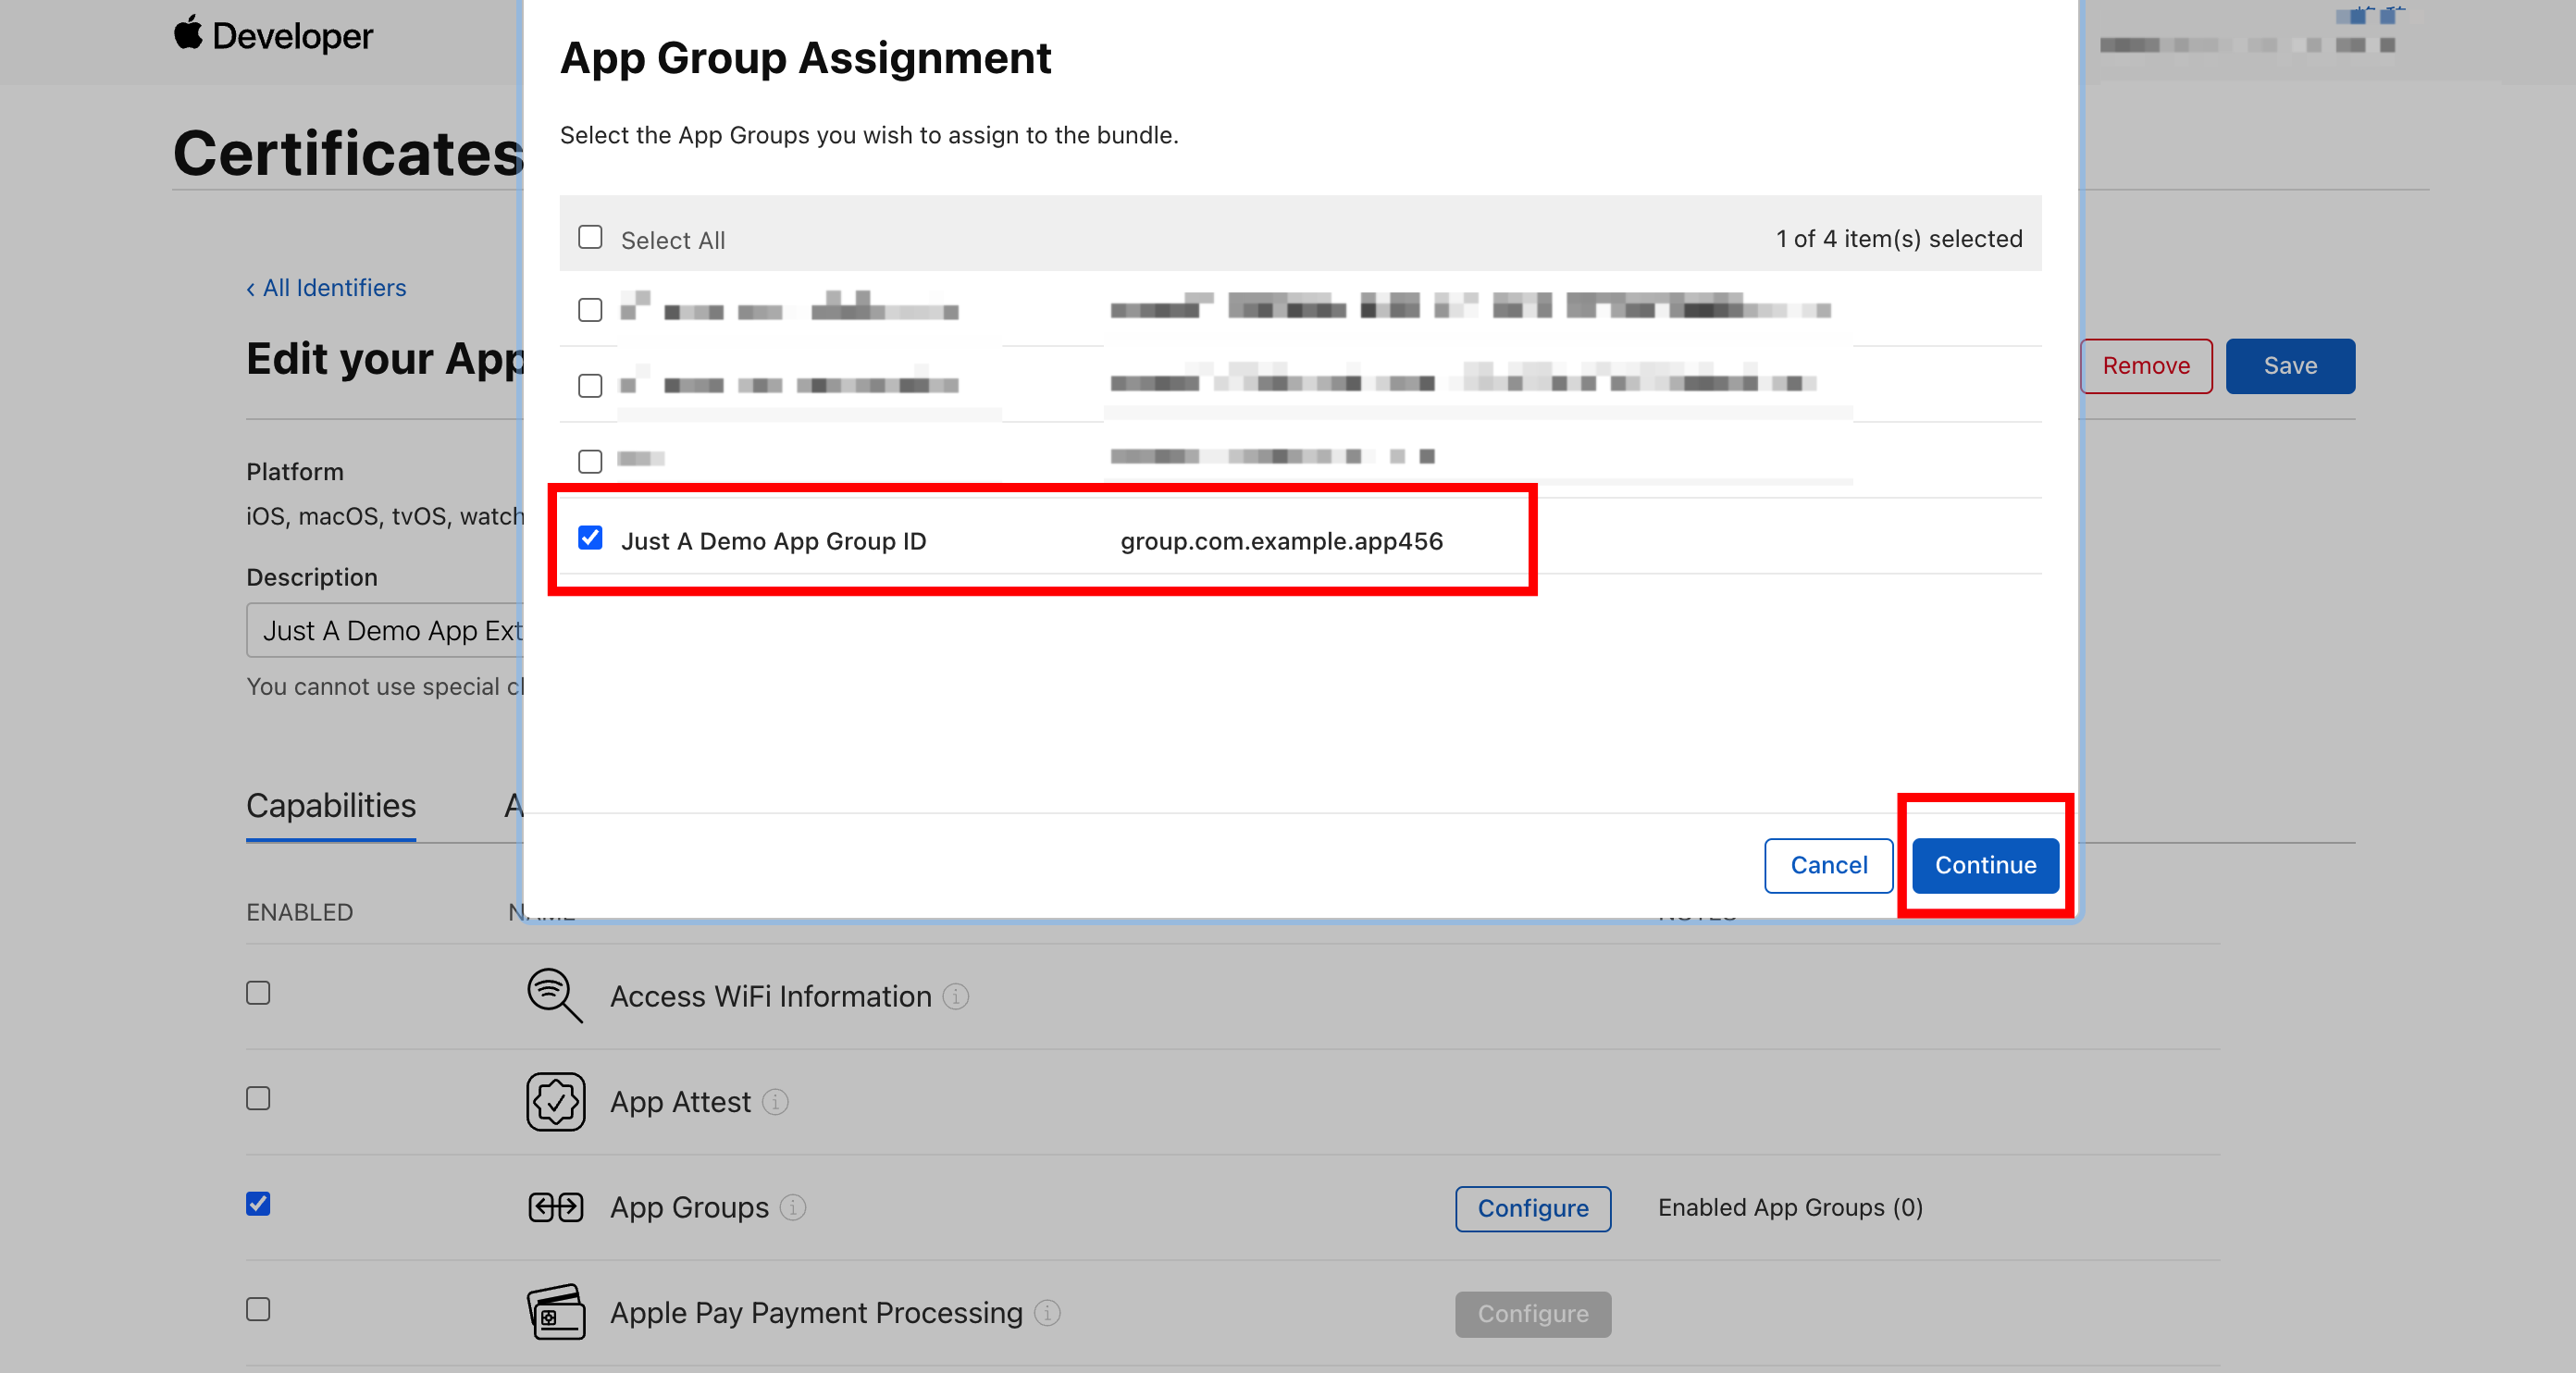
-
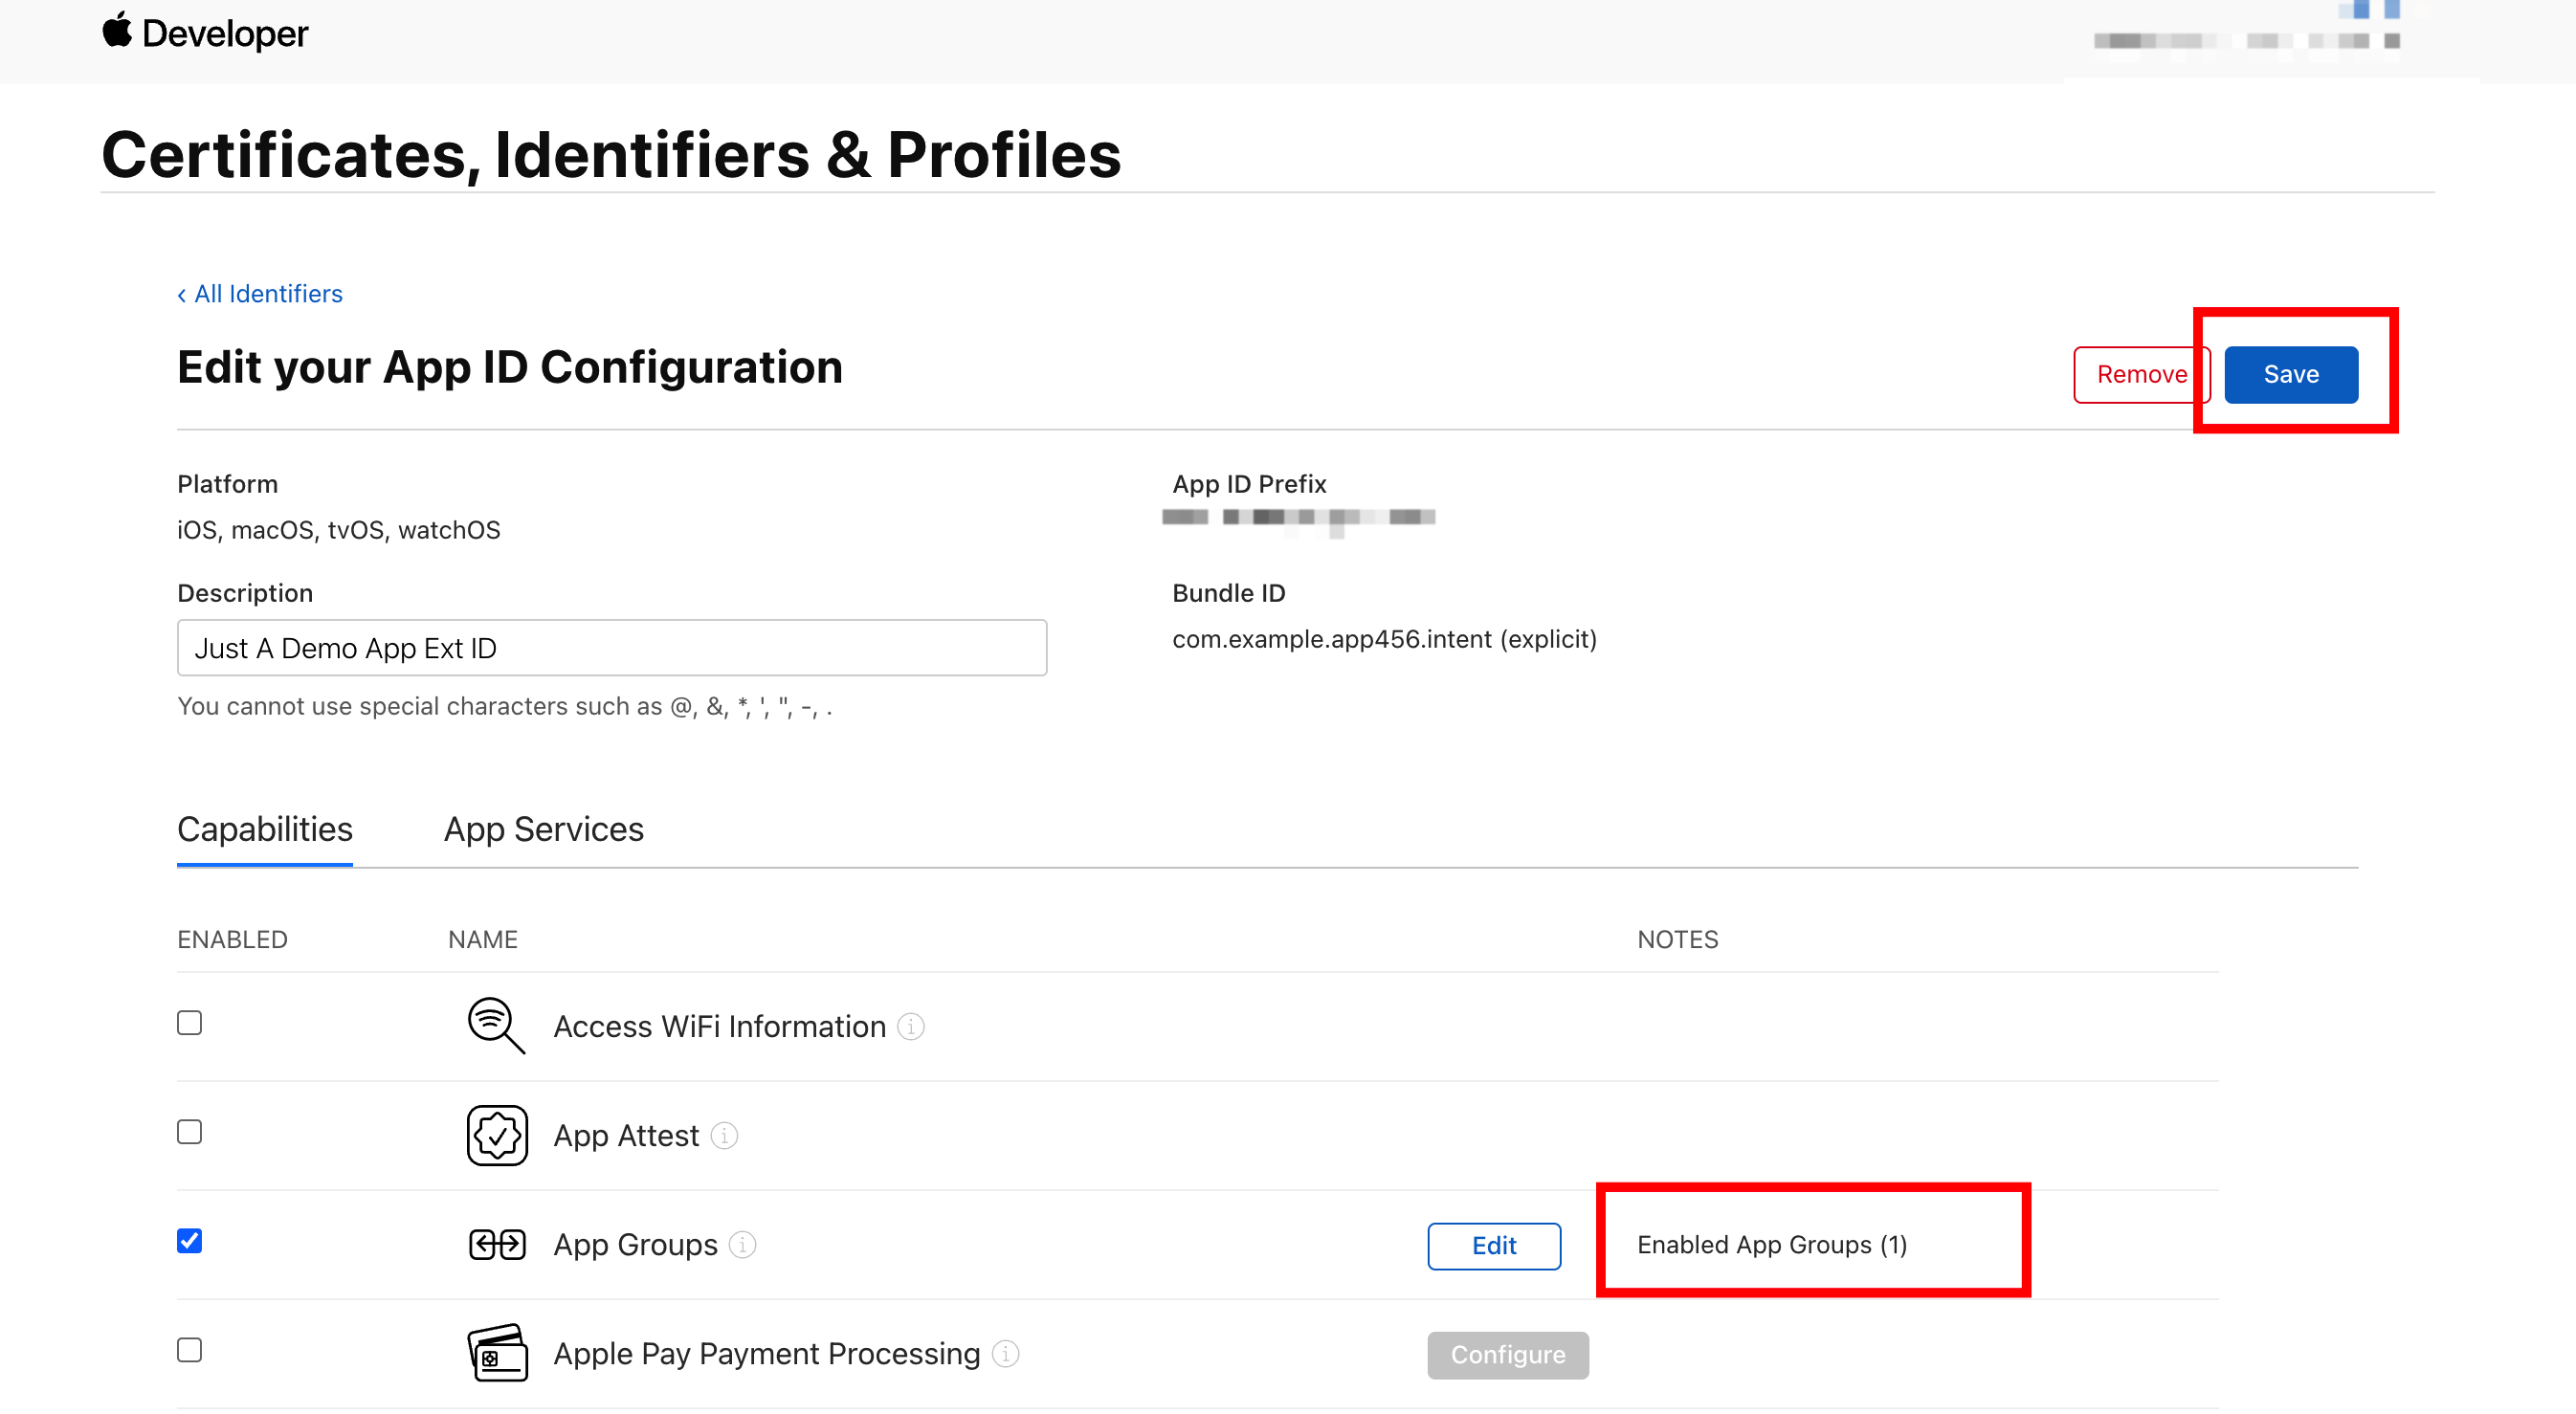
Make sure the prompt on the right of App Groups is changed to Enabled App Groups(1). Then, click Save in the top right corner of the page to save the settings.
-
Repeat Step 1 and continue to configure the App Groups capability for the App IDs of your other app extensions.
Step 2: Enable and configure capabilities required by main application
The capabilities of your OEM app are classified into basic capabilities and additional capabilities.
- Basic capabilities are required by all OEM apps powered by Tuya.
- Additional capabilities are provided after you subscribe to certain value-added services on the Tuya Developer Platform. The additional capabilities must match the actual services available to your app.
To configure basic capabilities, perform the following steps:
-
From the Identifier list, click the target App ID of the main application to open the details page of the main application. Configure the capabilities as described in the following table.
Capability Enabled status How to enable it Access Wi-Fi Information 
- App Groups 
Click Configure on the right of App Groups. In the dialog box that appears, select the previously created App Group ID and click Continue. Associated Domains 
- AutoFill Credential Provider 
- Push Notifications 
- -
Click Save in the top right corner of the page to save the settings.
Then, configure optional capabilities. Make sure your OEM app supports these optional capabilities. For example, certain capabilities must be supported by the device. The following conditions must be met:
-
If your OEM app has the AP Hotspot Auto-Connect feature enabled, you need to ensure that the Hotspot capability is selected for you App ID:

-
If your OEM app has third-party login enabled, as required by Apple’s App Store, you must also enable Sign In with Apple. For this purpose, select this capability for your App ID.

-
If Siri integration has been purchased for your OEM app, you must select SiriKit for your App ID.

-
If your OEM app supports Wi-Fi Easy Connect (EZ) pairing, follow the instructions in Request Multicast Entitlement to Enable Wi-Fi EZ Mode to request the Multicast Networking capability. Then, find and enable the requested capability on the Additional Capabilities tab.
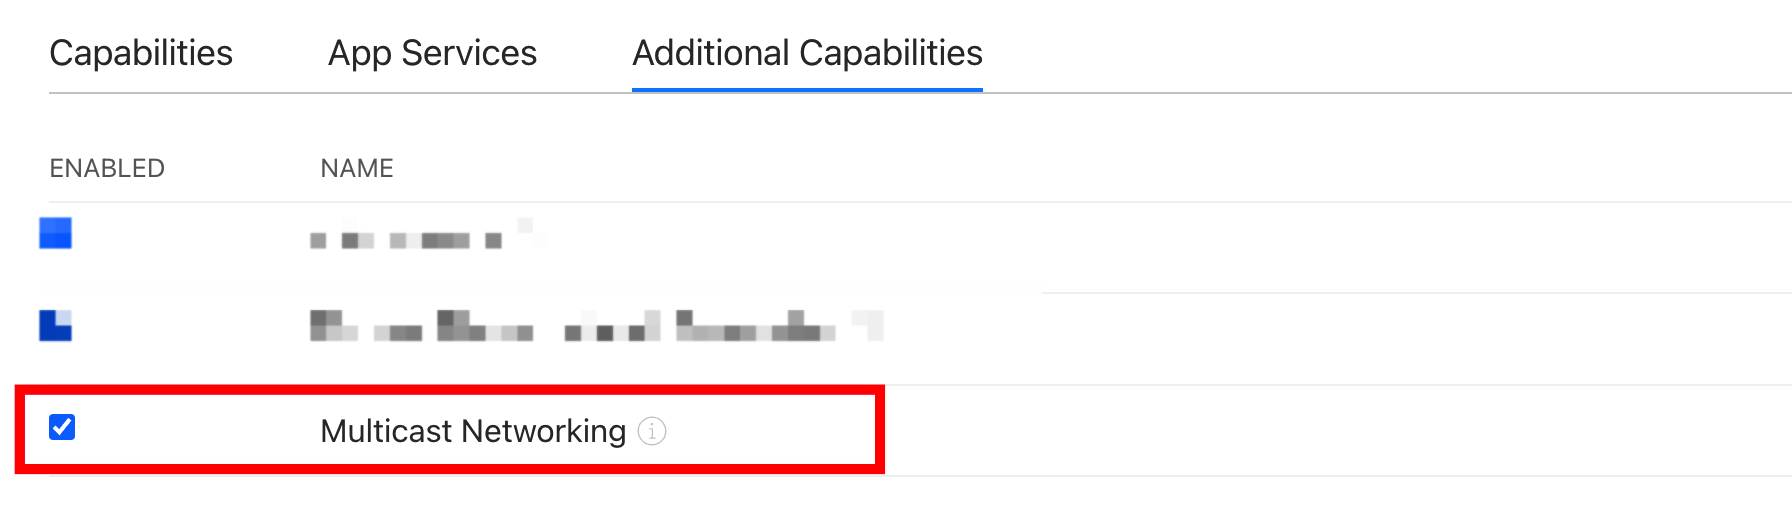
The capabilities listed on the Additional Capabilities tab must be approved by Apple before they can be used. By default, the Additional Capabilities tab does not appear on the details page for the App ID. It appears only after certain capabilities such as Multicast Networking are approved.
-
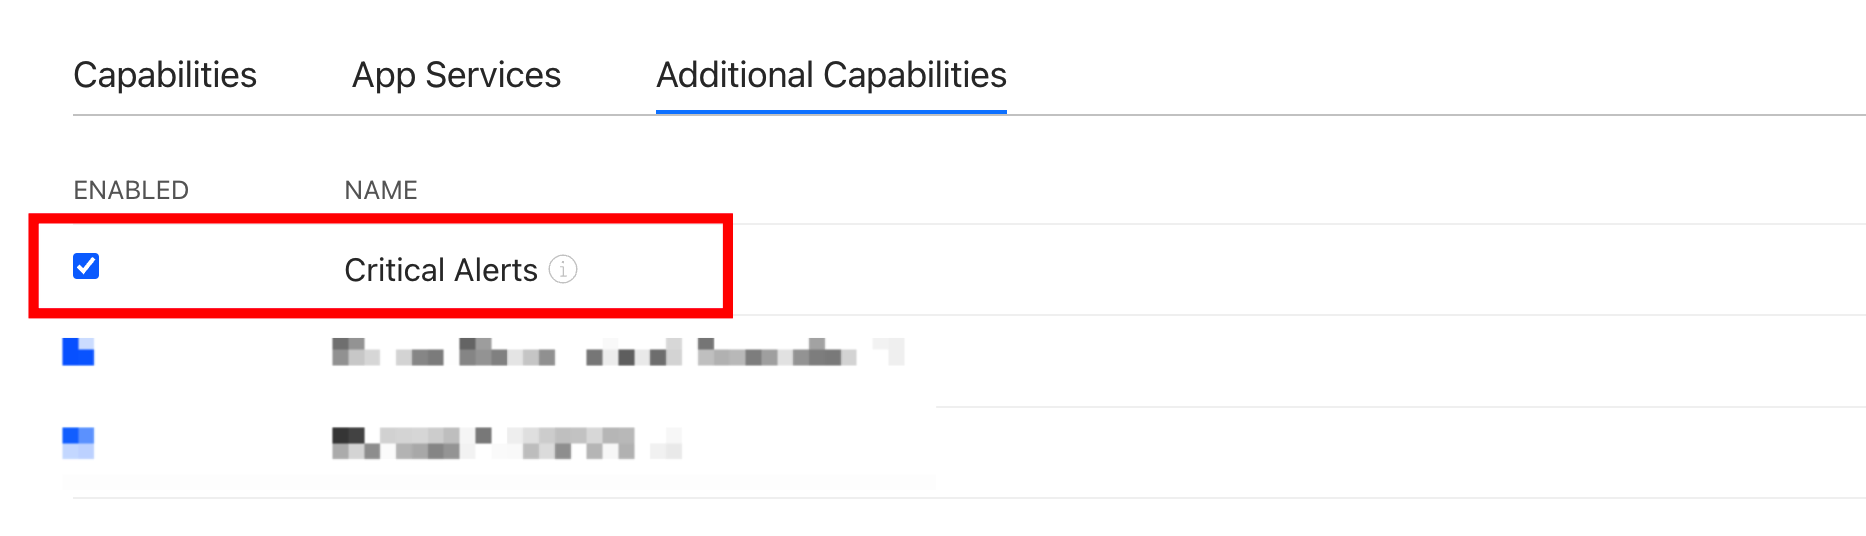
The Critical Alerts capability allows critical alerts to be sent to your app for iOS even when the iOS device stays in mute or Do Not Disturb (DND) mode. Submit a ticket to determine whether to enable this capability for your OEM app for iOS.
To enable this capability, go to the page Request a Critical Alert Notifications Entitlement and fill in the request for the capability. After the Critical Alerts capability is approved, find and enable the requested capability on the Additional Capabilities tab.
-
To make your OEM app support pairing, control, and sharing of Matter devices, you must select Matter Allow Setup Payload for your App ID.

Currently, OEM apps do not support self-service subscriptions to Matter features on the Tuya Developer Platform. To integrate your app with Matter, submit a ticket to let Tuya’s staff help you subscribe to it.
Click Save in the top right corner of the page to save the settings.
Create push certificate and distribution certificate
In the following sections, you must create the push certification and distribution certificate and upload them to the Tuya Developer Platform to configure and build your OEM app. Create the push certificate and distribution certificate in a similar procedure, including:
- Prepare your local environment, such as a macOS computer or other device with the operating system that runs OpenSSL, and create a Certificate Signing Request (CSR) file.
- Upload the CSR file to the Apple Developer platform, and download the certificate issued by Apple to your local directory.
- Merge the certificate and the private key to export the .p12 file, and upload the
.p12file to the Tuya Developer Platform.
Create CSR file
Create the CSR file in any of the following methods:
-
Use a macOS computer to create the CSR file (recommended).
-
Use the command-line interface (CLI) to run OpenSSL and create the CSR file.
To create the CSR file, a macOS computer is strongly recommended because it comes with a graphical user interface. If you do not have a macOS computer or you are an engineer, you can use the CLI to run OpenSSL and create the CSR file. OpenSSL 1.x series is recommended (version 1.1 is recommended). If you use OpenSSL 3.x version, you need to add the
-legacyparameter when exporting the p12 certificate file.
Method 1: Use a macOS computer to create CSR file
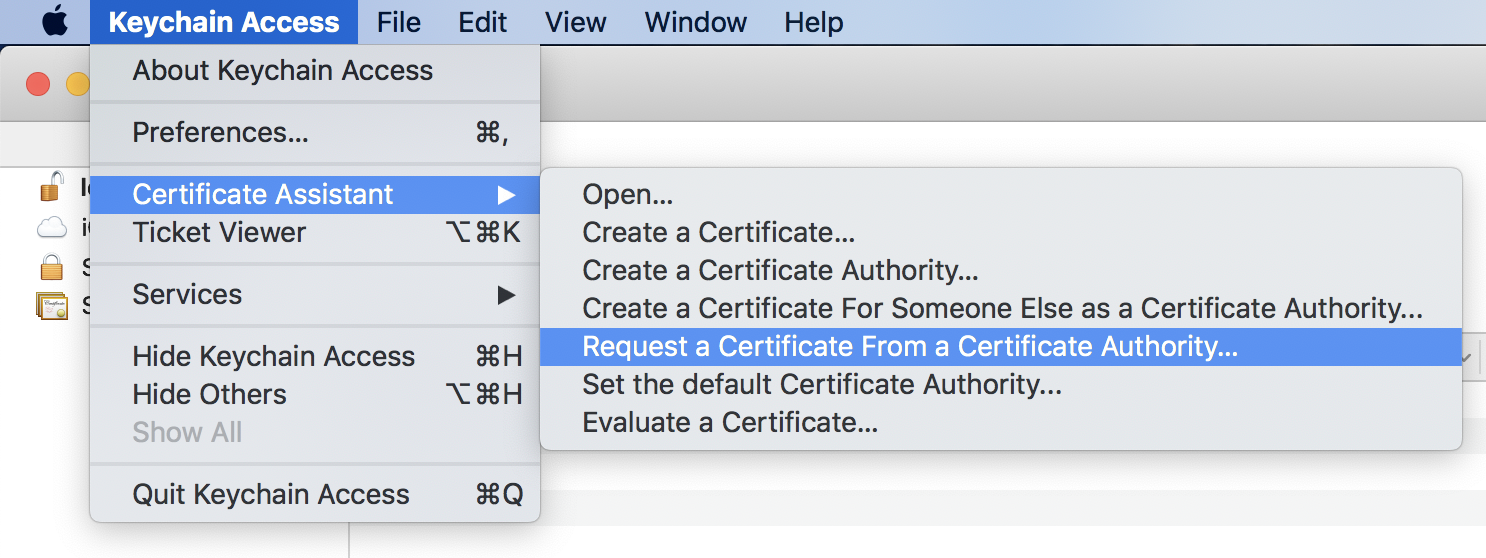
To create a CSR file on the macOS computer, you can use the Keychain Access application.
-
Find the Applications/Utilities folder and open the Keychain Access application on macOS.
-
On the menu bar, choose Keychain Access > Certificate Assistant > Request a Certificate From a Certificate Authority.
-
On the Certificate Assistant page, set User Email Address and Common Name, select Saved to disk, and then click Continue.
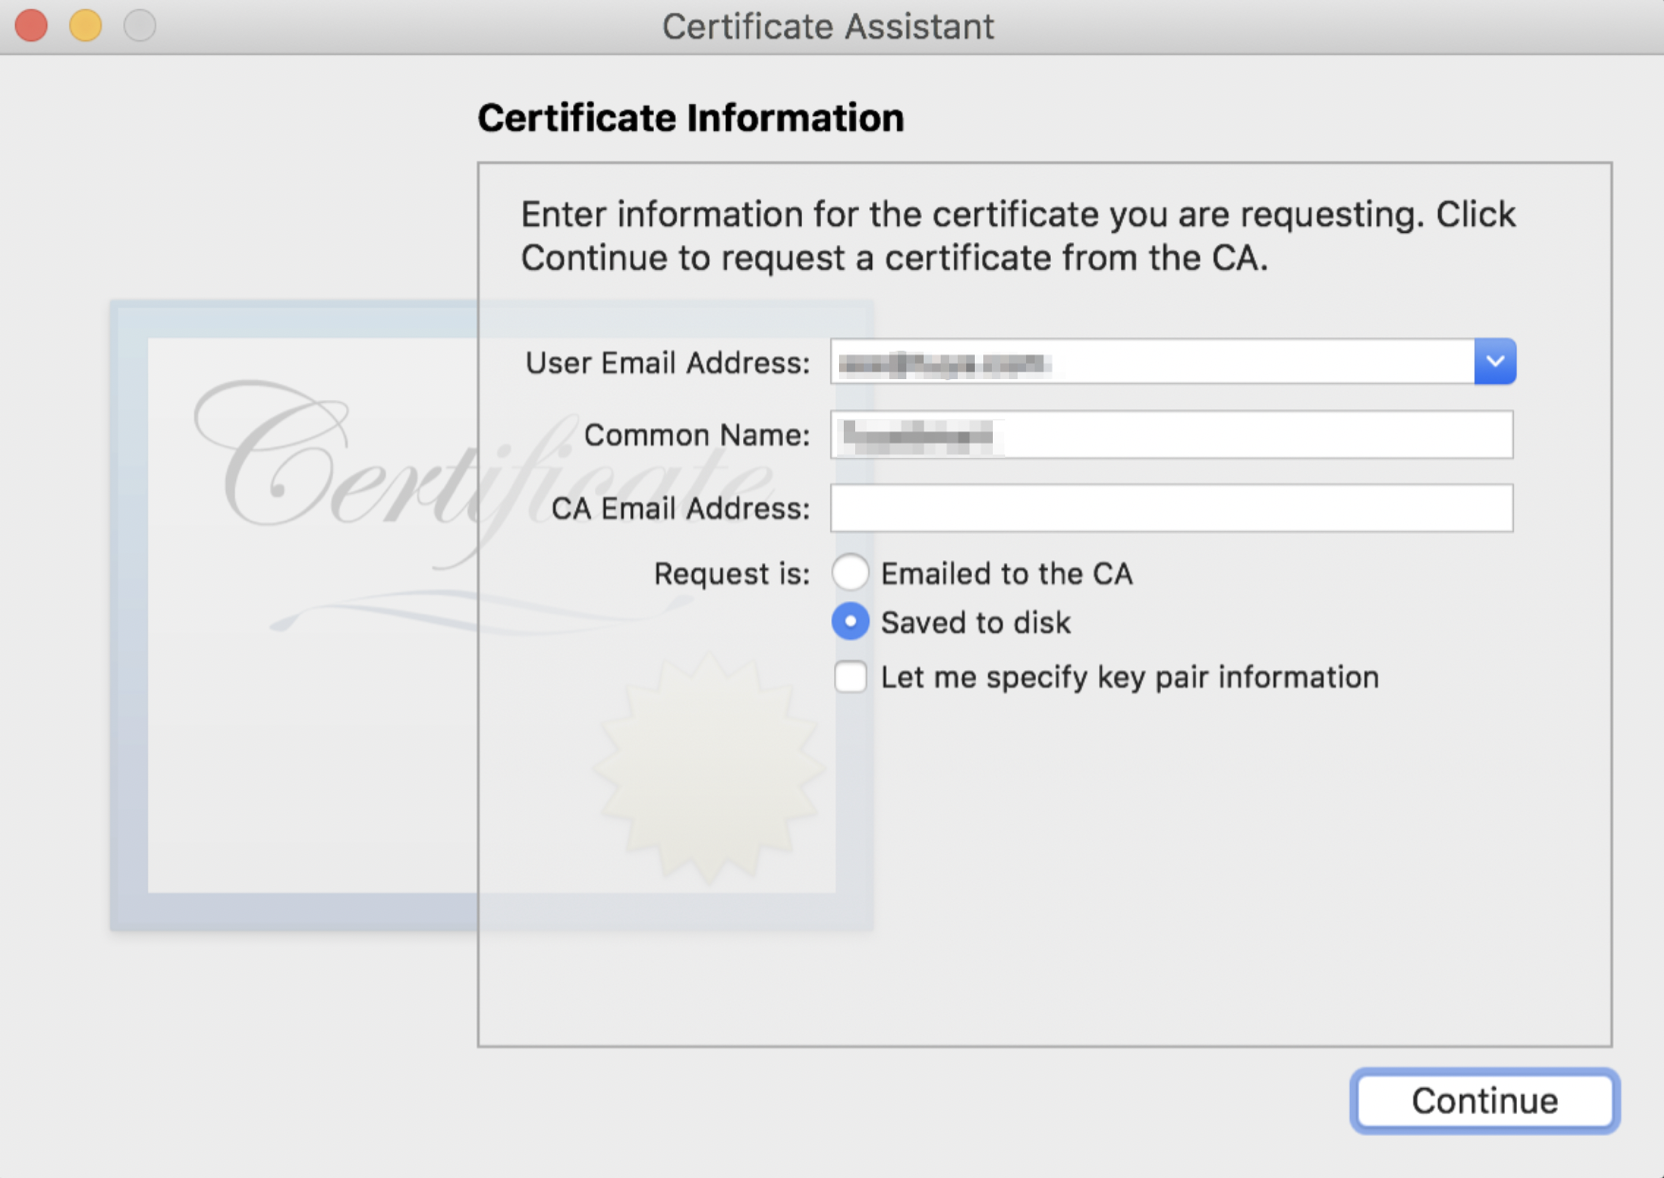
-
Save CertificateSigningRequest.certSigningRequest to a local directory.
Method 2: Use the CLI to create the CSR file
To use the CLI to create the CSR file, you must first install OpenSSL in your local environment, such as a Windows or Linux distribution. In your current operating system, open the terminal such as Windows Power Shell or Linux Terminal and create the private key and CSR file in the following procedure:
-
Run the following command to create a private key:
# openssl version should be 1.x series, 3.x not compatible openssl genrsa -out private.key 2048 -
Run the following command to generate a CSR file:
# openssl version should be 1.x series, 3.x not compatible
openssl req -new -key private.key -out example.csr -subj "/CN=Your Name/emailAddress=you@example.com"
In this command, replace Your Name with your name and you@example.com with your email address.
-
Run the following command to convert the CSR file to the
CertificateSigningRequest.certSigningRequestformat that is compatible with Apple’s platform.# openssl version should be 1.x series, 3.x not compatible openssl req -in example.csr -out CertificateSigningRequest.certSigningRequestWhen you use the CLI to run OpenSSL and create the CSR file, keep the
private.keyfile generated in Step 1 safe. This private key is required in the subsequent procedure to export the .p12 certificate.
Create the distribution certificate in the .p12 format
If multiple OEM apps are associated with your Tuya account, you can use the same distribution certificate for all these apps. No more distribution certificates are required.
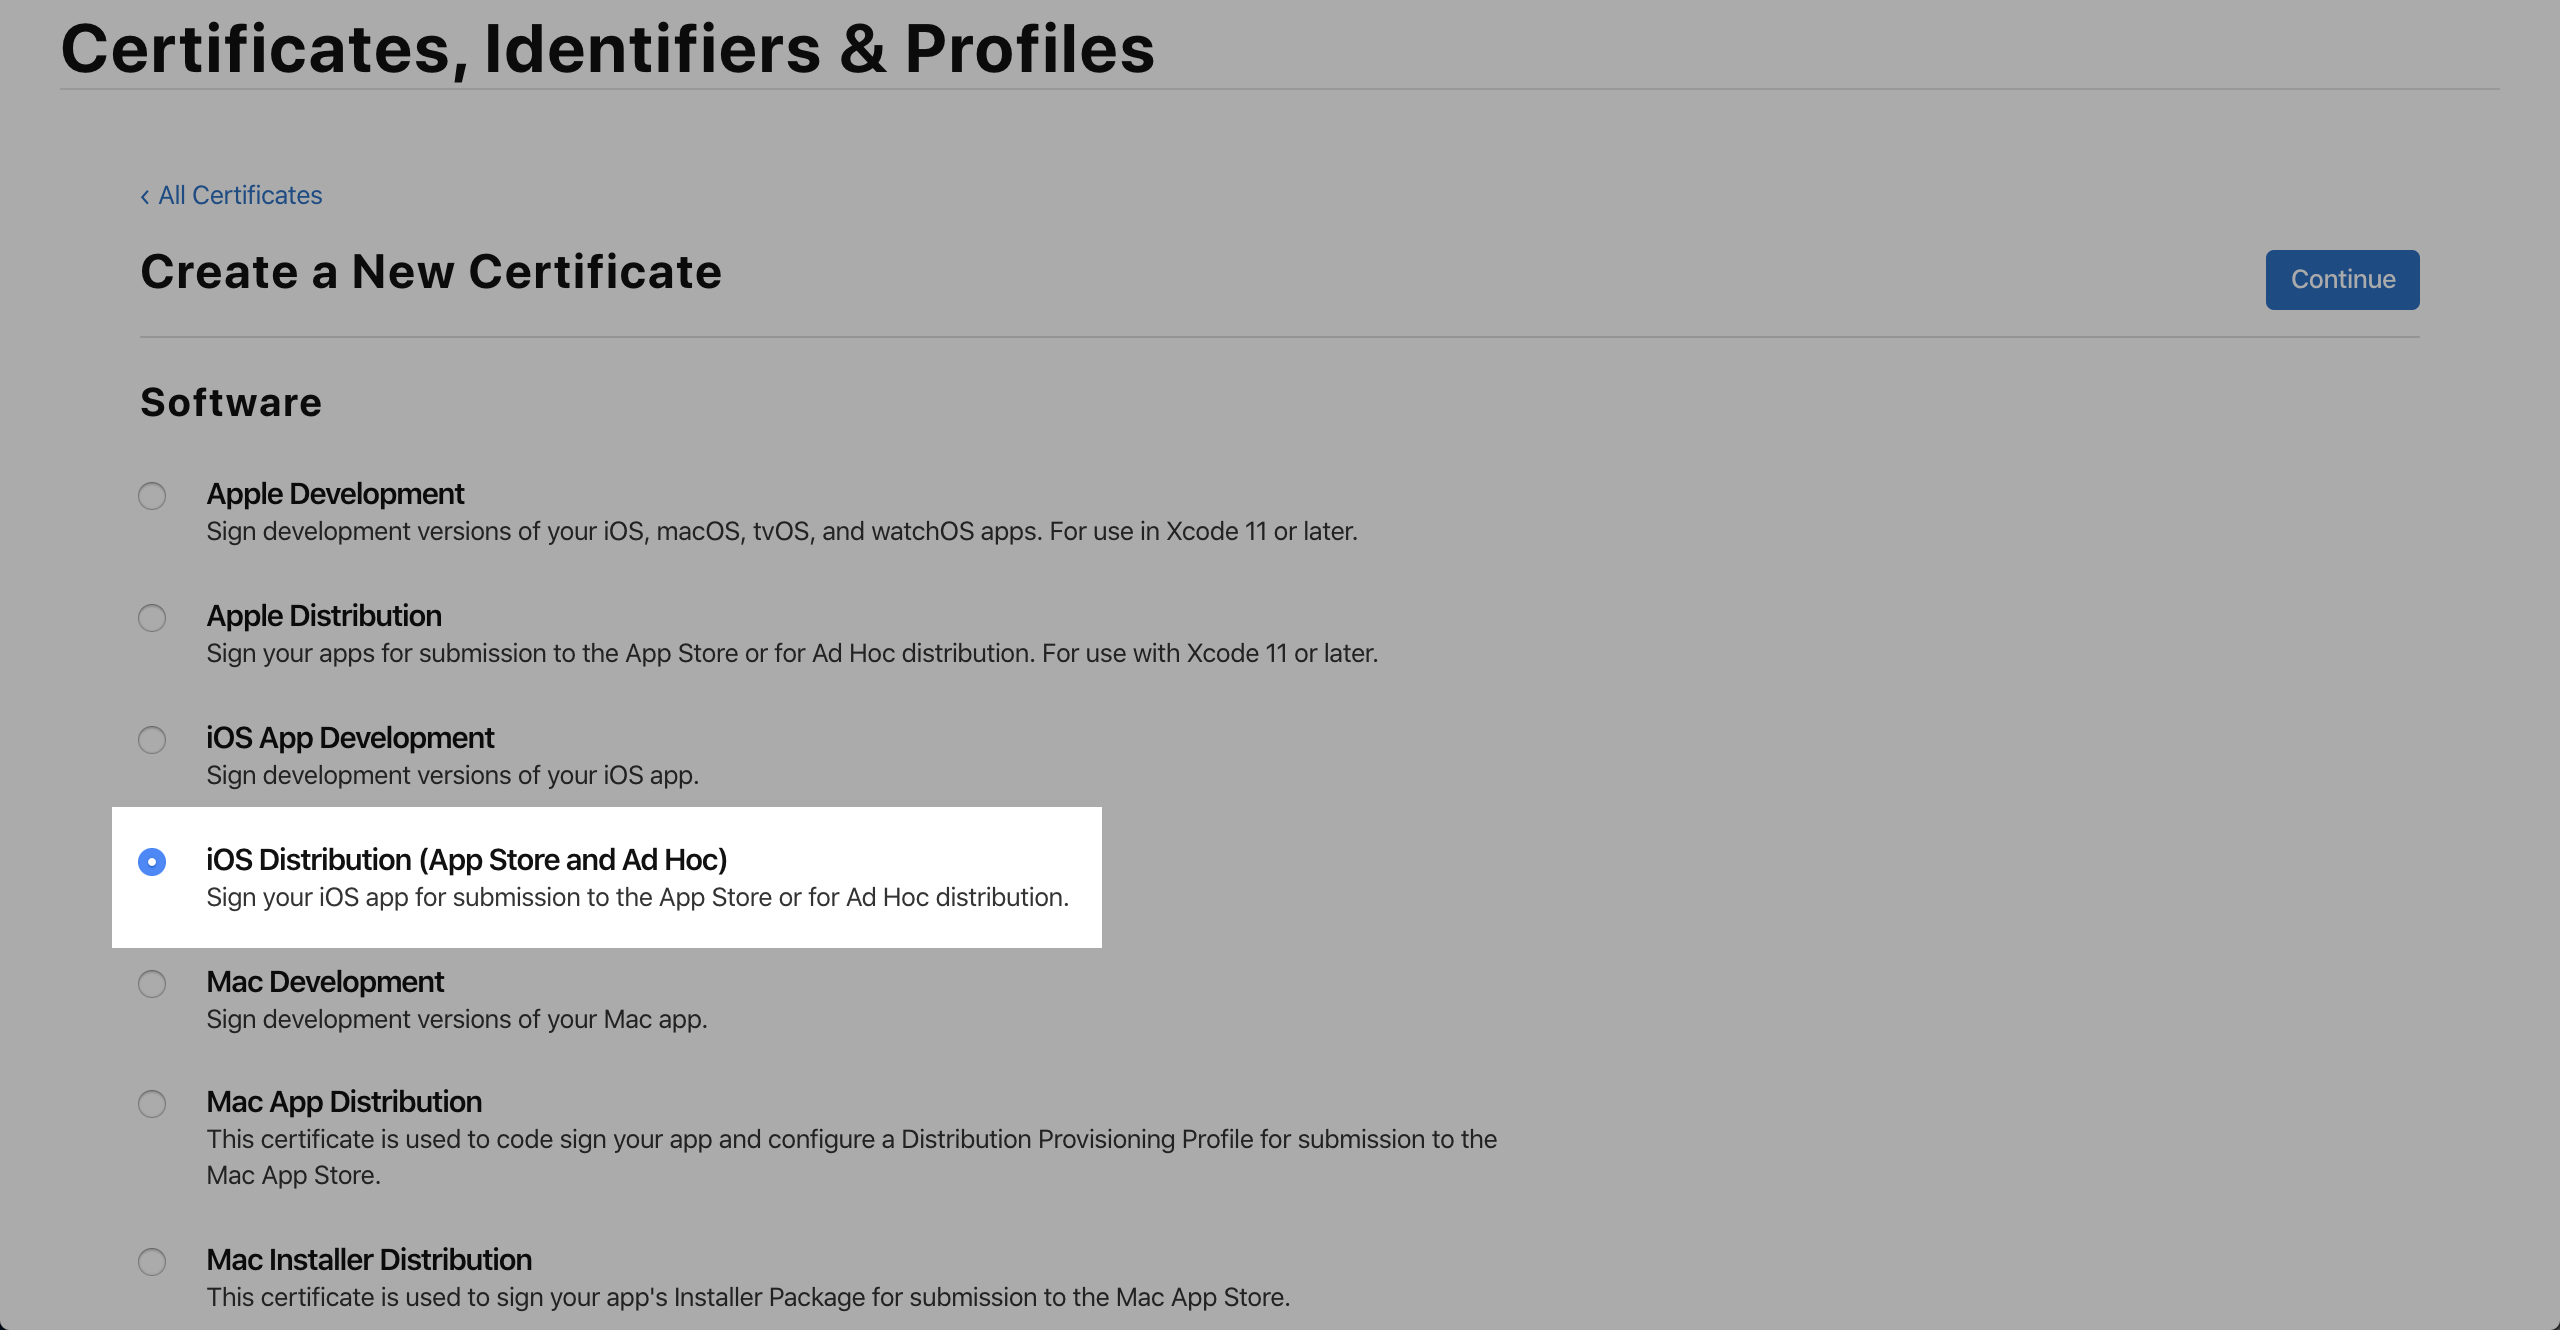
-
Choose Certificates, Identifiers & Profile > Certificates and click +.
-
Select iOS Distribution (App Store and Ad Hoc) and click Continue.
If this option is unavailable and the system indicates that the number of certificates has exceeded the upper limit, return to the previous page and delete the unnecessary certificates. The deletion does not affect the normal use of the launched apps. The certificates are only required when you build and launch apps.
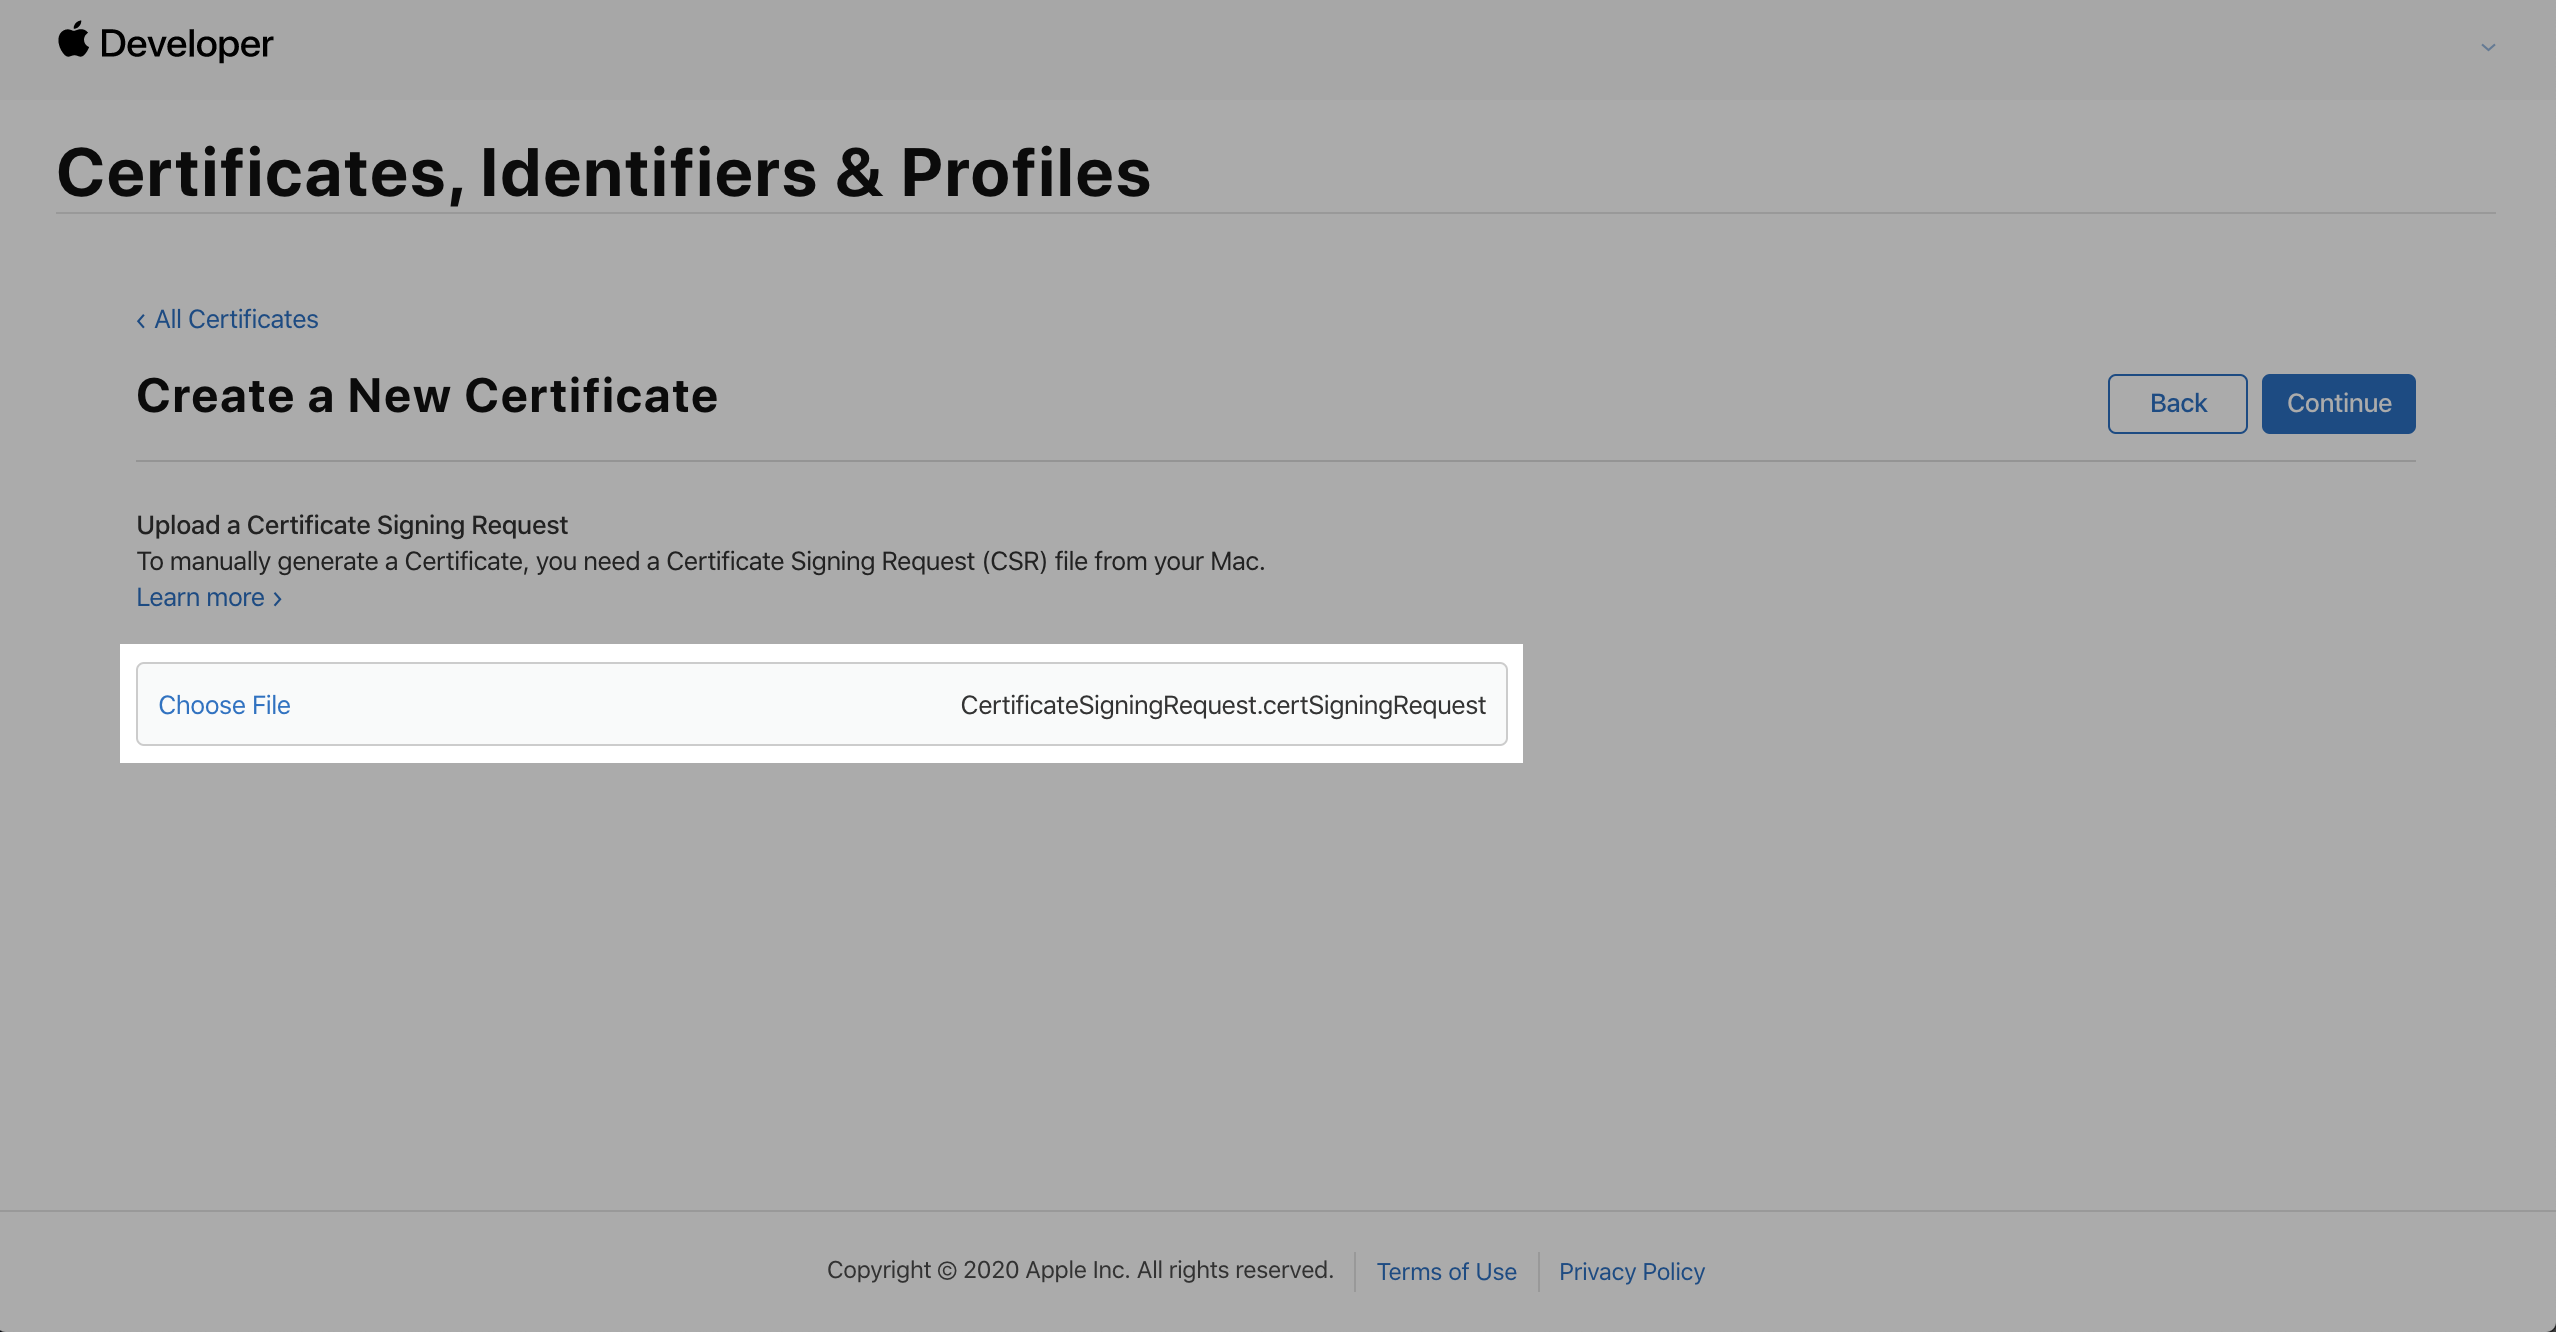
-
Click Choose File to select the newly generated CSR file and click Continue.
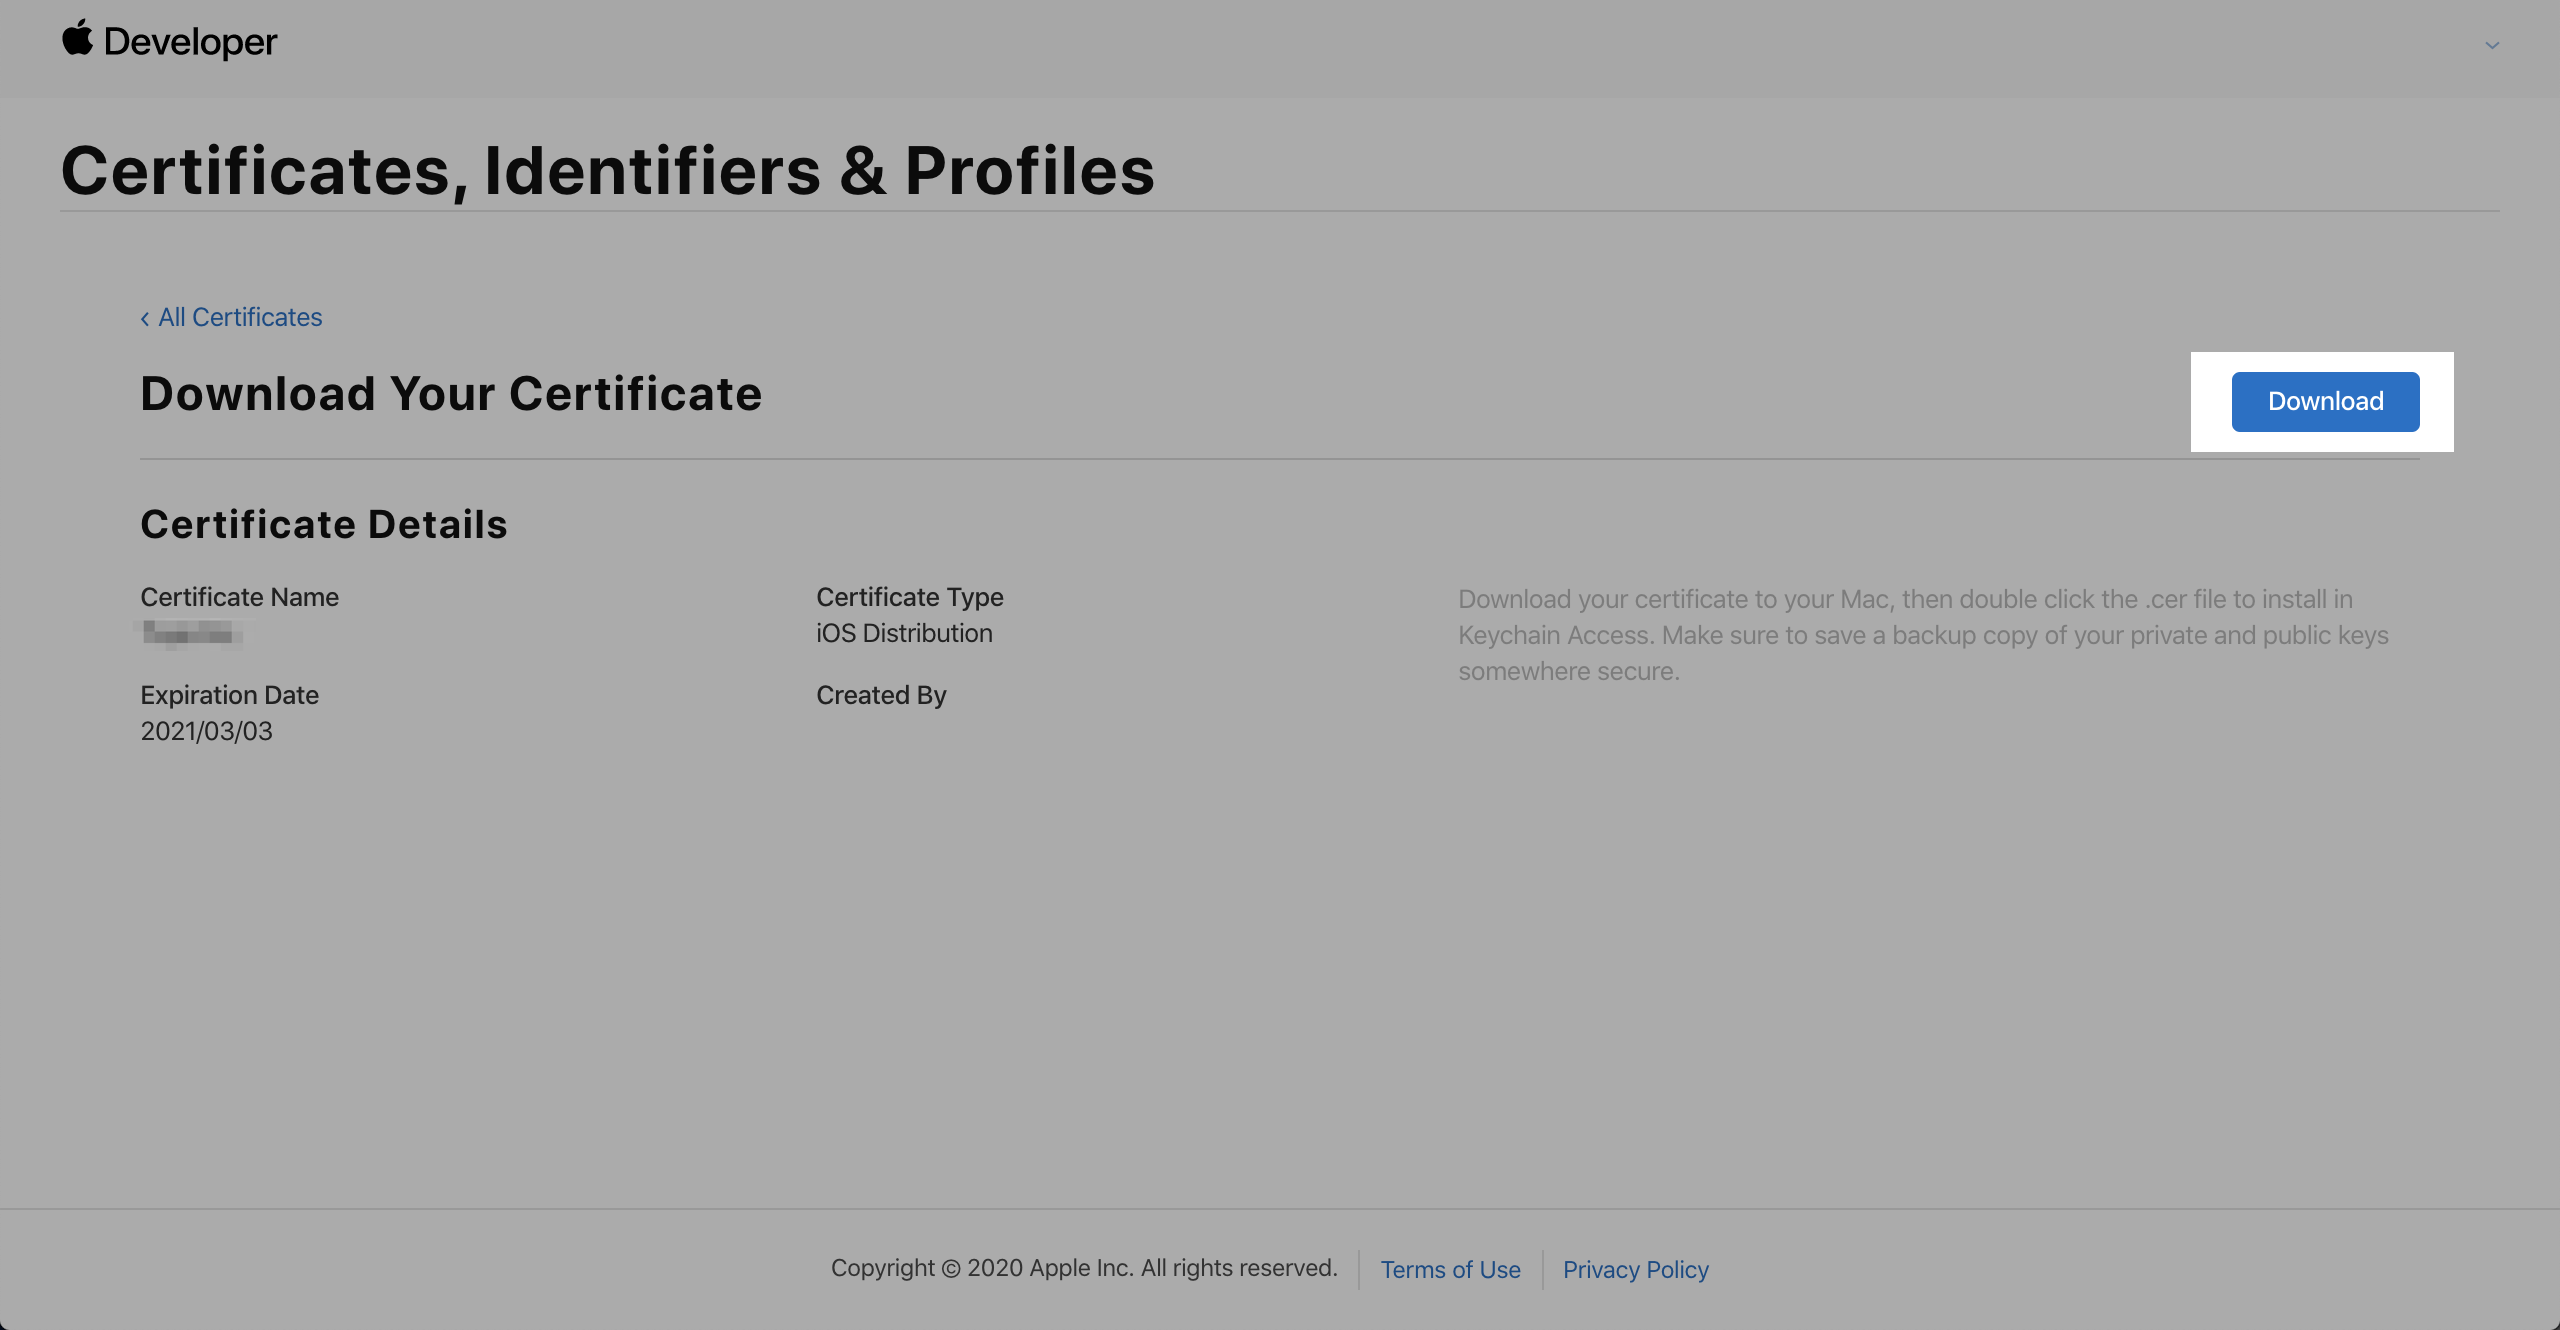
-
Click Download to download the ios_distribution.cer file to a local directory.
-
Export the certificate in the
.p12format in two methods that match those of how to create a CSR file:-
Method 1: If you use a macOS computer to create a CSR file, perform the following steps to export a
.p12file:-
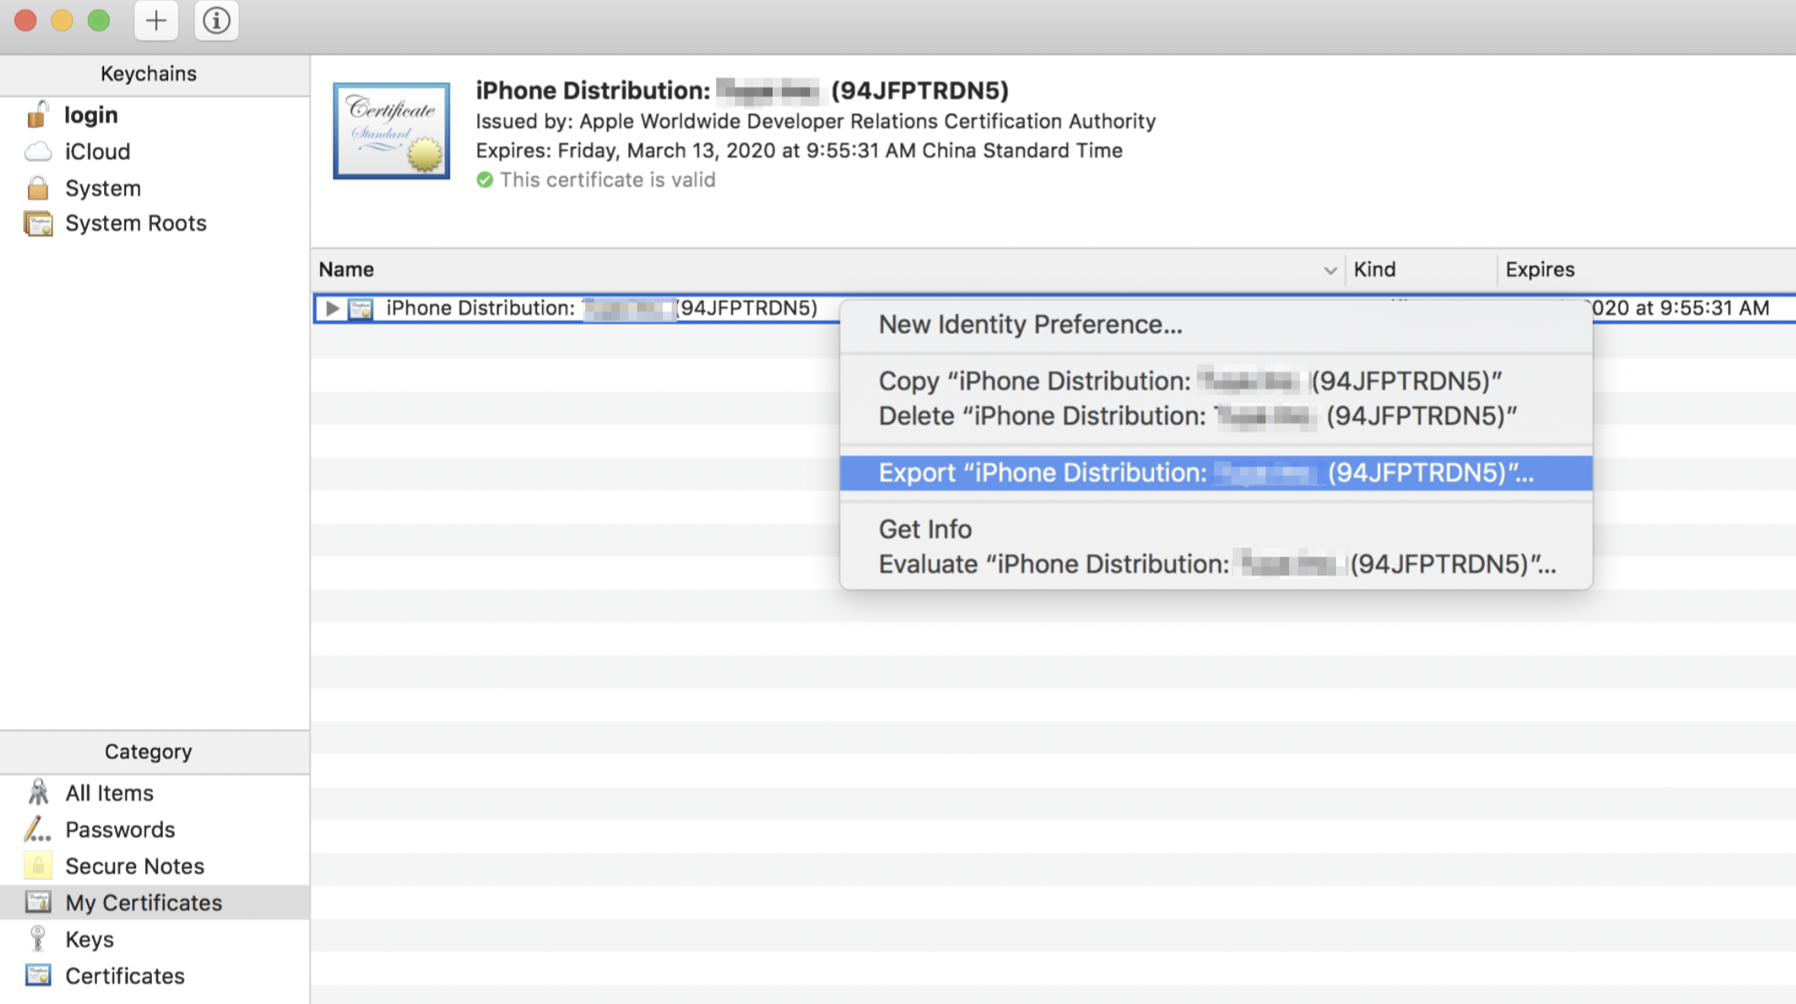
Double-click the downloaded file ios_distribution.cer that can be renamed in your own way. Then, the file will be automatically imported to the Keychain Access application.
The .cer file must be imported to the keychain before it can be exported as a .p12 file. Continue with the follow-up steps.
-
Open the Keychain Access application, choose Category > My Certificates, and then find the newly imported certificate. Right-click the certificate and select Export.
-
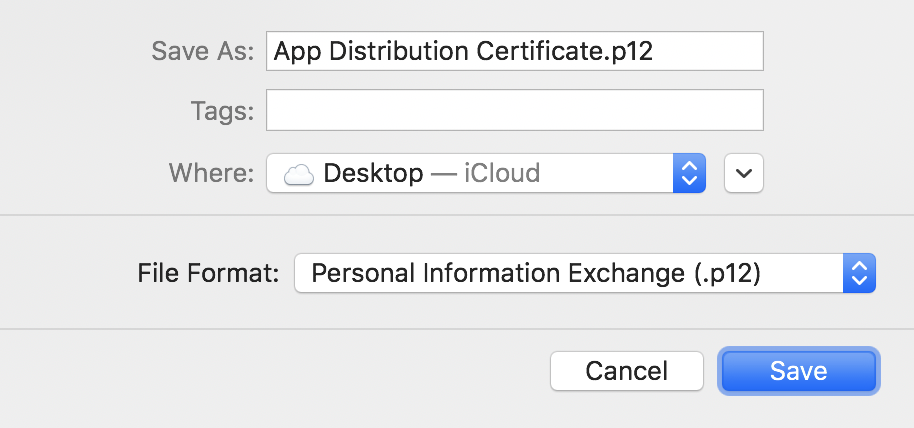
Save the certificate as App Distribution Certificate.p12, select the file format Personal Information Exchange (.p12), and then click Save.
-
Create a password for the distribution certificate, note it down, and then click OK.
-
-
Method 2: If you use a terminal to run OpenSSL and create the CSR file, run the command to merge the cer certificate and private key and export the .p12 file:
OpenSSL 1.x version (recommended 1.1):
openssl x509 -inform DER -in ios_distribution.cer -out ios_distribution.pem
openssl pkcs12 -export -out cert.p12 -inkey private.key -in ios_distribution.pem
OpenSSL 3.x version:
openssl x509 -inform DER -in ios_distribution.cer -out ios_distribution.pem
openssl pkcs12 -export -legacy -out cert.p12 -inkey private.key -in ios_distribution.pem
In this command, cert.p12 is the name of the
.p12file that you want to export, private.key is the private key file that is generated when you create the CSR file, and ios_distribution.cer is the name of the certificate that you have downloaded from the Apple Developer platform.After entering the command, you will be asked to enter the password. Enter the password that you want to set for the
.p12file, and confirm the password.
-
Create a push certificate in the .p12 format
Different from the distribution certificate, if multiple OEM apps are associated with your account, a push certificate must be created for each application.
-
Choose Certificates, Identifiers & Profile > Certificates and click +.
-
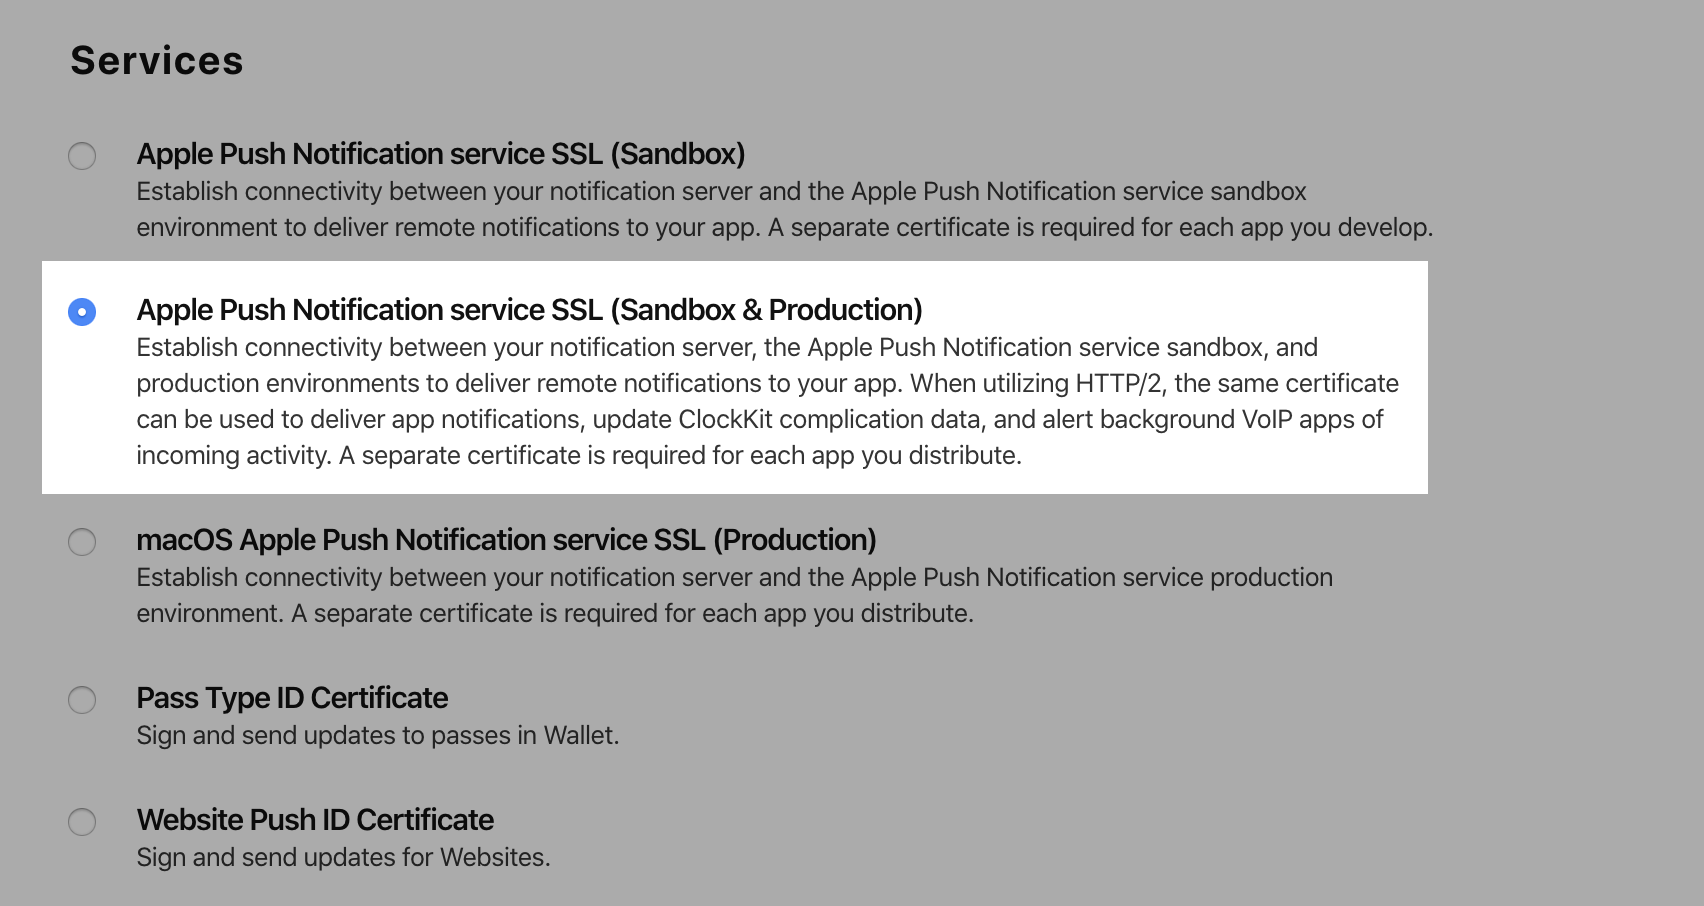
In the Services section, select Apple Push Notification service SSL (Sandbox & Production) and click Continue.
-
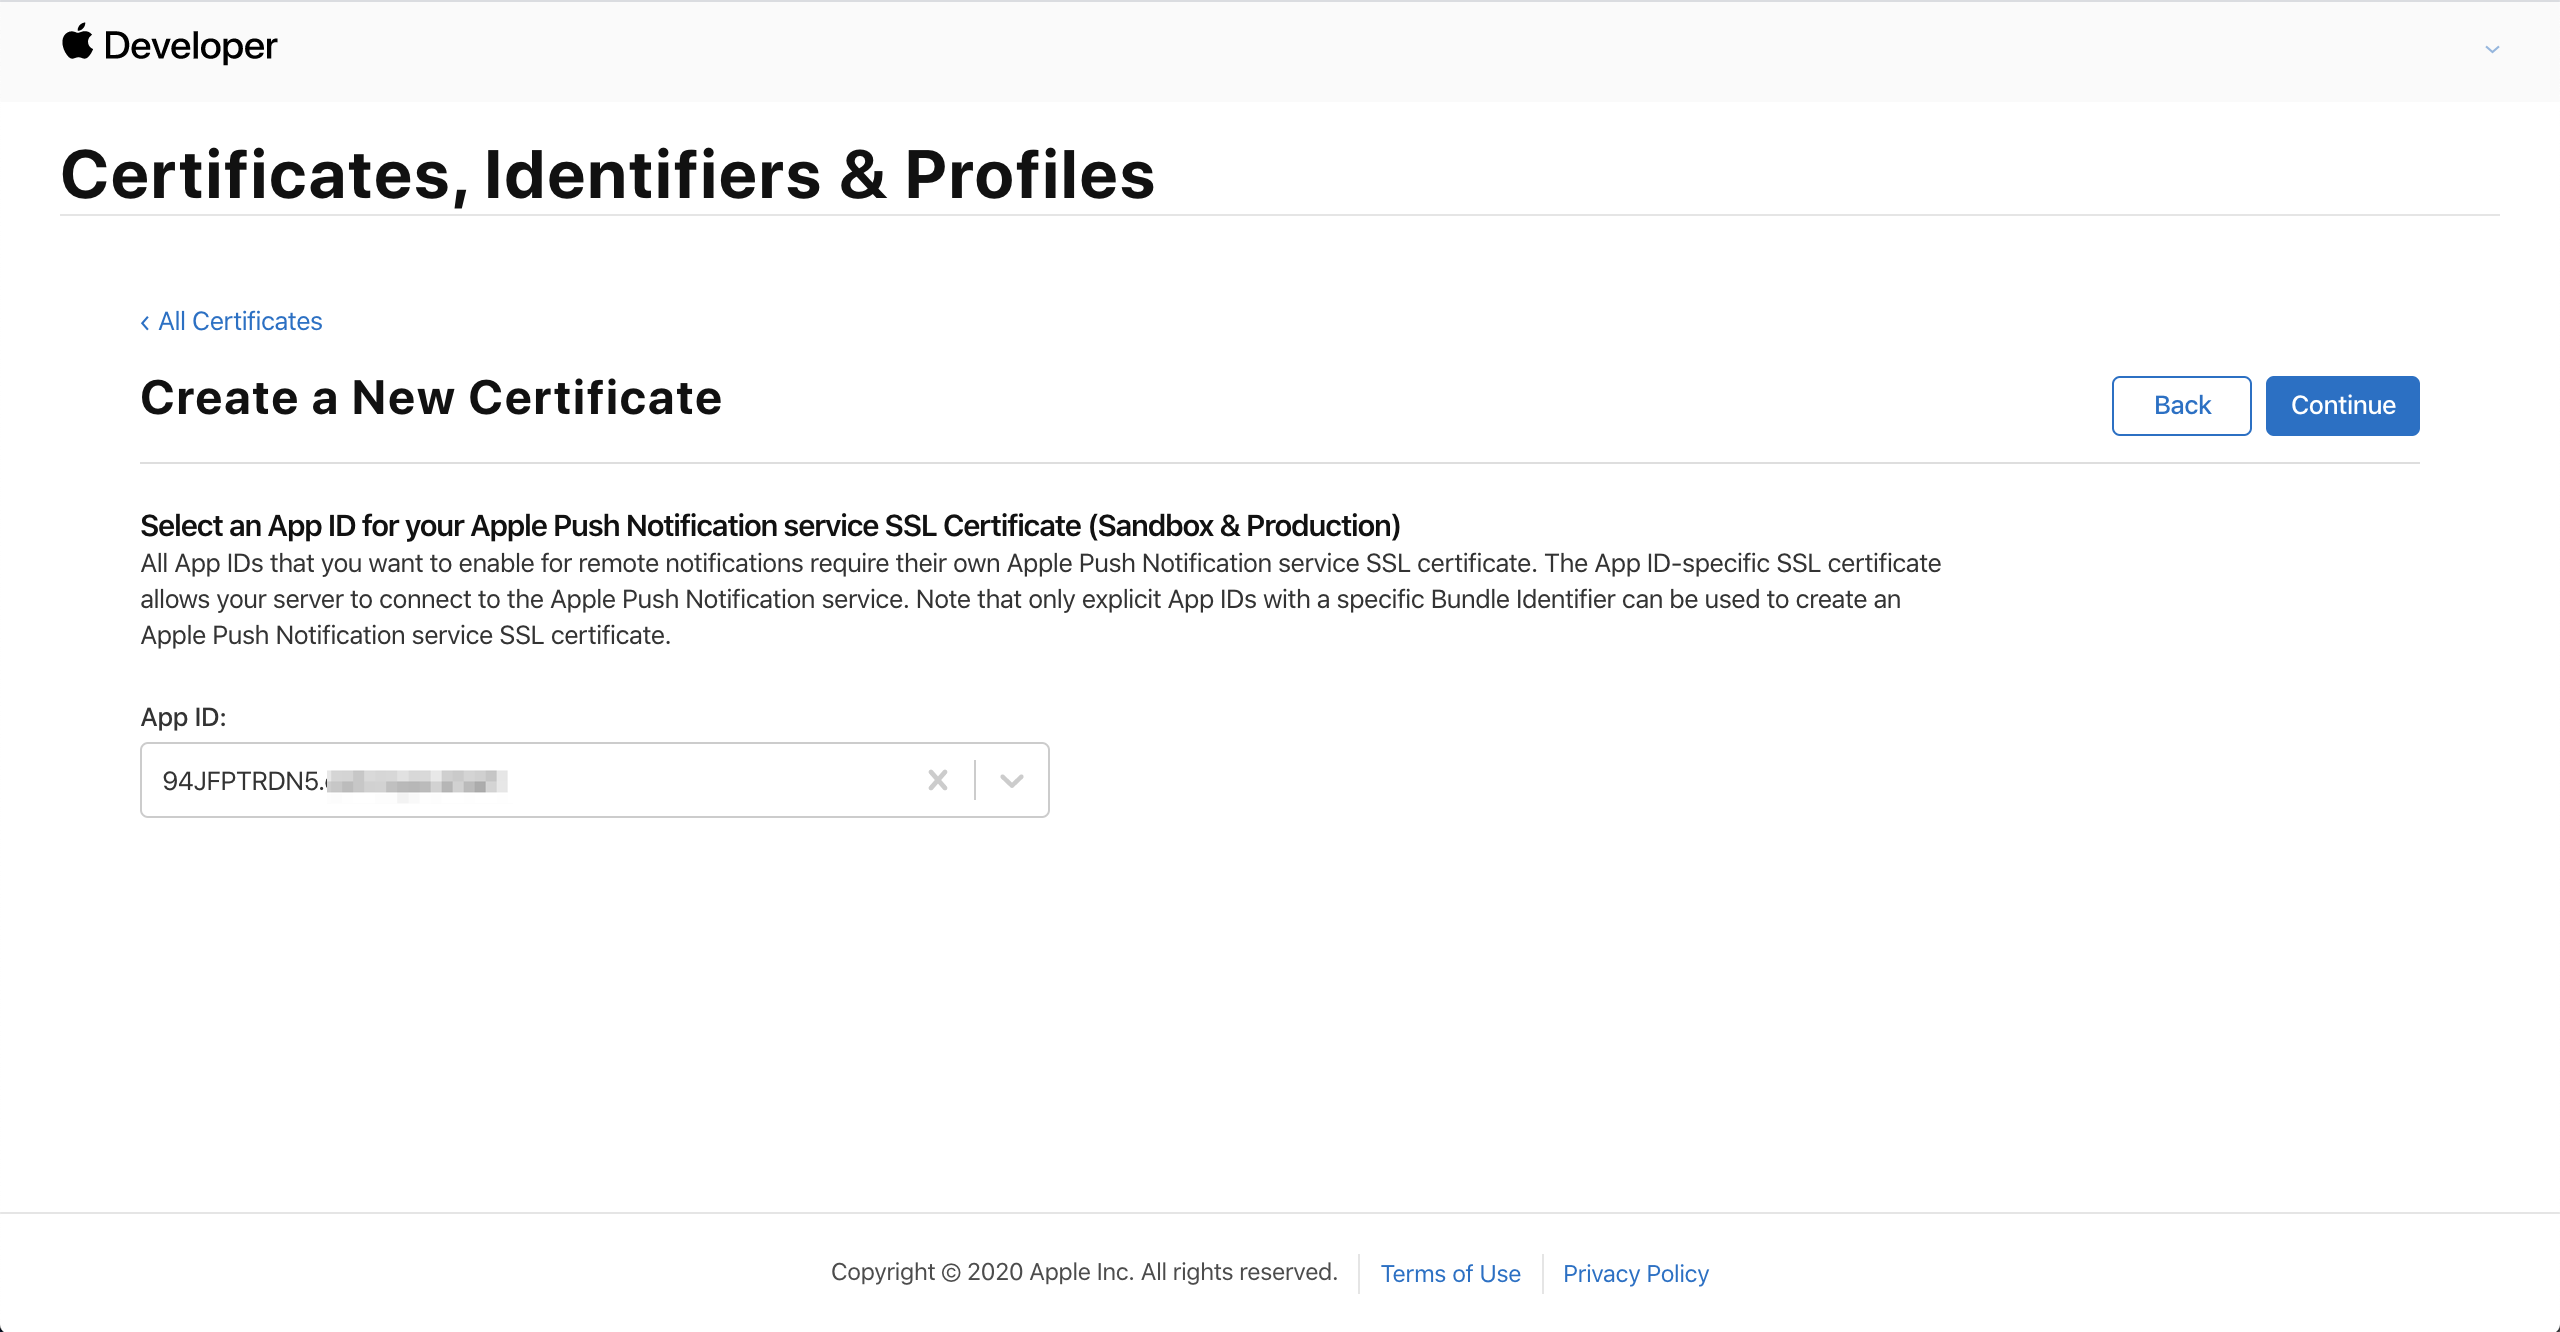
Select the bundle ID of the app from the App ID drop-down list and click Continue.
-
Click Choose File to select the newly generated CSR file and click Continue.
-
Click Download to download the aps.cer file to the local directory.
-
Export the certificate in the
.p12format in two methods that match those of how to create a CSR file:-
Method 1: If you use a macOS computer to create a CSR file, perform the following steps to export a
.p12file:-
Double-click the downloaded file aps.cer. Then, the file will be automatically imported to the Keychain Access application.
The .cer file must be imported to the keychain before it can be exported as a .p12 file. Continue with the follow-up steps.
-
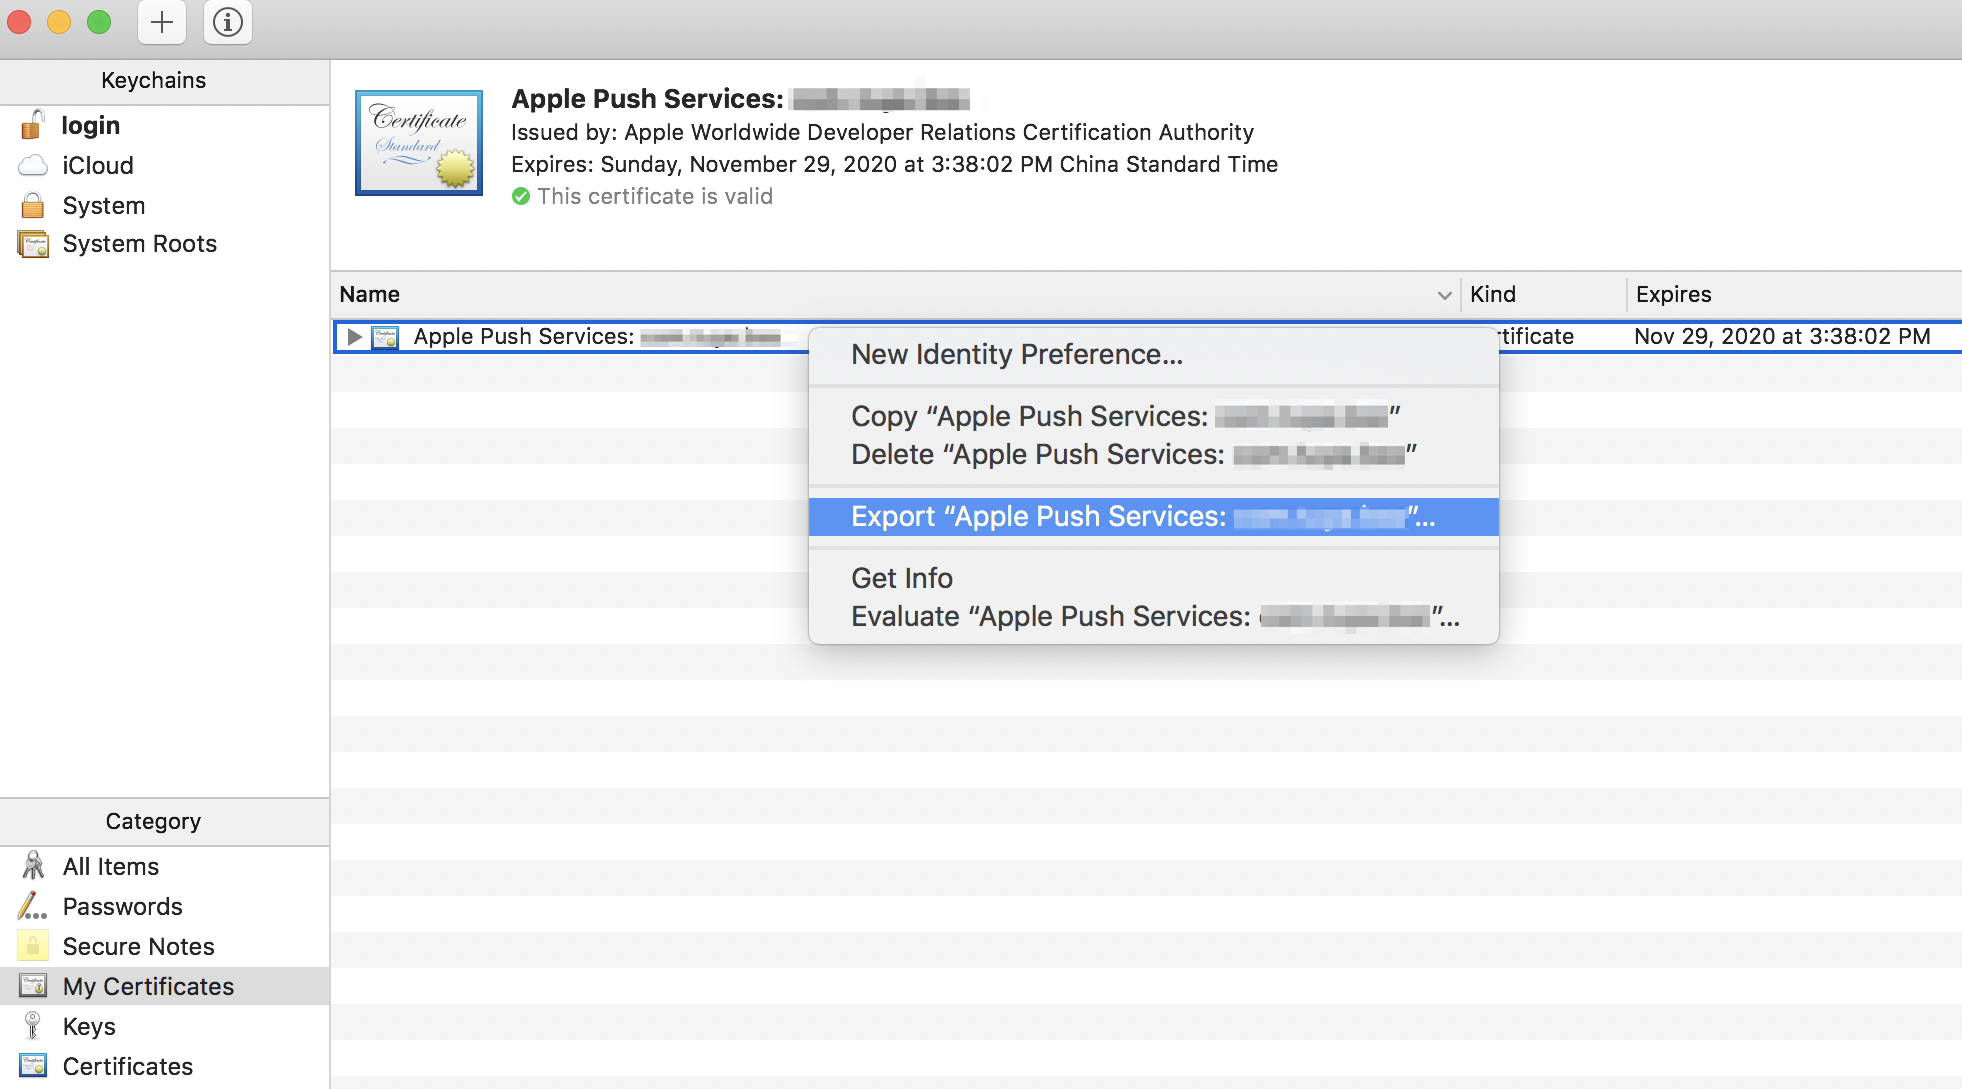
Open the Keychain Access application, choose Category > My Certificates, and then find the newly imported certificate. Right-click the certificate and select Export.
-
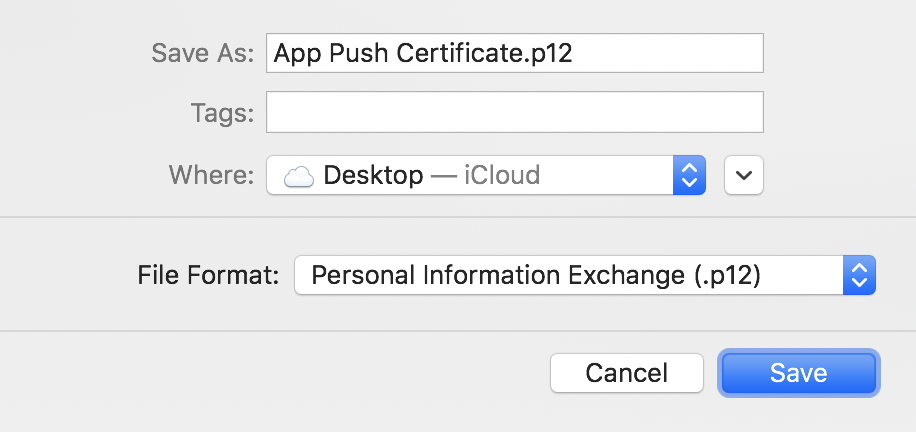
Save the certificate as App Push Certificate.p12 that can be renamed in your own way, select the file format Personal Information Exchange (.p12), and then click Save.
-
Create a password for the distribution certificate, note it down, and then click OK.
-
-
Method 2: If you use a terminal to run OpenSSL and create the CSR file, run the following command to merge the cer certificate and private key and export the .p12 file:
OpenSSL 1.x version (recommended 1.1):
openssl x509 -inform DER -in aps.cer -out aps.pem
openssl pkcs12 -export -out push.p12 -inkey private.key -in aps.pem
OpenSSL 3.x version:
openssl x509 -inform DER -in aps.cer -out aps.pem
openssl pkcs12 -export -legacy -out push.p12 -inkey private.key -in aps.pem
In this command, push.p12 is the name of the
.p12file that you want to export, private.key is the private key file that is generated when you create the CSR file, and aps.cer is the name of the certificate that you have downloaded from the Apple Developer platform.After entering the command, you will be asked to enter the password. Enter the password that you want to set for the
.p12file, and confirm the password.
-
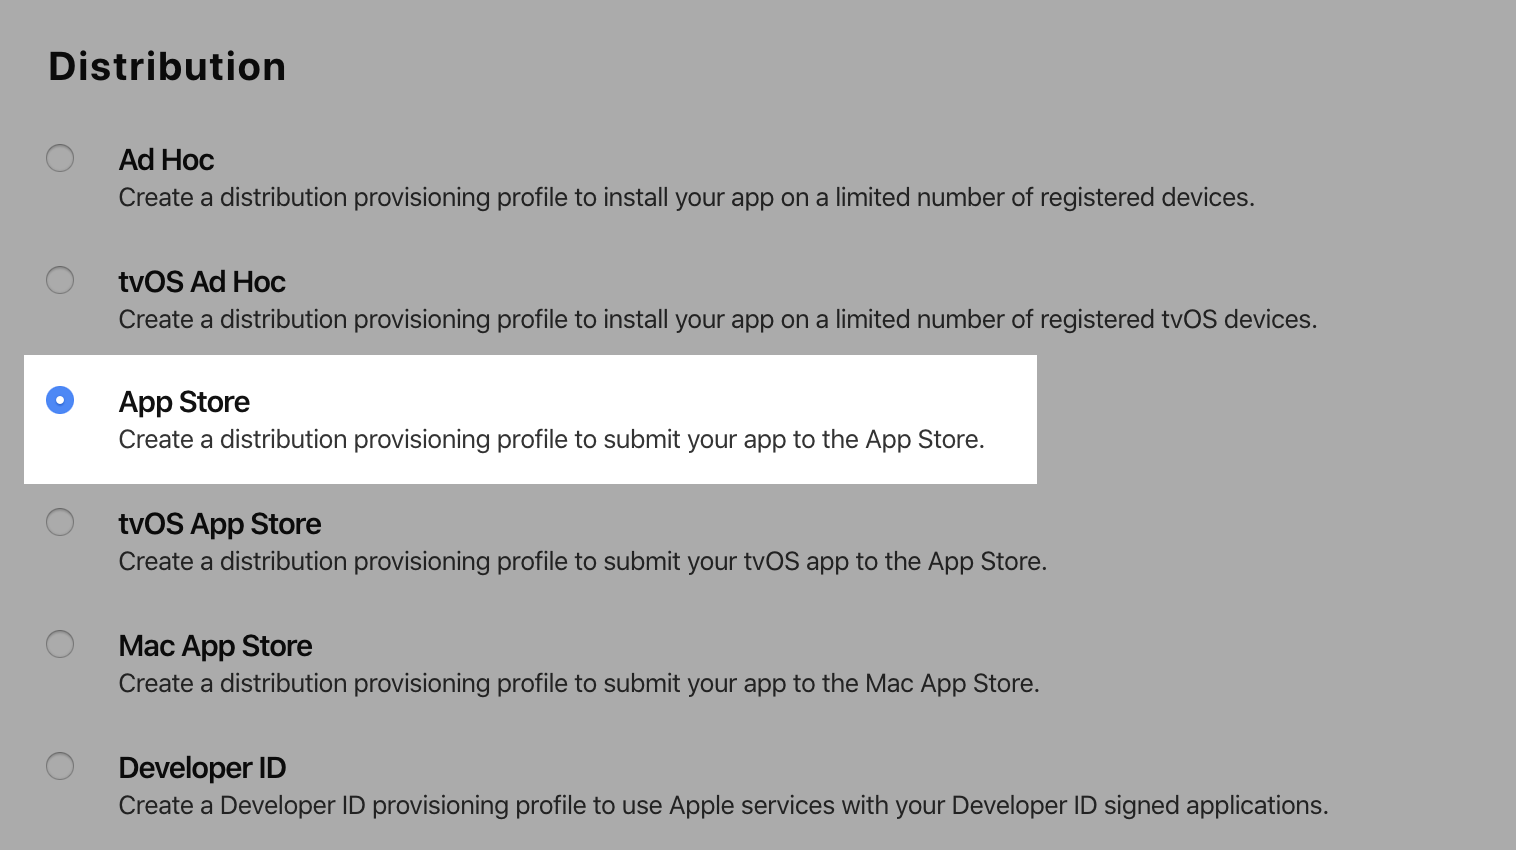
Create provisioning profiles
Create provisioning profile of main application in the .mobileprovision format
-
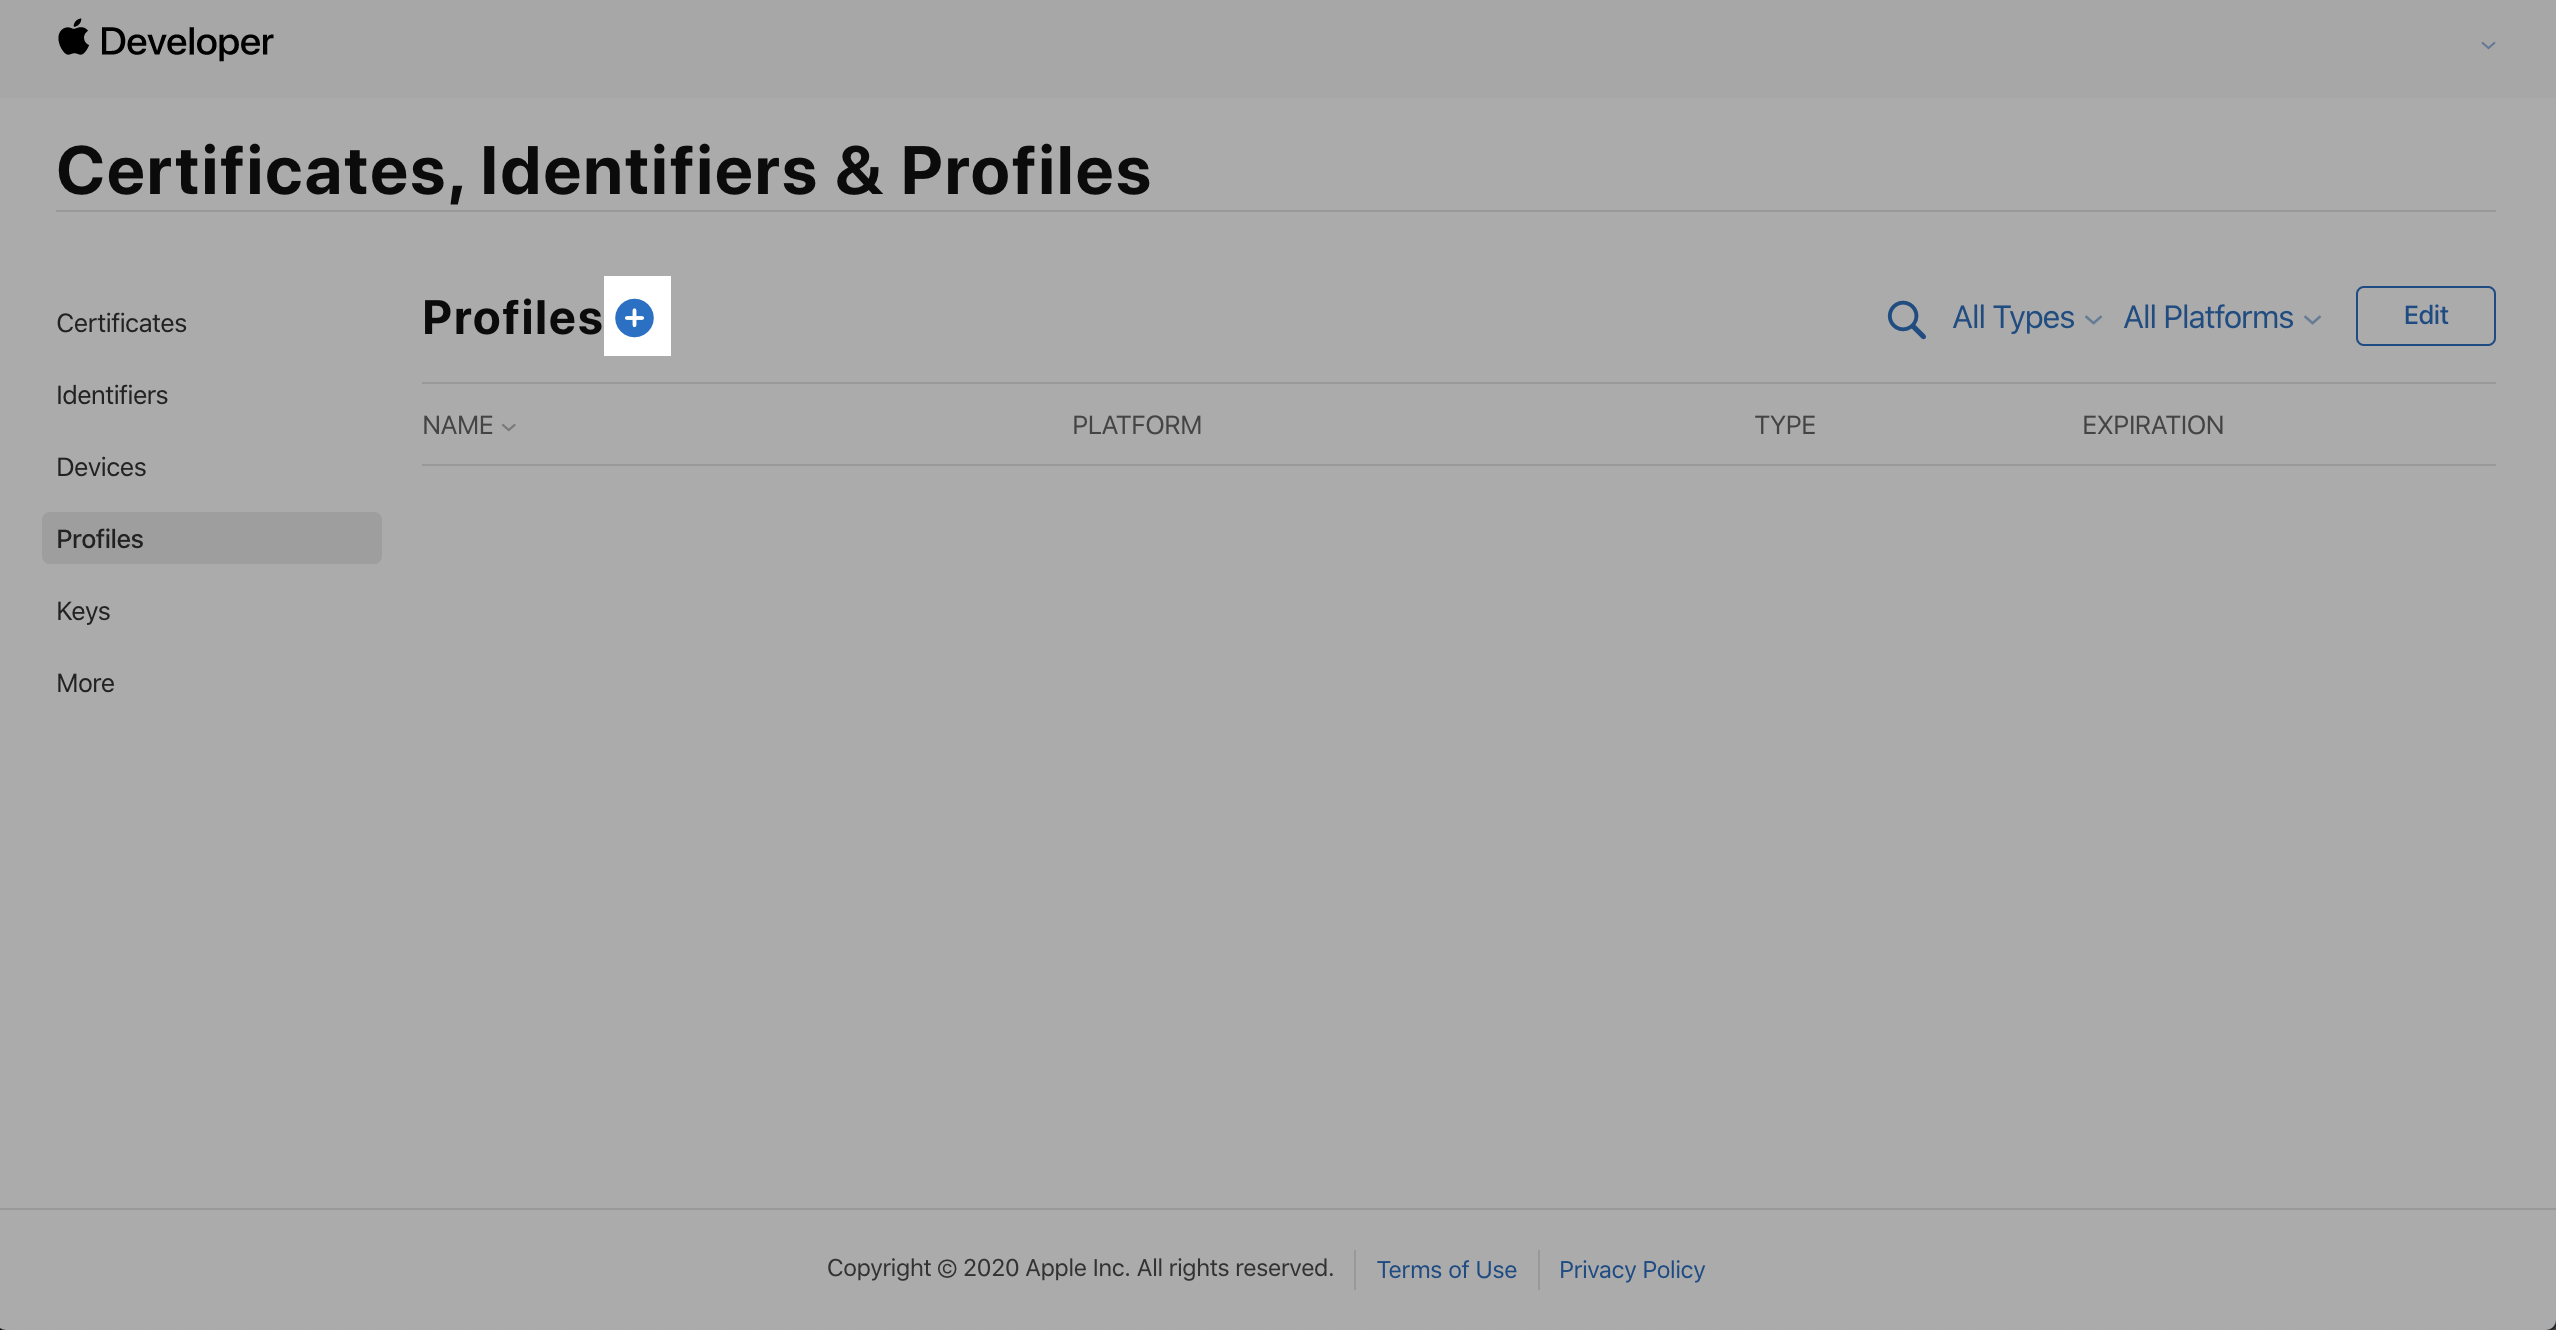
Choose Certificates, Identifiers & Profile > Profiles and click +.
-
In the Distribution section, select App Store and click Continue.
-
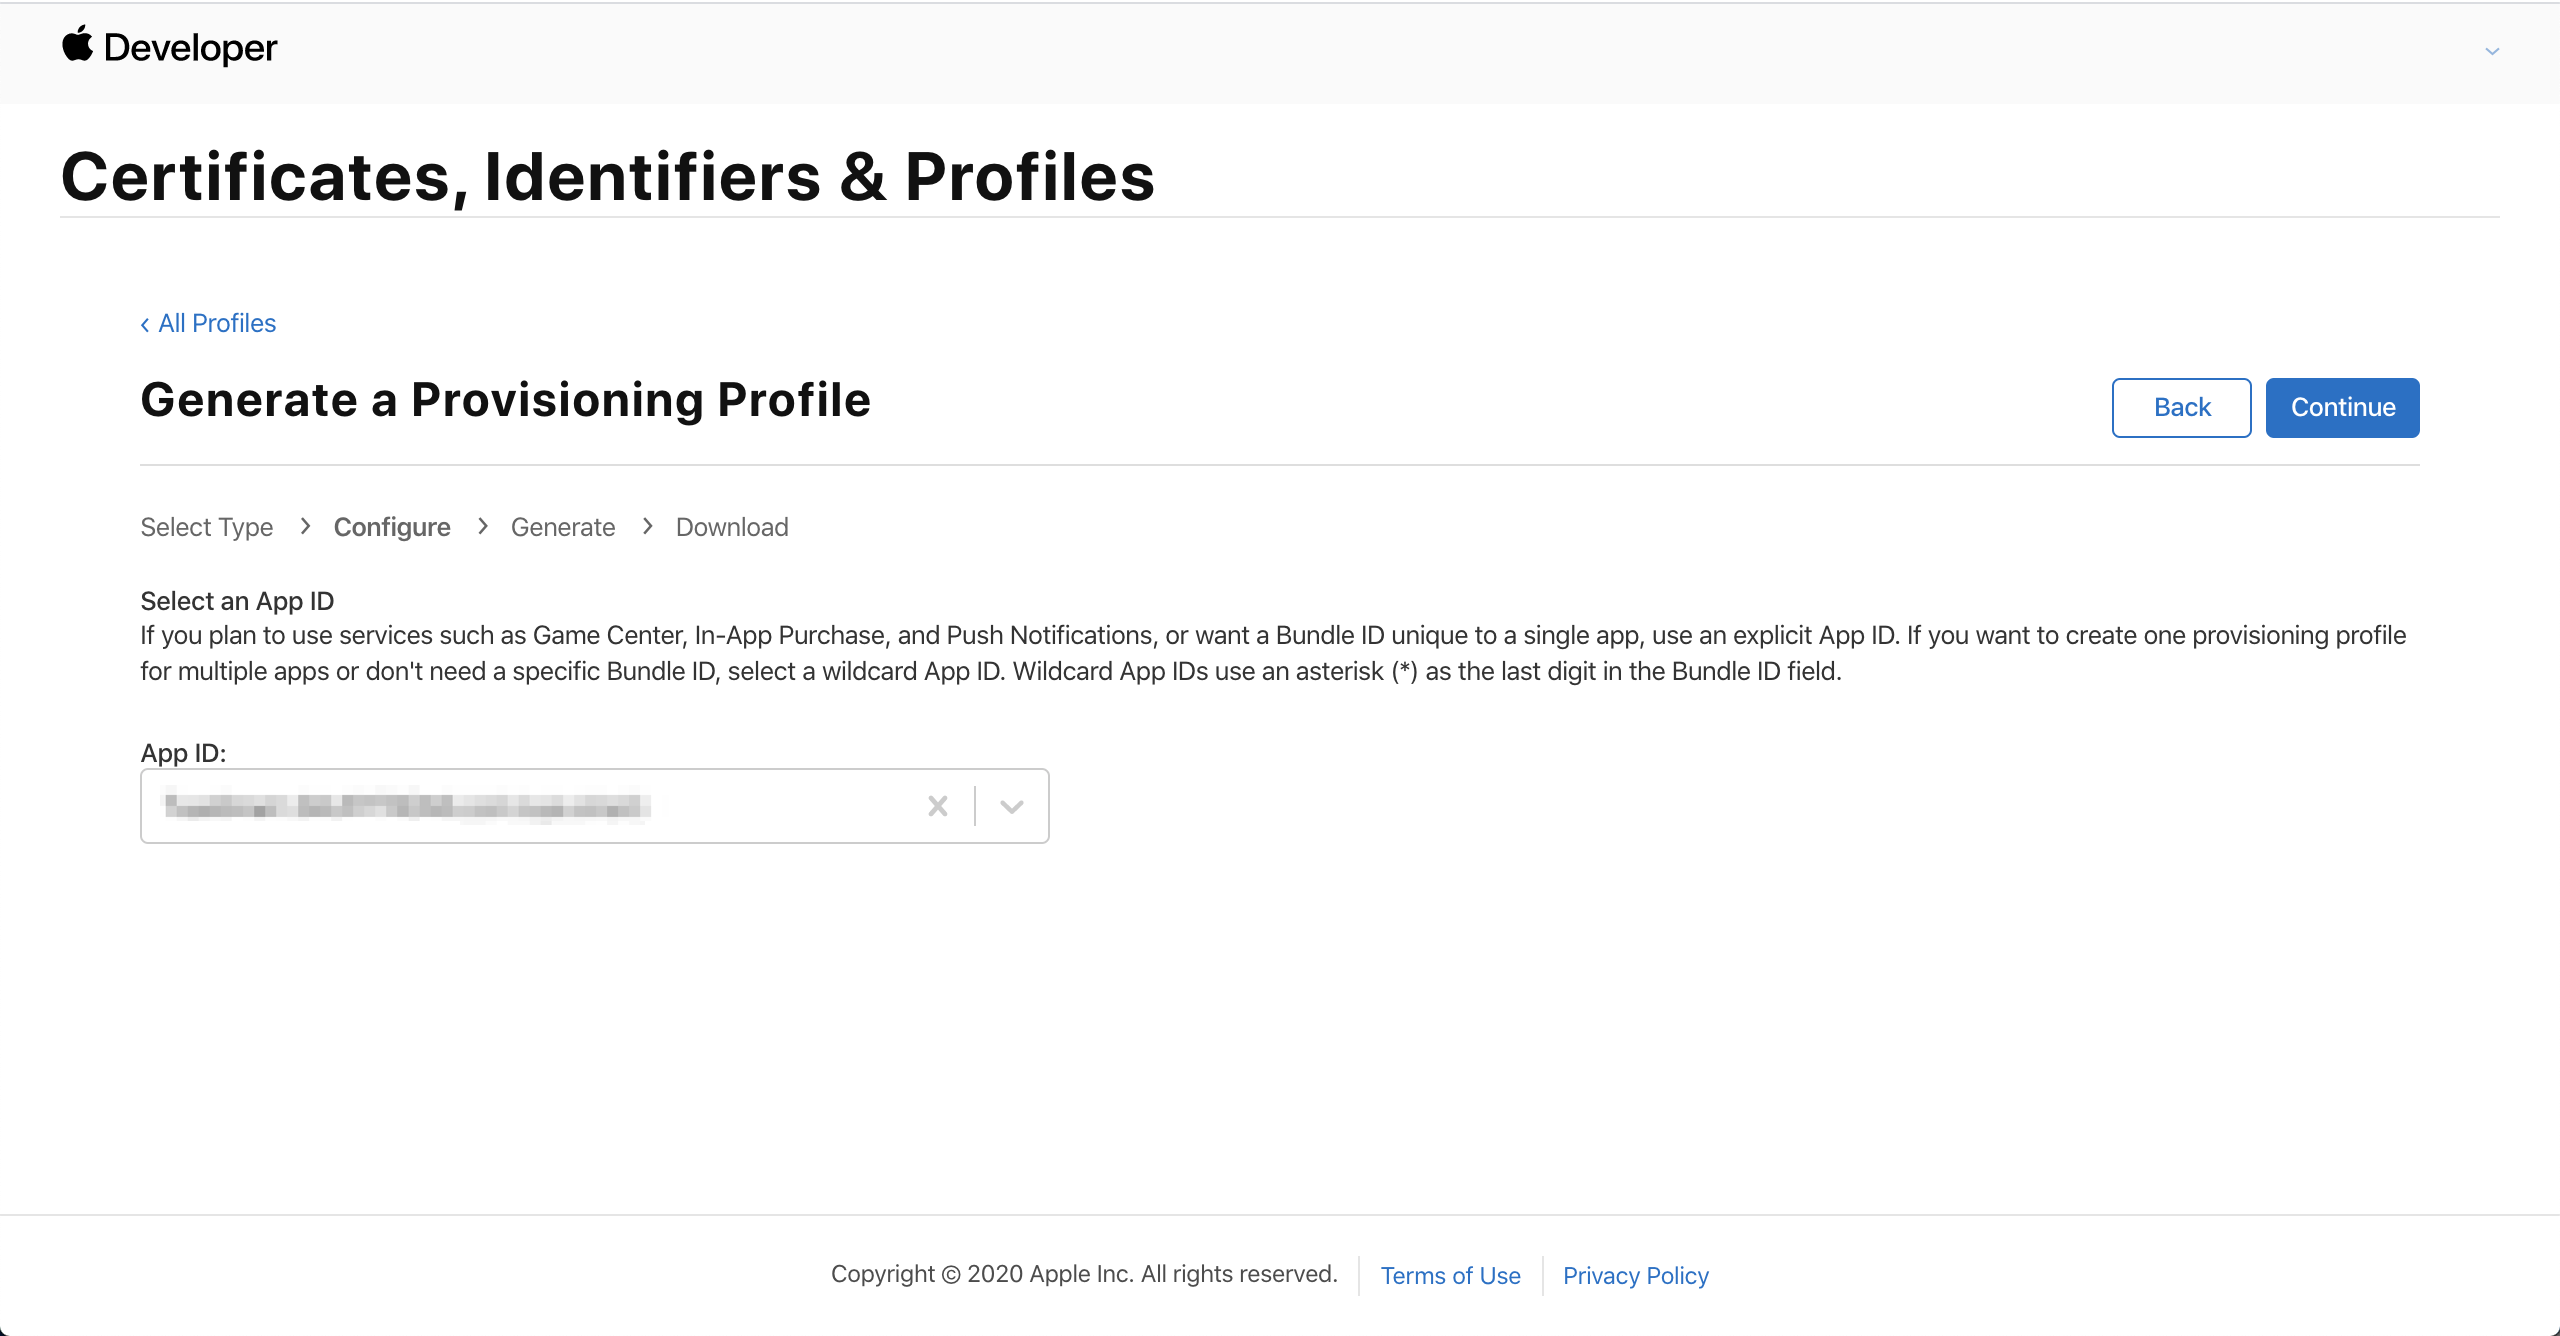
Select the previously created App ID of the main application and click Continue.
-
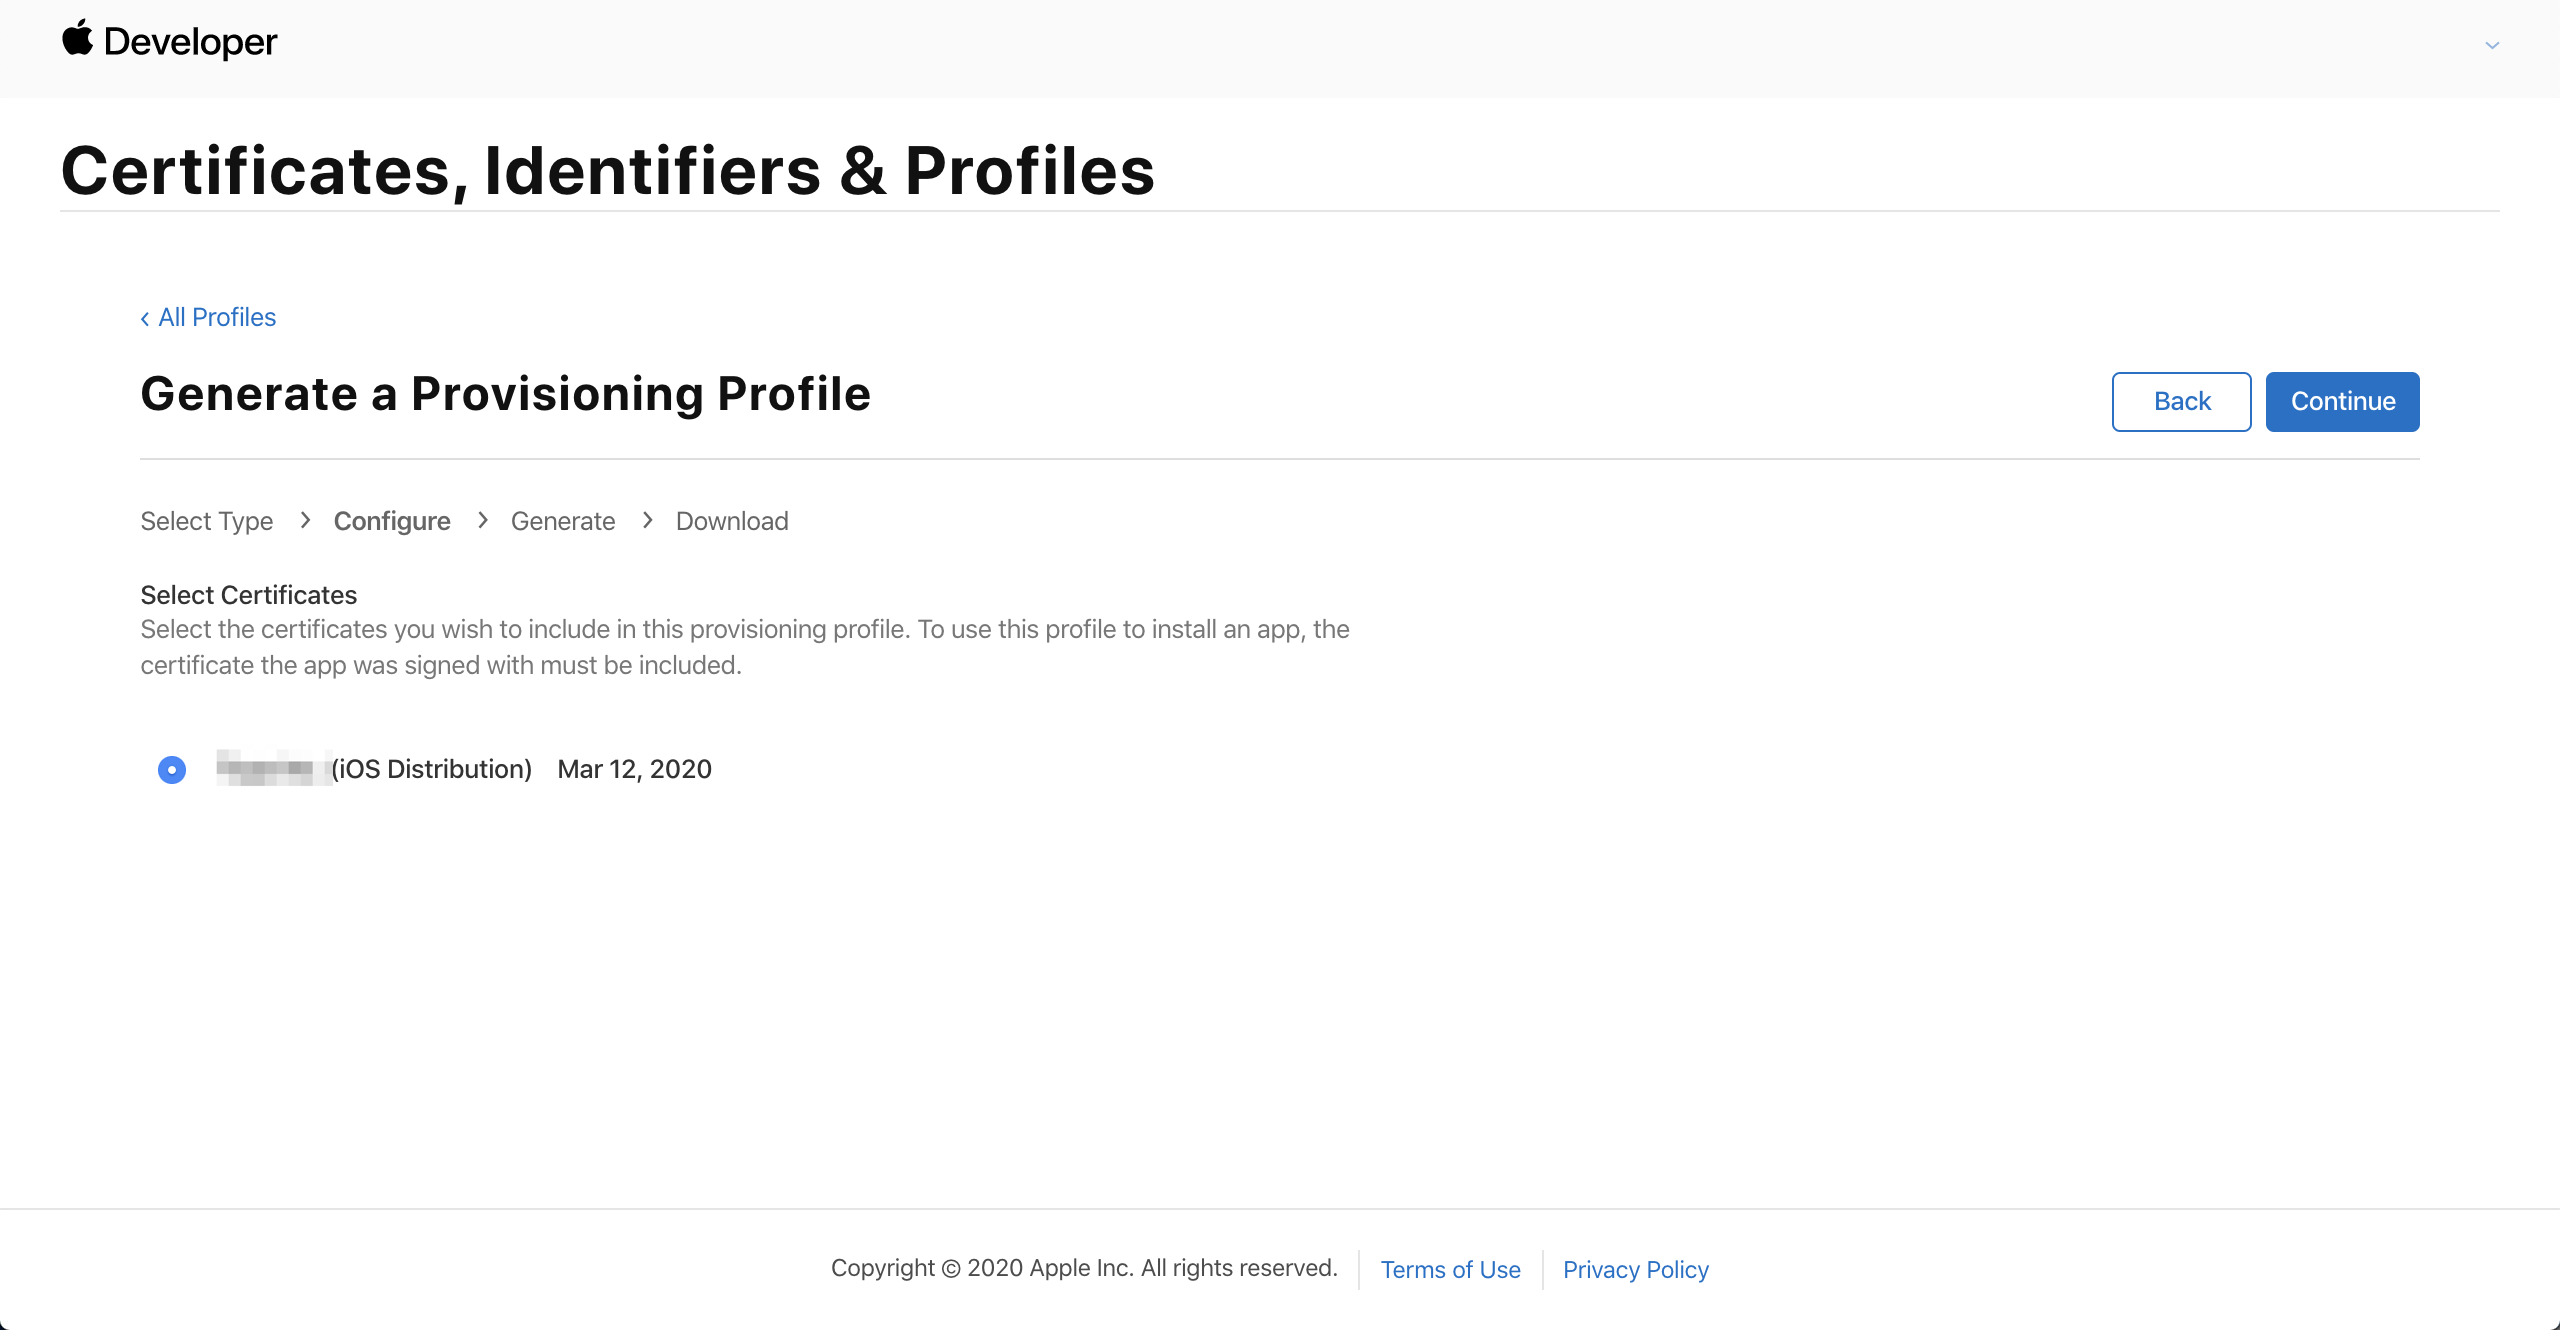
Select the newly created distribution certificate and click Continue.
If multiple certificates appear on the page, they can be distinguished by expiration time. Each certificate is valid for one year. If the certificates cannot be distinguished, we recommend that you return to the list of certificates, delete the unnecessary certificates, and then redo this step. The unmatched certificate might cause the app building to be failed.
-
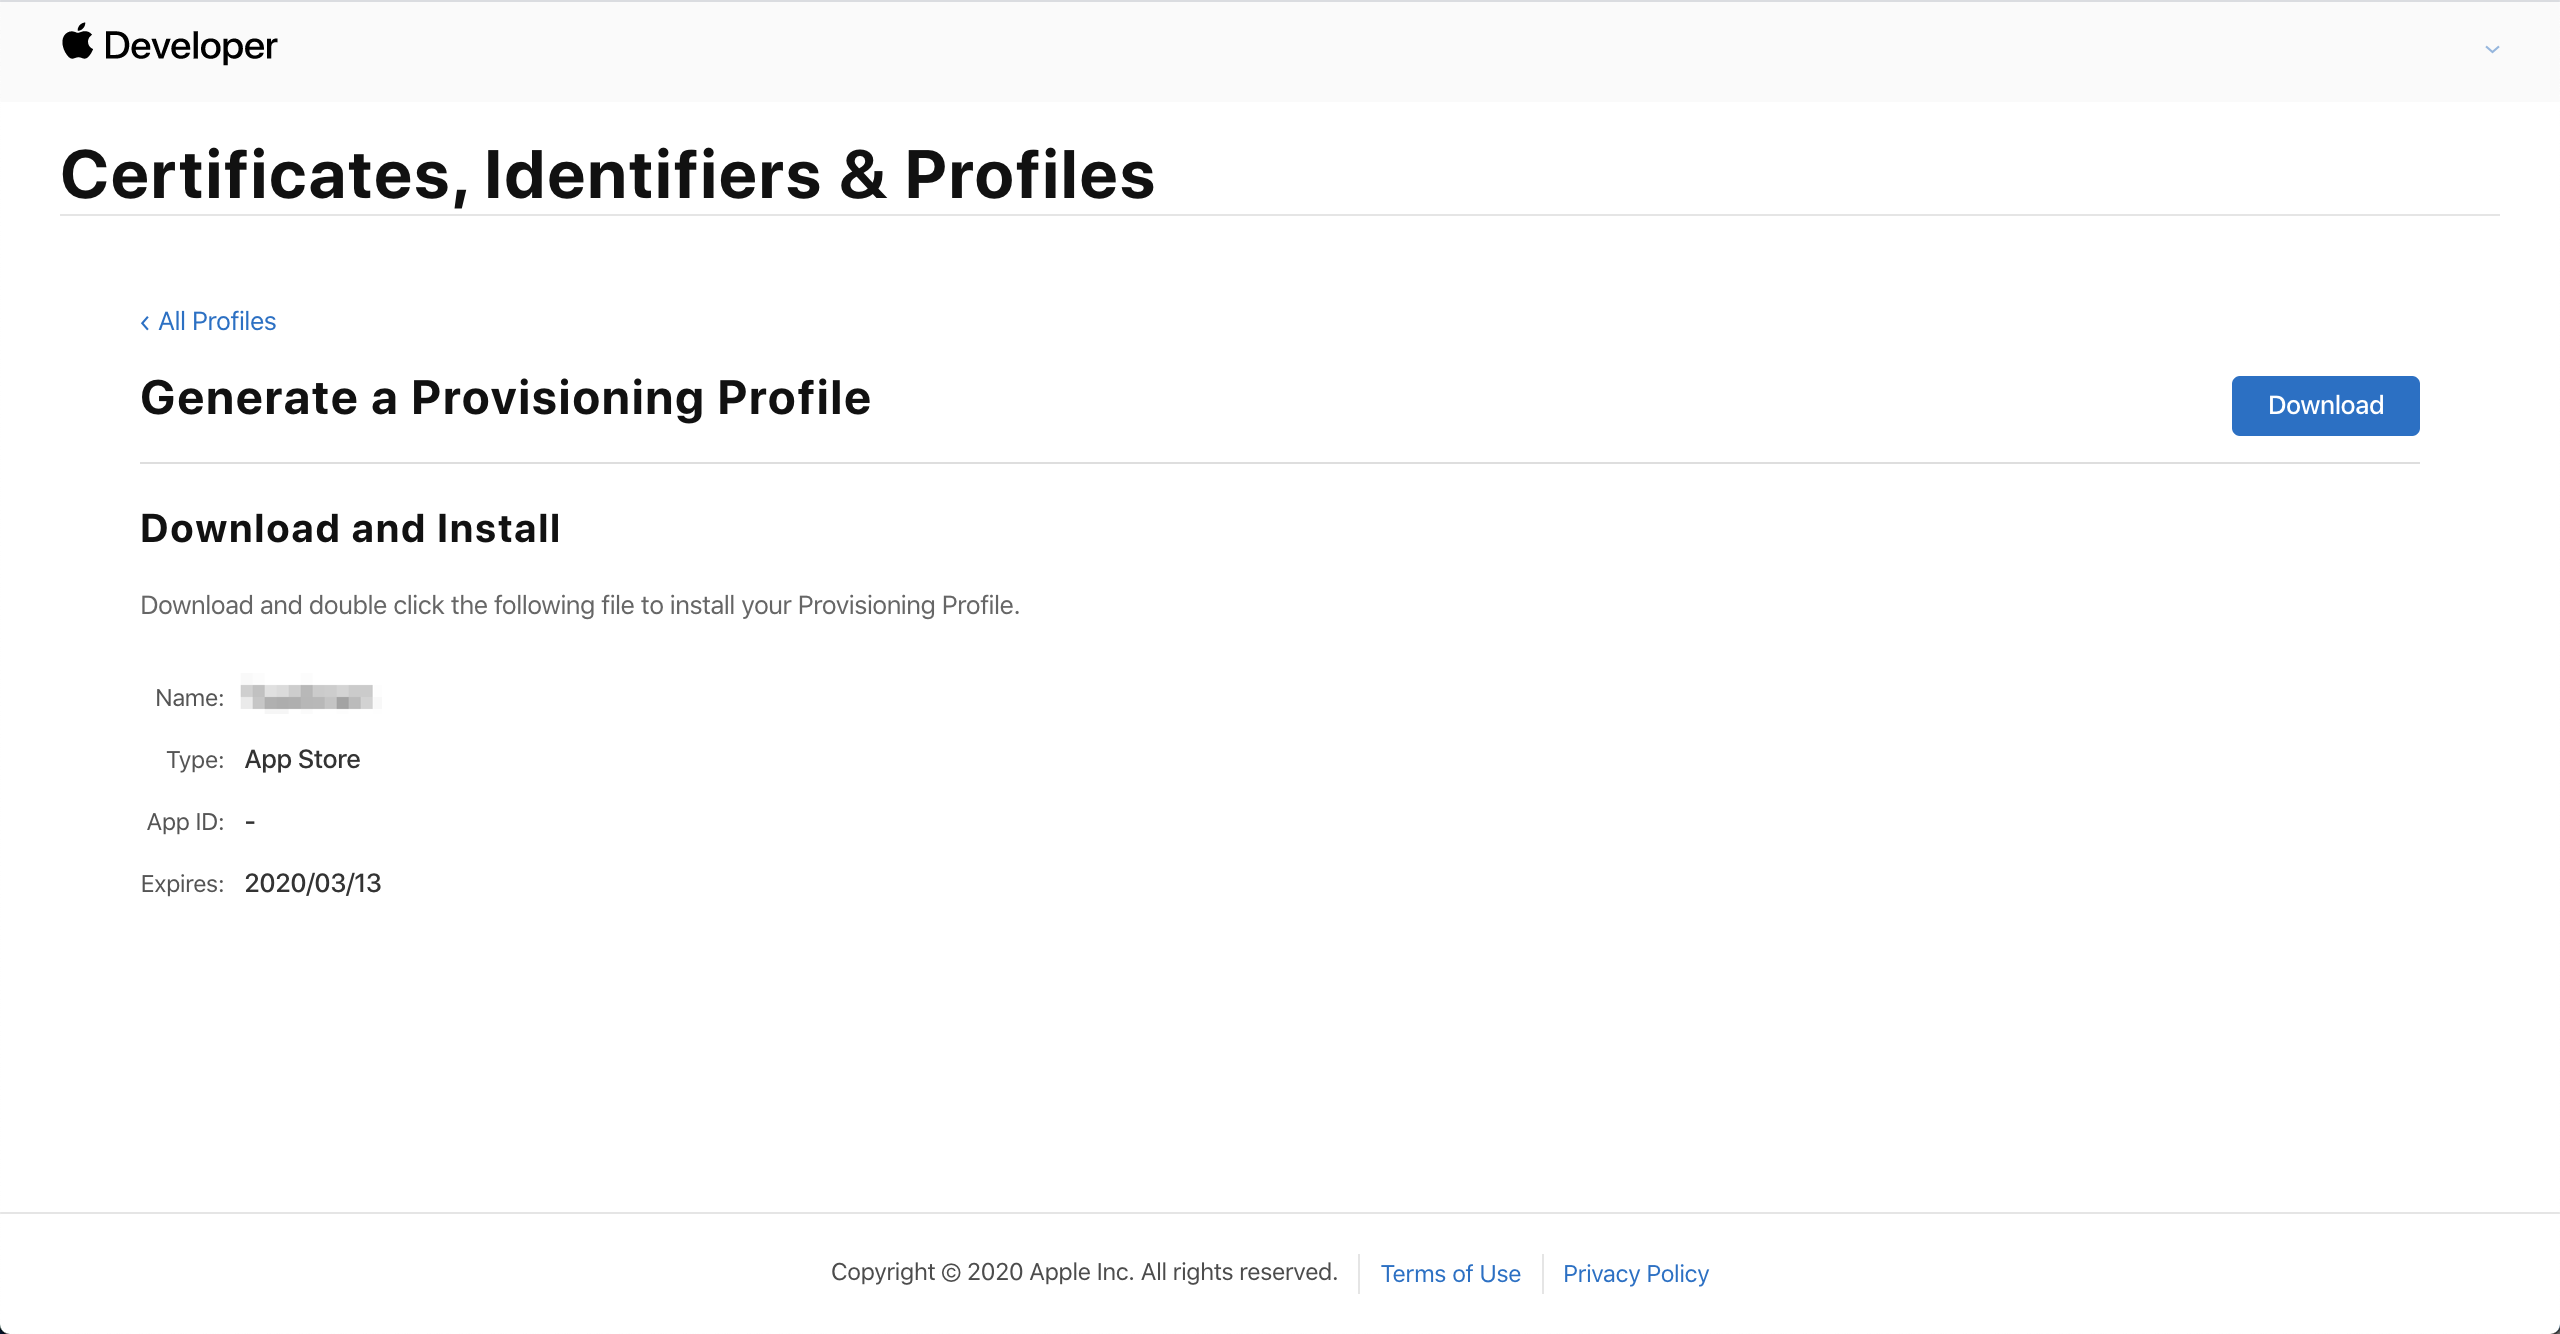
Enter your app name in the Provisioning Profile Name field and click Generate.
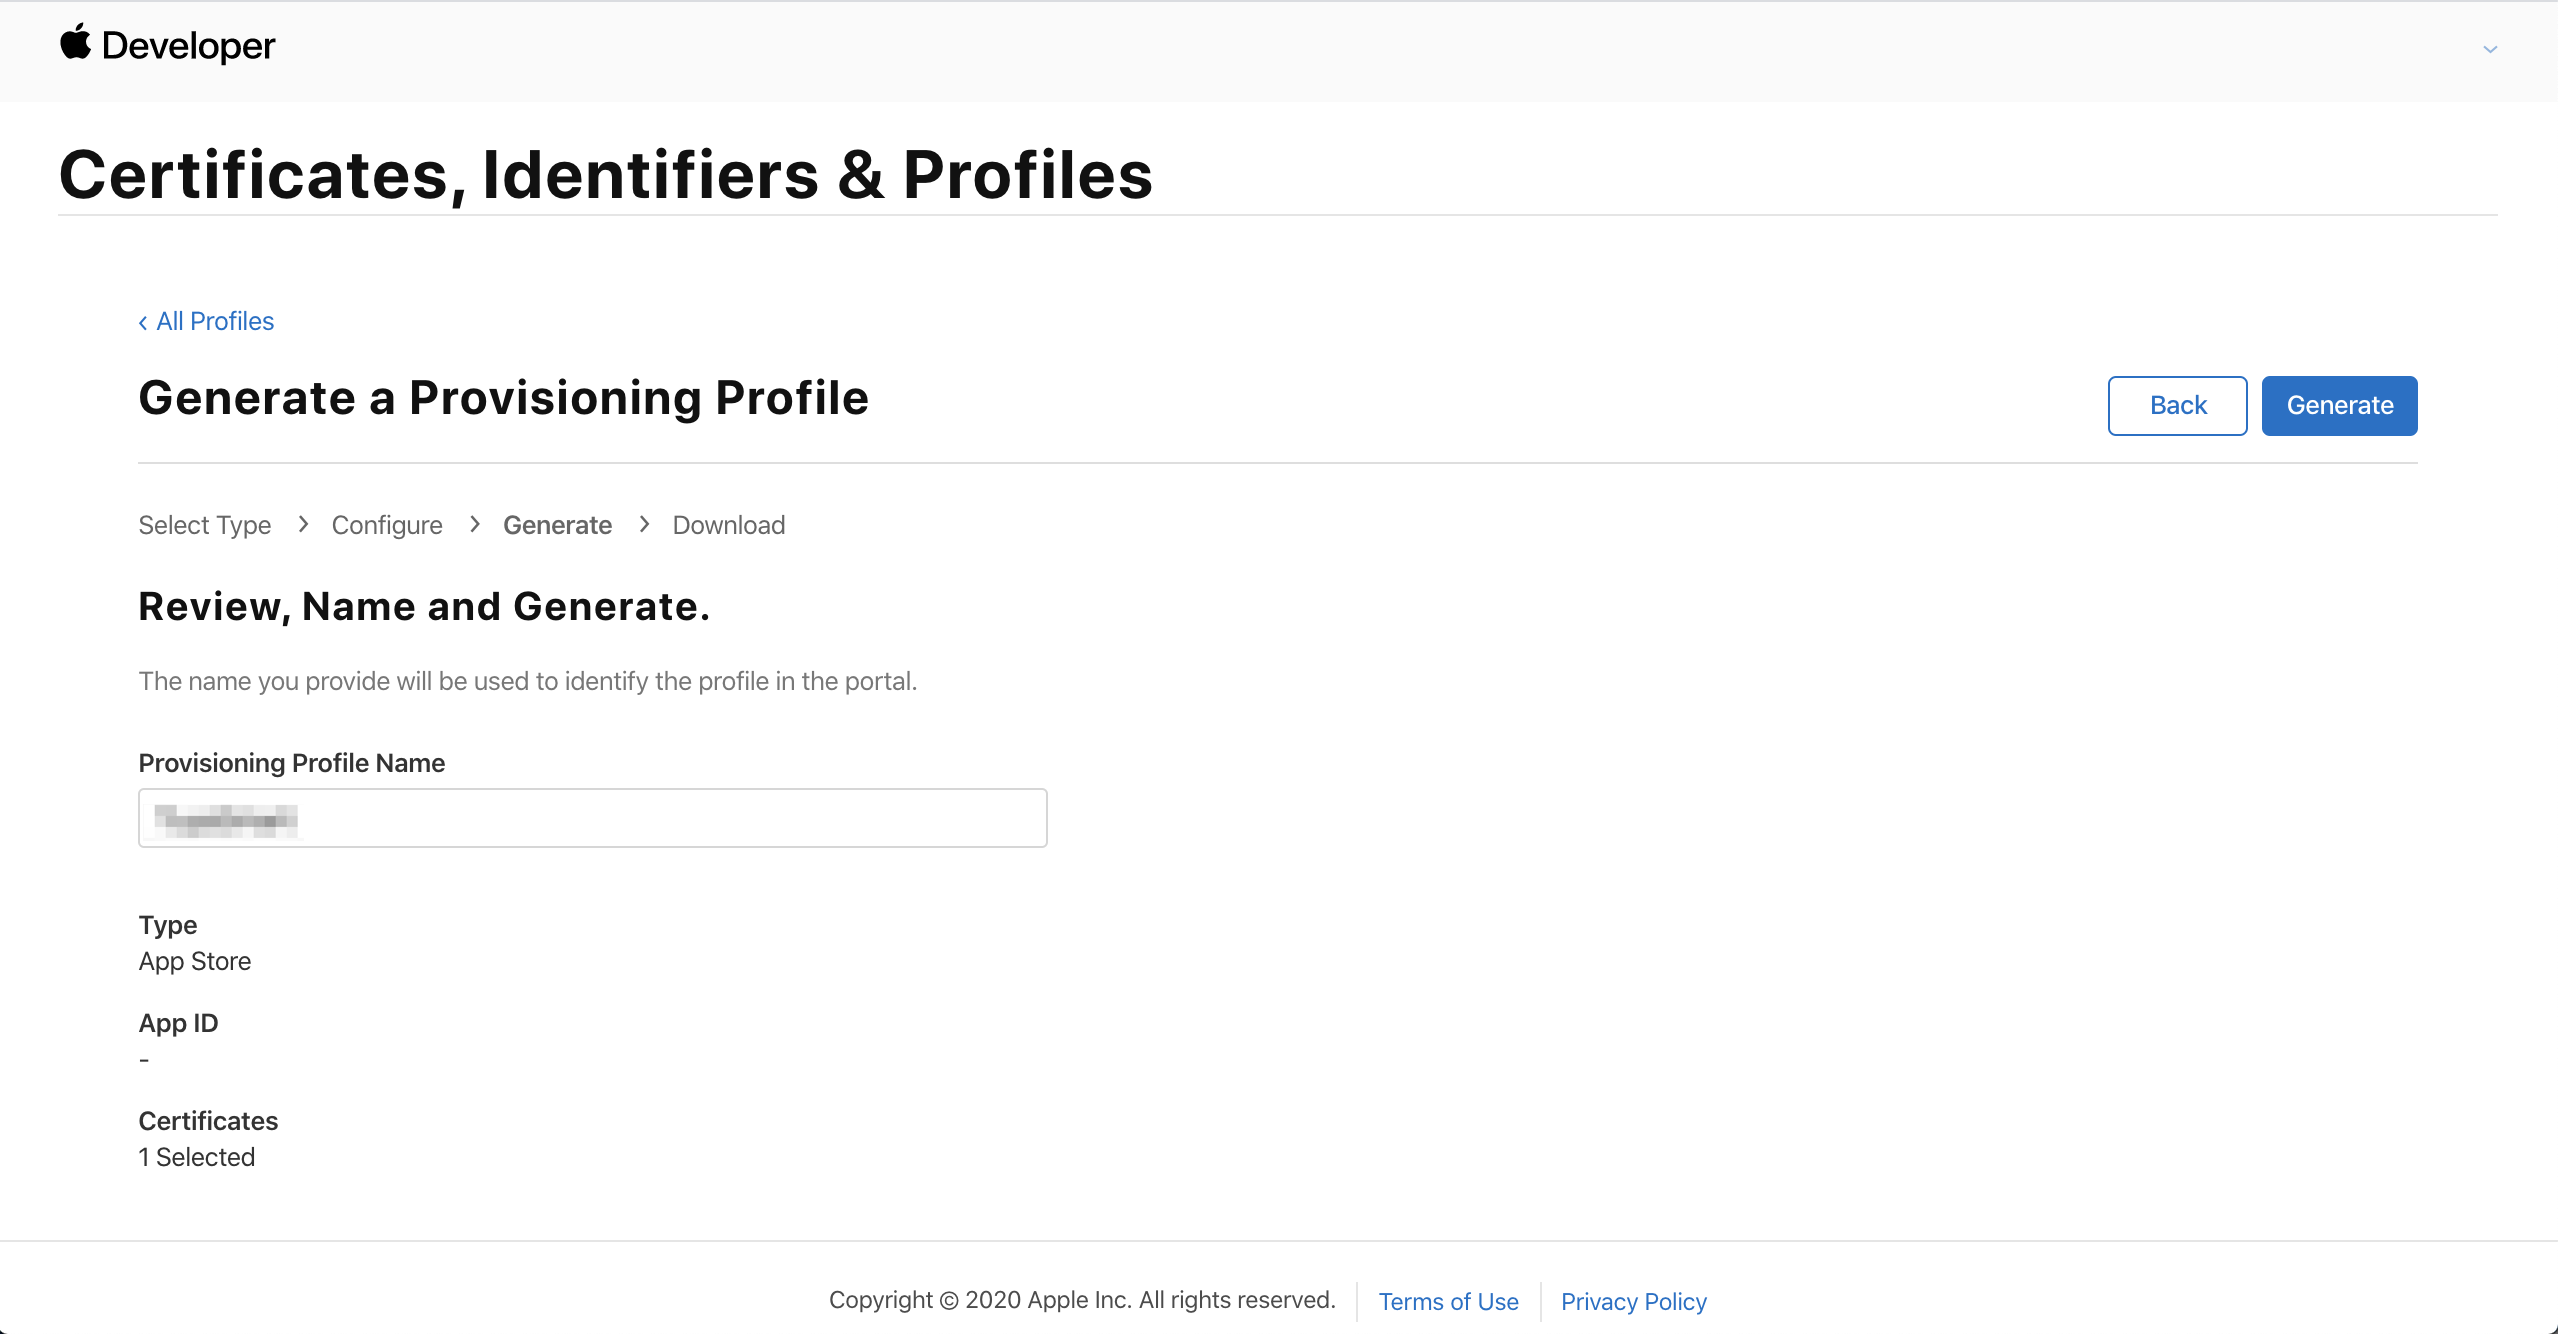
-
Click Download to download the configuration file.
Create provisioning profile of app extension in the .mobileprovision format
The procedure to create the provisioning profile of each app extension is similar to that of the main application. Note that you must select the target App IDs of app extensions at Step 3. For more information about the names of provisioning profiles, see the list of provisioning profiles described in Create App IDs of app extensions.
A provisioning profile must be created for each App ID of an app extension.
Upload certificates and provisioning profiles to Tuya Developer Platform
- Go to Tuya Developer Platform > App > OEM App > Required Setting > Certificate for iOS.
- In the Certificate for iOS section, upload the distribution certificate and all provisioning profiles, and enter the certificate password.
- In the iOS Push section, upload the push certificate, and enter the certificate password.
Things to note
-
The distribution certificate takes effect only after you rebuild the app.
-
The push certificate is valid for one year, and after it expires, the push notifications are disabled. To enable push notifications again, create and upload the push certificate. In this case, you do not need to rebuild the app.
-
Your Apple Developer account must be annually renewed. If the account expires, your app cannot be found on the App Store. After the renewal, your app can be found again.
-
Starting from April 2020, Sign in with Apple must be configured for the apps that enable the third-party login feature before they can be launched on the App Store. For more information, see Apple’s document New Guidelines for Sign in with Apple.
-
Starting from v3.15, due to the updates of certain third-party SDKs, you must enable the Associated Domains feature to build your app as expected.
-
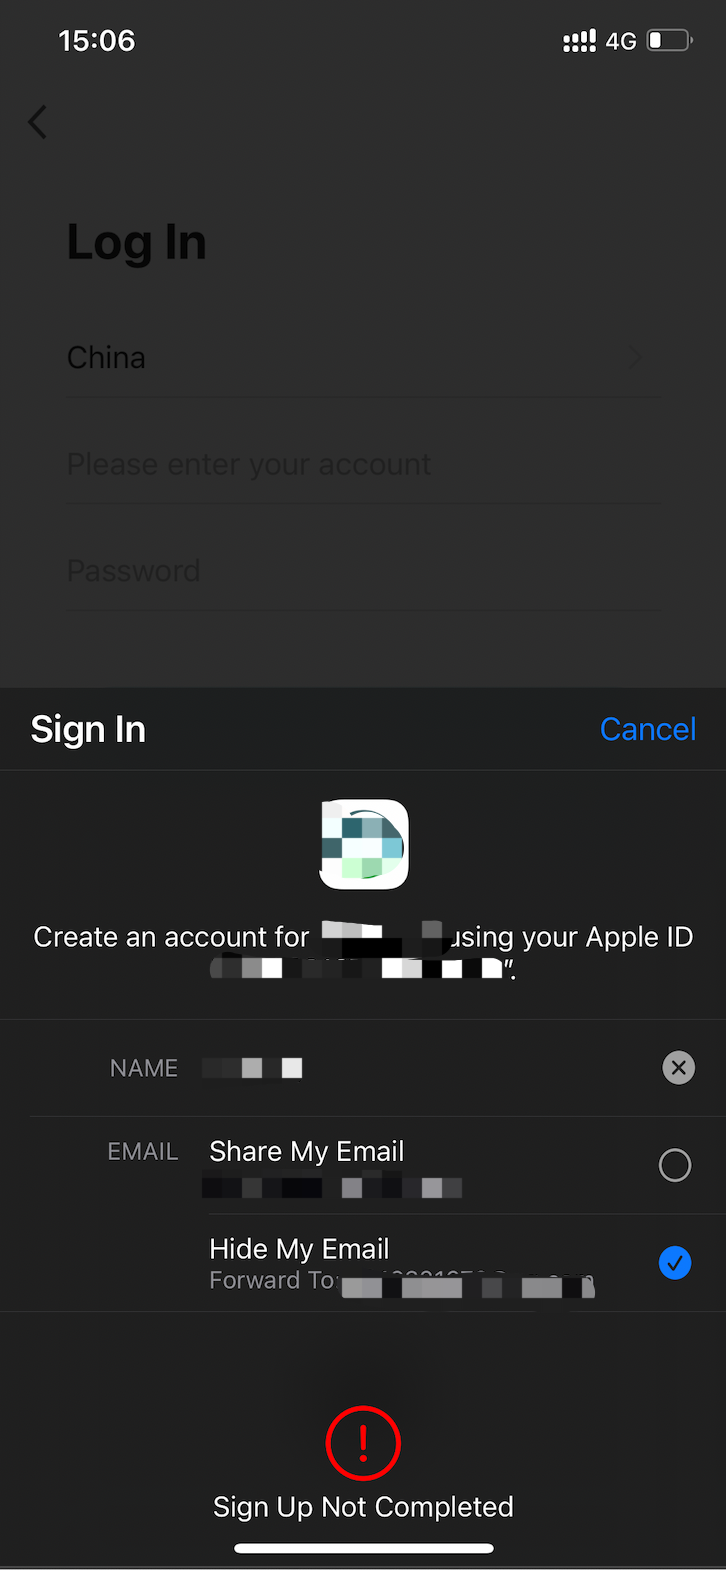
If the error Sign Up Not Completed is returned during login to the app with an Apple ID, log in to the Apple Developer again, find the target App IDs. In the Capabilities list, cancel Sign In with Apple and save the setting. Then, select Sign In with Apple and save the setting again.
Is this page helpful?
YesFeedbackIs this page helpful?
YesFeedback


