Quick Start with Commercial Lighting App SDK for iOS
Tuya Commercial Lighting App SDK is a mobile development tool specifically designed for IoT applications in the lighting industry. With the Commercial Lighting App SDK, you can quickly implement app functionality suitable for commercial lighting and scene linkage. This SDK is compatible with multiple protocols and can meet existing and new commercial lighting demands. Green buildings and healthy buildings can be implemented with smart features, such as device management, energy management, and human-centric lighting.
This tutorial walks you through a few steps to get started with the SDK and develop a preferred smart app within two hours. You will learn how to implement the following features:
- Register a merchant account on the Tuya Commercial Lighting Console and manage this account on the app.
- Create and manage a project and an area for the merchant account.
- Connect to and control devices in the area.
You can go to GitHub and download the sample code for the different features mentioned in this tutorial. Then, you can integrate the required sample code into your SDK development on the Tuya Developer Platform.
App SDK Development GitHub Sample
Preparation
Before you start, make sure that you have completed the preparation.
-
An account of the Tuya Developer Platform is registered, an app is built on the platform, and the values of
AppKeyandAppSecretof the Smart App SDK service are obtained. For more information, see Preparation.Before you start, you must request a commercial lighting account that can be either of the following types:
- Type 1: Trial account
- Follow the instructions in Preparation to open the Get SDK tab, and click subscribe to the trial version at the top of the page to get a 30-day trial account.
- During the trial, you can log in to the app developed by the SDK. After the app expires, login to the app is disabled. In this case, you cannot subscribe to the trial version again. You must subscribe to the official version to continue using the app.
- Type 2: Standard account
- You can subscribe to the value-added service Commercial Lighting PaaS.
- The validity of the standard version depends on your purchased service plan, and the official app SDK needs to be coupled with Commercial Lighting SaaS or open APIs. To integrate Commercial Lighting PaaS, you must provide Tuya’s account manager with the domain name and domain certificate that are required for the configuration.
:::
- Type 1: Trial account
-
Integrate the Commercial Lighting App SDK into your project using CocoaPods. For more information, see Fast Integration with Commercial Lighting App SDK for iOS.
Account management
Accounts are classified into brand owner accounts, enterprise main accounts, and enterprise sub-accounts. Typically, the single SaaS merchant mode is adopted, where only one merchant account is created for a brand owner account.
Before you get started, add the following code block to the Podfile:
platform :ios, '11.0'

target 'Your_Project_Name' do
     pod "ThingCommercialLightingKit"
end
Step 1: Register an enterprise main account
Currently, Tuya Commercial Lighting App SDK does not support registration on the app. You must go to the Tuya Commercial Lighting platform to purchase a merchant account plan and enable an enterprise main account.
Step 2: Log in to the account with password
You can call the API method loginMerchantByPassword to implement login to the enterprise main account.
 [[ThingSmartUser sharedInstance]loginMerchantByPassword:@"your_password"
                                            countryCode:@"your_countryCode"
                                               username:@"your_username"
                                           merchantCode:nil
                                   multiMerchantHanlder:nil
                                                success:^{
                                                       NSLog(@"login success");
                                             } failure:^(NSError *error) {
                                                      NSLog(@"login error");
                                              }
];
Each account can be assigned to only one merchant. Therefore, during the login, the account automatically matches the merchant. You do not need to pass in the parameter merchantCode.
In addition to the account and password, you can also implement login with a verification code, or submit a ticket to enable third-party login.
Step 3: Manage the account
The account information, such as the password and nickname, can be modified.
Change the password
[[ThingSmartUser sharedInstance]resetMerchantPasswordWithUsername:@"your_user_name"
                                                     countryCode:@"country_code"
                                                     oldPassword:@"old_password"
                                                     newPassword:@"new_password"
                                                         success:^{
                                                                     NSLog(@"reset password success");
                                                                  } failure:^(NSError *error) {
                                                                     NSLog(@"reset password failure");
                                                       }
];
Account management supports additional features. For example, reset the password, exit the account, change the avatar, and synchronize and update user information. For more information, see Merchant Account Management.
Project management
Concepts
-
A project is an independent unit that is managed by a user. It is also the maximum unit used to manage resources based on the Commercial Light SDK.
- A user can manage one or more projects.
- Projects are classified into indoor and outdoor projects. For more information, see Project Management.
- A newly created user is not assigned projects. Projects must be created after login to enable follow-up operations, such as device pairing and control.
The following project classes provide a bunch of features:ThingLightingProjectManager: query project configurations and projects and create projects.ThingLightingProject: query, update, and delete project information.ThingLightingProjectModel: query project information, such as the project name, area, and owner.
-
An area is an independent unit that is managed in a specific project. An area can be configured with one or more sub-areas. Similar to projects, areas are classified into indoor and outdoor areas.
The following area classes provide a bunch of features:ThingLightingAreaManager: create a new area.ThingLightingArea: store and modify the area information and manage devices in an area.
All examples and methods in this topic are used to process indoor projects and areas.
Step 1: Create an indoor project
After login, a project must be created.
    [[ThingLightingProjectManager new] createProjectWithProjectType:ThingLightingProjectTypeIndoor
                                                        networkType:self.meshMode
                                                       projectName:self.projectNameTextField.text
                                                        leaderName:self.leaderNameTextField.text
                                                      leaderMobile:self.leaderMobileTextField.text
                                                     detailAddress:self.detailAddressTextField.text
                                                  regionLocationId:@""
                                                           success:^(id _Nonnull result) {
        [SVProgressHUD dismiss];
        [self dismissViewControllerAnimated:YES completion:NULL];
    } failure:NULL];
- For indoor projects, the parameter
regionLocationIdcan be set to empty. - For outdoor projects, to provide a region ID, a country code such as
86and01can be concatenated with a level-1 administrative code using a comma (,).
Step 2: Query projects for a user
You can call the API method getProjectListWithSuccess: failure: to query all projects for a user.
ThingLightingProjectManager *manager = [[ThingLightingProjectManager alloc] init];
[manager getProjectListWithSuccess:^(NSArray<ThingLightingProjectModel *> * _Nonnull projectList) {
        // self.projectArray = [projectList  mutableCopy];
    } failure:^(NSError * _Nonnull error) {
    }];
Project information can be modified or deleted. For more information, see Modify a project.
Areas
An area, also known as a space, is an independent unit that is managed in a specific project. For more information, see Concepts.
- One or more sub-areas can be created in a specific area, and sub-areas cannot be created for a bottom-level area.
- In each area, one or more devices and groups can be created.
Step 1: Create a sub-area
The following example shows how to create a sub-area for an indoor project or a parking lot project.
        ThingLightingProjectManager *manager = [[ThingLightingProjectManager alloc] init];
        NSArray<ThingLightingProjectSpaceItemModel *> *attributes = [manager getSpaceAttributesWithProjectId:projectId];
        [ThingLightingAreaManager createAreaWithProjectId:projectId
                                           currentAreaId:0
                                                    name:alertC.textFields.firstObject.text
                                               roomLevel:attributes.firstObject.roomLevel
                                                 success:^(id result) {
        } failure:NULL];
Parameters
-
ProjectId: the current project ID. -
currentAreaId: the current area ID.- If no areas are created or a level-1 area is required, this parameter can be set to any value. To avoid conflict, we recommend that you set the value to
0or a negative number. - To create a parent area or sub-area based on an existing area, set the value to the existing area ID. You can query a list of sub-areas in the current area to get the existing area ID.
- If no areas are created or a level-1 area is required, this parameter can be set to any value. To avoid conflict, we recommend that you set the value to
-
roomLevel: the area level.1indicates the top level.- When
currentAreaIdis0, the target area is an independent area, no matter what the value ofroomLevelis. - If
currentAreaIdis an existing area ID, a sub-area or parent area is created based on the existing area ID.
- When
The following example shows how to create a sub-area for an existing area.
[ThingLightingAreaManager createAreaWithProjectId:@" the current ID"
                                   currentAreaId:  self.area.areaId
                                            name:@"area name"
                                       roomLevel:self.area.roomLevel+1
                                         success:^(id result) {
                                                     NSLog(@"success");
                                                   // you can get the new area id here
                                       } failure:^(NSError *error) {
                                                   NSLog(@"failure");
                                      }
];
Then, devices in the area can be connected to and managed.
Step 2: Get a list of top-level areas
    [self.project getAreaListWithSuccess:^(NSArray<ThingLightingAreaModel *> * _Nonnull areas) {
    } failure:^(NSError *error) {
    }];
Step 3: Get sub-areas under a specific area
    ThingLightingArea *area = [[ThingLightingArea alloc] initWithAreaId:self.areaId projectId:projectId];
    [area getSubAreaListWithSuccess:^(NSArray<ThingLightingAreaModel *> * _Nonnull areas) {
    } failure:^(NSError *error) {
    }];
Step 4: Get a list of devices under a specific area
Get a list of devices that belong to a specific area, and display the result on pages.
    [area getDeviceListWithOffsetKey:@""
                                 tag:@""
                             success:^(NSArray<ThingSmartDeviceModel *> * _Nonnull devices, NSString * _Nonnull nextOffsetKey, BOOL end, NSUInteger total) {
    } failure:^(NSError *error) {
    }];
Parameters
offsetKey: the pagination key. For the first page, this value is empty or the string"1".tag: the device classification. When the value is empty by default, all types of devices are returned.
Device pairing
Devices must be paired before they can be controlled. After users pair a device with the app, the device is connected and registered to the cloud and can communicate with the cloud. The Commercial Lighting App SDK empowers smart devices to be paired in multiple pairing modes. For example, they can be paired over Wi-Fi and Bluetooth. For more information, see Device Pairing (iOS) and Bluetooth Technology Stack.
Pairing modes
In this section, the Wi-Fi pairing modes are used as an example to describe how to integrate the SDK and register a device to the cloud.
Wi-Fi pairing modes include Wi-Fi Easy Connect (EZ) and Access Point (AP). In the later versions of the Commercial Lighting App SDK for iOS, we recommend that you use the AP mode instead of the Wi-Fi EZ mode. The former trumps the latter when it comes to the following aspects:
- Compared with the Wi-Fi EZ mode, the AP mode results in a higher success rate, optimal reliability, and fewer compatibility requirements for mobile phones and routers. The success rate of pairing in the AP mode is higher than that in the Wi-Fi EZ mode.
- The app built with Xcode 12.5 cannot send the EZ pairing data packets from an iPhone that runs iOS 14.5 or later. In this case, the permission com.apple.developer.networking.multicast must be enabled for the app. This permission must be approved by Apple before it can be enabled. As a temporary solution, you can use an earlier Xcode version, but the AP mode is still recommended.
Get pairing token
Before the AP pairing process, the SDK must get a pairing token from the cloud in the networked state.
- The token is valid for 10 minutes and expires immediately after the device is paired. A new token must be generated if the device needs to be paired again.
- To get a token, the current value of
projectIdmust be provided. Therefore, during this process, the account must be in the logged-in state and at least one project is created for the account.
//The following parameter HomeId equals to the projectId.
[[ThingSmartActivator sharedInstance] getTokenWithHomeId:projectId
                                                success:^(NSString *token) {
                                            //  NSLog(@"getToken success: %@", token);
                                           // You could start ConfigWiFi now.
                                          } failure:^(NSError *error) {
                                         //NSLog(@"getToken failure: %@", error.localizedDescription);
                                         }
];
Provide compatibility with iOS
iOS 14
Starting from iOS 14, when users perform device pairing or control over a local area network (LAN), the local network privacy setting dialog box is triggered.
- The app can send data to the LAN only after users tap OK.
- Otherwise, if users tap Don’t Allow, the app cannot access the LAN.
Currently, Apple does not provide APIs to process this privacy setting. We recommend that you guide users to allow the app to access LAN data when features that require a LAN connection cannot work. Specifically, go to Settings, choose Privacy > Local Network, and then allow the app to access the LAN.
iOS 13
Starting from iOS 13, if users do not allow the app to access location data, when the Wi-Fi feature is enabled, [[ThingSmartActivator sharedInstance] currentWifiSSID] cannot return a valid Wi-Fi service set identifier (SSID) or basic service set identifier (BSSID). In this case, iOS returns the following default values:
- SSID:
WLANorWi-Fi.WLANis returned for users in mainland China. - BSSID:
"00:00:00:00:00:00"
Start pairing
Before the pairing process is started, the device must keep a state pending pairing. To set the device to this state, you can guide users to follow the device user manual.
To call the API method startConfigWiFi, you must provide the SSID of the router (the Wi-Fi name), password, and the token obtained from the cloud.
[ThingSmartActivator sharedInstance].delegate = self;
[[ThingSmartActivator sharedInstance] startConfigWiFi:ThingActivatorModeAP
                                                ssid:ssid
                                            password:password
                                               token:token
                                             timeout:100];
The timeout parameter is set to 100 by default. Unit: seconds. You can specify any preferred value. However, a small value is not recommended. A proper value can ensure optimal pairing performance.
In AP pairing mode, you must implement the protocol ThingSmartActivatorDelegate and listen for the callback of the pairing result.
@interface xxxViewController () <ThingSmartActivatorDelegate>
- (void)activator:(ThingSmartActivator *)activator didReceiveDevice:(ThingSmartDeviceModel *)deviceModel error:(NSError *)error {
    if (deviceModel && error == nil) {
             //success
            // NSLog(@"connected success: %@", deviceModel.name);
    }
    if (error) {
        //fail
    }
   // stop config
}
(Optional) Stop pairing
After the pairing process is started, the app continuously broadcasts the pairing data until a device is paired or the process times out. To allow users to cancel or complete pairing during the process, you must call the API method stopConfigWiFi.
 [ThingSmartActivator sharedInstance].delegate = nil;
 [[ThingSmartActivator sharedInstance] stopConfigWiFi];
Step 4: Control devices
In this section, the objects ThingSmartDeviceModel and ThingSmartDevice are used.
| Object | Description | Reference |
|---|---|---|
| ThingSmartDeviceModel |
|
Set data point (DP) |
| ThingSmartDevice | ThingSmartDevice stores all data of device features, such as device control and firmware management. You must use the correct value of deviceId to initialize ThingSmartDevice. |
Device Management |
Make sure that ThingSmartDevice in ViewController or other objects is declared as a global variable (@property). Otherwise, a temporary variable of ThingSmartDevice might be released during initialization due to the scope limit, and thus nil is returned.
Query a list of devices
After a device is paired, users can query a list of devices that are created for a specific home.
self.home = [ThingSmartHome homeWithHomeId:#your homeId];
self.deviceList = [self.home.deviceList copy];
You must call the API method getHomeDataWithSuccess: failure: first to enable the query. Otherwise, the query will fail even after the device is paired.
View device information
-
DP data is stored in
schemaArrayofdeviceModel.ThingSmartDevice *device = self.device; NSArray *schemas = device.deviceModel.schemaArray; -
All DP data is stored in
schemaArray. Each DP is encapsulated as theThingSmartSchemaModelobject.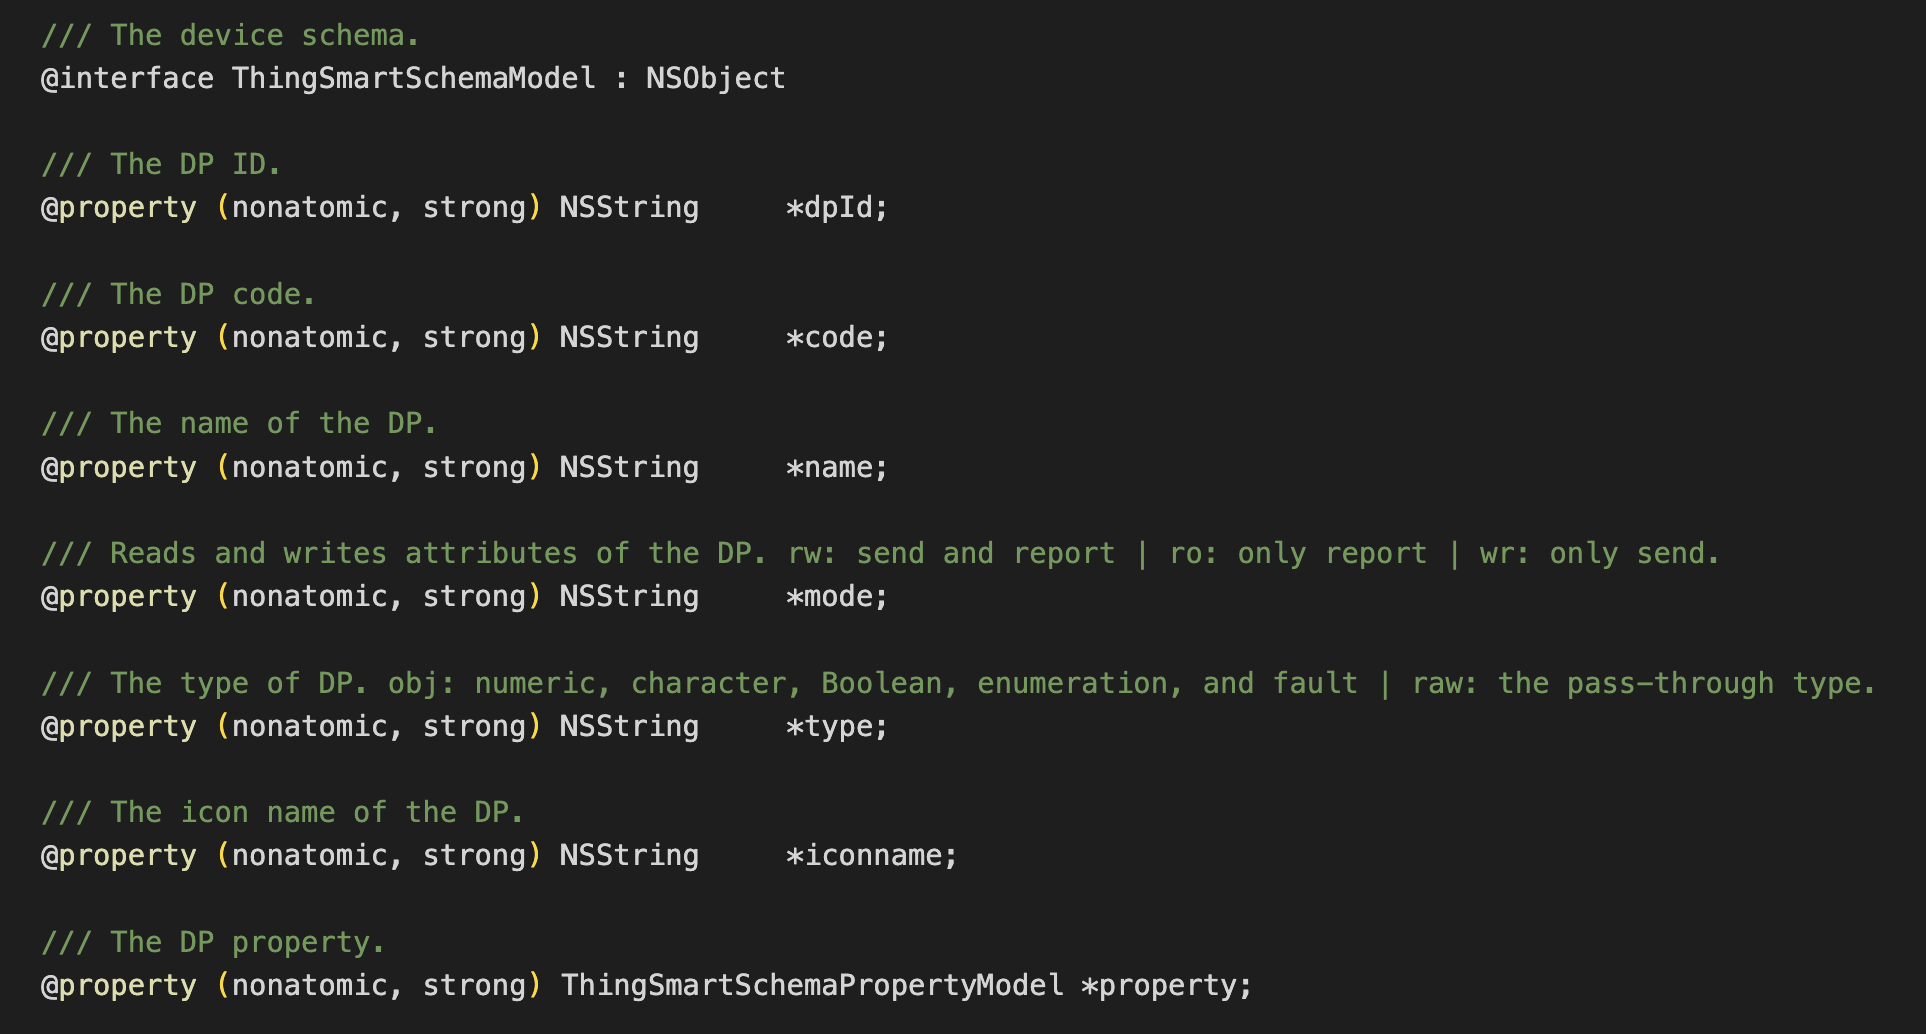
-
Certain complex DPs are further encapsulated in
propertyofThingSmartSchemaModel. Example:NSString *type = [schema.type isEqualToString:@"obj"] ?schema.property.type : schema.type; if ([type isEqualToString:@"bool"]) { SwitchTableViewCell *cell = [tableView dequeueReusableCellWithIdentifier:@"switchCell"]; if (cell == nil){ cell = [[[NSBundle mainBundle] loadNibNamed:@"SwitchTableViewCell" owner:self options:nil] lastObject]; cell.label.text = schema.name; [cell.switchButton setOn:[dps[schema.dpId] boolValue]]; }; } return cell; } else if ([type isEqualToString:@"value"]) { SliderTableViewCell *cell = [tableView dequeueReusableCellWithIdentifier:@"valueCell"]; if (cell == nil){ cell = [[[NSBundle mainBundle] loadNibNamed:@"SliderTableViewCell" owner:self options:nil] lastObject]; cell.label.text = schema.name; cell.detailLabel.text = [dps[schema.dpId] stringValue]; cell.slider.minimumValue = schema.property.min; cell.slider.maximumValue = schema.property.max; cell.slider.value = [dps[schema.dpId] floatValue]; }; }; return cell; } else if ([type isEqualToString:@"enum"]) { //... } //...
In the preceding code block, the DPs of a smart light are displayed in TableView. The following settings are applied:
- The switch data is displayed in
cellfor whichtypeis set to bool. - The brightness data is displayed in
cellfor whichtypeis set to value.
Control a device
To enable device control, you must call the device control API method and send DPs in the NSDictionary format to change the device status or features.
The parameter dps can define one or more DPs. Thus, multiple states of a device can be changed in the same call.
In the following code block, a smart light is used as an example to change its switch status and brightness value.
if ([type isEqualToString:@"bool"]) {
        SwitchTableViewCell *cell = [tableView dequeueReusableCellWithIdentifier:@"switchCell"];
        if (cell == nil){
            cell = [[[NSBundle mainBundle] loadNibNamed:@"SwitchTableViewCell" owner:self options:nil] lastObject];
            cell.label.text = schema.name;
            [cell.switchButton setOn:[dps[schema.dpId] boolValue]];
            cell.isReadOnly = isReadOnly;
           // turn on/off when click the UISwitch
            cell.switchAction = ^(UISwitch *switchButton) {
                [weakSelf publishMessage:@{schema.dpId: [NSNumber numberWithBool:switchButton.isOn]}];
            };
        }
        return cell;
    }

else if ([type isEqualToString:@"value"]) {
         SliderTableViewCell *cell = [tableView dequeueReusableCellWithIdentifier:@"valueCell"];
        if (cell == nil){
            cell = [[[NSBundle mainBundle] loadNibNamed:@"SliderTableViewCell" owner:self options:nil] lastObject];
            cell.label.text = schema.name;
            cell.detailLabel.text = [dps[schema.dpId] stringValue];
            cell.slider.minimumValue = schema.property.min;
            cell.slider.maximumValue = schema.property.max;
            [cell.slider setContinuous:NO];
            cell.slider.value = [dps[schema.dpId] floatValue];
            // change the value when tap the UISlider
            cell.sliderAction = ^(UISlider * _Nonnull slider) {
                float step = schema.property.step;
                float roundedValue = round(slider.value / step) * step;
                [weakSelf publishMessage:@{schema.dpId : [NSNumber numberWithInt:(int)roundedValue]}];
            };
         };
        return cell;
    }
- (void)publishMessage:(NSDictionary *) dps {
    [self.device publishDps:dps success:^{
            // change success
    }
    failure:^(NSError *error) {
         // change failed
    }];
}
To listen for changes in device status, such as getting online, removal notifications, and DP data changes, register ThingSmartDeviceDelegate.
self.device = [ThingSmartDevice deviceWithDeviceId:## your deviceId];
self.device.delegate = self;
#pragma mark - ThingSmartDeviceDelegate

/// Device information updates, such as the name and online status.
 /// @param device The device instance.
- (void)deviceInfoUpdate:(ThingSmartDevice *)device;

/// Device online status updates
 /// @param device The device instance.
- (void)deviceOnlineUpdate:(ThingSmartDevice *)device;

/// Indicates whether the device is removed.
 /// @param device The device instance.
- (void)deviceRemoved:(ThingSmartDevice *)device;

/// The DP data updates.
 /// @param device The device instance.
/// @param dps The command dictionary.
- (void)device:(ThingSmartDevice *)device dpsUpdate:(NSDictionary *)dps;

/// The DP data updates.
 /// @param device The device instance.
/// @param dpCodes The DP codes.
- (void)device:(ThingSmartDevice *)device dpCommandsUpdate:(NSDictionary *)dpCodes;

/// The group OTA task progress.
 /// @param device The gateway instance.
/// @param groupId group OTA task id.
/// @param type The firmware type.
/// @param progress The update progress.
- (void)device:(ThingSmartDevice *)device groupOTAId:(long)groupId firmwareType:(NSInteger)type progress:(double)progress;

/// The group OTA task status.
 /// @param device The gateway device instance.
/// @param upgradeStatusModel The model of the update status.
- (void)device:(ThingSmartDevice *)device
    groupOTAStatusModel:(ThingSmartFirmwareUpgradeStatusModel *)upgradeStatusModel;

/// The callback of Wi-Fi signal strength.
 /// @param device The device instance.
/// @param signal The signal strength.
- (void)device:(ThingSmartDevice *)device signal:(NSString *)signal;

/// Receives MQTT custom messages.
 /// @param device The device instance.
/// @param message The custom message.
- (void)device:(ThingSmartDevice *)device didReceiveCustomMessage:(ThingSmartMQTTMessageModel *)message;

/// Receives LAN custom messages.
 - (void)device:(ThingSmartDevice *)device didReceiveLanMessage:(ThingSmartLanMessageModel *)message;

/// The delegate of warning information updates.
 /// @param device The device instance.
/// @param warningInfo The warning information.
- (void)device:(ThingSmartDevice *)device warningInfoUpdate:(NSDictionary *)warningInfo;

/// The delegate of changes in device normal firmware/pid version update's status/progress
 /// Notice: sometimes the progress may <0, when it occured please ignore the progress.
/// @param device The device instance.
/// @param statusModel status/progress model.
- (void)device:(ThingSmartDevice *)device otaUpdateStatusChanged:(ThingSmartFirmwareUpgradeStatusModel *)statusModel;

/// The Tuya message data update.
 /// Example:
///     type == property:
///         payload = {
///           "code_name1": {
///             "value": "code_value1",
///             "time": 1234567890
///           },
///           "code_name2": {
///             "value": 50,
///             "time": 1234567890
///           }
///         }
///     type == action:
///         payload = {
///            "actionCode": "testAction",
///            "outputParams": {
///              "outputParam1":"outputValue1",
///              "outputParam2":50
///            }
///         }
///     type == event:
///         payload = {
///            "eventCode": "testEvent",
///            "outputParams": {
///              "outputParam1":["outputValue1", "outputValue2"],
///              "outputParam2":false
///            }
///         }
/// @param device The device instance.
/// @param thingMessageType The message type.
/// @param payload The message payload.
- (void)device:(ThingSmartDevice *)device didReceiveThingMessageWithType:(ThingSmartThingMessageType)thingMessageType payload:(NSDictionary *)payload;
(Optional) Remove a device
You can call the API method remove to remove a device from a specific home.
[self.device remove:^{
        NSLog(@"remove success");
      } failure:^(NSError *error) {
        NSLog(@"remove failure: %@", error);
      }];
Next step
In most commercial lighting scenarios, devices are managed in groups. A group is an aggregation of one or more devices that follow certain rules. This way, devices can be easily controlled by group.
For more information, see Group Management. You can also download the GitHub sample as mentioned at the beginning of this tutorial to get your development up and running.
Is this page helpful?
YesFeedbackIs this page helpful?
YesFeedback


