NB-IoT
Narrowband Internet of Things (NB-IoT) technology is built on a cellular network to connect people to things and things to things. NB-IoT focuses on the low-power wide-area (LPWA) IoT market, which is an emerging technology and can be widely used around the world.
Background
The bandwidth of the NB-IoT signal is only 180 kHz. NB-IoT uses the license frequency band and can adopt three deployment methods: in-band, guard-band, or independent carrier, to coexist with existing networks. It can be directly deployed on GSM, UMTS, and LTE without affecting the current networks.
Features
-
Low power consumption
IoT applications, such as smart meters, environmental monitoring, and smart agriculture, are battery-powered. To maintain battery life for 5 to 10 years, NB-IoT supports the power saving mode (PSM) and extended discontinuous reception (eDRX) modes, enabling devices to operate in an ultra-low-power mode for most of the time.
-
Cost efficiency
NB-IoT is built on narrowband technology, featuring reduced complexity of baseband. The use of a single antenna and half-duplex operation helps lower the cost of the radio frequency (RF) module by eliminating unnecessary features such as SRVCC, IMS, and emergency calls. The built-in power amplifier (PA) reduces the requirements for flash memory, size, and RF, resulting in significant cost savings for NB-IoT devices.
-
Powerful connection capacity
NB-IoT has 50 to 100 times higher upstream capacity than 2G, 3G, and 4G. It can connect large fleets, accommodating up to 50,000 devices per network cell.
-
Broad coverage
NB-IoT has a maximum coupling loss (MCL) of 164 dB, which is a 20 dB improvement over GPRS. It can cover well in challenging places such as underground parking lots, basements, and pipes.
| Feature | NB-IoT technical specification | Recommended values |
|---|---|---|
| Data volume | Air interface resources are limited (180 kHz), ideal for transmitting small amounts of data. | The optimal range is 50 to 200 bytes. Less data volume is more favorable. |
| Transmission frequency and duration | NB-IoT devices are mostly in sleep mode, with infrequent data transmission. | Reporting data one or two times daily is recommended. More frequent reporting, such as every 30 minutes, uses more network capacity. |
| Power efficiency | The PSM mode minimizes energy use. | Ideal for power-sensitive applications. |
| Mobility support | Designed for low-speed movement. | Suitable for speeds under 30 km/h. |
| Signal penetration | Effective in deep coverage areas. | Offer penetrative coverage for underground areas. |
| Data transfer rate | Maximum theoretical upstream rate: 15.6 kbit/s. Maximum theoretical downstream rate: 21.25 kbit/s. | Not suitable for high-bandwidth services. |
Network architecture
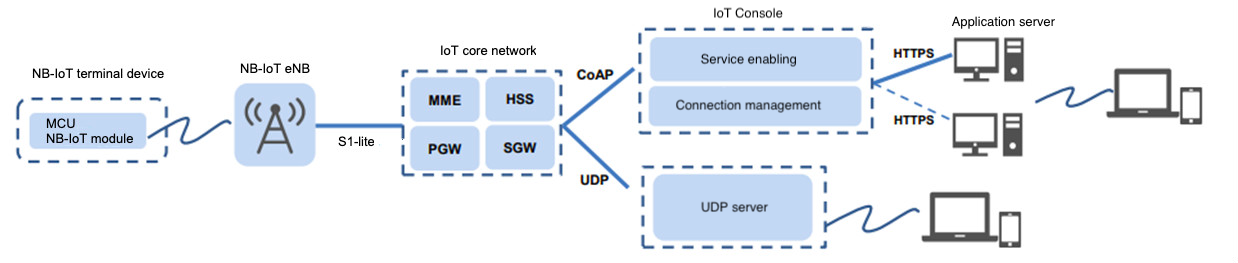
The NB-IoT network consists of the NB-IoT device, NB-IoT base station, NB-IoT packet core network, connectivity and management platform, and business server. The network architecture for NB-IoT is the same as LTE.
Low power modes
NB-IoT is well suited for devices and applications that require low throughput and bandwidth, long battery life, and low mobility. PSM and eDRX are critical technologies to enable the NB-IoT network to handle massive low power devices.
NB-IoT supports three low power modes:
- PSM: Power saving mode
- DRX: Discontinuous reception
- eDRX: Extended DRX
PSM
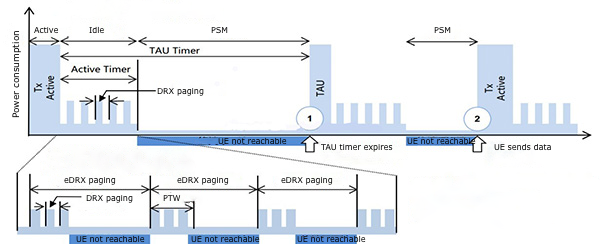
The NB-IoT device enters deep sleep mode during the non-service period, without receiving downstream data. It receives the downstream data (mobile terminated data) cached in the cloud only after proactively sending upstream data (mobile originated data).
In PSM, the radio module on the NB-IoT device is turned off, which is similar to power-off. However, the device remains registered with the network, so when it turns back to idle or connected mode, there is no need to re-attach with a packet data network (PDN) connection. PSM is suited for downstream latency-tolerant and battery-powered applications, for example, smart metering.
-
Active: The module is in active status. All functions of the module are available, and all processors are active. Radio transmission and reception can be performed. Transitions to Idle mode or PSM can be initiated.
-
Idle: The module is in the light sleep status, a network connection is maintained, and paging messages can be received. Transitions to Active mode or PSM can be initiated.
-
PSM: The module is in the deep sleep status and only the RTC is working. The network is disconnected and thus paging messages cannot be received. When the timer expires, the module is woken up. Alternatively, pull down
PSM_EINTto wake up the module from PSM.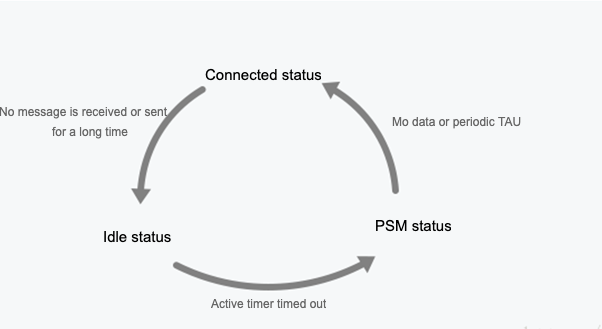
eDRX
eDRX provides a balanced trade-off between latency and battery lifetime. In each eDRX cycle, the NB-IoT device can receive downstream data in the preset paging time window (PTW). In between the PTWs, it is in deep sleep and not reachable. eDRX provides a good compromise between device reachability and power consumption. An example service is remote gas shut-off.
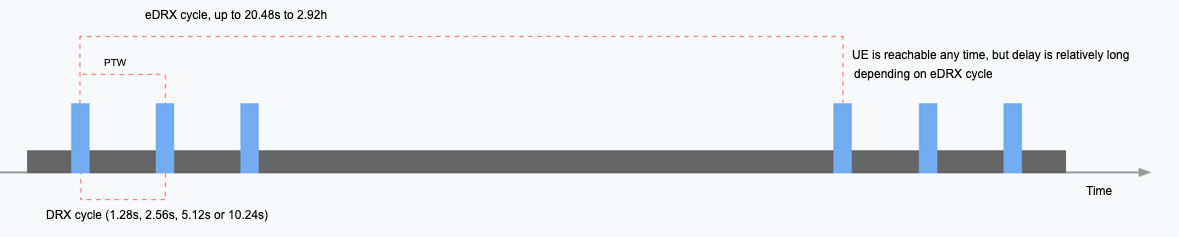
In each eDRX cycle, there is a PTW. The NB-IoT device listens to the paging channel to receive downstream traffic according to the DRX cycle in the PTW. Between two consecutive PTWs, it enters sleep mode.
In eDRX mode, the NB-IoT device is considered reachable at any time, but with a relatively long latency that is determined by an eDRX cycle. You can adjust a tradeoff between the energy saving and the latency incurred in downstream communication.
DRX
In DRX mode, downstream data can reach the NB-IoT device at any time. In each DRX cycle, it checks if downstream data arrives. This mode is suitable for services with low latency tolerance. Typically, the NB-IoT device is mains-powered, for example, the street lights.

The DRX cycle is short, which can be 1.28s, 2.56s, 5.12s, or 10.24s, depending on the APN specified by the carrier. Therefore, it is considered that the downstream data can arrive at any time with low latency.
DRX mode consumes more power. Generally, you can apply this mode to mains-powered devices with high latency sensitivity.
Latency
Initial access latency: When an NB-IoT device is turned on, it communicates with the cellular network for authentication, channel establishment, and IP address assignment. It takes six to eight seconds to complete networking and get an IP address for data transmission.
Data reporting and reception latency: A connected NB-IoT device initiates a wireless connection with the base station before transmitting data, without needing authentication or IP address assignment. Data reporting latency can vary based on the NB-IoT device’s status and wireless network coverage.
| NB-IoT device reports data to platform | Platform sends data to NB-IoT device (PSM) | Platform sends data to NB-IoT device (DRX) | Platform sends data to NB-IoT device (eDRX) |
| Air interface latency + private network to customer server latency | Air interface latency + private network to platform latency + longest PSM sleep duration (up to 310h) | Air interface latency (750 ms) + DRX paging cycle (1.28s to 10.24s) | Air interface latency (750 ms) + eDRX paging cycle (5.12s to 2.92h) |
| In seconds (3s to 30s) | In hours or days, depending on the reporting cycle | In seconds, depending on the DRX paging cycle | In seconds to hours, depending on the eDRX paging cycle |
Key parameters
The low power mechanism for NB-IoT applications depends on carrier configuration. Therefore, make sure you select the correct APN service when you purchase SIM cards.
If you do not know how to select a suitable APN service, contact the Tuya staff.
| APN | APN description | PSM | eDRX | Active timer | eDRX cycle | Paging window |
|---|---|---|---|---|---|---|
| ue.prefer.ctnb | Subject to the user setting. | Reported by NB-IoT device | Reported by NB-IoT device | Reported by NB-IoT device | Reported by NB-IoT device | Reported by NB-IoT device |
| ctnb | Reporting data, immediate PSM (2s), eDRX disabled. | Enable | Disable | 2s | - | - |
| psmA.eDRX0.ctnb | Reporting data, immediate PSM (2s), eDRX disabled. | Enable | Disable | 2s | - | - |
| psmC.eDRX0.ctnb | Reporting data, PSM later (60s), eDRX disabled. | Enable | Disable | 60s | - | - |
| psmF.eDRXC.ctnb | Reporting data, PSM later (180s), eDRX enabled, 20-second paging cycle. | Enable | Enable | 180s | 20.48s | 10.48s |
| psm0.eDRXH.ctnb | Sending commands, PSM disabled, eDRX enabled, 15-minute latency. | Disable | Enable | - | 655.36s | 10.24s |
| psm0.eDRXD.ctnb | Sending commands, PSM disabled, eDRX enabled, 1-minute latency. | Disable | Enable | - | 40.96s | 10.24s |
| psm0.eDRXC.ctnb | Sending commands, PSM disabled, eDRX enabled, 30-second latency. | Disable | Enable | - | 20.48s | 10.24s |
| psm0.eDRX0.ctnb | Sending commands, PSM disabled, DRX enabled, 10-second latency. | Disable | Disable (use DRX) | - | 2.56s | - |
Power consumption
| Status | Power consumption | Test result |
|---|---|---|
| PSM | 2 μA | 1.7 μA |
| eDRX idle | 2 μA to 2 mA | 1 mA |
| DRX idle | 1 to 4 mA | 1 mA |
| Connected | Transmit: 200 mA. Receive: 65 mA. | Transmit: 189 mA. Receive: 161 mA. |
MCU integration solution
If the product features are complex or the SoC solution does not meet your needs, you can opt for the MCU integration solution where Tuya’s module only acts as a data transmission channel. It is suitable for home appliances, security devices, and sensors.
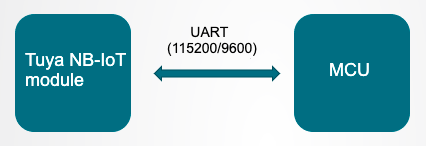
Advantage: Unlike the widely used attention command (AT command) development, Tuya’s serial protocol allows you to easily integrate the NB-IoT protocol into your product.
Hardware selection
- Generic PSM firmware: Used to report data.
- Generic DRX firmware: Used to send commands.
- Custom firmware: Tailored to fit your business needs.
Tuya offers the generic PSM and DRX modules to interface with your MCU. The generic eDRX module is not available. If you have specific requirements, such as custom protocols or features, consult with Tuya staff to assess feasibility.
Development process
To develop an NB-IoT product, you need to complete product creation, hardware debugging, software development, and functionality debugging.
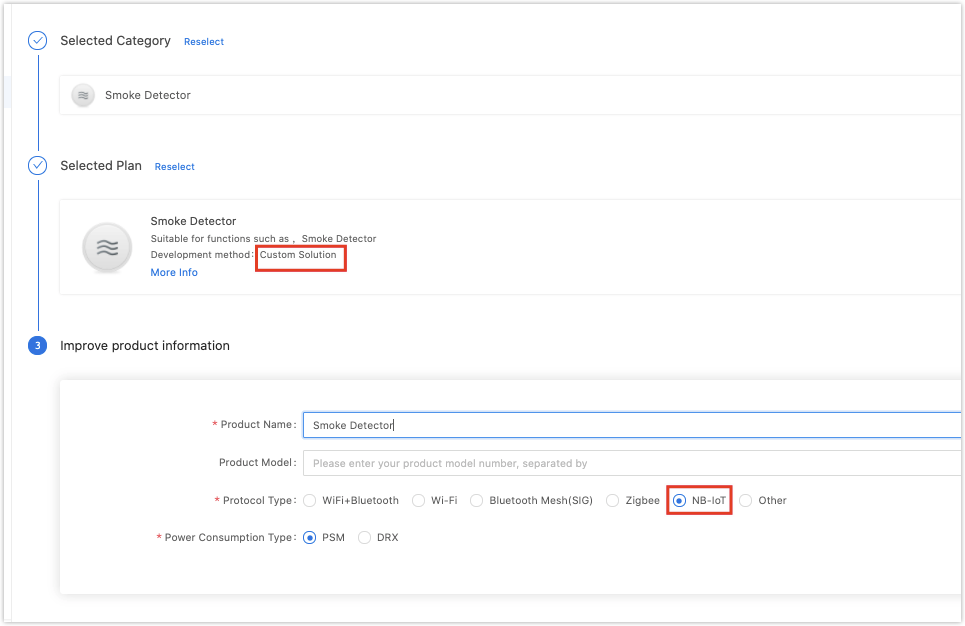
Step 1: Create product
Log in to the Tuya Developer Platform. Click Create. Select a product category. Choose NB-IoT for Protocol and the desired power type. Choose PSM for battery-powered and monitoring products. Choose DRX for products that are not sensitive to power levels and send control commands. Note that the power type selected will determine the sample product and mass production.
After you create a product, you can configure the function, panel, module, and firmware based on your requirements. Then, download the MCU SDK accordingly.
Introduction to modules
The platform recommends popular NB-IoT modules when you create a product. In the following example, the NM1-GL module is used.
After you select the module, you can purchase modules online and proceed with the PCB layout. For more information about hardware, see NB-IoT Datasheet.
The NB-IoT module has a peak current exceeding 300 mA. Consider the allowance when designing the power circuit.
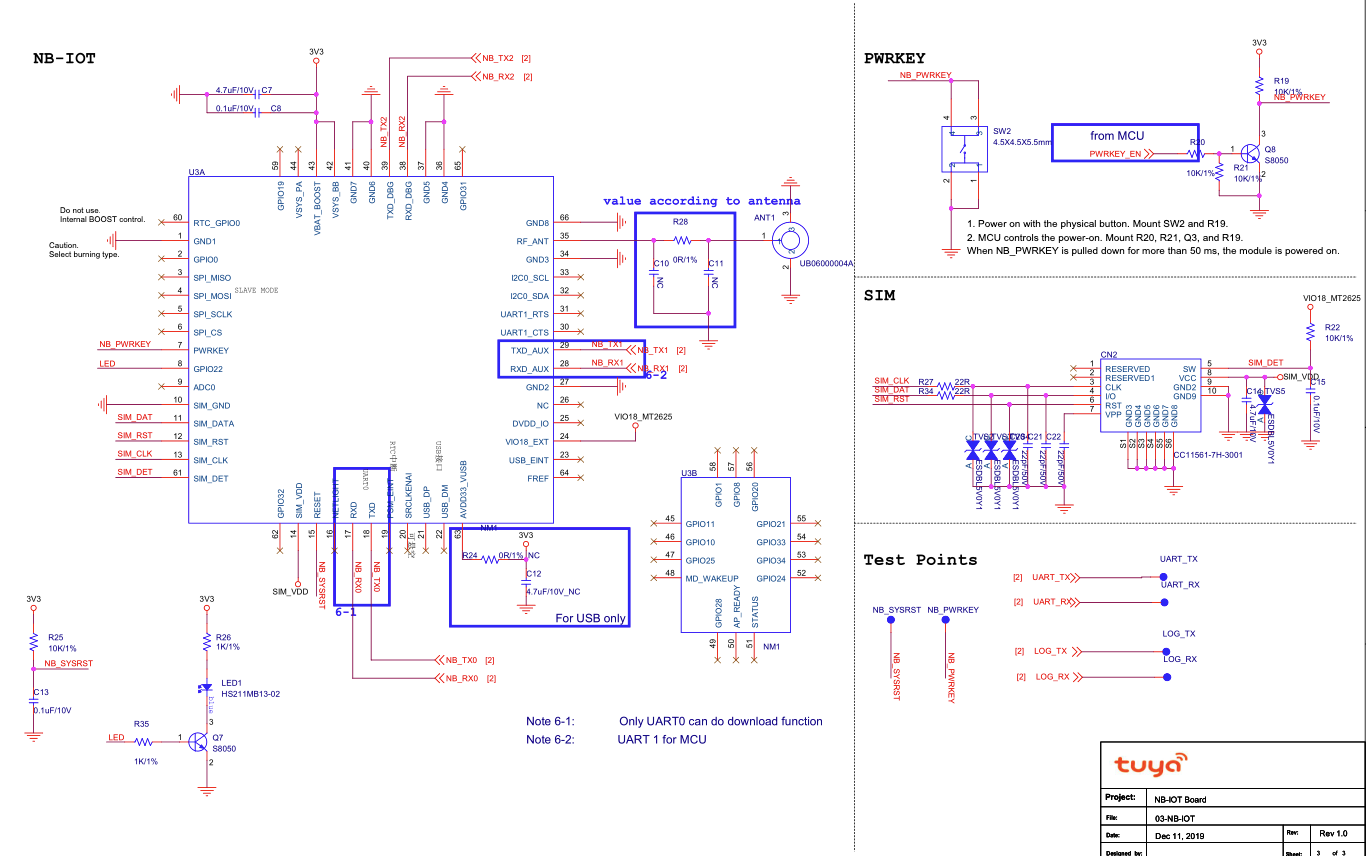
Minimal system diagram
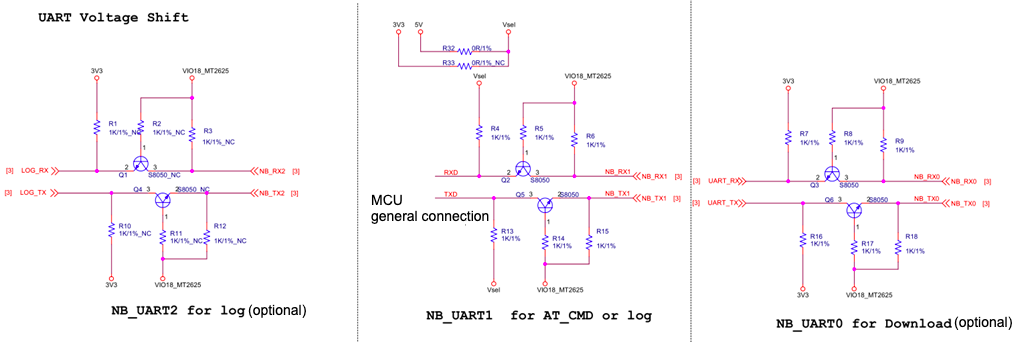
-
Serial communication circuit: The serial level is 1.8V, requiring a level translator.
- (Optional) UART0: Used to flash firmware to the module. This pin is not used in the MCU integration solution, so it can be brought out to the test point for debugging (baud rate 115200).
- (Required) UART1: Used for communication between the module and the user chip (baud rate 115200 or 9600).
- (Optional) UART2: Used to print logs for troubleshooting. This pin can be brought out to the test point for debugging (baud rate 921600).
-
Module wake-up circuit:
- Startup wake-up pin:
PWRKEY - Low power wake-up pin:
PSM_EINT
- Startup wake-up pin:
-
SIM card circuit: Before designing, choose the SIM card form factor (USIM or eSIM) and purchase the appropriate SIM card.
-
Power circuit: The module has a peak power of around 300 mA.
-
Antenna circuit: Refer to the hardware design guidelines and adapt the RF circuit for the antenna accordingly.
Step 2: Get familiar with protocol
Before starting coding, you can use Tuya’s Module Debugging Assistant in MCU simulation mode to get familiar with the communication between the MCU and the module.
In the MCU simulation mode, the Module Debugging Assistant simulates the MCU and responds to commands from the module. After you pair the module with the mobile app, you can test whether the module can receive and send data point (DP) data correctly. The following steps describe how to pair the module and use the Module Debugging Assistant.
-
Follow the minimal system schematic to build the peripheral circuit of the module, ensuring a stable power supply, excellent antenna performance, and an inserted NB-IoT card.
-
Open the Module Debugging Assistant and import the debugging file. Choose NB-IoT Protocol and MCU Simulation.
-
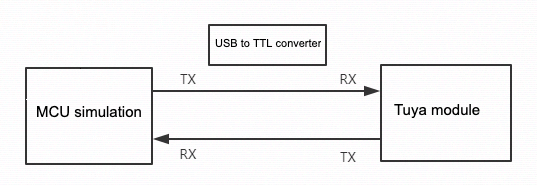
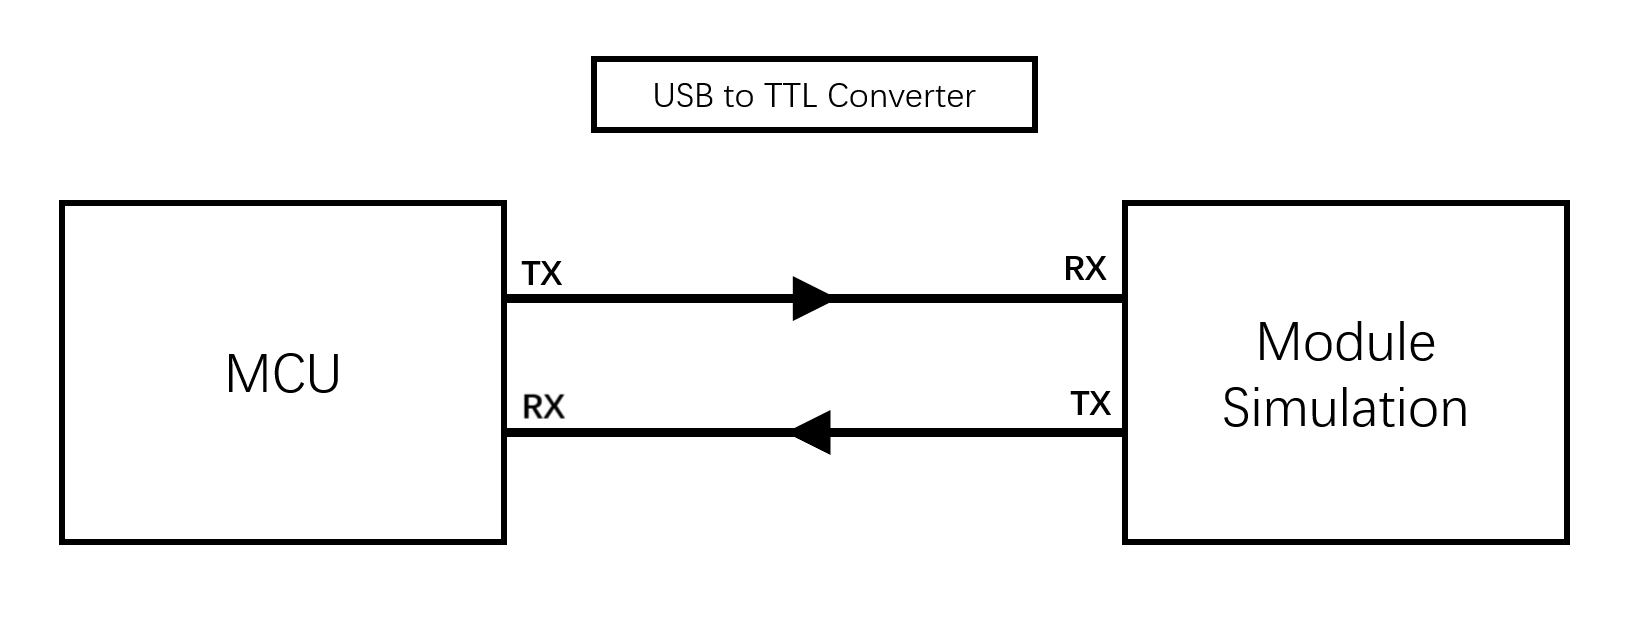
Connect the module to your computer by using a USB to TTL converter. Set the Serial Port and Baud Rate. Click Open and then Start Debugging to start the data communication.
The NB-IoT module constantly sends product information queries to the MCU upon powering on. It will start initialization on receiving the correct response from the MCU. If the module does not send data upon powering on, check whether the peripheral circuit of the module works as expected.

Pair with the app
-
Registration: The Tuya platform retrieves information about the authorized NB-IoT module and registers it with the mobile carrier platform.
-
Activation: After the NB-IoT module is powered on for the first time and initialized, it can connect to the mobile carrier platform. The network status shown by the module takes precedence.
-
Use: Only the activated modules that are not associated with other accounts can be bound with the app.
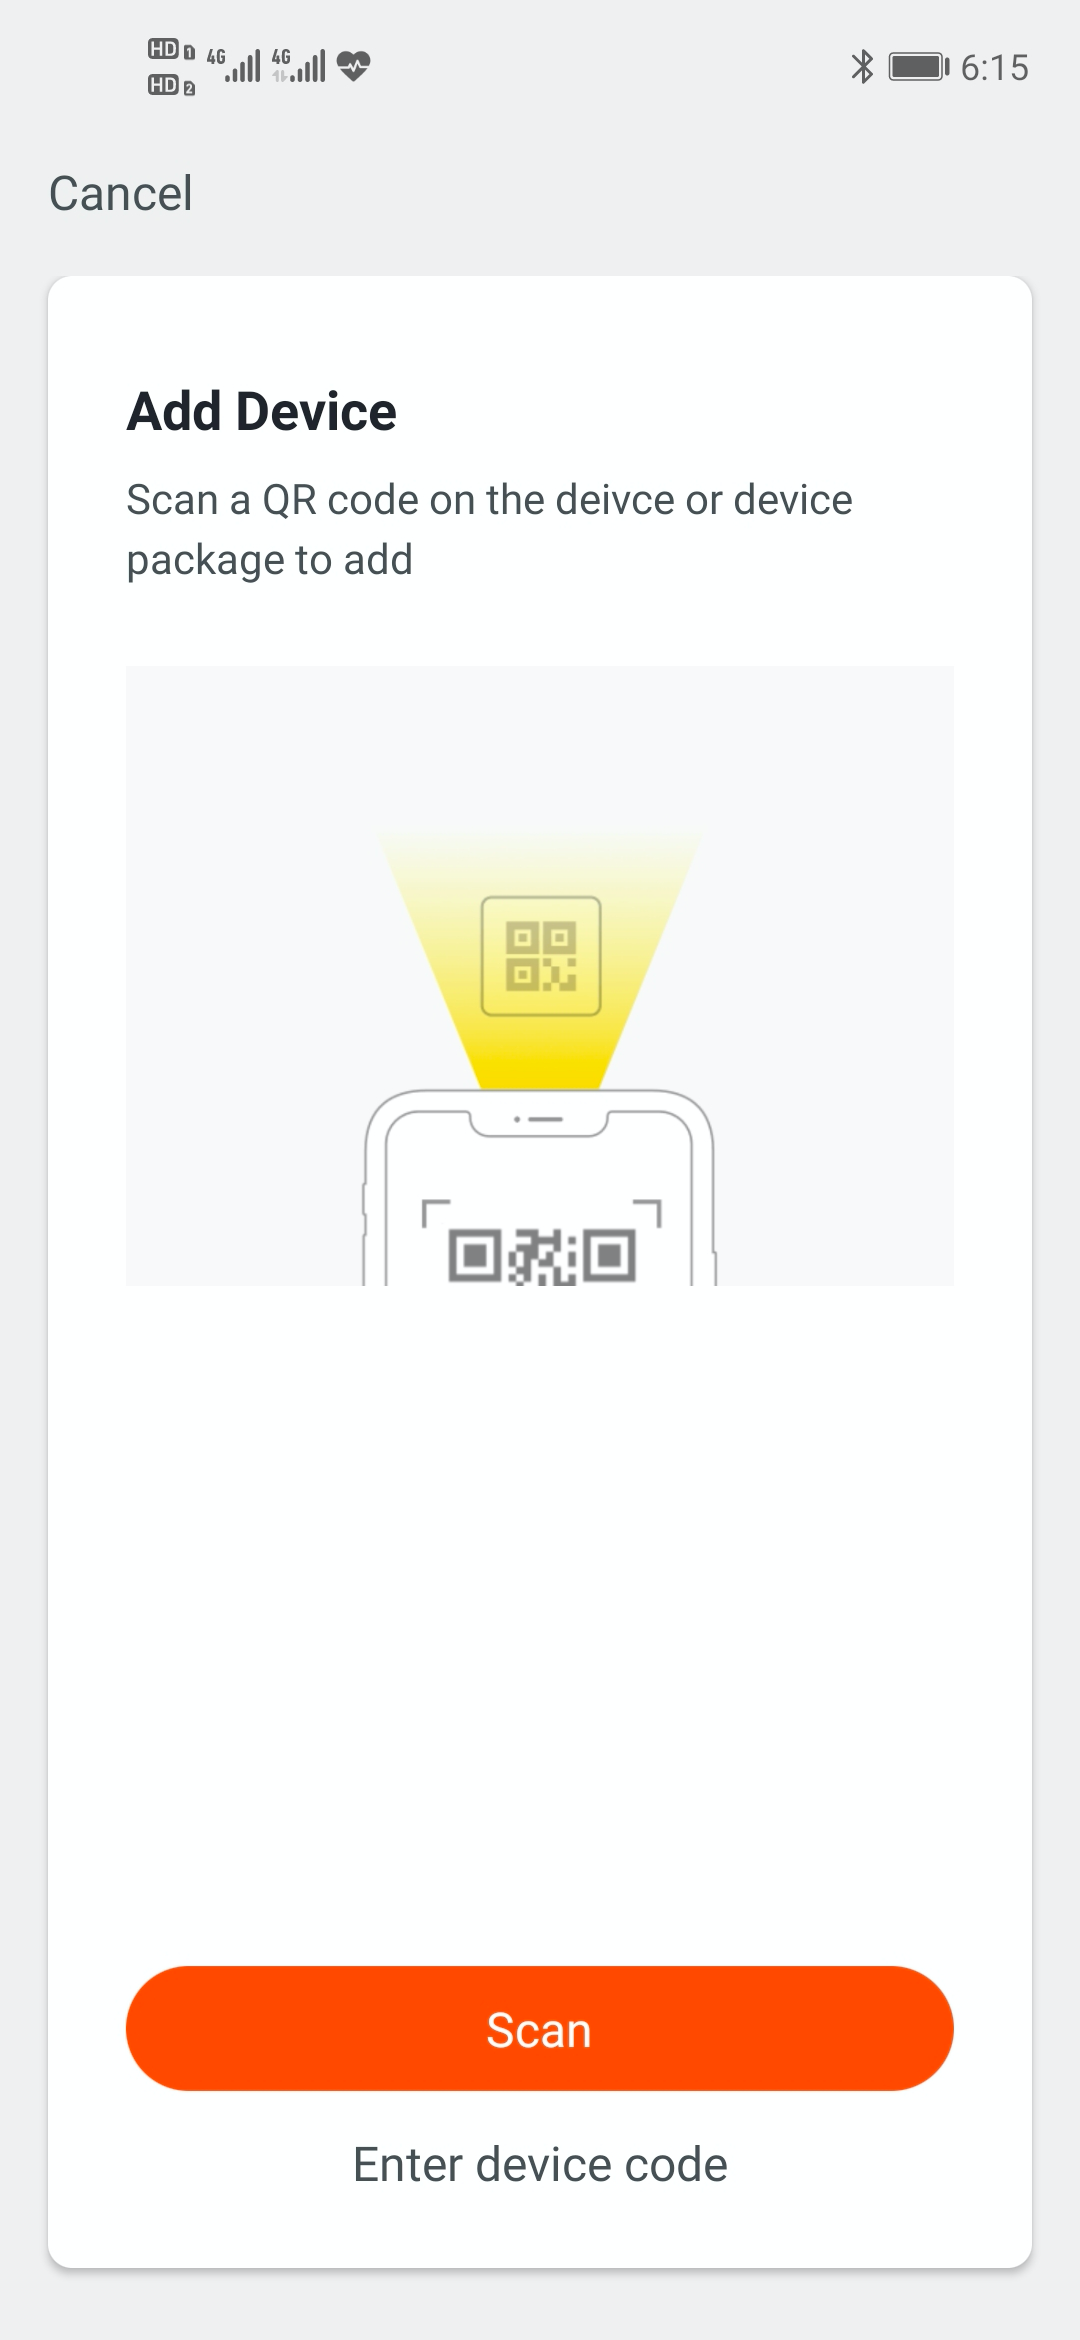
The NB-IoT QR code is generated by Tuya’s printing tools. Contact the Tuya team for details.
Step 3: Develop software
Refer to the protocol documentation in the development document to understand how data is exchanged between the MCU and the module on the Module Debugging Assistant. The protocol consists of the basic protocol and the function protocol.
- The basic protocol is product-neutral and shared by the modules. It consists of commands for module initialization and extended functions.
- The function protocol works to report and send commands based on the basic protocol and specifies the DP data format.
For more information, see NB-IoT Serial Protocol.
Tuya provides two methods to implement the communication between your MCU and Tuya’s module.
Interface with the protocol yourself
If your MCU does not have sufficient resources or porting SDK is not feasible, you can interface with the serial protocol yourself.
Port the MCU SDK
- If your MCU has sufficient resources, we recommend you port the MCU SDK for efficiency purposes. The MCU SDK is written in C language. You can directly import it to your project.
- The requirements for MCU resources:
- 4 KB flash memory.
- About 100 bytes of RAM are required, depending on the data length of the data point (DP).
- 9-level nested function.
- The requirements for MCU resources:
- If your MCU does not have sufficient resources, you can refer to the functions in the SDK for interfacing with Tuya’s protocol.
For more information, see MCU SDK Porting.
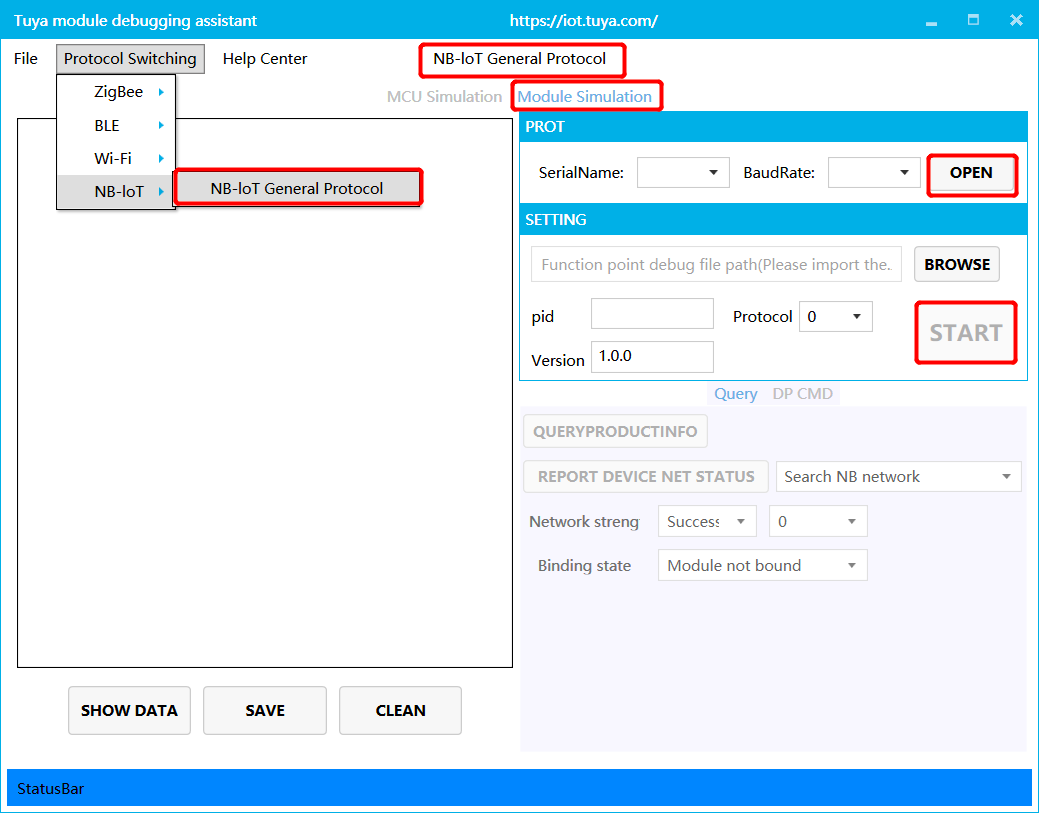
Step 4: Verify protocol
After you port the MCU SDK, you can use the module simulation mode in the Module Debugging Assistant to verify the code. In the module simulation mode, the Module Debugging Assistant automatically sends the initial data to the MCU to check whether the communication works properly. An error message will be returned if any issue occurs. After the initialization is verified, you can test other extended functions. After that, you can pair the actual module and test device functions.
The module simulation mode only verifies the communication between the MCU and the module and does not provide real networking capability.
Step 5: Debug functionality
After the code is verified, you can pair the module with the app and test DP data communication.
-
Device logs: You can check the device logs on the Operations Center to identify problems.
-
Tuya Developer Forum: Post your questions to seek help from the community. If the documentation cannot resolve your questions, you can submit a ticket to request technical support.
-
FAQs: Find frequently asked questions and their answers to troubleshoot.
Is this page helpful?
YesFeedbackIs this page helpful?
YesFeedback


