OTA Update
Overview
Tuya Bluetooth SDK implements the software delivery over the air (OTA), allowing you to deploy firmware updates for Bluetooth modules and the MCU to users.
Since firmware update logic is determined by specific chipset platforms, the SDK only provides the interface for OTA updates. The specific application is intended to be implemented by you.
Update process
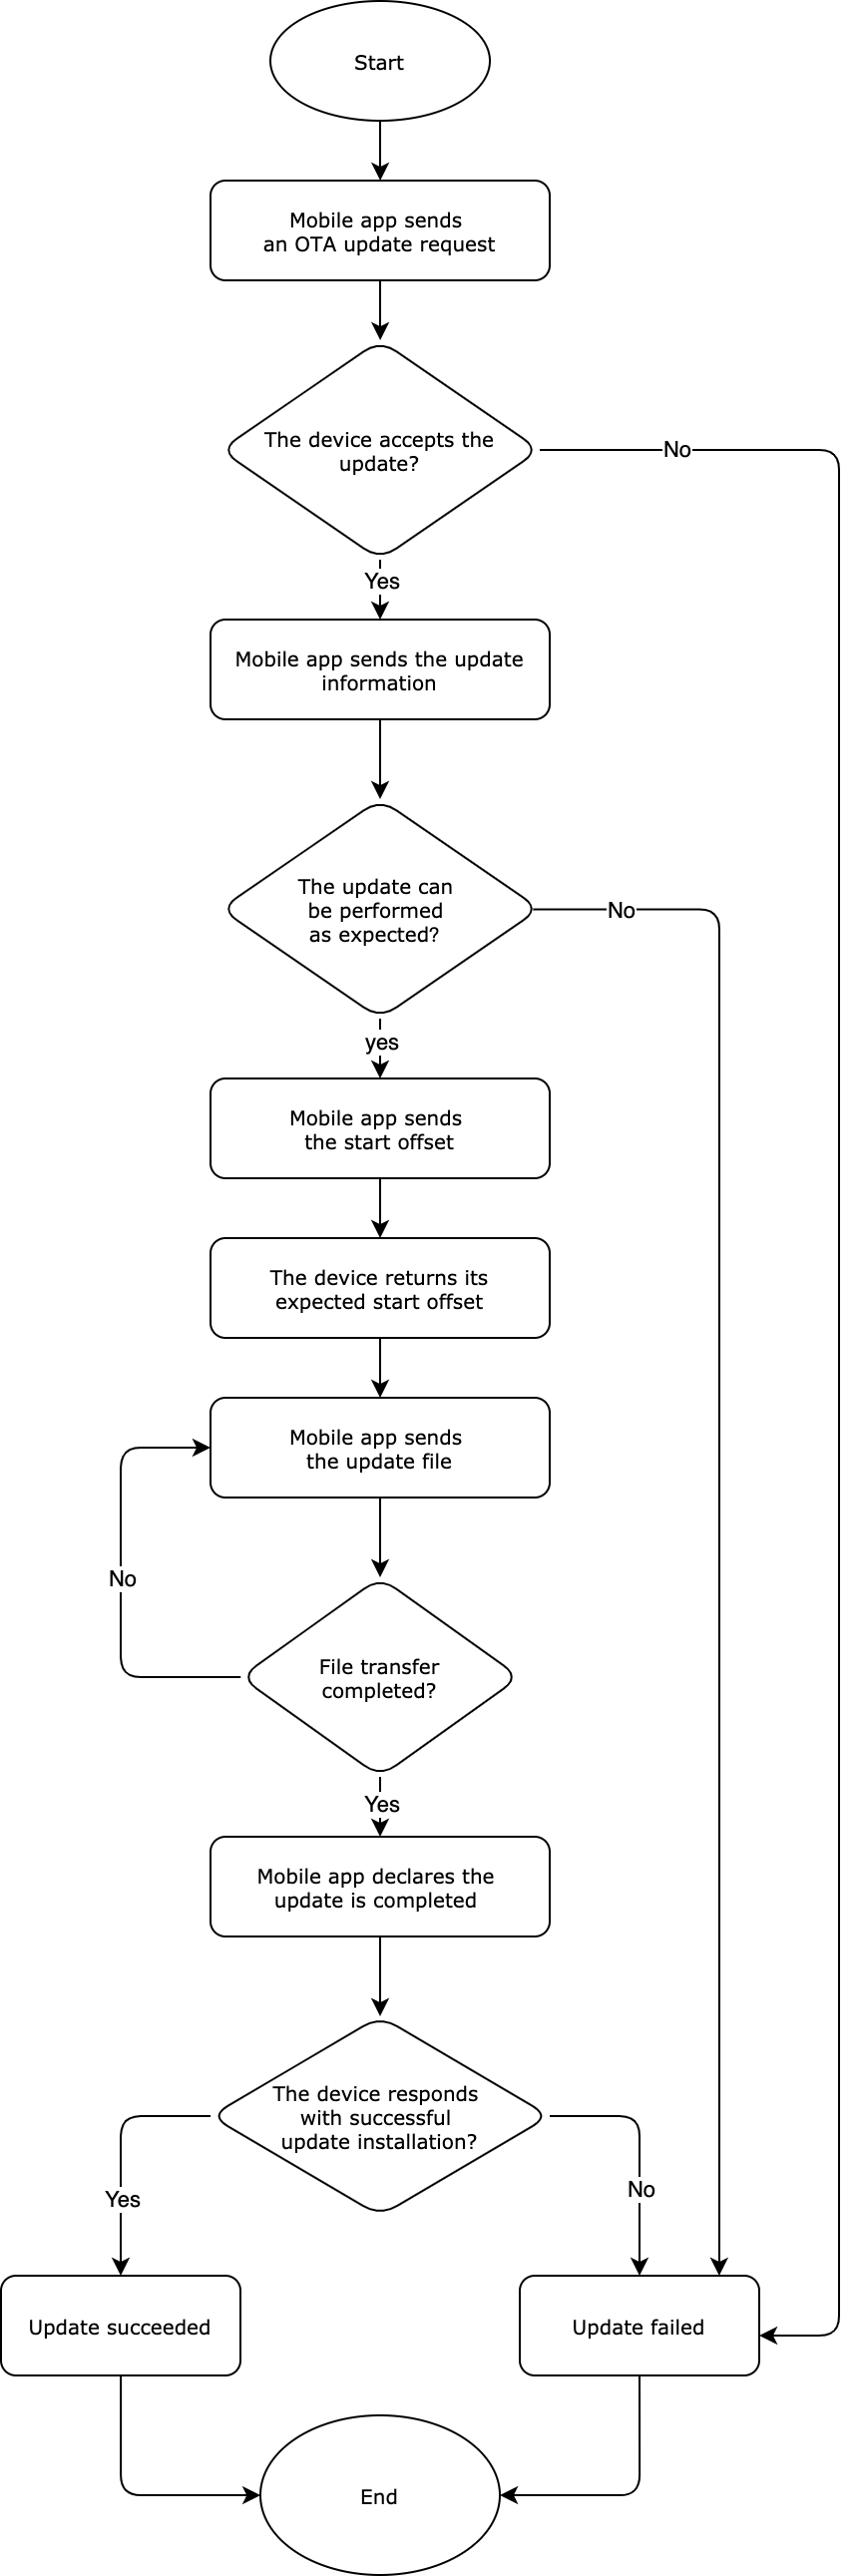
OTA protocol
Request an update (TUYA_BLE_OTA_REQ)
Mobile app to device communication
| data_len=1 | |
|---|---|
| Length | 1 byte |
| Data | Fixed to 0 |
Device to mobile app communication
| data_len=9 | |||||
|---|---|---|---|---|---|
| Length | 1 byte | 1 byte | 1 byte | 4 bytes | 2 bytes |
| Data | Flag | OTA_Version | 0 | Version | The maximum packet size |
Parameter description
Flag:0x00indicates the update is accepted.0x01indicates the update is rejected.OTA_Version: The major version of the OTA protocol. For example,0x03represents version3.x.Version: The version number of the current firmware, in big-endian format. For example,0x00 01 00 02representsv1.0.2.- The maximum packet size: The size of the largest packet that can be transmitted over the underlying network, in the unit of bytes. The current protocol specifies that the maximum packet size is 512 bytes.
Send the update information (TUYA_BLE_OTA_FILE_INFO)
Mobile app to device communication
| data_len=37 | ||||||
|---|---|---|---|---|---|---|
| Length | 1 byte | 8 bytes | 4 bytes | 16 bytes | 4 bytes | 4 bytes |
| Data | 0 | The product ID (PID) (reserved field) | The update version | The MD5 hash. | The file length | CRC32 checksum |
Update version: The version of firmware to be installed. For example, 0x00010002 represents v1.0.2.
If you have enabled the OEM feature, the received PID might not match the PID written to the device. It is recommended not to verify this field. You can just leave it as is.
Device to mobile app communication
| data_len=26 | |||||
|---|---|---|---|---|---|
| Length | 1 byte | 1 byte | 4 bytes | 4 bytes | 16 bytes |
| Data | 0 | STATE | The size of the update that has already been downloaded. | The CRC32 checksum of the update that has already been downloaded. | The MD5 hash value of the update that has already been downloaded. |
STATE:
0x00: The update is performed as expected.
0x01: The received PID does not match the one written to the device.
0x02: The update version is earlier than or equal to the current version.
0x03: The update size exceeds the upper limit.
Other fields: Reserved
The size of the update that has already been downloaded:
The device returns information of the update that has been downloaded to continue downloading from where it was interrupted. After receiving the response message, the app will calculate the CRC32 checksum and compare it to the value received. If the two match exactly, the app will change the start offset to the received data length in the following transmission request. Otherwise, the start offset is 0, meaning downloading from scratch.
Specify the start offset (TUYA_BLE_OTA_FILE_OFFSET_REQ)
Mobile app to device communication
| data_len=5 | ||
|---|---|---|
| Length | 1 byte | 4 bytes |
| Data | 0 | Offset |
offset: indicates where to start downloading the update.
Device to mobile app communication
| data_len=5 | ||
|---|---|---|
| Length | 1 byte | 4 bytes |
| Data | 0 | Offset |
offset: the start offset specified by the device.
The start offset address specified by the device should take precedence over the one provided by the app. The device-specified offset is usually less than the one provided by the app.
Download the update (TUYA_BLE_OTA_DATA)
Mobile app to device communication
| data_len=7+n | |||||
|---|---|---|---|---|---|
| Length | 1 byte | 2 bytes | 2 bytes | 2 bytes | n byte(s) |
| Data | 0 | Packet ID | The size of the current packet | The CRC16 checksum of the current packet | The payload of the current packet |
The packet ID starts with zero, in big-endian (high byte first) format.
Device to mobile app communication
| data_len=2 | ||
|---|---|---|
| Length | 1 byte | 1 byte |
| Data | 0 | STATE |
STATE:
0x00: Download is successful.
0x01: Packet ID error.
0x02: The data length does not match the expected one.
0x03: CRC check failed.
0x04: Other errors.
Update completed (TUYA_BLE_OTA_END)
Mobile app to device communication
| data_len=1 | |
|---|---|
| Length | 1 byte |
| Data | 0 |
Device to mobile app communication
| data_len=2 | ||
|---|---|---|
| Length | 1 byte | 1 byte |
| Data | 0 | STATE |
STATE:
0x00: Download is successful.
0x01: The total data length error.
0x02: The total CRC check failed.
0x03: Other errors.
After the update is successfully installed, the device will call tuya_ble_ota_response(tuya_ble_ota_response_t *p_data) to return the result to the app and then restart. A non-blocking delay of two seconds is required before the device restarts.
Example of OTA update
The application receives the update through the registered callback if no RTOS is used or through the registered message queue if an RTOS is used. The event ID is TUYA_BLE_CB_EVT_OTA_DATA. The device calls tuya_ble_ota_response(tuya_ble_ota_response_t *p_data) to return messages.
Data structure
typedef enum
{
TUYA_BLE_OTA_REQ, // An OTA update request.
TUYA_BLE_OTA_FILE_INFO, // Send the update information.
TUYA_BLE_OTA_FILE_OFFSET_REQ, // Specify the start offset.
TUYA_BLE_OTA_DATA, // Download the update.
TUYA_BLE_OTA_END, // The update is completed.
TUYA_BLE_OTA_UNKONWN,
}tuya_ble_ota_data_type_t;
typedef struct{
tuya_ble_ota_data_type_t type;
uint16_t data_len;
uint8_t *p_data;
}tuya_ble_ota_data_t; // Define the input parameters for the OTA update handler, including the OTA update event, data fields, and data length.
typedef struct{
tuya_ble_ota_data_type_t type;
uint16_t data_len;
uint8_t *p_data;
}tuya_ble_ota_response_t; // The data structure of the `tuya_ble_ota_response(tuya_ble_ota_response_t *p_data)` that is used to respond to an update.
Update steps
Step 1: Initialize the OTA update feature to get the update information and DFU settings. The following sample code is based on the Nordic nRF52832.
You must call the OTA initialization function after the SDK initialization function tuya_ble_sdk_demo_init is run.
uint32_t tuya_ble_ota_init(void)
{
    s_old_file = (tuya_ble_ota_file_info_storage_t*)(s_dfu_settings.init_command);

    uint32_t ret = nrf_dfu_settings_init(true);

    APP_ERROR_CHECK(ret);

    return ret;
}
Step 2: In the registered callback, populate the event TUYA_BLE_CB_EVT_OTA_DATA, in which the OTA handler is called.
static void tuya_ble_sdk_callback(tuya_ble_cb_evt_param_t* event)
{
     switch(event->evt)
    {
        case TUYA_BLE_CB_EVT_OTA_DATA: {
            tuya_ble_ota_handler(&event->ota_data); //  Add handlers in the OTA event.
        } break;


    ...
    …
    }
}
Step 3: Implement the handler for each OTA command in the tuya_ble_ota_handler().
void tuya_ble_ota_handler(tuya_ble_ota_data_t* ota)
{
    tuya_ble_ota_response_t rsp;

    rsp.type = ota->type;

    if(ota->type != TUYA_BLE_OTA_DATA) {
        TUYA_APP_LOG_INFO("ota_cmd_type: %d", ota->type);
        TUYA_APP_LOG_HEXDUMP_INFO("ota_cmd_data", ota->p_data, ota->data_len);
    }

    switch(ota->type)
    {
        case TUYA_BLE_OTA_REQ: // Request an update.
        {
            tuya_ble_ota_req_handler(ota->p_data, ota->data_len, &rsp);
        } break;

        case TUYA_BLE_OTA_FILE_INFO:  // Send the update information.
        {
            tuya_ble_ota_file_info_handler(ota->p_data, ota->data_len, &rsp);
        } break;

        case TUYA_BLE_OTA_FILE_OFFSET_REQ: // Specify the start offset.
        {
            tuya_ble_ota_file_offset_handler(ota->p_data, ota->data_len, &rsp);
        } break;

        case TUYA_BLE_OTA_DATA: // Download the update.
         {
            tuya_ble_ota_data_handler(ota->p_data, ota->data_len, &rsp);
        } break;

        case TUYA_BLE_OTA_END:  // The update is completed.
        {
            tuya_ble_ota_end_handler(ota->p_data, ota->data_len, &rsp);
        } break;

        case TUYA_BLE_OTA_UNKONWN:
        {
        } break;

        default: {
        } break;
    }
}
Sample code
Update deployment
Add firmware
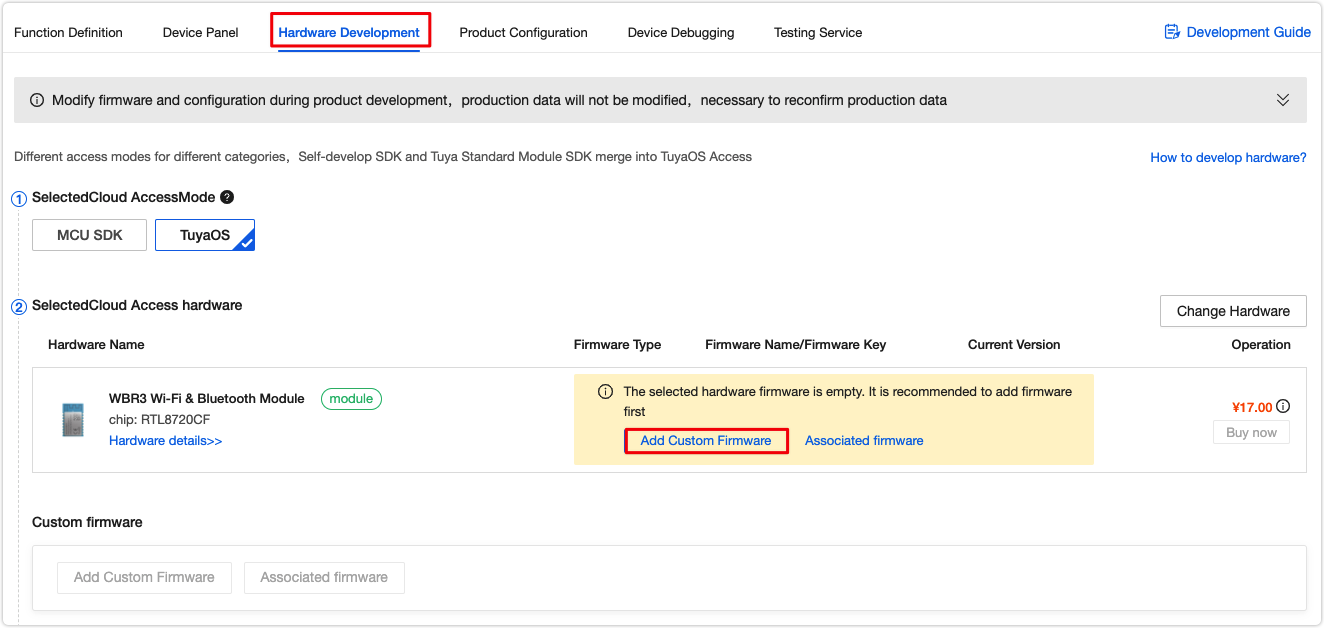
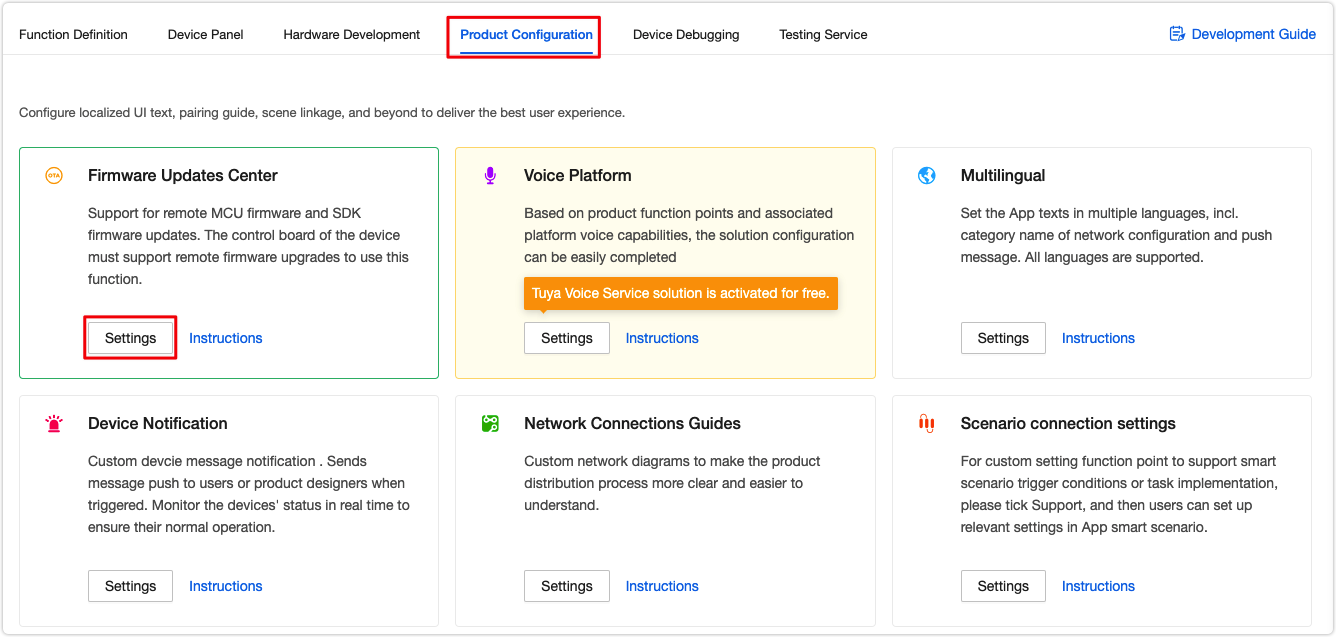
After you create a product on the Tuya Developer Platform, click Hardware Development and select a module. Click Add Custom Firmware.
Complete the required information.
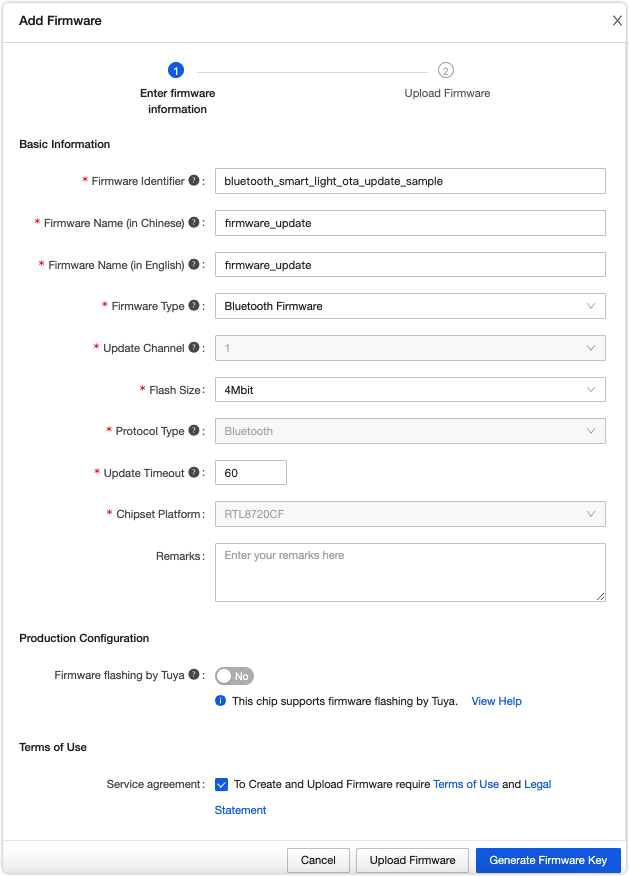
Firmware identifier: It is verified in the firmware flashing and authorization process. Make sure it is consistent with the name of the uploaded firmware .bin file. Otherwise, authorization will fail.
Firmware type:
- Module firmware: applies to Wi-Fi SDK development.
- MCU firmware: used to update the MCU firmware if you develop with the MCU SDK.
- Bluetooth firmware: applies to Bluetooth SDK development.
- Zigbee firmware: applies to Zigbee SDK development.
- Extended firmware: used to manage firmware used for accessories, such as the UI resources.
If you are not clear about the meaning of a field, click the ? to find out the explanation.
Create firmware version
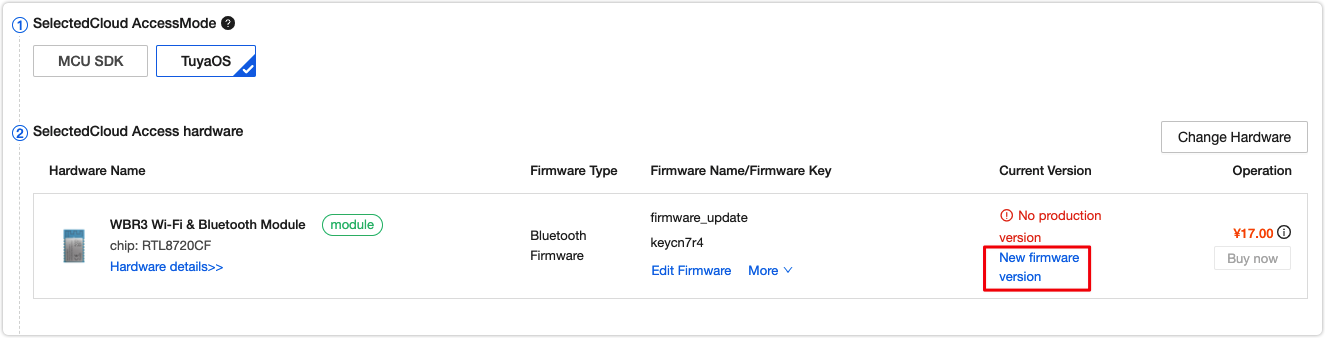
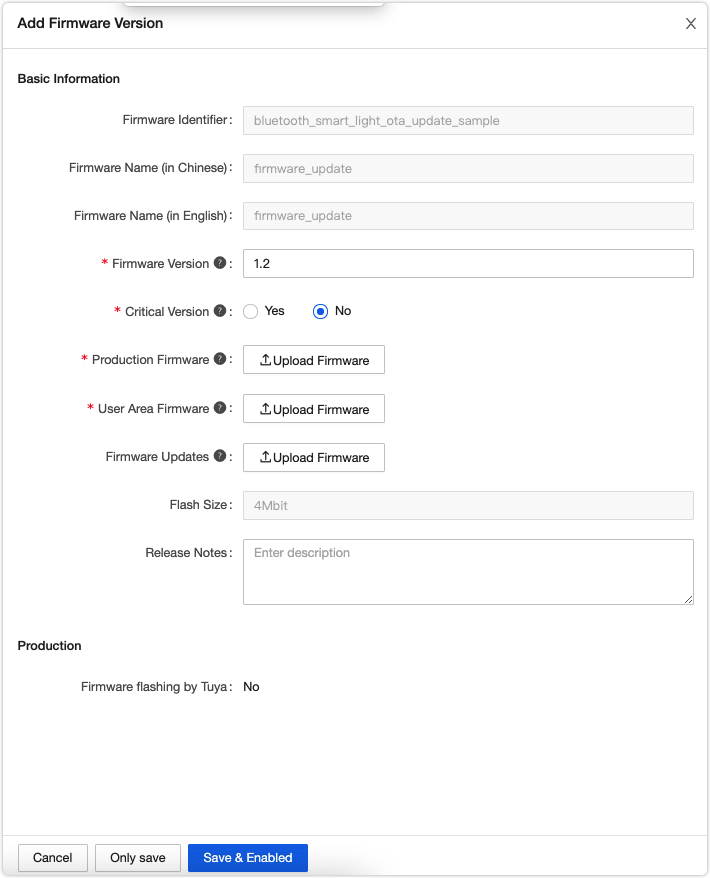
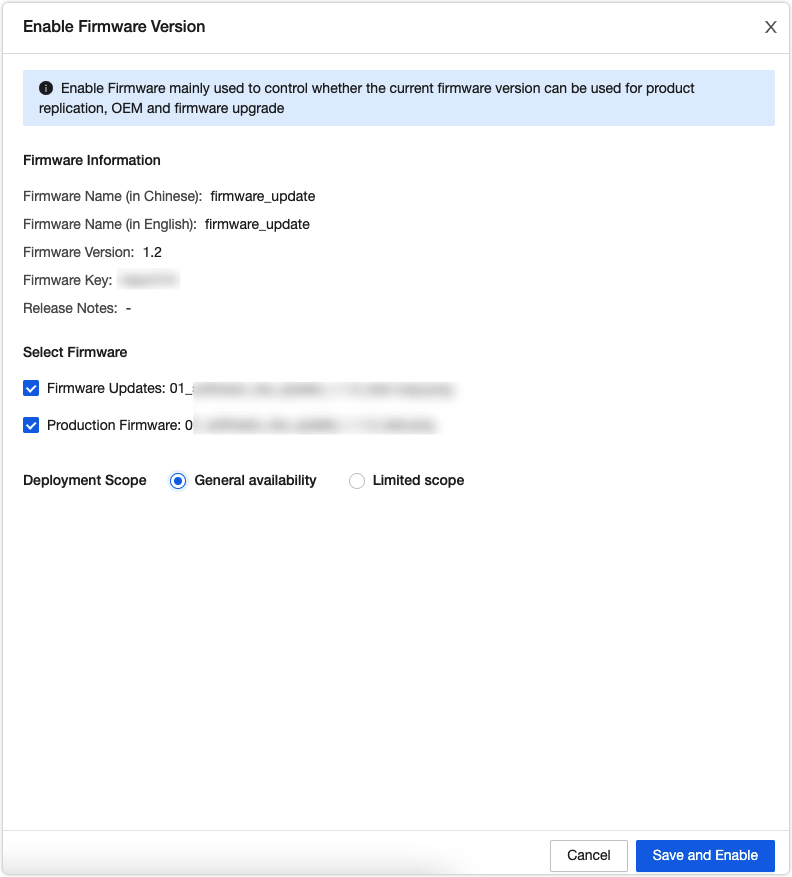
You must enable the added firmware version after adding it. Otherwise, you cannot find this firmware version when you deploy an update.
Deploy updates
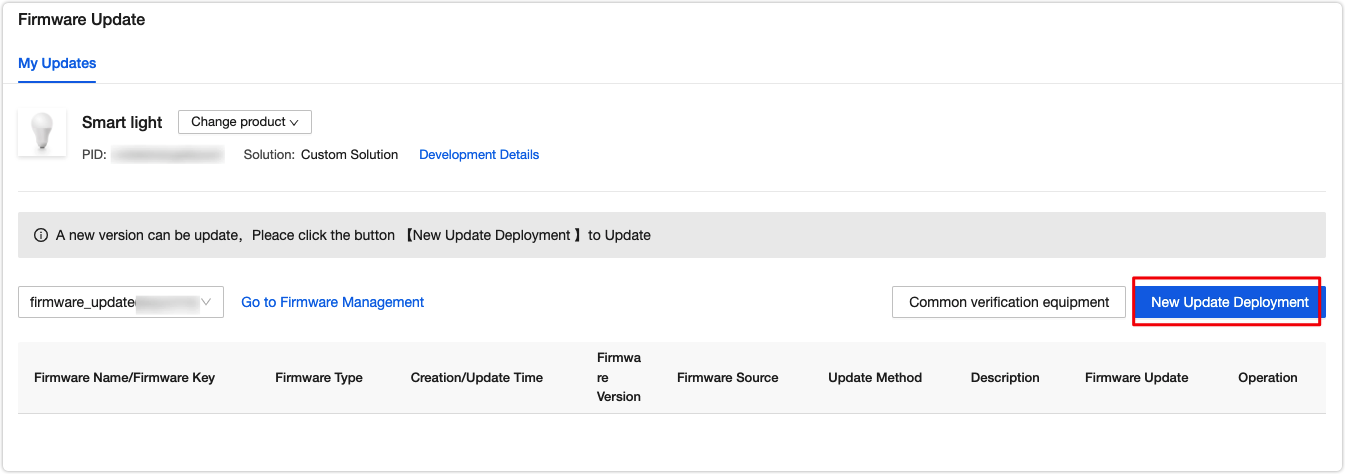
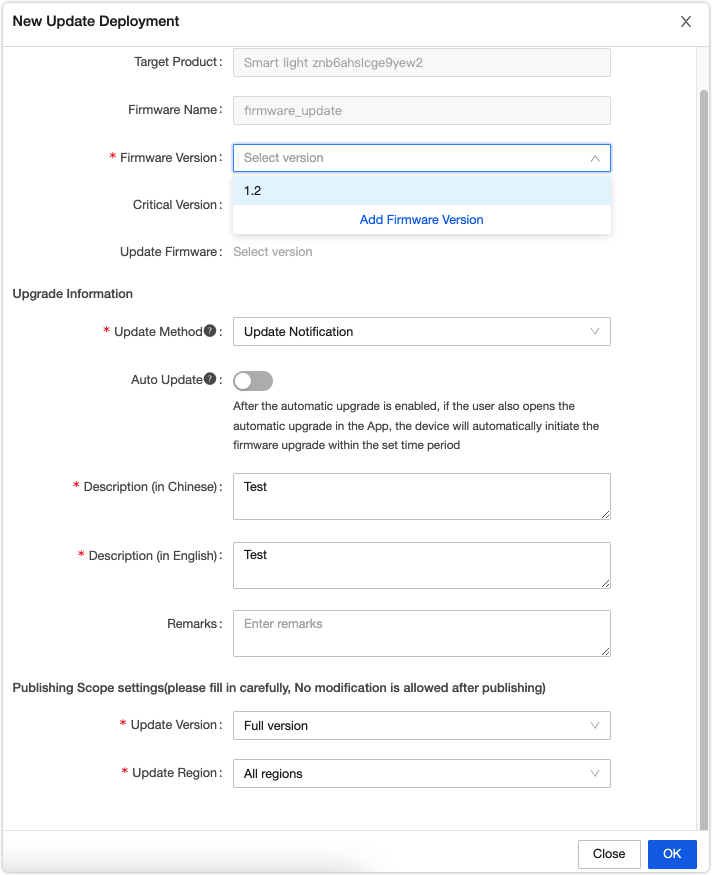
Update options:
- Update notification: Users receive a firmware update notification on the app and choose whether to install updates.
- Forced update: Users receive a firmware update notification on the app and have no option but to update the firmware.
- Check for updates: Users will not receive a firmware update notification on the app but need to manually check for new updates.
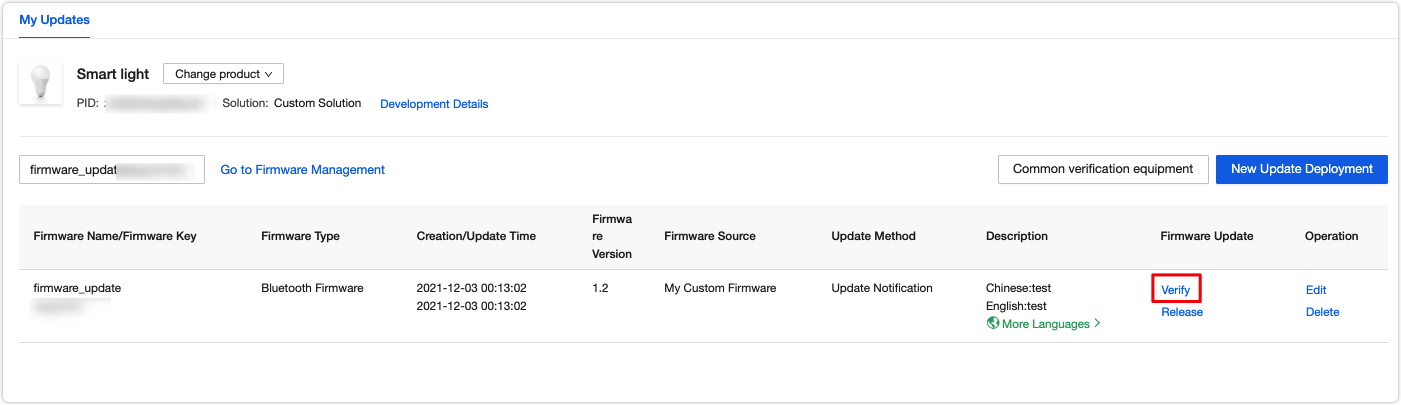
Verify updates
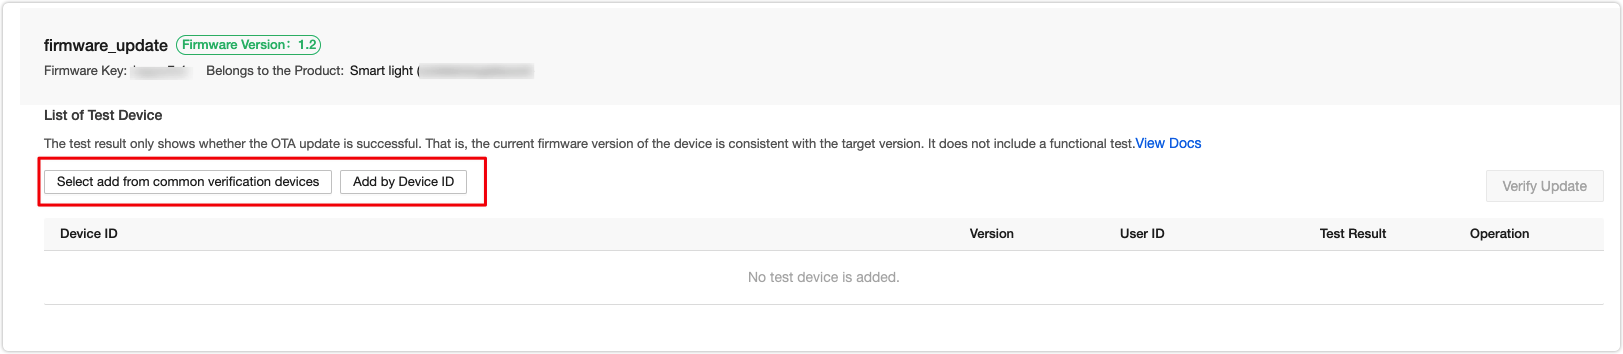
Click Verify and add devices for testing.
Enter the virtual ID of a device. When you open the control panel of this device in the mobile app, you will receive an update notification.
FAQs
How to find the virtual ID?
- Open the mobile app and select a product. Tap the editing icon in the top right corner > Device Information > Virtual ID and tap Copy.
When I add a device, I got an error saying 'No PID for the device'. How to fix it?
- This is because the PID associated with the virtual ID does not match the one you use to add a firmware version. Check if the PID specified in your code matches the one you use to add a firmware version.
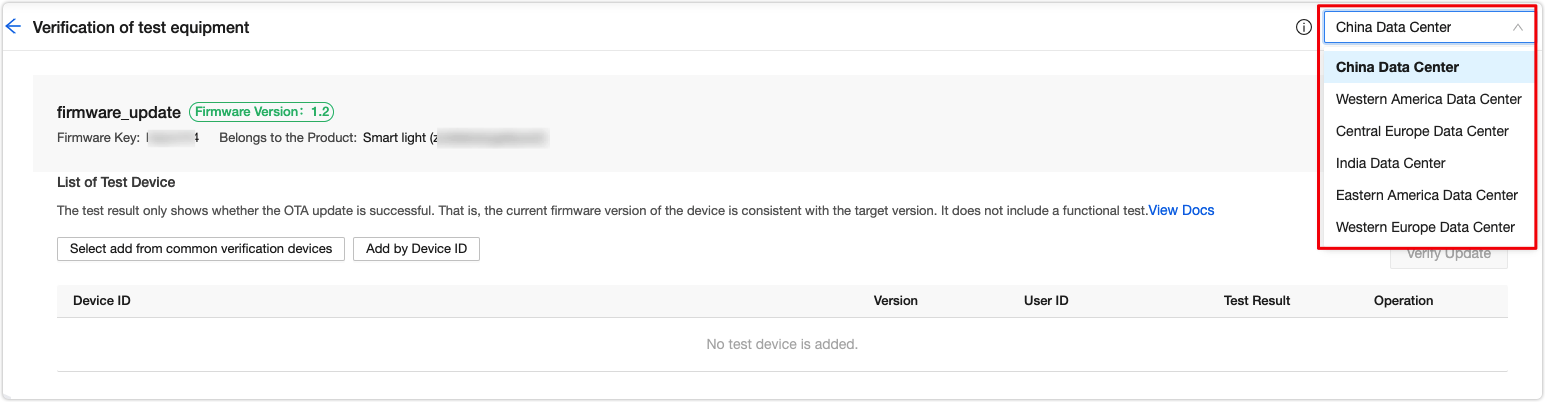
When I add a device, I got an error saying 'device not exist'. How to fix it?
-
Check if you select the correct data center. For example, if a device is registered in China Data Center but you select the Western America Data Center when you add this device, you will get this error.
Is this page helpful?
YesFeedbackIs this page helpful?
YesFeedback


