Application Development
This topic describes how to start the SDK and develop applications with the demo.
You will learn how to control the LED indicator D2 on the CBU Nano board by using the S2 button and the mobile app to control and print the status of network connection when the pairing state changes.
Flip the four toggles on the CBU Nano board to the ON position to enable flashing and logging.
Download the code from GitHub.
Start SDK
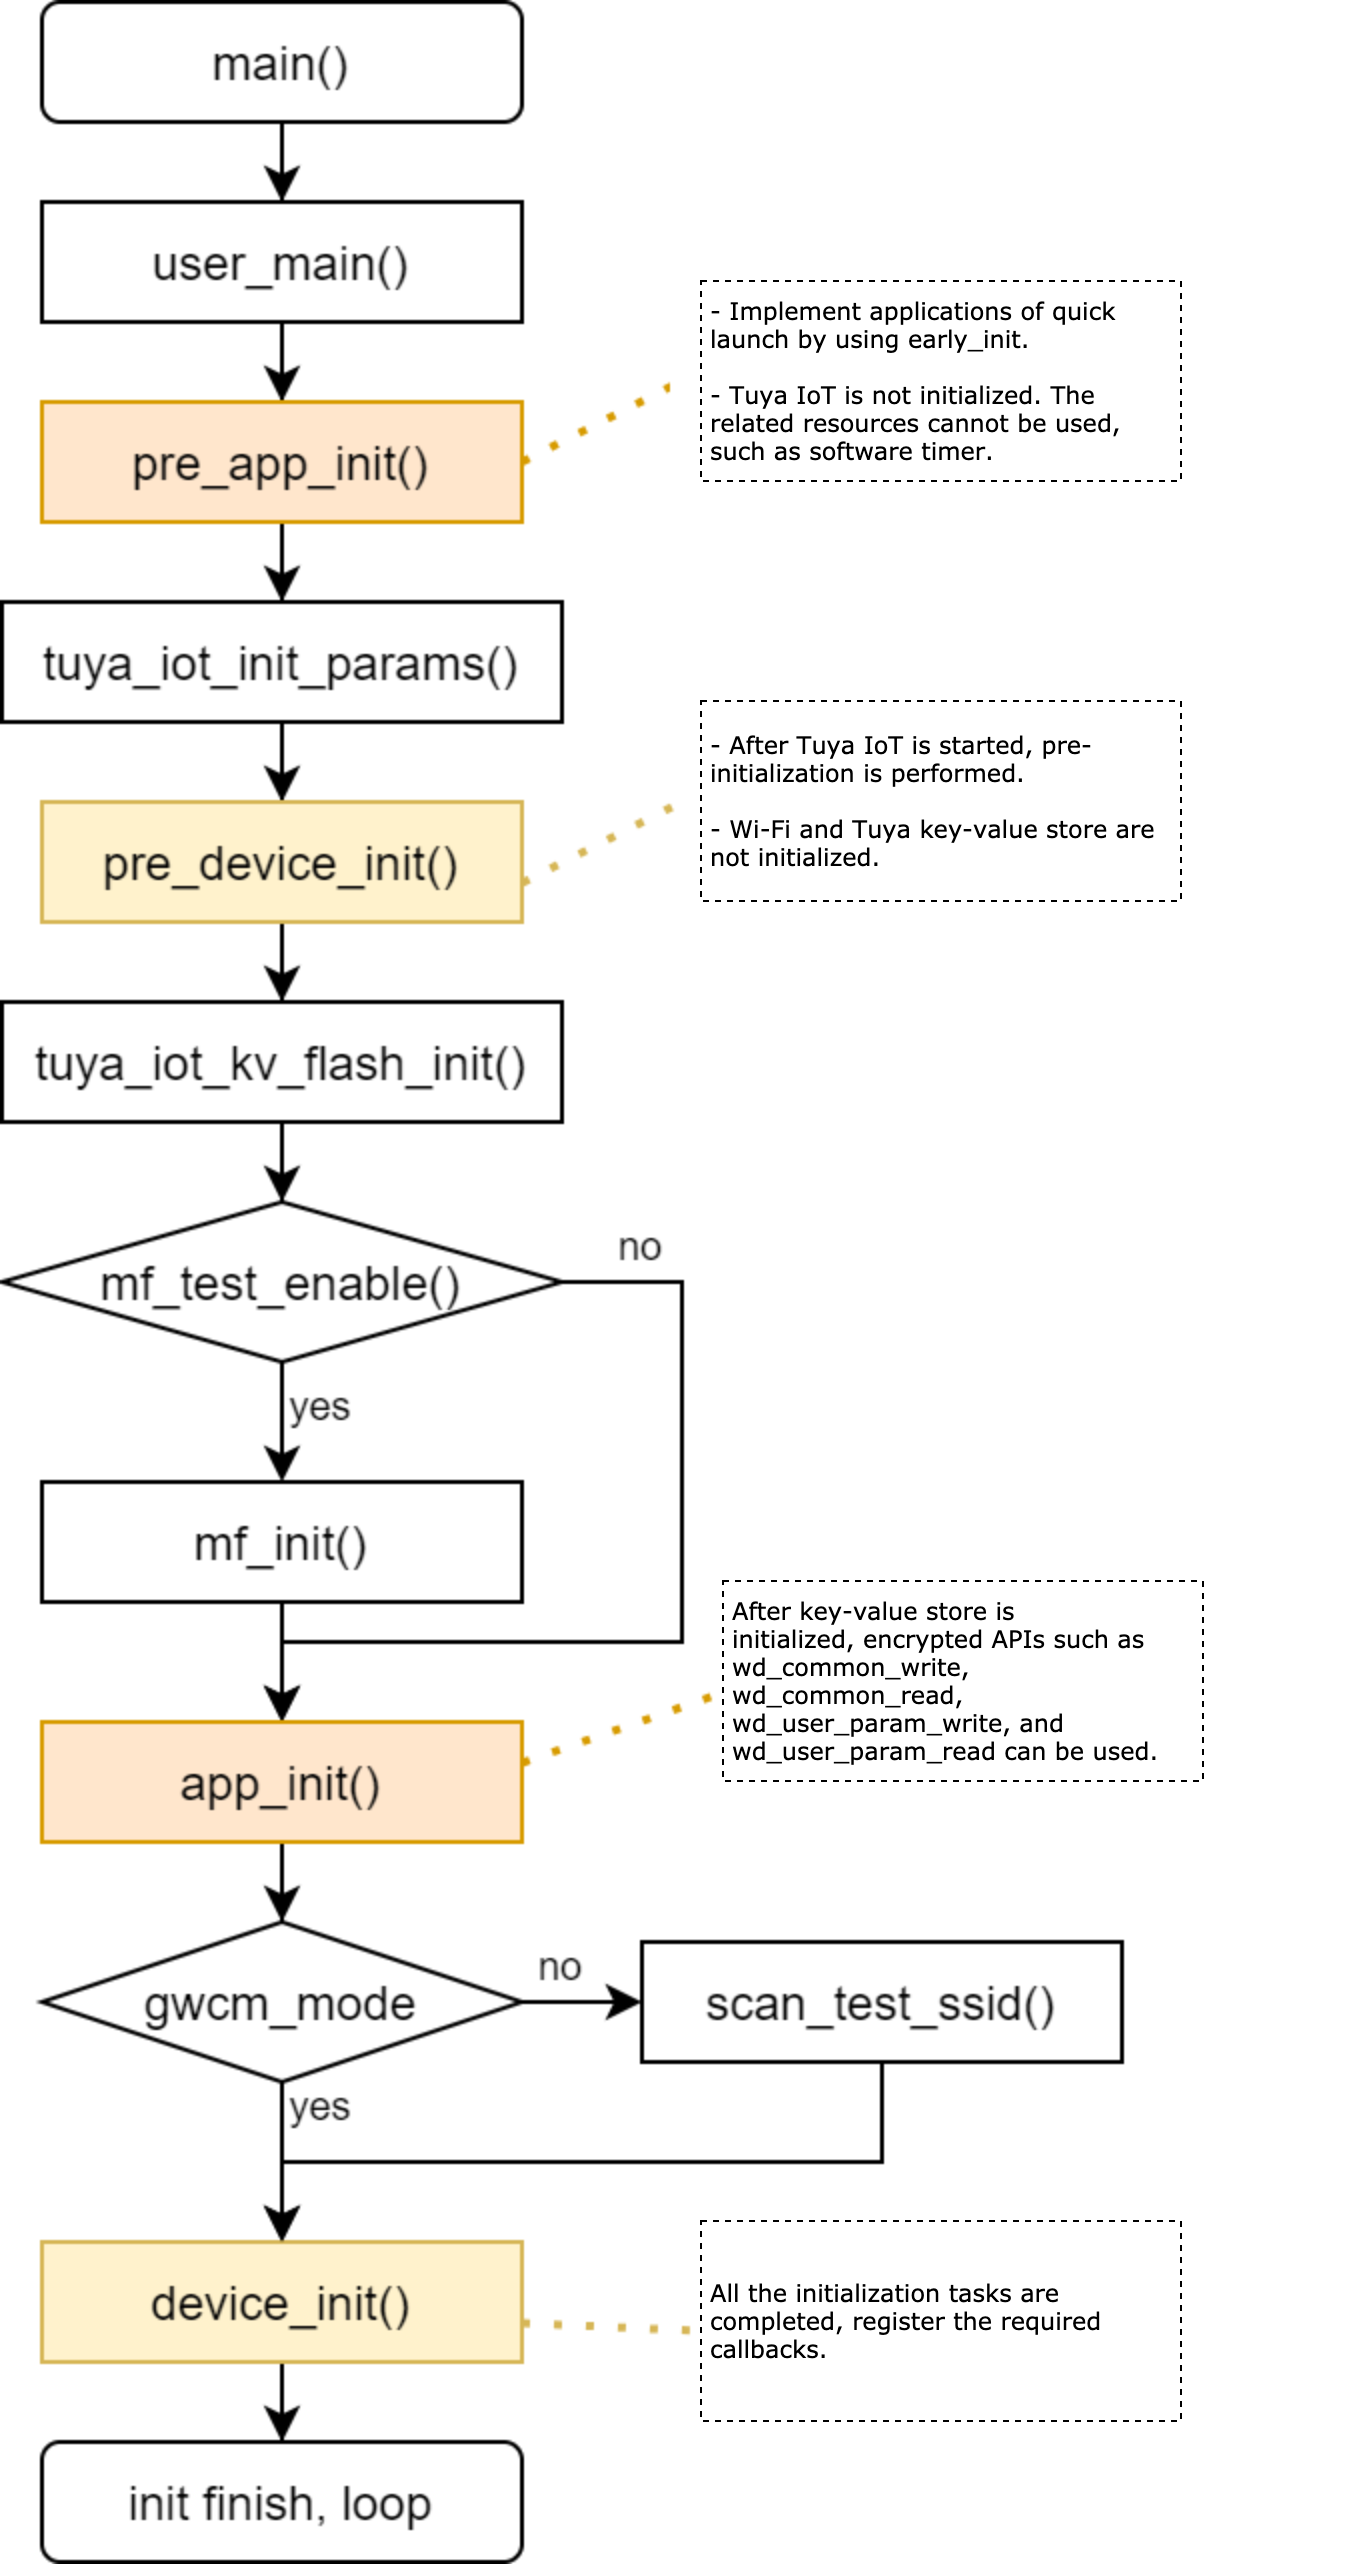
Before application development, you need to understand how SDK initialization works. Four functions are used for SDK initialization: pre_app_init(), pre_device_init(), app_init(), and device_init(). The following diagram shows the start progress. The section tuya_device describes the functions executed in startup.
Create project
Create a folder named bk7231n_light1_io_xx under the apps directory of the SDK. The folder name will be the project name and the firmware identifier. Make sure to give it a unique name to differentiate multiple projects.
You can use this naming rule chipset platform + product type + product feature + manufacturer or individual name initials or a rule as you prefer. Take bk7231n_light1_io_xx as an example. bk7231n indicates the chipset platform. light1 indicates cool white light. io indicates LED on/off is controlled by high and low signals. xx is the name initials.
In the bk7231n_light1_io_xx folder, create two folders named include and src respectively. include and src contain the header file and the source file respectively. You can create new folders in these two folders to manage different .c and .h files.
The project directory:
ty_iot_sdk_bk7231n_2.3.1
├── apps
│   ├── bk7231n_light1_io_xx # The created project.
│   │   ├── include
│   │   │   ├── dp_process.h
│   │   │   ├── light_system.h
│   │   │   └── tuya_device.h
│   │   └── src
│   │       ├── dp_process.c # Data point (DP) processing.
│   │       ├── light_system.c # Light driver.
│   │       └── tuya_device.c # Important file, used to implement callbacks.
│   │
│   ├── tuya_demo_elp_1plug # Demo
│   ├── tuya_demo_light_pwm # Demo
│   └── tuya_demo_template # Demo
├── build_app.sh
├── CHANGELOG.md
├── platforms
├── README.md
└── sdk
The following table describes the header files in the SDK.
| Header file | Feature |
|---|---|
| uni_log.h | Print logs. |
| tuya_iot_wifi_api.h | APIs for Wi-Fi connectivity. It includes functions used to initialize the Tuya IoT architecture, set the Wi-Fi working mode, reset the device, and more. |
| tuya_iot_com_api.h | It includes APIs for accessing service components. For example, get the SDK information. |
| tuya_hal_system.h | It includes APIs for system operation. For example, get the reason for system restart or the ticket of system running. |
| tuya_error_code.h | Error definitions. |
| tuya_cloud_com_defs.h | Type definitions related to the cloud. |
| tuya_cloud_types.h | It includes APIs for parameter types. For example, define or modify the type of variables or functions. |
| tuya_gpio.h | It includes APIs for GPIOs, which should be called after SDK initialization. |
| tuya_key.h | It includes APIs for button functionality, which should be called after SDK initialization. |
tuya_device
tuya_device.c and tuya_device.h are used to implement production test functions and Tuya IoT architecture initialization. The following table lists the functions that can be implemented:
| Function name | Description |
|---|---|
mf_user_pre_gpio_test_cb() |
The forward callback for a GPIO test. |
mf_user_enter_callback() |
Notify the application that the test mode is entered. In the callback, clear application data. |
mf_user_callback() |
Write the necessary authorization information to unencrypted storage for quick launch. |
mf_user_product_test_cb() |
The callback for an end product test. |
pre_app_init() |
Quick initialization during which Tuya IoT architecture is not initialized. |
pre_device_init() |
Tuya IoT architecture is initialized while Wi-Fi connectivity and key-value store are not initialized. |
app_init() |
The key-value store is initialized. |
device_init() |
All the initialization tasks are completed. |
For the latest SDK, app_init() and device_init() are required. Other functions are optional to implement.
Production test functions
mf_user_pre_gpio_test_cb(), mf_user_enter_callback(), mf_user_callback(), and mf_user_product_test_cb() are used for production tests. For the latest SDK, if you do not need the product test feature, implementing these functions in tuya_device.c is not needed. The latest SDK contains the corresponding functions declared with a weak symbol. However, if you fail to build the project due to the missing of these four functions, it means you do not use the latest SDK. In this case, you need to implement them.
This demo adds these four functions in tuya_device.c for compatibility with earlier SDKs.
/**
* @brief pre_gpio_test gpio test pre-interface, used to prepare for the gpio test
*
* @return none
*/
VOID_T mf_user_pre_gpio_test_cb(VOID_T)
{
    return;
}

/**
* @brief erase application data from flash
*
* @return none
*/
STATIC VOID_T hw_reset_flash_data(VOID_T)
{
    /* erase application data from flash */
    return;
}

/**
* @brief configure to enter the production test callback interface
*
* @return none
*/
VOID_T mf_user_enter_callback(VOID_T)
{
    hw_reset_flash_data();

    return;
}

/**
* @brief configuring the write callback interface
*
* @return none
*/
VOID_T mf_user_callback(VOID_T)
{
    return;
}

/**
/**
* @brief Finished Product test callbacks
*
* @return OPRT_OK
*/
OPERATE_RET mf_user_product_test_cb(USHORT_T cmd,UCHAR_T *data, UINT_T len, OUT UCHAR_T **ret_data,OUT USHORT_T *ret_len)
{
    return OPRT_OK;
}
It does not implement specific functions. If your project is intended for mass production, make sure to implement these four functions according to product features.
pre_app_init()
When pre_app_init() is executed, Tuya IoT architecture is not initialized so all the related functions cannot be invoked.
You need to implement applications of quick launch in pre_app_init() because Tuya IoT architecture and key-value store initialization takes a long time to complete.
To make the light come on when power-on, the light is initialized in pre_app_init(). At this time, since the Tuya IoT architecture is not initialized, the GPIO function OPERATE_RET tuya_gpio_inout_set(IN CONST TY_GPIO_PORT_E port, IN CONST BOOL_T in); is not available. We use early_init for quick initialization.
The following code snippet shows how light_system is implemented.
#include "tuya_gpio.h"

/**
* @brief need quick start tasks

* @return none
*/
VOID_T fast_boot(VOID_T)
{
    OPERATE_RET op_ret = OPRT_OK;
    op_ret = light_init();
    if (op_ret != OPRT_OK) {
        PR_ERR("fast boot light init error, %d", op_ret);
        return;
    }
}

/**
* @brief light gpio init
*
* @return none
*/
OPERATE_RET light_init(VOID_T)
{
     OPERATE_RET op_ret = OPRT_OK;

    /* light pin set output */
    op_ret = tuya_gpio_inout_set(LIGHT_PIN, FALSE);
    if (op_ret != OPRT_OK) {
        PR_ERR("light init gpio set inout error!");
        return op_ret;
    }

    /* light pin mode set pullup */
    op_ret = tuya_gpio_mode_set(LIGHT_PIN, TY_GPIO_PULLUP);
    if (op_ret != OPRT_OK) {
        PR_ERR("light init gpio mode set error!");
        return op_ret;
    }

    /* light on */
    op_ret = set_light_status(LIGHT_ON);
    if (op_ret != OPRT_OK) {
        PR_ERR("light init light on error!");
        return op_ret;
    }

    return op_ret;

}
The following code snippet shows how to register early_init in tuya_device.c for quick initialization.
/**
* @brief application initialization prep work
*
* @return none
*/
VOID_T pre_app_init(VOID_T)
{
    ty_subscribe_event(EVENT_SDK_EARLY_INIT_OK, "early_init", fast_boot, FALSE);

    return;
}
pre_device_init()
When pre_device_init() is executed, Tuya IoT architecture is initialized while Wi-Fi and key-value store are not initialized. So far, you can use Tuya IoT related functions.
The button API is provided by Tuya IoT architecture, so we can invoke it at this time.
/**
* @brief device initialization prep work
*
* @return none
*/
VOID_T pre_device_init(VOID_T)
{
    /* reset key init */
    wifi_key_init();

    PR_DEBUG("%s",tuya_iot_get_sdk_info()); /* print SDK information */
    PR_DEBUG("%s:%s", APP_BIN_NAME, DEV_SW_VERSION); /* print the firmware name and version */
    PR_NOTICE("firmware compiled at %s %s", __DATE__, __TIME__); /* print firmware compilation time */
    PR_NOTICE("system reset reason:[%s]",tuya_hal_system_get_rst_info()); /* print system reboot causes */

    SetLogManageAttr(TY_LOG_LEVEL_NOTICE); /* set the log level */

    return;
}
The following code snippet shows how to implement button initialization in tuya_device.c.
#include "uni_log.h"
#include "tuya_iot_wifi_api.h"
#include "tuya_hal_system.h"
#include "tuya_iot_com_api.h"
#include "tuya_error_code.h"
#include "gw_intf.h"
#include "tuya_gpio.h"
#include "tuya_key.h"
#include "base_event_info.h"

#include "tuya_device.h"
#include "light_system.h"
#include "dp_process.h"

/***********************************************************
*************************micro define***********************
***********************************************************/
#define APP_RAW_PRINT_DEBUG 1

/* wifi config */
#define WIFI_WORK_MODE_SEL          GWCM_OLD_PROD   /* select Wi-Fi work mode */
#define WIFI_CONNECT_OVERTIME_S     180             /* connect network timeout time, uint: s */

/* reset key config */
#define WIFI_KEY_PIN                TY_GPIOA_9  /* reset button pin */
#define WIFI_KEY_TIMER_MS           100         /* key scan poll time, default 100ms */
#define WIFI_KEY_LONG_PRESS_MS      3000        /* long press time */
#define WIFI_KEY_SEQ_PRESS_MS       400
#define WIFI_KEY_LOW_LEVEL_ENABLE   TRUE

/**
* @brief initiation reset key
*
* @param[in] none
* @return none
*/
STATIC VOID_T wifi_key_init(VOID_T)
{
    OPERATE_RET op_ret = OPRT_OK;

    KEY_USER_DEF_S key_def;

    op_ret = key_init(NULL, 0, WIFI_KEY_TIMER_MS);
    if (op_ret != OPRT_OK) {
        PR_ERR("key_init err:%d", op_ret);
        return;
    }

    /* config key parameter */
    memset(&key_def, 0, SIZEOF(key_def));
    key_def.port = WIFI_KEY_PIN;
    key_def.long_key_time = WIFI_KEY_LONG_PRESS_MS;
    key_def.low_level_detect = WIFI_KEY_LOW_LEVEL_ENABLE;
    key_def.lp_tp = LP_ONCE_TRIG;
    key_def.call_back = wifi_key_process;
    key_def.seq_key_detect_time = WIFI_KEY_SEQ_PRESS_MS;

    /* register key */
    op_ret = reg_proc_key(&key_def);
    if (op_ret != OPRT_OK) {
        PR_ERR("reg_proc_key err:%d", op_ret);
    }
}
The following code snippet shows how to implement button-press callback in tuya_device.c.
/**
* @brief button is pressed, call the function to process
*
* @param[in] port: button pin
* @param[in] type: button press type
* @param[in] cnt: press count
* @return none
* @Others: long press enter connect network mode, normal press toggle led
*/
STATIC VOID_T wifi_key_process(TY_GPIO_PORT_E port, PUSH_KEY_TYPE_E type, INT_T cnt)
{
    OPERATE_RET op_ret = OPRT_OK;

    PR_DEBUG("port:%d, type:%d, cnt:%d", port, type, cnt);

    if (port = WIFI_KEY_PIN) {
        if (LONG_KEY == type) { /* long press enter connect network mode */
            op_ret = tuya_iot_wf_gw_unactive();
            if (op_ret != OPRT_OK) {
                PR_ERR("long press tuya_iot_wf_gw_unactive error, %d", op_ret);
                return;
            }
        } else if (NORMAL_KEY == type) {
#if 1 /* turn on or off the button to control the light function */
            if (get_light_status() == LIGHT_OFF) {
                op_ret = set_light_status(LIGHT_ON); /* light turn on */
                if (op_ret != OPRT_OK) {
                    PR_ERR("dp process set light status error, %d", op_ret);
                    return;
                }
            } else {
                op_ret = set_light_status(LIGHT_OFF); /* light turn off */
                if (op_ret != OPRT_OK) {
                    PR_ERR("dp process set light status error, %d", op_ret);
                    return;
                }
            }
            /* update device current status to cloud */
            update_all_dp();
#endif
        } else {
            PR_NOTICE("key type is no deal");
        }
    }
}
app_init()
When app_init() is executed, Wi-Fi and key-value store are initialized. You can invoke APIs for encrypted flash such as wd_common_write, wd_common_read, wd_user_param_write, and wd_user_param_read in app_init().
/**
* @brief application initialization interface
*
* @return none
*/
VOID_T app_init(VOID_T)
{
    return;
}
device_init()
When device_init() is executed, all the initialization tasks are completed. You need to register the required callbacks at this time.
The function for Tuya IoT architecture initialization:
OPERATE_RET tuya_iot_wf_soc_dev_init_param(IN CONST GW_WF_CFG_MTHD_SEL cfg, IN CONST GW_WF_START_MODE start_mode,
                                     IN CONST TY_IOT_CBS_S *cbs,IN CONST CHAR_T *firmware_key,
                                     IN CONST CHAR_T *product_key,IN CONST CHAR_T *wf_sw_ver);
The callback invoked when Wi-Fi connection status is changed.
#define tuya_iot_reg_get_wf_nw_stat_cb(wf_nw_stat_cb) \
    tuya_iot_reg_get_wf_nw_stat_cb_params(wf_nw_stat_cb, 1)
__TUYA_IOT_WIFI_API_EXT \
OPERATE_RET tuya_iot_reg_get_wf_nw_stat_cb_params(IN CONST GET_WF_NW_STAT_CB wf_nw_stat_cb, IN CONST INT_T min_interval_s);
Function for Tuya IoT architecture initialization
OPERATE_RET tuya_iot_wf_soc_dev_init_param(IN CONST GW_WF_CFG_MTHD_SEL cfg, IN CONST GW_WF_START_MODE start_mode,
                                     IN CONST TY_IOT_CBS_S *cbs,IN CONST CHAR_T *firmware_key,
                                     IN CONST CHAR_T *product_key,IN CONST CHAR_T *wf_sw_ver);
| Parameter | Description |
|---|---|
| cfg | Select Wi-Fi working mode. For more information, see the following table for the Wi-Fi working mode. |
| start_mode | Set the mode that Wi-Fi is started in. For more information, see the following table for the Wi-Fi working mode. |
| *cbs | Register the required callbacks. |
| *firmware_key | The firmware key. Set it to NULL for non-OEM development. |
| *product_key | The product ID (PID) of the Wi-Fi product you create on the Tuya Developer Platform. Its macro is in the tuya_device.h file. |
| *wf_sw_ver | The software version number. |
Wi-Fi working modes:
/* tuya sdk definition of wifi work mode */
typedef BYTE_T GW_WF_CFG_MTHD_SEL;  // wifi config method select
#define GWCM_OLD                0   // do not have low power mode
#define GWCM_LOW_POWER          1   // with low power mode
#define GWCM_SPCL_MODE          2   // special with low power mode
#define GWCM_OLD_PROD           3   // GWCM_OLD mode with product
#define GWCM_LOW_POWER_AUTOCFG  4   // with low power mode && auto cfg
#define GWCM_SPCL_AUTOCFG       5   // special with low power mode && auto cfg
Wi-Fi working modes are broken into two parts: Wi-Fi working status and end product test mode. All the features for the end product testing are implemented by you.
| Wi-Fi working mode | Description |
|---|---|
GWCM_OLD |
You implement how and when to enter the test mode. |
GWCM_LOW_POWER |
|
GWCM_SPCL_MODE |
|
GWCM_OLD_PROD |
|
GWCM_LOW_POWER_AUTOCFG |
|
GWCM_SPCL_AUTOCFG |
|
The following code snippet shows how to define the Wi-Fi start mode.
/* Tuya SDK definition of Wi-Fi start mode */
typedef BYTE_T GW_WF_START_MODE;
#define WF_START_AP_ONLY        0   // Only have AP mode.
#define WF_START_SMART_ONLY     1   // Only have EZ mode.
#define WF_START_AP_FIRST       2   // Have both AP mode and EZ mode, defaulting to AP mode.
#define WF_START_SMART_FIRST    3   // Have both AP mode and EZ mode, defaulting to EZ mode.
#define WF_START_SMART_AP_CONCURRENT    4   // AP mode and EZ mode coexist.
| Pairing mode | Description |
|---|---|
WF_START_AP_ONLY |
Only AP mode is supported. |
WF_START_SMART_ONLY |
Only EZ mode is supported. |
WF_START_AP_FIRST |
AP mode or EZ mode is supported, defaulting to AP mode. After the device is reset, it changes to EZ mode. |
WF_START_SMART_FIRST |
AP mode or EZ mode is supported, defaulting to EZ mode. After the device is reset, it changes to AP mode. |
WF_START_SMART_AP_CONCURRENT |
AP mode and EZ mode coexist. |
If you use Wi-Fi and Bluetooth Low Energy combo module, all the above modes support pairing over Bluetooth.
The following code snippet shows the Tuya IoT callbacks. Make sure to delete the comments. Otherwise, compilation will fail.
TY_IOT_CBS_S wf_cbs = {
	status_changed_cb,\  // Invoked when the gateway status changes.
	gw_ug_inform_cb,\    // Invoked when an OTA update notification is received.
	gw_reset_cb,\        // Invoked when the device is reset.
	dev_obj_dp_cb,\      // Invoked when data of the object type (Boolean, value, enum, string, and fault) is received.
	dev_raw_dp_cb,\      // Invoked when raw data is received.
	dev_dp_query_cb,\    // Invoked when DP status query from the app is received.
	NULL,
};
The following code snippet shows how to implement Tuya IoT architecture initialization.
/**
* @brief device initialization interface
*
* @return OPRT_OK: success, others: please refer to tuya error code description document
*/
OPERATE_RET device_init(VOID_T)
{
    OPERATE_RET op_ret = OPRT_OK;

    TY_IOT_CBS_S wf_cbs = {
        status_changed_cb,\
        gw_ug_inform_cb,
        gw_reset_cb,\
        dev_obj_dp_cb,\
        dev_raw_dp_cb,\
        dev_dp_query_cb,\
        NULL,
    };

    /* tuya IoT framework initialization */
    op_ret = tuya_iot_wf_soc_dev_init_param(WIFI_WORK_MODE_SEL, WF_START_SMART_FIRST, &wf_cbs, NULL, PRODECT_ID, DEV_SW_VERSION);
    if(OPRT_OK != op_ret) {
        PR_ERR("tuya_iot_wf_soc_dev_init_param error,err_num:%d",op_ret);
        return op_ret;
    }
	...
    return op_ret;
}
Implement TY_IOT_CBS_S callback
-
status_changed_cb: Invoked when the gateway status changes./** * @brief report all dp status * * @return none */ VOID_T status_changed_cb(IN CONST GW_STATUS_E status) { PR_NOTICE("status_changed_cb is status:%d",status); return; } -
gw_ug_inform_cb: Invoked when an OTA update notification is received./** * @brief firmware download content process callback * * @param[in] fw: firmware info * @param[in] total_len: firmware total size * @param[in] offset: offset of this download package * @param[in] data && len: this download package * @param[out] remain_len: the size left to process in next cb * @param[in] pri_data: private data * @return OPRT_OK: success Other: fail */ STATIC OPERATE_RET get_file_data_cb(IN CONST FW_UG_S *fw, IN CONST UINT_T total_len, IN CONST UINT_T offset, IN CONST BYTE_T *data, IN CONST UINT_T len, OUT UINT_T *remain_len, IN PVOID_T pri_data) { PR_DEBUG("Rev File Data"); PR_DEBUG("Total_len:%d ", total_len); PR_DEBUG("Offset:%d Len:%d", offset, len); return OPRT_OK; } /** * @brief firmware download finish result callback * * @param[in] fw: firmware info * @param[in] download_result: 0 means download succes. other means fail * @param[in] pri_data: private data * @return none */ VOID_T upgrade_notify_cb(IN CONST FW_UG_S *fw, IN CONST INT_T download_result, IN PVOID_T pri_data) { PR_DEBUG("download Finish"); PR_DEBUG("download_result:%d", download_result); return; } /** * @brief ota inform callback * * @param[in] fw: firmware info * @return */ STATIC INT_T gw_ug_inform_cb(IN CONST FW_UG_S *fw) { PR_DEBUG("Rev GW Upgrade Info"); PR_DEBUG("fw->fw_url:%s", fw->fw_url); PR_DEBUG("fw->sw_ver:%s", fw->sw_ver); PR_DEBUG("fw->file_size:%d", fw->file_size); return tuya_iot_upgrade_gw(fw, get_file_data_cb, upgrade_notify_cb, NULL); } -
gw_reset_cb: Invoked when the device is reset or removed from the app to execute actions such as erasing user data./** * @brief called after reset device or app remove device * * @param[in] type: gateway reset type * @return none * @others reset factory clear flash data */ STATIC VOID_T gw_reset_cb(IN CONST GW_RESET_TYPE_E type) { PR_DEBUG("gw_reset_cb type:%d",type); if(GW_REMOTE_RESET_FACTORY != type) { PR_DEBUG("type is GW_REMOTE_RESET_FACTORY"); return; } hw_reset_flash_data(); return; } -
dev_obj_dp_cb: Invoked when data of the object type (Boolean, value, enum, string, and fault) is received./** * @brief called after the cloud sends data of type bool, value, enum, string or fault * * @param[in] dp: obj dp info * @return none */ STATIC VOID_T dev_obj_dp_cb(IN CONST TY_RECV_OBJ_DP_S *dp) { UCHAR_T i = 0; PR_DEBUG("dp->cid:%s dp->dps_cnt:%d", dp->cid, dp->dps_cnt); for(i = 0;i < dp->dps_cnt;i++) { deal_dp_proc(&(dp->dps[i])); } return; } -
dev_raw_dp_cb: Invoked when raw data is received./** * @brief called after the cloud sends data of type raw * * @param[in] dp: raw dp info * @return none */ STATIC VOID_T dev_raw_dp_cb(IN CONST TY_RECV_RAW_DP_S *dp) { PR_DEBUG("raw data dpid:%d", dp->dpid); PR_DEBUG("recv len:%d", dp->len); #if APP_RAW_PRINT_DEBUG INT_T i = 0; for(i=0; i<dp->len; i++) { PR_DEBUG_RAW("%02X ", dp->data[i]); } #endif PR_DEBUG_RAW("\n"); PR_DEBUG("end"); return; } -
dev_dp_query_cb: Invoked when DP status query from the app is received./** * @brief report all dp status * * @return none */ VOID_T hw_report_all_dp_status(VOID_T) { /* report all dp status */ update_all_dp(); return; } /** * @brief query device dp status * * @param[in] dp_qry: query info * @return none */ STATIC VOID_T dev_dp_query_cb(IN CONST TY_DP_QUERY_S *dp_qry) { PR_NOTICE("Recv DP Query Cmd"); hw_report_all_dp_status(); return; }
Callbacks invoked when Wi-Fi status changes
Function prototype:
#define tuya_iot_reg_get_wf_nw_stat_cb(wf_nw_stat_cb) \
    tuya_iot_reg_get_wf_nw_stat_cb_params(wf_nw_stat_cb, 1)
__TUYA_IOT_WIFI_API_EXT \
OPERATE_RET tuya_iot_reg_get_wf_nw_stat_cb_params(IN CONST GET_WF_NW_STAT_CB wf_nw_stat_cb, IN CONST INT_T min_interval_s);
Wi-Fi network status
/* tuya sdk definition of wifi-net status */
typedef BYTE_T GW_WIFI_NW_STAT_E;
#define STAT_LOW_POWER          0   // idle status,use to external config network
#define STAT_UNPROVISION        1   // smart config status
#define STAT_AP_STA_UNCFG       2   // ap WIFI config status
#define STAT_AP_STA_DISC        3   // ap WIFI already config,station disconnect
#define STAT_AP_STA_CONN        4   // ap station mode,station connect
#define STAT_STA_DISC           5   // only station mode,disconnect
#define STAT_STA_CONN           6   // station mode connect
#define STAT_CLOUD_CONN         7   // cloud connect
#define STAT_AP_CLOUD_CONN      8   // cloud connect and ap start
#define STAT_REG_FAIL           9   // register fail
#define STAT_OFFLINE            10   // offline
#define STAT_MQTT_ONLINE        11
#define STAT_MQTT_OFFLINE       12
#define STAT_UNPROVISION_AP_STA_UNCFG		13 //smart-cfg and ap-cfg concurrent config status
Sample code:
/**
* @brief This function is called when the state of the device connection has changed
*
* @param[in] stat: curr network status
* @return none
*/
STATIC VOID_T wf_nw_status_cb(IN CONST GW_WIFI_NW_STAT_E stat)
{
    /* print current Wi-Fi status */
    PR_NOTICE("wf_nw_status_cb, wifi_status:%d", stat);

    /* report all DP status when connected to the cloud */
    if (stat == STAT_CLOUD_CONN || stat == STAT_AP_CLOUD_CONN) {
        hw_report_all_dp_status();
    }

    return;
}

/**
* @brief device initialization interface
*
* @return OPRT_OK: success, others: please refer to tuya error code description document
*/
OPERATE_RET device_init(VOID_T)
{
    OPERATE_RET op_ret = OPRT_OK;

	...

    /* register Wi-Fi connection status change callback function */
    op_ret = tuya_iot_reg_get_wf_nw_stat_cb(wf_nw_status_cb);
    if(OPRT_OK != op_ret) {
        PR_ERR("tuya_iot_reg_get_wf_nw_stat_cb is error,err_num:%d", op_ret);
        return op_ret;
    }

    return op_ret;
}
Edit PID
The PID is a unique identifier of each product created on the Tuya Developer Platform. During the pairing process, if the app does not find your device, it might be because you do not change the PID to the correct one. When you develop a new product, make sure to replace PRODECT_ID in tuya_device.h with your own PID.
In the tuya_device.h file:
/**
* @file tuya_device.h
* @author www.tuya.com
* @brief
* @version 0.1
* @date 2021-08-19
*
* @copyright Copyright (c) tuya.inc 2021
*
*/

#ifndef __TUYA_DEVICE_H__
#define __TUYA_DEVICE_H__

#include "tuya_cloud_com_defs.h"

#ifdef __cplusplus
extern "C" {
#endif

#ifdef _TUYA_DEVICE_GLOBAL
    #define _TUYA_DEVICE_EXT
#else
    #define _TUYA_DEVICE_EXT extern
#endif /* _TUYA_DEVICE_GLOBAL */

/***********************************************************
*************************micro define***********************
***********************************************************/
/* device information define */
#define DEV_SW_VERSION USER_SW_VER
#define PRODECT_ID "fnrwpglflmbhjvvh"

/***********************************************************
***********************typedef define***********************
***********************************************************/


/***********************************************************
***********************variable define**********************
***********************************************************/


/***********************************************************
***********************function define**********************
***********************************************************/


#ifdef __cplusplus
}
#endif /* __cplusplus */

#endif /*__TUYA_DEVICE_H__*/
dp_process
dp_process is used to process DP data.
Report DP status
OPERATE_RET dev_report_dp_json_async(IN CONST CHAR_T *dev_id,IN CONST TY_OBJ_DP_S *dp_data,IN CONST UINT_T cnt); is used to report DP status to the cloud.
Sample code:
/**
* @brief upload all dp data
*
* @return none
*/
VOID_T update_all_dp(VOID_T)
{
    OPERATE_RET op_ret = OPRT_OK;

    INT_T dp_cnt = 1; /* update DP number */

    /* no connect router, return */
    GW_WIFI_NW_STAT_E wifi_state = STAT_LOW_POWER;
    get_wf_gw_nw_status(&wifi_state);
    if (wifi_state <= STAT_AP_STA_DISC || wifi_state == STAT_STA_DISC) {
        return;
    }

    TY_OBJ_DP_S *dp_arr = (TY_OBJ_DP_S *)Malloc(dp_cnt*SIZEOF(TY_OBJ_DP_S));
    if(NULL == dp_arr) {
        PR_ERR("malloc failed");
        return;
    }

    /* initialize requested memory space */
    memset(dp_arr, 0, dp_cnt*SIZEOF(TY_OBJ_DP_S));

    dp_arr[0].dpid = DPID_LIGHT_SWITCH; /* DP ID */
    dp_arr[0].type = PROP_BOOL; /* DP type */
    dp_arr[0].time_stamp = 0;
    dp_arr[0].value.dp_bool = get_light_status(); /* DP data */

    /* report DP */
    op_ret = dev_report_dp_json_async(NULL ,dp_arr, dp_cnt);

    /* free requested memory space */
    Free(dp_arr);
    dp_arr = NULL;
    if(OPRT_OK != op_ret) {
        PR_ERR("dev_report_dp_json_async relay_config data error,err_num",op_ret);
    }
}
Receive DP commands
STATIC VOID_T dev_obj_dp_cb(IN CONST TY_RECV_OBJ_DP_S *dp) is used to process DP commands from the cloud. This function passes data to VOID_T deal_dp_proc(IN CONST TY_OBJ_DP_S *root) to execute the received command.
Sample code:
/**
* @brief handle dp commands from the cloud
*
* @param[in] root: pointer header for dp data
* @return none
*/
VOID_T deal_dp_proc(IN CONST TY_OBJ_DP_S *root)
{
    OPERATE_RET op_ret = OPRT_OK;

    UCHAR_T dpid;
    dpid = root->dpid;
    PR_DEBUG("dpid:%d", dpid);

     switch(dpid) {
        case DPID_LIGHT_SWITCH:
            if (root->value.dp_bool == TRUE) {
                op_ret = set_light_status(LIGHT_ON);
                if (op_ret != OPRT_OK) {
                    PR_ERR("dp process set light status error, %d", op_ret);
                    return;
                }
            } else {
                op_ret = set_light_status(LIGHT_OFF);
                if (op_ret != OPRT_OK) {
                    PR_ERR("dp process set light status error, %d", op_ret);
                    return;
                }
            }

            /* update device current status to cloud */
            update_all_dp();
            break;

        default :
            break;
    }
}
light_system
light_system is used to control the light.
Initialize the light
To quickly initialize the light, we use the function from the chip vendor to perform I/O initialization.
light_system.h file:
#include "tuya_cloud_types.h"
#include "tuya_gpio.h"

#define LIGHT_PIN   TY_GPIOA_16
light_system.c file:
#include "light_system.h"
#include "uni_log.h"

STATIC LED_STATUS_E cur_light_status = LIGHT_ON;

/**
* @brief need quick start tasks

* @return none
*/
VOID_T fast_boot(VOID_T)
{
    OPERATE_RET op_ret = OPRT_OK;
    op_ret = light_init();
    if (op_ret != OPRT_OK) {
        PR_ERR("fast boot light init error, %d", op_ret);
        return;
    }
}

/**
* @brief light gpio init
*
* @return none
*/
OPERATE_RET light_init(VOID_T)
{
     OPERATE_RET op_ret = OPRT_OK;

    /* light pin set output */
    op_ret = tuya_gpio_inout_set(LIGHT_PIN, FALSE);
    if (op_ret != OPRT_OK) {
        PR_ERR("light init gpio set inout error!");
        return op_ret;
    }

    /* light pin mode set pullup */
    op_ret = tuya_gpio_mode_set(LIGHT_PIN, TY_GPIO_PULLUP);
    if (op_ret != OPRT_OK) {
        PR_ERR("light init gpio mode set error!");
        return op_ret;
    }

    /* light on */
    op_ret = set_light_status(LIGHT_ON);
    if (op_ret != OPRT_OK) {
        PR_ERR("light init light on error!");
        return op_ret;
    }

    return op_ret;

}
Control the light
Invoke functions provided by the chip vendor to control the light.
light_system.h file:
typedef LED_STATUS_E LED_STATUS_E;
#define LIGHT_OFF   0
#define LIGHT_ON    1
light_system.c file:
/**
* @brief light on
*
* @return none
*/
STATIC OPERATE_RET light_on(VOID_T)
{
    OPERATE_RET op_ret = OPRT_OK;

    /* pin set low level, light on */
    op_ret = tuya_gpio_write(LIGHT_PIN, FALSE);
    if (op_ret != OPRT_OK) {
        PR_ERR("light on error!");
        return op_ret;
    }

    cur_light_status = LIGHT_ON;

    return op_ret;
}

/**
* @brief light off
*
* @return none
*/
STATIC OPERATE_RET light_off(VOID_T)
{
    OPERATE_RET op_ret = OPRT_OK;

    /* pin set high level, light off */
    op_ret = tuya_gpio_write(LIGHT_PIN, TRUE);
    if (op_ret != OPRT_OK) {
        PR_ERR("light off error!");
        return op_ret;
    }

    cur_light_status = LIGHT_OFF;

    return op_ret;
}

/**
* @brief set light status
*
* @param[in] status: LIGHT_ON or LIGHT_OFF
* @return none
*/
OPERATE_RET set_light_status(LED_STATUS_E status)
{
    OPERATE_RET op_ret = OPRT_OK;

    if (status == LIGHT_ON) {
        op_ret = light_on();
        if (op_ret != OPRT_OK) {
            return op_ret;
        }
    } else {
        light_off();
        if (op_ret != OPRT_OK) {
            return op_ret;
        }
    }

    return op_ret;
}
Get the light status
Get the current on/off state of the light.
/**
* @brief get light status
*
* @return light status: LIGHT_ON or LIGHT_OFF
*/
LED_STATUS_E get_light_status(VOID_T)
{
    return cur_light_status;
}
Is this page helpful?
YesFeedbackIs this page helpful?
YesFeedback


