Fast Integration with SmartLife App SDK for Android
This topic describes how to quickly integrate SmartLife App SDK for Android into your development environment, such as Android Studio. It also sheds light on the initialization method and how to enable the debugging mode with a few simple steps. This allows you to run the demo app and get started with your SmartLife app development by using the App SDK.
Prerequisites
-
Before you start, make sure that you have performed the steps in Preparation.
-
If you have not installed Android Studio, visit the Android Studio official website to download Android Studio.
SDK versions
-
If you have integrated SmartLife App SDK v3.x.x or v4.x.x into your project, follow the instructions in Upgrade Guide and upgrade to the latest version.
-
Starting from SmartLife App SDK for Android v4.0.0, the SDK is classified into the development edition and official edition. For more information, see Pricing.
-
Starting from the SmartLife App SDK for Android v4.0.0, the Android package name configured on the Tuya Developer Platform must be the same as the value of
packageNamein your project. Otherwise,ILLEGAL_CLIENT_IDwill be returned. -
Starting from the SmartLife App SDK for Android v3.29.5, SHA256 hash values are required. For more information, see How to Get SHA1 and SHA256 Keys.
If you plan to launch the app to Google Play, you must enable the re-signing feature. If this feature is enabled, go to the Tuya Developer Platform and configure the SHA256 hash values generated by Google. Otherwise, an illegal client error will occur. For more information, see Enable Signature Protection for Android.
-
App SDK v3.10.0 and earlier only support
armeabi-v7a. App SDK v3.11.0 and later have integrated witharmeabi-v7aandarm64-v8a. If you have added.solibraries to the project, you must remove them and only use the library included in the SDK. If you want to integrate the.solibrary of a later version, you must remove the library of an earlier version to avoid conflicts or other possible issues.
Integrate with the SDK
Step 1: Create an Android project
Create a project in Android Studio.
Step 2: Configure build.gradle
Add dependencies to the build.gradle file of the Android project.
android {
   defaultConfig {
      ndk {
         abiFilters "armeabi-v7a", "arm64-v8a"
      }
   }
   packagingOptions {
      pickFirst 'lib/*/libc++_shared.so' // An Android Archive (AAR) file contains an Android library. If the .so file exists in multiple AAR files, select the first AAR file.
   }
}

configurations.all {
    exclude group: "com.thingclips.smart" ,module: 'thingsmart-modularCampAnno'
}

dependencies {
   implementation fileTree(dir: 'libs', include: ['*.aar'])
   implementation 'com.alibaba:fastjson:1.1.67.android'
   implementation 'com.squareup.okhttp3:okhttp-urlconnection:3.14.9'

   // The latest stable App SDK for Android.
   implementation 'com.thingclips.smart:thingsmart:7.5.6'
}
Add the Tuya IoT Maven repository URL to the build.gradle file in the root directory.
repositories {
   jcenter()
   maven { url 'https://maven-other.tuya.com/repository/maven-releases/' }
   maven { url "https://maven-other.tuya.com/repository/maven-commercial-releases/" }
   maven { url 'https://jitpack.io' }
   google()
   mavenCentral()
   maven { url 'https://maven.aliyun.com/repository/public' }
   maven { url 'https://central.maven.org/maven2/' }
   maven { url 'https://oss.sonatype.org/content/repositories/snapshots/' }
   maven { url 'https://developer.huawei.com/repo/' }
}
This SDK version supports Android minSdkVersion 23, targetSdkVersion 35, and only supports building via AndroidX.
Step 3: Integrate with security component
-
Go to the Get SDK tab, select one or more required SDKs or BizBundles, and then download the App SDK for iOS or Android.

-
Extract the downloaded package, put
security-algorithm.aarin thelibsdirectory of the project, and then make suredependenciesinbuild.gradleof your project include:implementation fileTree(include: ['*.aar'], dir: 'libs').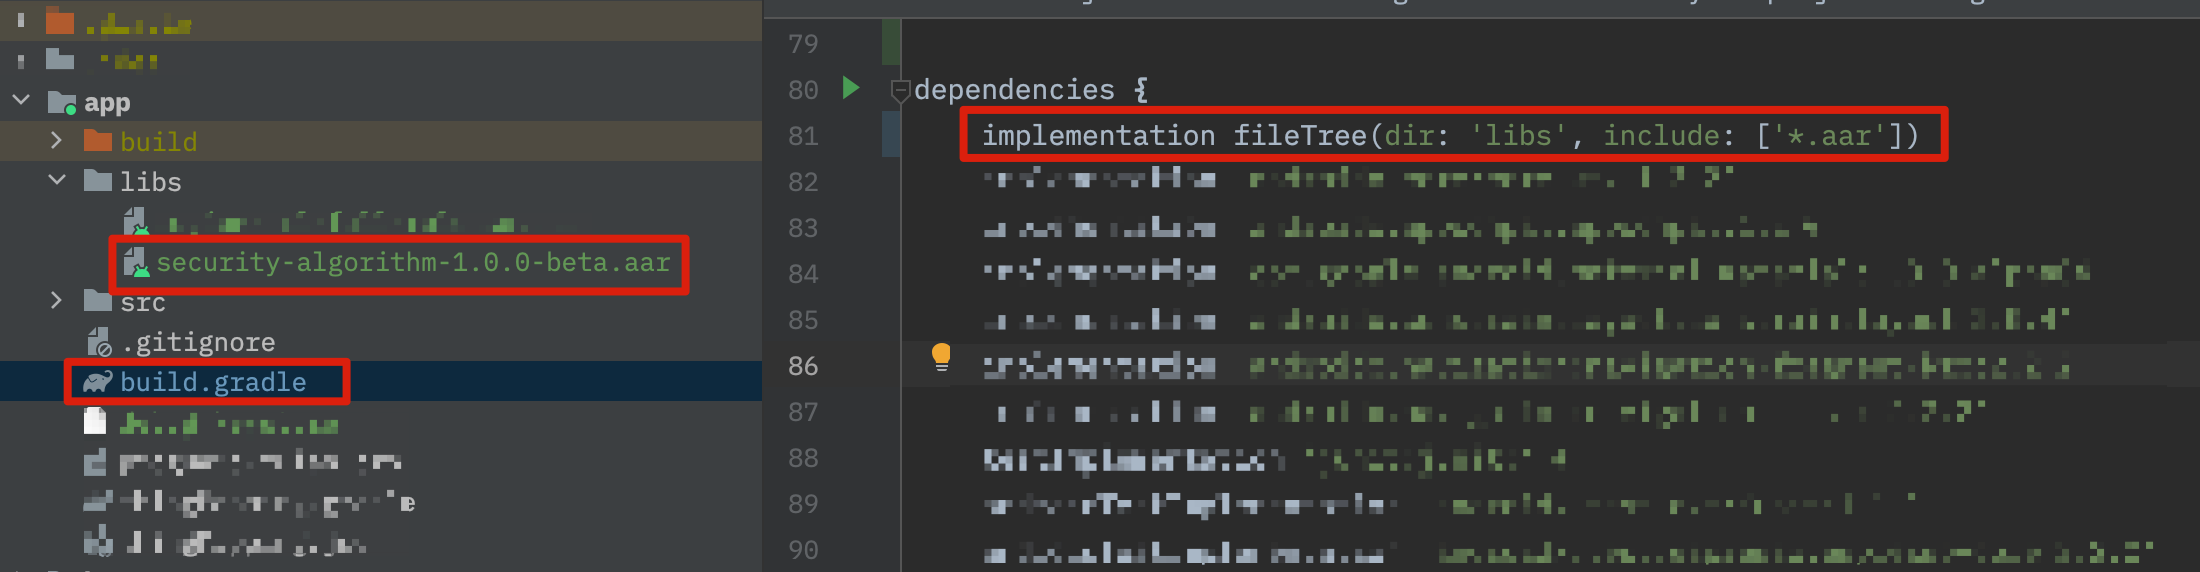
Step 4: Configure AppKey, AppSecret, and certificate signature
-
Log in to the Tuya Developer Platform, go to the SDK Development page, and then click the SDK to be managed.
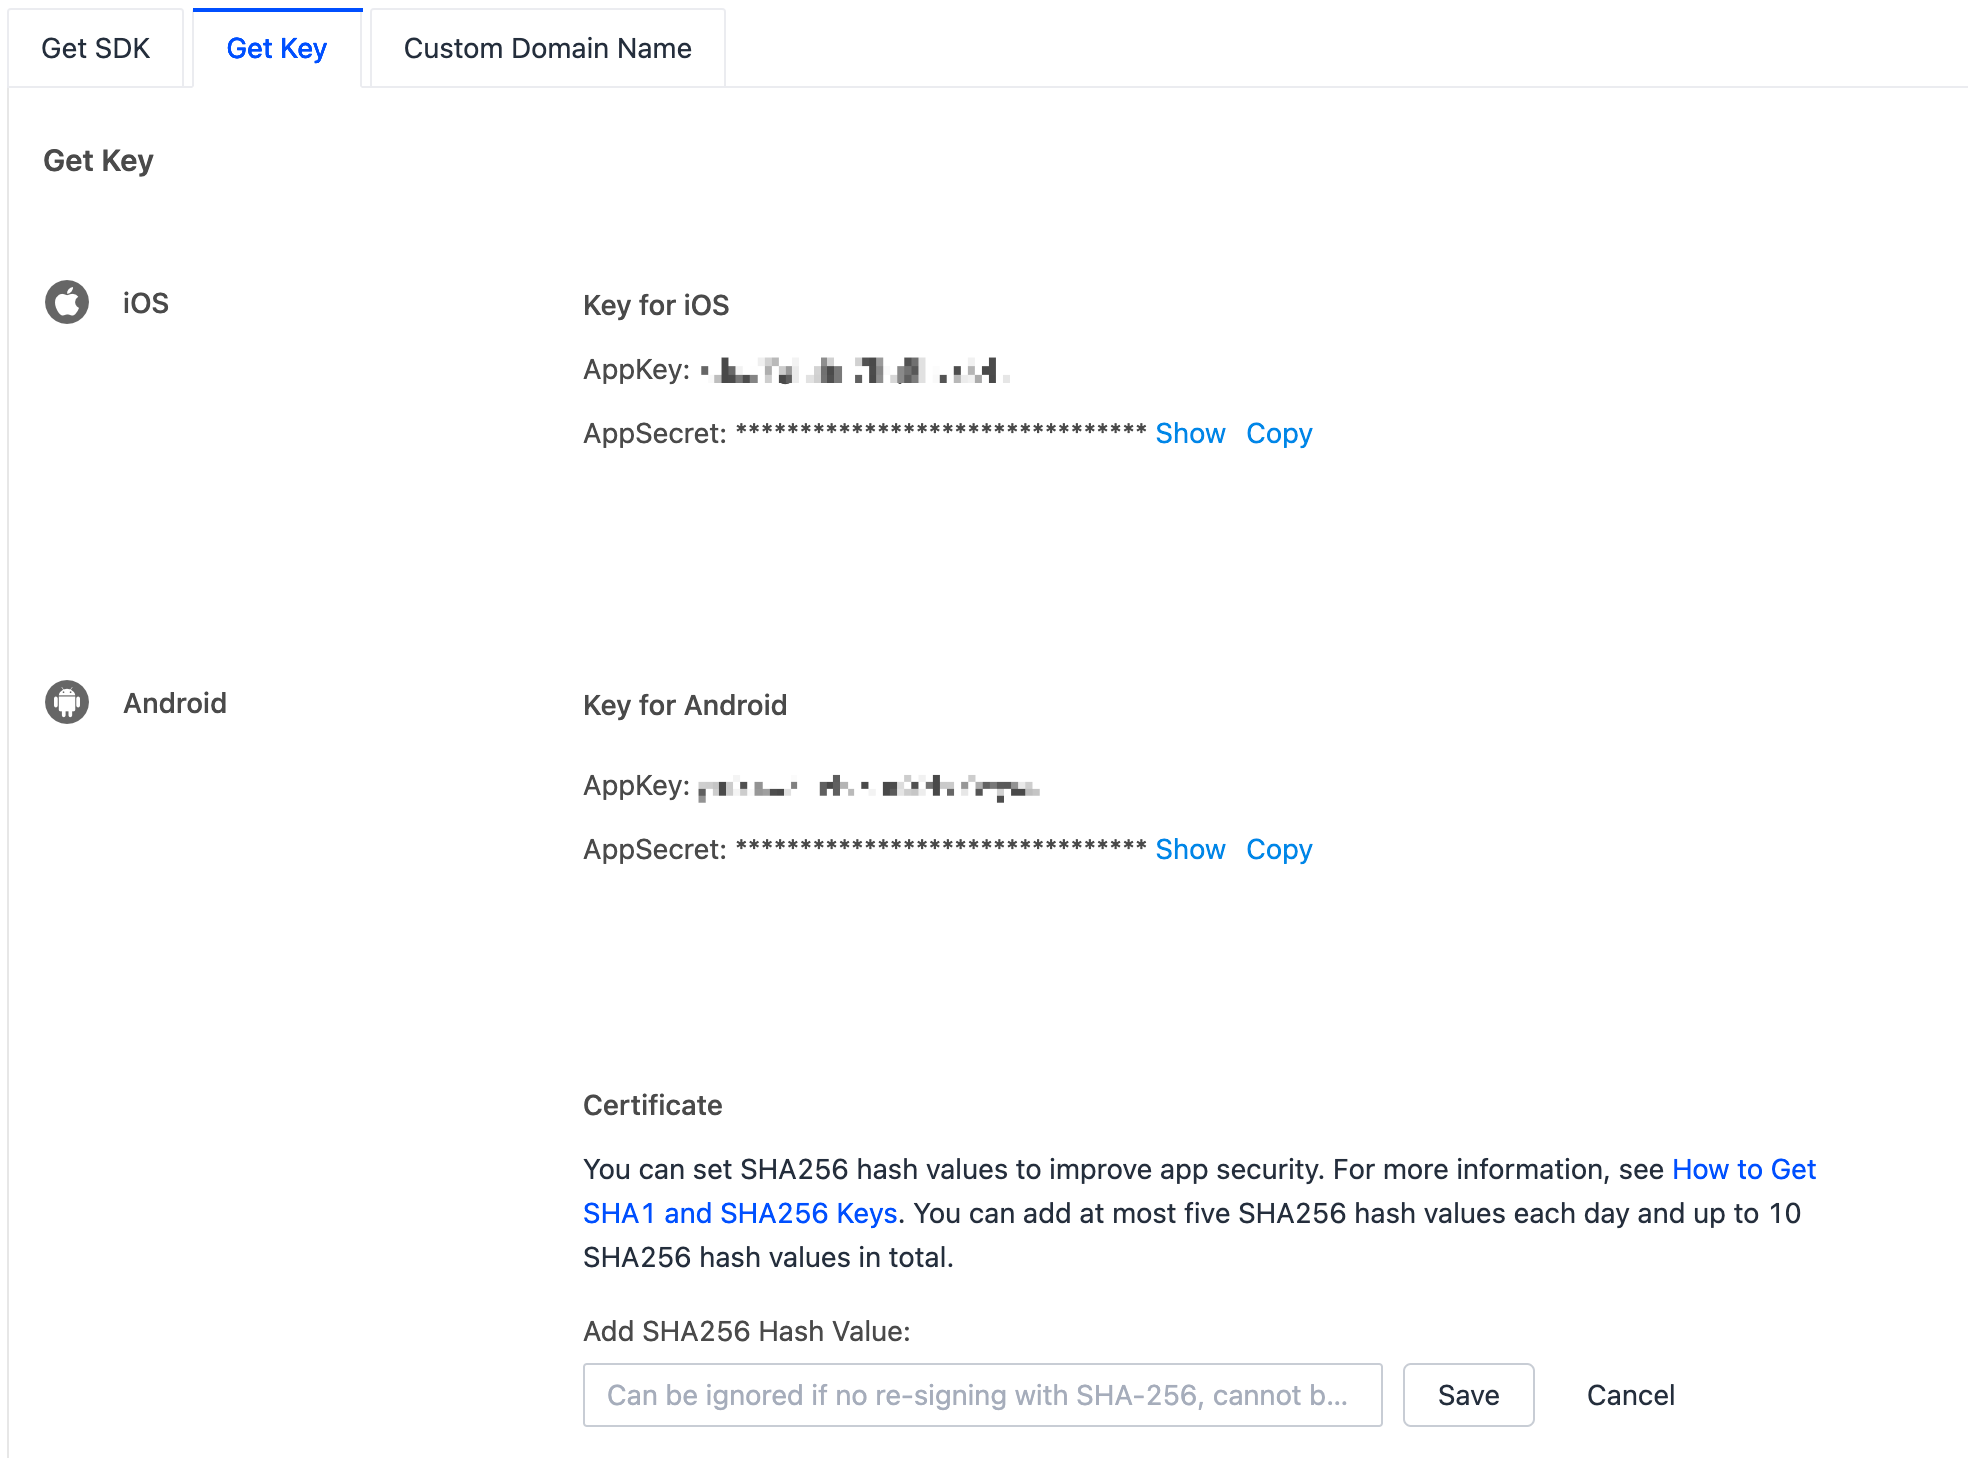
-
Get the
AppKeyandAppSecretfrom the previous step and configure them inAndroidManifest.xml:<meta-data android:name="THING_SMART_APPKEY" android:value="AppKey" /> <meta-data android:name="THING_SMART_SECRET" android:value="AppSecret" /> -
Configure the app certificate:
- Generate an SHA-256 hash value. For more information, see the document of Android and How to Get SHA1 and SHA256 Keys.
- Enter the SHA256 keys in the certificate.
Step 5: Obfuscate the code
Configure obfuscation in proguard-rules.pro.
#fastJson
-keep class com.alibaba.fastjson.**{*;}
-dontwarn com.alibaba.fastjson.**

#mqtt
-keep class com.thingclips.smart.mqttclient.mqttv3.** { *; }
-dontwarn com.thingclips.smart.mqttclient.mqttv3.**

#OkHttp3
-keep class okhttp3.** { *; }
-keep interface okhttp3.** { *; }
-dontwarn okhttp3.**

-keep class okio.** { *; }
-dontwarn okio.**

-keep class com.thingclips.**{*;}
-dontwarn com.thingclips.**

# Matter SDK
-keep class chip.** { *; }
-dontwarn chip.**

#MINI SDK
-keep class com.gzl.smart.** { *; }
-dontwarn com.gzl.smart.**
Step 6: Initialize the SDK
Initialize the SDK in the main thread of Application. Make sure that all processes are initialized. Example:
public class ThingSmartApp extends Application {
   @Override
   public void onCreate() {
      super.onCreate();
      ThingHomeSdk.init(this);
   }
}
Configure appKey and appSecret in AndroidManifest.xml, or run the initialization code.
ThingHomeSdk.init(Application application, String appkey, String appSerect)
Step 7: Destroy the cloud connection
Before you exit the app, you must call the following operation to destroy the cloud connection.
ThingHomeSdk.onDestroy();
Step 8: Enable or disable logging
-
In debug mode, you can enable SDK logging to facilitate troubleshooting.
-
We recommend that you disable logging in release mode.
ThingHomeSdk.setDebugMode(true);
Run the demo app
- After the SDK is integrated into your project, you can get the values of
AppKeyandAppSecret. Make sure theAppKeyandAppSecretare consistent with those used on the Tuya Developer Platform. Any mismatch will cause the SDK development to be failed. For more information, see Step 4: Configure AppKey, AppSecret, and certificate signature. - The demo app that is created in the sample project of SmartLife App SDK is used for reference only. Do not use the demo app for commercial purposes. For more information, see Tuya Developing Service Agreement.
In the following example, a demo app is used to describe the process of app development with the App SDK and indicate the SDK capabilities that you can integrate to implement smart life scenarios. Before the development of your app, we recommend that you run the demo app.
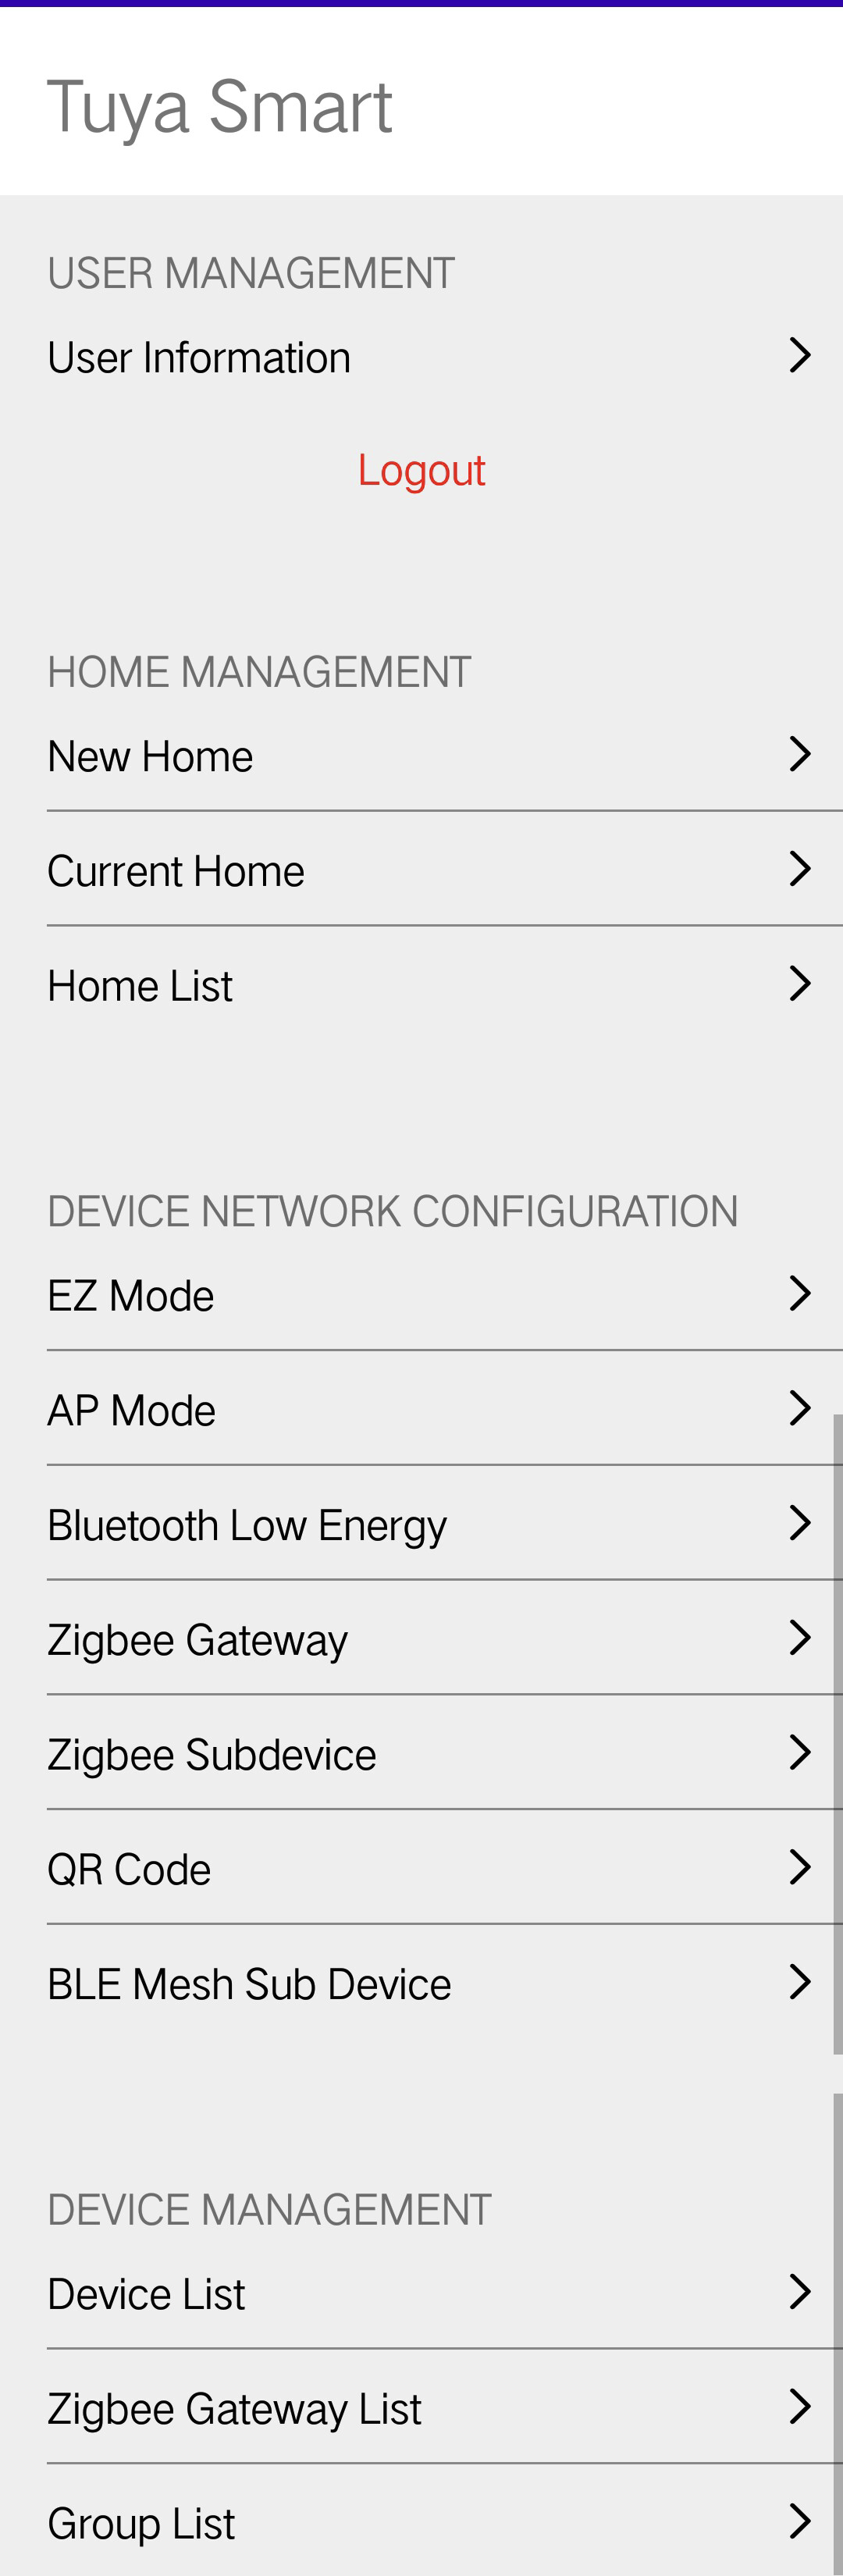
Feature overview
The demo app supports the following features:
-
User management: Register and log in to the app account by mobile phone number or email address.
-
Home and device management:
- Create a home and switch between homes.
- Display a list of devices in the home and control data points (DPs) of the devices.
- Rename and remove devices.
-
Pair devices: Multiple pairing methods are supported, including EZ Mode, AP Mode, Bluetooth Low Energy, Zigbee Gateway, Zigbee Subdevice, QR Code, and Bluetooth LE Mesh Sub Device.
For more information, see the GitHub project tuya-home-android-sdk-sample-kotlin.
Run the demo
-
Choose
app>build.gradleand change the value ofapplicationIdto your app package name.
-
Make sure that you have completed Step 3: Integrate with security component and Step 4: Configure AppKey, AppSecret, and certificate signature.
-
Click Run to run the sample.
FAQs
SING_VALIDATE_FALED
Troubleshoot the error message: SING_VALIDATE_FALED
-
Problem: When the system runs the demo app, an error message is returned in the following response:
{ "success": false, "errorCode" : "SING_VALIDATE_FALED", "status" : "error", "errorMsg" : "Permission Verification Failed", "t" : 1583208740059 } -
Solutions:
- Check whether your AppKey, and AppSecret are correctly configured and consistent with those obtained in Preparation.
- If the app SDK is upgraded from an older version (3.x or 4.x), please check whether the project depends on the low-version
t_s.bmpsecurity image, and delete this file if necessary.
ILLEGAL_CLIENT_ID
-
After the SmartLife App SDK for Android is updated to v3.29.5, an error message
ILLEGAL_CLIENT_IDis returned to indicate an illegal client. How do I troubleshoot this problem?- Starting from SmartLife App SDK for Android v3.29.5, data security is enhanced and SHA256 hash values are required.
- You must follow the steps in the documentation to get the SHA256 hash values and add the hash values to the Tuya Developer Platform. For more information, see Preparation.
-
After SmartLife App SDK for Android is updated to v4.0.0, an error message
ILLEGAL_CLIENT_IDis returned to indicate an illegal client. How do I troubleshoot this problem?- Starting from SmartLife App SDK for Android v4.0.0, data security is enhanced.
- The Android package name configured on the Tuya Developer Platform must be the same as the value of
packageNamein your project. Otherwise,ILLEGAL_CLIENT_IDwill be returned.
-
After SHA256 hash values are configured on the Tuya Developer Platform and the sample is run, the error message saying
ILLEGAL_CLIENT_IDis still returned. How do I troubleshoot the problem?Solution: Before you run the sample, add the following signature information to
build.gradleof theappmodule.android { ... signingConfigs { debug { storeFile file('xxxx.jks') storePassword 'xxxxxx' keyAlias 'xxx' keyPassword 'xxxxxx' } release { storeFile file('xxxx.jks') storePassword 'xxxxxx' keyAlias 'xxx' keyPassword 'xxxxxx' } } }
Is this page helpful?
YesFeedbackIs this page helpful?
YesFeedback


