TuyaOS SDK for Android
TuyaOS SDK for Andriod is built on top of the TuyaOS architecture and designed for IoT applications. It applies to Android 4.4 and later versions that are adapted to the data format defined by the Tuya Developer Platform.
Overview
TuyaOS is Tuya’s proprietary IoT OS based end-to-end SDK. It is designed to help you quickly and easily implement the bidirectional communication between smart devices and the cloud and develop IoT applications. The component-based architecture allows you to tailor SDKs as needed to develop products across various categories such as control panels, wearables, surveillance cameras, control hubs, smart speakers, smart locks, and many more.
Demo usage
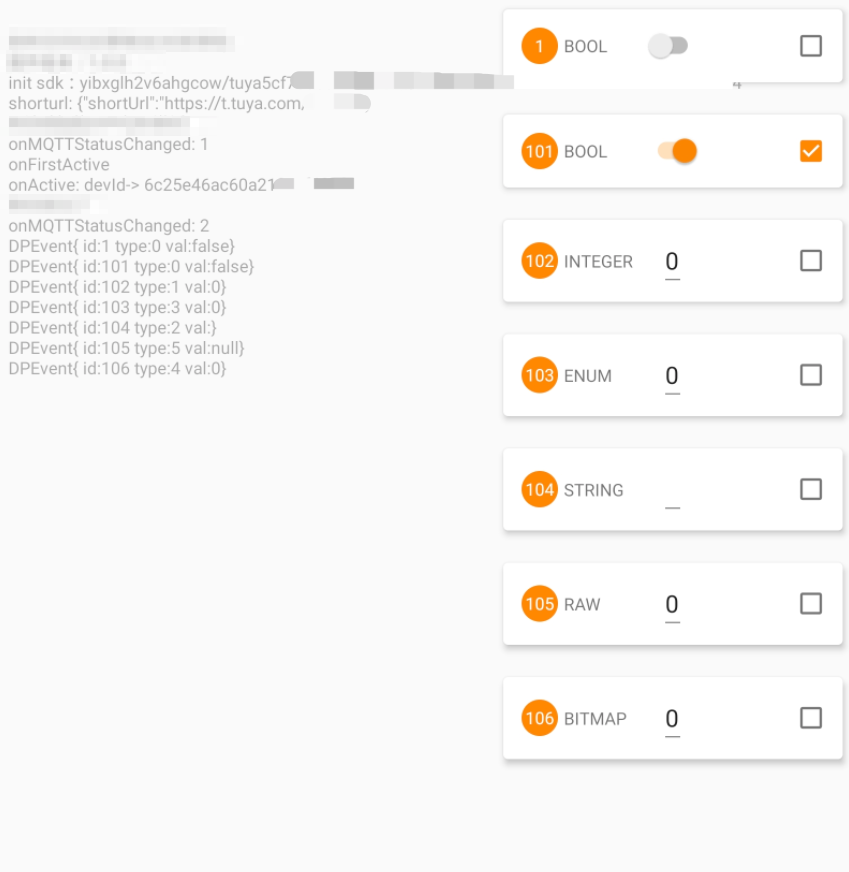
The demo allows users to obtain licenses, activate devices, test data points (DPs), and display operation logs.
Download the demo APK file on GitHub.
Before you set up the demo, make sure to replace the parameters pid, uuid, and authkey with your own values.
Parameter configuration
There are three methods to configure the parameters depending on the SDK installation methods. The interface will look like this after successful configuration:
-
If you work out the code on your own, choose this method:
Add the following code to the file
local.properties.UUID="Your UUID" AUTHKEY="Your Key" PID="Your PID" -
If you install the SDK by using the demo, choose one of two following methods:
-
Enter the required parameters manually in the dialog box.

-
Alternatively, scan the QR code to configure the parameters.

You can use a QR code generator to convert the following JSON string to a QR code.
{
	"PID": "Your PID",
	"UUID": "Your UUID",
	"AUTHKEY": "Your AUTHKEY"
}
-
Get started
Dependencies
Add the following implementation.
implementation 'com.tuya.smart:tuyasmart-iot_sdk:1.0.7'
implementation 'com.tencent.mars:mars-xlog:1.2.3'
Add the following Maven repository URL in your project’s build.gradle.
maven { url 'https://maven-other.tuya.com/repository/maven-releases/'}
maven { url 'https://maven-other.tuya.com/repository/maven-snapshots/'}
Obfuscation
If you enable obfuscation, add the following code to proguard-rules.pro.
-keep class com.tuya.smartai.iot_sdk.** {*;}
-keep class com.tencent.mars.** {*;}
Permissions
<uses-permission android:name="android.permission.INTERNET" />
<uses-permission android:name="android.permission.WRITE_EXTERNAL_STORAGE" />
<uses-permission android:name="android.permission.READ_EXTERNAL_STORAGE" />
Initialization
IoTSDKManager ioTSDKManager = new IoTSDKManager(context);

/**
     * Initialize the SDK. Note that one UUID can only be used to activate one device.
     * @param basePath  The path to save files. For example, "/sdcard/tuya_iot/".
     * @param productId  The PID of your product created on the Tuya Developer Platform.
     * @param uuid   The UUID.
     * @param authKey  The AuthKey.
     * @param version  The firmware version number, used for OTA updates.
     * @param mCallback  The callback.
     * @return
     */
ioTSDKManager.initSDK(String basePath, String productId, String uuid, String authorKey, String version, IoTCallback mCallback);


public interface IoTCallback {

        /**
                 * Receive DP events.
                 * @param event
                 *
                 * The event value. (event.value)
                 * The event ID. (event.dpid)
                 * The event type. (event.type)
                 * DPEvent.Type.PROP_BOOL
                 * DPEvent.Type.PROP_VALUE
                 * DPEvent.Type.PROP_STR
                 * DPEvent.Type.PROP_ENUM
                 * DPEvent.Type.PROP_RAW
                 */
        void onDpEvent(DPEvent event);

                // This callback is invoked after a device is unbound from the app. You need to restart the app's process here to make sure this device can be correctly paired next time.
        void onReset();

                // A short URL for device pairing is received. Null is returned on a failed operation.
        void onShorturl(String url);

        /**
         * MQTT connection status
         * @param status IoTSDKManager.STATUS_OFFLINE  The network is offline.
         *               IoTSDKManager.STATUS_MQTT_OFFLINE  The network is online but the MQTT connection is offline.
         *               IoTSDKManager.STATUS_MQTT_ONLINE  Both the network and the MQTT connection are online.
         */
        void onMQTTStatusChanged(int status);

                // Activate the device.
        void onActive();

                // Activate the device for the first time.
        void onFirstActive();

    }
Destroy
// Perform a destroy, such as unregister broadcast receiver.
ioTSDKManager.destroy();
Test
We recommend you enable logging during testing so that the SDK operation logs will be automatically saved to the path you specified.
We recommend you disable logging during production runs.
/**
     * Enable local logging.
     * @param logPath  The path to save logs. For example, "/sdcard/tuya_log/"
     * @param cacheDays  The number of days to keep logs on local storage.
     * @return
     */
Log.init(context, logPath, cacheDays);

// Log flush, which can be initiated manually if necessary. isSync: `true` indicates synchronous flush. The result will not be returned until the log flush is finished.  `false` indicates asynchronous flush. The result will be returned before the log flush is finished.
Log.flush(isSync)

// Destroy local logging, which is called when an activity is ended or an application is exited.
Log.close();
APIs
// A device is unbound by local control. This is an asynchronous operation. `onReset` callback will be invoked on successful unbinding.
IoTSDKManager.reset();

/**
     * Send DP events.
         *
     * @param id: DP ID
     * @param type: The type of a DP event.
     * DPEvent.Type.PROP_BOOL   Boolean
     * DPEvent.Type.PROP_VALUE  Integer
     * DPEvent.Type.PROP_STR    String
     * DPEvent.Type.PROP_ENUM   Integer
     * DPEvent.Type.PROP_RAW    Byte
     * @param val: The parameter value.
     * @return
     */
IoTSDKManager.sendDP(int id, int type, Object val)

/**
     * Send multiple DP events
     *
     * @param events: Multiple types of DPs.
     * @return
     */
IoTSDKManager.sendDP(DPEvent... events)

/**
     * Send a DP event with a timestamp contained.
     *
     * @param id: DP ID
     * @param type: The type of a DP event.
     * @param val: The parameter value.
     * @param timestamp: The timestamp, in seconds.
     * @return
     */
IoTSDKManager.sendDPWithTimeStamp(int id, int type, Object val, int timestamp)


/**
     * Send multiple DP events with timestamp contained. The timestamp should be assigned to `DPEvent.timestamp`.
     *
     * @param events: Multiple types of DPs.
     * @return
     */
IoTSDKManager.sendDPWithTimeStamp(DPEvent... events)

/**
     * Send HTTP request.
     * @param apiName: The request API.
     * @param apiVersion: The version number.
     * @param jsonMsg: The parameters in JSON.
     * @return
     */
IoTSDKManager.httpRequest(String apiName, String apiVersion, String jsonMsg)


// Get the device ID.
IoTSDKManager.getDeviceId()

// You can customize the implementation of network status monitoring. The return values can be online or offline. The SDK provides the default implementation. You can use it directly.
ioTSDKManager = new IoTSDKManager(this) {

            @Override
            protected boolean isOffline() {
                // Your custom implementation of network status monitoring.
                return super.isOffline();
            }
        }
OTA update
Firmware versions are differentiated by the value of version in ioTSDKManager.initSDK. The value of version must be replaced with the new firmware version number after an update is installed, for example, 1.2.3.
A firmware update can be initiated from either the device or the mobile app. The following code snippet shows the update process.
-
Set the callback. See the following sample code snippet.
ioTSDKManager.setUpgradeCallback(new UpgradeEventCallback() { @Override public void onUpgradeInfo(String version) { // The device receives the update version number. // It triggers the update download. ioTSDKManager.startUpgradeDownload(); } @Override public void onUpgradeDownloadStart() { // The update download callback. } @Override public void onUpgradeDownloadUpdate(int i) { // The download progress i%. } @Override public void upgradeFileDownloadFinished(int result, String file) { // The download completion callback. If the result is `0`, it means successful download. The `file` indicates the path of the downloaded update file. } }); -
Upload the firmware update file in ZIP format.
-
The device calls
ioTSDKManager.startUpgradeDownloadto start the update download after it receives the update information.
Is this page helpful?
YesFeedbackIs this page helpful?
YesFeedback


