Application Development
A smart device has basic features including network connection, device control, status reporting, and OTA updates as well as firmware flashing and authorization, and production test. This topic describes how to call interface functions based on the Wi-Fi SDK to implement these features.
Overview
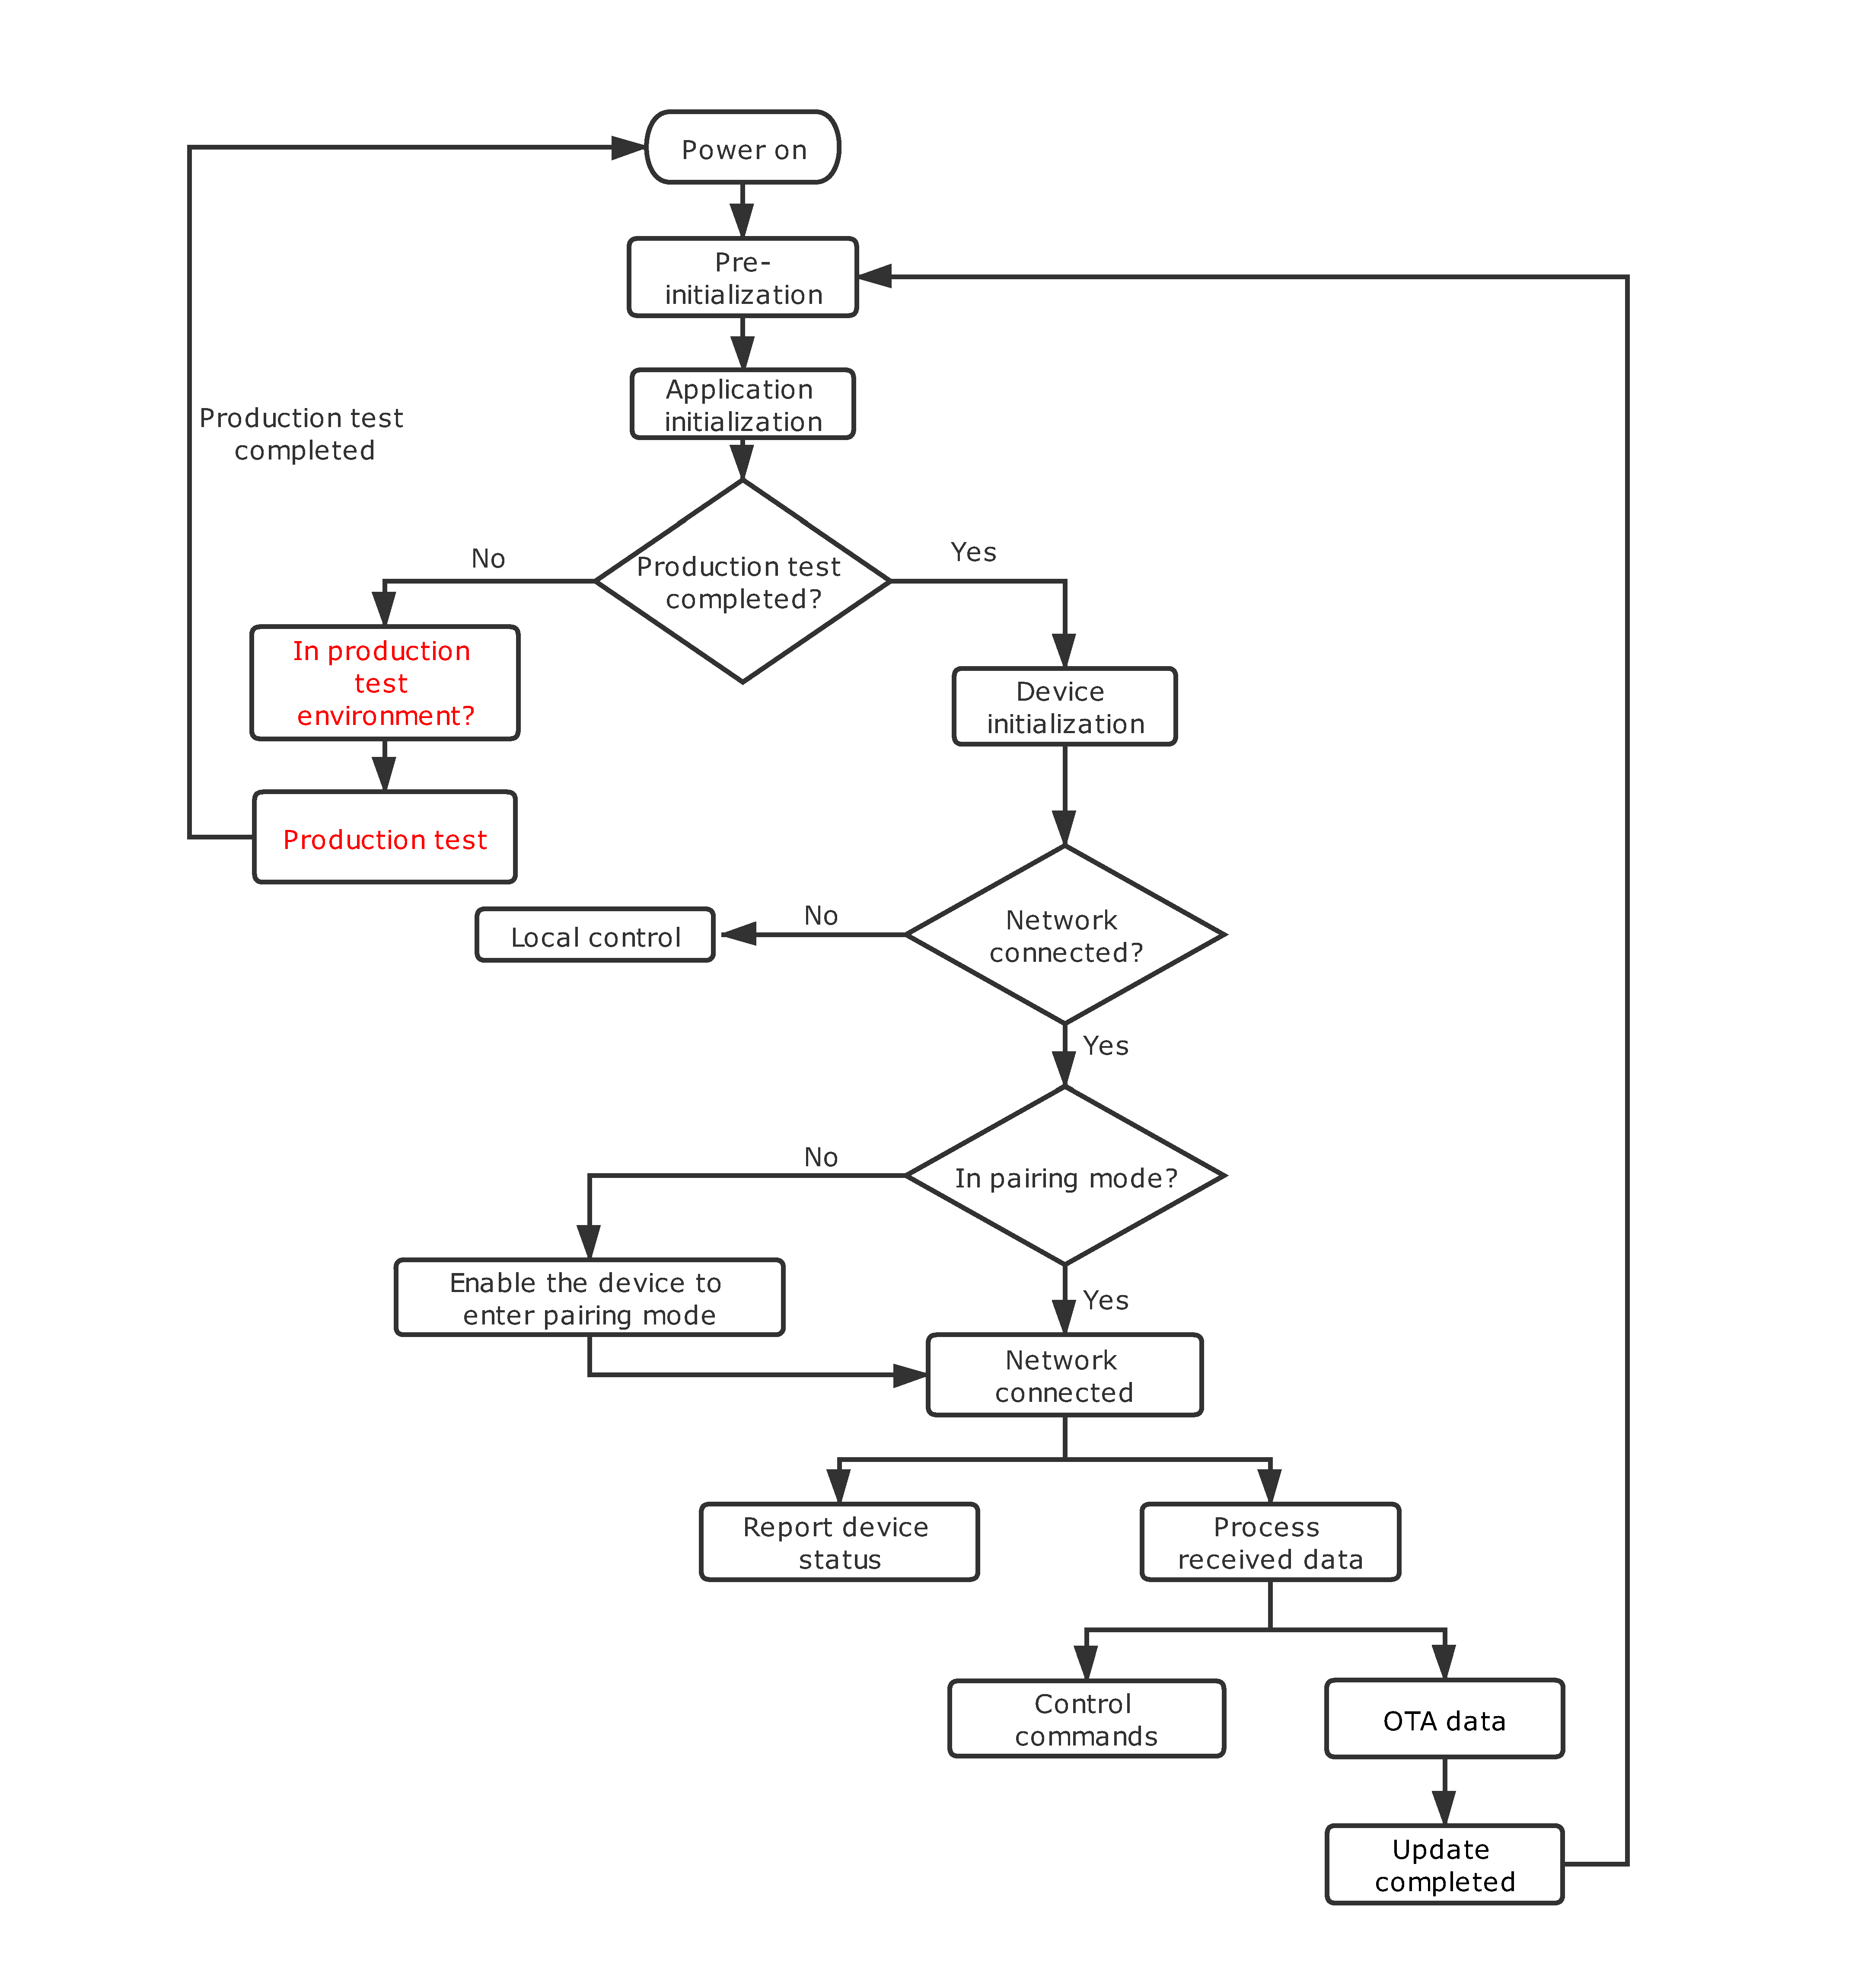
The following block diagram shows how the Wi-Fi SDK works. After you implement the features required in each part, a basic smart device is made.
Pre-initialization
In the pre-initialization, configure the required parameters and features to run the system.
The following sample code implements application pre-initialization and log level settings. The log level can help you check system health and troubleshoot issues.
VOID pre_device_init(VOID)
{
    PR_DEBUG("%s",tuya_iot_get_sdk_info());  // View SDK version.
    PR_DEBUG("%s:%s",APP_BIN_NAME,DEV_SW_VERSION); // View the SDK name and firmware version.
    PR_NOTICE("firmware compiled at %s %s",__DATE__,__TIME__);// View when firmware is compiled.
    PR_NOTICE("system reset reason:[%s]",tuya_hal_system_get_rst_info());// Get the information on system reset.
    SetLogManageAttr(TY_LOG_LEVEL_DEBUG); // Set the log level.
}
Application initialization
Before you get the application to run, you must configure the required hardware and the run mode, including peripheral initialization and product feature settings.
The following sample code initializes peripherals, configures Wi-Fi working mode, and registers the callback for the production test.
VOID app_init(VOID)
{
    tuya_device_config(); // Initialize peripherals.
    app_cfg_set(tuya_hard_get_wifi_mode(),prod_test); // Set the Wi-Fi working mode and register the callback for production test.
    tuya_iot_wf_timeout_set(180);         // Set the timeout value for device pairing.
}
Device initialization
Operating system-dependent features are encapsulated in the Wi-Fi SDK. The task schedules for core features of a smart device such as device pairing and data communication have been implemented. Therefore, you can directly call the initialization function to specify parameters and register callbacks.
In the following sample code, we call the initialization function tuya_iot_wf_soc_dev_init_param(cfg,start_mode,cbs,NULL,product_key,wf_sw_ver) to register callbacks, Wi-Fi working mode, product ID (PID), firmware version, and more. The registered callbacks will be invoked for device pairing, firmware updates, and data processing. The PID serves as the unique identifier of a device to register with the Tuya Developer Platform. The firmware information is used for OTA updates.
OPERATE_RET device_init(VOID)
{
    OPERATE_RET op_ret = OPRT_OK;
    tuya_hard_prod_flag(FALSE);
    TY_IOT_CBS_S wf_cbs =
     {
        gw_status_cb,gw_ug_cb,gw_reset_cb,dev_obj_dp_cb,dev_raw_dp_cb,dev_dp_query_cb, NULL
     };
    op_ret =
    tuya_iot_wf_soc_dev_init_param(tuya_hard_get_wifi_mode(),WF_START_SMART_FIRST,&wf_cbs,NULL,PRODUCT_KEY,DEV_SW_VERSION);
    if (OPRT_OK != op_ret)
    {
        PR_ERR("tuya_iot_wf_soc_dev_init fail,fail_num:%d",op_ret);
        return op_ret;
    }
}
Network connection
The following block diagram shows how a device connects to the cloud.
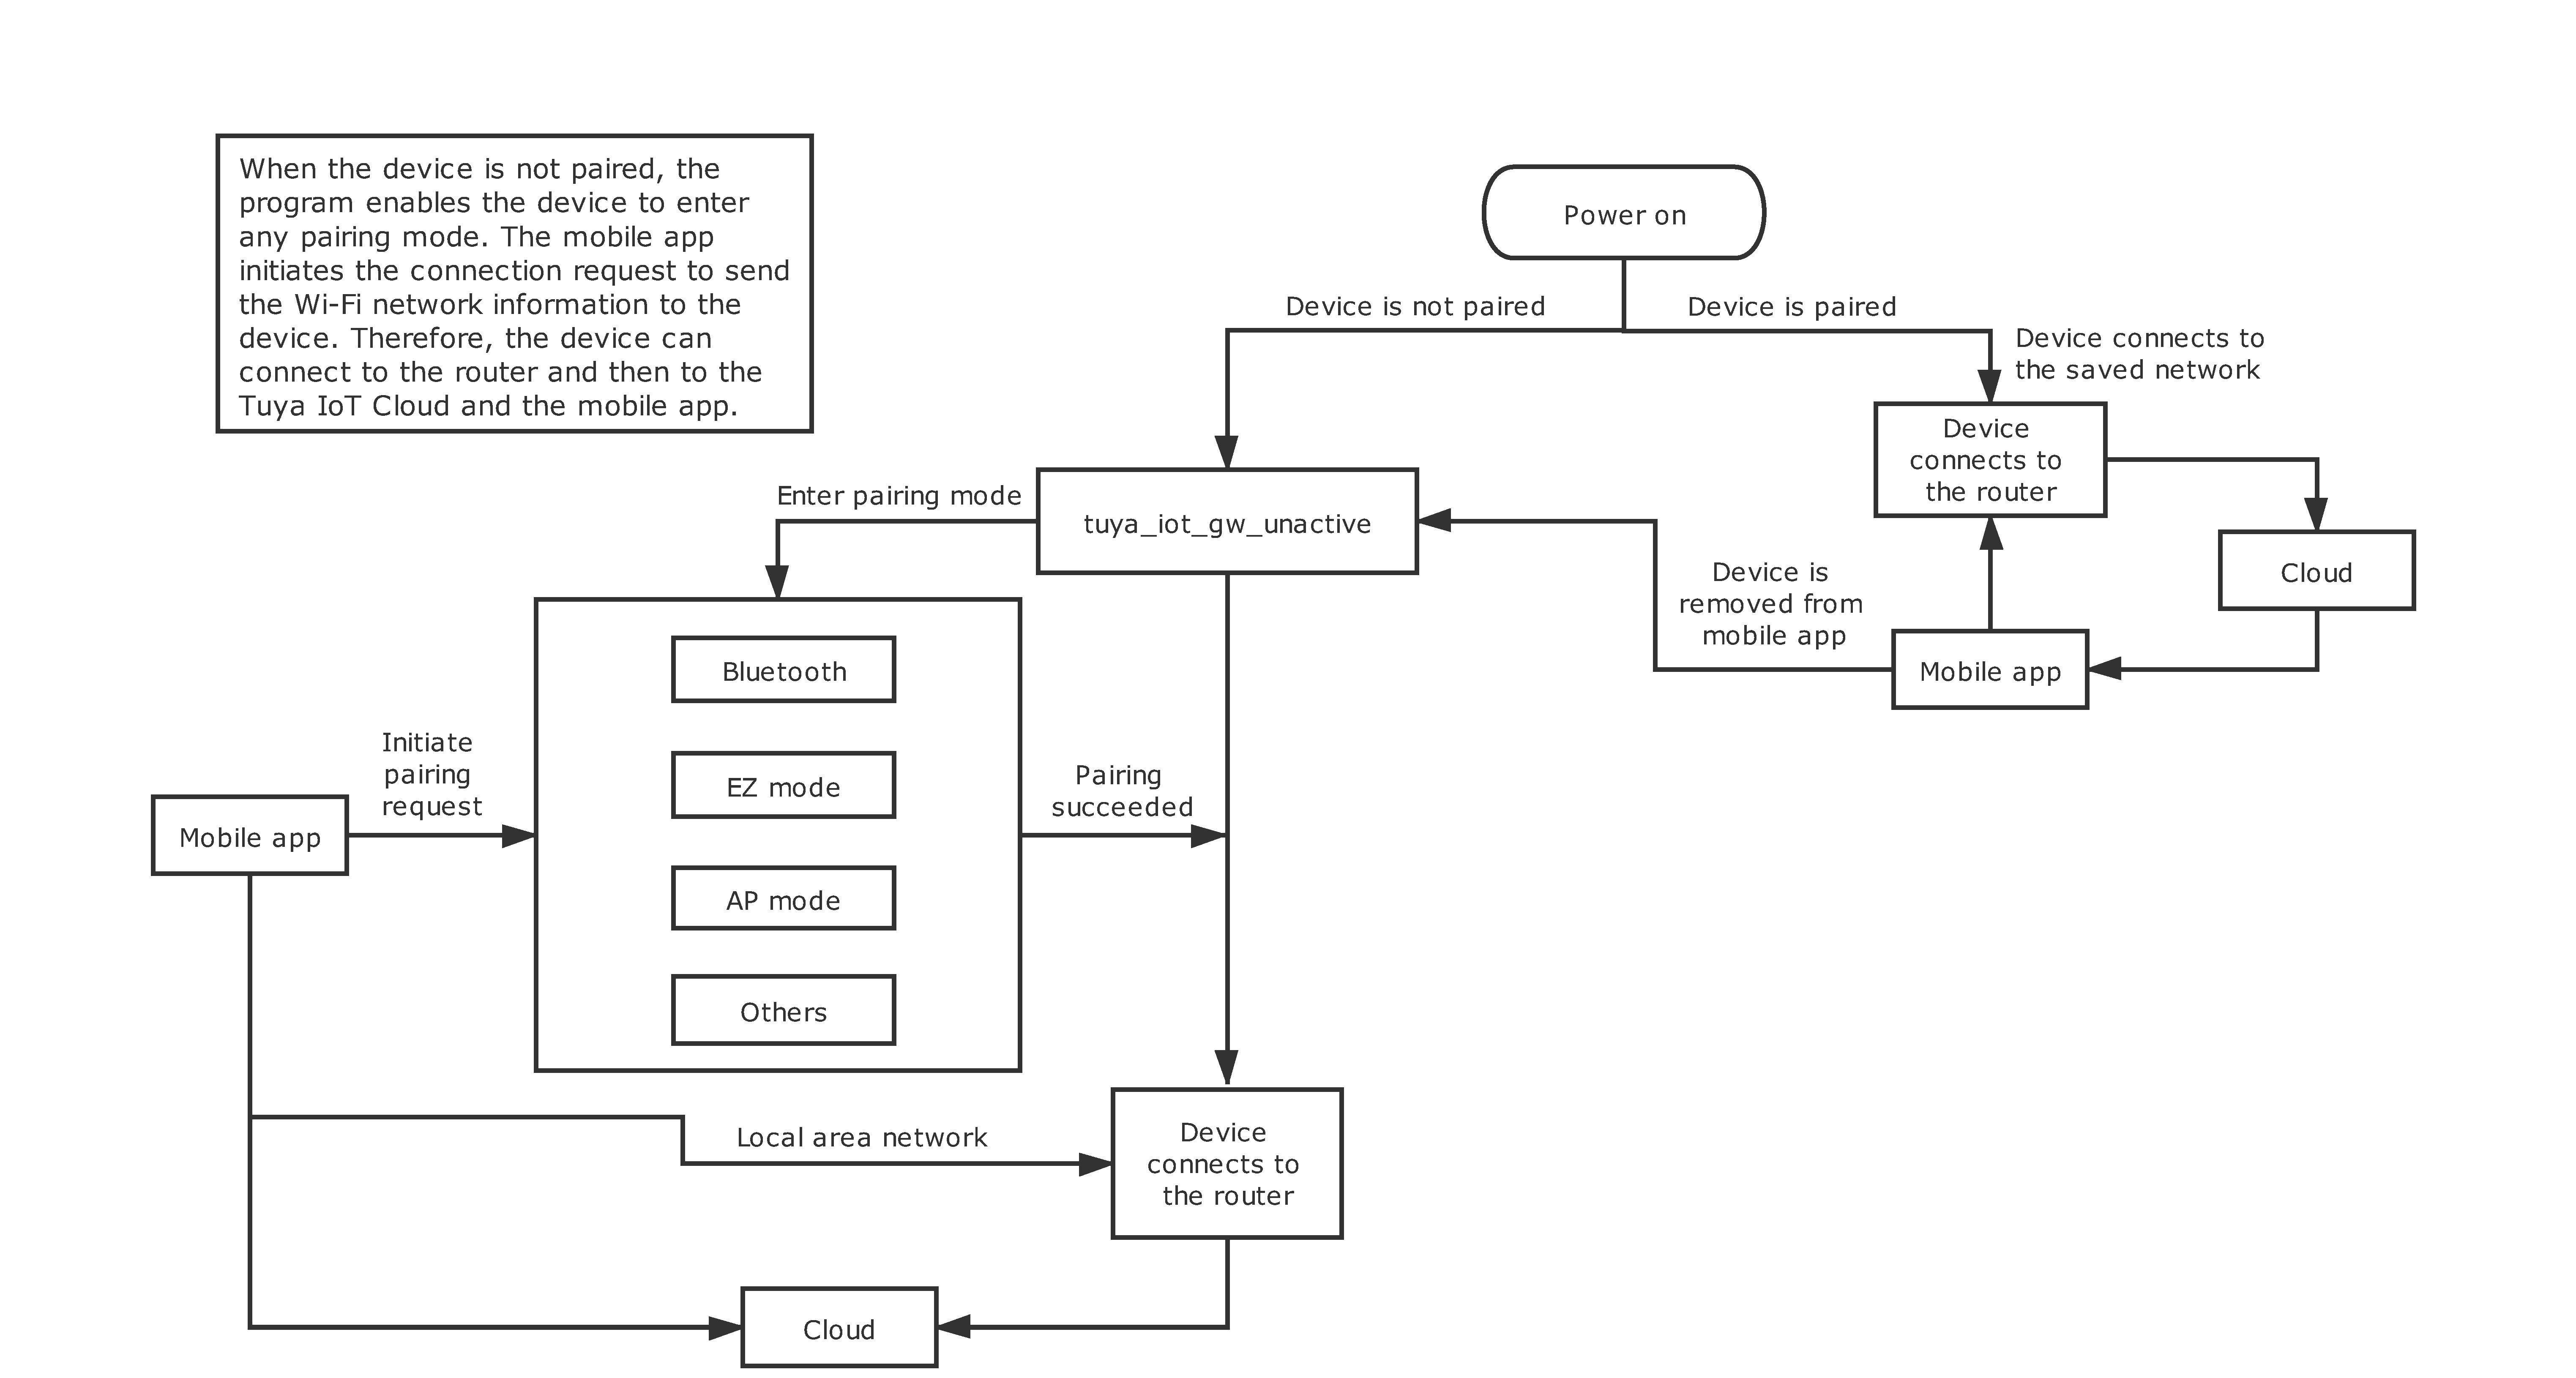
Configure a hardware trigger condition for invoking network connection. When the program determines a condition is met, it will call the pairing function to enable the device to enter pairing mode.
The following sample code implements a condition of the press-and-hold of a button. When the program detects this condition, it calls the pairing function to enable the device to enter pairing mode.
STATIC VOID key_process(tuya_pin_name_t port,PUSH_KEY_TYPE_E type,INT_T cnt)
{
    PR_DEBUG("port:%d,type:%d,cnt:%d",port,type,cnt); // Print information about the button peripheral.
    OPERATE_RET op_ret = OPRT_OK;
    if(tuya_hard_judge_key_pin(port))
    {
        if(LONG_KEY == type) // The program detects the press-and-hold of a button and calls the pairing function to enable the device to enter pairing mode.
        {
            tuya_iot_wf_gw_unactive();// The pairing function.
        }
        else if(NORMAL_KEY == type) // The program detects the press of a button and calls the button control function.
        {
            tuya_hard_key_control(); // Trigger the corresponding action.
            op_ret = tuya_hard_channel_upload(DOUBLE_TYPE); // The program synchronizes status with the cloud and the mobile app after the device executes the action.
            if (OPRT_OK != op_ret)
            {
                PR_ERR("[%s] tuya_hard_channel_upload fail,fail_num:%d",__FUNCTION__,op_ret);
            }
            tuya_hard_channel_save();// Save the current device status.
        }
        else
        {
            PR_NOTICE("key type is no deal");
        }
    }
    return;
}
Data processing
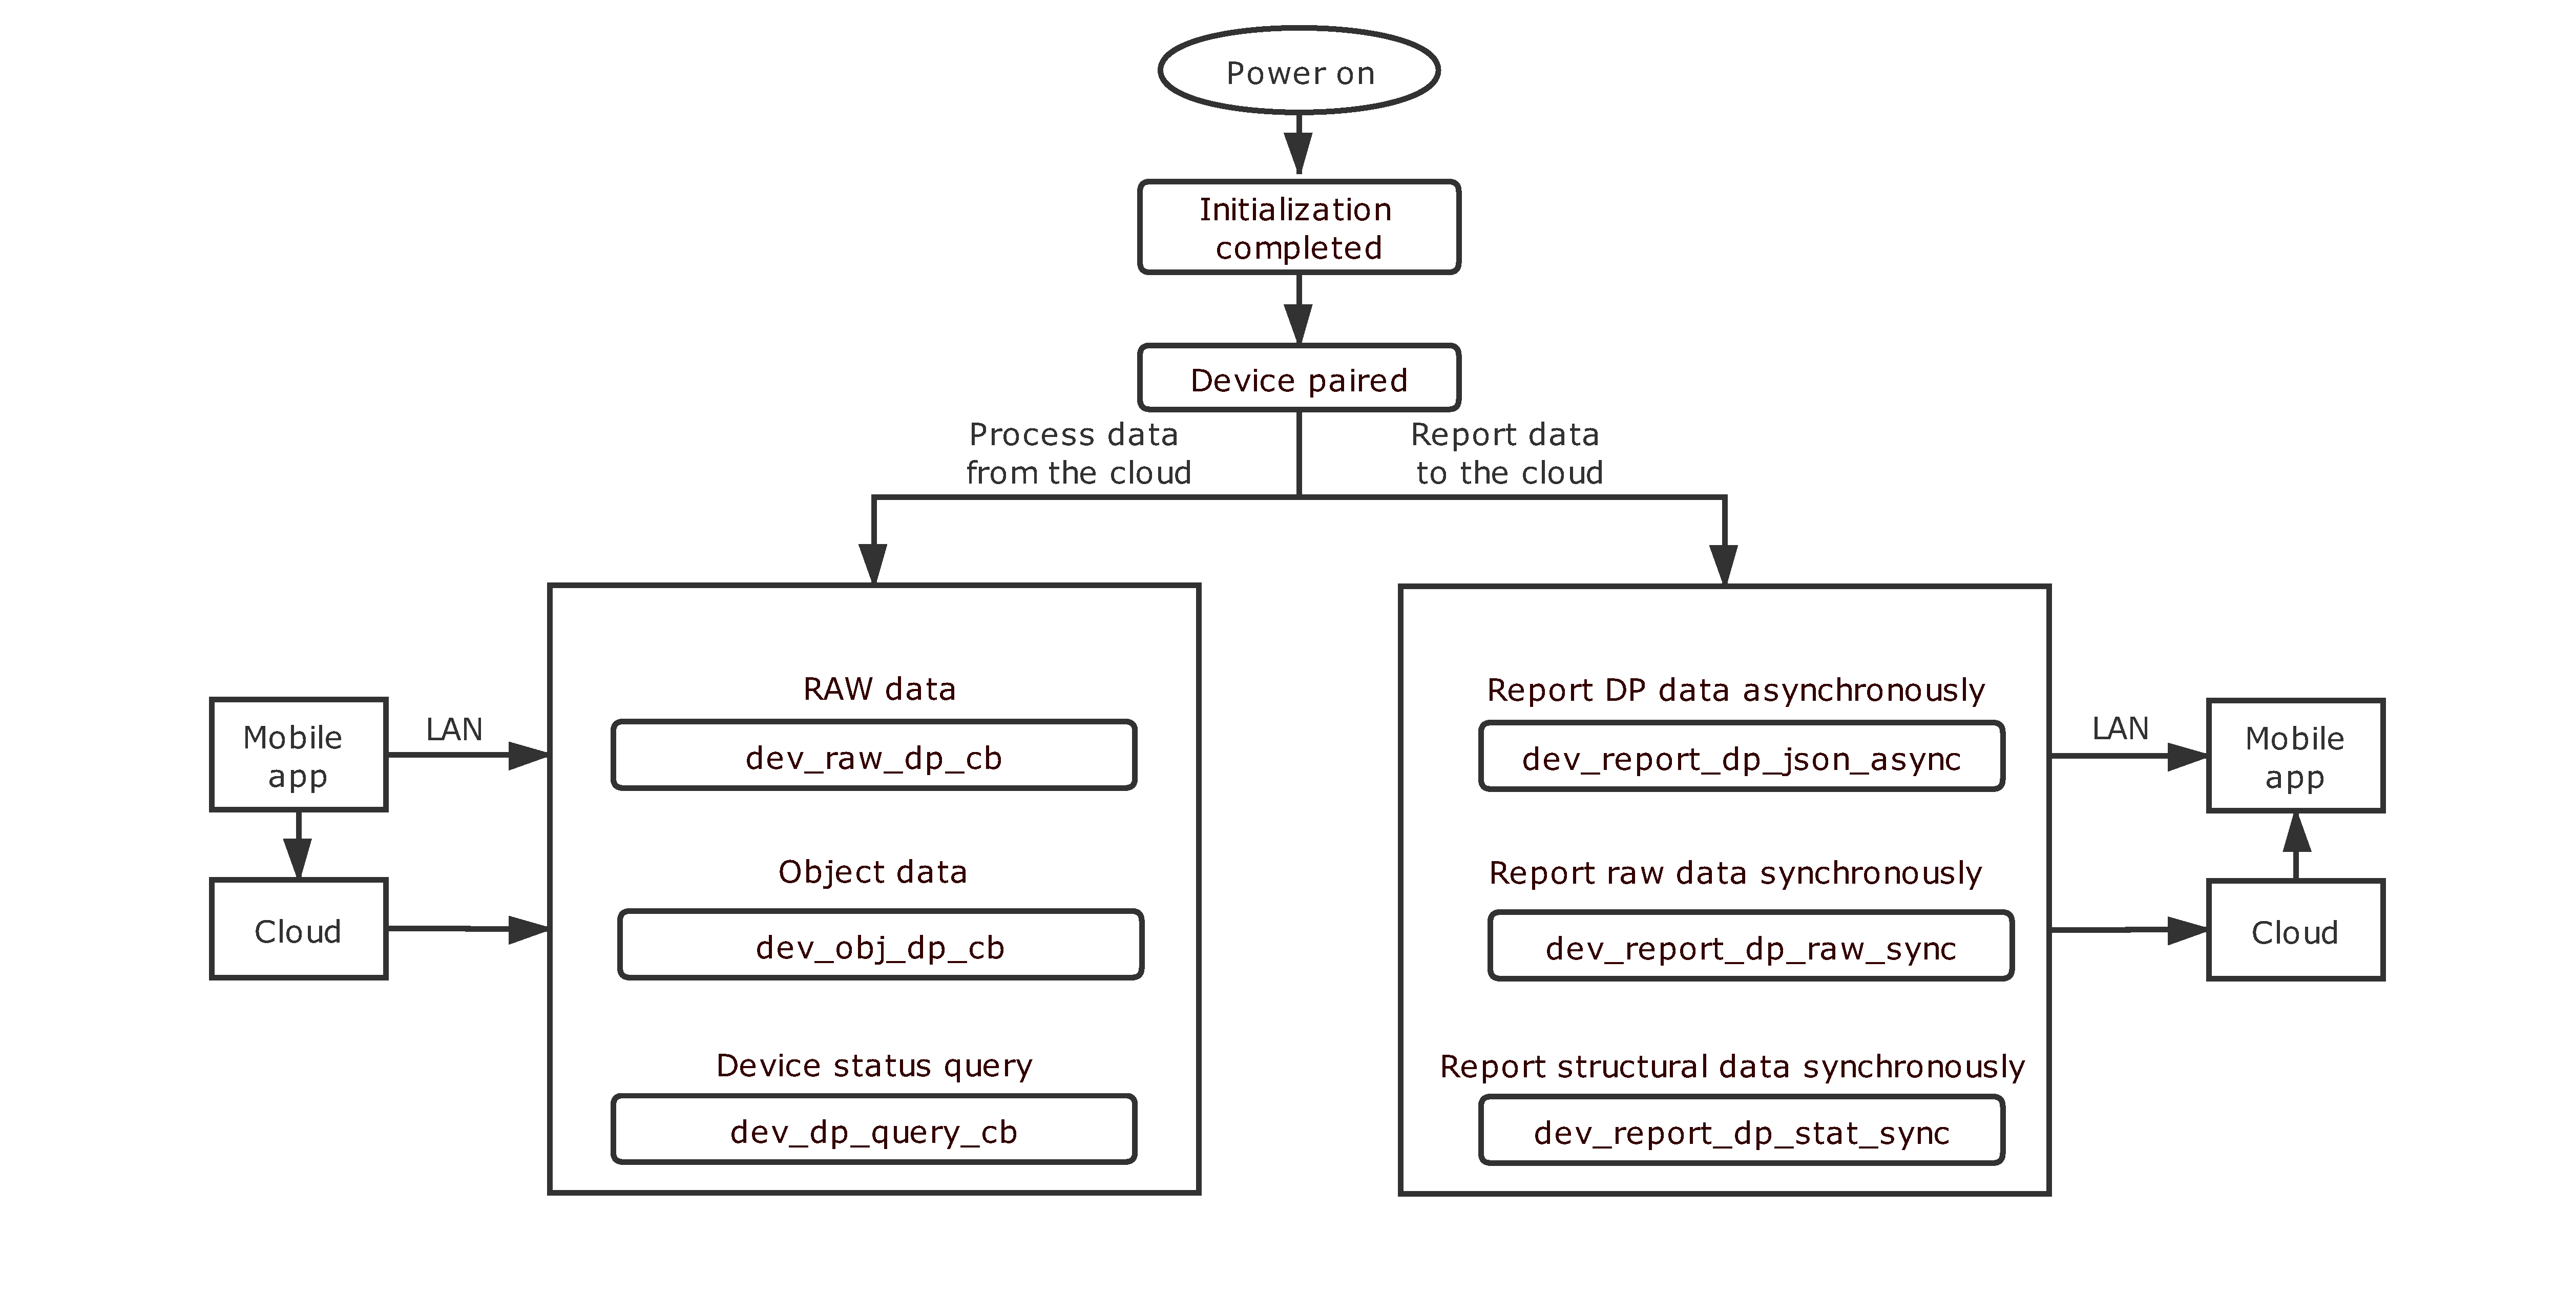
The following block diagram shows how reporting and sending data works.
Processing data from the cloud
The callback for processing the data from the cloud must be registered in the initialization process. When the cloud or mobile app sends data to a device, the SDK will retrieve and execute corresponding callbacks. You need to implement the callback logic to enable data parsing and command execution.
The following sample code processes the received data of a switch.
VOID dev_obj_dp_cb(IN CONST TY_RECV_OBJ_DP_S *dp)
{
    PR_NOTICE("app_send dp_cnt:%d",dp->dps_cnt);
    OPERATE_RET op_ret = OPRT_OK;
    UINT_T dp_index = 0;
    UINT_T app_send_dp_num = dp->dps_cnt;
    DEV_DP_TYPE_E dpid_type = DP_NOT_EXIST;
    for (dp_index = 0;dp_index < app_send_dp_num;dp_index++) // Parse the data from the cloud in loop.
    {
        dpid_type = tuya_hard_dpid_type(dp->dps[dp_index].dpid);
        PR_DEBUG("dpid_type:%d",dpid_type);
        switch (dpid_type) // The program determines the type of the received data point (DP).
        {
            case SW_TYPE:  // A DP for on/off control.
                PR_DEBUG("value:%d",dp->dps[dp_index].value.dp_bool);
                tuya_hard_channel_control(dp->dps[dp_index].value.dp_bool);
            break;
            case SW_CD_TYPE:// A DP for countdown timer.
                PR_DEBUG("value:%d",dp->dps[dp_index].value.dp_value);
                tuya_hard_channel_cd_control(dp->dps[dp_index].value.dp_value);
            break;
            case RELAY_ST_TYPE:// A DP for setting power-on status.
                PR_DEBUG("value:%d",dp->dps[dp_index].value.dp_enum);
                tuya_hard_relay_power_stat(dp->dps[dp_index].value.dp_enum);
            break;
            default:
            break;
        }
    }
    op_ret = tuya_hard_upload_all_data();// The program synchronizes the current device status with the cloud and the mobile app after an action is executed.
    if (OPRT_OK != op_ret)
    {
        PR_ERR("[%s] tuya_hard_upload_all_data fail,fail_num:%d",op_ret);
    }
    return;
}
Reporting status to the cloud
When the device status changes, the program calls the data reporting function based on the DPs to synchronize the current DP status with the cloud and the mobile app.
The following sample code reports data when DPs of on/off, countdown, and power-on status change.
OPERATE_RET tuya_hard_upload_all_data(VOID)
{
    OPERATE_RET op_ret = OPRT_OK;
    DP_UPLOAD_S *upload_dp = NULL;
    UINT_T dp_cnt = DEV_DP_NUM;
    upload_dp = tuya_upload_alloc_space(dp_cnt);// Request memory allocation for the reported data.
    if (NULL == upload_dp)
    {
        PR_ERR("tuya_upload_alloc_space fail");
        return OPRT_COM_ERROR;
    }
    if (g_dev_info.dev_dp.switch_dp.is_exist)// Determine whether the status of on/off DP changes.
    {
        tuya_upload_dp_bool_frame(upload_dp,g_dev_info.dev_dp.switch_dp.dpid_num,g_dev_stat.relay_stat);// Assign values to on/off DP of Boolean type.
    }
    if (g_dev_info.dev_dp.switch_cd_dp.is_exist)// Determine whether the status of countdown DP changes.
    {
        tuya_upload_dp_value_frame(upload_dp,g_dev_info.dev_dp.switch_cd_dp.dpid_num,g_dev_stat.relay_cd_sec);// Assign values to countdown DP of value type.
    }
    if (g_dev_info.dev_dp.app_relay_stat.is_exist)// Determine whether the power-on status DP changes.
    {   tuya_upload_dp_enum_frame(upload_dp,g_dev_info.dev_dp.app_relay_stat.dpid_num,g_dev_stat.relay_power_stat);// Assign values to power-on status DP of enum type.
    }
//  dev_report_dp_json_async(get_gw_cntl()->gw_if.id, upload_dp->dp_buf, upload_dp->cur_idx)
    op_ret = dev_report_dp_json_async(get_gw_cntl()->gw_if.id,upload_dp->dp_buf,upload_dp->cur_index);// Report the current values of all DPs.
    tuya_upload_delete_space(upload_dp);// Free up memory that was allocated for DP status.
    if (OPRT_OK != op_ret)
    {
        PR_ERR("dev_report_dp_json_async all_data is fail,fail_num:%d",op_ret);
        return op_ret;
    }
    PR_DEBUG("upload all dp data sucess");
    return OPRT_OK;
}
Firmware compilation
The Wi-Fi SDK provides a standard compilation script. Binary files for production can be generated by running the shell command.
-
Command format:
sh build.sh the code path the code name the version number -
Sample command:
sh build.sh apps/tuya_demo_elp_1plug tuya_demo_elp_1plug 1.0.0
The following sample code shows the input parameters in the compilation script. For more information, see the file build.app.sh.
APP_PATH=$1
APP_NAME=$2
APP_VERSION=$3
USER_CMD=$4
echo APP_PATH=$APP_PATH
echo APP_NAME=$APP_NAME
echo APP_VERSION=$APP_VERSION
echo USER_CMD=$USER_CMD

...
Flashing and authorization
Flash the binary file to the chip and use Tuya’s tool to authorize the chip to connect to the Tuya Developer Platform. Then, you can test your code.
The flashing methods depend on chips. When you start firmware flashing, see the documentation for your chip platform. Regarding chip authorization, you can write the license to the designated flash memory of the chip through serial communication. The SDK has implemented the logic without additional code.
Production test
The code-based automated test is introduced to mass production for promoting efficiency, which is called the production test.
The proven technologies for production tests are encapsulated in the Wi-Fi SDK. Devices under test scan the signal from a designated router and outputs signal strength, on which you can base the RF performance. In the pre-initialization, register the callback for the production test and complete the logic code to implement the automated test.
The following sample code implements the production test.
app_cfg_set(tuya_hard_get_wifi_mode(),prod_test); // Called in the pre-initialization to set the Wi-Fi working mode and the production test.

// The program determines the RF performance based on the scanned Wi-Fi signal strength and executes feature tests.
VOID prod_test(BOOL_T flag,CHAR_T rssi)
{
    PR_NOTICE("rssi:%d,flag:%d",rssi,flag);
    if (flag == FALSE || rssi < -60)
    {
        tuya_hard_set_led_state(PROD_TEST_FAIL);
    }
    tuya_hard_set_led_state(ENTER_PROD_TEST);
    tuya_hard_prod_flag(TRUE);
}
OTA
The following block diagram shows how the OTA updates work.
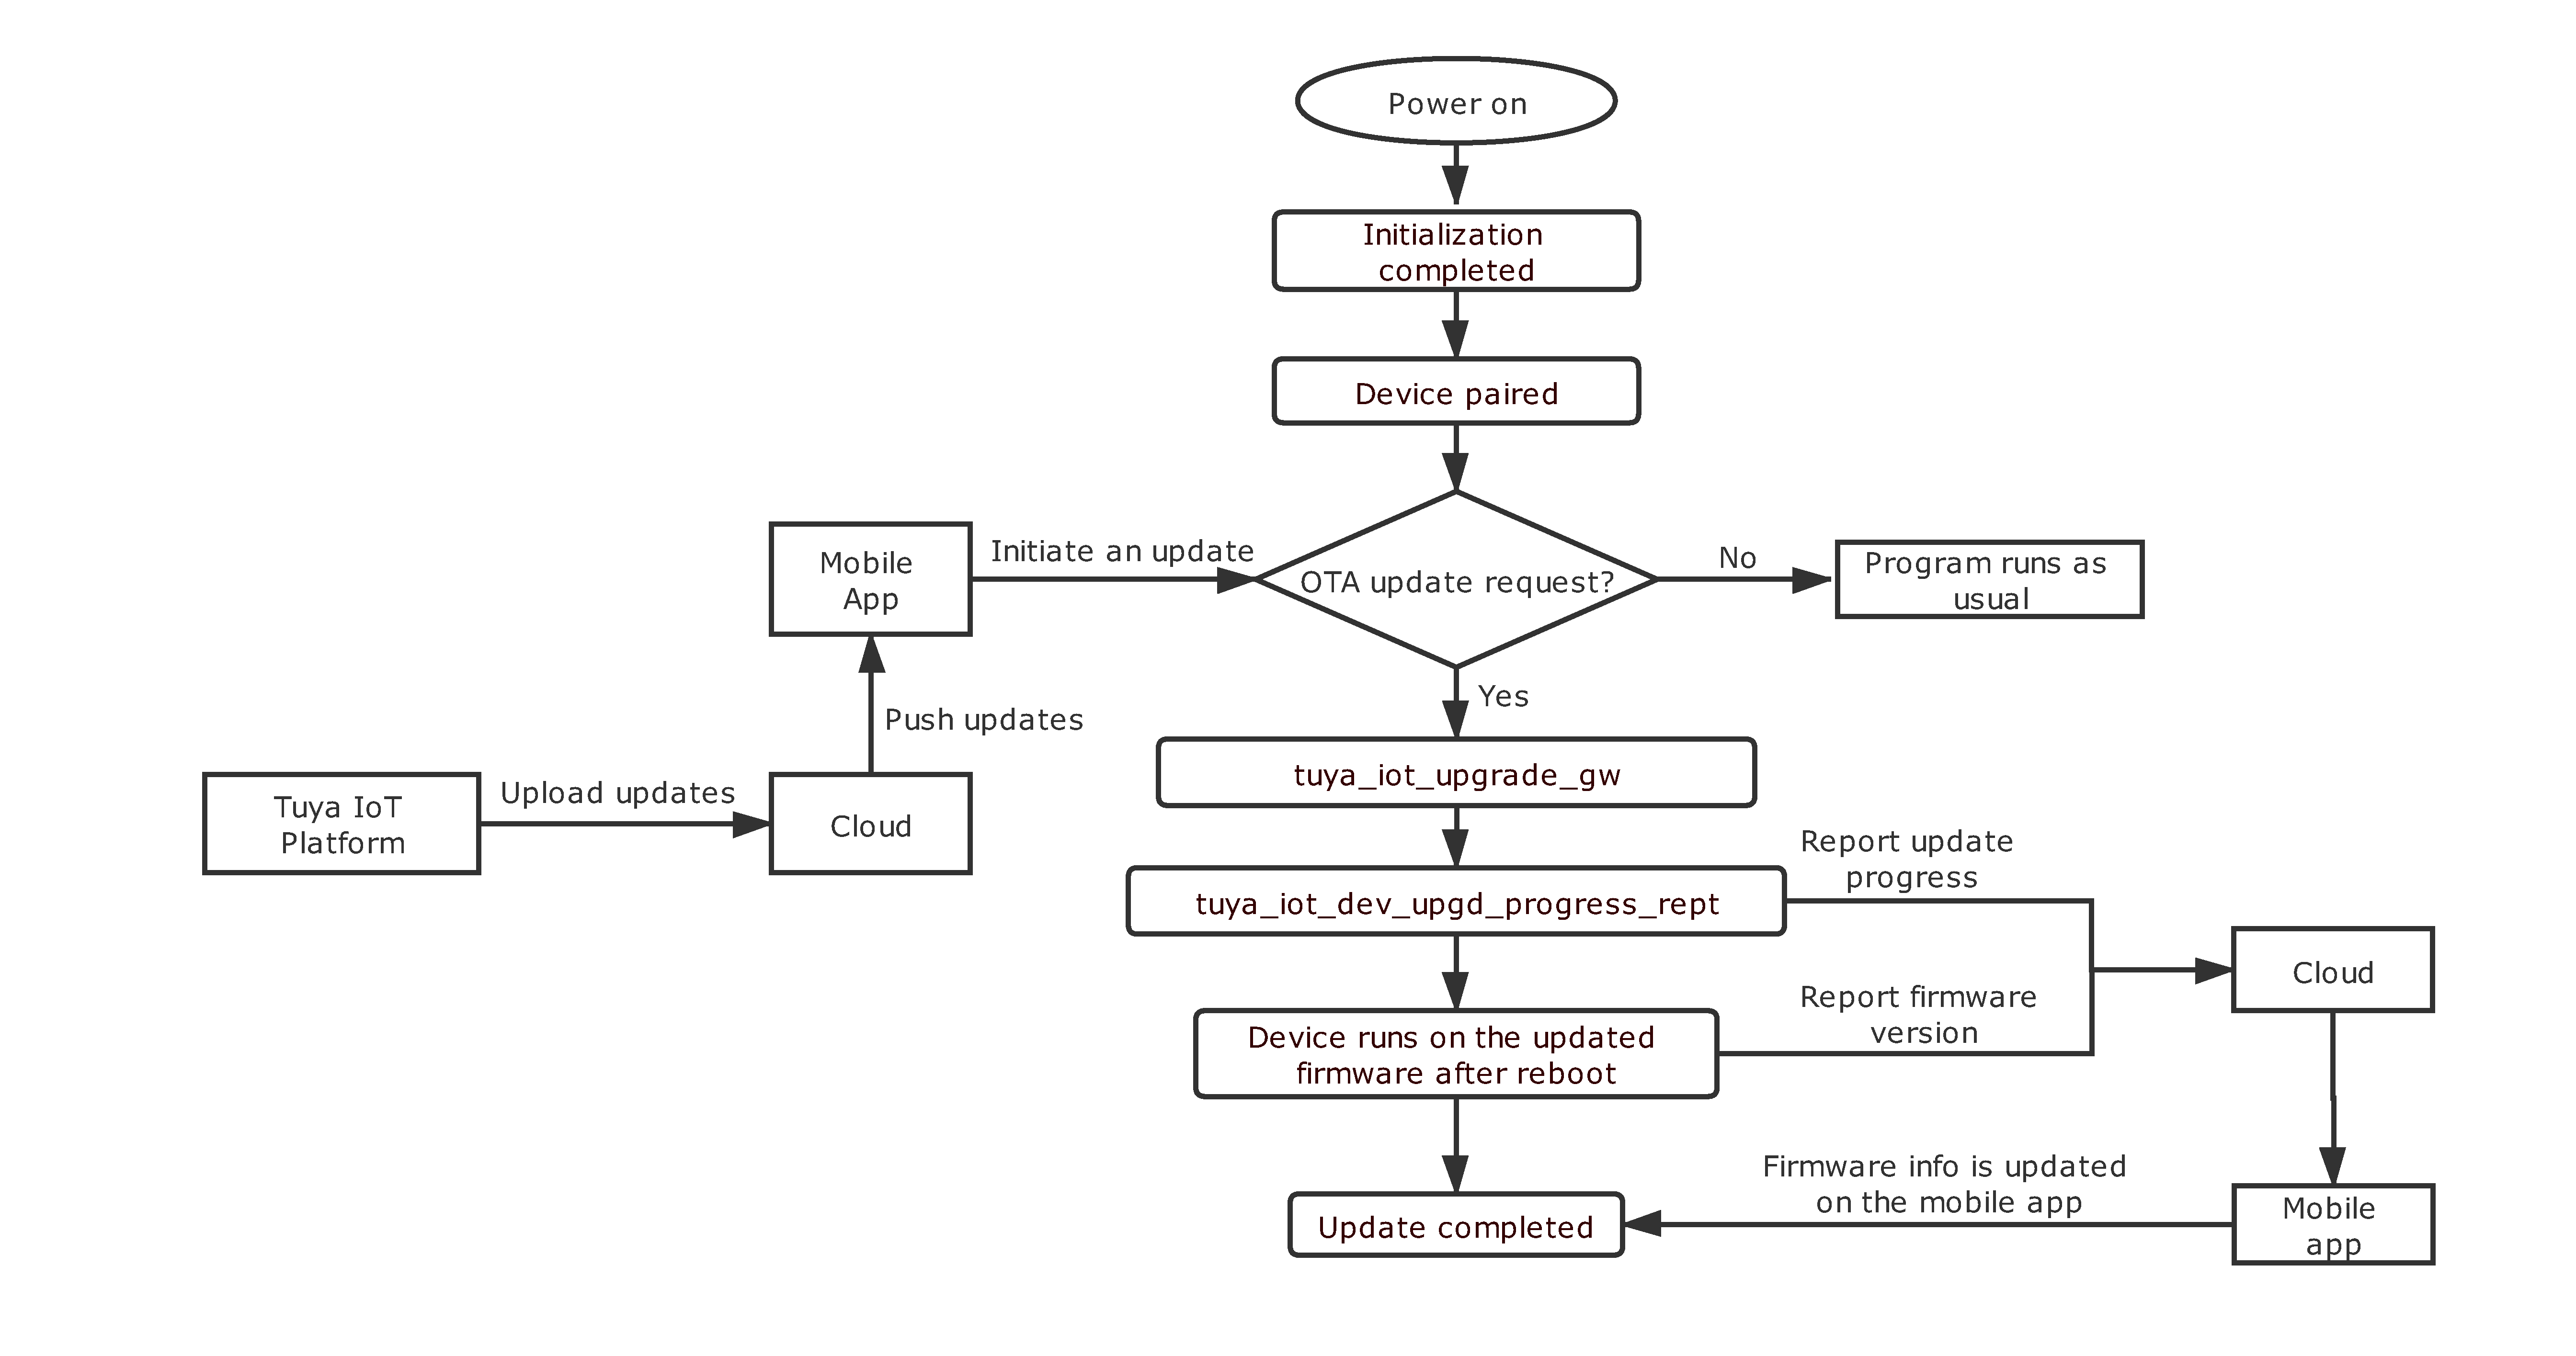
The Wi-Fi SDK has implemented the OTA update feature for the chipset. In the pre-initialization, you only need to register the function for OTA updates and complete the required callbacks.
The following sample code shows the callback for OTA updates.
int gw_ug_cb(IN CONST FW_UG_S *fw)
{
    PR_DEBUG("Rev GW Upgrade Info");
    PR_DEBUG("fw->fw_url:%s", fw->fw_url);
    PR_DEBUG("fw->sw_ver:%s", fw->sw_ver);
    PR_DEBUG("fw->file_size:%d", fw->file_size);
    return tuya_iot_upgrade_gw(fw, get_file_data_cb, upgrade_notify_cb, NULL);
}
Is this page helpful?
YesFeedbackIs this page helpful?
YesFeedback


