Connecting to Sub-devices
This topic describes how a sub-device is connected to a gateway and how to implement the basic and extended features based on their communication.
Prerequisites
You have created at least one sub-device product on the Tuya Developer Platform. For more information about product creation, see Create a sub-device.
Create a sub-device
This section takes a 3-gang switch as an example to briefly describe the procedure for product creation.
-
Log in to the Tuya Developer Platform.
-
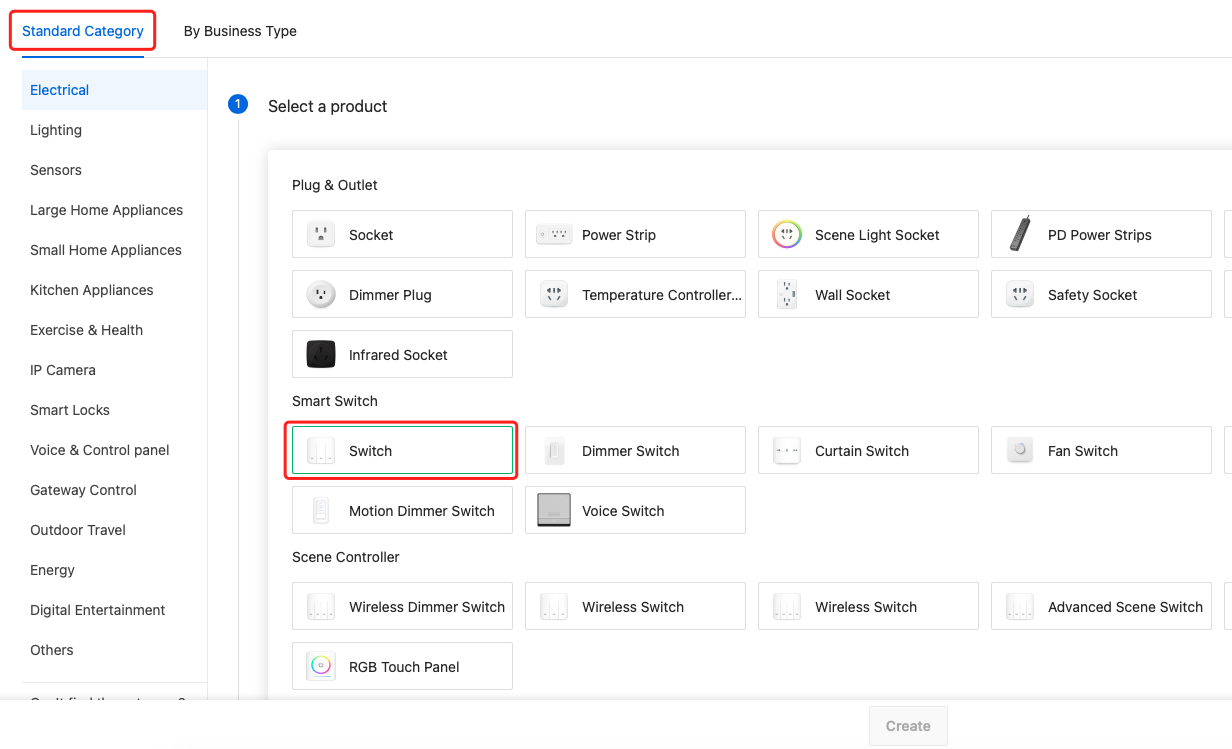
In the Standard Category tab, choose Electrical > Switch.
-
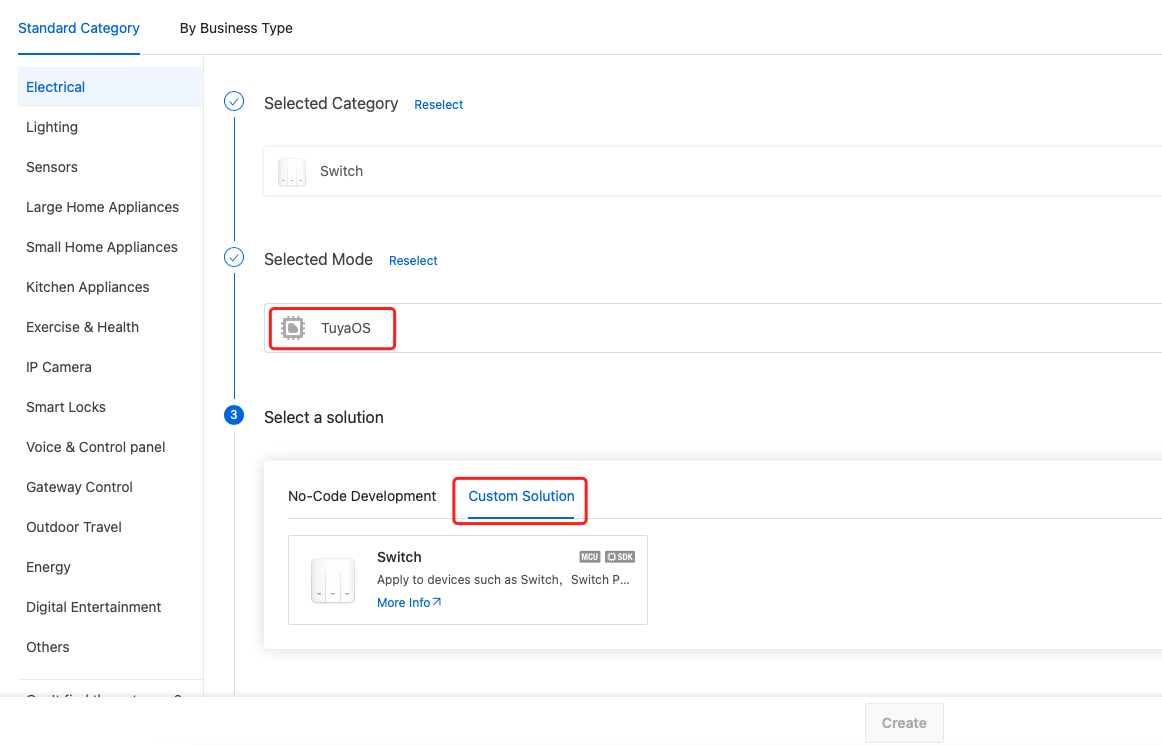
Choose TuyaOS > Custom Solution.
-
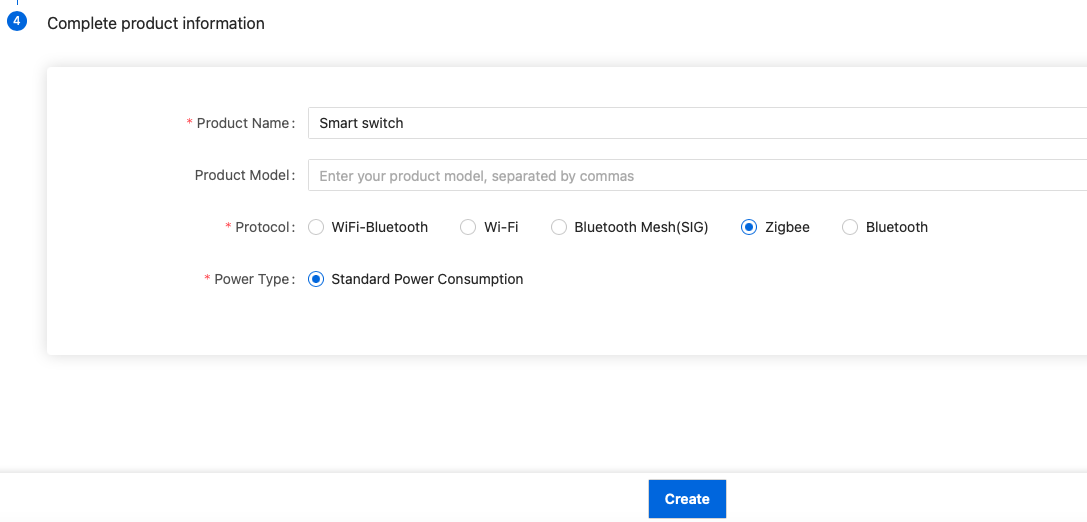
Complete the required information. Select a protocol such as Zigbee.
-
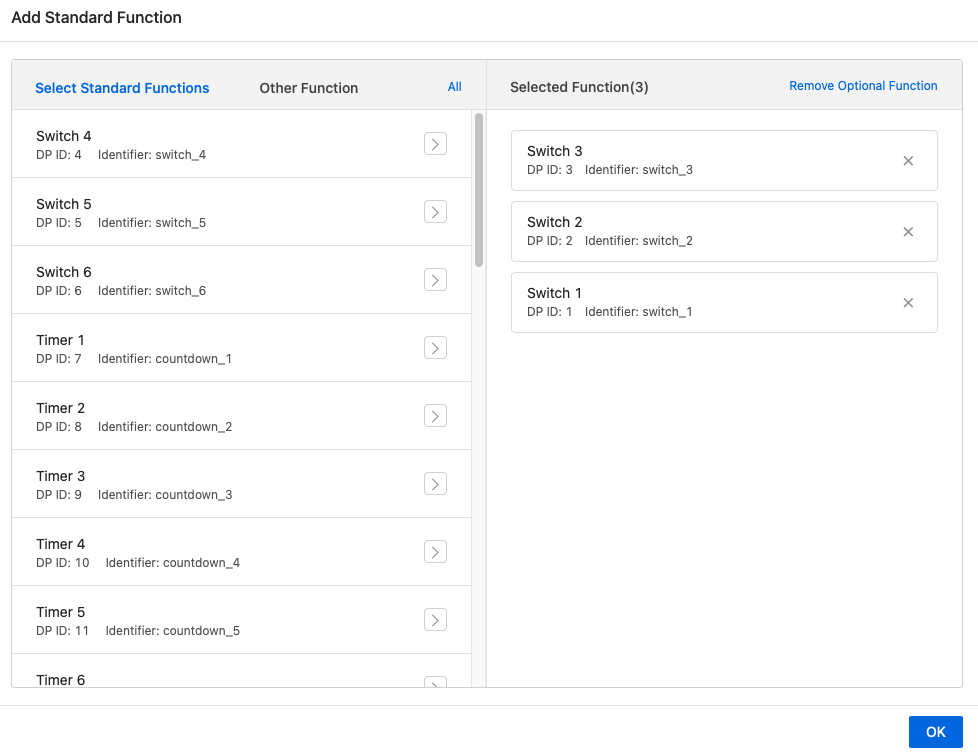
In this example, we create a 3-gang switch so we add three switches used for three separate controls.
-
In the Device Panel tab, select the desired app panel and click Apply.
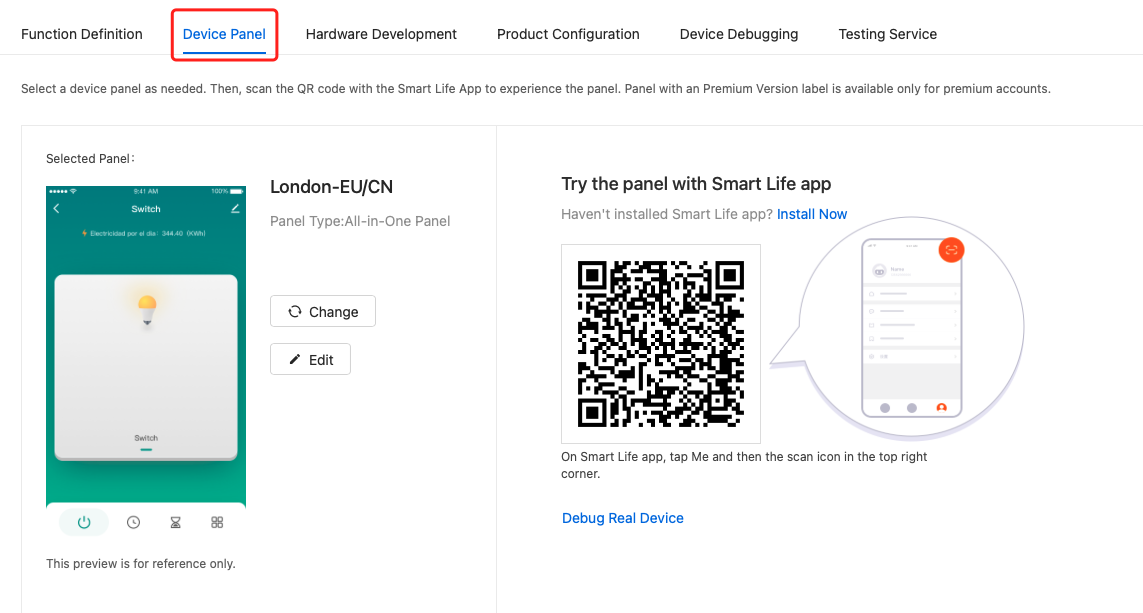
The creation of a 3-gang switch product is completed.
Development guide
The gateway acts as a bridge to help sub-devices connect to the internet for accessing cloud services. The SDK provides the implementation of two-way communication between the gateway and sub-devices. How the gateway communicates with its sub-devices is implemented by you. Your implementation refers to the application.
How the SDK interacts with the application:
- The SDK interacts with the application by using callbacks.
- The application interacts with the SDK by using functions.
Typically, the microcontroller on the gateway talks to the modules through a serial port. The modules talks to sub-devices over specific protocols such as Zigbee and Bluetooth.

Device activation
Through the gateway, a sub-device can be connected to and registered with the cloud for activation.
To activate a sub-device, the end-users will perform the following actions:
-
Open the SmartLife app, select the gateway, and tap Add Sub-device. Then, the gateway will be ready for connecting to a sub-device.
-
Press and hold the reset button on a sub-device to make it enter the pairing mode. Then, the sub-device will regularly send broadcast packets.
-
After the sub-device joins the same network as the gateway, it will be bound with the cloud through the gateway. At this time, this sub-device will be on the list of bound sub-devices. End-users tap Done to complete the process.
The following sequence diagram shows how they interact with each other:
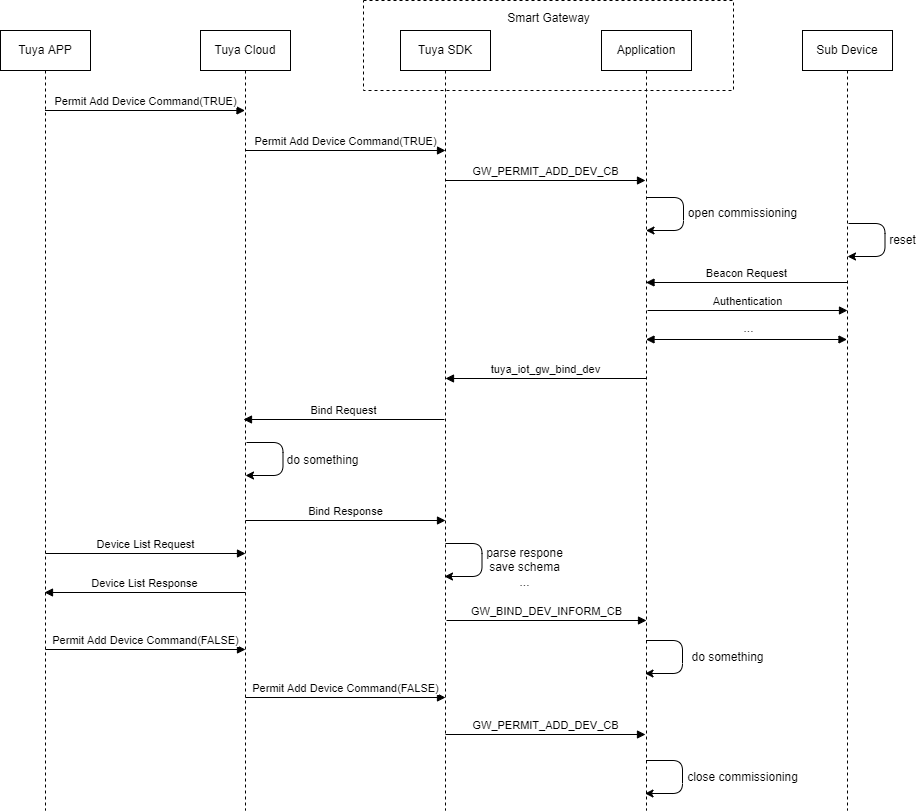
The interaction can be broken down into three parts:
- The SDK directs the application to allow or disallow a sub-device to join the network.
- The application calls the SDK’s device binding function to bind the sub-device with the cloud.
- The SDK notifies the application of the operation result.
Implementation steps:
-
Call
tuya_iot_reg_gw_mgr_cbto register the device management callback and implement the callback functions. -
Implement the communication between the gateway and sub-devices.
-
After a sub-device joins the network, the application calls
tuya_iot_gw_bind_devto bind the sub-device with the cloud.
Sample code
STATIC BOOL_T __dev_add_cb(CONST GW_PERMIT_DEV_TP_T tp, CONST BOOL_T permit, CONST UINT_T timeout)
{
    /** TODO
     * If `permit` is TRUE, it means allowing a sub-device to join the network. If a timeout occurs, joining the network will be disallowed.
     * If `permit` is FALSE, it means disallowing a sub-device to join the network.
     */

     /**
      * The following sample code shows that when the application is notified of allowing a sub-device to join the network
      *   a) binds the sub-device directly based on the existing information.
      *   b) checks for the registration state of the sub-device before binding it to avoid duplicate operation.
      */
      DEV_DESC_IF_S *dev_if = NULL;
      CHAR_T *dev_id = "abcdefabcdef";
      CHAR_T *pid    = "d1xabwgg"; // The PID of the 3-gang switch created on the Tuya Developer Platform.
      if (permit) {
        dev_if = tuya_iot_get_dev_if(dev_id);
        if (dev_if && dev_if->bind) {
            return TRUE;
        }
        tuya_iot_gw_bind_dev(DEV_ATTACH_MOD_1, 0, dev_id, pid, "1.0.0");
      }

      return TRUE;
}

STATIC VOID __dev_bind_cb(CONST CHAR_T *dev_id, CONST OPERATE_RET result)
{
    /**
     * result != OPRT_OK, Binding failed. The sub-device is removed.
     * result == OPRT_OK
     *  a) calls `tuya_iot_set_dev_hb_cfg` to set the heartbeat timeout period.
     *  b) reads the current status of the sub-device and reports it to the cloud.
     */

     /**
      * The following sample code shows when a sub-device is bound successfully
      *   a) sets the heartbeat timeout period of the sub-device to 3 minutes, with 3 heartbeat checks.
      *   b) reports the status of the sub-device.
      */
      if (result == OPRT_OK) {
          tuya_iot_set_dev_hb_cfg(dev_id, 120, 3, FALSE);

          TY_OBJ_DP_S *dps = (TY_OBJ_DP_S *)Malloc(3 * SIZEOF(TY_OBJ_DP_S));
          if (dps == NULL) {
              return;
          }

          // Turn on all three switches.
          for (int i = 0; i < 3; i++) {
              dps[i].dpid = (i + 1);
            dps[i].type = PROP_BOOL;
            dps[i].value.dp_bool = TRUE;
          }
          dev_report_dp_json_async(dev_id, dps, 3);
      }
}

/**
 * Implement callbacks. Network joining uses the `dev_add` and `dev_bind_ifm` callbacks.
 */
TY_IOT_DEV_CBS_S dev_mgr_cbs = {
    .dev_add       = __dev_add_cb,
    .dev_bind_ifm  = __dev_bind_cb,
};

/**
 * Parameter 1: The protocol type. `tp` ranges between [DEV_ATTACH_MOD_1, DEV_ATTACH_MOD_10].
 *               If `tp` < DEV_ATTACH_MOD_1, it is reserved for the SDK use.
 * Parameter 2: Device management callbacks.
 */
tuya_iot_reg_gw_mgr_cb(DEV_ATTACH_MOD_1, &dev_mgr_cbs);
Device control
Each device feature is structured and represented as a data point (DP). Six data types are supported for a DP, including Boolean, value, enum, fault, string, and raw.
The gateway needs to convert the DP command received from the cloud into the specified protocol command before sending it to the sub-device. After the sub-device executes the command, the gateway syncs the current status of the sub-device to the cloud. The cloud takes the returned status as a response to command execution.
The gateway needs to convert the protocol command received from the sub-device into the DP data before reporting it to the cloud.
The following sequence diagram shows how they interact with each other:
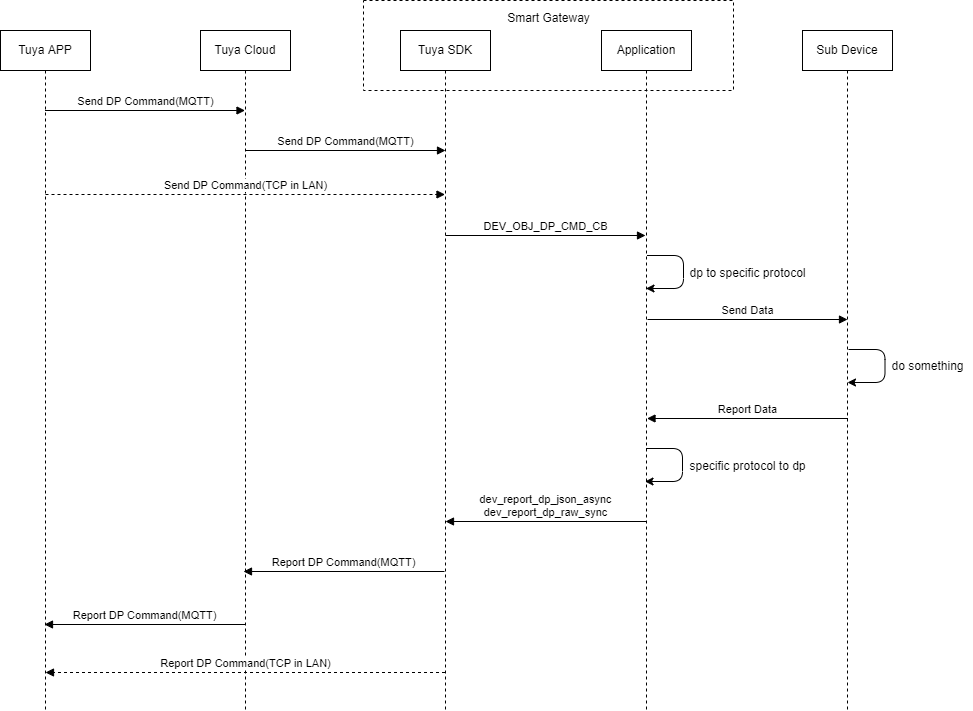
The interaction can be broken down into two parts:
- The SDK directs the application to process a DP command.
- The application calls the SDK’s DP status reporting function to sync status to the cloud.
Implementation steps:
-
Call
tuya_iot_reg_dp_cbto register the DP management callback and implement the callback functions. -
Implement the communication between the gateway and sub-devices.
-
The gateway converts the protocol data from the sub-device into DP data and calls
dev_report_dp_json_asyncordev_report_dp_raw_syncto send the data to the cloud.
Sample code
STATIC VOID __dev_cmd_obj_cb(CONST TY_RECV_OBJ_DP_S *cmd)
{
     /**
      * In the callback, convert the DP of object type into the protocol-specific data and send the converted data to the sub-device.
      *   a) reads the `uddd` of the sub-device. `uddd` is a custom parameter in the device binding function. It is used to describe a sub-device for data mapping.
      *   b) maps the DP data to the protocol-specific data by `uddd`.
      */

     /**
      * The following sample code shows when a control command is received:
      *   a) parses the DP data and prints it.
      *   b) directly reports the received data to the cloud.
      */
     for (INT_T i = 0; i < cmd->dps_cnt; i++) {
         PR_DEBUG("dpid: %d", cmd->dps[i].dpid);
             switch (cmd->dps[i].type) {
             case PROP_BOOL:
                 PR_DEBUG("dp_bool value: %d", cmd->dps[i].value.dp_bool);
                 break;
             case PROP_VALUE:
                 PR_DEBUG("dp_value value: %d", cmd->dps[i].value.dp_value);
                 break;
             case PROP_ENUM:
                 PR_DEBUG("dp_enum value: %d", cmd->dps[i].value.dp_enum);
                 break;
             case PROP_STR:
                 PR_DEBUG("dp_str value: %s", cmd->dps[i].value.dp_str);
                 break;
             }
     }

     dev_report_dp_json_async(cmd->cid, cmd->dps, cmd->dps_cnt);
}

STATIC VOID __dev_cmd_raw_cb(CONST TY_RECV_RAW_DP_S *dp)
{
    /**
     * In the callback, convert the DP of raw type into the protocol-specific data and send the converted data to the sub-device.
     */
}

TY_IOT_DP_CBS_S dev_dp_cbs = {
    .obj   = __dev_cmd_obj_cb,
    .raw   = __dev_cmd_raw_cb,
};

/**
 * Parameter 1: The device type, used to specify that the DP callbacks apply to sub-devices only, gateways only, or both the sub-devices and gateways.
 * Parameter 2: The protocol type. The protocol type. `tp` ranges between [DEV_ATTACH_MOD_1, DEV_ATTACH_MOD_10].
 *               If `tp` < DEV_ATTACH_MOD_1, it is reserved for the SDK use.
 * Parameter 3: DP management callbacks.
 */
tuya_iot_reg_dp_cb(DP_DEV, DEV_ATTACH_MOD_1, &dev_dp_cbs);
Heartbeat mechanism
The heartbeat mechanism monitors the connection between the gateway and sub-devices. There are two methods to achieve the heartbeat check.
- The gateway can regularly send a ping packet to sub-devices in a manner such as reading the version number of the sub-device.
- The sub-device can regularly report data such as its version number.
The SDK provides the implementation of the first method. When a heartbeat timeout occurs, the SDK notifies the application of the heartbeat check. The application calls tuya_iot_fresh_dev_hb to refresh the heartbeat status on receiving any messages from the sub-device.
Register the notification callback to invoke when a heartbeat timeout occurs.
STATIC VOID __dev_hb_cb(CONST CHAR_T *dev_id)
{
    /**
     * In the callback, detect whether the sub-device is online in a manner such as reading version number.
     * Call `tuya_iot_fresh_dev_hb` to refresh the heartbeat status on receiving any messages from the sub-device.
     */

     /**
      * The following sample code shows when a heartbeat timeout occurs:
      *   a) directly calls the heartbeat refresh function to make the sub-device stay online.
      */
     tuya_iot_fresh_dev_hb(dev_id);
}

TY_IOT_DEV_CBS_S dev_mgr_cbs = {
    .dev_hb        = __dev_hb_cb,
    .dev_add       = __dev_add_cb,
    .dev_bind_ifm  = __dev_bind_cb,
};

tuya_iot_reg_gw_mgr_cb(DEV_ATTACH_MOD_1, &dev_mgr_cbs);
The default timeout period is 10 seconds. To adjust the timeout, traverse all the sub-devices on program startup and then set the heartbeat timeout.
DEV_DESC_IF_S *dev_if = NULL;
VOID *iter = NULL;

dev_if = tuya_iot_dev_traversal(&iter);
while (dev_if) {
    if (dev_if->tp == DEV_ATTACH_MOD_1) {
        // Read the status of the sub-device and sync it to the cloud.
        // Call `tuya_iot_set_dev_hb_cfg` to set the heartbeat timeout period.

        /**
         * The following sample code shows the heartbeat timeout of all connected sub-devices is set to 3 minutes when the program is started.
         */
          tuya_iot_set_dev_hb_cfg(dev_if->id, 120, 3, FALSE);
    }
}
Resetting and removal
After end-users operate Remove or Remove and Wipe Data on the mobile app, the SDK will trigger a callback to notify the application of this event.
Register the resetting and removal callback.
STATIC VOID __dev_del_cb(CONST CHAR_T *dev_id, CONST GW_DELDEV_TYPE type)
{
    /**
     * In the callback, remove the sub-device.
     *   If `type` is  `GWDEV_DELTYPE_MQTT`, a sub-device is removed over MQTT in real time.
     *   If `type` is `GWDEV_DELTYPE_SYNC`, a sub-device is removed and synced with the device list on the mobile app.
     */
}

STATIC VOID __dev_reset_cb(CONST CHAR_T *dev_id, DEV_RESET_TYPE_E type)
{
    /**
     * In the callback, reset the sub-device.
     *   If `type` is `DEV_REMOTE_RESET_FACTORY`, the sub-device is removed from the mobile app.
     *   If `type` is  `DEV_RESET_DATA_FACTORY`, the data of the sub-device is erased on activation.
     */
}

TY_IOT_DEV_CBS_S dev_mgr_cbs = {
    .dev_del       = __dev_del_cb,
    .dev_reset     = __dev_reset_cb,
    .dev_hb        = __dev_hb_cb,
    .dev_add       = __dev_add_cb,
    .dev_bind_ifm  = __dev_bind_cb,
};

tuya_iot_reg_gw_mgr_cb(DEV_ATTACH_MOD_1, &dev_mgr_cbs);
OTA update
Over-the-air (OTA) firmware updates are a vital component of any IoT system. OTA firmware updates indicate the practice of remotely updating the code on an embedded device.
This section describes how to install OTA updates on sub-devices.
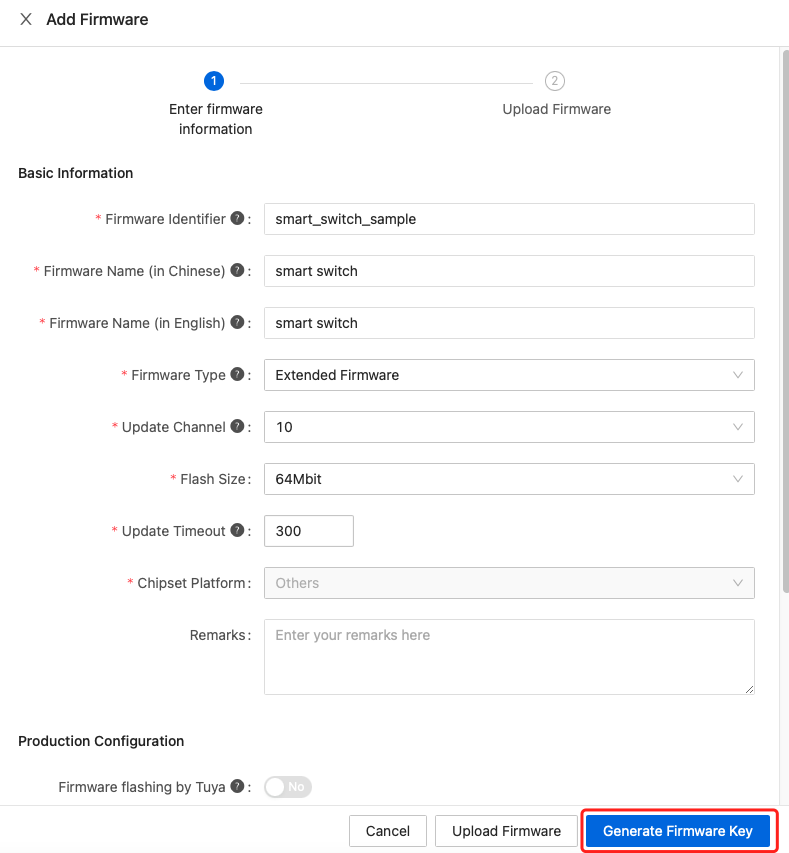
Create firmware key
The firmware key is used to manage the firmware. One firmware key can be associated with multiple firmware versions.
Steps to create a firmware key:
-
Log in to the Tuya Developer Platform. On the Smart Products page, find the 3-gang switch created in the step of Create a sub-device and click Continue to Develop.

-
Click the Hardware Development tab. Choose Add Custom Firmware.
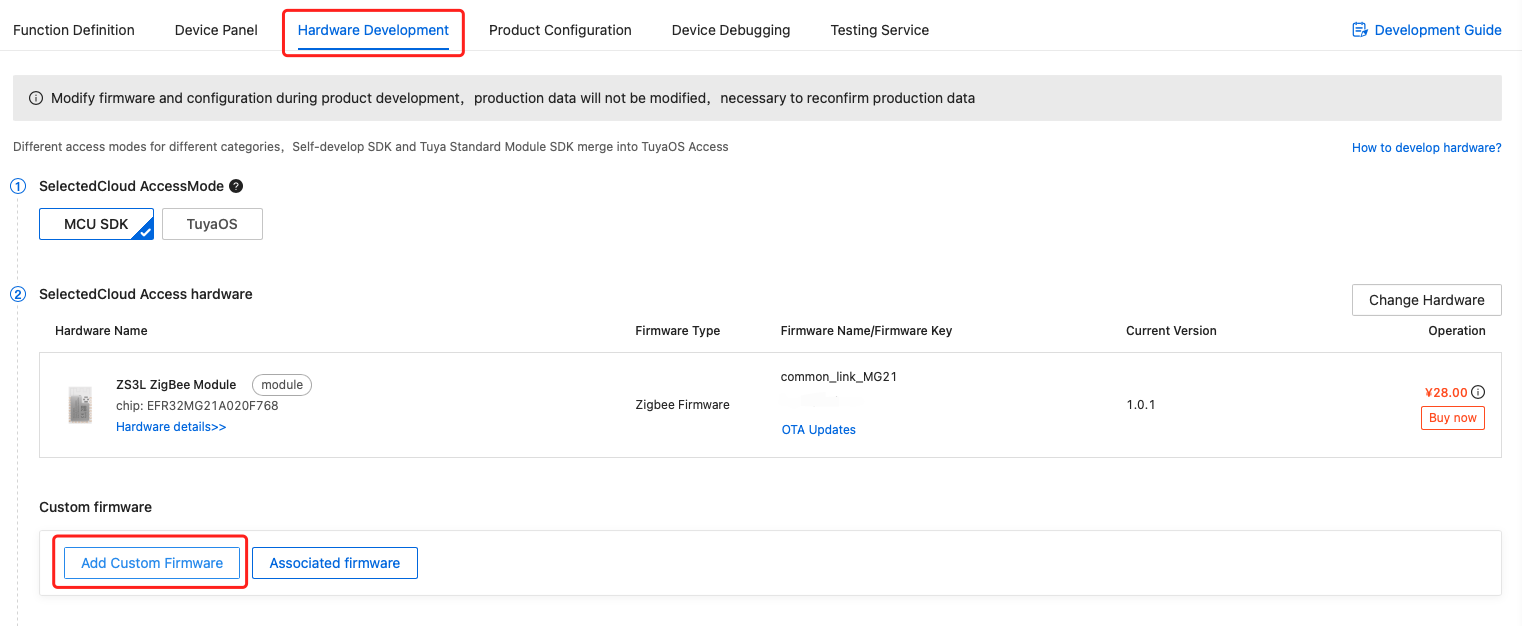
-
Complete the required information and click Generate Firmware Key.
Field description
Firmware Type: Choose Extended Firmware. The protocol type less than 10 is reserved for internal SDK use. The protocol type greater than or equal to 10 is custom.
Update Channel: It matches the input parameter of the protocol type that is bound with the sub-device.
Update Timeout: If the sub-device fails to report the new version number, the app will prompt end-users with a message saying update timeout.
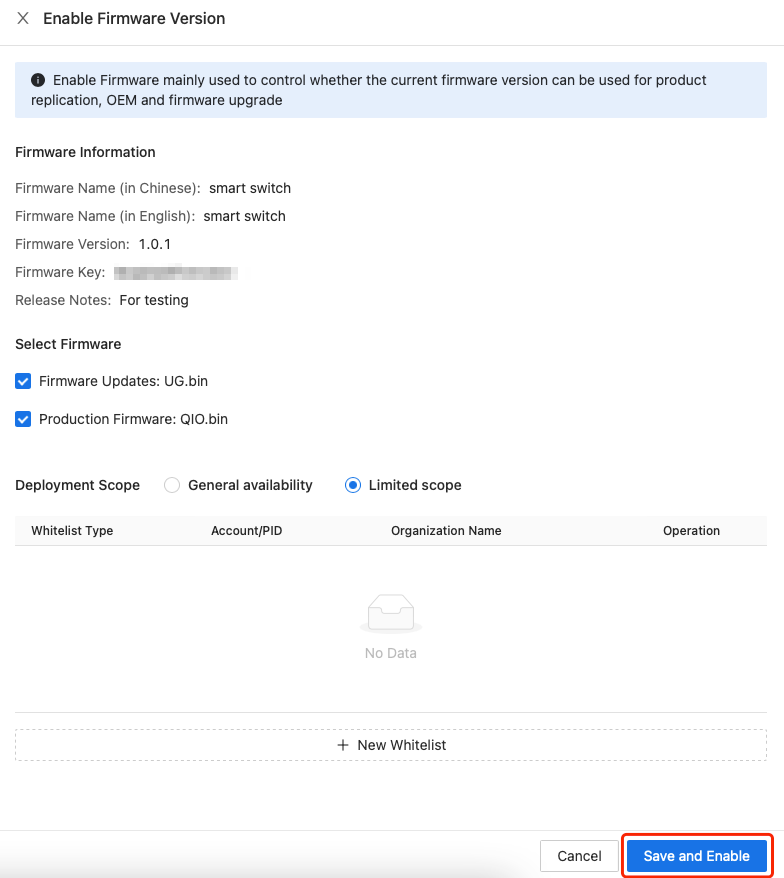
Create firmware version
This section describes how to upload firmware updates to the platform.
-
Click New Firmware Version.

-
Enter the Firmware Version, upload the Production Firmware and Firmware Updates, and click Save & Enabled.
In this example, the firmware update file only contains a
Hello Worldstring for demonstration.
-
Click Save and Enable.
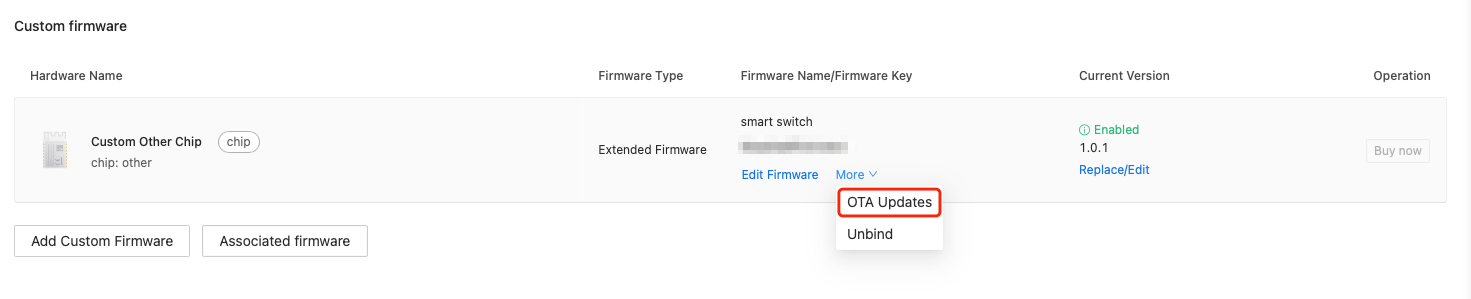
Verify
This section describes how to verify the updates by using the allowlist.
-
Click More > OTA Updates.
-
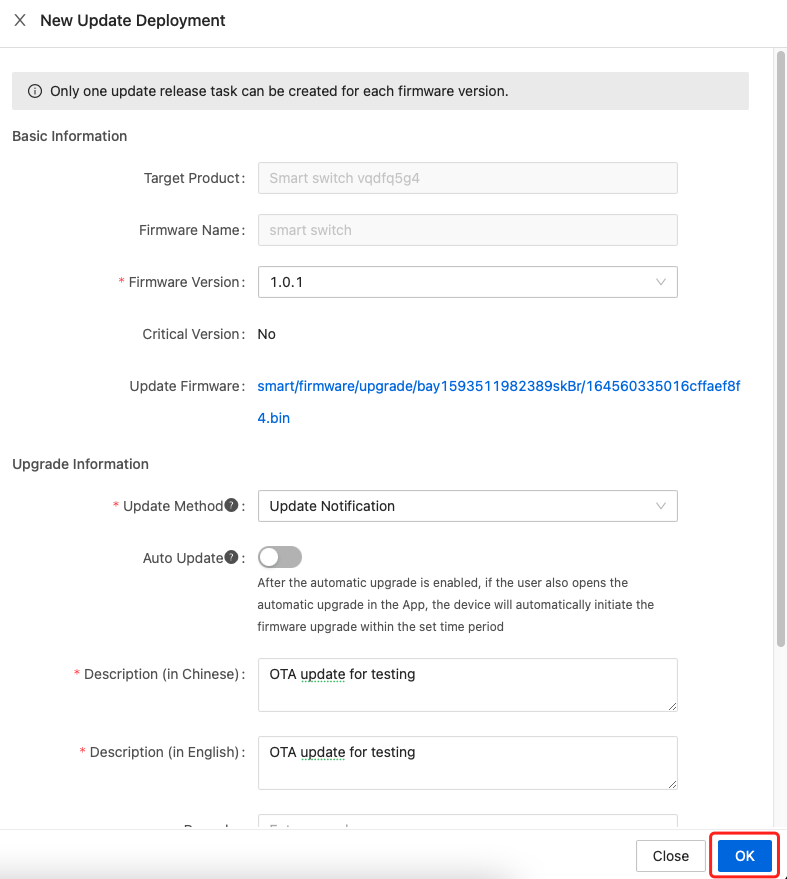
Select the firmware key and click New Update Deployment.
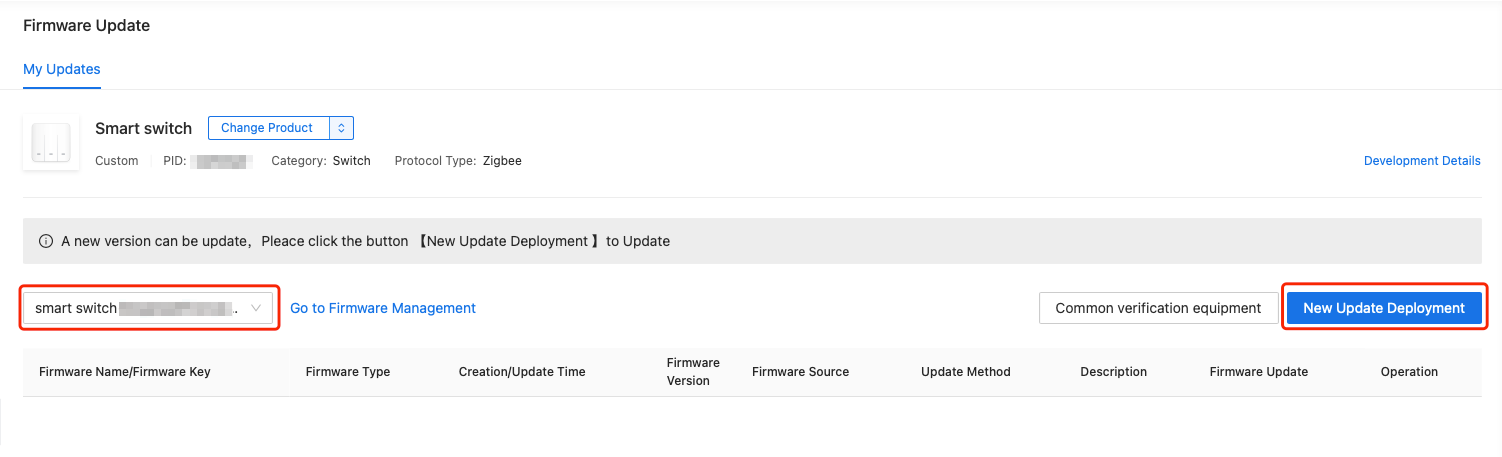
-
Select the firmware version we created. For Update Method, choose Update Notification. Complete the description and click OK.
-
Click Verify. Enter the virtual ID of the sub-device to add it to the allowlist.
To find the virtual ID, open the SmartLife app and enter the control panel of the sub-device. Tap … in the top right corner and tap Device Information.

Implementation code
The following sequence diagram shows how an OTA update for a sub-device works:
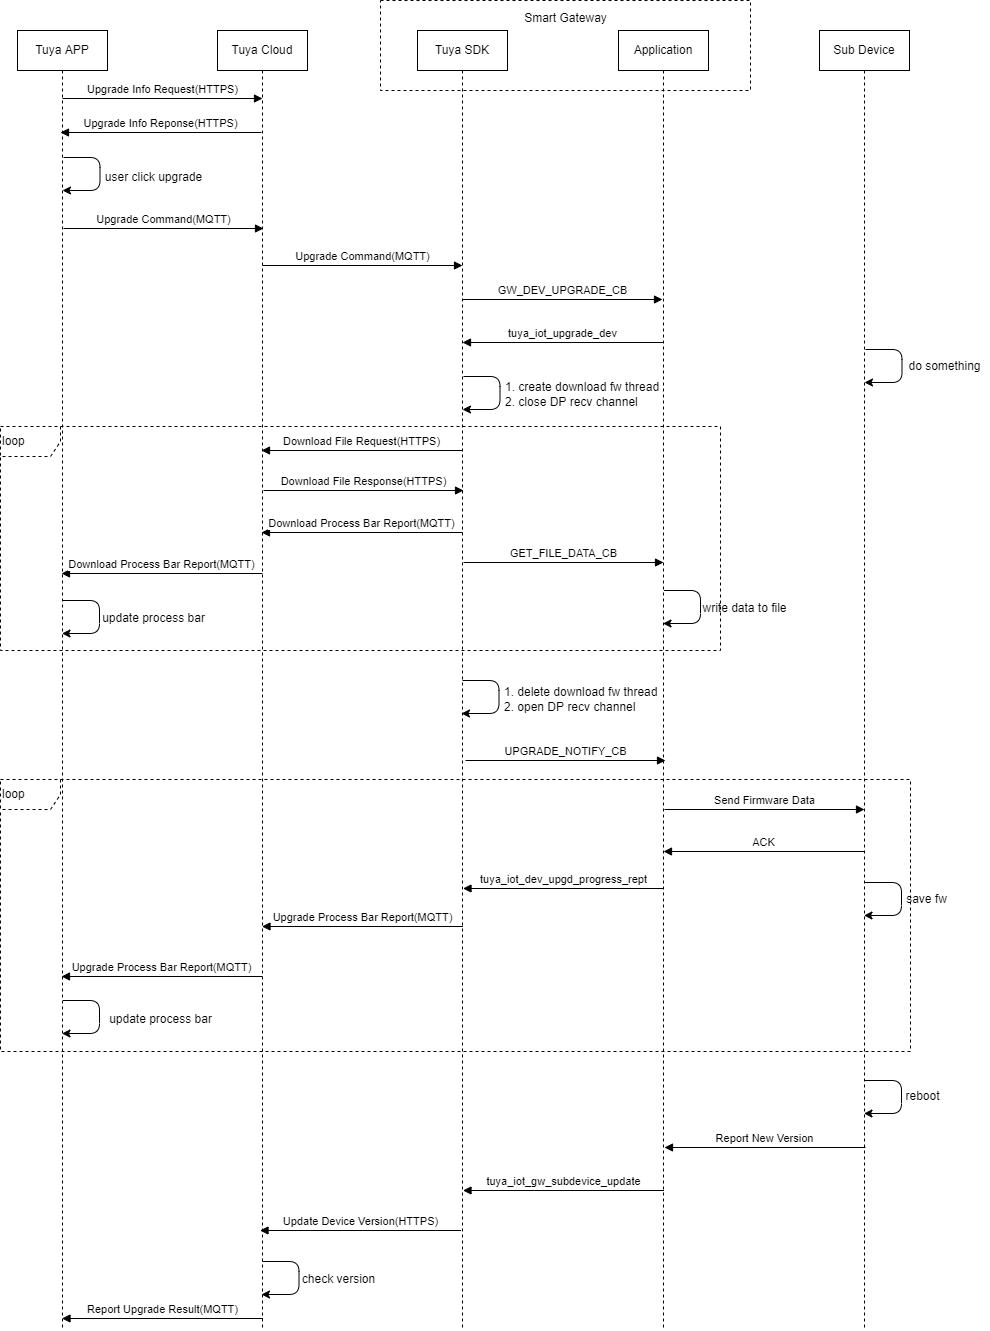
The interaction can be broken down into six parts:
- The SDK notifies the application of new firmware updates available.
- The application calls the SDK’s update download function.
- The SDK downloads the updates in multiple packets and sends them to the application for processing.
- After the download is completed, the SDK notifies the application of the download result.
- If the download is successful, the application sends the updates to the sub-device and calls the progress bar updating function.
- If the download failed, the application calls the SDK’s update status reporting function to report update failure.
Sample code:
STATIC CHAR_T upg_dev[DEV_ID_LEN] = {0};

STATIC OPERATE_RET __dev_ota_data(IN CONST FW_UG_S *fw,
                                  IN CONST UINT_T total_len,
                                  IN CONST UINT_T offset,
                                  IN CONST BYTE_T *data,
                                  IN CONST UINT_T len,
                                  OUT UINT_T *remain_len,
                                  IN PVOID_T pri_data)
{
    /**
     * The firmware data reception callback to write firmware data to files.
     */

    /**
     * The following sample code shows downloading firmware updates of the sub-device.
     *   a) directly prints data without saving.
     *   b) reports the progress to the cloud.
     */
    for (INT_T i = 0; i < len; i++) {
        PR_DEBUG_RAW("%02x ", data[i]);
    }
    PR_DEBUG_RAW("\n");

    UINT_T percent = 0;
    percent = ((offset * 100) / (total_len+1));
    if (percent >= 99) {
        percent = 98;
    }
    tuya_iot_dev_upgd_progress_rept(percent, upg_dev, fw->tp);

    return OPRT_OK;
}

STATIC VOID __dev_ota_notify(IN CONST FW_UG_S *fw,
                             IN CONST INT_T download_result,
                             IN PVOID_T pri_data)
{
    /**
     * download_result == OPRT_OK, The updates are downloaded. The application will notify the sub-device of installation and send the updates to it.
     * download_result != OPRT_OK, Failed to download the updates. The application reports update failure.
     */

    /**
     * The following sample code shows processing the notification of the sub-device update.
     *   Download successful: Report the new version number.
     *   Download failed: Report the update status.
     */
    if (download_result == OPRT_OK) {
        tuya_iot_gw_subdevice_update(upg_dev, fw->sw_ver);
    } else {
        tuya_iot_dev_upgd_result_report(upg_dev, fw->tp, 4);
    }
}

STATIC VOID __dev_upgrade_cb(CONST CHAR_T *dev_id, CONST FW_UG_S *fw)
{
    /**
     * In the callback, call the update download function. You can add the processing logic as needed.
     */
    strncpy(upg_dev, dev_id, SIZEOF(upg_dev));
    tuya_iot_upgrade_dev(dev_id, fw, __dev_ota_data, __dev_ota_notify, NULL);
}

TY_IOT_DEV_CBS_S dev_mgr_cbs = {
    .dev_upgrade   = __dev_upgrade_cb,
    .dev_del       = __dev_del_cb,
    .dev_reset     = __dev_reset_cb,
    .dev_hb        = __dev_hb_cb,
    .dev_add       = __dev_add_cb,
    .dev_bind_ifm  = __dev_bind_cb,
};

tuya_iot_reg_gw_mgr_cb(DEV_ATTACH_MOD_1, &dev_mgr_cbs);
Appendix
Full code
#include <unistd.h>

#include "uni_log.h"
#include "mem_pool.h"
#include "base_os_adapter.h"
#include "tuya_iot_base_api.h"
#include "tuya_iot_com_api.h"

#include "tuya_iot_sdk_api.h"
#include "tuya_iot_sdk_defs.h"

#include "tuya_gw_subdev_api.h"

#if defined(TY_BT_MOD) && (TY_BT_MOD == 1)
#include "tuya_os_adapt_bt.h"
#endif

#define PID       "fljmamufiym5fktz"                  // Replace it with your own PID.
#define UUID      "tuya461dbc63aeeb991f"              // Replace it with your own UUID.
#define AUTHKEY   "c8X4PR4wx1gMFaQlaZu5dfgVvVRwB8Ug"  // Replace it with your own AUTHKEY.

STATIC CHAR_T upg_dev[DEV_ID_LEN] = {0};

STATIC VOID __gw_reset_cb(GW_RESET_TYPE_E type)
{
    PR_DEBUG("gw reset callback, type: %d", type);

    if (GW_RESET_DATA_FACTORY != type) {
        exit(0);
    }

    return;
}

STATIC VOID __gw_upgrade_cb(CONST FW_UG_S *fw)
{
    PR_DEBUG("gw upgrade callback");

    if (fw == NULL) {
        PR_ERR("invalid param");
        return;
    }

    PR_DEBUG("        tp: %d", fw->tp);
    PR_DEBUG("    fw_url: %s", fw->fw_url);
    PR_DEBUG("    sw_ver: %s", fw->sw_ver);
    PR_DEBUG("   fw_hmac: %s", fw->fw_hmac);
    PR_DEBUG(" file_size: %u", fw->file_size);

    return;
}

STATIC VOID __gw_active_stat_cb(GW_STATUS_E status)
{
    PR_DEBUG("gw active stat callback, status: %d", status);

    return;
}

STATIC VOID __gw_reboot_cb(VOID)
{
    PR_DEBUG("gw reboot callback");

    exit(0);

    return;
}

STATIC VOID __nw_stat_cb(IN CONST SDK_NW_STAT_T stat)
{
    PR_DEBUG("network stat: %d", stat);

    return;
}

STATIC VOID __wired_stat_cb(IN CONST SDK_WIRED_NW_STAT_T stat)
{
    PR_DEBUG("wired stat: %d", stat);

    return;
}

STATIC BOOL_T __dev_add_cb(CONST GW_PERMIT_DEV_TP_T tp, CONST BOOL_T permit, CONST UINT_T timeout)
{
    /** TODO
     * If `permit` is TRUE, it means allowing a sub-device to join the network. If a timeout occurs, joining the network will be disallowed.
     * If `permit` is FALSE, it means disallowing a sub-device to join the network.
     */

     /**
      * The following sample code shows that when the application is notified of allowing a sub-device to join the network
      *   a) binds the sub-device directly based on the existing information.
      *   b) checks for the registration state of the sub-device before binding it to avoid duplicate operation.
      */
      DEV_DESC_IF_S *dev_if = NULL;
      CHAR_T *dev_id = "abcdefabcdef";
      CHAR_T *pid    = "d1xabwgg"; // The PID of the 3-gang switch created on the Tuya Developer Platform.
      if (permit) {
        dev_if = tuya_iot_get_dev_if(dev_id);
        if (dev_if && dev_if->bind) {
            return TRUE;
        }
        tuya_iot_gw_bind_dev(DEV_ATTACH_MOD_1, 0, dev_id, pid, "1.0.0");
      }

      return TRUE;
}

STATIC VOID __dev_bind_cb(CONST CHAR_T *dev_id, CONST OPERATE_RET result)
{
    /**
     * result != OPRT_OK, Binding failed. The sub-device is removed.
     * result == OPRT_OK
     *  a) calls `tuya_iot_set_dev_hb_cfg` to set the heartbeat timeout period.
     *  b) reads the current status of the sub-device and reports it to the cloud.
     */

     /**
      * The following sample code shows when a sub-device is bound successfully
      *   a) sets the heartbeat timeout period of the sub-device to 3 minutes, with 3 heartbeat checks.
      *   b) reports the status of the sub-device.
      */
      if (result == OPRT_OK) {
          tuya_iot_set_dev_hb_cfg(dev_id, 120, 3, FALSE);

          TY_OBJ_DP_S *dps = (TY_OBJ_DP_S *)Malloc(3 * SIZEOF(TY_OBJ_DP_S));
          if (dps == NULL) {
              return;
          }

          // Turn on all three switches.
          for (int i = 0; i < 3; i++) {
              dps[i].dpid = (i + 1);
            dps[i].type = PROP_BOOL;
            dps[i].value.dp_bool = TRUE;
          }
          dev_report_dp_json_async(dev_id, dps, 3);
      }
}

STATIC VOID __dev_hb_cb(CONST CHAR_T *dev_id)
{
    /**
     * In the callback, detect whether the sub-device is online in a manner such as reading version number.
     * Call `tuya_iot_fresh_dev_hb` to refresh the heartbeat status on receiving any messages from the sub-device.
     */

     /**
      * The following sample code shows when a heartbeat timeout occurs:
      *   a) directly calls the heartbeat refresh function to make the sub-device stay online.
      */
     tuya_iot_fresh_dev_hb(dev_id);
}

STATIC VOID __dev_del_cb(CONST CHAR_T *dev_id, CONST GW_DELDEV_TYPE type)
{
    /**
     * In the callback, remove the sub-device.
     *   type == GWDEV_DELTYPE_MQTT: A sub-device is removed over MQTT in real time.
     *   type == GWDEV_DELTYPE_SYNC: A sub-device is removed and synced with the device list on the mobile app.
     */
}

STATIC VOID __dev_reset_cb(CONST CHAR_T *dev_id, DEV_RESET_TYPE_E type)
{
    /**
     * In the callback, reset the sub-device.
     *   type == DEV_REMOTE_RESET_FACTORY: The sub-device is removed from the mobile app.
     *   type == DEV_RESET_DATA_FACTORY: The data of the sub-device is erased on activation.
     */
}

STATIC OPERATE_RET __dev_ota_data(IN CONST FW_UG_S *fw,
                                  IN CONST UINT_T total_len,
                                  IN CONST UINT_T offset,
                                  IN CONST BYTE_T *data,
                                  IN CONST UINT_T len,
                                  OUT UINT_T *remain_len,
                                  IN PVOID_T pri_data)
{
    /**
     * The firmware data reception callback to write firmware data to files.
     */

    /**
     * The following sample code shows downloading firmware updates of the sub-device.
     *   a) directly prints data without saving.
     *   b) reports the progress to the cloud.
     */
    for (INT_T i = 0; i < len; i++) {
        PR_DEBUG_RAW("%02x ", data[i]);
    }
    PR_DEBUG_RAW("\n");

    UINT_T percent = 0;
    percent = ((offset * 100) / (total_len+1));
    if (percent >= 99) {
        percent = 98;
    }
    tuya_iot_dev_upgd_progress_rept(percent, upg_dev, fw->tp);

    return OPRT_OK;
}

STATIC VOID __dev_ota_notify(IN CONST FW_UG_S *fw,
                             IN CONST INT_T download_result,
                             IN PVOID_T pri_data)
{
    /**
     * download_result == OPRT_OK, The updates are downloaded. The application will notify the sub-device of installation and send the updates to it.
     * download_result != OPRT_OK, Failed to download the updates. The application reports update failure.
     */

    /**
     * The following sample code shows processing the notification of the sub-device update.
     *   Download successful: Report the new version number.
     *   Download failed: Report the update status.
     */
    if (download_result == OPRT_OK) {
        tuya_iot_gw_subdevice_update(upg_dev, fw->sw_ver);
    } else {
        tuya_iot_dev_upgd_result_report(upg_dev, fw->tp, 4);
    }
}

STATIC VOID __dev_upgrade_cb(CONST CHAR_T *dev_id, CONST FW_UG_S *fw)
{
    /**
     * In the callback, call the update download function. You can add the processing logic as needed.
     */
    strncpy(upg_dev, dev_id, SIZEOF(upg_dev));
    tuya_iot_upgrade_dev(dev_id, fw, __dev_ota_data, __dev_ota_notify, NULL);
}

STATIC VOID __dev_cmd_obj_cb(CONST TY_RECV_OBJ_DP_S *cmd)
{
     /**
      * In the callback, convert the DP of object type into the protocol-specific data and send the converted data to the sub-device.
      *   a) reads the `uddd` of the sub-device. `uddd` is a custom parameter in the device binding function. It is used to describe a sub-device for data mapping.
      *   b) maps the DP data to the protocol-specific data by `uddd`.
      */

     /**
      * The following sample code shows when a control command is received:
      *   a) parses the DP data and prints it.
      *   b) directly reports the received data to the cloud.
      */
     for (INT_T i = 0; i < cmd->dps_cnt; i++) {
         PR_DEBUG("dpid: %d", cmd->dps[i].dpid);
             switch (cmd->dps[i].type) {
             case PROP_BOOL:
                 PR_DEBUG("dp_bool value: %d", cmd->dps[i].value.dp_bool);
                 break;
             case PROP_VALUE:
                 PR_DEBUG("dp_value value: %d", cmd->dps[i].value.dp_value);
                 break;
             case PROP_ENUM:
                 PR_DEBUG("dp_enum value: %d", cmd->dps[i].value.dp_enum);
                 break;
             case PROP_STR:
                 PR_DEBUG("dp_str value: %s", cmd->dps[i].value.dp_str);
                 break;
             }
     }

     dev_report_dp_json_async(cmd->cid, cmd->dps, cmd->dps_cnt);
}

STATIC VOID __dev_cmd_raw_cb(CONST TY_RECV_RAW_DP_S *dp)
{
    /**
     * In the callback, convert the DP of raw type into the protocol-specific data and send the converted data to the sub-device.
     */
}

STATIC OPERATE_RET __user_init(VOID)
{
    OPERATE_RET rt = OPRT_OK;
    DEV_DESC_IF_S *dev_if = NULL;
    VOID *iter = NULL;

    TY_IOT_DP_CBS_S dev_dp_cbs = {
        .obj   = __dev_cmd_obj_cb,
        .raw   = __dev_cmd_raw_cb,
    };

    /**
     * Implement callbacks. Network joining uses the `dev_add` and `dev_bind_ifm` callbacks.
     */
    TY_IOT_DEV_CBS_S dev_mgr_cbs = {
        .dev_upgrade   = __dev_upgrade_cb,
        .dev_del       = __dev_del_cb,
        .dev_reset     = __dev_reset_cb,
        .dev_hb        = __dev_hb_cb,
        .dev_add       = __dev_add_cb,
        .dev_bind_ifm  = __dev_bind_cb,
    };

    /**
     * Parameter 1: The protocol type. `tp` ranges between [DEV_ATTACH_MOD_1, DEV_ATTACH_MOD_10].
     *                If `tp` < DEV_ATTACH_MOD_1, it is reserved for the SDK use.
     * Parameter 2: Device management callbacks.
     */
    TUYA_CALL_ERR_RETURN(tuya_iot_reg_gw_mgr_cb(DEV_ATTACH_MOD_1, &dev_mgr_cbs));

    /**
     * Parameter 1: The device type, used to specify that the DP callbacks apply to sub-devices only, gateways only, or both the sub-devices and gateways.
     * Parameter 2: The protocol type. The protocol type. `tp` ranges between [DEV_ATTACH_MOD_1, DEV_ATTACH_MOD_10].
     *              If `tp` < DEV_ATTACH_MOD_1, it is reserved for the SDK use.
     * Parameter 3: DP management callback.
     */
    TUYA_CALL_ERR_RETURN(tuya_iot_reg_dp_cb(DP_DEV, DEV_ATTACH_MOD_1, &dev_dp_cbs));

    dev_if = tuya_iot_dev_traversal(&iter);
    while (dev_if) {
        if (dev_if->tp == DEV_ATTACH_MOD_1) {
            // Read the status of the sub-device and sync it to the cloud.
            // Call `tuya_iot_set_dev_hb_cfg` to set the heartbeat timeout period.

            /**
             * The following sample code shows the heartbeat timeout of all connected sub-devices is set to 3 minutes when the program is started.
             */
              tuya_iot_set_dev_hb_cfg(dev_if->id, 120, 3, FALSE);
        }
    }
}

int main(int argc, char **argv)
{
    OPERATE_RET rt = OPRT_OK;
    GW_PROD_INFO_S prod_info = {0};

    /* gw base callback */
    TY_GW_INFRA_CBS_S gw_cbs = {
        .gw_reset_cb       = __gw_reset_cb,
        .gw_upgrade_cb     = __gw_upgrade_cb,
        .gw_active_stat_cb = __gw_active_stat_cb,
        .gw_reboot_cb      = __gw_reboot_cb,
    };

#if defined(TY_BT_MOD) && (TY_BT_MOD == 1)
    tuya_os_adapt_reg_bt_intf();
#endif

    /* initiate os-layer service*/
    tuya_os_intf_init();

    /* initiate iot-layer service */
    TUYA_CALL_ERR_RETURN(tuya_iot_init("./"));

    /* set the logging level to debug */
    SET_PR_DEBUG_LEVEL(TY_LOG_LEVEL_DEBUG);

    PR_DEBUG("SDK INFO: %s", tuya_iot_get_sdk_info());

    /* set uuid and authkey */
    prod_info.uuid     = UUID;
    prod_info.auth_key = AUTHKEY;
    TUYA_CALL_ERR_RETURN(tuya_iot_set_gw_prod_info(&prod_info));

    /* pre-initiate sdk service */
    TUYA_CALL_ERR_RETURN(tuya_iot_sdk_pre_init(TRUE));

    /* initiate application service, more service in here */
    TUYA_CALL_ERR_RETURN(tuya_user_svc_init(&gw_cbs));
    TUYA_CALL_ERR_RETURN(__user_init());

    /* initiate sdk service */
#if defined(GW_SUPPORT_WIRED_WIFI) && (GW_SUPPORT_WIRED_WIFI==1)
    TUYA_CALL_ERR_RETURN(tuya_iot_wired_wf_sdk_init(IOT_GW_NET_WIRED_WIFI, GWCM_OLD, WF_START_AP_ONLY, PID, USER_SW_VER, NULL, 0));
#elif defined(WIFI_GW) && (WIFI_GW==1)
    TUYA_CALL_ERR_RETURN(tuya_iot_wf_sdk_init(GWCM_OLD, WF_START_AP_ONLY, PID, USER_SW_VER, NULL, 0));
#else
    TUYA_CALL_ERR_RETURN(tuya_iot_sdk_init(PID, USER_SW_VER, NULL, 0));
#endif

    /* register net stat notification callback */
    TUYA_CALL_ERR_RETURN(tuya_iot_sdk_reg_netstat_cb(__nw_stat_cb, __wired_stat_cb, NULL));

    /* start application service, more service in here */
    TUYA_CALL_ERR_RETURN(tuya_user_svc_start(NULL));

    while (1) {
        sleep(10);
    }

    return 0;
}
Is this page helpful?
YesFeedbackIs this page helpful?
YesFeedback


