XVR SDK v2.0
This topic describes how to develop with the XVR SDK to implement the features for your NVR or DVR product, such as device activation, live preview, cloud storage, and local storage. In this topic, unless otherwise stated, NVR and XVR represent the same concept.
Make sure to carefully read through this documentation to better understand the key concepts and how the SDK works, which will help in your product development.
Operation mode
An XVR can operate in NVR mode and station mode. You can define the operation mode with the macro DEMO_USE_AS_NVR.
-
NVR mode: A controller device with one UUID can control multiple sub-devices. These sub-devices share the same product ID (PID). The controller device contains the UUID information of sub-devices it connects to. The number of sub-devices that a controller device can connect to equals the maximum amount of sub-devices that a controller device can bind with. Adding or deleting sub-devices is initiated in bulk by the controller device. The API requests are quite easy. Sub-devices can be identified by their channel IDs or node IDs.
-
Station mode: The sub-device has its unique UUID and PID. Adding or deleting sub-devices is initiated individually by using the mobile app. This mode allows flexible control and management over devices. The sub-devices can be identified by
devid.
- The UUID acts as a credential that authenticates access to Tuya’s cloud services. Each device must be assigned with a unique and authorized UUID. In the XVR SDK, the device cluster consists of the controller device and the sub-device. Theoretically, we need the UUIDs of both the controller device and the sub-device to complete the authentication. To improve the process efficiency, we design a special type of UUID that can be used to authenticate both the controller device and the specified sub-device. The concept of channel is introduced to describe the number of sub-devices that a controller device can bind with. For example, a 4-channel UUID indicates a controller device can bind with up to four sub-devices.
- The major difference between the NVR mode and the station mode lies in the process of binding sub-devices. NVR mode allows users to have the sub-devices bound with the controller device in bulk by using a special UUID. Station mode does not support bulk operation. Users need to use the mobile app to bind sub-devices with the controller device one by one. The NVR mode is preferred by most users thanks to its high efficiency.
In the XVR SDK, the device ID of the sub-device refers to the node ID. The node ID is a unique identifier used for the controller device to manage its sub-devices. The node ID differs from the virtual ID in the device information displayed on the mobile app. The virtual ID and the node ID are both used to uniquely identify the same device but they are used for different scenarios. They have a mapping relationship in the cloud. - In NVR mode, a unique node ID is generated based on the UUID, following the format
uuid+a+ sequence number, such asuuida001anduuida002. In this topic, unless otherwise stated, the device ID mentioned in the NVR mode-related description refers to the node ID. - In station mode, the node ID generated based on the UUID is used to identify each sub-device.
Since the unique channel ID and node ID both identify the same sub-device, the XVR SDK can use either ID to obtain the other ID.
-
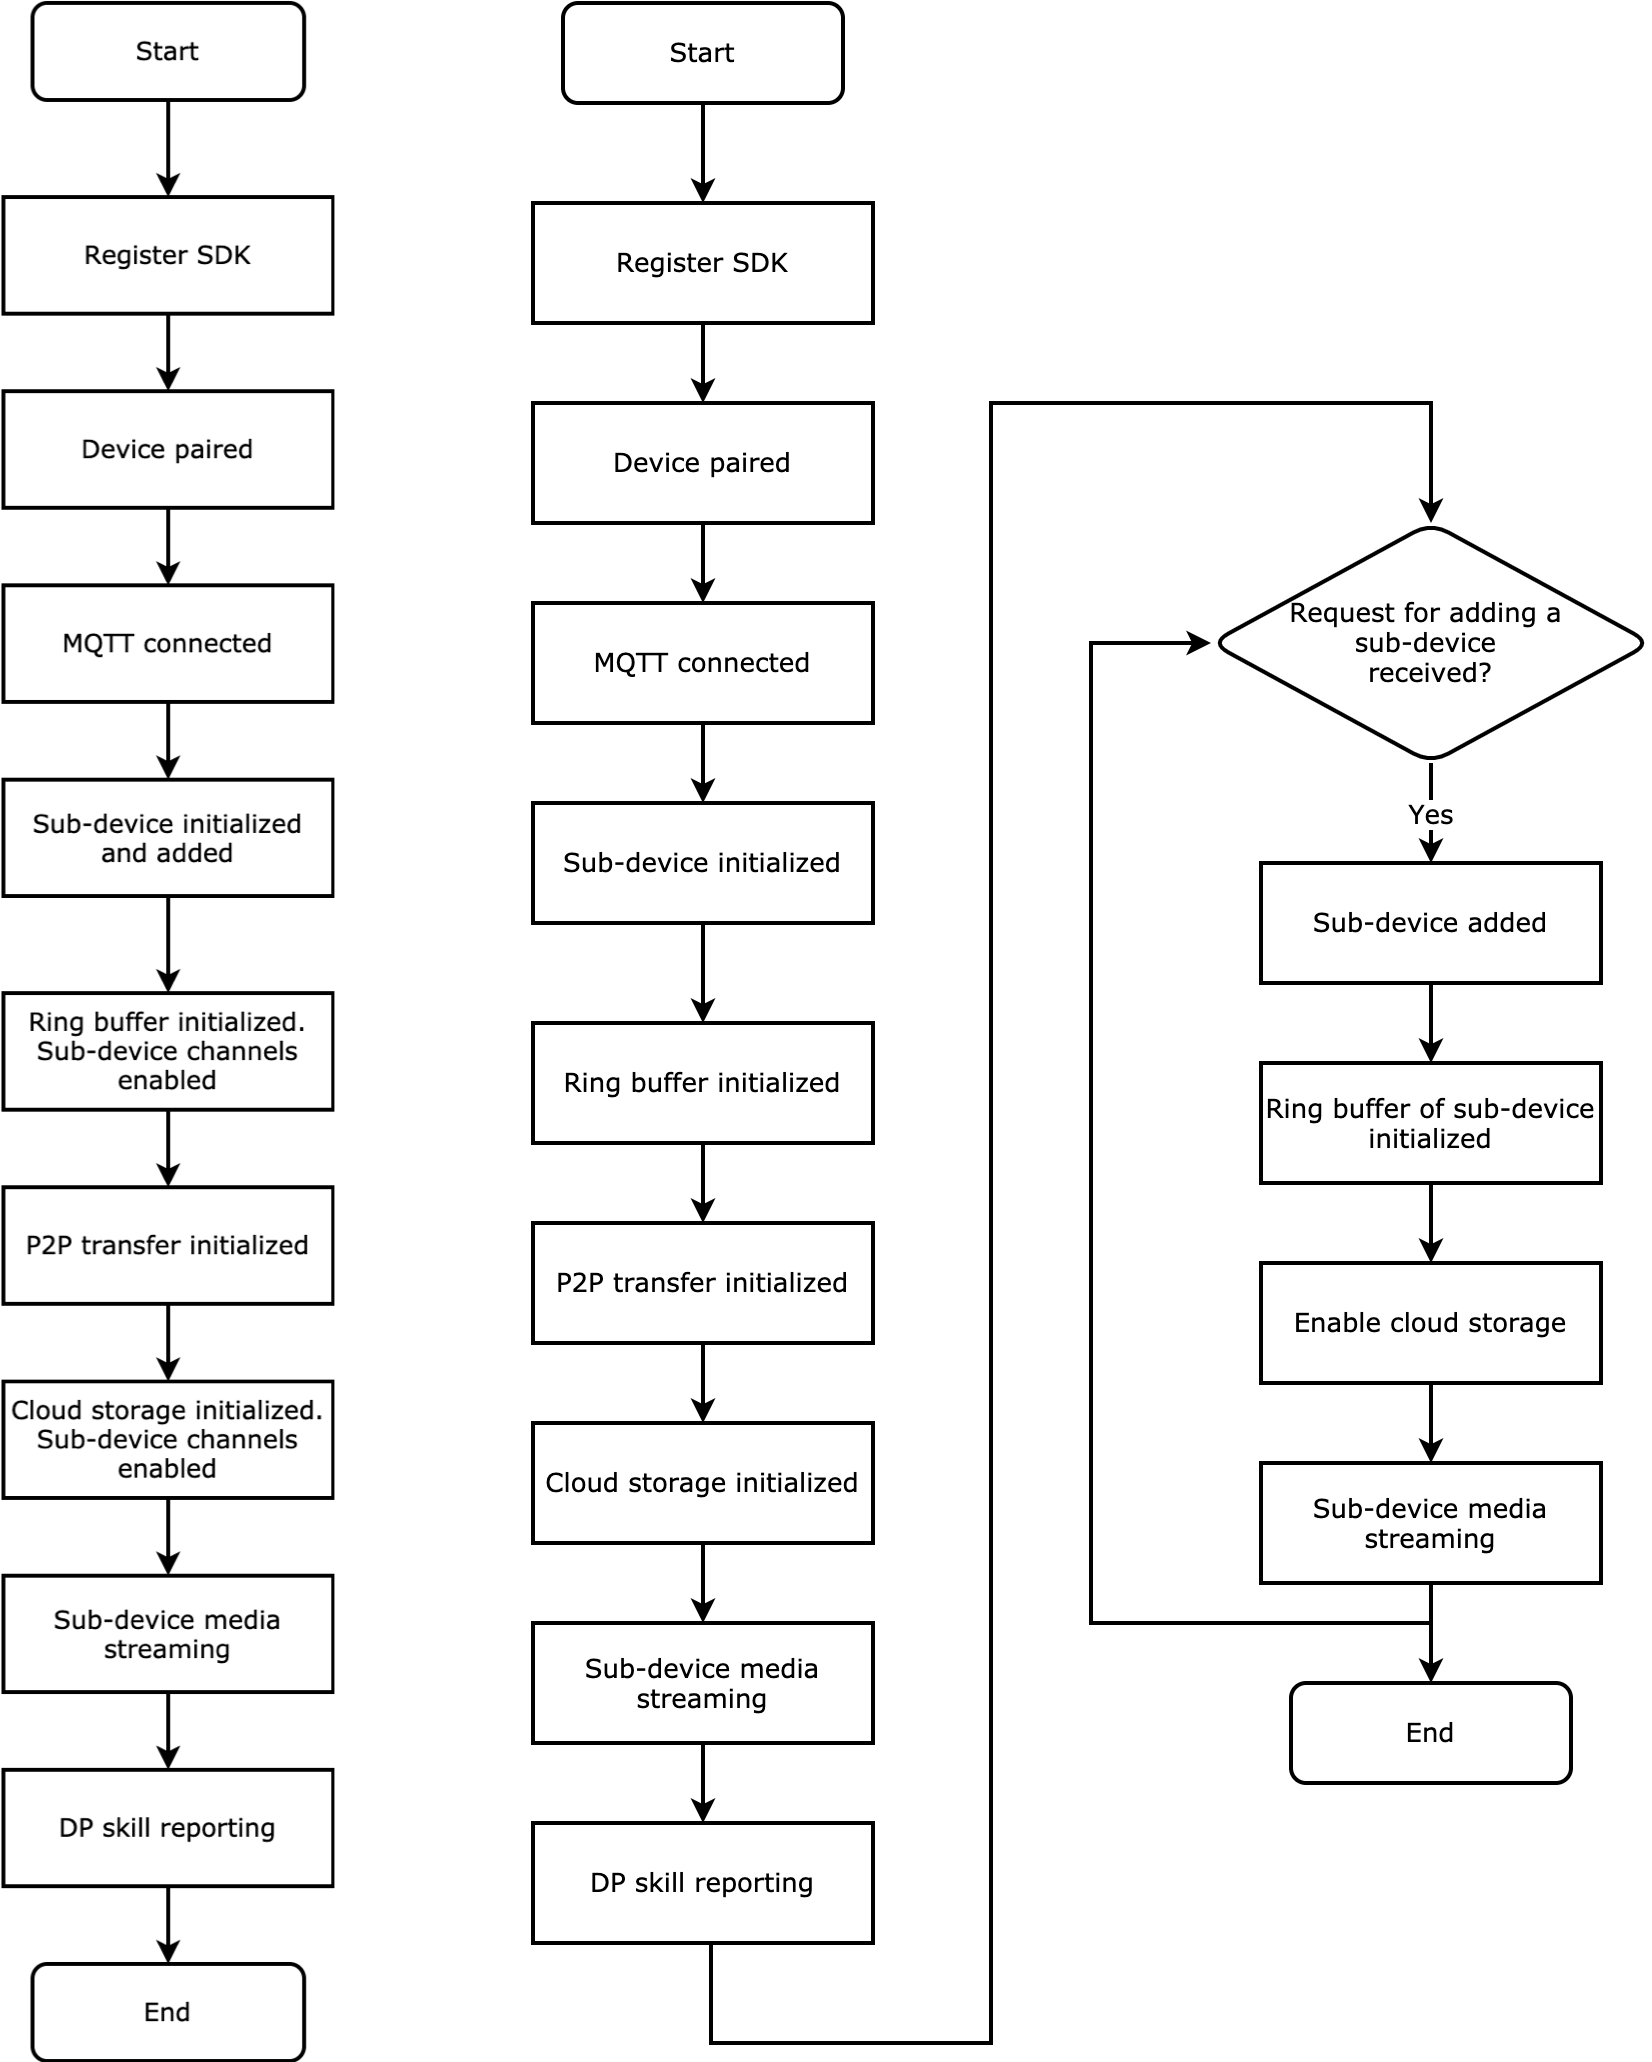
The following diagram shows the initialization process in the NVR mode and station mode respectively.
Get started
This section uses Ubuntu as an example to show you how to try the NVR demo.
Set up development environment
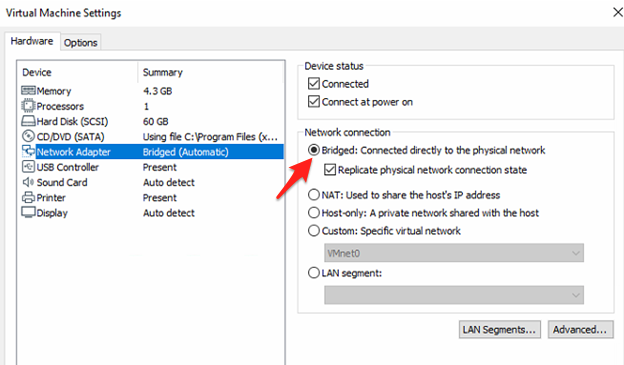
If you have installed Ubuntu on a virtual machine (VM), you can follow the steps below and set up the environment to try pairing a device in wired mode.
-
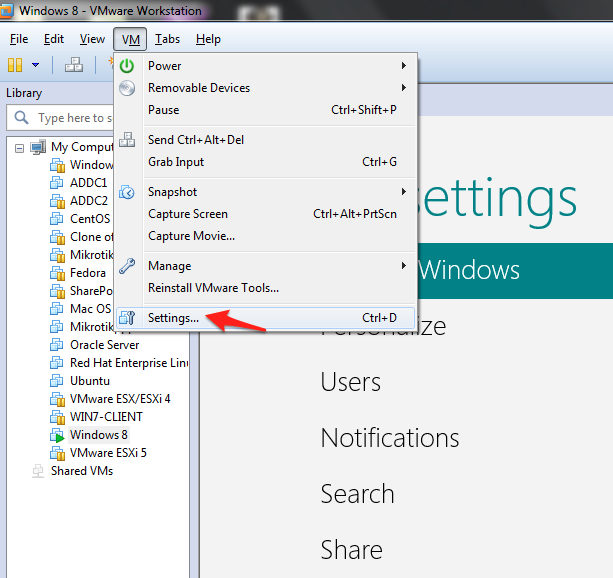
Open VM and click VM > Settings.
-
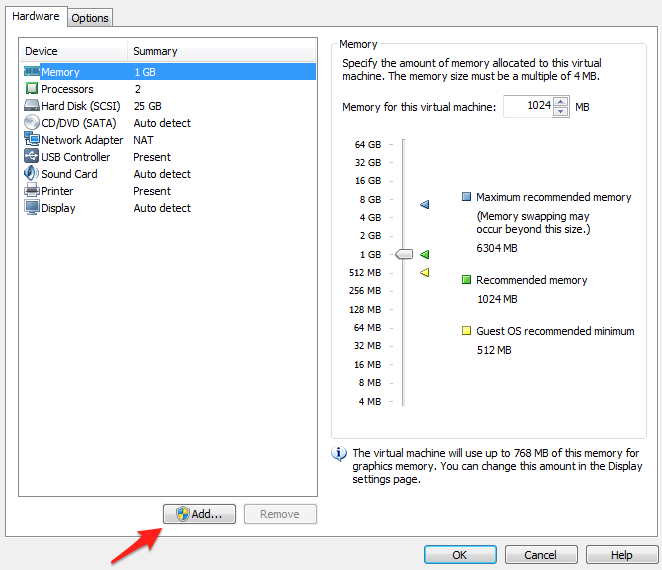
Click Add.
-
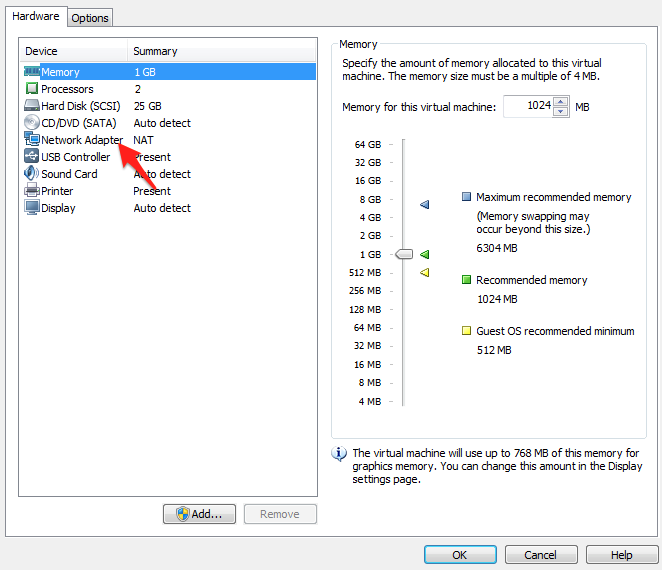
Choose Network Adapter.
-
Choose Bridged.
-
Connect to a router with an Ethernet cable.
-
Restart the device to complete the environment setup.
Run the demo
-
Log in to GitHub and download the demo.
-
Assign an interface to your network adapter.
\#define WLAN_DEV "ens38" -
Update the parameters of
UUID,AUTHKEY, andPIDwith your own values. For more information, see Parameter setting.The
UUIDandAuthKeymust be processed by the Tuya Developer Platform to support NVR features. If you need help, submit a service ticket. The use of UUID and AuthKey follows the one-key-per-device authentication mechanism. If you intend to use an already occupied AuthKey for another device, you need to unpair it from the associated device first. -
Run the following command in
ubuntu_Demoto generate an executable file../build.sh ubuntu_xvr_5_2After building, you can find the output file
Demo_ipcinubuntu_Demo/cmake-build/out. -
Run the following command in
ubuntu_Demo/cmake-build/out../Demo_ipc -r "../../components/Demo_tuya_ipc" -
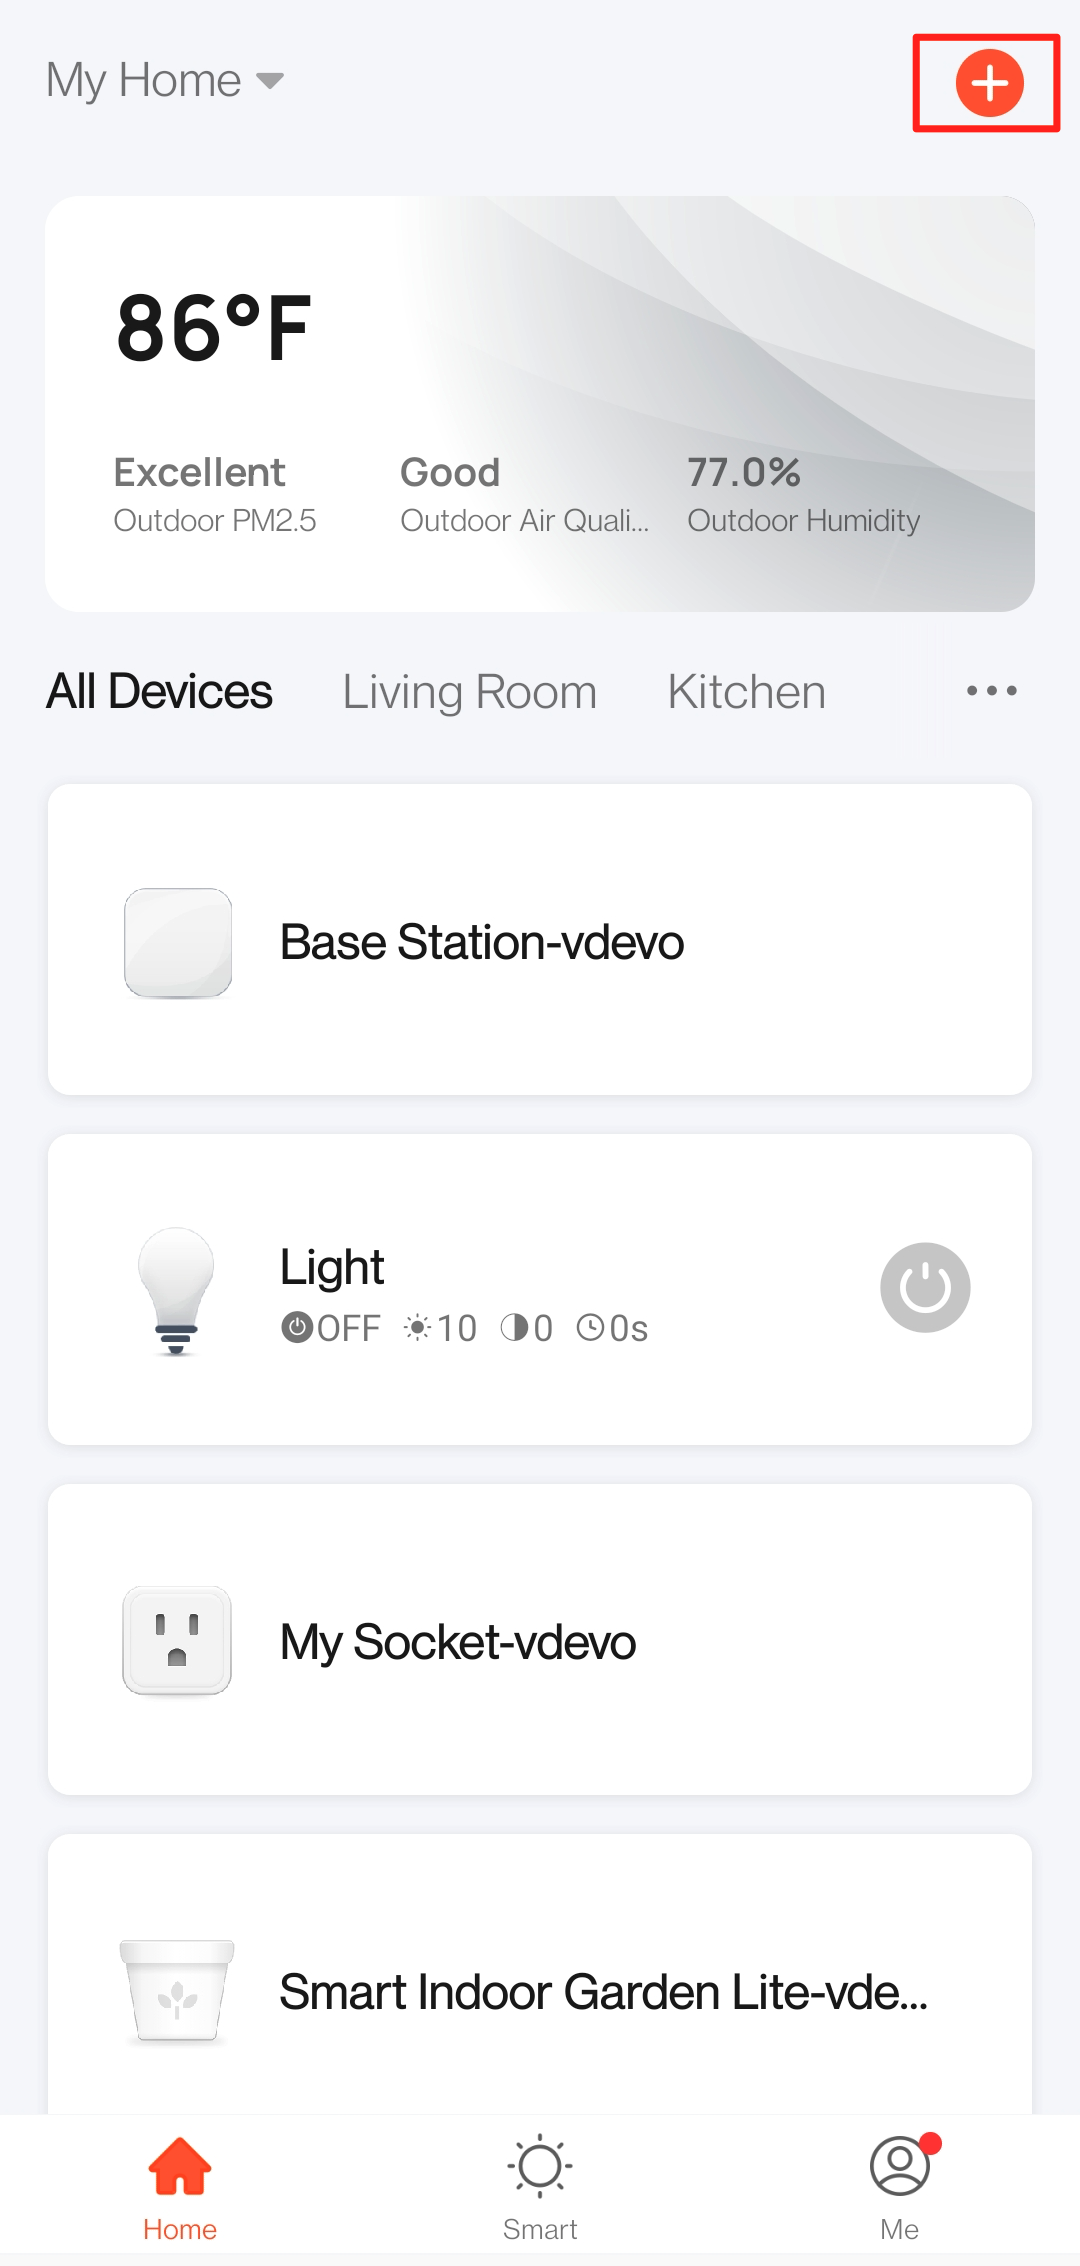
Open the SmartLife app and tap the + icon in the top right corner to add a device.
-
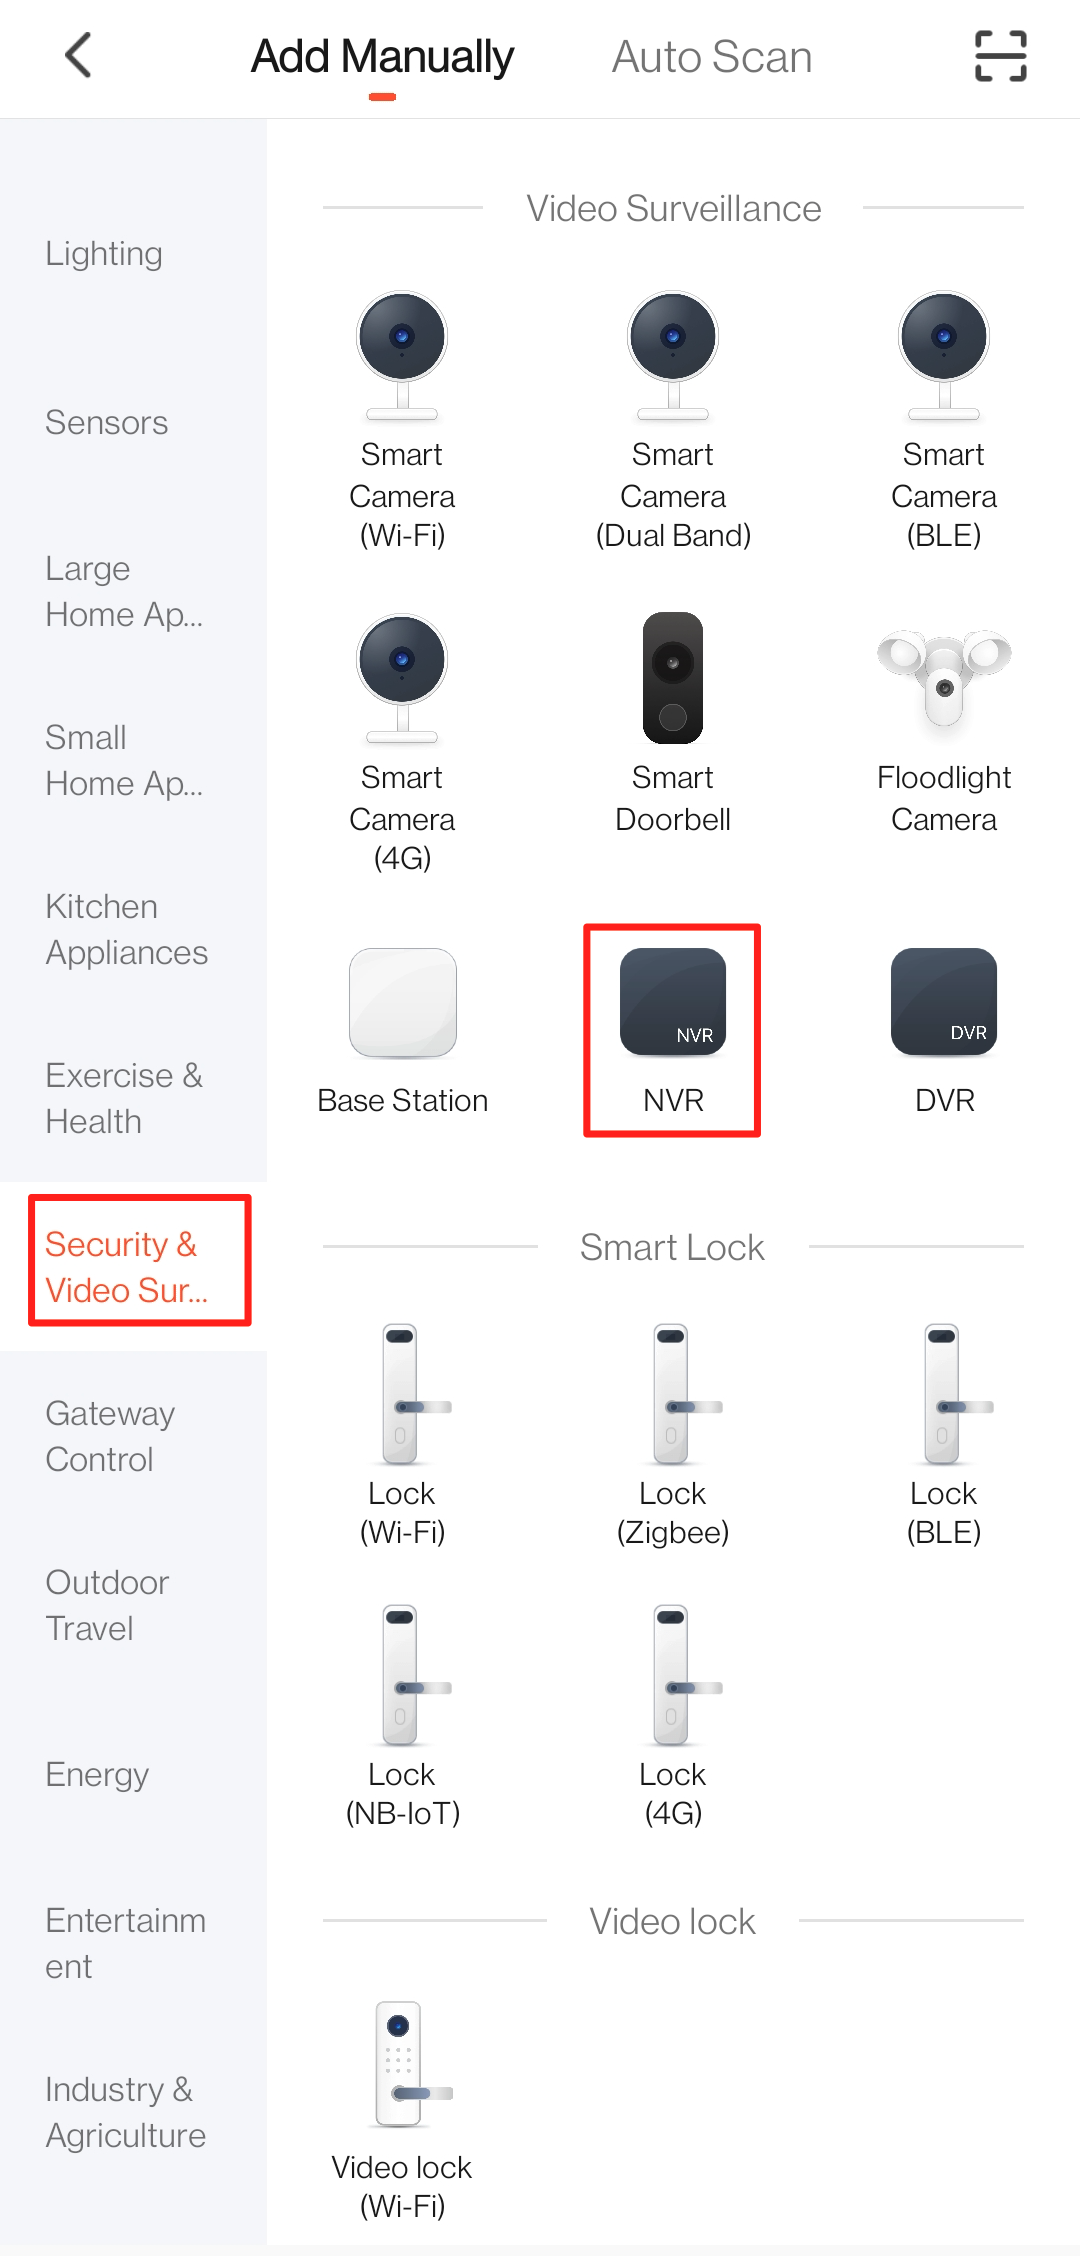
Select Security & Video Surveillance > NVR.
-
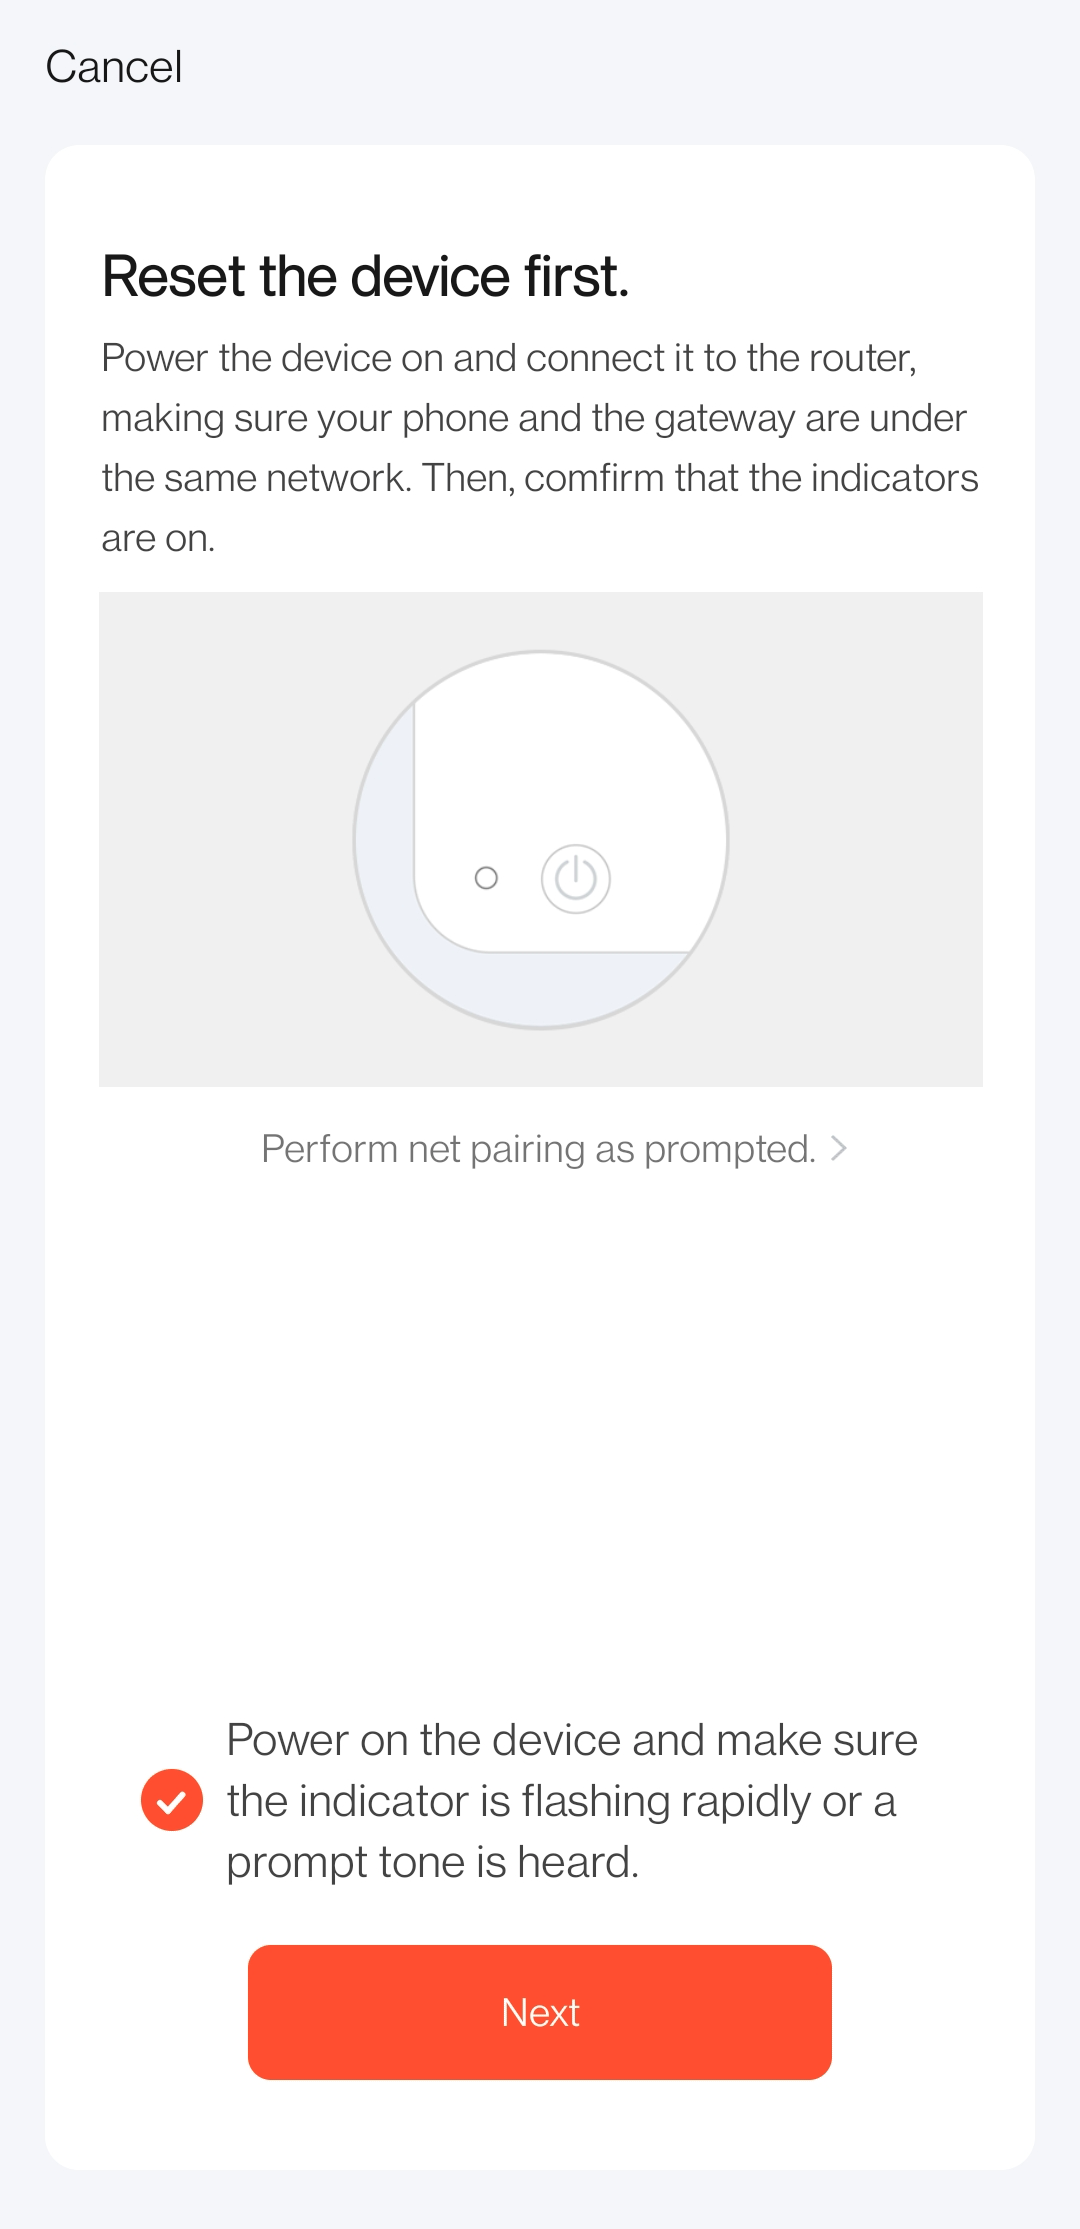
Connect your mobile phone to the Wi-Fi network provided by the router that your controller device is connected to.
-
Tap Next.
-
Wait for the process to be completed.
Tap the added device and view the live video stream. If no video is displayed, it indicates that
Demo_resourceis not set correctly.
-
The following table lists the commands for simulated operations. You can run a command to test different features.
Command Description showSubDevInfo Display sub-device information. showSubCloudInfo Display cloud storage of the sub-device. move4 Channel 0 to 3 perform motion detection. move Channel 0 performs motion detection. bell Trigger doorbell alerts. For example, If you run the following data, you will receive a notification of motion detection in the message center.
#moveWith the above commands, you will have a general understanding of the NVR SDK.
Parameter settings
-
In the
user_main.cfile, change the save path of DB files, OTA files, and local recording files.#define IPC_APP_STORAGE_PATH "/tmp/" #define IPC_APP_UPGRADE_FILE "/tmp/upgrade.file" #define IPC_APP_SD_BASE_PATH "/tmp/"The DB file contains the device pairing information. It must be stored in a read/write directory in the non-volatile memory. Data loss or corruption will cause the paired device to enter the pairing mode.
Make sure to check whether or not there is a slash (/) at the end of the path to save the DB file and local media file. -
You can change the operation mode, the number of sub-devices,
PID,UUID, andAUTHKEYintuya_ipc_common_Demo.h.- If your controller device runs in NVR mode, it can add sub-devices in bulk.
- If your controller device runs in station mode, it adds sub-devices one by one. Bulk operation is not supported.
#define DEMO_USE_AS_NVR 1    // 1 indicates NVR mode. Other values indicate station mode.
#define DEMO_NVR_SUB_DEV_NUM 4 // according to UUID, must smaller than SUB_DEV_MAX_NUM
#if defined(DEMO_USE_AS_NVR) && (DEMO_USE_AS_NVR == 1)
/*nvr dev config*/
#define IPC_APP_PID "potalyu2wh72hmjq" // The PID of the NVR device.
#define IPC_APP_UUID "zy008e00e83e6e2e70b1" // The UUID of the NVR device.
#define IPC_APP_AUTHKEY "EDhPZXTlMj6eNaqJFDOzgSpk2E2gdAa3" // The AUTHKEY of the NVR device.

#define IPC_APP_VERSION "1.0.0" // The version number of the NVR device.
#define IPC_APP_SUB_DEV_PID "hswzdzhuyplzhjzy"// The PID of the sub-device.
#define IPC_APP_SUB_DEV_VERSION "1.0.0" // The version number of the sub-device.

#else
/* Station configuration */
#define IPC_APP_PID "b4f2rzqixqfnxsja" // The PID of the station.
#define IPC_APP_UUID "tuya78d607d67b28f58a"// The UUID of the station.
#define IPC_APP_AUTHKEY "ByEKFL9wZTqwW1JO5RNAXuTMqiXSChTB"// The AUTHKEY of the station.
#define IPC_APP_VERSION "1.0.0" // The version number of the station.
#endif
The basic parameter setting is completed. Next, you can proceed with developing pairing modes.
Pair the device
NVR devices support pairing in wired mode and Wi-Fi Easy Connect (EZ mode). For more information about implementing EZ mode, see 5.x SDK Development Guide.
Wired mode
-
The device calls
IPC_APP_Init_SDKfor SDK initialization. -
The following interfaces are intended to be implemented by you. For the reference implementation, see the
tuya_ipc_wired_Demo.c.// Get the IP address. When the device detects a connected router, it returns the IP address. OPERATE_RET tuya_adapter_wired_get_ip(OUT NW_IP_S *ip) // Get the MAC address of a device. OPERATE_RET tuya_adapter_wired_get_mac(OUT NW_MAC_S *mac) // Get the connection status of a port. BOOL_T tuya_adapter_wired_station_conn(VOID) -
The SDK broadcasts the IP address and MAC address through the router. When the mobile phone connects to the Wi-Fi network and receives the broadcast, it will request a token from the server. Then, the mobile phone sends the token to the device for pairing.
Blocking is not allowed on any interfaces with the prefix of
tuya_apapter. Otherwise, device pairing cannot work as expected.The XVR SDK runs correctly only after the MQTT connection is established. Make sure to start the services with a connected MQTT.
Bind sub-devices
Call IPC_APP_Init_SDK to initialize the SDK. Bind a sub-device after the MQTT connection is established (that is when s_mqtt_status is 1).
Function description
-
tuya_xvr_dev_bindsis used to bind a sub-device.typedef struct { GW_PERMIT_DEV_TP_T tp; // The device type. Set it to 10 or 0 for adding sub-devices. The value of 0 also applies to the attribute of IP cameras. USER_DEV_DTL_DEF_T uddd; // Set it to 0x2 << 24 for pairing sub-devices. char product_id[64]; //PID char uuid[64]; //UUID char version[64]; // Version number INT_T bind_dev_cnt; // The number of bound devices. }Tuya_XVR_BIND_CTX_T; /** * \fn tuya_xvr_dev_binds * \brief Bind sub-devices * \[in] bind_ctx_ptr: Parameters of sub-devices. * \return OPRT_OK is a success. Other values indicate a failure. */ OPERATE_RET tuya_xvr_dev_binds(Tuya_XVR_BIND_CTX_T * bind_ctx_ptr) -
tuya_xvr_dev_info_get_by_chanis used to get the sub-device information by its associated channel ID.typedef struct { INT_T chn; // The channel ID. CHAR_T devId[64]; // The ID of the sub-device. CHAR_T virId[64]; // The virtual ID of a sub-device. INT_T vmChn; // The start number of channel IDs. For more information about the sort order, see `RINGBUFFER_STREAM_E`. BOOL_T alive; // Indicates whether a sub-device is online, which is used for the gateway mode. UINT_T mod; } Tuya_XVR_DEV_INFO_T; /** * \fn tuya_xvr_dev_info_get_by_chan * \brief Get the sub-device information by its associated channel ID. * \[in] chanNo: The channel ID of a sub-device. * \[out] sub_dev_info: The sub-device information. * \return OPRT_OK is a success. Other values indicate a failure. */ OPERATE_RET tuya_xvr_dev_info_get_by_chan(IN INT_T chanNo, OUT Tuya_XVR_DEV_INFO_T* sub_dev_info); -
ty_gw_subdev_add_devis called after the device receives a command to bind a sub-device.After receiving a command to bind a sub-device, the device will run this callback.
- Implementing this function is not necessary for the NVR mode.
- If your device runs in station mode, in this callback, you need to get the sub-device information such as UUID, PID, and version (see
Tuya_XVR_BIND_CTX_T), calltuya_xvr_dev_bindsto bind a sub-device, and calltuya_xvr_dev_hearbeat_time_setto set a keepalive timer. For more information, see the sample code intuya_xvr_dev_Demo.c.
/** * \fn ty_gw_subdev_add_dev * \brief The sub-device binding callback in station mode. * \[in] tp: The device type. Set it to 0 or a value equal or greater than 10 for adding sub-devices. * \[in] permit: 0 indicates adding sub-devices is now allowed. 1 indicates adding sub-devices is allowed. * \[in] timeout: The timeout period for adding sub-devices. * \return OPRT_OK is a success. Other values indicate a failure. */ BOOL_T ty_gw_subdev_add_dev(IN CONST GW_PERMIT_DEV_TP_T tp, IN CONST BOOL_T permit, IN CONST UINT_T timeout); -
tuya_xvr_dev_bind_ctx_setis used to set the parameters of bound sub-devices./** * \fn tuya_xvr_dev_bind_ctx_set * \brief Set the parameters of bound sub-devices. * \[in] devId: Device ID. * \return OPERATE_RET * \NOTICE: This function is only used for the station mode. */ OPERATE_RET tuya_xvr_dev_bind_ctx_set(IN CHAR_T* devId);
Sample in NVR mode
The device calls IPC_APP_Init_SDK to initialize the SDK. After the MQTT connection is established, tuya_xvr_dev_binds is called to bind a sub-device. For more information, see the sample code in Tuya_APP_Add_XVR_Dev.
Sample in station mode
-
You can refer to the demo and implement
ty_gw_subdev_add_dev. -
The device calls
IPC_APP_Init_SDKto initialize the SDK. -
ty_gw_subdev_add_devis called after the device receives a command to bind a sub-device. -
ty_gw_subdev_inform_devis called to initialize the bound sub-device.
Set the keepalive timer
The device sends a reliable packet to the server on a regular basis to keep the connection alive. If the server does not receive a keepalive at predefined intervals, it will declare that a device is offline.
Function description
-
tuya_xvr_dev_hb_initis used to initialize the keepalive timer./*********************************************************** * Function: tuya_xvr_dev_hb_init * Desc: Enable a keepalive timer. The gateway will check if all the sub-devices send keepalives within a timeout value every 3,000 ms. If the gateway does not receive a keepalive from a sub-device, it will terminate the connection and call `hb_send_cb` to notify the user of this broken connection up to three times. Generally, the keepalive callback is called every 8 to 10 seconds. * Input: The keepalive callback `hb_send_cb`. * Return: OPRT_OK: success Other: fail ***********************************************************/ OPERATE_RET tuya_xvr_dev_hb_init(IN CONST DEV_HEARTBEAT_SEND_CB hb_send_cb,IN CONST UINT_T min_query_interval); -
tuya_xvr_dev_hearbeat_time_setis used to set a keepalive timer for sub-devices./** * \fn tuya_xvr_dev_hearbeat_time_set * \brief Set a keepalive timer. * \[in] dev_id: The device ID, which is also the sub-device UUID in station mode. * \[in] timeout: The keepalive interval, in seconds. The sub-device interacts with the cloud so the recommended value is 60 to 120 seconds. A short interval can increase network overhead. A long interval might cause a disconnection to be detected too late. * \return OPERATE_RET * \NOTICE: This function should be called after sub-devices are bound. */ OPERAT -
tuya_xvr_dev_devId_get_by_chanis used to get the device ID associated with a channel ID./** * \fn tuya_xvr_dev_devId_get_by_chan * \brief Get the device ID associated with a channel ID. * \[in] chn: The channel ID of a sub-device. * \[in] len: The length of a device ID. * \[out] devId: The device ID associated with a channel ID. * \return OPRT_OK is a success. Other values indicate a failure. */ OPERATE_RET tuya_xvr_dev_devId_get_by_chan(IN CONST INT_T chn, OUT CHAR_T* devId, IN CONST INT_T len);
Development processes
-
Call
tuya_xvr_dev_hb_initto initialize the keepalive timer. -
Call
tuya_xvr_dev_devId_get_by_chanto get the device ID associated with a specified channel ID. -
Call
tuya_xvr_dev_hearbeat_time_setto set a keepalive timer.
Audio and video
Live preview
When the SDK is initialized, a 10-second media cache will be created by default. You can feed the media data into the ring buffer. The SDK library already enables data transmission, so related development is not required.
Function description
-
Confirm the video parameters in the
IPC_APP_Set_Media_Info.We recommend that the size of the group of pictures (GOP) be set to two to three times the frame per second (FPS) and the resolution be 16:9. The bitrate cannot exceed 2 Mbit/s. H.264 and H.265 encoding formats are supported.
// Configure the mainstream as needed.
/* If the mainstream supports multiple types of video streams, you need to set each parameter to its maximum value. */
s_media_info.channel_enable[E_IPC_STREAM_VIDEO_MAIN] =TRUE;/* Whether to enable local HD video streaming*/
s_media_info.video_fps[E_IPC_STREAM_VIDEO_MAIN] = 30;  /* FPS */
s_media_info.video_gop[E_IPC_STREAM_VIDEO_MAIN] = 30;  /* GOP */
s_media_info.video_bitrate[E_IPC_STREAM_VIDEO_MAIN] = Tuya_VIDEO_BITRATE_1M; /* Bitrate limit */
s_media_info.video_width[E_IPC_STREAM_VIDEO_MAIN] = 1920; /* Resolution of single frame width */
s_media_info.video_height[E_IPC_STREAM_VIDEO_MAIN] = 1080;/* Resolution of single frame height */
s_media_info.video_freq[E_IPC_STREAM_VIDEO_MAIN] = 90000; /* Clock frequency */
s_media_info.video_codec[E_IPC_STREAM_VIDEO_MAIN] = Tuya_CODEC_VIDEO_H264; /* Encoding format */
// Configure the substream as needed. /* If the substream supports multiple types of video streams, you need to set each parameter to its maximum value. */ s_media_info.channel_enable[E_IPC_STREAM_VIDEO_SUB] = TRUE; /* Whether to enable local SD video stream */ s_media_info.video_fps[E_IPC_STREAM_VIDEO_SUB] = 30; /* FPS */ s_media_info.video_gop[E_IPC_STREAM_VIDEO_SUB] = 30; /* GOP */ s_media_info.video_bitrate[E_IPC_STREAM_VIDEO_SUB] = Tuya_VIDEO_BITRATE_512K; /* Bitrate limit */ s_media_info.video_width[E_IPC_STREAM_VIDEO_SUB] = 640; /* Resolution of single frame width */ s_media_info.video_height[E_IPC_STREAM_VIDEO_SUB] = 360;/* Resolution of single frame height */ s_media_info.video_freq[E_IPC_STREAM_VIDEO_SUB] = 90000; /* Clock frequency */ s_media_info.video_codec[E_IPC_STREAM_VIDEO_SUB] = Tuya_CODEC_VIDEO_H264; /* Encoding format */ -
Confirm the audio parameters in the
IPC_APP_Set_Media_Info.- The audio format supports PCM, G.711u, and G.711a.
- The maximum upload size is 1,400 bytes. 8K and 16K audio are supported.
- The audio sent from the app is fixed to 320 bytes.
/* Audio stream configuration `E_CHANNEL_AUDIO` data is used by P2P preview, cloud storage, and local storage in the SDK. */ s_media_info.channel_enable[E_IPC_STREAM_AUDIO_MAIN] = TRUE; /* Whether to enable local audio collection */ s_media_info.audio_codec[E_IPC_STREAM_AUDIO_MAIN] = Tuya_CODEC_AUDIO_PCM;/* Encoding format */ s_media_info.audio_sample [E_IPC_STREAM_AUDIO_MAIN]= Tuya_AUDIO_SAMPLE_8K;/* Sampling Rate */ s_media_info.audio_databits [E_IPC_STREAM_AUDIO_MAIN]= Tuya_AUDIO_DATABITS_16;/* Bit width */ s_media_info.audio_channel[E_IPC_STREAM_AUDIO_MAIN]= Tuya_AUDIO_CHANNEL_MONO;/* Channel */ s_media_info.audio_fps[E_IPC_STREAM_AUDIO_MAIN] = 25;/* Fragments per second */ -
tuya_ipc_ring_buffer_initis used to initialize ring buffer./** * \fn Tuya_APP_Init_Ring_Buffer * \brief Initialize the ring buffer. * \[in] device: The device ID. For the sub-devices connected to the NVR, this parameter indicates the channel ID. * \[in] channel: The camera serial number (a single device can have multiple cameras. Set this parameter to 0 if a device only has one camera.) * \[in] stream: The stream type. * \[in] pparam: The stream parameters. * \return OPERATE_RET */ OPERATE_RET tuya_ipc_ring_buffer_init(INT_T device, INT_T channel, IPC_STREAM_E stream, Ring_Buffer_Init_Param_S* pparam);The channel ID is generated based on the ID of the sub-device. Generally, the sort order of sub-devices displayed on the mobile app corresponds to the channel IDs generated by the XVR SDK, which means that the first device on the app is the channel 0 device managed by the XVR SDK. However, in some particular cases, the channel ID of the first device displayed on the app might be any values rather than 0. Given this, use
tuya_xvr_dev_chan_get_by_devIdto get the channel ID. -
tuya_ipc_ring_buffer_openis used to start a session of media transmission.All the interfaces related to the ring buffer support NVR and IPC. For the IPC, the parameters
deviceandchannelare generally set to0./* * \fn tuya_ipc_ring_buffer_open * \brief Start a new read-write session. * \[in] device: The device ID. For sub-devices, this parameter indicates the channel ID. * \[in] channel: The camera serial number (a single device can have multiple cameras. Set this parameter to 0 if a device only has one camera.) * \[in] stream: stream type (mainstream, substream) * \return open_type: the type of the ring buffer of a session */ Ring_Buffer_User_Handle_S tuya_ipc_ring_buffer_open(INT_T device, INT_T channel, IPC_STREAM_E stream, RBUF_OPEN_TYPE_E open_type); -
IPC_APP_Sync_Utc_Timeis used to sync time (UTC).OPERATE_RET IPC_APP_Sync_Utc_Time(VOID); -
Tuya_APP_Enable_P2PTransferis used to enable P2P transfer./* * \fn Tuya_APP_Enable_P2PTransfer * \brief Enable P2P transfer. * \[in] max_users: The maximum number of P2P connections. * \return OPERATE_RET */ OPERATE_RET Tuya_APP_Enable_P2PTransfer(IN UINT_T max_users);This function is used to initiate live preview. It serves as the entry point to all preview operations. When the XVR SDK receives a preview request, it will call the related events back. You can implement the corresponding functions as needed.
-
Tuya_APP_Put_Frameis used to transmit media data./* Send the raw media data to the SDK. [in] handle: the handle returned by `tuya_ipc_ring_buffer_open` [in] p_frame: media frame to be transmitted. */ OPERATE_RET Tuya_APP_Put_Frame(Ring_Buffer_User_Handle_S handle,IN CONST MEDIA_FRAME_S *p_frame);If you do not have a specific value assigned to
ptsinp_frame, set it to-1.
Otherwise, PUT will fail. -
Speaker on/off switch in
Tuya_APP_speaker_audio_callbackis intended to be implemented by you.void __Tuya_APP_speaker_audio_callback(IN CONST INT_T chn, IN CHAR_T * devId,IN CONST TRANSFER_AUDIO_FRAME_S *p_audio_frame, IN CONST UINT_T frame_no) { /* Developers need to implement the operations of voice playback*/ PR_DEBUG("dev[%s] audio data recv\n",devId); return ; } -
The app sends the audio in G.711u format by default. If the device requires PCM audio, you can call
tuya_g711_decodeto transcode the audio.Function parameters:
- Encoding data type (
Tuya_G711_MU_LAW) - The address of resolved data
- The length of resolved data
- The output address after data is resolved
- The length after data is resolved
int tuya_g711_decode(unsigned char type, unsigned short *src, unsigned int srcLen, unsigned char *drc, unsigned int *pOut); - Encoding data type (
Development processes
-
Configure the video mainstream and substream and audio parameters in
IPC_APP_Set_Media_Info. -
Call
Tuya_APP_Init_Ring_Bufferto initialize the ring buffer of each sub-device. -
Call
IPC_APP_Sync_Utc_Timeto sync time in UTC. -
Call
Tuya_APP_Enable_P2PTransferto enable P2P transfer. -
Enable the video thread and audio thread.
pthread_t h264_output_thread; pthread_create(&h264_output_thread, NULL, thread_live_video, NULL); pthread_detach(h264_output_thread); pthread_t pcm_output_thread; pthread_create(&pcm_output_thread, NULL, thread_live_audio, NULL); pthread_detach(pcm_output_thread); -
Call
tuya_ipc_ring_buffer_openin the audio thread and video thread to start a new session. -
Call
Tuya_APP_Put_Framein the thread function to transmit the collected video frame to the ring buffer. -
The P2P thread can automatically transmit data in the ring buffer to the mobile app.
Cloud storage
The SDK library has integrated cloud storage. After the cloud storage service is subscribed, the SDK will send the media in the ring buffer to the cloud for storage. The retention time depends on the subscribed cloud storage service.
The SDK applies software encryption for data by default. The encryption API OpensslAES_CBC128_encrypt uses the AES in CBC mode. If software encryption puts a large load on the MCU, you can use hardware encryption and the SoC encryption channel with PKCS#5 and PKCS#7 padding.
| Padding type | Description |
|---|---|
| Zero padding | In the encrypted mode, some blocks do not need to be padded. Or the plain texts are integer multiples of the block length. |
| ISO10126 | If the data with 64-bit block size is FF FF FF FF FF FF FF FF FF, the padded data is FF FF FF FF FF FF FF FF FF 7D 2A 75 EF F8 EF 07. |
| PKCS#5/PKCS#7 | If the data with 64-bit block size is FF FF FF FF FF FF FF FF FF, the padded data is FF FF FF FF FF FF FF FF FF 07 07 07 07 07 07 07. PKCS#5 padding is defined for 8-byte block sizes, which will be padded to 16 bytes. PKCS#7 padding works for any block size from 1 to 255 bytes. |
| OAEP/PKCS#1 | It provides the basic definitions of and recommendations for implementing the RSA algorithm for public-key cryptography. |
Function description
-
cloud_stor_get_mediais called after a query for the media cloud storage.VOID __cloud_stor_get_media(IN CONST INT_T chn,IN OUT IPC_MEDIA_INFO_S *param) { //user insert media info for chn // Make sure the input parameters are consistent with these specified in the ring buffer initialization. // Cloud storage has a 2s pre-record. Make sure the GOP is properly set. IPC_APP_Set_Media_Info(); memcpy(param, &s_media_info, sizeof(IPC_MEDIA_INFO_S)); } -
tuya_xvr_cloud_storage_initis used to initialize cloud storage.typedef struct { Tuya_GET_DEV_MEDIA_CB media_cb; // Media parameters. AES_HW_CBC_FUNC *aes_func;// The encryption method. XVR_CLOUD_STORAGE_CLARITY_E stream_clarity;// Set the stream type for cloud storage, which can be mainstream (default) or substream. XVR_CLOUD_STORAGE_AUDIO_CHANNEL_E audio_channel;// Set the audio channel, which can be the main audio (default) or the sub-audio. }Tuya_XVR_CLOUD_STORAGE_INIT_T; /** * \fn OPERATE_RET tuya_xvr_cloud_storage_init * \brief Initialize cloud storage. After that, memory will be allocated. * \[in] xvr_cloud_stro_init_ptr Initialization parameter. * \return OPRT_OK: success. Other values indicate a failure. */ OPERATE_RET tuya_xvr_cloud_storage_init(Tuya_XVR_CLOUD_STORAGE_INIT_T * xvr_cloud_stro_init_ptr); -
tuya_xvr_cloud_order_cb_registis called after cloud storage is subscribed.XVR_ClOUD_STORAGE_EVENT_EandXVR_CLOUD_STORAGE_ORDER_Twill be called to query the event type and sub-device information. The return value will be used as the input parameter of the callbacktuya_xvr_cloud_order_cb_regist./** * \fn OPERATE_RET tuya_xvr_cloud_order_cb_regist * \brief Get the cloud storage status of all sub-devices. * \param[in] The callback. * \return OPERATE_RET */ OPERATE_RET tuya_xvr_cloud_order_cb_regist(Tuya_XVR_Cloud_Stor_ORDER_Cb cb); -
sub_cloud_stor_event_Cbis called after a cloud storage event of a sub-device occurs.INT_T _sub_cloud_stor_event_Cb(XVR_ClOUD_STORAGE_EVENT_E type, VOID_T * args) { /* To be implemented by you as per your business requirements */ } -
tuya_xvr_cloud_storage_startis used to enable cloud storage for a sub-device by its device ID./** * \fn OPERATE_RET tuya_xvr_cloud_storage_add * \brief start device cloud storage * \param[in]xvr devId: Device ID. * \return OPERATE_RET */ OPERATE_RET tuya_xvr_cloud_storage_start(CHAR_T* devId); -
tuya_xvr_cloud_storage_start_by_chnis used to enable cloud storage for a sub-device by its channel ID./** * \fn OPERATE_RET tuya_xvr_cloud_storage_start_by_chn * \brief Enable cloud storage for a sub-device by its channel ID. * \param[in] chn The channel ID. * \return OPERATE_RET * NOTICE: the same with tuya_xvr_cloud_storage_start */ OPERATE_RET tuya_xvr_cloud_storage_start_by_chn(INT_T chn); -
tuya_xvr_cloud_storage_event_addis used to trigger a cloud storage event./** * \fn OPERATE_RET tuya_xvr_cloud_storage_event_add * \brief When an event is reported, cloud storage will start and maintain an event list. * \param[in] devid: Device ID * \param[in] type Event type * \param[in] max_duration: The maximum duration of a cloud storage event, in seconds. * \return EVENT_ID Event ID */ EVENT_ID tuya_xvr_cloud_storage_event_add(CHAR_T* devId,ClOUD_STORAGE_EVENT_TYPE_E type, UINT_T max_duration); -
tuya_xvr_cloud_storage_event_deleteis used to stop a cloud storage event./** * \fn OPERATE_RET tuya_xvr_cloud_storage_event_delete * \brief Stop a cloud storage event. * \param[in] devid: Device ID * \param[in] event_id:tuya_xvr_cloud_storage_event_add The returned event ID. * \return OPERATE_RET */ OPERATE_RET tuya_xvr_cloud_storage_event_delete(CHAR_T* devId, EVENT_ID event_id) -
tuya_xvr_cloud_storage_audio_stat_setis used to mute the recording for cloud storage./** * \fn OPERATE_RET tuya_xvr_cloud_storage_audio_stat_set * \brief Mute the recording that is stored to the cloud. This interface only works to shield the sound. The audio data still needs to be included. * \param[in] chan: The index of the device channel. * \param[in] isAudioOpen: Specify whether to mute the recording. FALSE: mute. TRUE: not mute. * \return OPERATE_RET */ OPERATE_RET tuya_xvr_cloud_storage_audio_stat_set(INT_T chan,IN CONST BOOL_T isAudioOpen)
Development processes
-
Event-based cloud storage
- Call
tuya_xvr_cloud_storage_initto initialize cloud storage. - Call
tuya_xvr_dev_devId_get_by_chanto get the device ID of a sub-device that has an event to report. - Call
tuya_xvr_cloud_storage_event_addto start a new cloud storage event. - Call
tuya_xvr_cloud_storage_event_deleteto stop a cloud storage event.
- Call
-
24-hour rolling cloud storage
- Call
tuya_xvr_cloud_storage_initto initialize cloud storage. - Call
tuya_xvr_cloud_storage_start_by_chnortuya_xvr_cloud_storage_startto enable cloud storage for a sub-device. Note that the input parameters of these two interfaces are different. - After the rolling cloud storage is enabled, automatic recording will run without any other manual operation.
24-hour rolling cloud storage will increase the costs. Use it with caution.
- Call
Play back locally stored footage
The XVR SDK does not come with the implementation of local footage playback. It provides the interfaces used to implement queries for local footage and footage transfer to the app for playing. To implement the playback feature, you need to complete the file retrieval and media streaming information in the corresponding interfaces.
Function description
Tuya_APP_event_cb is used to handle the events from the mobile app.
Register this callback when you initialize the P2P function Tuya_APP_Enable_P2PTransfer to enable the device to process commands from the mobile app. Playback related commands:
-
TRANS_PLAYBACK_QUERY_MONTH_SIMPLIFY_GWis used to query the local footage by month.After users select a month on the app, this event is sent to the device.
tuya_ipc_pb_query_by_monthreturns the availability of local footage in the specified month./** A UINT is a 32-bit unsigned integer. Each bit indicates whether footage exists on that day. The right-most bit indicates the 0th day. For example, if the value of the day is `26496`, it is `0110 0111 1000 0000` in binary, indicating that there is footage on the 7th, 8th, 9th, 10th, 13th, and 14th of that month. */ // Query the availability of local footage by month. typedef struct tagC2CCmdQueryGWPlaybackInfoByMonth{ unsigned int channel;// The channel ID of a sub-device. unsigned int idx; // Reserved bit. char subdid[64]; // The device ID. unsigned int year; // The year to query. unsigned int month;// The month to query. unsigned int day; // The day(s) to query. }C2C_TRANS_QUERY_GW_PB_MONTH_REQ, C2C_TRANS_QUERY_GW_PB_MONTH_RESP; case TRANS_PLAYBACK_QUERY_MONTH_SIMPLIFY_GW: { // Returns the day(s) on which the footage exists. C2C_TRANS_QUERY_GW_PB_MONTH_REQ *p = (C2C_TRANS_QUERY_GW_PB_MONTH_REQ *)args; PR_DEBUG("dev[%s] pb query by month: %d-%d\n",p->subdid, p->year, p->month); // You need to implement populating parameters. break; } -
TRANS_PLAYBACK_QUERY_DAY_TS_GWis used to query the local footage by day.After users select the day(s) on the app, this event is sent to the device.
tuya_ipc_pb_query_by_dayreturns the availability of local footage on the specified day(s).typedef struct { UINT_T file_count; /* The number of footage files */ SS_FILE_TIME_TS_S file_arr[0]; /* The array of footage files */ } SS_QUERY_DAY_TS_ARR_S; case TRANS_PLAYBACK_QUERY_DAY_TS_GW: { // Return the footage files on the specified day(s). C2C_TRANS_QUERY_GW_PB_DAY_RESP *pquery = (C2C_TRANS_QUERY_GW_PB_DAY_RESP *)args; PR_DEBUG("pb_ts query by day: idx[%d]%d-%d-%d\n", pquery->channel,pquery->year, pquery->month, pquery->day); SS_QUERY_DAY_TS_ARR_S *p_day_ts = NULL; // You need to implement data query and populating data. -
TRANS_PLAYBACK_START_TS_GWis used to start playback.After users select the desired footage to play, this event is sent to the device. In the struct
C2C_TRANS_CTRL_GW_PB_START,channelindicates the specified channel.idxis used to identify multiple channels if any. You can return the receivedidxvalue.PLAYBACK_TIME_Sis used to get the start and end time of the specified footage. The corresponding footage information should be returned.typedef struct { UINT_T start_timestamp; /* The start timestamp of playback, in seconds. */ UINT_T end_timestamp; /* The end timestamp of playback, in seconds. */ } PLAYBACK_TIME_S; typedef struct tagC2C_TRANS_CTRL_GW_PB_START{ unsigned int channel; /* The channel ID of the sub-device */ unsigned int idx; /* The internal channel, which can be returned directly */ char subdid[64]; /* The ID of the sub-device */ PLAYBACK_TIME_S time_sect; UINT_T playTime; /* The start timestamp of playback, in seconds. */ }C2C_TRANS_CTRL_GW_PB_START; case TRANS_PLAYBACK_START_TS_GW: { /* When playback starts, the client will record the start time. */ C2C_TRANS_CTRL_GW_PB_START *pParam = (C2C_TRANS_CTRL_GW_PB_START *)args; PR_DEBUG("PB StartTS idx:%d %u [%u %u]\n", pParam->channel, pParam->playTime, pParam->time_sect.start_timestamp, pParam->time_sect.end_timestamp); SS_FILE_TIME_TS_S pb_file_info; int ret; memset(&pb_file_info, 0x00, sizeof(SS_FILE_TIME_TS_S)); memcpy(&pb_file_info, &pParam->time_sect, sizeof(SS_FILE_TIME_TS_S)); -
tuya_ipc_playback_send_video_frame_with_channelis used to transfer the video to play.typedef struct { Tuya_CODEC_ID video_codec; // The encoding format. TRANSFER_VIDEO_FRAME_TYPE_E video_frame_type; // The frame type. BYTE_T *p_video_buf; // The video payload. UINT_T buf_len; // The length of the video payload. UINT64_T pts; // The timestamp, in microseconds, used for streaming by WebRTC or third-party services. UINT64_T timestamp; // The timestamp, in microseconds, used for P2P streaming and cloud storage. VOID *p_reserved; }TRANSFER_VIDEO_FRAME_S; /** * \fn OPERATE_RET tuya_ipc_playback_send_video_frame_with_channel * \brief Transfer the specified video. * \param[in] chn: The channel ID of the sub-device. * \param[in] client: The internal channel. * \param[in] p_video_frame: The video frame. */ OPERATE_RET tuya_ipc_playback_send_video_frame_with_channel(IN CONST UINT_T chn,IN CONST UINT_T client, IN CONST TRANSFER_VIDEO_FRAME_S *p_video_frame); -
tuya_ipc_playback_send_audio_frame_with_channelis used to transfer the audio to play./** * \fn OPERATE_RET tuya_ipc_playback_send_audio_frame_with_channel * \brief Transfer the specified video. * \param[in] chn: The channel ID of the sub-device. * \param[in] client: The internal channel. * \param[in] p_audio_frame: The audio frame. */ OPERATE_RET tuya_ipc_playback_send_audio_frame_with_channel(IN CONST UINT_T chn,IN CONST UINT_T client, IN CONST TRANSFER_AUDIO_FRAME_S *p_audio_frame); -
tuya_ipc_playback_send_finish_with_channelis used to finish playback.At the end of the playback, call this interface to notify that playback is finished.
/** * \fn OPERATE_RET tuya_ipc_playback_send_finish_with_channel * \brief Notify playback finished. * \param[in] chn: The channel ID of the sub-device. * \param[in] client: The internal channel. */ OPERATE_RET tuya_ipc_playback_send_finish_with_channel(IN CONST UINT_T chn,IN CONST UINT_T client) -
TRANS_PLAYBACK_PAUSE_GWis used to pause playback.After users pause playback, this event is sent to the device.
typedef struct tagC2C_TRANS_CTRL_GW_PB_STOP{ unsigned int channel; /* The channel ID of the sub-device */ unsigned int idx; /* Reserved. Default to 0.*/ char subdid[64]; /* The ID of the sub-device */ }C2C_TRANS_CTRL_GW_PB_STOP; case TRANS_PLAYBACK_PAUSE_GW: { C2C_TRANS_CTRL_GW_PB_PAUSE *pParam = (C2C_TRANS_CTRL_GW_PB_PAUSE *)args; PR_DEBUG("PB Pause idx:%d\n", pParam->channel); // Users pause streaming. break; } -
TRANS_PLAYBACK_RESUME_GWis used to resume playback.case TRANS_PLAYBACK_RESUME_GW: { C2C_TRANS_CTRL_GW_PB_RESUME *pParam = (C2C_TRANS_CTRL_GW_PB_RESUME *)args; PR_DEBUG("PB Resume idx:%d\n", pParam->channel); // Users resume streaming. break; } -
TRANS_PLAYBACK_MUTE_GWis used to mute playback.case TRANS_PLAYBACK_MUTE_GW: { C2C_TRANS_CTRL_GW_PB_MUTE *pParam = (C2C_TRANS_CTRL_GW_PB_MUTE *)args; PR_DEBUG("PB idx:%d mute\n", pParam->channel); // Users stop audio streaming. break; } -
TRANS_PLAYBACK_UNMUTE_GWis used to unmute playback.case TRANS_PLAYBACK_UNMUTE_GW: { C2C_TRANS_CTRL_GW_PB_UNMUTE *pParam = (C2C_TRANS_CTRL_GW_PB_UNMUTE *)args; PR_DEBUG("devId[%s]PB idx:%d unmute\n",pParam->subdid, pParam->channel); // Users resume audio streaming. break; }
Development processes
- The mobile app sends the device the command
TRANS_PLAYBACK_QUERY_MONTH_SIMPLIFY_GWto query local footage by month. The device returns the day(s) on which the footage exists. - The mobile app sends the device the command
TRANS_PLAYBACK_QUERY_DAY_TS_GWto query local footage by day(s). The device returns the footage information. - The mobile app sends the device the command
TRANS_PLAYBACK_START_TS_GWto start playback. The device reads the specified audio and video data and sends it to the app. - The mobile app sends the device the command
TRANS_PLAYBACK_PAUSE_GWto pause playback. The device pauses streaming. - The mobile app sends the device the command
TRANS_PLAYBACK_RESUME_GWto resume playback. The device resumes streaming. - The mobile app sends the device the command
TRANS_PLAYBACK_MUTE_GWto mute playback. The device stops the audio transfer. - The mobile app sends the device the command
TRANS_PLAYBACK_UNMUTE_GWto unmute playback. The device resumes audio transfer.
Added protocol to playback events
In the current playback process, the app sends the specified date to the device, the device returns the footage information, and the app renders the progress bar accordingly. However, it cannot meet the following two requirements:
Use colors to distinguish the footage with events or without events.
Filter events by type and display the event type on the progress bar. The filter conditions support multi-select.
-
Therefore, we add the local storage capability to implement the new footage retrieval method, as shown in the following code snippet:
tuya_ipc_skill_param_u skill_param = {.value = 50397699}; tuya_ipc_skill_enable(Tuya_IPC_SKILL_LOCALSTG,&skill_param); // Make sure to set the bit 26 of the value to 1. -
New local event query
The mobile app sends a command to query the events on specific date(s). The SDK returns the data by using the callback
TRANS_PLAYBACK_QUERY_DAY_TS_PAGE_MODE.The struct of the received data is as follows:
typedef struct{
    char subid[64];// The ID the device.
    unsigned int channel;// The channel.
    unsigned int year;// The specified year.
    unsigned int month;// The specified month.
    unsigned int day;// The specified day.
    int page_id;// The index of the queried page. The mobile app sends the `page_id`, starting from zero. The number of the page is returned.
    int total_cnt;// The total number of events on the specified day, depending on your own value.
    int page_size;// The number of events displayed on each page, depending on your needs.
    C2C_PB_EVENT_INFO_ARR_S * event_arr;// The event list. For more information, see `C2C_PB_EVENT_INFO_ARR_S`.
}C2C_TRANS_QUERY_EVENT_PB_DAY_RESP;

typedef struct {
    int version;// The version number. Set it to 1.
    int event_cnt;/* The number of events. It is different from the `page_size`. For example, if 10 events are retrieved, and the `page_size` is set to 3, the app will send the `page_id` 0, 1, 2, 3. For pages of `page_id` 0, 1, 2, the `event_cnt` is 3 for each page. For `page_id` 3, the `page_size` is 1 and the `event_cnt` is 1.
	*/
    C2C_PB_EVENT_INFO_S event_info_arr[0];// The event details. For more information, see `C2C_PB_EVENT_INFO_S`.
}C2C_PB_EVENT_INFO_ARR_S;

typedef struct {
	unsigned int start_timestamp; /* The start time of the event */
	unsigned int end_timestamp; /* The end time of the event */
	int type;/* The event type */
	char pic_id[20];/* The image information. Reserved */
}C2C_PB_EVENT_INFO_S;
Playback download
The SDK supports downloading the playback footage to the mobile phone by using the app.
Function description
-
Tuya_APP_event_cbis the callback used to receive the playback download command from the app.After users tap Download on the app, this callback will receive the event
TRANS_DOWNLOAD_START_GW. The struct includes thechannel(an ID used to identify download events of multiple channels if any) and the start and end time of the footage to download. If an error occurred when the device retrieves the footage, it callstuya_xvr_local_video_download_end_report(IN CHAR_T* devId,IN CONST UINT_T client, IN CONST UINT_T percent). Setclienttochannel. Setpercentto 100 to stop the download task because the notification of failed events is not supported. If thepercentis set to-1, it means failure. -
tuya_xvr_local_video_downloadis used to transfer the local footage to the app.typedef struct { UINT_T type; // The frame type. 0 for P frame and B frame. 1 for I frame. UINT_T size; // The frame size. UINT64_T timestamp;// The timestamp, in microseconds, used for P2P streaming and cloud storage. UINT64_T pts;// The timestamp, in microseconds, used for streaming by WebRTC or third-party services. }STORAGE_FRAME_HEAD_S; /* * \fn OPERATE_RET tuya_xvr_local_video_download * \param[in] devId: The channel ID of the sub-device. * \param[in] client: The internal channel. * \param[in] pHead: The header. For more information, see STORAGE_FRAME_HEAD_S. * \param[in] pData: The footage data. */ OPERATE_RET tuya_xvr_local_video_download(IN CHAR_T* devId,IN CONST UINT_T client, IN CONST STORAGE_FRAME_HEAD_S * pHead, IN CONST CHAR_T * pData);Make sure to upload the audio data even if you want silent playback because the playback download depends on the audio data. Otherwise, the download on the app cannot work properly.
-
tuya_xvr_local_video_download_end_reportis used to notify footage transfer finished./* * \fn OPERATE_RET tuya_xvr_local_video_download * \param[in] devId: The channel ID of the sub-device. * \param[in] client: The internal channel. * \param[in] percent: The download progress in percentage. -1 for failed download. 100 for download finished. */ OPERATE_RET tuya_xvr_local_video_download_end_report(IN CHAR_T* devId,IN CONST UINT_T client, IN CONST UINT_T percent);
Development processes
- After users tap Download, the device will receive a P2P event
TRANS_DOWNLOAD_STARTthrough the callbackTuya_APP_event_cb. The struct includes thechannel(an ID used to identify download events of multiple channels if any) and the start and end time of the footage to download. If an error occurred when the device retrieves the footage, it callstuya_xvr_local_video_download_end_report. Set percent to 100 to stop the download task because the notification of failed events is not supported. If thepercentis set to-1, it means failure. - After the specified footage is retrieved, the device calls
tuya_xvr_local_video_downloadto transfer data, which follows the principle of one API operation per frame. ThepHeadstruct:type: seeMEDIA_FRAME_TYPE_E type.size: the size of the payload, no more thanMAX_MEDIA_FRAME_SIZE.Timestamp: in milliseconds. An inaccurate timestamp can cause the video to be frozen.
- To notify data transfer finished, call
tuya_xvr_local_video_download_end_reportand reportpercentof 100.
Data point (DP)
The DP is the abstract representation of a product feature, used to control different functions applied on a device. A device should be capable of processing the commands from the cloud, executing them correctly, and then returning the result to the cloud. The tuya_ipc_dp_utils.h file describes the DPs to help you understand how to develop with DPs. You can also add and set custom DPs by referring to the existing DP code of the same data type.
The defined DP is associated with a specific product ID. If you have added a new DP or edited the existing DP, devices with the associated PID must be reset and paired again to use the updated DP setting.
You can use five data types to set required DPs.
- Boolean
- Value
- String
- Enum
- Bitmap (reserved)
For more information, see the struct TY_OBJ_DP_VALUE_U.
The controller device and its sub-devices might have the same DP ID, but the DP ID represents different features. For example, DP 104 for an NVR represents storage status while for a sub-device (IPC), it represents OSD watermark. You should use the cid to distinguish the source of a DP. For more information, see tuya_ipc_dp_utils.h.
The SDK should identify the source of DP data and call tuya_xvr_main_dev_dp_process or tuya_xvr_sub_dev_dp_process to process the commands for the controller device or the sub-device respectively. You should use the cid to distinguish the source of a DP. If the value of cid is NULL, it means the DP of the controller device. Otherwise, the value of cid is the ID of a sub-device.
The ID of a sub-device refers to a node ID that is generated based on the UUID of the controller device, following the format uuid + a + sequence number, such as uuida001 and uuida002.
Function description
You can assign the write and read permission to the DP data as needed.
-
tuya_app_write_INTandtuya_app_write_STRimplement DP data storage./* Configure parameters for the local storage of DP data. In this sample code, the local storage path is specified as `/tmp`. You can change it to the required path. Note that the substituting path must be the same as the one for DP data read/write.*/ STATIC VOID __tuya_app_write_INT(CHAR_T *key, INT_T value) { //TODO CHAR_T tmp_cmd[128] = {0}; snprintf(tmp_cmd, 128, "mkdir -p /tmp/tuya.cfgs/;echo %d > /tmp/tuya.cfgs/%s", value, key); printf("write int exc: %s \r\n", tmp_cmd); system(tmp_cmd); } STATIC VOID __tuya_app_write_STR(CHAR_T *key, CHAR_T *value) { //TODO CHAR_T tmp_cmd[256] = {0}; snprintf(tmp_cmd, 256, "echo %s > /tmp/tuya.cfgs/%s", value, key); printf("write STR exc: %s \r\n", tmp_cmd); system(tmp_cmd); } -
tuya_app_read_INTandtuya_app_read_STRimplement DP data read operation. For the full sample code, see the demo./* Configure parameters for reading local DP data. You can change the path to the required one. Note that the substituting path must be the same as the one for the local storage of DP data.*/ STATIC INT_T __tuya_app_read_INT(CHAR_T *key) { //TODO CHAR_T tmp_file[64] = {0}; snprintf(tmp_file, 64, "cat /tmp/tuya.cfgs/%s", key); printf("read int exc: %s \r\n", tmp_file); FILE *p_file = popen(tmp_file, "r"); STATIC INT_T __tuya_app_read_STR(CHAR_T *key, CHAR_T *value, INT_T value_size) { //TODO memset(value, 0, value_size); CHAR_T tmp_file[64] = {0}; snprintf(tmp_file, 64, "cat /tmp/tuya.cfgs/%s", key); printf("read str exc: %s \r\n", tmp_file); FILE *p_file = popen(tmp_file, "r"); } -
tuya_xvr_dev_chan_get_by_devIdis used to get the channel ID by device ID./** * \fn tuya_xvr_dev_info_get_by_chan * \brief Get the channel ID of a sub-device by device ID. * \[in] devId: Device ID of a sub-device * \[out] pChn: Channel ID associated with the device ID * \return OPRT_OK is a success. Other values indicate a failure. */ OPERATE_RET tuya_xvr_dev_chan_get_by_devId(IN CONST CHAR_T* devId, OUT INT_T* pChn); -
tuya_xvr_main_dev_dp_processis used for the controller device to process DP data./** * \fn ty_gw_deal_gateway_dp_cmd * \brief Handler of DP data for the controller device. * \[in] dp: DP data received from the server. */ void tuya_xvr_main_dev_dp_process(CONST TY_RECV_OBJ_DP_S *dp) -
tuya_xvr_sub_dev_dp_processis used for the sub-device to process DP data.You can implement handlers of DP data for different sub-devices to achieve the interaction between sub-devices and the controller device.
void tuya_xvr_sub_dev_dp_process(CONST TY_RECV_OBJ_DP_S *dp) { printf("SOC Rev DP Obj Cmd t1: %d t2: %d CNT: %u\n", dp->cmd_tp, dp->dtt_tp, dp->dps_cnt); UINT_T index = 0; for(index = 0; index < dp->dps_cnt; index++) { CONST TY_OBJ_DP_S *p_dp_obj = dp->dps + index; printf("idx: %d dPID: %d type: %d ts: %u cid = %s\n", -
IPC_APP_handle_dp_cmd_objsis the callback of DP data handler.typedef struct { DP_CMD_TYPE_E cmd_tp;// Signaling type DP_TRANS_TYPE_T dtt_tp;// Transmission type. See `DP_TRANS_TYPE`. CHAR_T *cid;// The device ID of a DP signaling object. If `cid` is NULL, it indicates signals from the controller device. BYTE_T dPID;//DPID CHAR_T *mb_id; UINT_T len;// Data length BYTE_T data[0];// Data }TY_RECV_RAW_DP_S; VOID IPC_APP_handle_dp_cmd_objs(IN CONST TY_RECV_OBJ_DP_S *dp) { if(dp == NULL) { printf("soc not have cid\n"); return ; } if (NULL == dp->cid){ tuya_xvr_main_dev_dp_process(dp); } else { INT_T chn = 0; tuya_xvr_dev_chan_get_by_devId(dp->cid,&chn); // You can identify which channel a DP signaling belongs to by `chn` and implement the subsequent data handler as needed. tuya_xvr_sub_dev_dp_process(dp); } return; }
OSD timestamp
This feature can enable or disable timestamp to the video. On the device, you can set where to place a timestamp on the video.
Development processes
-
Add the following code to
tuya_ipc_dp_utils.h.#define Tuya_DP_WATERMARK 104 -
Add the following code in
s_dp_table[]oftuya_ipc_dp_utils.c.#ifdef Tuya_DP_WATERMARK {Tuya_DP_WATERMARK, handle_DP_WATERMARK}, #endifhandle_DP_WATERMARKis intended to be implemented by you. The sample code is as follows.#ifdef Tuya_DP_WATERMARK STATIC VOID handle_DP_WATERMARK(IN TY_OBJ_DP_S *p_obj_dp) { BOOL_T watermark_on_off = check_dp_bool_invalid(p_obj_dp); IPC_APP_set_watermark_onoff(watermark_on_off); watermark_on_off = IPC_APP_get_watermark_onoff(); respone_dp_bool(Tuya_DP_WATERMARK, watermark_on_off); } #endifTo enable the sub-device to process this DP, implement the handler in
tuya_xvr_sub_dev_dp_process. -
Call
IPC_APP_handle_dp_cmd_objsin the main function to process the DP data from the server and determine whether to trigger the feature function of this DP. The callback has been registered inIPC_APP_Init_SDK.
Motion detection
The SDK provides functions to implement motion detection on/off, sensitivity adjustment, timing, intermittent control, and data reporting. You can call the SDK API to implement motion detection and motion tracking.
Function description
For more information about feature implementation, see 5.x SDK Development Guide.
-
tuya_xvr_notify_with_eventis used to report DP data to the server by device ID./** * \fn OPERATE_RET tuya_xvr_notify_with_event * \ Send alerts to the cloud and the mobile app. * \param[in] dev_id: Device ID * \param[in] snap_buffer: The address of the current snapshot. * \param[in] snap_size: The size of the snapshot, in bytes. * \param[in] type: The data type, NOTIFICATION_CONTENT_TYPE_E * \param[in] name: The event type, NOTIFICATION_NAME_E * \param[in] isNotifyMsgCenter: Specifies whether to send an event to the in-app message center. 0: not send events to the message center. 1: send events to the message center. * \return OPERATE_RET */ OPERATE_RET tuya_xvr_notify_with_event(IN CONST CHAR_T * dev_id, IN CONST CHAR_T *snap_buffer, IN CONST UINT_T snap_size, IN CONST NOTIFICATION_CONTENT_TYPE_E type, IN CONST NOTIFICATION_NAME_E name,BOOL_T isNotifyMsgCenter); -
tuya_xvr_notify_with_event_by_channelis used to report an event by channel ID./** * \fn OPERATE_RET tuya_xvr_notify_with_event_by_channel * \ Send alerts to the cloud and the mobile app. * \param[in] chn: The channel ID of a sub-device. * \param[in] snap_buffer: The address of the current snapshot. * \param[in] snap_size: The size of the snapshot, in bytes. * \param[in] type: The data type, NOTIFICATION_CONTENT_TYPE_E * \param[in] name: The event type, NOTIFICATION_NAME_E * \param[in] isNotifyMsgCenter: Specifies whether to send an event to the in-app message center. 0: not send events to the message center. 1: send events to the message center. * \return OPERATE_RET */ OPERATE_RET tuya_xvr_notify_with_event_by_channel(IN CONST INT_T chn, IN CONST CHAR_T *snap_buffer, IN CONST UINT_T snap_size, IN CONST NOTIFICATION_CONTENT_TYPE_E type, IN CONST NOTIFICATION_NAME_E name,BOOL_T isNotifyMsgCenter);
Development processes
Refer to the thread_md_proc in the demo.
-
Add the DP of motion alert to enable the motion detection feature.
-
Enable the motion detection thread, as shown below.
pthread_create(&motion_detect_thread, NULL, thread_md_proc, NULL); -
Call
get_motion_statusin the motion detection thread to determine whether an object is moving.With
Tuya_Ipc_Motion, you can implement the function used to determine whether an object is moving according to your chip platform.int fake_md_status = 0; int get_motion_status() { // If motion is detected, 1 is returned. // Otherwise, 0 is returned. The return value is stored in the parameter of `fake_md_status`. return fake_md_status; } -
If an object is moving, the SDK calls
tuya_xvr_dev_devId_get_by_chanto get the device ID associated with a channel ID. -
Based on the device ID, the SDK calls
tuya_xvr_cloud_storage_event_addto enable cloud storage and callsget_motion_snapshotto capture images.// You can implement an image capture function according to your chip platform. void get_motion_snapshot(char *snap_addr, int *snap_size) { //we use file to simulate char snapfile[128]; *snap_size = 0; extern char s_raw_path[]; printf("get one motion snapshot\n"); snprintf(snapfile,64,"%s/resource/media/Demo_snapshot.jpg",s_raw_path); FILE*fp = fopen(snapfile,"r+"); //... } -
Based on the device ID, the SDK calls
tuya_xvr_notify_with_eventto send an alert to the server. -
If the object does not move and more than 10 seconds have passed since the last motion detection event, the SDK calls
tuya_xvr_cloud_storage_event_deleteto stop local storage and cloud storage.
Image scaling
For more information about implementation, see 5.x SDK Development Guide.
Features of PTZ cameras
The DP 119 is used to start rotating, and DP 116 is used to stop rotating.
#define Tuya_DP_PTZ_CONTROL                119
/* Pan-tilt control is the enum type. 0: up.  1: upper right.  2: right.  3: lower right. 4: down.  5: lower left. 6: left.  7: upper left.
In SDK v4.0, 0: upper right. 1: right. 2: lower right. 3: down. 4: lower left. 5: left. 6: upper left. 7: up.
*/
#define Tuya_DP_PTZ_STOP                   116          /* Stop rotating. Boolean type */
The device receives the command from the server and then controls the PTZ camera to rotate to the specified angle. The following code shows the typical data format of DP 119.
{
	"range":["1","2","3","4","5","6","7","0"],
	"type":"enum"
}
General features
For more information about implementation, see 5.x SDK Development Guide.
Preset points
-
The DP 178 is for preset points.
#define Tuya_DP_PRESET_SET 178 /* Add or delete preset points. This DP is of the string type. The string differs depending on operation types. `type 1`: add. `type 2`: delete. */ -
Up to six preset points can be added.
The data of the preset point that the device receives is in cJSON.
You can parse the data and implement the required functions. For more information, see IPC_APP_set_preset of tuya_ipc_dp_handler.c.
/*
*cid: the device ID, used to determine which sub-device the data of DP 178 belongs to.
*type: 1: add a preset point. 2: delete a preset point. 3: the device is rotating to the preset point.
*mpId: the ID of a preset point.
*t: time in UTC.
*/
{"data":{"cid":"zy006136663551327feca001","ctype":0,"dps":{"178":"{\"type\":3,\"data\":{\"mpId\":\"1\"}}"}},"protocol":5,"t":1627612487}
Function description
-
To add a preset point, the device must report the non-cruise status of DP 179.
-
tuya_xvr_preset_addis used to add a preset point./** * \fn OPERATE_RET tuya_xvr_preset_add(S_PRESET_POSITION* preset_pos) * \brief Add a preset point. * \param[in] devid: Device ID. * \param[in] preset_pos: The position of a preset point. * \return OPERATE_RET */ OPERATE_RET tuya_xvr_preset_add(char *devid, S_PRESET_POSITION* preset_pos); -
Struct
S_PRESET_POSITIONtypedef struct { CHAR_T id[32]; // The server ID. CHAR_T name[32]; // The name of a preset point. INT_T mpId; // The index ID. S_PRESET_PTZ ptz; // The position of a preset point. } S_PRESET_POSITION; typedef struct { INT_T pan; // Landscape INT_T tilt; // Portrait INT_T zoom; // Set this value to 0 for fixed-focus cameras. }S_PRESET_PTZ;id[32]: The ID value from the server, which can be ignored.name[32]: The name of an added preset point, which can be stored.mpId: Specify a serial number for an added preset point, starting with one.ptz: Specify the pan and tilt coordinates of an added preset point. For fixed-focus cameras, set the coordinate of zoom to0.
-
tuya_xvr_preset_pic_addis used to add a snapshot of a preset point./* \fn OPERATE_RET tuya_xvr_preset_pic_add(CHAR_T *addr, UINT_T size) \brief Upload the snapshot of the current preset point. \param[in] devid: Device ID. \param[in] addr/size: The address and size of the snapshot. \return OPERATE_RET */ OPERATE_RET tuya_xvr_preset_pic_add(char* devid,CHAR_T *addr, UINT_T size); -
tuya_xvr_preset_deleteis used to delete a preset point./** * \fn OPERATE_RET tuya_xvr_preset_delete * \brief Delete a preset point. * \param[in] preset_id: The ID of a preset point. * \param[in] nodeId: The device ID. * \return OPERATE_RET */ OPERATE_RET tuya_xvr_preset_delete(char* nodeId,char * preset_id);
Development processes
-
Define DPs in
tuya_ipc_dp_utils.hto enable the preset point feature.#define Tuya_DP_PRESET_SET 178 /* Add or delete preset points. This DP is of the string type. The string differs depending on operation types. `type 1`: add, `type 2`: delete */ -
Add the following code in
s_xvr_dp_table[]oftuya_ipc_dp_utils.c.#ifdef Tuya_DP_PRESET_SET {Tuya_DP_PRESET_SET, handle_DP_SET_PRESET}, #endif -
In
IPC_APP_set_presetofhandle_DP_SET_PRESET, determine the operation on a preset point, such as adding, deleting, and calling, and call the functions accordingly.-
tuya_ipc_preset_add: Add a preset point.Before you call
tuya_ipc_preset_add, you must get the current position of the PTZ. -
tuya_ipc_preset_add_pic: Upload a snapshot of a preset point. -
tuya_ipc_preset_del: Delete a preset point. -
tuya_ipc_preset_go: Call a preset point. This function is intended to be implemented by you.
/*1: add a preset point. 2: delete a preset point. 3: call a preset point. */
if(type->valueint == 1)
{
	tuya_xvr_preset_pic_add(char* devid,CHAR_T *addr, UINT_T size);
}
else if(type->valueint == 2)
{
	tuya_xvr_preset_delete(char* nodeId,char * preset_id);
}
else if(type->valueint == 3)
{
	tuya_ipc_preset_go(data);
}
To enable the sub-device to process this DP, implement the handler in
ty_gw_deal_subdev_dp_cmd. -
-
Call
IPC_APP_handle_dp_cmd_objsto process the DP data from the server and determine whether to trigger the feature function of this DP.IPC_APP_handle_dp_cmd_objshas been called inTuya_IPC_SDK_START.
Doorbell feature
This section describes how to develop features of a doorbell, including push notification of doorbell press alerts, video talk, and video messages.
Function description
-
get_motion_snapshotis used to get the current snapshot data.// You need to implement the image capture function according to your chip platform. //According to different chip platforms, users need to implement the interface of capture. void get_motion_snapshot(char *snap_addr, int *snap_size) { //we use file to simulate char snapfile[256]; *snap_size = 0; extern char s_raw_path[]; printf("get one motion snapshot\n"); snprintf(snapfile,256,"%s/rawfiles/tuya_logo.jpg",s_raw_path); FILE*fp = fopen(snapfile,"r+" -
After the image capture, call
tuya_xvr_notify_door_bell_pressto send the image to the server and the mobile app./** * \fn OPERATE_RET tuya_ipc_door_bell_press * \brief Send the doorbell message to the server and mobile app. * \param[in] chn: The channel ID. * \param[in] snap_buffer: The address of the snapshot. * \param[in] snap_size: The size of the snapshot. * \param[in] type: The image format, JPEG or PNG. * \param[in] name: The event type. Choose `NOTIFICATION_NAME_DOORBELL` for doorbell events. * \return OPERATE_RET */ OPERATE_RET tuya_xvr_notify_door_bell_press(IN CONST INT_T chn, IN CONST CHAR_T *snap_buffer, IN CONST UINT_T snap_size, IN CONST NOTIFICATION_CONTENT_TYPE_E type, IN CONST NOTIFICATION_NAME_E name)
Development processes
-
Call
IPC_APP_Init_SDKto initialize the SDK. -
get_motion_snapshotis used to capture a snapshot when the doorbell is pressed. -
Call
tuya_xvr_notify_door_bell_pressto report doorbell events of a sub-device by channel ID.
OTA update
This section describes how to implement the OTA update, a major method to update the firmware. When the SDK detects firmware updates, it will notify the device of OTA updates through a callback.
Function description
-
IPC_APP_Upgrade_Inform_cb()is called after the master NVR requests an OTA update.- Before you call
tuya_iot_upgrade_gw, you can release memory resources. For example, disable local storage and deinitialize the ring buffer. - The first callback
IPC_APP_get_file_data_cbintuya_iot_upgrade_gwis used to get the sharding data.
typedef struct { DEV_TYPE_T tp;// The device type. UPGRADE_TYPE_T type;// The update type. CHAR_T fw_url[FW_URL_LEN+1];// The URL of the firmware update. CHAR_T sw_ver[SW_VER_LEN+1];// The firmware version. UINT_T file_size;// The size of the update. CHAR_T fw_hmac[FW_HMAC_LEN+1];// Firmware HMAC. BOOL_T diff_ota;// Specify whether the OTA updates are different. This member is not available currently. }FW_UG_S; VOID IPC_APP_Upgrade_Inform_cb(IN CONST FW_UG_S *fw) { PR_DEBUG("Rev Upgrade Info"); PR_DEBUG("fw->fw_url:%s", fw->fw_url); PR_DEBUG("fw->sw_ver:%s", fw->sw_ver); PR_DEBUG("fw->file_size:%u", fw->file_size); // Release memory. OPERATE_RET op_ret = tuya_iot_upgrade_gw(fw, __IPC_APP_get_file_data_cb, __IPC_APP_upgrade_notify_cb, NULL); if(OPRT_OK != op_ret) { PR_ERR("tuya_iot_upgrade_gw err: %d\n", op_ret); } return ; } - Before you call
-
tuya_iot_upgrade_gwis used to start downloading the update file./* @param[in] fw: Firmware information. * @param[in] get_file_cb: Update download callback. * @param[in] upgrd_nofity_cb: Download completion callback. * @param[in] pri_data: The private parameter for `get_file_cb` and `upgrd_nofity_cb`. If you do not use it, set it to NULL. */ tuya_iot_upgrade_gw(fw, get_file_cb, upgrd_nofity_cb, pri_data) -
IPC_APP_upgrade_notify_cbis used to notify the result of update file download.- In this callback, you can determine the OTA operation based on the return value of
download_result.- If
download_resultis0, it indicates the update file is downloaded. You need to implement firmware erase. - Other values indicate the download failed. Deinitialization is irreversible. If the OTA update fails, the device must be restarted.
- If
- Before update installation, back up the DB file. Otherwise, the configuration will restore default settings.
- After the update is installed, compare the MD5 hash of the DB file before and after the update. If the MD5 hash is identical, restart the device. Otherwise, replace the current DB file with the backup DB file and restart the device.
VOID __IPC_APP_upgrade_notify_cb(IN CONST FW_UG_S *fw, IN CONST INT_T download_result, IN PVOID_T pri_data) { PR_DEBUG("Upgrade Finish"); PR_DEBUG("download_result:%d fw_url:%s", download_result, fw->fw_url); if(download_result == 0) { // The update file is downloaded to the specified location (p_mgr_info->upgrade_file_path). You need to implement update installation. } //TODO // System restart. } - In this callback, you can determine the OTA operation based on the return value of
-
ty_gw_dev_ug_informis called after a sub-device requests an OTA update.You need to determine on which sub-device an OTA update will be performed according to the
pdevId. The callback includes parameters such asdevIDl(for distinguishing between controller device and sub-device),url(download URL),md5(for file integrity check), andsize(the file size).//pdevId: The device ID of a sub-device. VOID ty_gw_dev_ug_inform(IN CONST CHAR_T *pdevId, IN CONST FW_UG_S* pfw) -
tuya_xvr_dev_version_updateis called after the update is installed on the sub-device.//devId: The device ID of a sub-device. The version is the updated version number. OPERATE_RET tuya_xvr_dev_version_update(char * devId,char *version)
Custom OTA update progress
-
The device downloads firmware through a URL and calls
tuya_iot_dev_upgd_progress_reptto report download progress./** * @brief tuya_iot_dev_upgd_progress_rept * @param[in] percent: The data reporting progress. * @param[in] devid: The device ID. * @param[in] tp: The device type. Set it to 10 for NVR devices. * @return OPERATE_RET */ OPERATE_RET tuya_iot_dev_upgd_progress_rept(IN CONST UINT_T percent, IN CONST CHAR_T *devid, IN CONST DEV_TYPE_T tp);The progress value is recommended to be less than 99%. The interval between requests of this interface should be greater than two seconds.
-
When the firmware is being updated, the progress displayed on the app will pause at 98%. At this time, the firmware has been downloaded, and the app is waiting for the device to be restarted and send the new firmware version number. After receiving the new version number, the app will display a successful update.
-
Generally, the app waits one minute for the device to replace the firmware and report the new version number. If the waiting time of your device exceeds one minute, you can contact the project manager to configure the PID in the backend.
Remove and reset devices
This section describes how to remove devices from the app and reset devices by button press.
In NVR mode, sub-devices cannot be removed individually.
Remove devices
-
IPC_APP_Reset_System_CBis used to remove the controller device.When the user removes the master NVR on the mobile app, this callback will be triggered. In this function, you need to implement device restart and DP file reset. Do not delete the DB file.
VOID IPC_APP_Reset_System_CB(GW_RESET_TYPE_E type) { printf("reset ipc success. please restart the ipc %d\n", type); IPC_APP_Notify_LED_Sound_Status_CB(IPC_RESET_SUCCESS); //TODO /* Developers need to restart IPC operations */ } -
ty_gw_subdev_del_devis called after a sub-device is removed from the mobile app.When the user removes a sub-device on the mobile app, this callback will be triggered. In this callback, you need to disable the cloud storage of the removed sub-device according to the
pdevId, delete or retain the DB file as needed, and calltuya_iot_gw_unbind_devto unbind this sub-device.VOID ty_gw_subdev_del_dev(IN CONST CHAR_T *pdevId) { //tuya_iot_gw_unbind_dev(pdevId); }
Reset devices
- When the device detects that the reset button is pressed, three DB files
tuya_user.db_bak,tuya_user.db, andtuya_enckey.dbwill be deleted. - The device resets the DB file and then is restarted.
Adaptive sub-device panel
This feature is not available on the mobile app.
DP 231 is temporarily specified for adaptive sub-device panels. This way, an NVR device can report data of supported DPs for individual sub-device to implement a personalized interface display for panels of different sub-devices.
Function description
-
tuya_xvr_sub_dp_reportis used to report data of DPs for sub-devices./** * \fn OPERATE_RET tuya_xvr_sub_dp_report(IN CONST INT_T chn, IN BYTE_T dp_id, IN DP_PROP_TP_E type, IN VOID * pVal, IN CONST UINT_T cnt) * \brief Report data of DPs for sub-devices. * \chn The channel ID of a sub-device. * \dp_id The DP to be reported. * \type The data type. See `DP_PROP_TP_E`. * \pVal The DP data to be reported. * \cnt The number of reporting times. * \return OPERATE_RET */ OPERATE_RET tuya_xvr_sub_dp_report(IN CONST INT_T chn, IN BYTE_T dp_id, IN DP_PROP_TP_E type, IN VOID * pVal, IN CONST UINT_T cnt); -
tuya_xvr_dev_devId_get_by_chanis used to get the device ID associated with a channel ID./*********************************************************** * Function: tuya_xvr_dev_devId_get_by_chan * Desc: Get the device ID associated with a channel ID. * Input: chn: The channel ID. * Output: devId: The device ID. * Input: len: The data length, which must be greater than devId. * Return: OPRT_OK: success Other: fail * Warning: deprecated ! ***********************************************************/ //OPERATE_RET tuya_xvr_dev_devId_get_by_chan(IN CONST INT_T chn, OUT CHAR_T* devId, IN CONST INT_T len); OPERATE_RET tuya_xvr_dev_devId_get_by_chan(IN CONST INT_T chn, OUT CHAR_T* devId, IN CONST INT_T len); -
tuya_ipc_dp_reportis used to report DP data./** * \fn OOPERATE_RET tuya_ipc_dp_report(IN CONST CHAR_T *dev_id, IN BYTE_T dp_id, IN DP_PROP_TP_E type, IN VOID * pVal, IN CONST UINT_T cnt) * \brief Report data of DPs for sub-devices. * \dev_id The ID of the sub-device. * \dp_id The DP to be reported. * \type The data type. See `DP_PROP_TP_E`. * \pVal The DP data to be reported. * \cnt The number of reporting events. * \return OPERATE_RET */ OPERATE_RET tuya_ipc_dp_report(IN CONST CHAR_T *dev_id, IN BYTE_T dp_id, IN DP_PROP_TP_E type, IN VOID * pVal, IN CONST UINT_T cnt); -
tuya_xvr_get_subdev_skillis used to get a set of DPs a sub-device supports.You need to implement this interface yourself. You can use
chnto get a set of DPs that a sub-device can report. The return value is a string, such as[0,524288,554164608,33554464,1373056,0,0,0], which consists of eight 32-bit unsigned integers. Converting this string into binary is 256 bits. From right to left, the sequence number starts with one. Each bit represents a DP ID.1indicates DP reporting supported, and0indicates DP reporting not supported. Eight unsigned integers can identify DP ID 1 through 256.For more information about the supported DPs for a sub-device, contact your account manager.
/**
* \fn OPERATE_RET tuya_xvr_get_subdev_skill(IN CONST INT_T chn,OUT CHAR_T *dp_report)
* \brief    Get a set of DPs that a sub-device support.
* \chn       The ID of the sub-device.
* \dp_list  A set of DPs that a sub-device can report.
* \return OPERATE_RET
*/
OPERATE_RET tuya_xvr_get_subdev_skill(IN CONST INT_T chn,OUT CHAR_T *dp_list)
{
	switch(chn)
	{
		case 0 :
		snprintf(dp_report,128, "[0,524288,554164608,33554464,1373056,0,0,0]");
		break;
}
Development processes
-
Example 1
-
Call
tuya_xvr_get_subdev_skillto get a set of DPs a sub-device supports. -
Call
tuya_xvr_sub_dp_reportto report DP data to the server.Sample code
VOID handle_sub_dp_skill_report()
{
	CHAR_T dp_report[128] = {0};
	int chn=0;
	for (chn = 0; chn < DEMO_NVR_SUB_DEV_NUM; chn++){
		memset(dp_report,0, sizeof(dp_report));
		if (OPRT_OK == tuya_xvr_get_subdev_skill(chn,dp_report)){
			tuya_xvr_sub_dp_report(chn,231,PROP_STR,dp_report,1);
		}
	}
}
-
-
Example 2
-
Call
tuya_xvr_get_subdev_skillto get a set of DPs a sub-device supports. -
Call
tuya_xvr_dev_devId_get_by_chanto get thedevidassociated with a channel ID. -
Call
tuya_ipc_dp_reportto report DP data to the server.Sample code
VOID handle_sub_dp_skill_report()
{

	CHAR_T dp_list[256] = {0};
	int chn=0;
	CHAR_T devId[64]={0};
	for (chn = 0; chn < DEMO_NVR_SUB_DEV_NUM; chn++){
		memset(devId,0, sizeof(devId));
		memset(dp_list,0, sizeof(dp_list));
		if (OPRT_OK == tuya_xvr_get_subdev_skill(chn,dp_list) && OPRT_OK == tuya_xvr_dev_devId_get_by_chan(chn, devId,64)){
			tuya_xvr_sub_dp_report(devId,231,PROP_STR,dp_list,1);
		}
	}
}
-
Dynamic replacement of devices
The XVR SDK supports dynamically replacing a device with another one.
This feature requires device pairing with the app. Currently, after replacement, the app might not be able to play the footage stored in the cloud. If you have any problems, submit a service ticket.
tuya_xvr_media_update is used to dynamically update devices.
	/**
	* \fn OPERATE_RET tuya_xvr_media_update(INT_T device,XVR_MEDIA_UPDATE_CB cb)
	* \brief  Update the specified device dynamically.
	* \device  The channel of the sub-device.
	* \cb  : The media update callback. In this callback, you need to deinitialize the ring buffer of the target device and initialize this ring buffer again. For more information, see the demo.
	* \return OPERATE_RET
	*/
Additional features
-
tuya_xvr_p2p_video_audio_chan_syncis used for audio channel setting for preview.
It allows users to get the main audio when the mainstream is selected and get the sub-audio when the substream is selected. -
tuya_xvr_local_video_delete_end_reportis used to notify local footage deleted.
After users send a command to delete specified local footage, the device uses this interface to return the result to the app after command execution. -
tuya_iot_dev_online_updateis used to force a sub-device to go offline.
Typically, after the controller device is activated, its associated sub-devices will show online, no matter they are real or virtual devices. This interface allows you to force a specific sub-device to show offline on the app./** * \fn OPERATE_RET tuya_iot_dev_online_update(IN CONST CHAR_T *dev_id,IN CONST BOOL_T online, IN CONST BOOL_T is_force); * \brief Force the sub-device to be online or offline on the app. * \dev_id The sub-device. * \online : TRUE for online. FALSE for offline. *\is_force: TRUE means forced status update. FALSE means not using forced status update. * \return OPERATE_RET */
Is this page helpful?
YesFeedbackIs this page helpful?
YesFeedback


