BLE SDK Demo Overview
This topic was no longer updated as of August 24, 2021. If you want to see the updated content, please refer to Bluetooth Device Access of TuyaOS.
The Tuya BLE SDK demo consists of two parts:
- The Original chip SDK.
- The Tuya BLE SDK Demo Project corresponding to the chip model.
If the provided demo project is not available for your chip, you can download the Tuya BLE SDK and perform migration by yourself according to the documentation in the SDK.
Download demos
Find the download URL of the Tuya BLE SDK Demo Project from the following table. Refer to the README.md file under each branch to import the project.
| Chip platforms | Model | Download URL |
|---|---|---|
| Nordic | nrf52832 | tuya_ble_sdk_Demo_Project_nrf52832.git |
| Realtek | RTL8762C | tuya_ble_sdk_Demo_Project_rtl8762c.git |
| Telink | TLSR825x | tuya_ble_sdk_Demo_Project_tlsr8253.git |
| Silicon Labs | BG21 | Coming soon. |
| Beken | BK3431Q | Tuya_ble_sdk_demo_project_bk3431q.git |
| Beken | BK3432 | tuya_ble_sdk_Demo_Project_bk3432.git |
| Cypress | Psoc63 | tuya_ble_sdk_Demo_Project_PSoC63.git |
Build development environment
-
Software environment
Install the integrated development environment (IDE) as per the requirements of the original chip SDK.
-
Hardware environment
You can choose the development board corresponding to the original chips or use your self-developed PCBA. Tuya BLE SDK Demo Project performs development and testing based on the development board of the original chips.
Download and compile demos
- According to your chip model, download the original chip SDK or ask for the SDK from the original chip manufacturers.
- Download the corresponding Tuya BLE SDK Demo Project.
- According to the
README.mdincluded in the Tuya BLE SDK Demo Project, you import the project, compile the firmware, and download the firmware to the development board or other PCBA.
Create smart products
- Log in to the Developer Platform. If you do not have an account, register as prompted.
- Refer to Create Products and create a smart product.
- Contact the project manager to apply for the authorization code (UUID and authkey) for testing.
Modify demo code
Description of files
The functionality of the files included in the demo project is shown in the following table.
| File name | Functionality |
|---|---|
| tuya_ble_app_demo.c | The master files of the application example. It contains SDK initialization functions, message processing functions, and more. |
| tuya_ble_app_demo.h | Header file. |
| tuya_ble_app_ota.c | OTA related code. |
| tuya_ble_app_ota.h | Header file. |
| custom_app_product_test.c | Implementation related to customized production test. |
| custom_app_product_test.h | Header file. |
| custom_app_uart_common_handler.c | Code file to implement the general UART connection. This file can be ignored if not used. |
| custom_app_uart_common_handler.h | Header file. |
| custom_tuya_ble_config.h | The configuration files for application. |
Modify code
-
Enter the product’s PID in
tuya_ble_app_demo.h. The PID is generated in the Tuya Developer Platform.#define APP_PRODUCT_ID "xxxxxxxx"Replace
xxxxxxxxwith PID. -
Enter the applied authorization code (UUID and authkey) in
tuya_ble_app_demo.c.static const char auth_key_test[] = "yyyyyyyy"; static const char device_id_test[] = "zzzzzzzz";Replace
yyyyyyyywith the authkey andzzzzzzzzwith the UUID.
Compile and run dome code
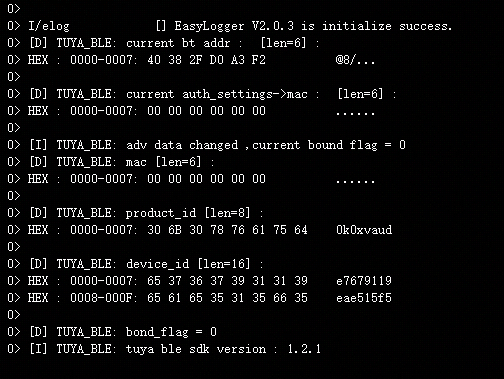
Compile the modified code, download the firmware to the hardware, and run it. You may need to download the stack and bootloader depending on the chip models. You view logs and use the third-party Bluetooth debugging app to check if the broadcast works properly, such as LightBlue for iOS.
The following figure shows the boot log of the nrf52832 demo.
Pair and add device
- You can download the Tuya app from App Store or Google Play.
- Register and sign in.
- Tap Add Device > Auto Scan > Enable Bluetooth > Start scanning.
- After the device is found, tap Next to start pairing. After pairing is completed, the app will enter the device panel by default.
- Tap each DP to test data sending and receiving.
OTA test
-
Modify the firmware version number in
tuya_ble_app_demo.h. For example, change it from 1.0 to 1.1.// Firmware version #define TY_APP_VER_NUM 0x0101 #define TY_APP_VER_STR "1.1" -
Generate an OTA file for the compiled firmware. It might be a
.binfile or.hexfile depending on the chip platforms. -
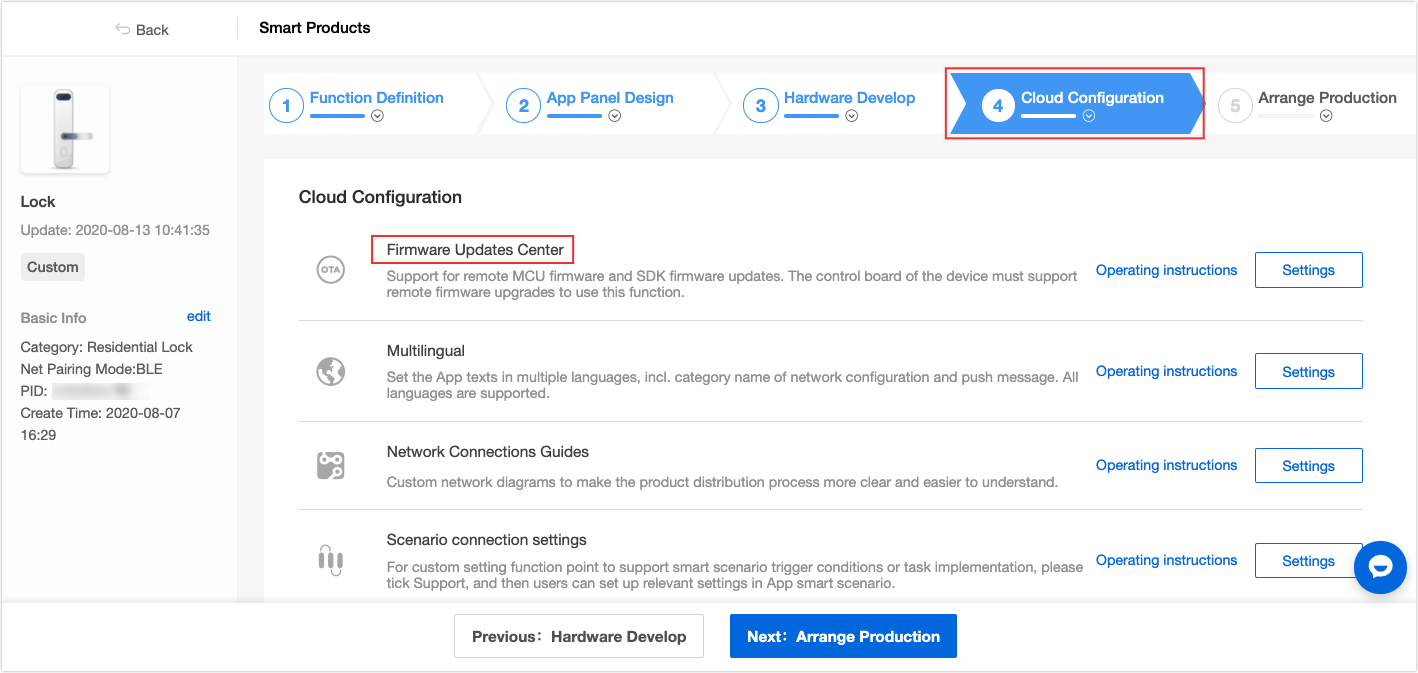
Configure firmware updates in the Tuya Developer Platform.
-
Click Firmware Updates Center and enter the configuration page. Click Create Firmware, upload the firmware file, and enter the firmware version number.
-
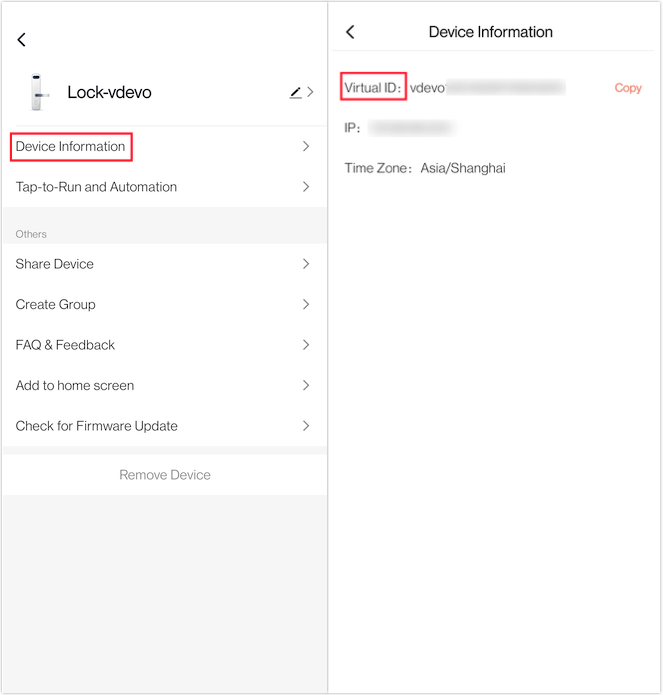
Click Common white list and device ID to be updated. How to find the device ID is shown in the following figure.
DP data receiving and sending
The device receives and processes DP data through CALL BACK EVENT with the ID of TUYA_BLE_CB_EVT_DP_WRITE. It sends DP data by calling tuya_ble_dp_data_report().
static void tuya_cb_handler(tuya_ble_cb_evt_param_t* event)
{
    int16_t result = 0;
    switch (event->evt)
    {
    case TUYA_BLE_CB_EVT_CONNECTE_STATUS:
   TUYA_BLE_LOG_INFO("received tuya ble conncet status update event,current connect status = %d",event->connect_status);
   break;
    case TUYA_BLE_CB_EVT_DP_WRITE:
   dp_data_len = event->dp_write_data.data_len;
   memset(dp_data_array,0,sizeof(dp_data_array));
   memcpy(dp_data_array,event->dp_write_data.p_data,dp_data_len);
   TUYA_BLE_LOG_HEXDUMP_DEBUG("received dp write data :",dp_data_array,dp_data_len);
   tuya_ble_dp_data_report(dp_data_array,dp_data_len);
   //custom_evt_1_send_test(dp_data_len);
   break;
    case TUYA_BLE_CB_EVT_DP_DATA_REPORT_RESPONSE:
   TUYA_BLE_LOG_INFO("received dp data report response result code =%d",event->dp_response_data.status);
   break;
    case TUYA_BLE_CB_EVT_DP_DATA_WTTH_TIME_REPORT_RESPONSE:
   TUYA_BLE_LOG_INFO("received dp data report response result code =%d",event->dp_response_data.status);
   break;
    case TUYA_BLE_CB_EVT_UNBOUND:

   TUYA_BLE_LOG_INFO("received unbound req");

   break;
    case TUYA_BLE_CB_EVT_ANOMALY_UNBOUND:

   TUYA_BLE_LOG_INFO("received anomaly unbound req");

   break;
    case TUYA_BLE_CB_EVT_DEVICE_RESET:

   TUYA_BLE_LOG_INFO("received device reset req");

   break;
    case TUYA_BLE_CB_EVT_DP_QUERY:
   TUYA_BLE_LOG_INFO("received TUYA_BLE_CB_EVT_DP_QUERY event");
   tuya_ble_dp_data_report(dp_data_array,dp_data_len);
   break;
    case TUYA_BLE_CB_EVT_OTA_DATA:
   tuya_ota_proc(event->ota_data.type,event->ota_data.p_data,event->ota_data.data_len);
   break;
    case TUYA_BLE_CB_EVT_NETWORK_INFO:
   TUYA_BLE_LOG_INFO("received net info : %s",event->network_data.p_data);
   tuya_ble_net_config_response(result);
   break;
    case TUYA_BLE_CB_EVT_WIFI_SSID:

   break;
    case TUYA_BLE_CB_EVT_TIME_STAMP:
   TUYA_BLE_LOG_INFO("received unix timestamp : %s ,time_zone : %d",event->timestamp_data.timestamp_string,event->timestamp_data.time_zone);
   break;
    case TUYA_BLE_CB_EVT_TIME_NORMAL:

   break;
    case TUYA_BLE_CB_EVT_DATA_PASSTHROUGH:
   TUYA_BLE_LOG_HEXDUMP_DEBUG("received ble passthrough data :",event->ble_passthrough_data.p_data,event->ble_passthrough_data.data_len);
   tuya_ble_data_passthrough(event->ble_passthrough_data.p_data,event->ble_passthrough_data.data_len);
   break;
    default:
   TUYA_BLE_LOG_WARNING("app_tuya_cb_queue msg: unknown event type 0x%04x",event->evt);
   break;
    }
}
Note: For the DP data format and other APIs provided by the Tuya BLE SDK, see the Tuya BLE SDK Guide, which is in the
docsubdirectory of the Tuya BLE SDK directory. It is recommended to read this document before development.
Is this page helpful?
YesFeedbackIs this page helpful?
YesFeedback


