Production Test on Energy Monitoring Socket
This topic describes how to use a beacon and gateway to perform production tests on Zigbee sockets and power strips with an energy monitoring function.
Background information
According to the different ways of device access to the network, Zigbee electrical production tests can be classified into Zigbee gateway tests and Zigbee beacon dongle tests.
Application scope
It applies to no-code Zigbee energy monitoring sockets and power strips.
Things to note
- Remove paired devices from the app with the network and wait 10 seconds to power them off before starting the production test.
- Before performing production tests with the Zigbee gateway, you need to update the specific firmware of the gateway. Contact Tuya engineers to request technical support.
Preparation
Device preparation
| Device | Quantity | Note |
|---|---|---|
| Device under test | 1 | / |
| Production test backplane (PCBA) | 1 | / |
| Stable isolated power supply | 1 | The adjustable voltage includes 220V and 120V, and the output power can be viewed. |
| Load | 1 |
|
| Test jig with a voltmeter | 1 | The voltmeter is powered independently with an isolated switch and power supply. |
| Zigbee gateway or beacon dongle | 1 | You need to purchase from Tuya. |
| PC | 1 | You need to install 32-bit or 64-bit Windows 7 or later version. |
Prepare software
| Software | Note |
|---|---|
| Tuya solution production test platform | Go to the Tuya PMS. For more information about Tuya PMS account application, see Apply Account. |
| JSON file | You can get the JSON file from the package downloaded from the Tuya PMS. |
Get the software
After logging in to the Tuya PMS, download the software and drivers in Production Support in the left navigation bar. 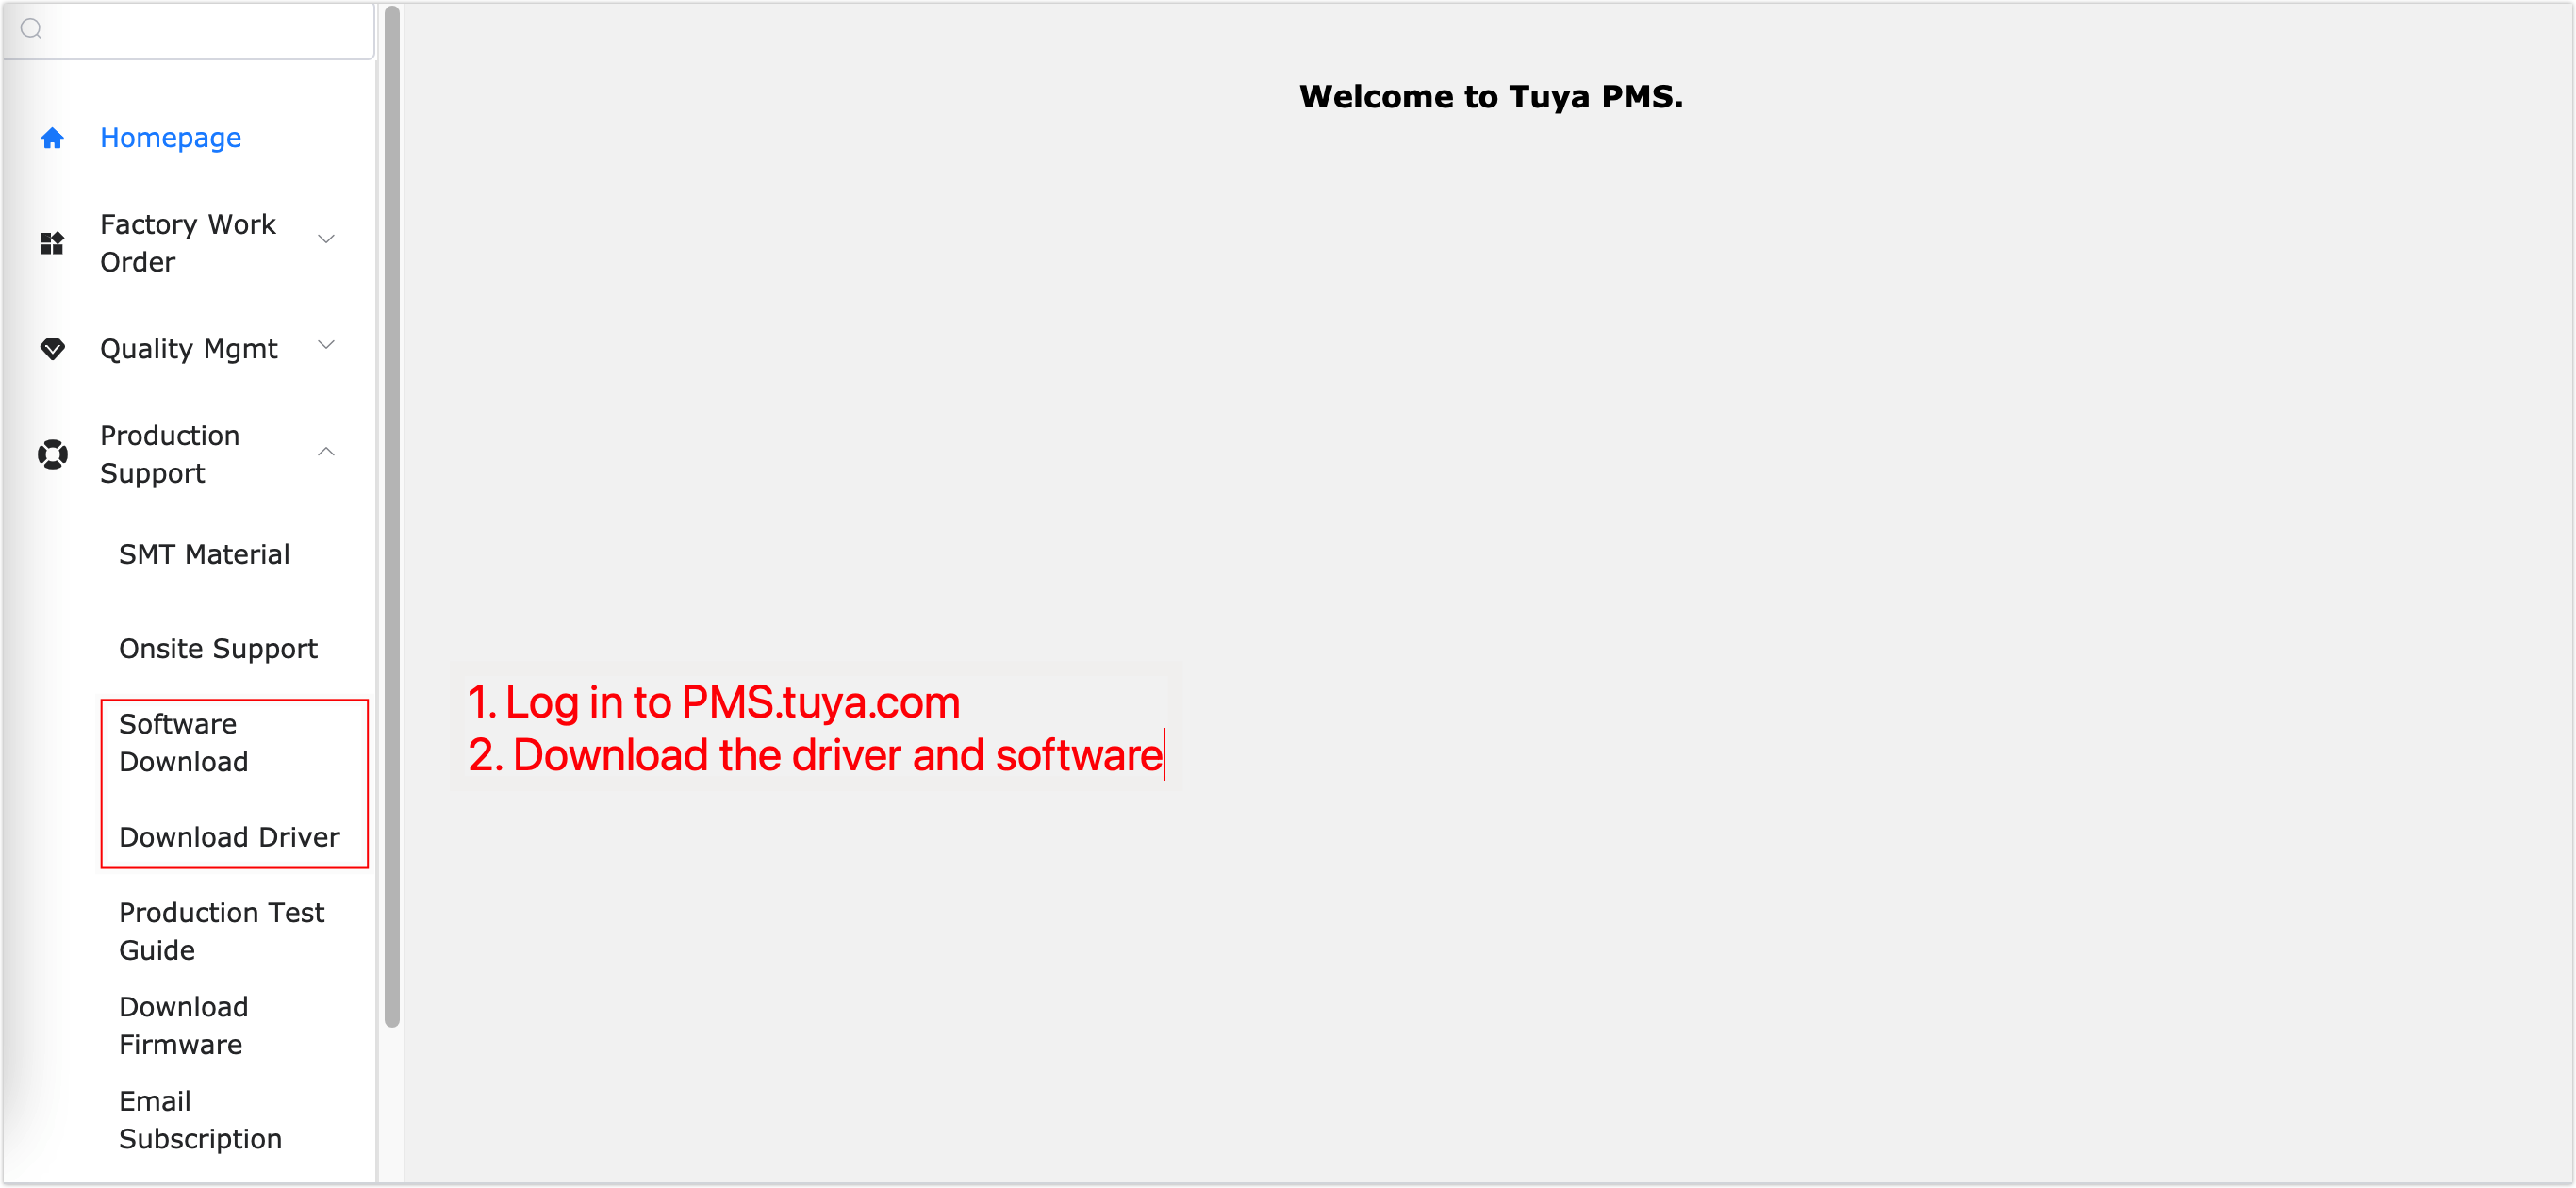
Configuration for the installation of production test platform
| Configuration | Requirement |
|---|---|
| Operating system | 32-bit or 64-bit Windows 7 or later version. |
| Hard Disk | More than 200 MB of space is required on the system disk. |
| Memory | At least 1 GB. |
| Processor | Core i5 or later version. |
| Runtime library | .Net Framework 4.0 or later version is installed. |
JSON file setup
Normally the JSON file is already configured according to your requirement, and you do not need to modify it by yourself.
If you want to modify, you can open the JSON file with the notepad tool on your PC, and add or delete the test items.
For example, PCBA does not need to be flashed, so you can delete the firmware update item. The deleted content is as follows.
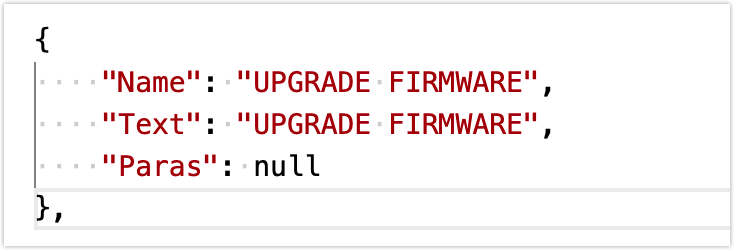
Note: Do not modify at will to avoid test failures.
Deployment preparation
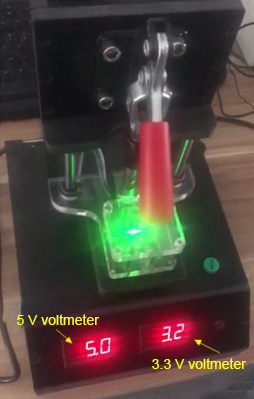
- Connect the AC stable isolated power supply to the input live wire LIN and the input neutral wire N of the control board.
- Press down the test jig and check whether the current is normal.
- Connect the load to the output live wire LOUT and output neutral wire N of the control board.
Note: Pay attention to the heat dissipation of the load to prevent burns.
- The Zigbee beacon dongle (if used) needs to be switched to active transmission mode and placed within one meter from the product under test.
Production test process
- Production test with a Zigbee beacon:
- Production test with a Zigbee gateway
Procedure
Production test with a Zigbee beacon
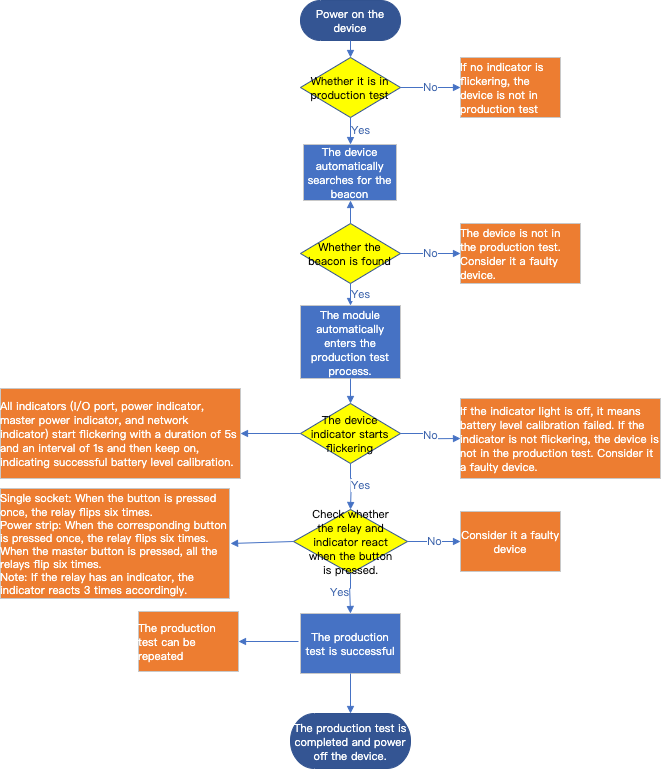
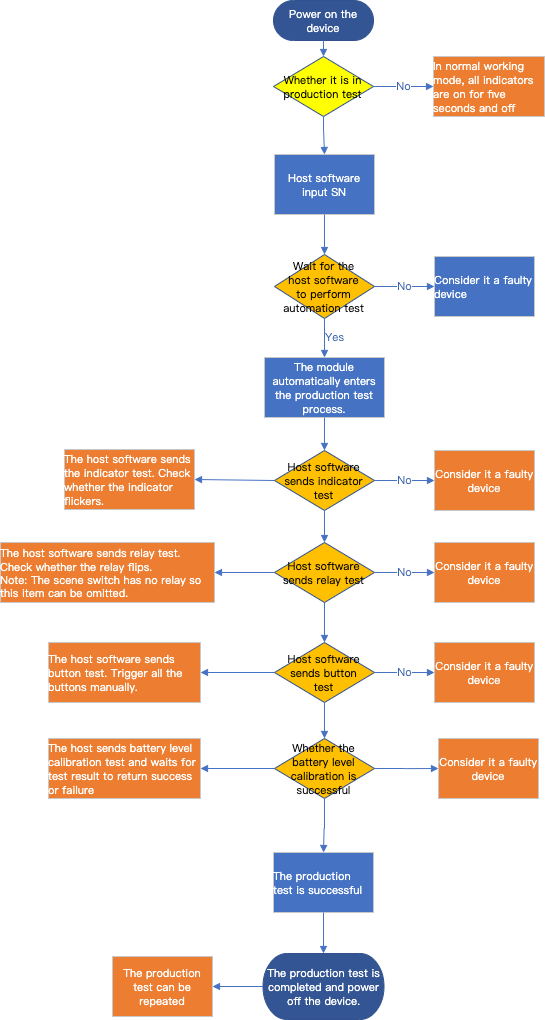
- Power on the device under test.
- Power on the beacon and switch the switch 4 to
ON(switch to the side of the USB port).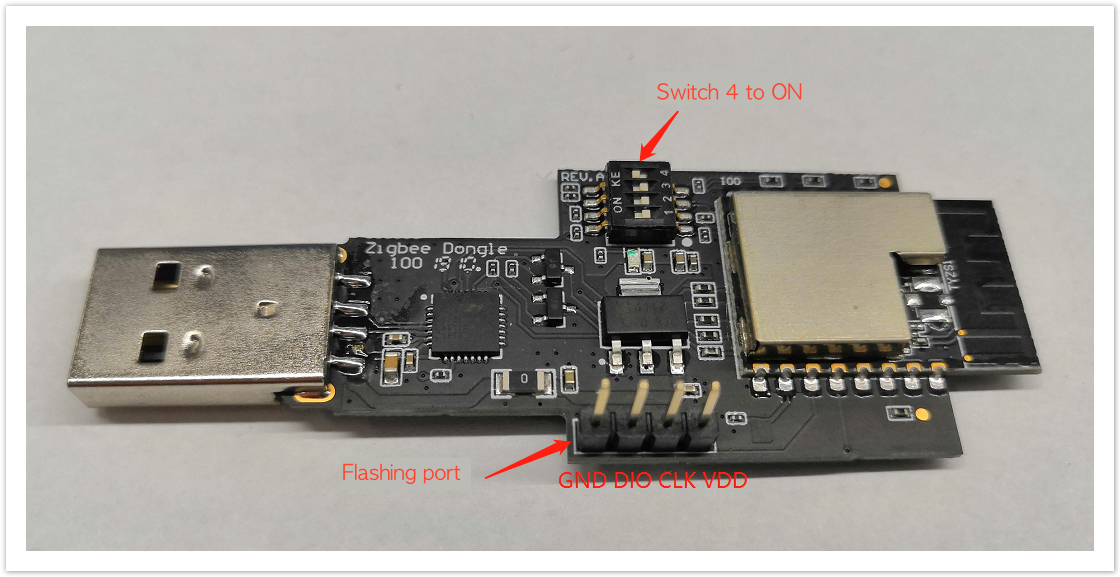
- Wait for the device to automatically search for the beacon and enter the production test process.
- Determine whether the production test is successful.
Success: After the switch or master switch is pressed, the relays of all channels flip six times with an interval of 0.5 seconds. The power indicator or master power indicator and network indicator turn on and off synchronously with the relay flips.
Production test with a Zigbee gateway
-
Power on the device under test.
-
Power on the gateway and connect it to the PC with a network cable. Wait until the two indicators turn green and start flickering before you start pairing.
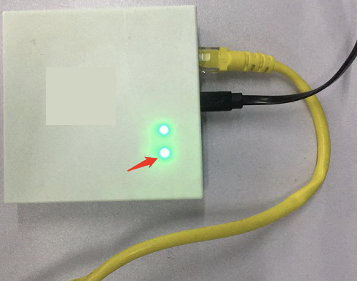
Note: Before performing production tests, you need to update the specific firmware of the gateway. You can get help from Tuya staff.
-
Open the network settings on the PC, and after you complete the Ethernet configuration of the gateway, click OK.
You can configure the IP address and subnet mask as follows. The last number field of the IP address should be smaller than 254. -
Log in to the Tuya solution production test platform
-
Enter the authorization code that you got by applying in the authorization code box and press the Enter button on your PC.
The software will automatically come up with the production information of the device. -
In the Mode> Mode Selection box in the lower left corner, select Debug Mode.
-
Click Import, select and import the JSON file.
-
Click Test in the top right corner.
-
In the corresponding line window, click Configure, and enter the parameters in the pop-up TCP link setting window.
Parameter Description IP address Enter 192.168.1.254. Port Enter 12130. Delay It is recommended to enter 200 milliseconds. -
Press and hold the reset button on the device and wait until the indicator starts flickering before you release the button. If the indicator flickers for a few seconds and then turns off, it indicates that the device is paired. At this time, click Run to start the production test.
Note: The devices that do not indicate as expected during the automatic test can be considered faulty devices.
-
Wait for the production test platform to send an indicator test command and check whether the indicator flickers.
-
Wait for the production test platform to send a relay test command and check whether the relay flips.
-
Wait for the production test platform to send a button test command, press all the buttons manually, and check whether the relay flips.
-
Wait for the production test platform to automatically complete the battery level calibration and return the result of success or failure.
Is this page helpful?
YesFeedbackIs this page helpful?
YesFeedback


