Create Smart Light
This topic describes how to create a lighting product with a no-code solution on the Tuya Developer Platform, using Wi-Fi multicolor light (RGBCW) as an example.
Background information
The no-code solutions for LED lighting products on the Tuya Developer Platform cover four types of communication methods, each of which includes five control modes.
| Communication method | Control mode |
|---|---|
| Wi-Fi |
|
| Zigbee | |
| Bluetooth mesh |
|
| Bluetooth mesh (Tuya) |
Create lighting products
Procedure
-
Log in to Developer Platform.
-
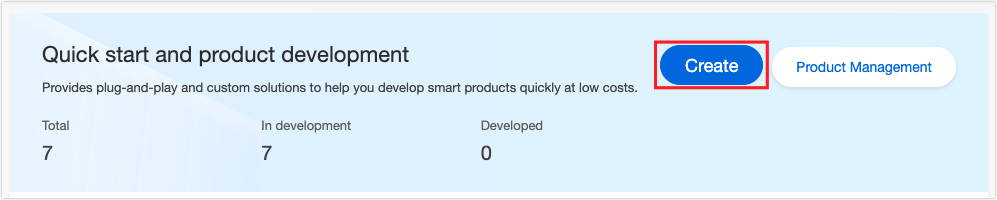
Click Create.
-
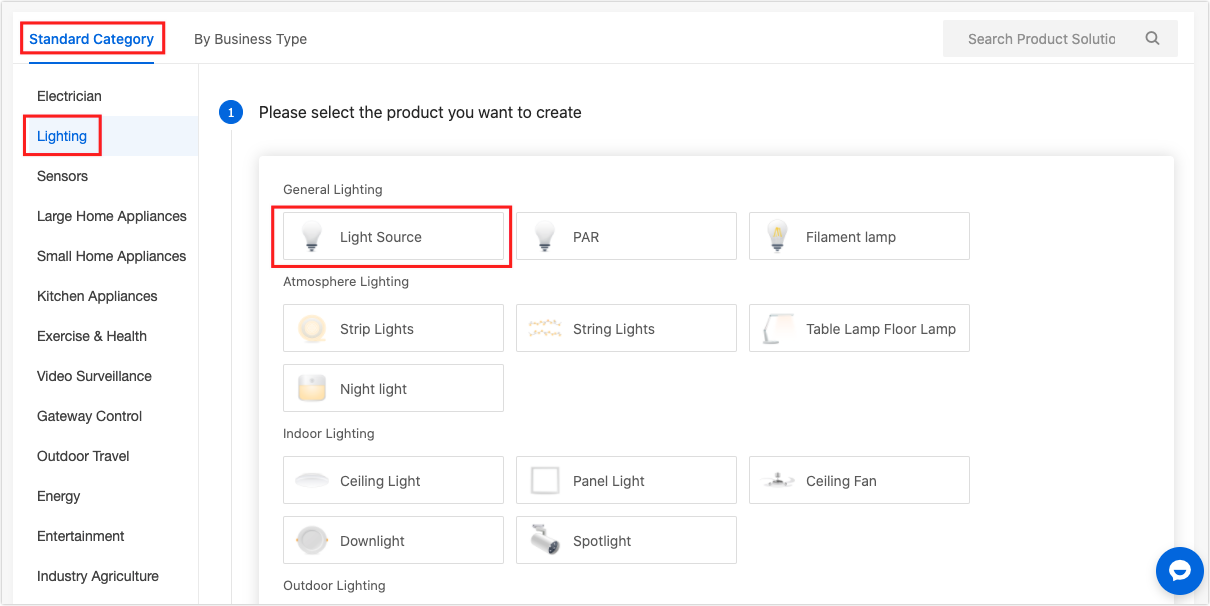
Find Standard Category, and click Lighting > Light Source.
-
Find Choose a product plan, and click No-Code Development > Wi-Fi > Multicolor Light (RGBCW)_Wi-Fi.
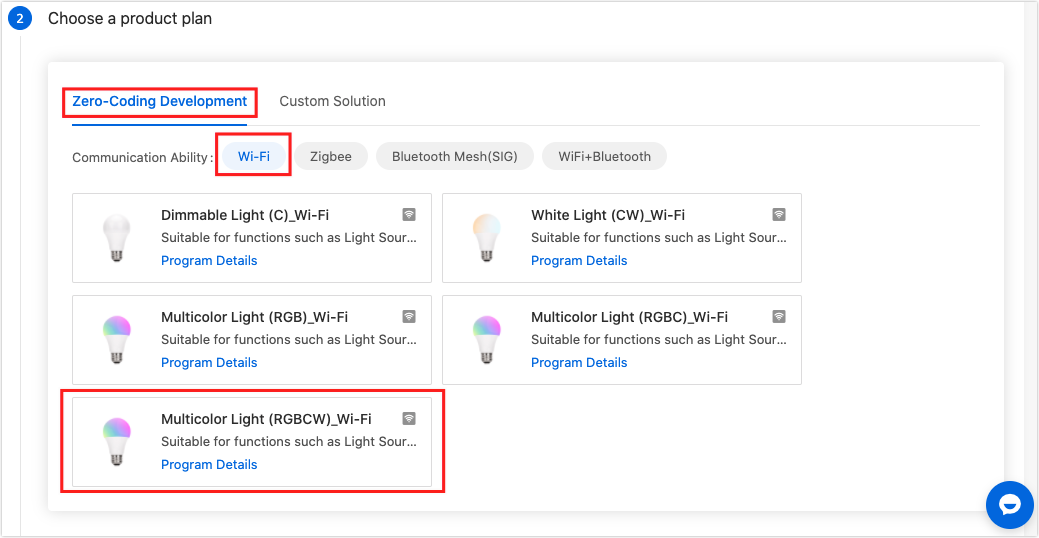
Note: If the functionality provided by the no-code solution cannot meet your requirements, you can turn to custom solutions with the reference of SoC Custom Firmware.
-
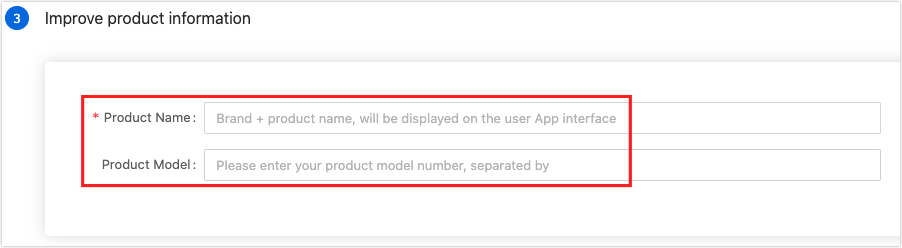
Complete product information.
- Product Name (required): Enter brand and product name. The name is displayed on the app’s control panel.
- Product Model (optional): Enter the product’s model number. Multiple model numbers are available, separated by a half-width comma.
Note: The model number will not be displayed on the app. It is recommended to enter the internal model name or customer’s product model to ease product maintenance and order management on the Developer Platform.
-
Click Create. When a product is created, the page automatically jumps to Create Standard Functions of the step of Function Definition.
Define product functions
Procedure
-
Select the desired functions from Create Standard Functions window and click Confirm.
Note: The required functions cannot be removed from the selected functions.
-
On Function Definition page, enable Cloud Functions as needed. (Optional)

-
Click Next: Device Panel at the bottom of the page. The page jumps to Device Panel.
Configure device panel
This section describes how to configure an app panel, using a visualized panel and its default configuration as an example. If you require custom panels or panel editing, you proceed with relevant operations as per the prompts.
Procedure
-
On the Device Panel page, find an ideal panel and click Apply.

-
You can change or edit the panel as needed. Scan QR code with Tuya app to preview. (Optional)
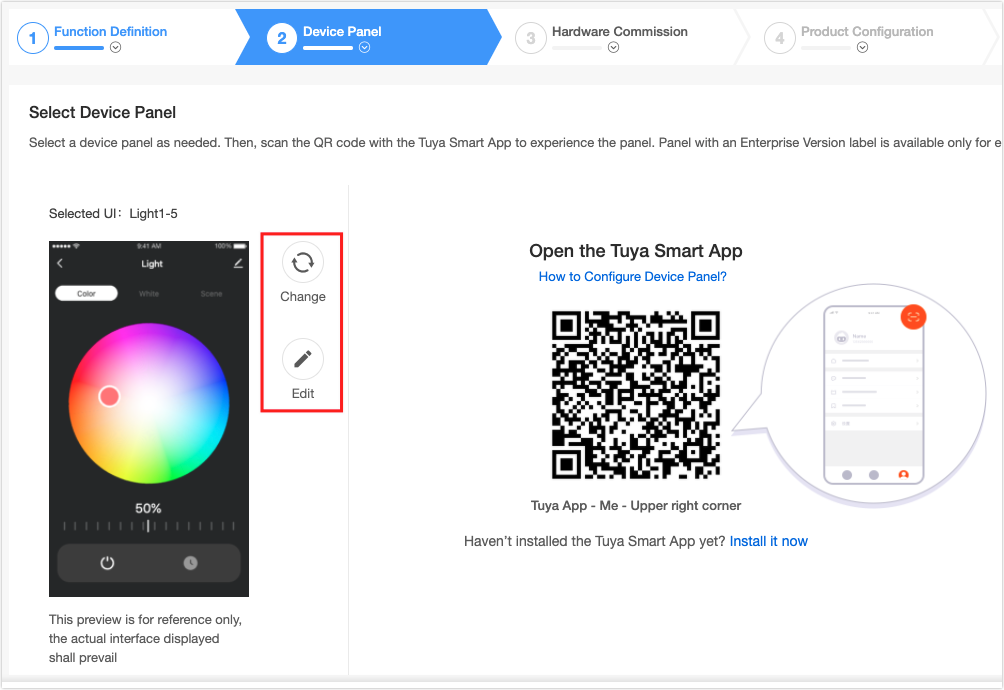
-
Click Next: Hardware Commission. The page jumps to Hardware Commission.
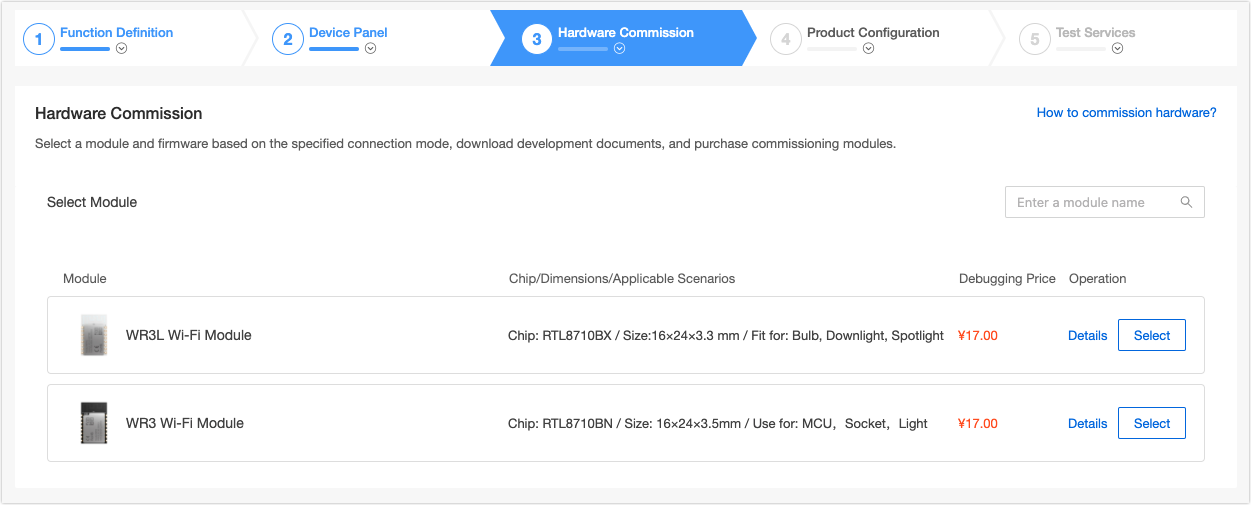
Hardware commission
You can define the electrical parameters of the module. It is recommended that an engineer define the professional parameters.
Background information
Currently, Tuya provides ten types of Wi-Fi modules. You choose an ideal one based on specific product features such as packaging requirements, mounting space, temperature conditions, and antenna specifications.
| Product category | Recommendation |
|---|---|
| Bulb | TYE3L module |
| Filament lamp | TYLC5 module |
| LED candle and GU10 | TYLC4 module |
| Lights using internal LED driver or metal housing LED driver | TYE1S-IPEX module supporting external antenna |
| Lights using plastic housing LED driver | TYE1S module with onboard antenna or TYE3S module |
| Compact products, such as strip light controller | TYE2S module |
Note:
- Provide module instructions and I/O schematic diagram for your reference.
- The EN pin of the E3S and E3L modules shall be tied high.
- Give the best attention to RF reference design.
Procedure
- Select a module as required.
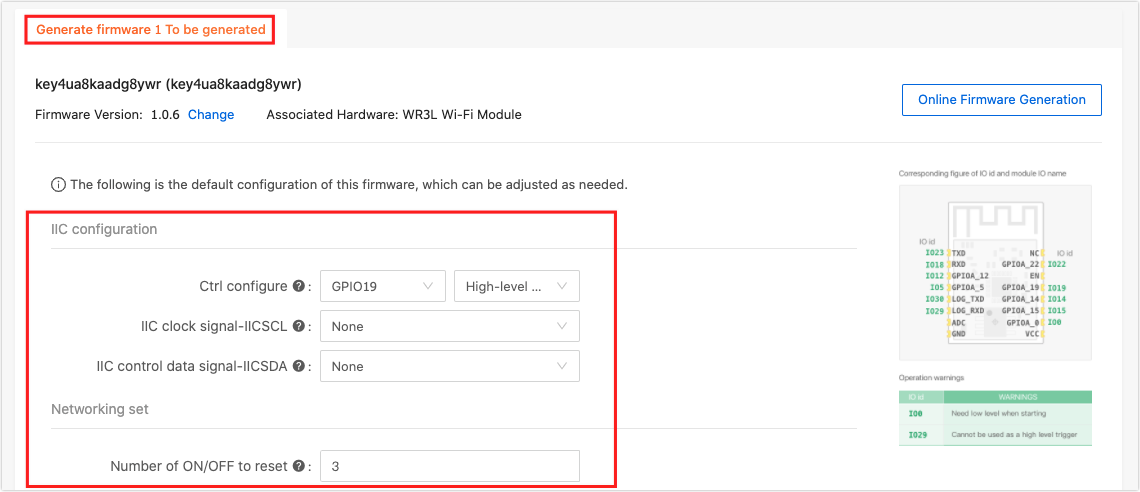
- Configure firmware parameters in the Generate firmware 1 To be generated. The specific parameter configuration is as follows.
| Parameter type | Parameter | Description |
|---|---|---|
| IIC configuration | Ctrl configure | When the light is turned on, high level is output, while when the light is turned off on the app, low level is output to shut off white and RGB circuits for reducing standby power.Note: If Product drive mode is set to IIC-SM726EB, only the RGB circuit can be shut off. |
| IIC clock signal—IICSCL | Select a pin from the pull-down menu and the selected one cannot be used for other parameter configuration. | |
| IIC control data signal—IICSDA | Select a pin from the pull-down menu and the selected one cannot be used for other parameter configuration. | |
| Networking set | Number of ON/OFF to reset | The number of on/off operations that trigger reset network pairing. For example, if the parameter is set to 3, the network pairing will be reset after the "on, off, on, off, and on" operation is performed. |
| Color | Red drive pin-R | Select a pin from the pull-down menu and the selected one cannot be used for other parameter configuration. |
| Green drive pin-G | Select a pin from the pull-down menu and the selected one cannot be used for other parameter configuration. | |
| Blue drive pin-B | Select a pin from the pull-down menu and the selected one cannot be used for other parameter configuration. | |
| White drive pin-C/Bright | Select a pin from the pull-down menu and the selected one cannot be used for other parameter configuration. | |
| Warm drive pin-W/CCT | Select a pin from the pull-down menu and the selected one cannot be used for other parameter configuration. | |
| Product functional relevance | White mode maximum brightness | The highest duty cycle output from the white light I/O or the dedicated IC output. Value range: 1–100. |
| White mode minimum brightness | The lowest duty cycle output from the white light I/O or the dedicated IC output. Value range: 1–100. Note: Select the applicable minimum brightness according to the hardware IC. Improper settings may cause the lights to flicker. |
|
| Frequency of PWM | The too high or too low frequency will cause jitter and stroboscopic effect. Value range: 100–20000. Default value of 1000 is recommended. |
|
| Color temperature adjustment drive |
|
|
| Product drive mode | The mode to drive LED lamp beads.
|
|
| Power memory mode | After the product is powered off and restarted, whether to recover to the last set state, such as color, brightness, color temperature, and scenario mode.Note: Power-off memory takes effect after the current state lasts for five seconds. |
|
| Switch gradual | How brightness changes when the light is on/off.
|
|
| Product distribution network options | Pairing reminder brightness | The indicator brightness during network pairing. Value range: 10–100. |
| Normal brightness | The initial brightness of the always-on indicator after the network pairing is successful or when the pairing mode indicator is always-on. Value range: 1–100. |
|
| Normal temperature | The initial temperature after the network pairing is successful or when the network pairing indicator is in always-on mode after power-on. Value range: 0–100. |
- When you are finished configuring, click Online Firmware Generation.
- Click Next: Product Configuration. The page jumps to Product Configuration.
Product configuration
Configure items according to operating instructions. When you are finished configuring, click Next: Test Service.

Test services
Follow the prompts on the page to perform a self-service product test with the Tuya Cloud Test app and generate a test report. You can also subscribe to the Tuya Test service. When you are finished test, click Next: Product Release.
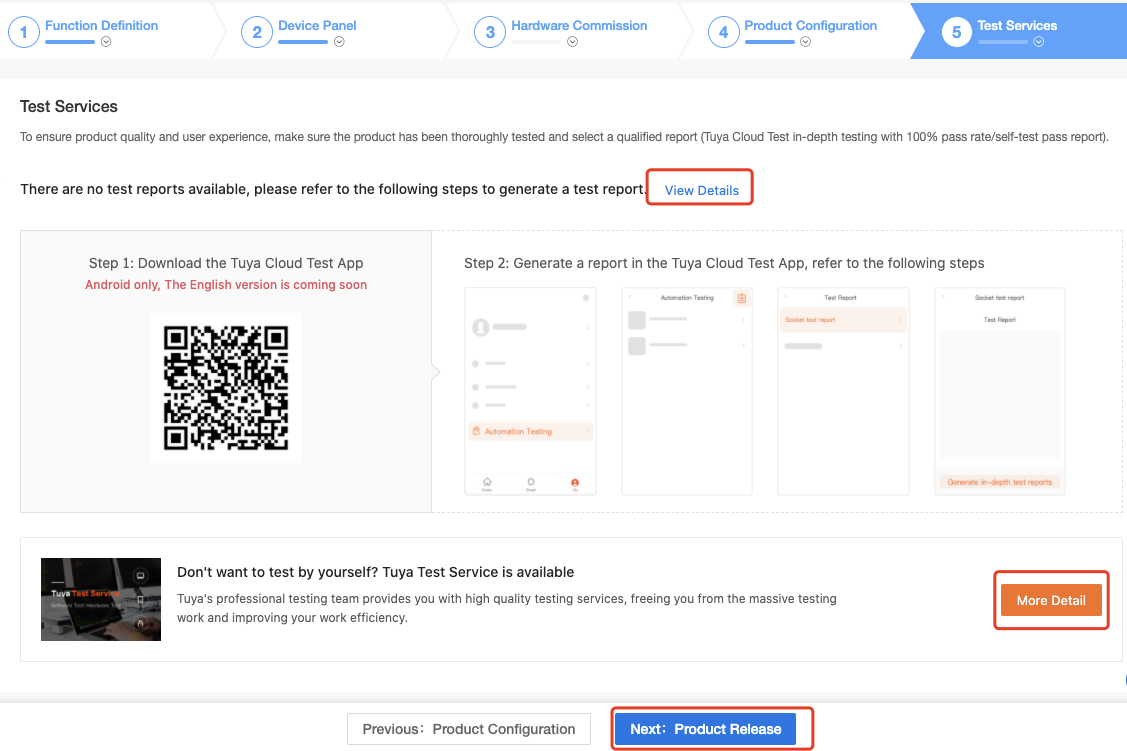
Note:
- Tuya Cloud Test app is only available for Android.
- For more information about the Tuya Cloud Test process, see Tuya Cloud Test App.
- Do not delete developing or developed products to avoid data loss and affecting proper product usage.
Is this page helpful?
YesFeedbackIs this page helpful?
YesFeedback


