Quick Start
This topic describes how to build a Matter over Thread project using the product development kit in Tuya Wind IDE.
Environment setup
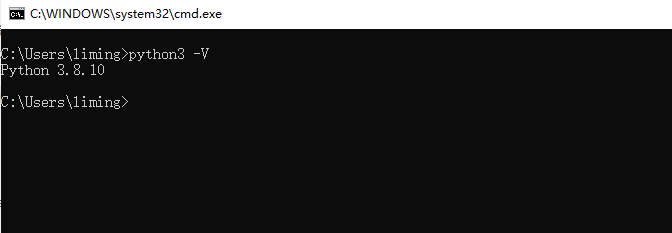
Install Python
Go to the Python website, download any version between Python 3.6 and Python 3.8, and install it using the default settings.
After you have installed Python on Windows, the executable in the installation location is python.exe by default. Make a copy of it and rename it to python3.exe.
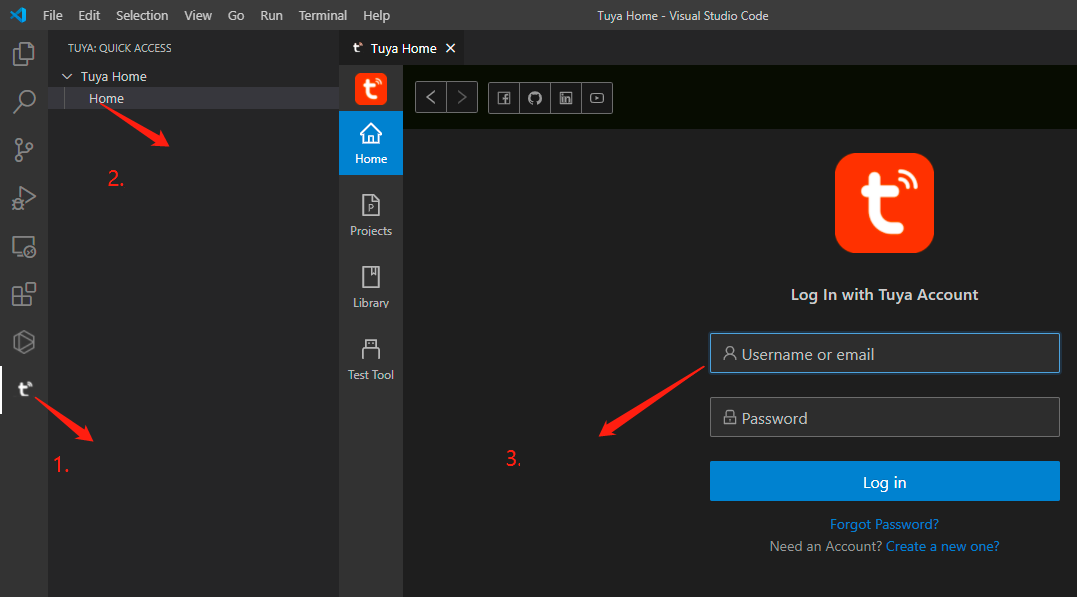
Install Tuya Wind IDE
Go to the Visual Studio Code website, download the latest release, and install it using the default settings. Search for Tuya Wind IDE in the extension marketplace and install it. You can log in with your Tuya Developer Platform account. If you do not have an account yet, register with the Tuya Developer Platform.
Development kit architecture
Block diagram
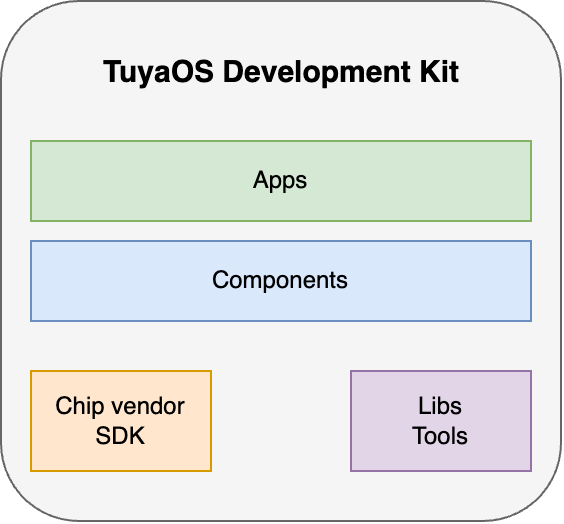
Overview
TuyaOS Matter over Thread sub-device development kit works for developing products compatible with the Matter 1.0 standard. It abstracts away much of the complexity required to adopt Matter technologies and is integrated with TuyaOS technologies to help you quickly get started with Matter development. The development kit contains the vendor SDK, feature libraries, hardware interfaces, networking interfaces, components, and tools. Various sample applications are also available to walk you through the use of APIs and Matter development specifications.
Directory
.
├─ hardware
│  ├─ chip_manual
│  └─ module_manual
├─ pc
│  └─ tools
├─ TuyaOS
│  ├─apps
│  │  └─tuyaos_demo_thread_light
│  ├─components
│  ├─docs
│  ├─include
│  │  ├─adapter
│  │  ├─base
│  │  └─components
│  ├─libs
│  ├─scripts
│  ├─tools
│  └─vendor
└─ tuya.json
Directory description
| Folder | Purpose |
|---|---|
hardware |
Includes hardware datasheets. |
pc |
Includes tools for PC provided by semiconductor vendors. |
apps |
Includes demo apps, allowing you to quickly develop applications by editing the sample code. |
doc |
Includes development documentation. |
include |
Includes APIs for TuyaOS sub-device development. |
lib |
Includes the libraries on which TuyaOS sub-device development depends. |
scripts |
Includes script files. |
tools |
Includes tools and scripts for compilation. |
vendor |
Includes the optimized chip vendor SDK. |
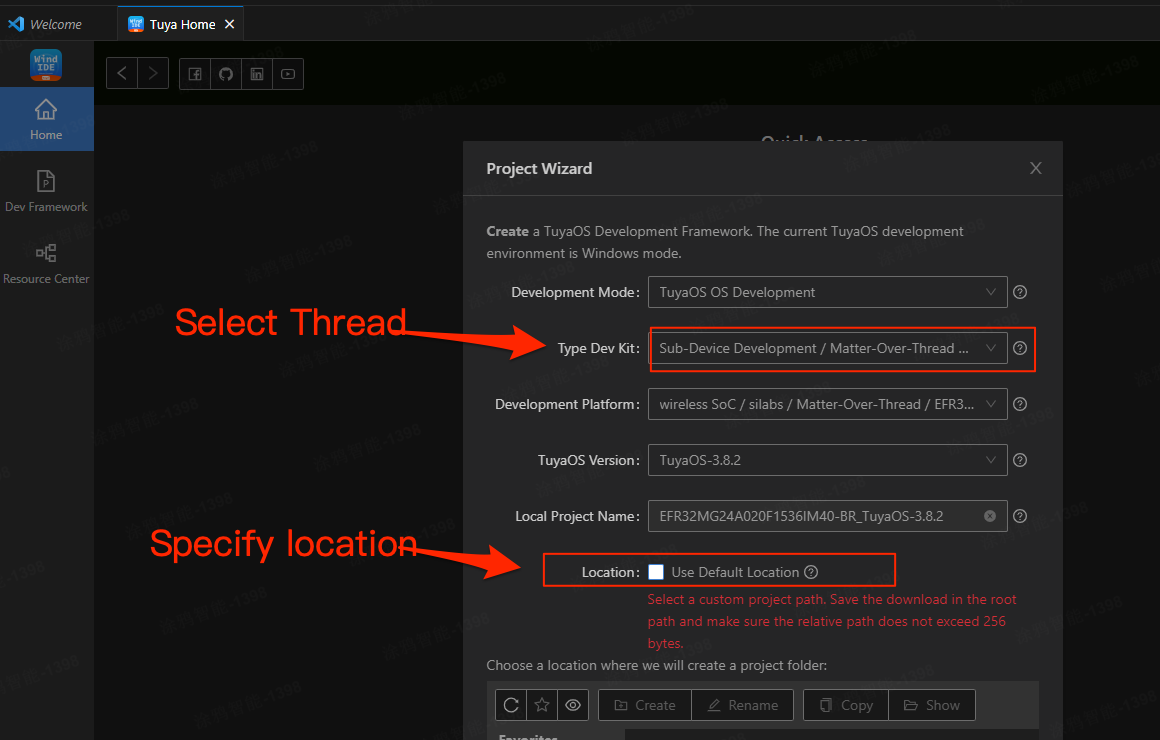
Get development kit
-
Create a sub-device development kit. Log in to Tuya Wind IDE with your Tuya Developer Platform account. Click Create New Framework.

-
Select the desired development kit and click Finish to start downloading the file.
Initialize development kit
VOID_T tal_dev_power_on_init(VOID_T): The callback after power on to initialize device information.
tal_device_info_config: Initializes device configurations.tal_device_network_config: Initializes network information.tal_matter_init_identify: Initializes the callback required for the Identify cluster.tal_matter_attribute_change_handler_register: Registers the callback invoked when attributes change.tal_matter_event_notification_register: Registers the callback invoked when network status changes.tal_matter_device_init: Initializes the device endpoint, cluster, attribute, and default attribute value. Seezcl_attr_template.handzcl_cluster_template.hto implement your initialization.
VOID_T tal_dev_power_on_init(VOID_T)
{
    TUYA_LOG("register_device_info ");
    TUYA_LOG("firmware_version  = 0x%x ", FIRMWARE_VERSION);
    /***************config device basic infomation************/   //step 1
    DEVICE_INFO_T  device_info = {
        TUYA_PID,
        FIRMWARE_NAME,
        FIRMWARE_VERSION,
        FIRMWARE_OTA_ID
    };
    tal_device_info_config(&device_info);

    /***************config device network information*********/  // step 2
    NETWORK_CONFIG_T network_data;
    network_data.power_on_start_pairing = TRUE;//FALSE;
    network_data.node_type = ROUTER;//SLEEP_END_DEVICE;
    network_data.network_pairing_timeout =  3 * 60; //min value of 3 * 60 seconds: max value of 15 * 60 seconds
    tal_device_network_config(&network_data);
    /**************config device cluster infomation************/  //step 3
    tal_matter_init_identify(app_ep_info[0].endpoint,
                            MATTER_ZCL_IDENTIFY_TYPE_VISIBLE_LED,
                            identify_start_callback,
                            identify_stop_callback,
                            identify_effect_callback);  //init identity callback
    tal_matter_attribute_change_handler_register(attribute_change_callback); //register attribute change callback

    tal_matter_event_notification_register(network_change_callback); //register network state change callback

    tal_matter_device_init(&app_ep_info[0], get_array_len(app_ep_info)); //init device endpoint infomation
}
tal_dev_system_on_init: Initializes hardware interfaces, such as button input and LED output.
VOID_T tal_dev_system_on_init(VOID_T)
{
    ty_key_init(0, 1, 0, 5000, key_event_callback);
    ty_key_init(1, 2, 0, 5000, key_event_callback);
    ty_led_init(0, 21, TUYA_GPIO_LEVEL_LOW, 1);
    ty_led_init(1, 20, TUYA_GPIO_LEVEL_LOW, 1);
}
Key functions
Configure Matter information
Configure device information
VOID_T tal_device_info_config(DEVICE_INFO_T *device_info_p);
This function configures basic information about a Matter node, including the PID (generated on the Tuya Developer Platform), firmware name, firmware version, and firmware identifier.
Register endpoint
OPERATE_RET tal_matter_device_init(MATTER_ENDPOINT_S endpoint_info[],
                                   UINT16_T endpoint_info_sums);
This function registers the Matter endpoint, cluster, and attribute to the protocol stack. The TuyaOS Matter Development Framework provides pre-made templates for clusters and attributes. You can select the required one to initialize your application, or use the templates as a reference to implement your clusters and attributes. The underlying protocol stack for endpoint 0 has already been initialized, without you taking care of it.
This function should be registered in tal_dev_power_on_init.
Configure node network
VOID_T tal_device_network_config(NETWORK_CONFIG_T* network_data);
This function configures the Matter node, such as node type, pairing timeout, and power-on pairing. It must be configured manually.
Matter networking
Start pairing
OPERATE_RET tal_matter_commission_start(UINT32_T timeout);
This function starts Matter pairing. The device will activate Bluetooth advertising and enter pairing mode. If the device is paired, it will leave the current network and restart. If the device is not paired or not waiting for pairing, it will start the pairing process. timeout specifies the pairing timeout, in seconds. Alternatively, use tal_device_network_config to set the timeout.
Stop pairing
OPERATE_RET tal_matter_commission_stop(VOID_T);
This function stops Matter pairing.
Leave network
OPERATE_RET tal_matter_reset_factory_new(VOID_T);
This function instructs a device to leave the network. After leaving the network, the device will clear the Thread network and fabric information, and then restart.
Register network status callback
OPERATE_RET tal_matter_event_notification_register(EVENT_FUNC_CB event_callback);
This function registers the Matter network status callback in tal_dev_power_on_init. This callback will inform you when the Matter network status changes, so you can respond accordingly. The following table lists the possible network status.
| Status | Timing | Purpose |
|---|---|---|
MATTER_EVT_POWER_ON |
Invoked when the device is powered on. | Indicate the device is powered on. |
MATTER_EVT_COMMISSION_START |
Invoked when the device starts pairing. | Indicate pairing starts. |
MATTER_EVT_COMMISSION_OK |
Invoked when the device joins the Matter network. | Indicate successful pairing. |
MATTER_EVT_COMMISSION_FAILED |
Invoked when the device fails to pair within the timeout period. | Indicate pairing timeout. |
MATTER_EVT_RESET_FACTORY_NEW |
Invoked when the device leaves the network and is reset to factory settings. | Indicate a factory reset has been performed. |
In MATTER_EVT_POWER_ON, you can get the Matter status using tal_matter_status_get().
MATTER_ST_POWER_ON_CONNECTEDindicates the device has been powered on and paired.MATTER_ST_POWER_ON_UNCONNECTEDindicates that the device has been powered on but not paired.
Get Matter network status
MATTER_STATUS_E tal_matter_status_get(VOID_T);
This function requests the current Matter network status.
| Status | Description |
|---|---|
MATTER_ST_POWER_ON_CONNECTED |
Indicate the device is connected to the Matter network after power on. |
MATTER_ST_POWER_ON_UNCONNECTED |
Indicate the device is not connected to the Matter network after power on. |
MATTER_ST_CONNECTED |
Indicate the device is paired. |
MATTER_ST_UNCONNECTED |
Indicate the device fails to pair. |
Get Matter network event
MATTER_EVT_E tal_matter_event_get(VOID_T);
The network events returned by this function match the event registered by tal_matter_event_notification_register.
Matter attribute and command
Write attributes
OPERATE_RET tal_matter_attribute_write(UINT16_T endpoint,
                                       UINT32_T cluster_id,
                                       UINT32_T attr_id,
                                       UINT8_T *attr_data,
                                       UINT8_T attr_type);
This function writes Matter attribute values. The attribute to write must have been registered. Otherwise, the operation will fail. If the attribute mask is set to TY_ATTRIBUTE_MASK_NONVOLATILE or TY_ATTRIBUTE_MASK_TOKENIZE, the attribute value will be stored in non-volatile flash memory upon writing.
Read attributes
OPERATE_RET tal_matter_attribute_read(UINT16_T endpoint,
                                      UINT32_T cluster_id,
                                      UINT32_T attr_id,
                                      UINT8_T *attr_data,
                                      UINT16_T data_len);
This function reads Matter attribute values. The attribute to read must have been registered. Otherwise, the operation will fail.
Register the callback invoked when attribute values change
OPERATE_RET tal_matter_attribute_change_handler_register(ATTR_CHANGE_CB attr_change_callback);
This function registers a callback invoked when the attribute value changes, for example, writing attribute values remotely or locally, and modifying attributes.
Attribute updates
OPERATE_RET tal_matter_attribute_config_update(UINT16_T endpoint,
                                               UINT32_T cluster_id,
                                               CONST MATTER_ATTR_S *attr);
This function updates the initial parameters of attributes.
Register the callback for reading and writing attributes locally
OPERATE_RET tal_matter_ext_attribute_handler_register(EXT_ATTR_WRITE_CB ext_attr_write_cb,
                                                      EXT_ATTR_READ_CB ext_attr_read_cb);
This function registers the callbacks for writing and reading attributes locally, corresponding to tal_matter_attribute_write and tal_matter_attribute_read.
Register the identify cluster command callback
OPERATE_RET tal_matter_init_identify(UINT16_T endpoint,
                                     MATTER_ZCL_IDENTIFY_E type,
                                     MATTER_INDENTIFY_CB start_cb,
                                     MATTER_INDENTIFY_CB stop_cb,
                                     MATTER_INDENTIFY_CB effect_cb);
This function initializes the callbacks for the identify cluster commands, which are the start, stop, and effect callbacks.
Command reception callback
VOID_T tal_dev_cmd_recv_callback(UINT16_T endpoint, UINT32_T cluster, UINT32_T cmd_id, UINT8_T * cmd_buffer, UINT16_T cmd_len)
This callback is invoked when the device receives Matter cluster commands.
Matter production testing
Disable beacon testing
VOID_T tal_mf_test_disable_beacon_test(VOID_T);
This function disables the beacon test mode.
Configure serial port
VOID_T tal_mf_test_get_uart_cfg(UINT_T *out_uart_id, TAL_UART_CFG_S *out_cfg);
This function configures the serial port for production testing. If this function is not called, the SDK will use the default serial port.
Test start callback
VOID_T tal_mf_test_pre_start_callback(VOID_T *args);
This callback is invoked when the device enters the testing process, applying to the double dongle test mode only. You can set an indicator to signal when the device enters testing mode.
Test exit callback
VOID_T tal_mf_test_end_callback(UINT8_T *data);
This callback is invoked when the device exits the testing process, applying to the double dongle test mode only. *data of 1 indicates the testing process is finished.
Test result notification
VOID_T tal_mf_test_result_notify(TUYA_MF_TEST_RET_T result);
This function returns the test result, which is either true or false.
Button test result
VOID_T tal_mf_test_button_test_notify(UINT_T key_id);
This function returns the test result of keypress, where key_id is the ID of the test button.
Level sensor test result
VOID_T tal_mf_test_bool_sensor_notify(UINT8_T sensor_type, UINT8_T index, BOOL_T result);
This function returns the test result of the high/low level sensor.
Analog sensor test result
VOID_T tal_mf_test_analog_sensor_notify(CHAR_T* sensor_type, UINT8_T index, FLOAT_T* value,BOOL_T result);
This function returns the test result of the analog sensor.
Generic test result notification
VOID_T tal_mf_test_general_send(UINT8_T cmd, UINT8_T len, UINT8_T *data);
This function returns the test result of keypress, requiring you to assemble the response data.
Matter application development guide
Create application project
In the apps directory, create a new project folder. Within this folder, create two subfolders named include and src to store header files and source files, respectively.
Modify JSON configuration file
{
    "firmwareInfo": {
        "description": "this is a matter demon project",
        "TUYA_PID":"ueoxczuav3sln***",
        "MODULE_TYPE":"TS24_U",
        "FIRMWARE_NAME": "app_thread_light",
        "FIRMWARE_VERSION": "65536",
        "SOFTWARE_VERSION": "1.0.6",
        "FIRMWARE_OTA_ID": "light",
        "VID": "0x125D",
        "PID": "0x002C"
    }
}
Modify appconfig.json for your product.
| Field | Purpose |
|---|---|
description |
Project description. |
TUYA_PID |
The PID of your product, generated on the Tuya Developer Platform, is used to identify the product type and app panel. Contact your product manager for more information. |
MODULE_TYPE |
The type of the module your product uses, which can be TS24_U, TS24_2S, or TS24_LC5. |
FIRMWARE_NAME |
The firmware name. An incorrect firmware name can cause the fingerprint verification test to fail. |
FIRMWARE_VERSION |
The firmware version. For example, the decimal 65545 is equivalent to 0X00010009 in hexadecimal. The major version is represented by the highest two bytes, the minor version by the middle byte, and the patch version by the last byte. |
SOFTWARE_VERSION |
The software version, aligning with the firmware version. |
FIRMWARE_OTA_ID |
The firmware OTA ID, which will be verified during an OTA update. If the verification fails, the update will not proceed. |
VID |
Matter Vendor ID that uniquely identifies a particular product manufacturer or vendor. It is allocated by the Connectivity Standards Alliance (CSA). |
PID |
Matter Product ID that uniquely identifies a product of a vendor. It is assigned by you. For Tuya-enabled products, the PID can be obtained from the Tuya Developer Platform. |
{
    "_libs": {
        "lib_symblos":[
            "libs/libapploader.a",
            "libs/libbluetooth.a",
            "libs/librail_multiprotocol_efr32xg24_gcc_release.a",
            "libs/libnvm3_CM33_gcc.a",
            "libs/sl_rail_phy_overrides.o",
            "libs/libMatterRouterDebug.a"
        ]
    }
}
Libraries required for the project:
- libs/libMatterRouterDebug.a (for router nodes): Build firmware with logs, suitable for debugging. The logging port can be configured using the function. A baud rate of 921600 is recommended.
- libs/libMatterRouterRelease.a (for router nodes): Build firmware without logs, suitable for production.
The firmware built with a logging library is too big to support OTA updates.
Build and clean
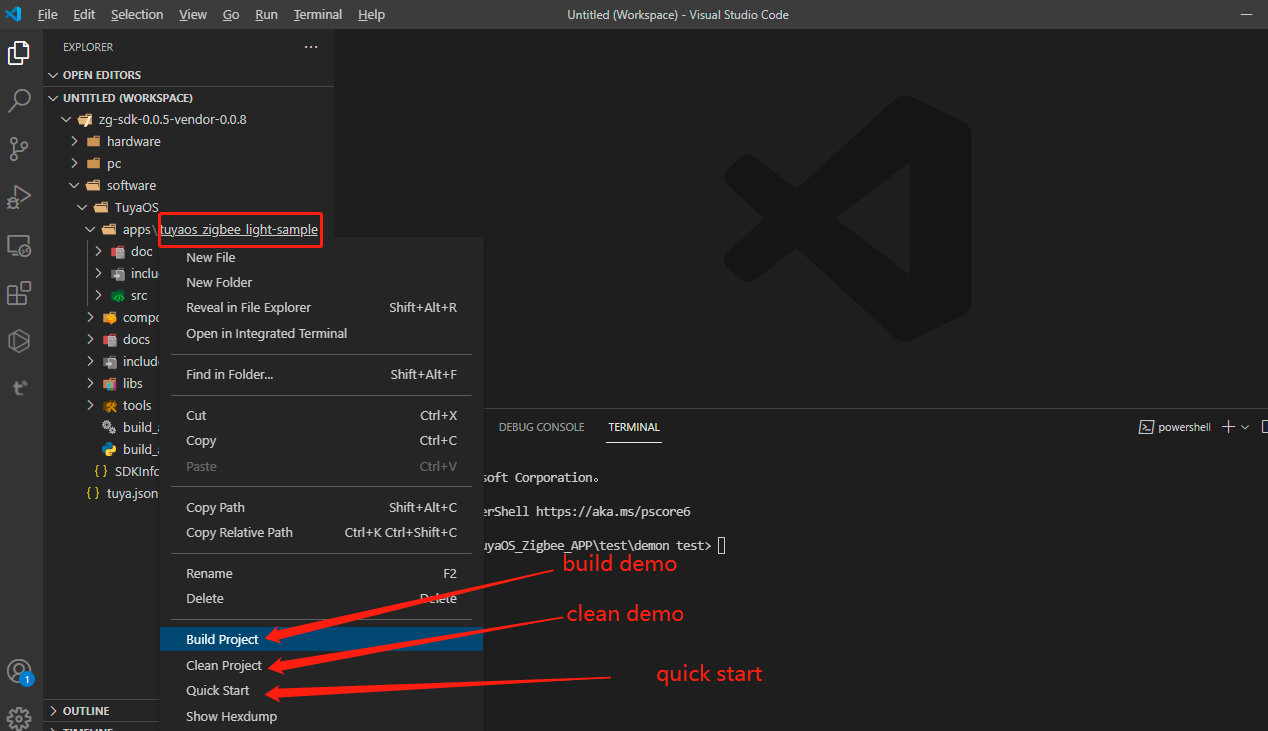
Open Visual Studio Code. Right-click the application project to Build Project or Clean Project.
Flash firmware with chip vendor’s tool
Navigate to xxx\pc\tools\Simplicity_Commander and open commander.exe. Click Browse to select the QIO binary file in the output folder within the project directory and click Flash.
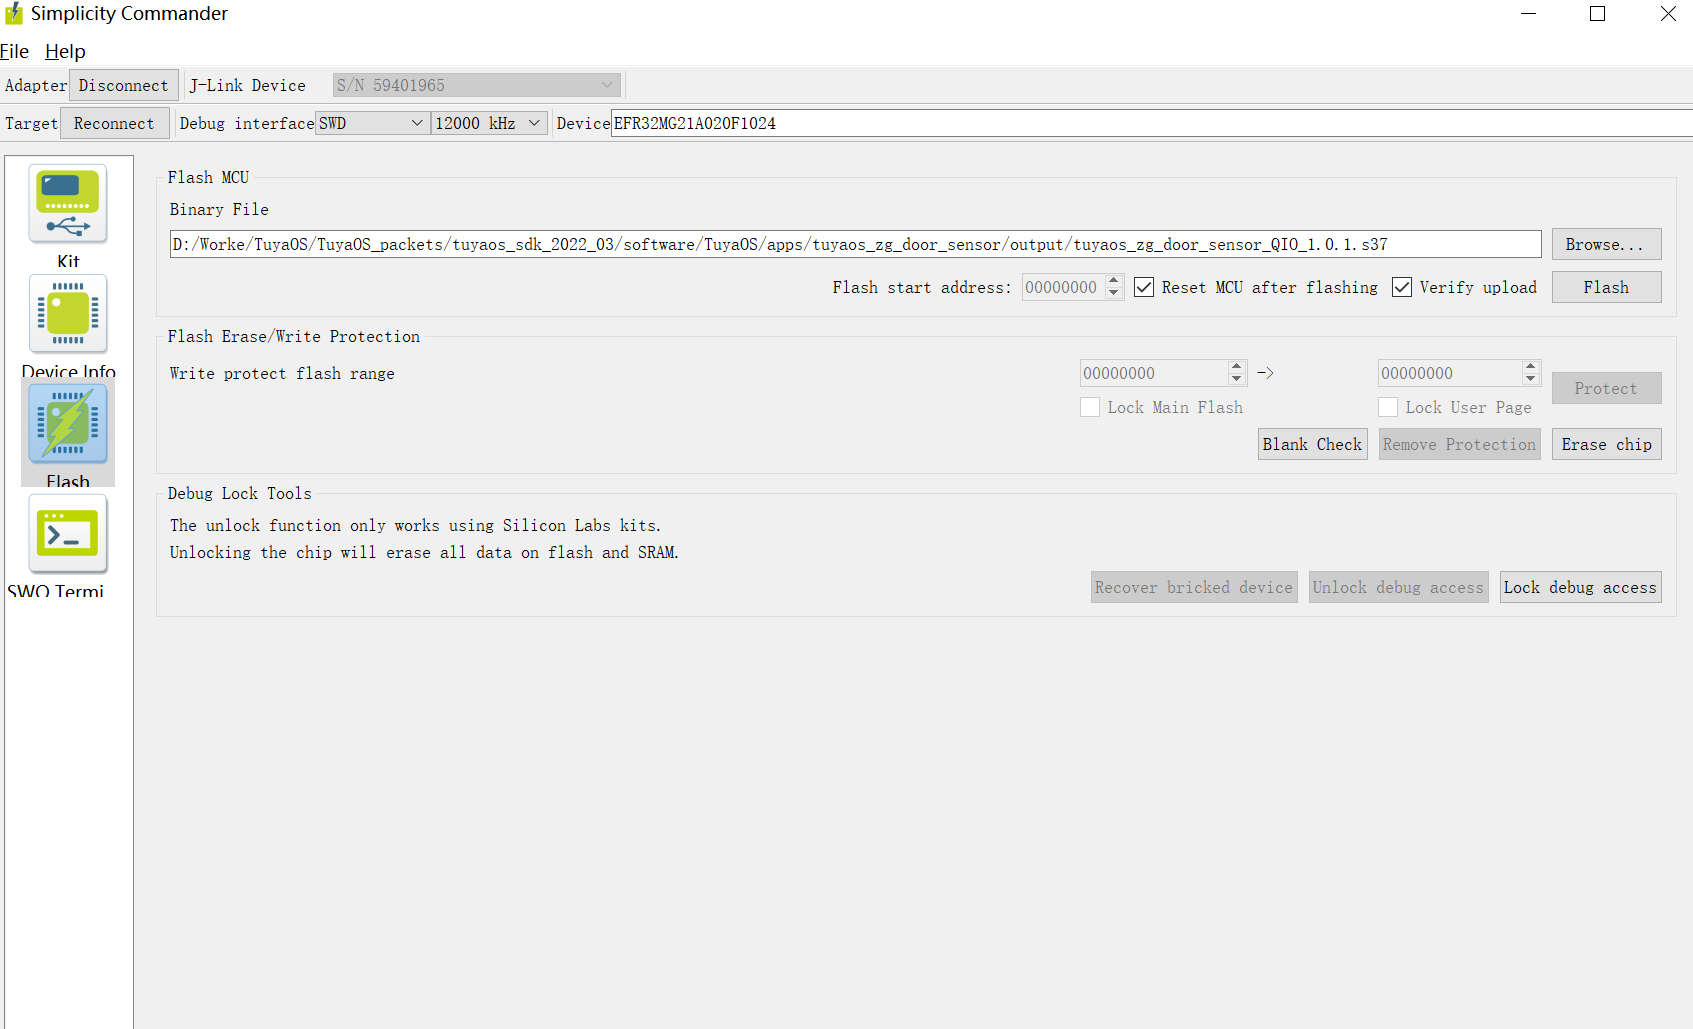
The firmware flashed using the software from the chip vendor is only valid for seven days. After it expires, the device might not work as expected.
Firmware type
The built firmware is found in the output folder within the project folder, where QIO is for production and UG is for a full update.
Support and help
If you have any problems with TuyaOS development, you can post your questions in the Tuya Developer Forum.
Is this page helpful?
YesFeedbackIs this page helpful?
YesFeedback


