Smart Plug Demo
This topic describes how to develop a smart plug with Tuya’s standard Wi-Fi SDK. We use the smart plug demo in the SDK as an example to illustrate this process.
Get the demo
Go to the Tuya Developer Platform and download the Tuya Standard Module SDK in the step of Hardware Development. You can refer to the demos included in the SDK for writing application code. The smart plug demo is one of them.

Demo directory
Extract the downloaded SDK and find the apps folder that contains demos. The directory of the smart plug demo is as follows.
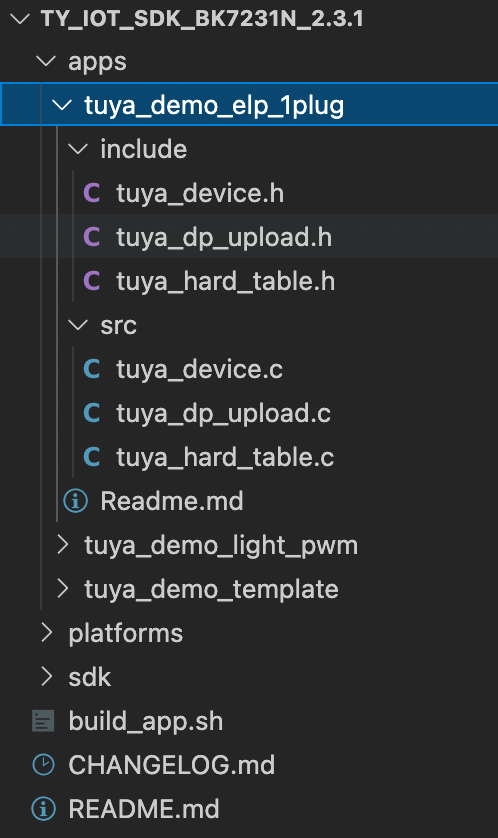
The demo includes the following files.
| File name | File type | Description |
|---|---|---|
| tuya_device.h | Header file | Includes functions involving device initialization, feature code, and production tests. |
| tuya_dp_upload.h | Header file | Includes functions involving data point (DP) reporting. |
| tuya_hard_table.h | Header file | Includes functions involving peripheral configuration. |
| tuya_device.c | Source file | Includes interfaces for hardware control. |
| tuya_dp_upload.c | Source file | Includes the key of critical firmware. |
| tuya_hard_table.c | Source file | Includes interfaces for hardware control. |
Code implementation
This section describes how the sample code works and how to write code to implement smart plug features.
Communication logic
The following describes how a device interacts with the cloud.
-
Data interaction methods.
The device interacts with the cloud in JSON. The DP ID and definition are set in the first step of creating a product on the Tuya Developer Platform. The demo code writes DP information in the function
tuya_device_config.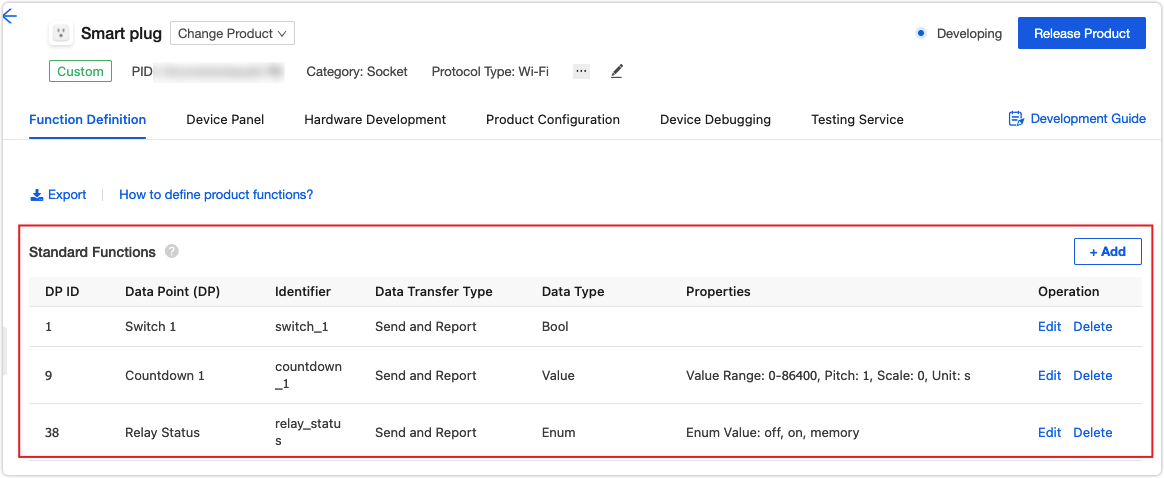

-
The product ID.
A product ID (PID) is generated when a product is created on the Tuya Developer Platform. The PID is the unique identifier of a device and associated with product configurations, such as app panel, cloud configuration, and voice capability. Therefore, the PID must be written to the code. The demo code writes the PID in
tuya_device.h.
-
Hardware authorization.
To connect a device to the Tuya Cloud, you must flash Tuya’s license to the chip for authorization. For more information, see General Wi-Fi SDK Burning and Authorization Instruction.
Demo features
The following table lists the features the demo can implement.
| Feature | Implementation methods |
|---|---|
| Local control | Detect the button I/O and control the signal that a relay outputs to control a device. If a device is connected to the Tuya Cloud, the updated DP status will be synchronized to the cloud. |
| Entering pairing mode | Detect the button I/O. If the button is pressed and hold for a specified time period such as five seconds, the reset function will be called to enable a device to enter pairing mode. |
| Status indication | Determine device status and indicate different types of status by LED on, LED off, LED flickering quickly, and LED flickering slowly. |
| Device pairing with mobile app | The SDK includes the implementation code for the pairing operation on the mobile app. After a device enters pairing mode, users can operate on the mobile app and complete pairing. |
| Device control using mobile app | Parse the received control commands from the cloud, enable a device to execute specified action, and return the updated DP status to the cloud. |
| Removing devices from mobile app | Call the interface for removing a device to enable a device to enter pairing mode. |
| Voice control | The implementation code for voice control shares the same control logic for device control. |
| Timer | Enable the software timer and update the countdown at a specified time period. When the system determines the time is up, it will trigger preset device actions. |
| Power-off memory | When a device enters a specified status, a timer will be enabled to set a time period. When the time is up, the current device status will be written to the flash memory. Once the device is powered on, it will read the saved status and get parameters to continue the action that takes place before a power outage. |
| OTA updates | Receive updates from the cloud and install them on the device. |
| Production test | Scan an SSID specified for a test to determine whether the Wi-Fi signal is qualified. |
Feature implementation
Before directly moving to how the demo code implements device management and control, we describe how SDK initialization works.
This section describes the feature code. In some cases, several features can be implemented by one function so only the unique code is displayed and shared code is represented with.
Commonly used functions
Four functions are vital for feature implementation.
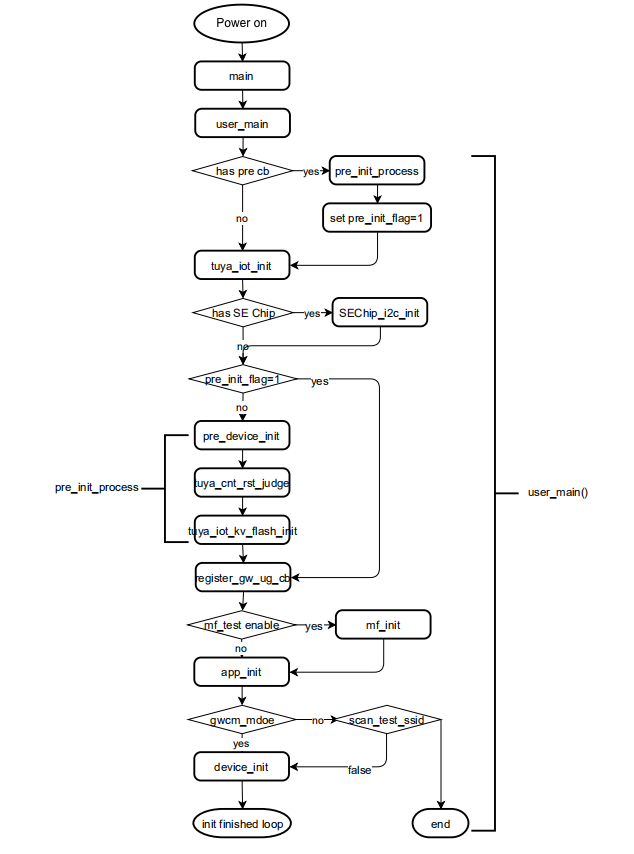
user_main()         // The entry point function. It calls the following three functions to complete SDK initialization.
pre_device_init()  // View SDK version and set the log level.
app_init()         // Initialize the hardware features, set the working mode of the Wi-Fi module, register the callback for production test, and set the timeout for device pairing.
device_init()      // Register the feature callback, complete the initialization, and run the SDK.
-
View SDK version:
// Print SDK information and firmware name and version. Set the log level. VOID pre_device_init(VOID) { PR_DEBUG("%s",tuya_iot_get_sdk_info()); PR_DEBUG("%s:%s",APP_BIN_NAME,DEV_SW_VERSION); PR_NOTICE("firmware compiled at %s %s",__DATE__,__TIME__); PR_NOTICE("system reset reason:[%s]",tuya_hal_system_get_rst_info()); SetLogManageAttr(TY_LOG_LEVEL_DEBUG); // Set the log level. } -
Hardware features and pairing settings:
// Initialize the hardware features, set the working mode of the Wi-Fi module, register the callback for production test, and set the timeout for device pairing. VOID app_init(VOID) { tuya_device_config(); app_cfg_set(GWCM_LOW_POWER,prod_test); tuya_iot_wf_timeout_set(180); } -
Initialize the hardware and register the feature callback:
// Initialize the hardware, register the feature callback, and runs the SDK.
OPERATE_RET device_init(VOID)
{
OPERATE_RET op_ret = OPRT_OK;
tuya_hard_prod_flag(FALSE); // Set the flag for production test.
// The feature callback.
	TY_IOT_CBS_S wf_cbs = {
		gw_status_cb,\
		gw_ug_cb,\
		gw_reset_cb,\
		dev_obj_dp_cb,\
		dev_raw_dp_cb,\
		dev_dp_query_cb,\
		NULL,
};
// Initialize the IoT architecture.
op_ret = tuya_iot_wf_soc_dev_init_param(func_select.gwcm_mode_user, WF_START_SMART_FIRST, &wf_cbs, FIRMWAIRE_KEY, PRODUCT_KEY, DEV_SW_VERSION);
	if(OPRT_OK != op_ret) {
		PR_ERR("tuya_iot_wf_soc_dev_init err:%d",op_ret);
		return op_ret;
}
// Initializes the software timer.
op_ret = tuya_hard_soft_timer_init();
if(OPRT_OK != op_ret)
{
	PR_ERR("tuya_hard_soft_timer_init fail,fail_num:%d",op_ret);
	return op_ret;
}
// The callback for querying the Wi-Fi module status.
op_ret = tuya_iot_reg_get_wf_nw_stat_cb(__get_wf_status);
if(OPRT_OK != op_ret) {
PR_ERR("tuya_iot_reg_get_wf_nw_stat_cb err:%d",op_ret);
	return op_ret;
}
PR_NOTICE("system free heap:%d",tuya_hal_system_getheapsize());
return OPRT_OK;
}
Local control
// Initialize the involved hardware and register the processing function for local control.
VOID tuya_device_config(VOID)
{
	DEVICE_PARAM_S dev_param;
	/*You need to configure the following settings according to your hardware I/Os.*/
	dev_param.wifi_mode = GWCM_LOW_POWER;
	dev_param.wifi_led.io_pin = TY_GPIOA_9;
	dev_param.wifi_led.io_level = IO_LOW_LEVEL;
	dev_param.key_control.io_config.io_pin = TY_GPIOA_7;
	dev_param.key_control.io_config.io_level = IO_LOW_LEVEL;
	dev_param.key_control.press_time = 3000;
	dev_param.key_control.key_call_back = key_process;
	dev_param.relay.io_pin = TY_GPIOA_6;
	dev_param.relay.io_level = IO_HIGH_LEVEL;
	// Configure DPs of product features.
	dev_param.dev_dp.switch_dp.is_exist = TRUE;
	dev_param.dev_dp.switch_dp.dpid_num = 1;
	dev_param.dev_dp.switch_cd_dp.is_exist = TRUE;
	dev_param.dev_dp.switch_cd_dp.dpid_num = 9;
	dev_param.dev_dp.app_relay_stat.is_exist = TRUE;
	dev_param.dev_dp.app_relay_stat.dpid_num = 38;
	dev_param.relay_led.io_pin = TY_GPIOA_8;
	dev_param.relay_led.io_level = IO_LOW_LEVEL;
	tuya_hard_init(&dev_param);
}

VOID key_process(IN TY_GPIO_PORT_E port, IN PUSH_KEY_TYPE_E type, IN INT_T cnt)
{
	PR_DEBUG("port:%d,type:%d,cnt:%d",port,type,cnt);
	OPERATE_RET op_ret = OPRT_OK;
	if(tuya_hard_judge_key_pin(port))
	{
		if(LONG_KEY == type)// A press-and-hold button event to enter pairing mode.
		{
			tuya_iot_wf_gw_unactive();// The function for pairing reset.
		}
		else if(NORMAL_KEY == type) // Execute the button press action.
		{
			tuya_hard_key_control();// Control the button press action.
			op_ret = tuya_hard_channel_upload(DOUBLE_TYPE);// Update the relay status.
			if (OPRT_OK != op_ret)
			{
				PR_ERR("[%s] tuya_hard_channel_upload fail,fail_num:%d",__FUNCTION__,op_ret);
			}
			tuya_hard_channel_save();// Save the current relay status.
		}
		else
		{
			PR_NOTICE("key type is no deal");
		}
	}

	return;
}
// Control the button press action.
VOID tuya_hard_key_control(VOID)
{
	g_dev_stat.relay_stat = !g_dev_stat.relay_stat;
	PR_DEBUG("key control channel status,channel_stat:%d",g_dev_stat.relay_stat);
	g_dev_stat.relay_cd_sec = 0;
	tuya_hard_set_channel_stat(g_dev_stat.relay_stat);
	tuya_hard_channel_upload(DOUBLE_TYPE);
}
Entering pairing mode
The SDK can implement two pairing modes, Wi-Fi Easy Connect and access point, which are the EZ mode and AP mode in the Tuya app respectively.
This demo can enable the smart plug to enter different pairing modes with a press-and-hold button event.
-
The function
key_processthat is registered intuya_device_configcan detect a press-and-hold button event. -
Call
tuya_iot_wf_gw_unactiveto enable the device to enter pairing mode.The pairing status is switched in sequence.
- If a device has not entered pairing mode, after
tuya_iot_wf_gw_unactiveis called, it will enter EZ mode. - If a device is in EZ mode, after
tuya_iot_wf_gw_unactiveis called, it will enter AP mode.
- If a device has not entered pairing mode, after
VOID tuya_device_config(VOID)
{
	DEVICE_PARAM_S dev_param;
	/*You need to configure the following settings according to your hardware I/Os.*/
	dev_param.wifi_mode = GWCM_LOW_POWER; // Set the working mode of the Wi-Fi module.
	dev_param.wifi_led.io_pin = TY_GPIOA_9;
	dev_param.wifi_led.io_level = IO_LOW_LEVEL;
	dev_param.key_control.io_config.io_pin = TY_GPIOA_7; // Set the button I/O.
	dev_param.key_control.io_config.io_level = IO_LOW_LEVEL;// Set the button-trigger.
	dev_param.key_control.press_time = 3000; // Set the threshold for determining a press-and-hold button event.
	dev_param.key_control.key_call_back = key_process;// Register the button callback.
	..... // Irrelevant to this feature
	tuya_hard_init(&dev_param);
}

VOID key_process(IN TY_GPIO_PORT_E port, IN PUSH_KEY_TYPE_E type, IN INT_T cnt)
{
	...... // Irrelevant to this feature
	if(tuya_hard_judge_key_pin(port))
	{
		if(LONG_KEY == type)// A press-and-hold button event to enter pairing mode.
		{
			tuya_iot_wf_gw_unactive();// The function for pairing reset.
		}
		else if(NORMAL_KEY == type)
	...... // Irrelevant to this feature
}
Query network status
When network status changes, the callback tuya_iot_reg_get_wf_nw_stat_cb in the device_init calls nw_stat_cb to query the current status through hw_set_wifi_led_stat.
OPERATE_RET device_init(VOID)
{
.....  // Irrelevant to this feature
	op_ret = tuya_iot_reg_get_wf_nw_stat_cb(nw_stat_cb);
	if(OPRT_OK != op_ret) {
	PR_ERR("tuya_iot_reg_get_wf_nw_stat_cb fail,fail_num:%d",op_ret);
		return op_ret;
		}
..... // Irrelevant to this feature
}

VOID nw_stat_cb(IN CONST GW_WIFI_NW_STAT_E stat)
{
	PR_NOTICE("cur_wifi_stat:%d",stat);
	OPERATE_RET op_ret = OPRT_OK;
	tuya_hard_wifi_status(stat); // The LED indicates Wi-Fi status.
	if (STAT_CLOUD_CONN == stat || STAT_AP_CLOUD_CONN == stat)
	{
		op_ret = tuya_hard_upload_all_data();// After a device is connected to the cloud for the first time, the status of all DPs is sent to the cloud for synchronization with the mobile app.
		if (OPRT_OK != op_ret)
		{
			PR_ERR("tuya_hard_upload_all_data fail,fail_num:%d",op_ret);
		}
	}
	return;
}
Device pairing with mobile app
The mobile app chooses a pairing mode based on the device’s network status. The SDK includes the implementation code of this functionality. After a device is connected to the cloud, the status of all DPs must be sent to the cloud for synchronization with the mobile app.
// After a device is connected to the cloud, the status of all DPs must be sent to the cloud for synchronization with the mobile app.
VOID nw_stat_cb(IN CONST GW_WIFI_NW_STAT_E stat)
{
	.....  // The device is connected to the cloud.
	if (STAT_CLOUD_CONN == stat || STAT_AP_CLOUD_CONN == stat)
	{
		**op_ret = tuya_hard_upload_all_data();// After a device is connected to the cloud for the first time, the status of all DPs is sent to the cloud for synchronization with the mobile app.**
		if (OPRT_OK != op_ret)
		{
			PR_ERR("tuya_hard_upload_all_data fail,fail_num:%d",op_ret);
		}
	}
	return;
}

OPERATE_RET tuya_hard_upload_all_data(VOID)
{
	OPERATE_RET op_ret = OPRT_OK;
	DP_UPLOAD_S *upload_dp = NULL;
	UINT_T dp_cnt = DEV_DP_NUM;
	upload_dp = tuya_upload_alloc_space(dp_cnt);
	if (NULL == upload_dp)
	{
		PR_ERR("tuya_upload_alloc_space fail");
		return OPRT_COM_ERROR;
	}
	if (g_dev_info.dev_dp.switch_dp.is_exist)
	{
		tuya_upload_dp_bool_frame(upload_dp,g_dev_info.dev_dp.switch_dp.dpid_num,g_dev_stat.relay_stat);
	}
	if (g_dev_info.dev_dp.switch_cd_dp.is_exist)
	{
		tuya_upload_dp_value_frame(upload_dp,g_dev_info.dev_dp.switch_cd_dp.dpid_num,g_dev_stat.relay_cd_sec);
	}
	if (g_dev_info.dev_dp.app_relay_stat.is_exist)
	{
		tuya_upload_dp_enum_frame(upload_dp,g_dev_info.dev_dp.app_relay_stat.dpid_num,g_dev_stat.relay_power_stat);
	}
//            dev_report_dp_json_async(get_gw_cntl()->gw_if.id, upload_dp->dp_buf, upload_dp->cur_idx)
	op_ret = dev_report_dp_json_async(get_gw_cntl()->gw_if.id,upload_dp->dp_buf,upload_dp->cur_index);
	tuya_upload_delete_space(upload_dp);
	if (OPRT_OK != op_ret)
	{
		PR_ERR("dev_report_dp_json_async all_data is fail,fail_num:%d",op_ret);
		return op_ret;
	}
	PR_DEBUG("upload all dp data sucess");
	return OPRT_OK;
}
Device control using mobile app
In the function device_init, the callback dev_obj_dp_cb for DP processing is registered. When the device receives data from the mobile app, the system automatically calls dev_obj_dp_cb to process the data and enables the device to execute an operation accordingly. Then, tuya_hard_upload_all_data will be called to send the current DP status to the mobile app.
OPERATE_RET device_init(VOID)
{
...... // Irrelevant to this feature
	TY_IOT_CBS_S wf_cbs = {
		status_changed_cb,\
		gw_ug_inform_cb,\
		gw_reset_cb,\
		dev_obj_dp_cb,\
		dev_raw_dp_cb,\
		dev_dp_query_cb,\
		NULL,
	};
	...... // Irrelevant to this feature
}

VOID dev_obj_dp_cb(IN CONST TY_RECV_OBJ_DP_S *dp)
{
	PR_NOTICE("app_send dp_cnt:%d",dp->dps_cnt);
	OPERATE_RET op_ret = OPRT_OK;
	UINT_T dp_index = 0;
	UINT_T app_send_dp_num = dp->dps_cnt;
	DEV_DP_TYPE_E dpid_type = DP_NOT_EXIST;
	for (dp_index = 0;dp_index < app_send_dp_num;dp_index++)
	{
		dpid_type = tuya_hard_dpid_type(dp->dps[dp_index].dpid);
		PR_DEBUG("dpid_type:%d",dpid_type);
		switch (dpid_type)
		{
			case SW_TYPE:
				PR_DEBUG("value:%d",dp->dps[dp_index].value.dp_bool);
				tuya_hard_channel_control(dp->dps[dp_index].value.dp_bool);
			break;
			case SW_CD_TYPE:
				PR_DEBUG("value:%d",dp->dps[dp_index].value.dp_value);
				tuya_hard_channel_cd_control(dp->dps[dp_index].value.dp_value);
			break;
			case RELAY_ST_TYPE:
				PR_DEBUG("value:%d",dp->dps[dp_index].value.dp_enum);
				tuya_hard_relay_power_stat(dp->dps[dp_index].value.dp_enum);
			break;
			default:
			break;
		}
	}
	op_ret = tuya_hard_upload_all_data();// The status of all DPs is sent to the cloud for synchronization with the mobile app.
	if (OPRT_OK != op_ret)
	{
		PR_ERR("[%s] tuya_hard_upload_all_data fail,fail_num:%d",op_ret);
	}
	return;
}
// Query device status from the mobile app.
VOID dev_dp_query_cb(IN CONST TY_DP_QUERY_S *dp_qry)
{
	PR_DEBUG("Recv DP Query Cmd");
	OPERATE_RET op_ret = OPRT_OK;
	op_ret = tuya_hard_upload_all_data();// The status of all DPs is sent to the cloud for synchronization with the mobile app.
	if (OPRT_OK != op_ret)
	{
		PR_ERR("tuya_hard_upload_all_data fail,fail_num: %d",op_ret);
	}
	return;
}
Remove devices from mobile app
When users remove a device from the mobile app, the device calls gw_reset_cb on receiving the removing command to reset and enter pairing mode.
VOID gw_reset_cb(GW_RESET_TYPE_E type)
{
	if (GW_REMOTE_RESET_FACTORY != type)
	{
		return;
	}
	/*Clear flash data*/
	tuya_hard_clear_flash_data();// Clear all the device information saved in the flash memory.
	return;
}

// Clear all the device information saved in the flash memory.
VOID tuya_hard_clear_flash_data(VOID)
{
	OPERATE_RET op_ret = OPRT_OK;
	op_ret = iot_wd_common_delete(POWER_STAT_STORAGE);
	if (OPRT_OK != op_ret)
		{
		PR_ERR("[%s] delete power_stat fail",__FUNCTION__);
	}
	op_ret = iot_wd_common_delete(CHANNEL_STAT_STORAGE);
	if (OPRT_OK != op_ret)
		{
		PR_ERR("[%s] delete channel_stat fail",__FUNCTION__);
	}
	return;
}
Voice control
The implementation code for voice control shares the same logic for device control using a mobile app. For more information, see Device pairing with mobile app, Device control using mobile app, and Removing devices from mobile app.
To enable voice control, you must subscribe to the required voice assistant services on Tuya Value-Added Service. For more information, see Third-Party Access.
Countdown timer
After the SDK receives the countdown message in dev_obj_dp_cb, it gets into tuya_hard_channel_cd_control to enable the software timer and register the callback count_down_timer. The timer is updated every one second and then the SDK reports the countdown to the cloud.
VOID dev_obj_dp_cb(IN CONST TY_RECV_OBJ_DP_S *dp)
{
	..... // Irrelevant to this feature
		switch (dpid_type)
		{
			..... // Irrelevant to this feature
			case SW_CD_TYPE:
				PR_DEBUG("value:%d",dp->dps[dp_index].value.dp_value);
				tuya_hard_channel_cd_control(dp->dps[dp_index].value.dp_value);
			break;
			  ..... // Irrelevant to this feature
			default:
			break;
		}
	..... // Irrelevant to this feature
}

VOID tuya_hard_channel_cd_control(UINT_T app_send_cd_sec)
{
	g_dev_stat.relay_cd_sec = app_send_cd_sec;
	if (app_send_cd_sec == 0)
	{
		g_dev_stat.relay_cd_sec = 0;
		tuya_hard_stop_soft_timer(g_dev_timer.count_down_timer);
	}
	else
	{
		tuya_hard_start_soft_timer(g_dev_timer.count_down_timer,1000,TIMER_CYCLE);
		tuya_hard_channel_upload(SINGLE_TYPE);
	}
}
Power-off memory
Every time the device status is changed, tuya_hard_channel_save will be called to save the current device status. When the device is powered on after a power outage, it will read the saved status and restore the program before losing power.
STATIC VOID key_process(tuya_pin_name_t port,PUSH_KEY_TYPE_E type,INT_T cnt)
{
	..... // Irrelevant to this feature
	if(tuya_hard_judge_key_pin(port))
	{
		if(LONG_KEY == type)// A press-and-hold button event to enter pairing mode.
		{
			tuya_iot_wf_gw_unactive();
		}
		else if(NORMAL_KEY == type)
		{
			tuya_hard_key_control();
			op_ret = tuya_hard_channel_upload(DOUBLE_TYPE);
			if (OPRT_OK != op_ret)
			{
				PR_ERR("[%s] tuya_hard_channel_upload fail,fail_num:%d",__FUNCTION__,op_ret);
			}
			tuya_hard_channel_save(); // The device restores the program before losing power.
		}
	..... // Irrelevant to this feature
	}
}

VOID tuya_hard_channel_save(VOID)
{
	if (g_dev_stat.relay_power_stat == RELAY_MEM)
	{
		tuya_hard_start_soft_timer(g_dev_timer.channel_save_timer,5000,TIMER_ONCE); // Enable the software timer. Device status is saved every five seconds.
	}
	PR_DEBUG("relay_power_stat is not need save,stat:%d",g_dev_stat.relay_power_stat);
	return;
}
OTA updates
Configure the update details and deploy the updates on the Tuya Developer Platform. When a device receives the updates, it calls the callback gw_ug_cb to install the updates. After successful installation, the device runs on the new firmware.
int gw_ug_cb(IN CONST FW_UG_S *fw)
{
	PR_DEBUG("Rev GW Upgrade Info");
	PR_DEBUG("fw->fw_url:%s", fw->fw_url);
	PR_DEBUG("fw->sw_ver:%s", fw->sw_ver);
	PR_DEBUG("fw->file_size:%d", fw->file_size);
	return tuya_iot_upgrade_gw(fw, get_file_data_cb, upgrade_notify_cb, NULL);
}

// The callback for updates download.
OPERATE_RET get_file_data_cb(IN CONST FW_UG_S *fw, IN CONST UINT_T total_len, IN CONST UINT_T offset,
									IN CONST BYTE_T *data, IN CONST UINT_T len, OUT UINT_T *remain_len, IN PVOID_T pri_data)
{
	PR_DEBUG("Rev File Data");
	PR_DEBUG("Total_len:%d ", total_len);
	PR_DEBUG("Offset:%d Len:%d", offset, len);
	return OPRT_OK;
}
// The update progress callback.
VOID upgrade_notify_cb(IN CONST FW_UG_S *fw, IN CONST INT_T download_result, IN PVOID_T pri_data)
{
	PR_DEBUG("download  Finish");
	PR_DEBUG("download_result:%d", download_result);
}
Production test
Register a function for the production test in app_init through app_cfg_set. In a test, the device will scan the TEST_SSID defined tuya_main.c to determine the signal strength.
-
If the signal strength is greater than -60 dB, it indicates the Wi-Fi signal works fine. Then, the SDK enables the software timer and calls the callback
protest_switch_timer_cbto start the product feature test. -
If the signal strength is less than -60 dB, it indicates the Wi-Fi signal is poor. We recommend that you provide users with self-service diagnosis tips for troubleshooting.
#define TEST_SSID "tuya_mdev_test1"

VOID app_init(VOID)
{
	.....
	app_cfg_set(tuya_hard_get_wifi_mode(),prod_test);
	.....
}

VOID prod_test(BOOL_T flag,CHAR_T rssi)
{
PR_NOTICE("rssi:%d,flag:%d",rssi,flag);
if (flag == FALSE || rssi < -60)
{
	tuya_hard_set_led_state(PROD_TEST_FAIL);
}
tuya_hard_set_led_state(ENTER_PROD_TEST);
tuya_hard_prod_flag(TRUE);
}
Compile the firmware
The SDK includes a script for compilation. You can run the following command to call the script for compiling.
-
Command: Navigate to the directory of the script and run
./build_app.sh apps/<project name> <project name> <version number>. -
Sample command:
./build_app.sh apps/one_plug_demo one_plug_demo 1.0.0
After successful compilation, you will find the output binary file (with the . bin extension) in the apps/project name/output/version number/xxx.bin directory, as shown below.
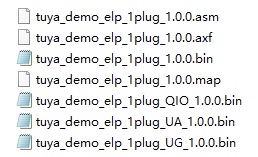
The three binary files with the suffix QIO, UA, and UG are used for production, debugging, and updates respectively.
| File name | Description |
|---|---|
| tuya_demo_elp_1plug_QIO_1.0.0.bin | It is used for production and applies to modules that run the flash memory in QIO (Quad I/O) mode. |
| tuya_demo_elp_1plug_UA_1.0.0(2)_1.0.0.bin | It is used for debugging purposes. |
| tuya_demo_elp_1plug_UG_1.0.0.bin | It is used for configuring firmware updates on the Tuya Developer Platform. |
Flashing and authorization
Upload your firmware to the Tuya Developer Platform and request Tuya’s license. Then, you can flash the license to the module using Cloud Module Burning Authorization Platform. For more information, see General Wi-Fi SDK Burning and Authorization Instruction.
Log level
Log level is a powerful way of distinguishing log events and helps in reducing the information noise.
The SDK provides the following log levels:
- Notice
- Warning
- Err
- Debug
The log level determines how much granularity to display in the log. For example, if you set the level to TY_LOG_LEVEL_INFO, ERR, WARN, NOTICE, and INFO information will be displayed, while DEBUG and TRACE information will not be displayed.
VOID pre_device_init(VOID)
{
	.... // Irrelevant to this feature
	PR_DEBUG("%s",tuya_iot_get_sdk_info());
	PR_DEBUG("%s:%s",APP_BIN_NAME,DEV_SW_VERSION);
	PR_NOTICE("firmware compiled at %s %s",__DATE__,__TIME__);
	PR_NOTICE("system reset reason:[%s]",tuya_hal_system_get_rst_info());
	SetLogManageAttr(TY_LOG_LEVEL_DEBUG);                // Set the log level.
}

/* Tuya SDK definition of log level */
typedef INT_T LOG_LEVEL;
#define TY_LOG_LEVEL_ERR       0  // Error condition, displayed when the program does not work correctly.
#define TY_LOG_LEVEL_WARN      1  // Warning message.
#define TY_LOG_LEVEL_NOTICE    2  // Normal but significant condition.
#define TY_LOG_LEVEL_INFO      3  // Informational message.
#define TY_LOG_LEVEL_DEBUG     4  // Message for debugging purposes, which will be deleted in release.
#define TY_LOG_LEVEL_TRACE     5  // Reports events showing step-by-step execution of your code, which will be deleted in release.
Is this page helpful?
YesFeedbackIs this page helpful?
YesFeedback


