Flash Firmware and Authorize Module
The firmware and license must be flashed to the module to enable the connection to the cloud services. Tuya provides various approaches to flashing and authorizing devices of different protocols.
Overview
Flashing and authorization combined
This approach allows you to complete both firmware flashing and module authorization by using the Cloud Module Burning Authorization Platform. This platform is integrated with the software for flashing firmware to Tuya standard chip. Before flashing firmware, you need to upload the firmware binary file to the Tuya Developer Platform as instructed and get the license (also known as the credential).
Flashing and authorization separated
This approach is used when you debug code or when the Cloud Module Burning Authorization Platform is not integrated with the flashing software for the chip you use. You have two options for flashing firmware, depending on how you implement authorization.
- Write the license without using Tuya’s host: Tuya provides a license list in a spreadsheet. You need to write the license to firmware and perform firmware flashing and module authorization by using flashing software.
- Write the license using Tuya’s host: Upload the firmware binary file to the Tuya Developer Platform as instructed and get the credential (authorization only). Then, authorize your module by using Tuya’s Cloud Module Burning Authorization Platform and flash firmware by using flashing software.
Upload binaries
To use Tuya’s Cloud Module Burning Authorization Platform for authorization, upload the firmware binary file to the Tuya Developer Platform in the Hardware Development step.
-
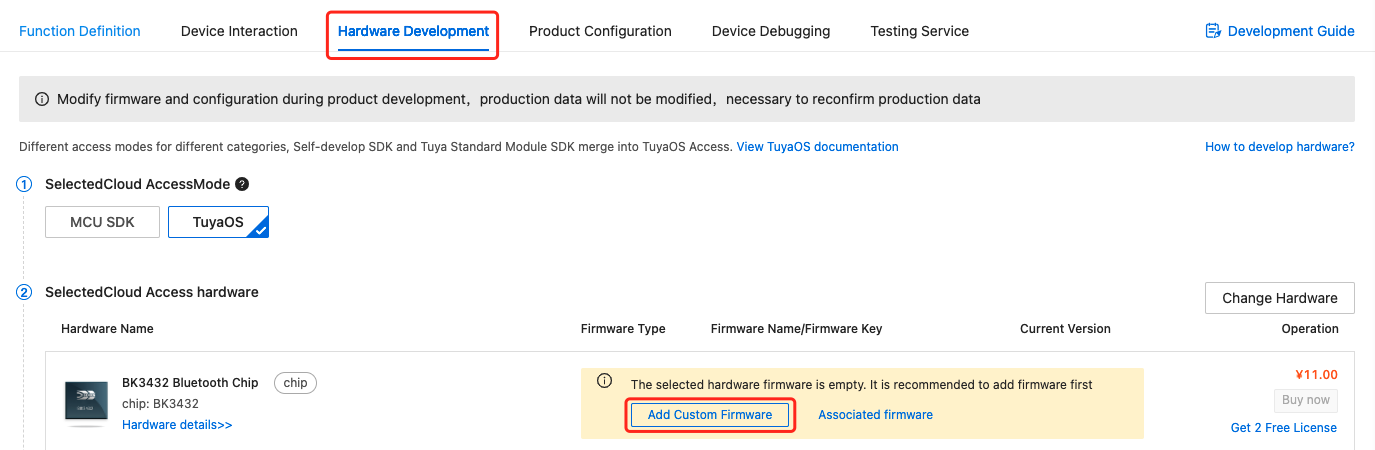
Add firmware
Go to Hardware Development and click Add Custom Firmware.
-
Enter firmware information
You can hover over the question mark ? right after each item to check out the description.
-
Firmware identifier: It must be identical to the one set in the step Configure firmware.
-
Flash size: It can be found in the module datasheet.

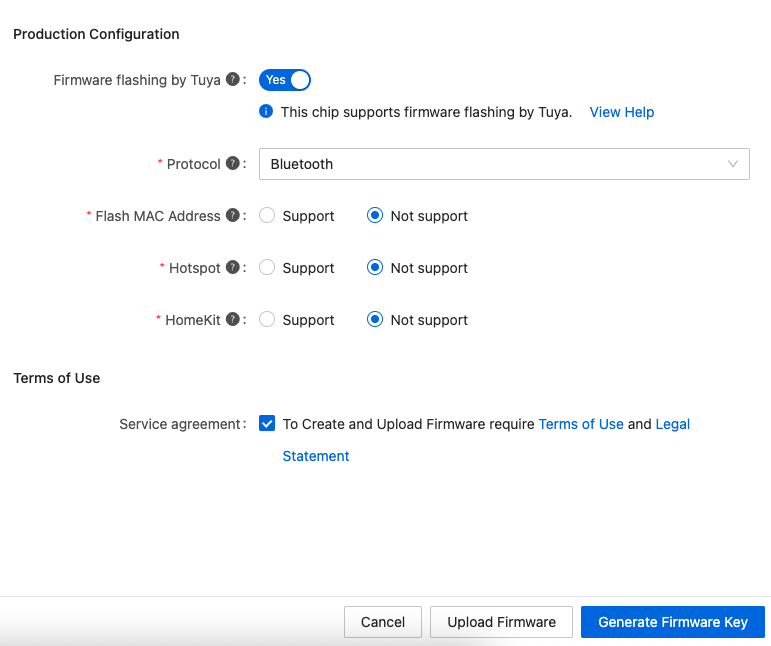
After setup, click Generate Firmware Key. If you get an error saying The firmware identifier already exists, change it to another one. Make sure the firmware identifier is unique. You can set it as you prefer. For example, chipset platform + product type + product feature + manufacturer or individual name initials.
-
-
Configure firmware
Open the
tuya_ble_sdk_demo.hfile undertuya_ble_sdk_demo\app. Set the value for PID, firmware identifier, and firmware version. Make sure the firmware identifier is identical to the one set in the step Enter firmware information.For more information about defining firmware version, see Firmware Versions. For Bluetooth Low Energy (LE) firmware, the version number is in the format
bv.sv(0.0 to 99.99), corresponding to the lower 16 bits of the value ofTY_DEVICE_FVER_NUM. For example, if the version number is 1.10, the value ofTY_DEVICE_FVER_NUMis set as 0x0000010A (00 00 01 0A)./* Replace "xxxxxxxx" with the PID of your Bluetooth product created on the Tuya Developer Platform. */ #define TY_DEVICE_PID "xxxxxxxx" /* Set the firmware name and version number, which must be identical to the one specified when you add firmware. */ #define TY_DEVICE_FIR_NAME "ble_module_sdk_development_demo" #define TY_DEVICE_FVER_NUM 0x00000001 #define TY_DEVICE_FVER_STR "0.1"Open the
tuya_ble_sdk_test.hfile undertuya_ble_sdk_demo\app. Set the value ofTUYA_BLE_SDK_TESTas0to disable the test mode./* Change 1 to 0 to disable the test mode. */ #define TUYA_BLE_SDK_TEST 0 -
Build firmware
Build the code to generate firmware. For the
TLSR825xplatform, we recommend that you refresh the project in the workspace before building the project. In the example, the generated firmware binary file isble_sdk_multimode\8258_module\8258_module.bin.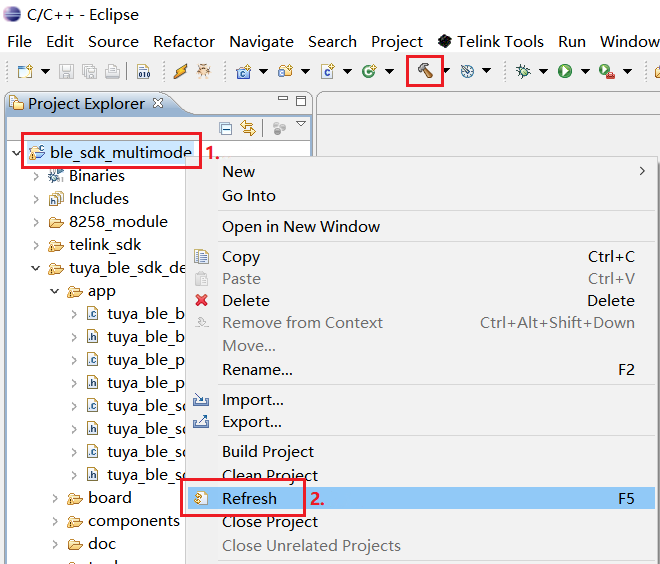
-
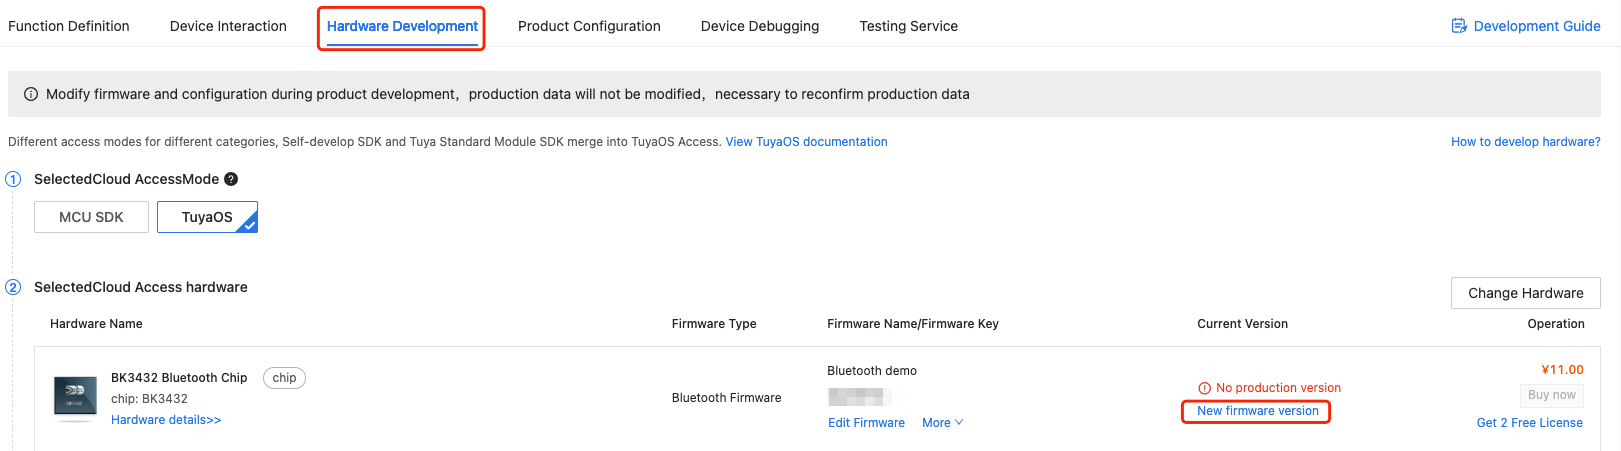
Add firmware version
Click New firmware version to upload the firmware binary file.
-
Upload firmware
You can hover over the question mark ? right after each item to check out the description.
-
Firmware version: It must be identical to the one set in the step Configure firmware.
-
Production firmware: The manufacturer will flash it to the chip.
-
User area firmware: The manufacturer will flash it to the chip.
-
Firmware updates: Used for deploying an OTA update. If you upload firmware for the first time, you can ignore this option.
For the
TLSR825xplatform, we upload the same8258_module\8258_module.binfile for the production firmware, user area firmware, and firmware updates.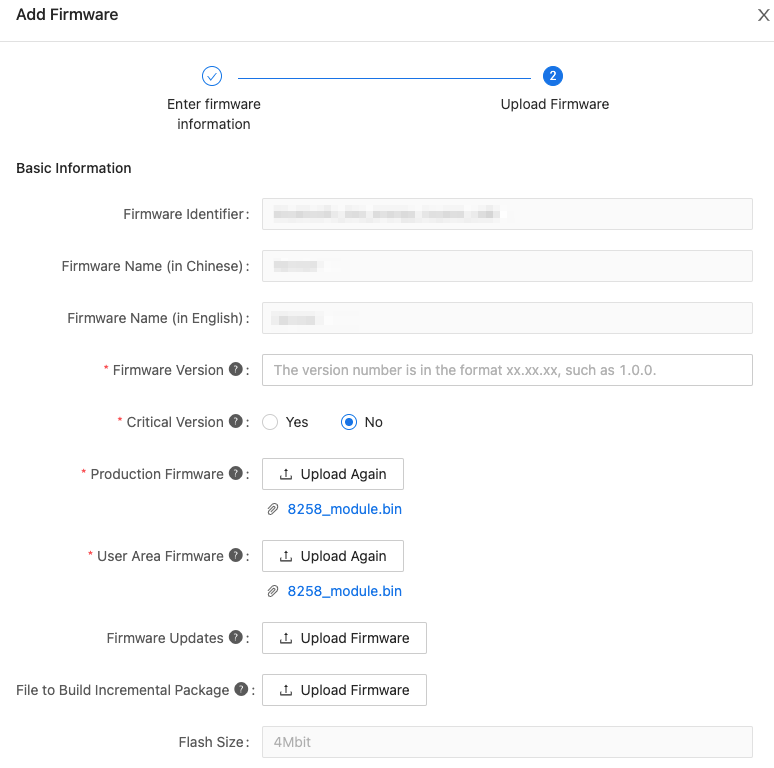
If you upload firmware in the step Enter firmware information and get an error saying The firmware identifier already exists after clicking Save, click Back and change the firmware identifier. Make sure to change the value of
TY_DEVICE_FIR_NAMEin thetuya_ble_sdk_demo.haccordingly. After modification, go back to the Upload Firmware page. Hover over the uploaded file8258_module.bin, click Delete, and upload the updated file. -
-
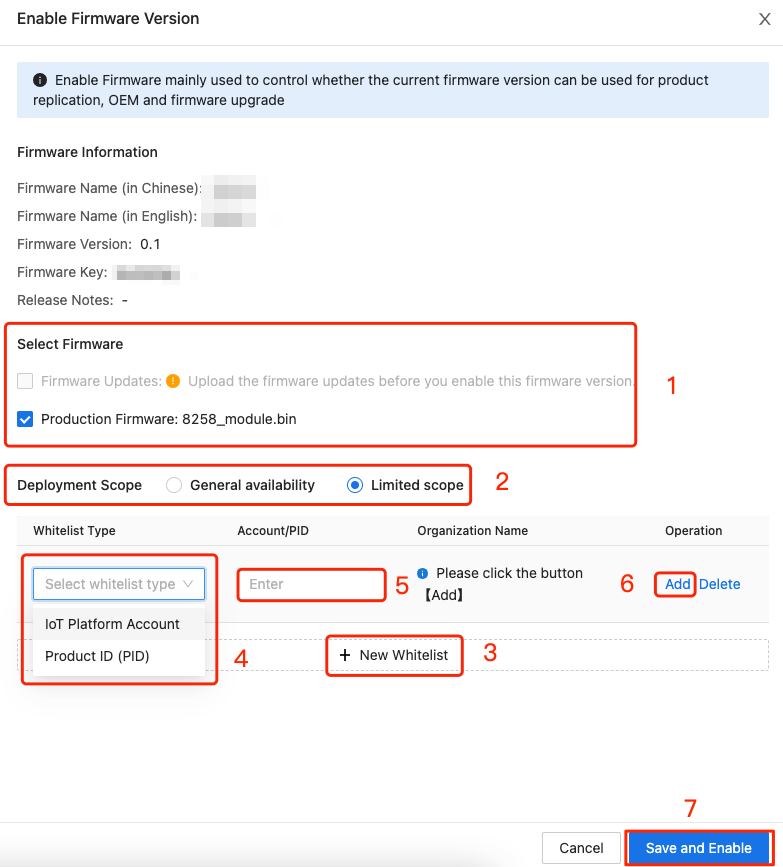
Enable firmware

-
Select the firmware to enable and set the deployment scope. Click Save and Enable.
-
Manage firmware
In the left navigation pane, choose Product > Firmware Management. Click Details to view firmware information.

Get license
Module
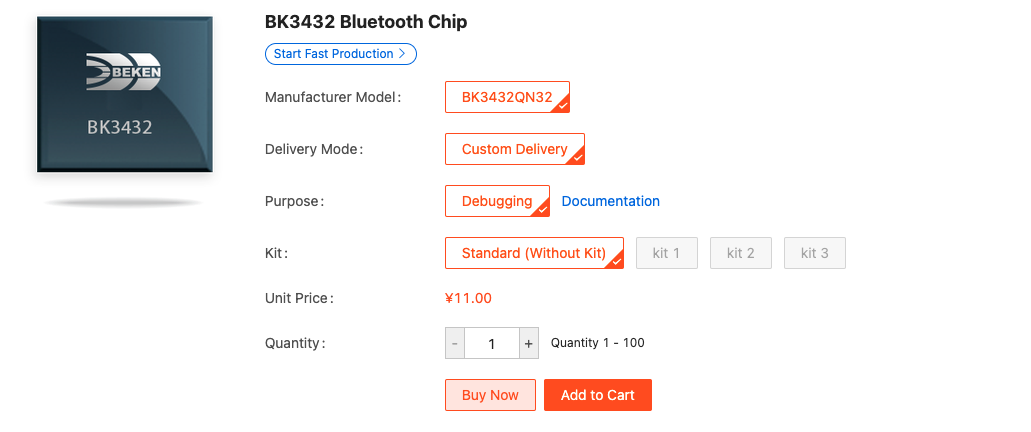
On the Hardware Development page, select the desired module and then perform the following steps to get licenses.
-
Click Buy Now to buy the module.
New users are entitled to two free licenses. For more information, see Step 5 in this section.

-
Set the Quantity and click Buy Now to confirm the order. If everything is correct, click Submit Order.
-
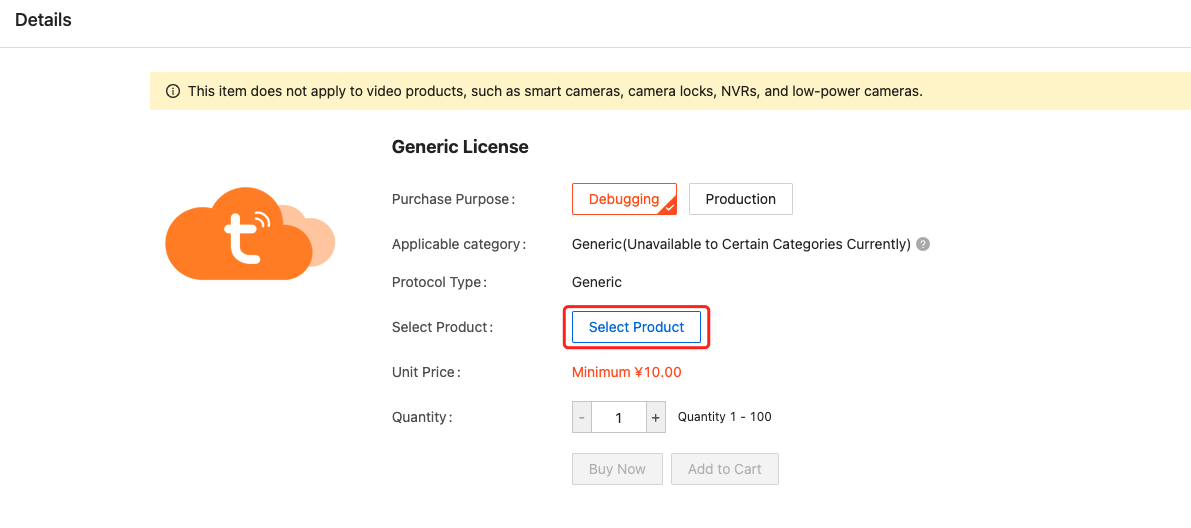
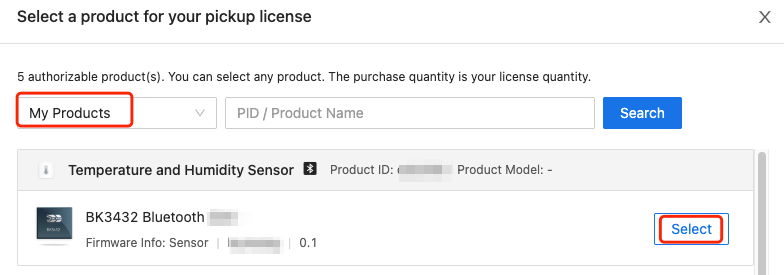
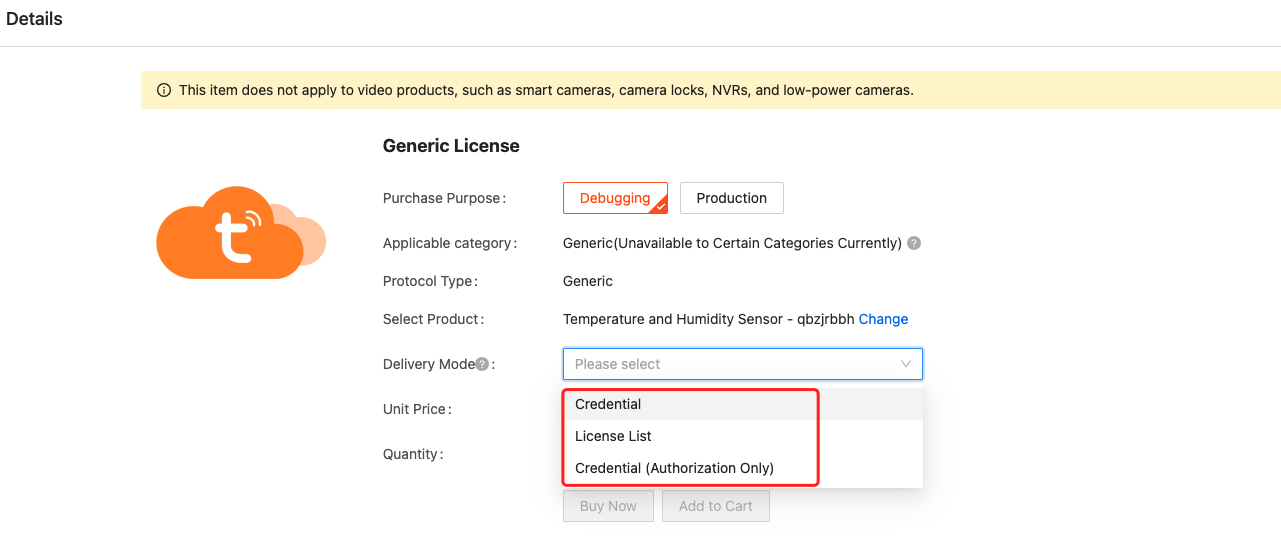
If you want to buy a license only, in the left navigation pane, choose Purchase > Production. Under the Materials & Licenses tab, buy the Generic License.

-
On the Details page, click Select Product and Delivery Mode.
-
If you click Get 2 Free Licenses, select Delivery Mode and confirm.
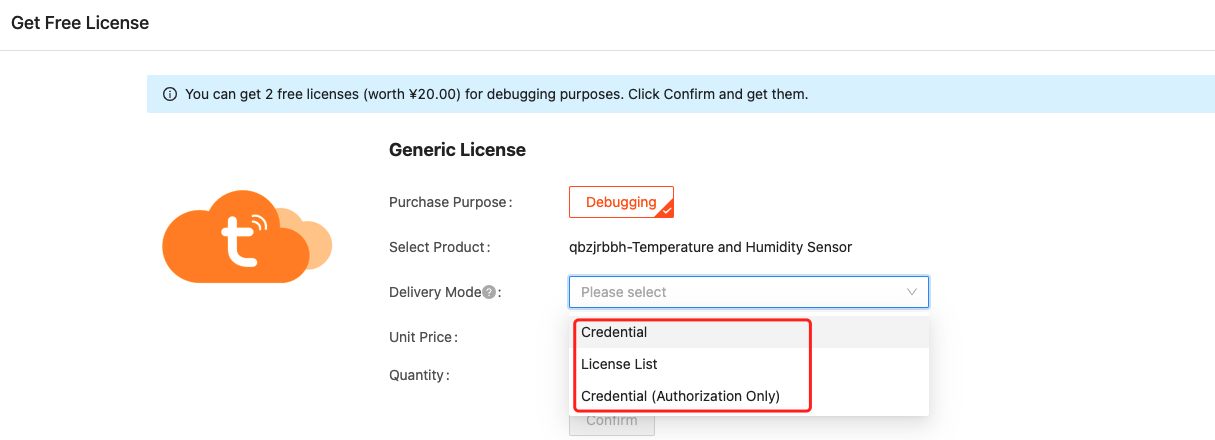
-
Choose Purchase > Order > Debugging & Sample Order. Download the license for your product.

Sandwich development board
This section describes how to get the license for Tuya Sandwich development board.
-
In the left navigation pane, choose Product > Evaluation Kit. Click Add Development Board and enter the required information.
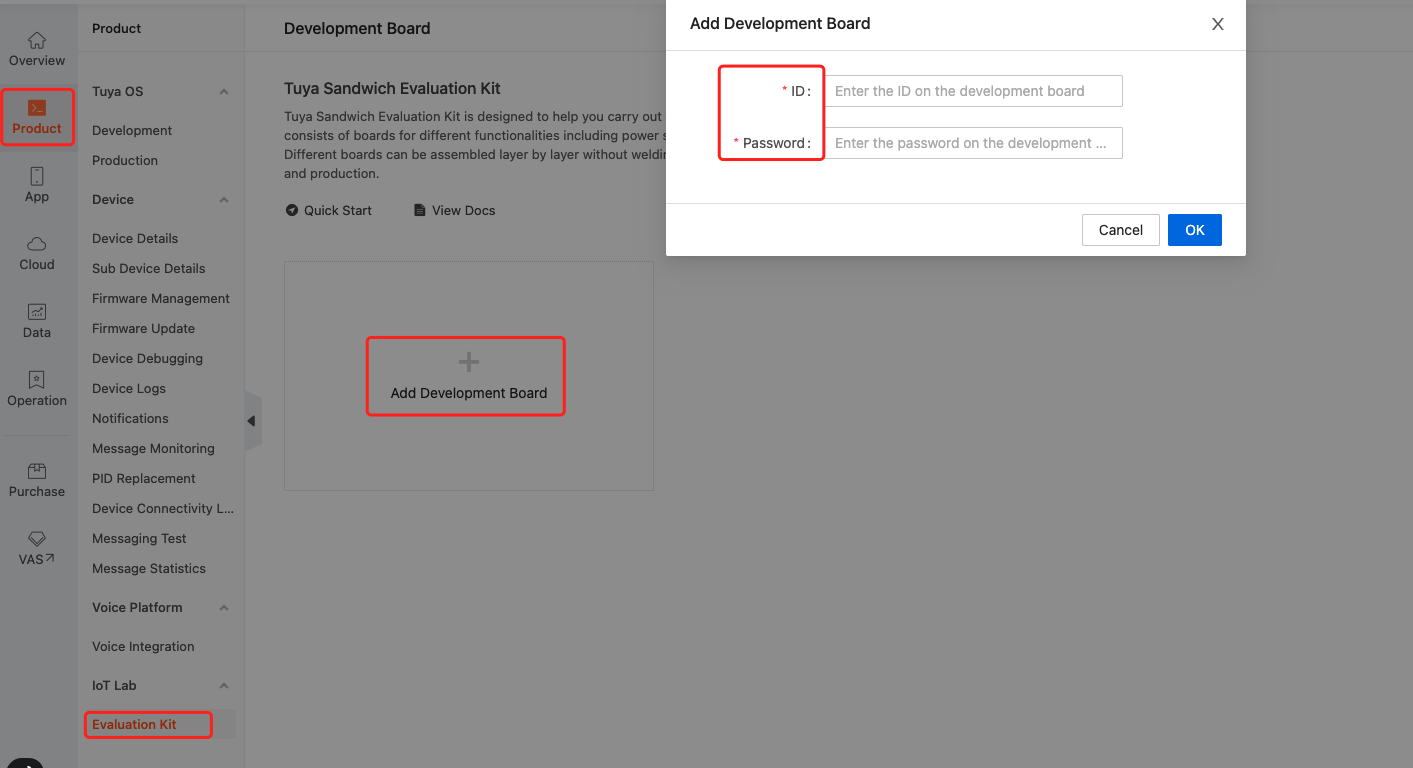
-
Click Request a new authorization code. Select the target product and click OK to get the license.
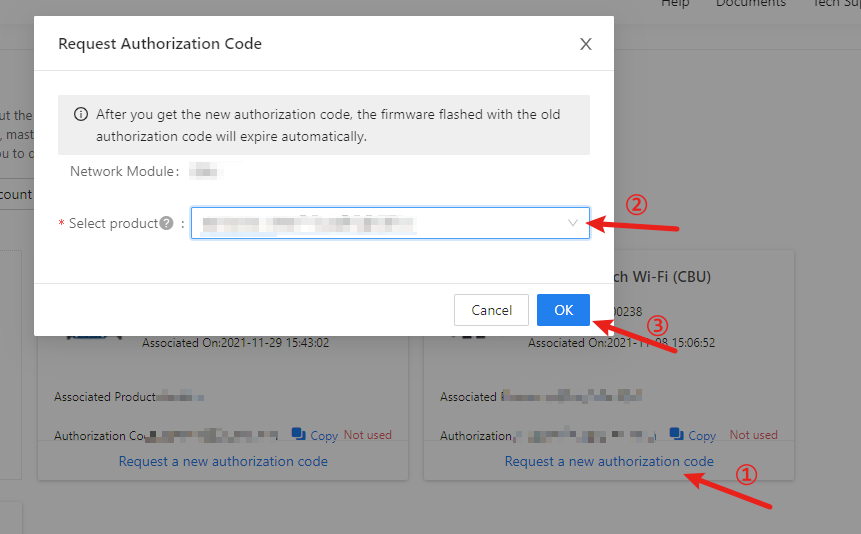
If you fail to request the authorization code, you need to create an account with Smart PMS system first. The phone number used to create the Smart PMS account must be the same as the one for your Tuya Developer Platform account.
Flash firmware and authorize module
Before flashing firmware, make sure you have done the following. For more information, see Set up environment.
- Registered with the Smart PMS system.
- Installed the Tuya production toolkit and the flashing software provided by the chip vendor. For more information about the BTU module, see Telink BDT.
- A development board with Tuya Bluetooth module, chip-specific programmer, and USB to TTL converter.
This section describes how to flash the firmware and authorize the module in terms of three delivery modes of the license.
Credential
-
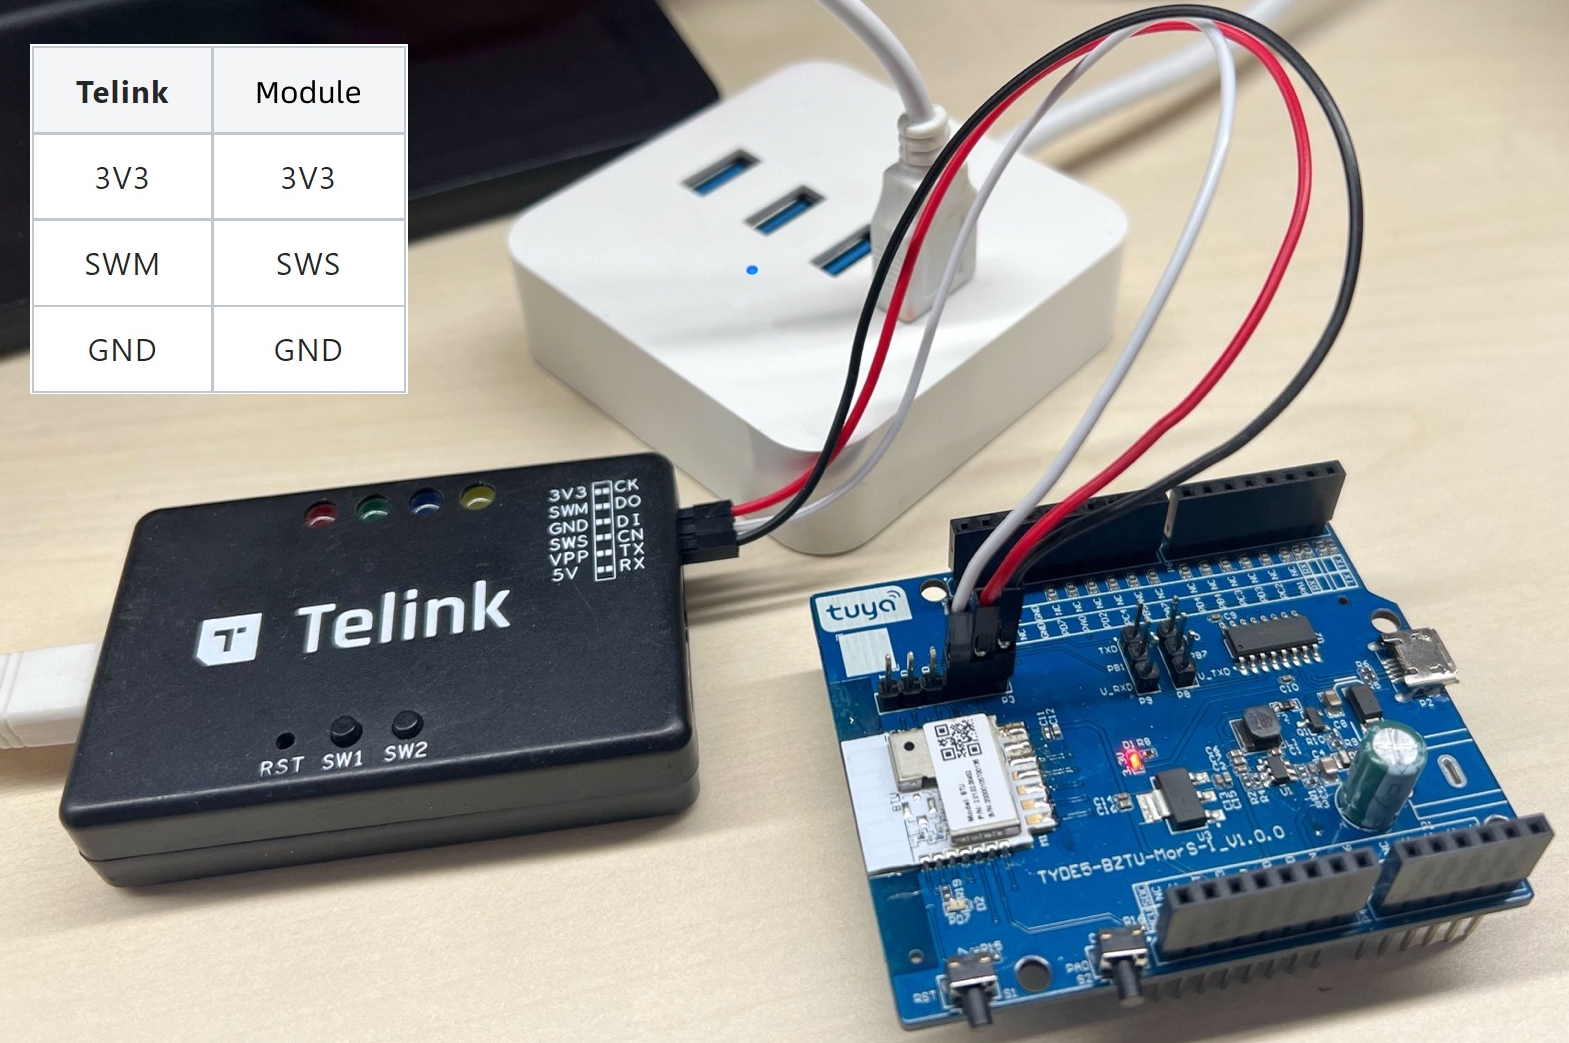
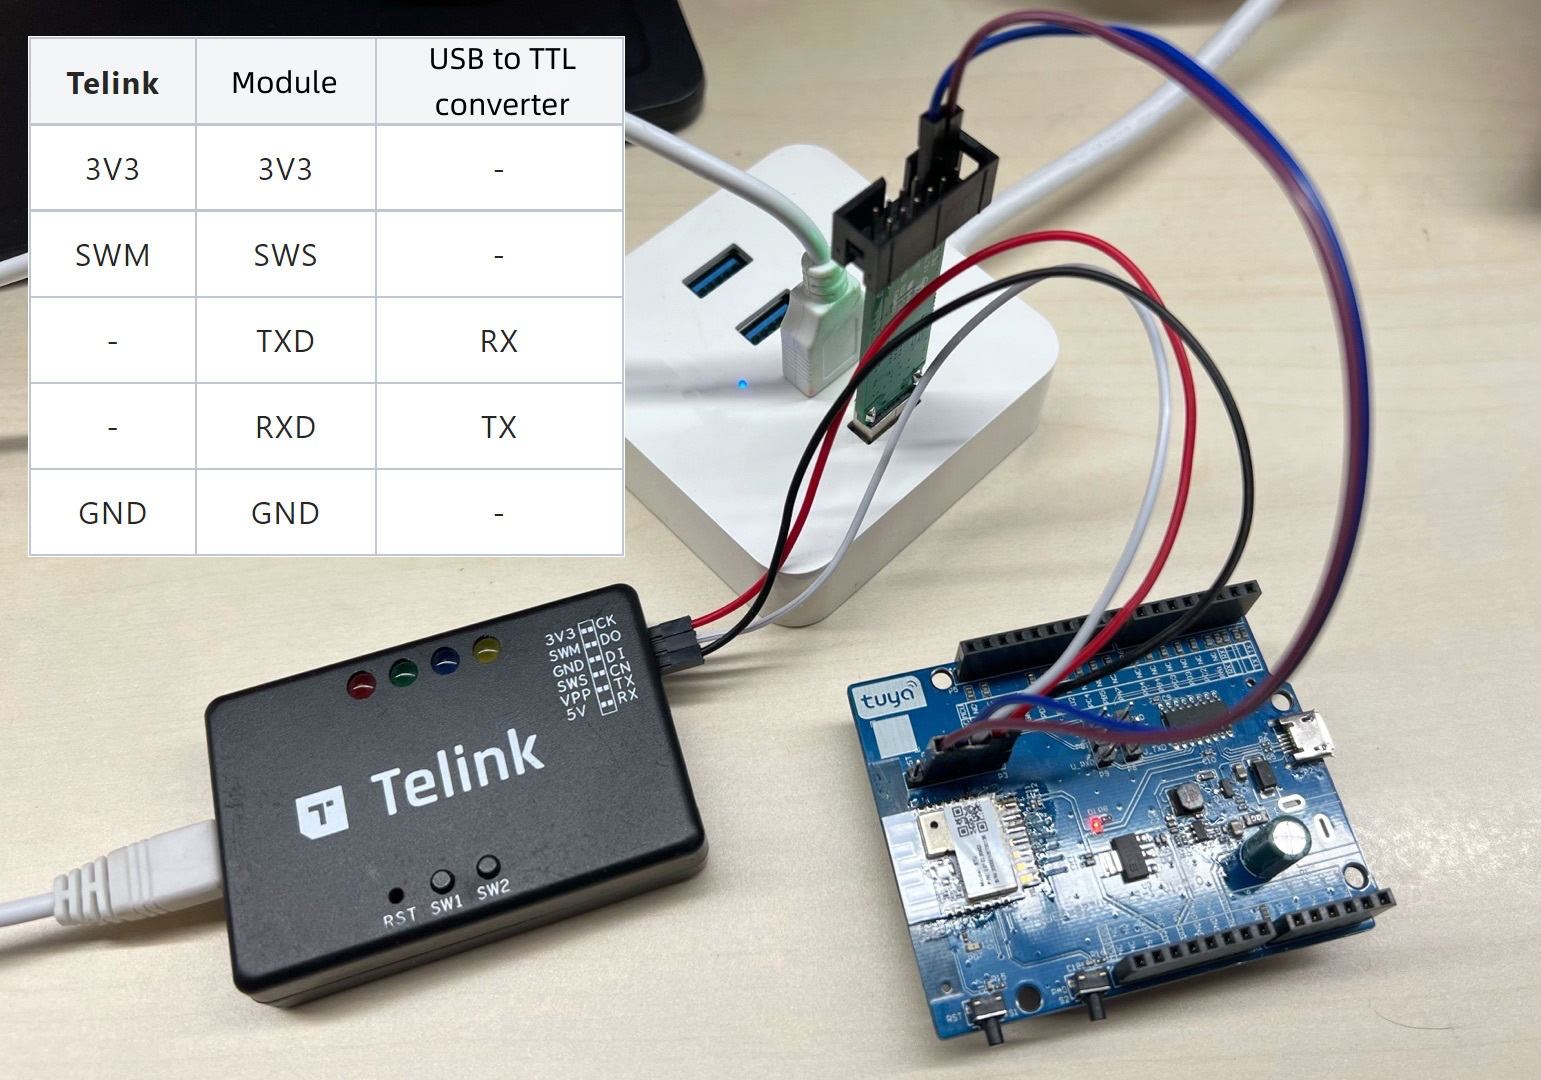
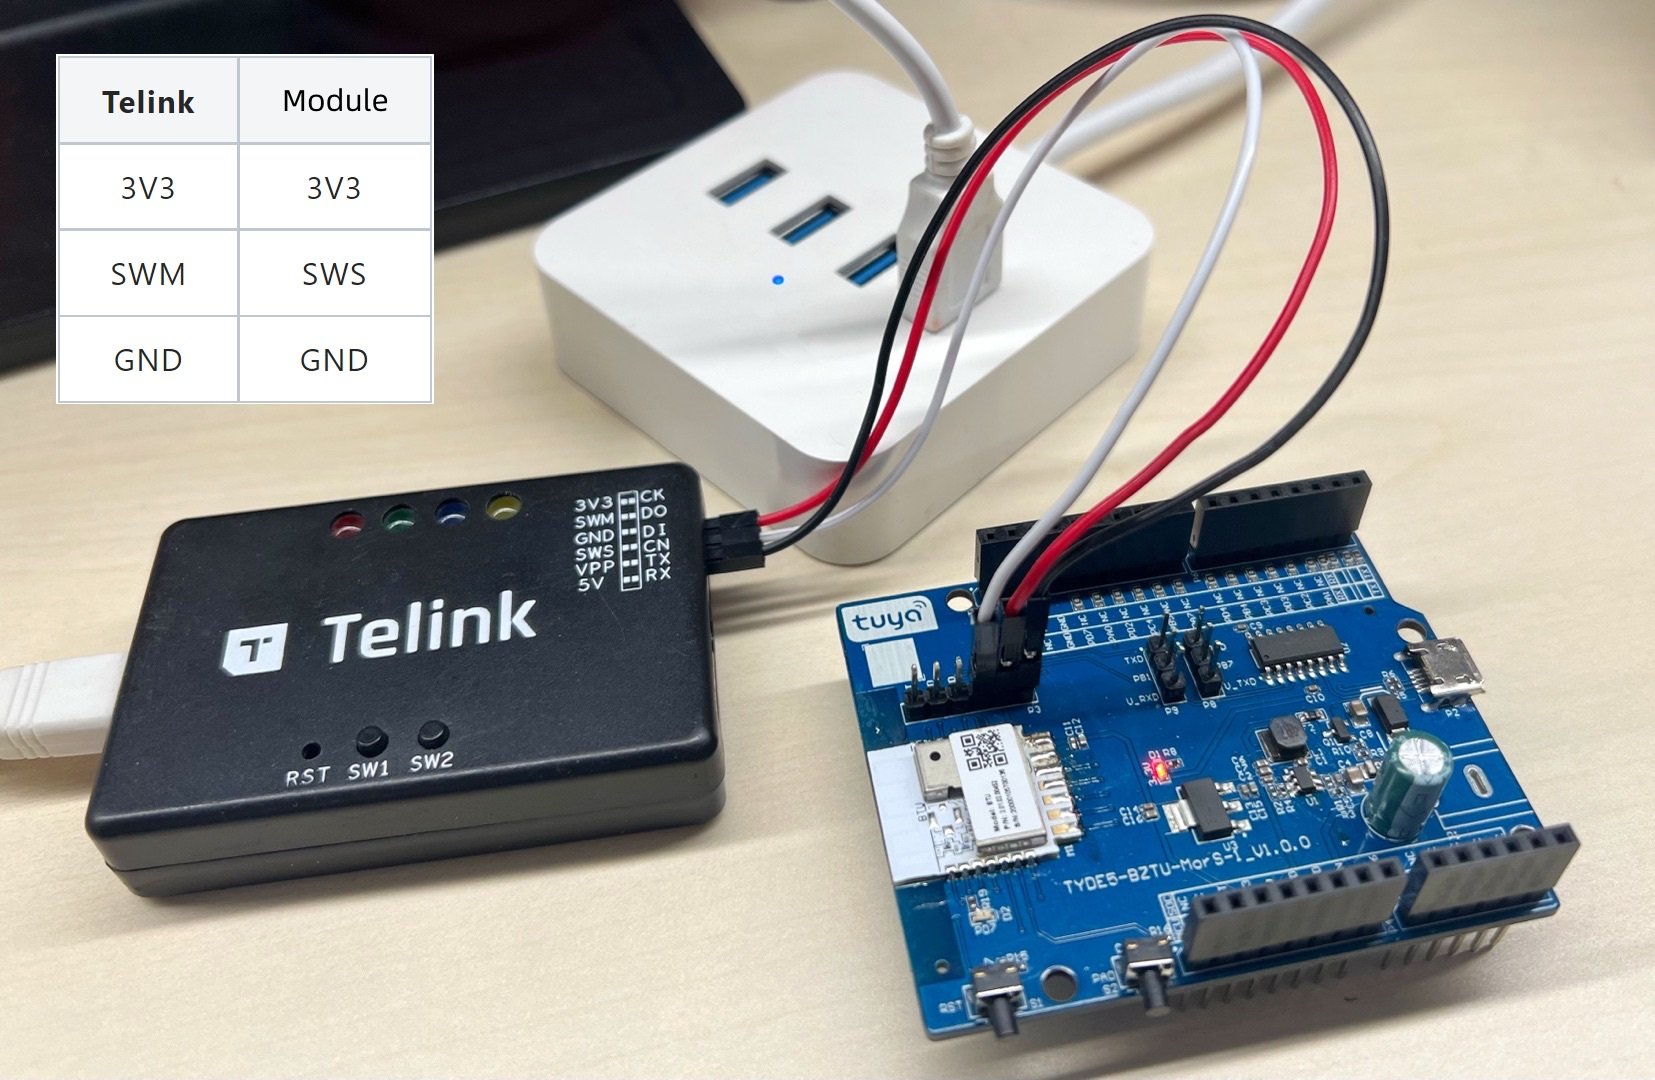
Connect your development board with the USB to TTL converter and the Telink programmer.
For some chip platforms, you only need to connect the development board with the USB to TTL converter.
For TLSR825x based board, you must connect it with both the USB to TTL converter and the Telink programmer.
-
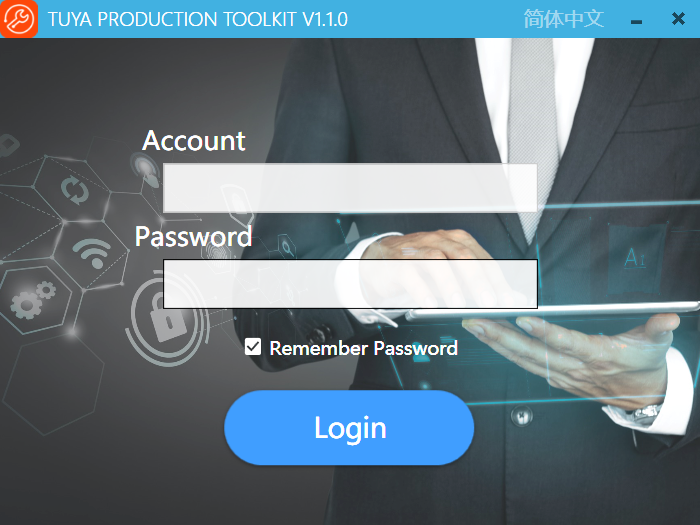
Open the Production Toolkit software. Log in with your Smart PMS account.
-
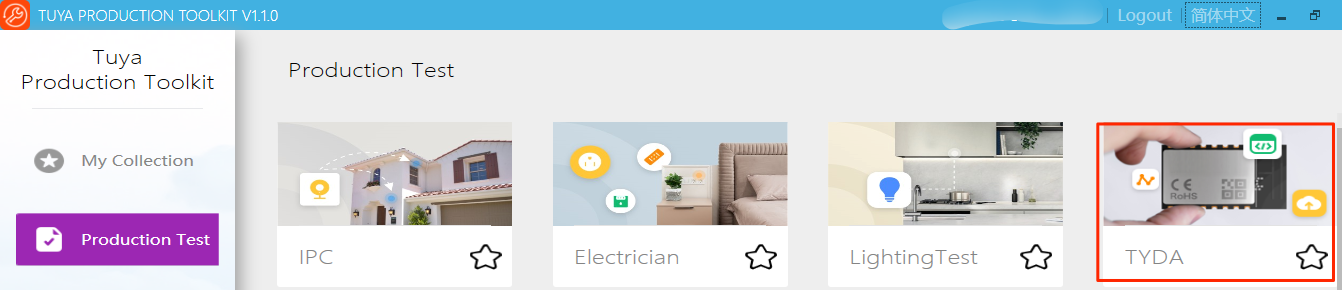
Click TYDA to install the Cloud Module Burning Authorization Platform.

-
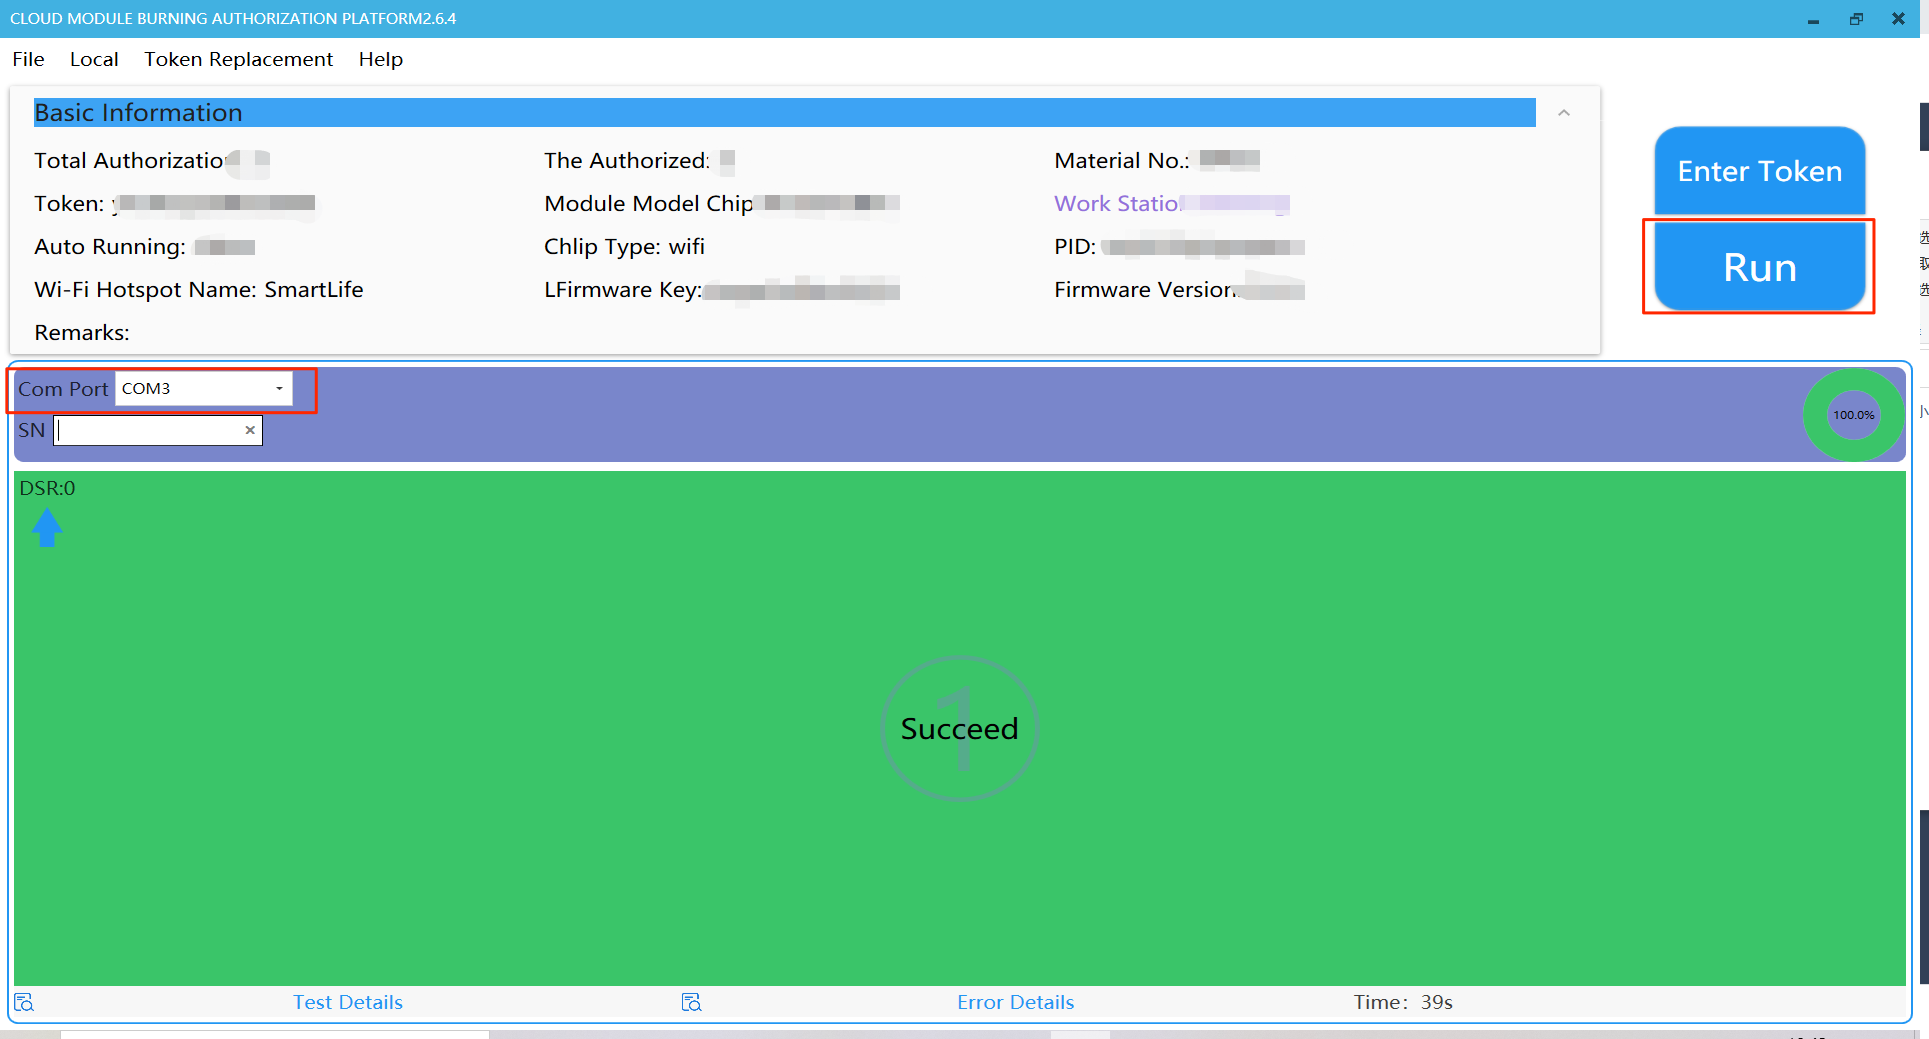
Choose the correct COM Port. Enter Token. Select Burning Authorization for the work station.

-
Click Run to flash the firmware and authorize the module.

License list
-
Connect your development board with the Telink programmer.
-
Open the
tuya_ble_sdk_demo.hfile. Enter a set of UUID, Authkey, and MAC address from the license list to the corresponding macro.#define TY_DEVICE_PID "xxxxxxxx" /* PID */ #define TY_DEVICE_MAC "xxxxxxxx" /* MAC */ #define TY_DEVICE_DID "xxxxxxxx" /* UUID */ #define TY_DEVICE_AUTH_KEY "xxxxxxxx" /* Authkey */ -
In the
tuya_ble_sdk_demo.cfile, setuse_ext_license_keyanddevice_id_lento1andDEVICE_ID_LEN(that is 16) respectively to enable the license to take effect.static tuya_ble_device_param_t tuya_ble_device_param = { .use_ext_license_key = 1, /* 1-info in tuya_ble_sdk_demo.h, 0-auth info */ .device_id_len = DEVICE_ID_LEN, /* DEVICE_ID_LEN-info in tuya_ble_type.h, 0-auth info */ .p_type = TUYA_BLE_PRODUCT_ID_TYPE_PID, .product_id_len = 8, .adv_local_name_len = 4, .firmware_version = TY_DEVICE_FVER_NUM, .hardware_version = TY_DEVICE_HVER_NUM, }; -
Build code and flash the generated binary file
8258_module.binto the module by using the Telink Burning and Debugging Tool (BDT).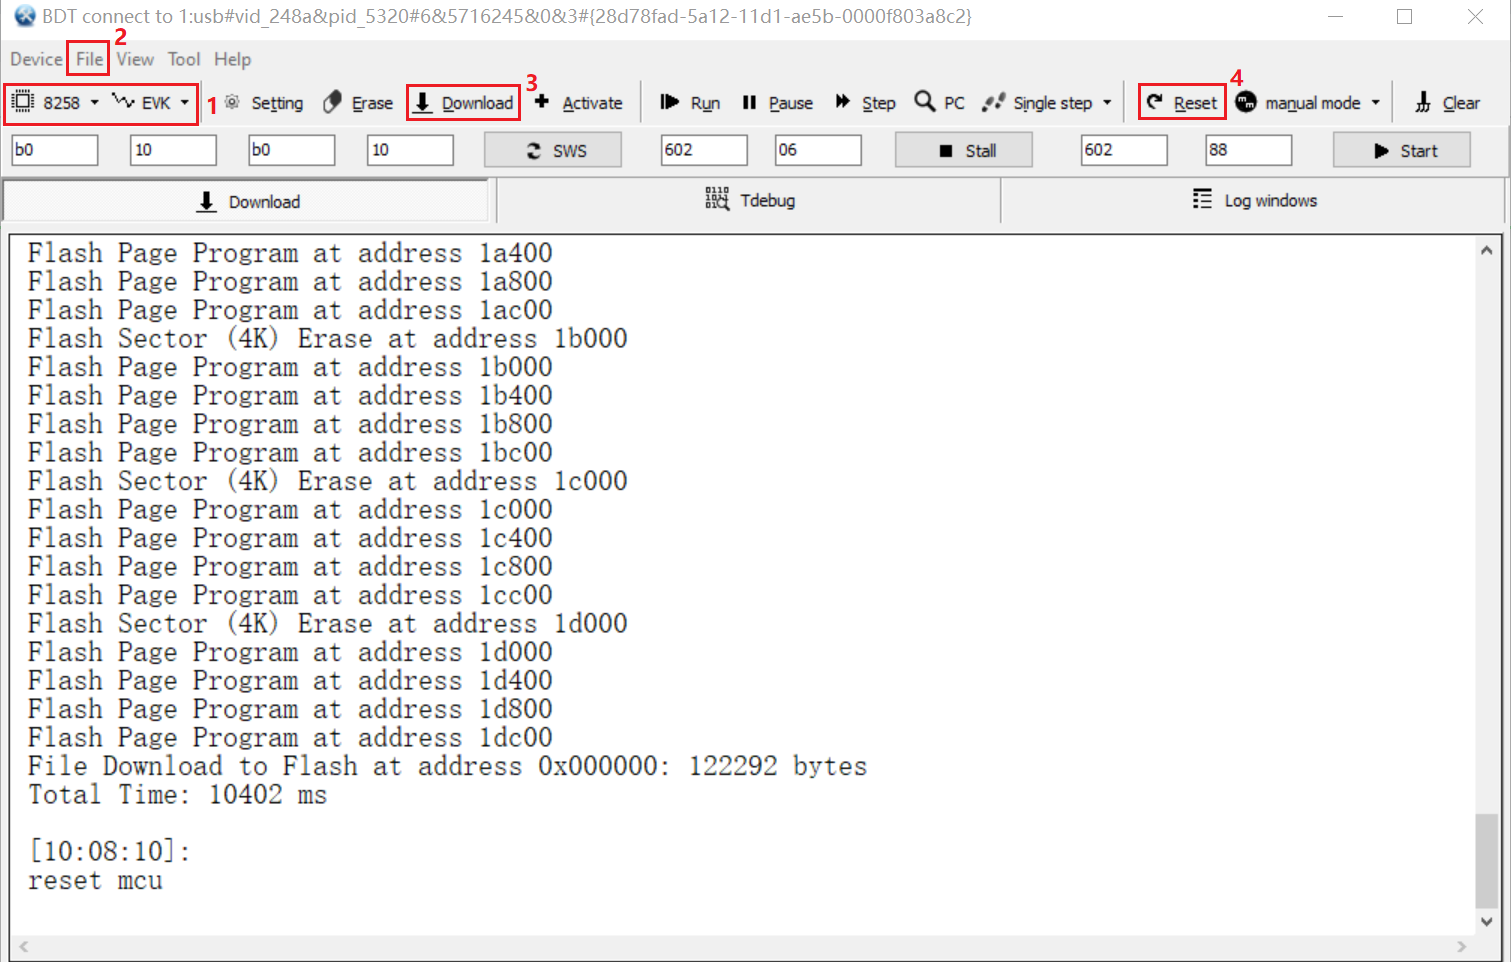
Credential (authorization only)
-
Connect your development board with the USB to TTL converter and the Telink programmer.
-
Open the Production Toolkit software. Log in with your Smart PMS account.
-
Click TYDA to install the Cloud Module Burning Authorization Platform.
-
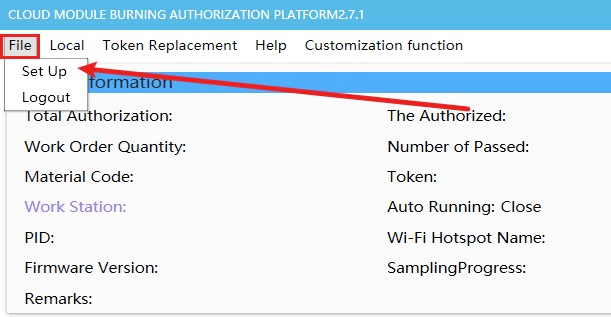
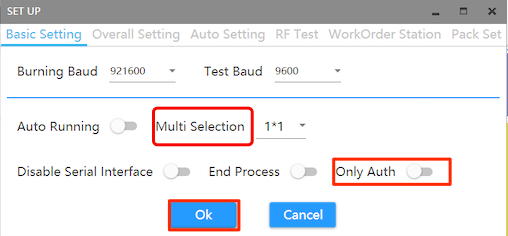
Choose File > Set Up. Enable Only Auth and click OK.
-
Choose the correct COM Port. Enter Token. Select Burning Authorization for the work station and click OK.

-
Click Run to authorize module.
-
Open Telink BDT. Flash the binary file
8258_module.binto the module as shown in the following figure.
Flash firmware again
During debugging, if you modify the firmware, you can use the flashing software from the chip vendor and the chip-specific programmer to flash the firmware again. You do not need to authorize the module again.
-
Connect your development board with the Telink programmer.
-
Build code and flash the generated binary file
8258_module.binto the module by using the Telink Burning and Debugging Tool (BDT).
Test network connection
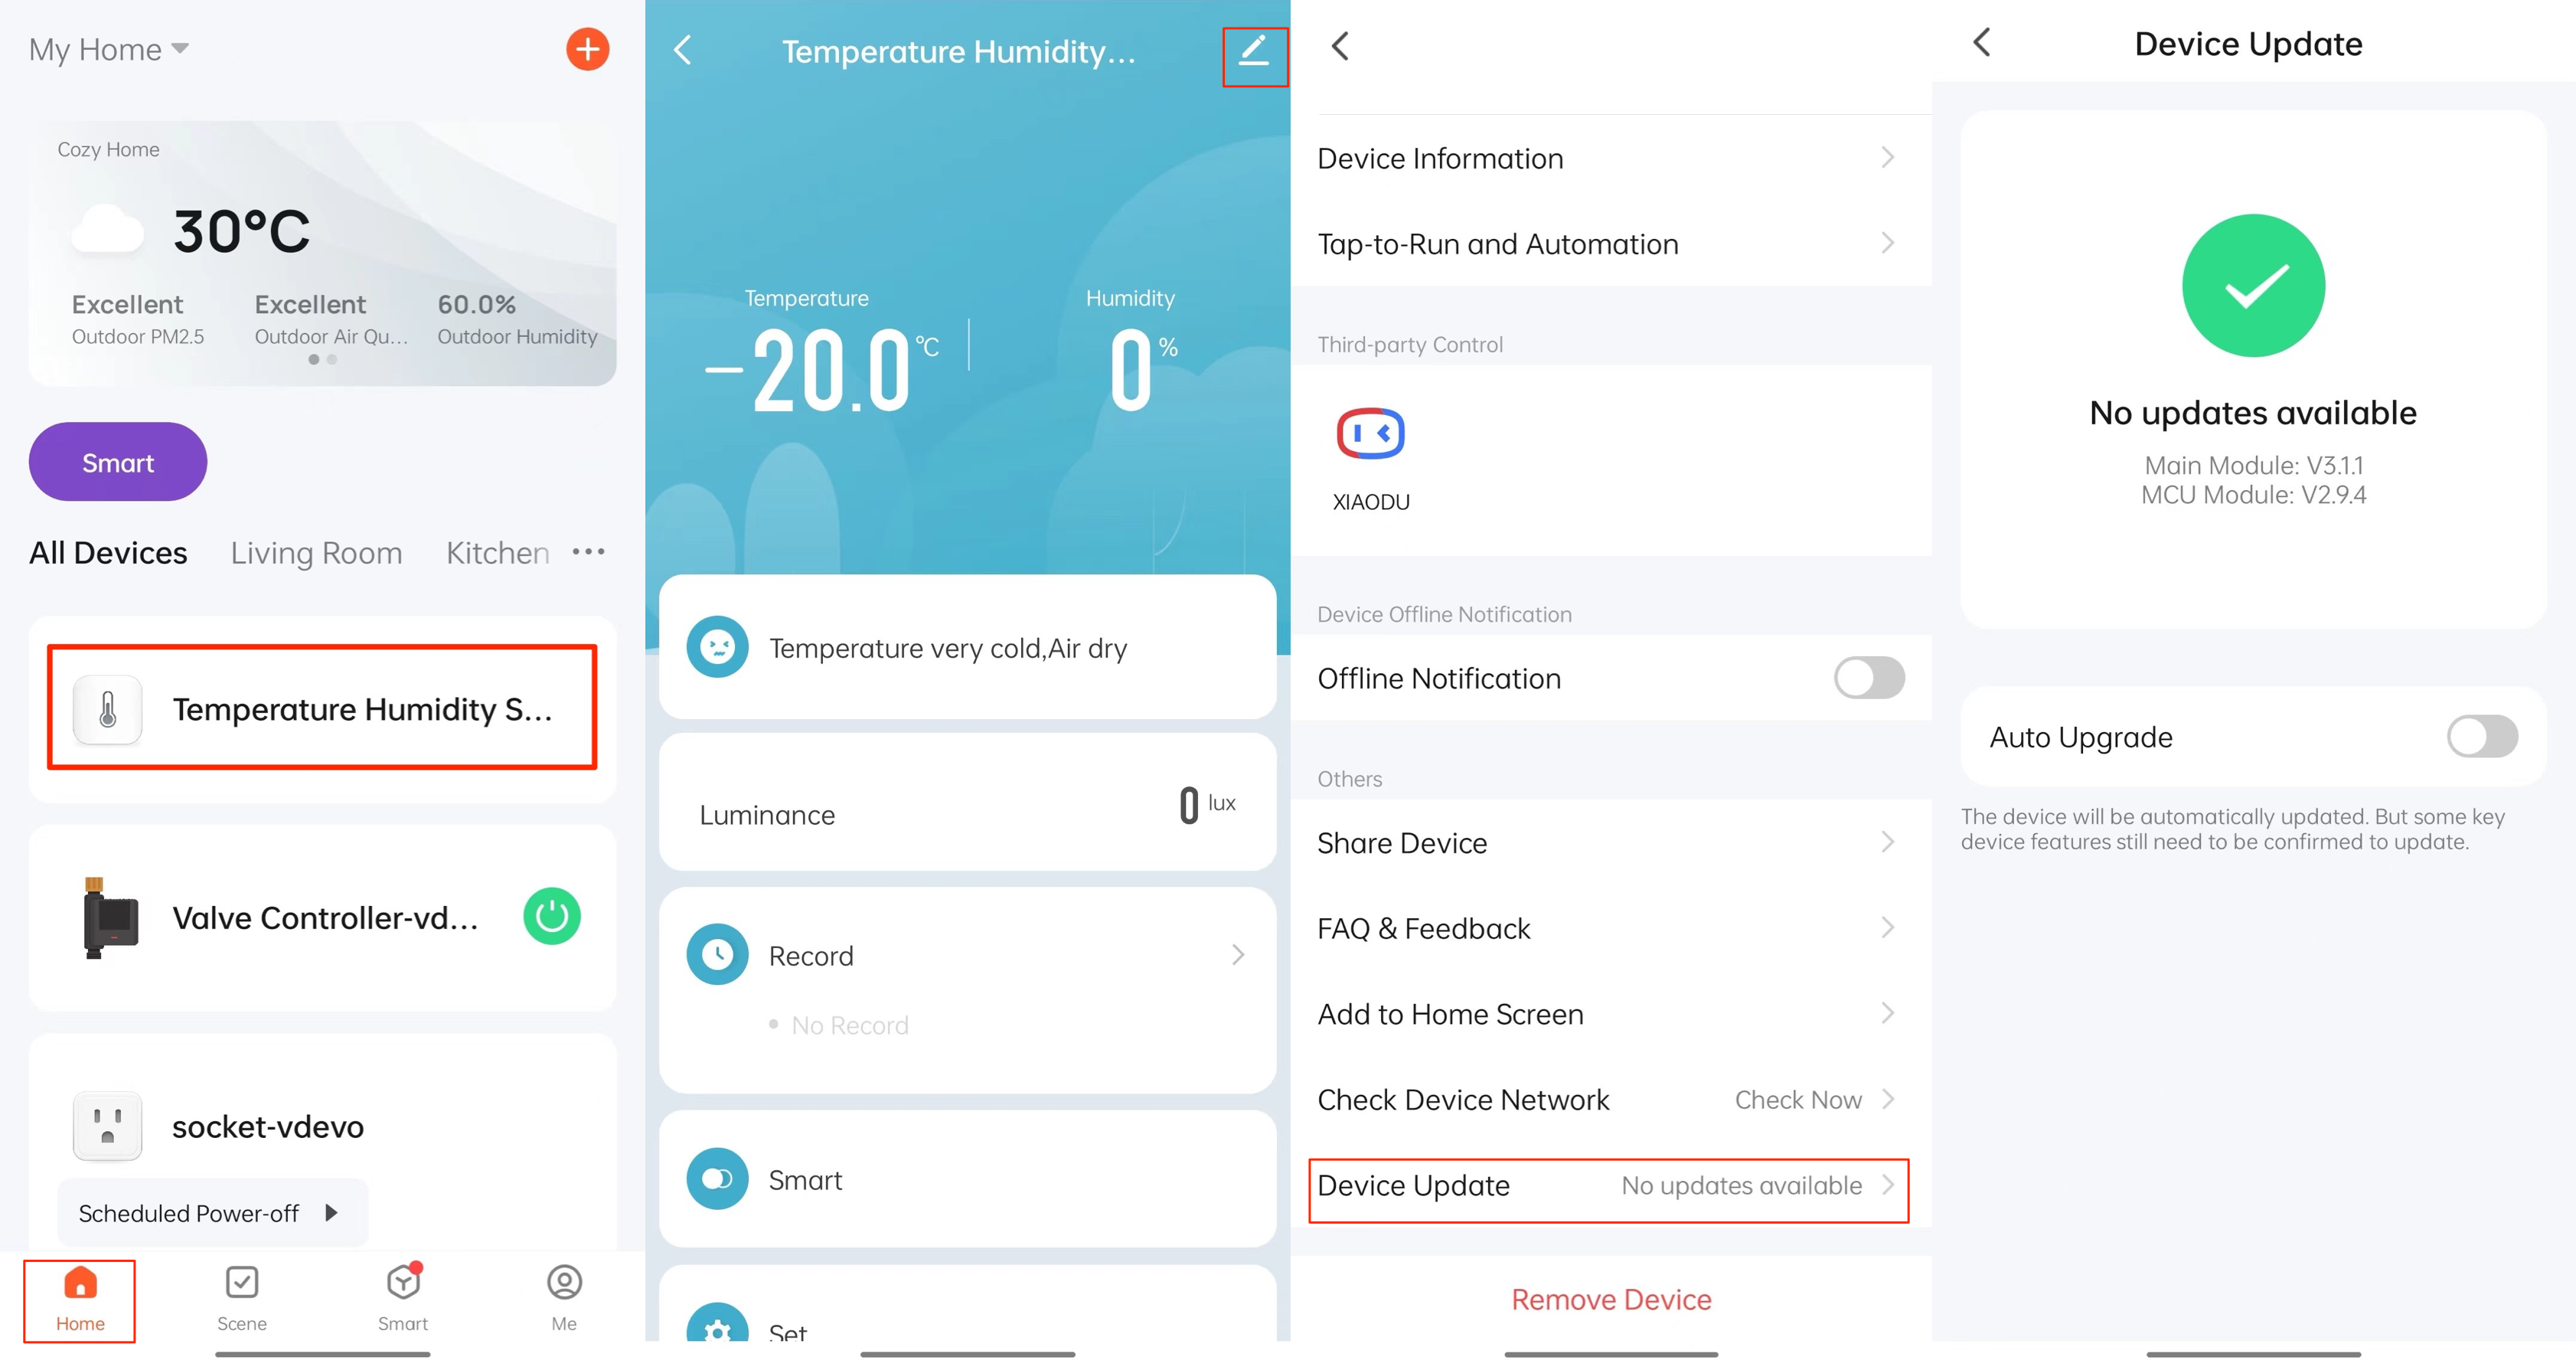
After you complete firmware flashing and module authorization, connect the Bluetooth module to the cloud by using the SmartLife app.
-
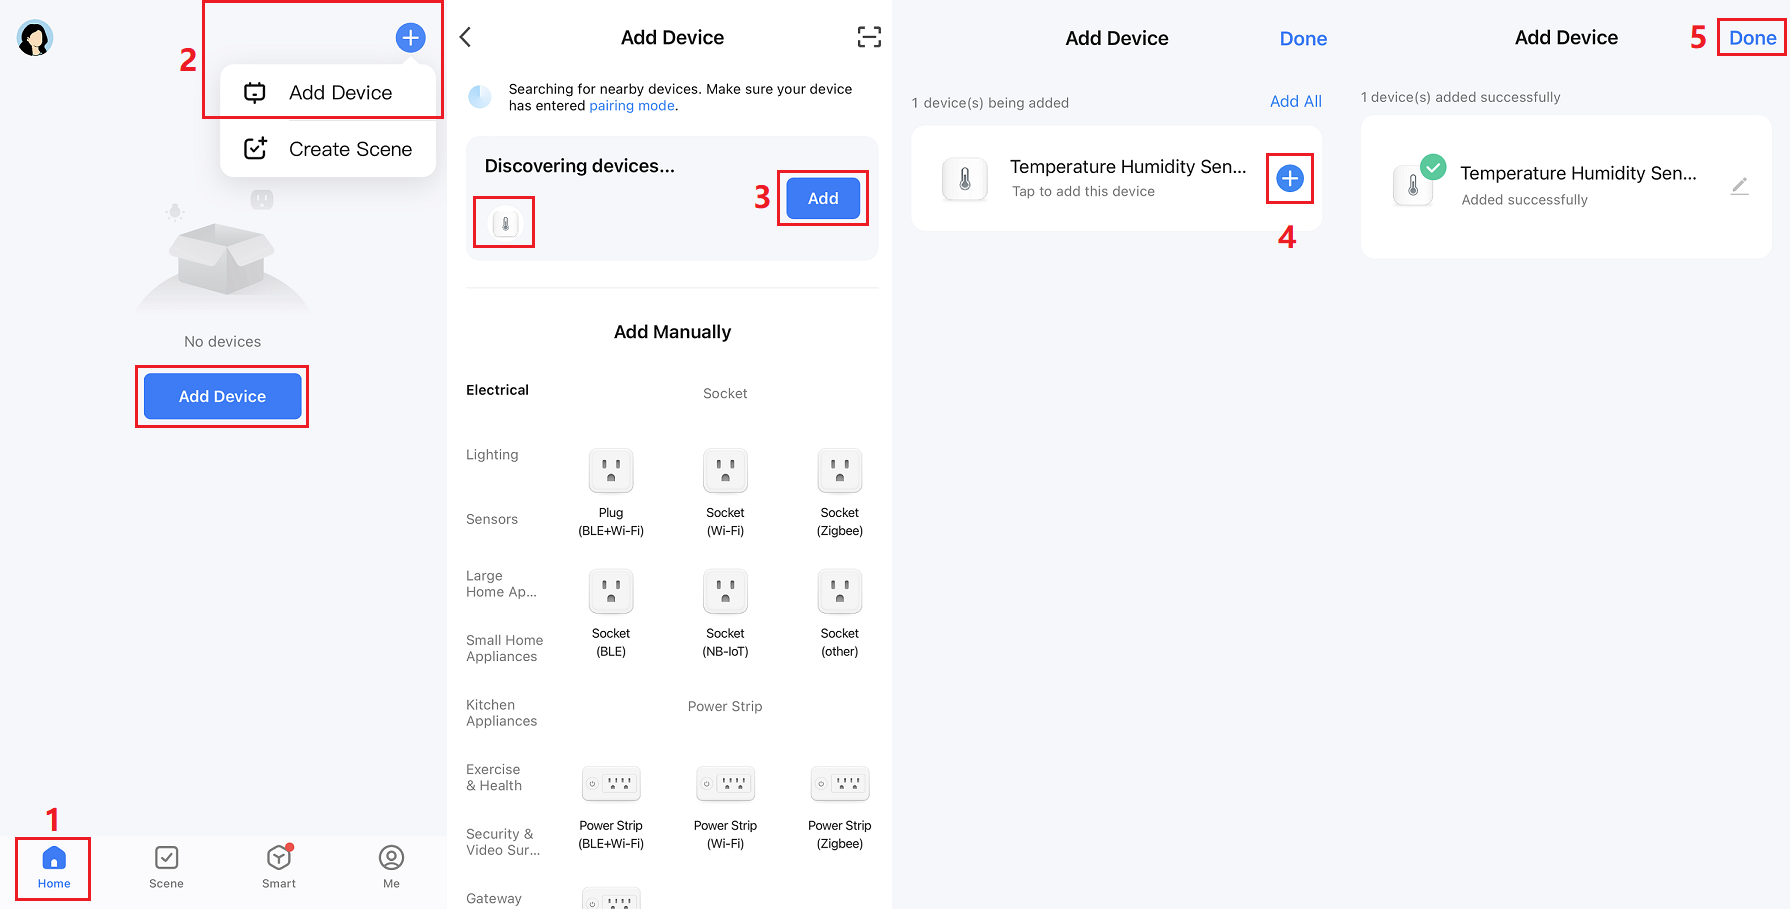
Open the SmartLife app.
Option 1: On the homepage, tap + in the top right corner and choose Add Device. Tap Add and select your product.
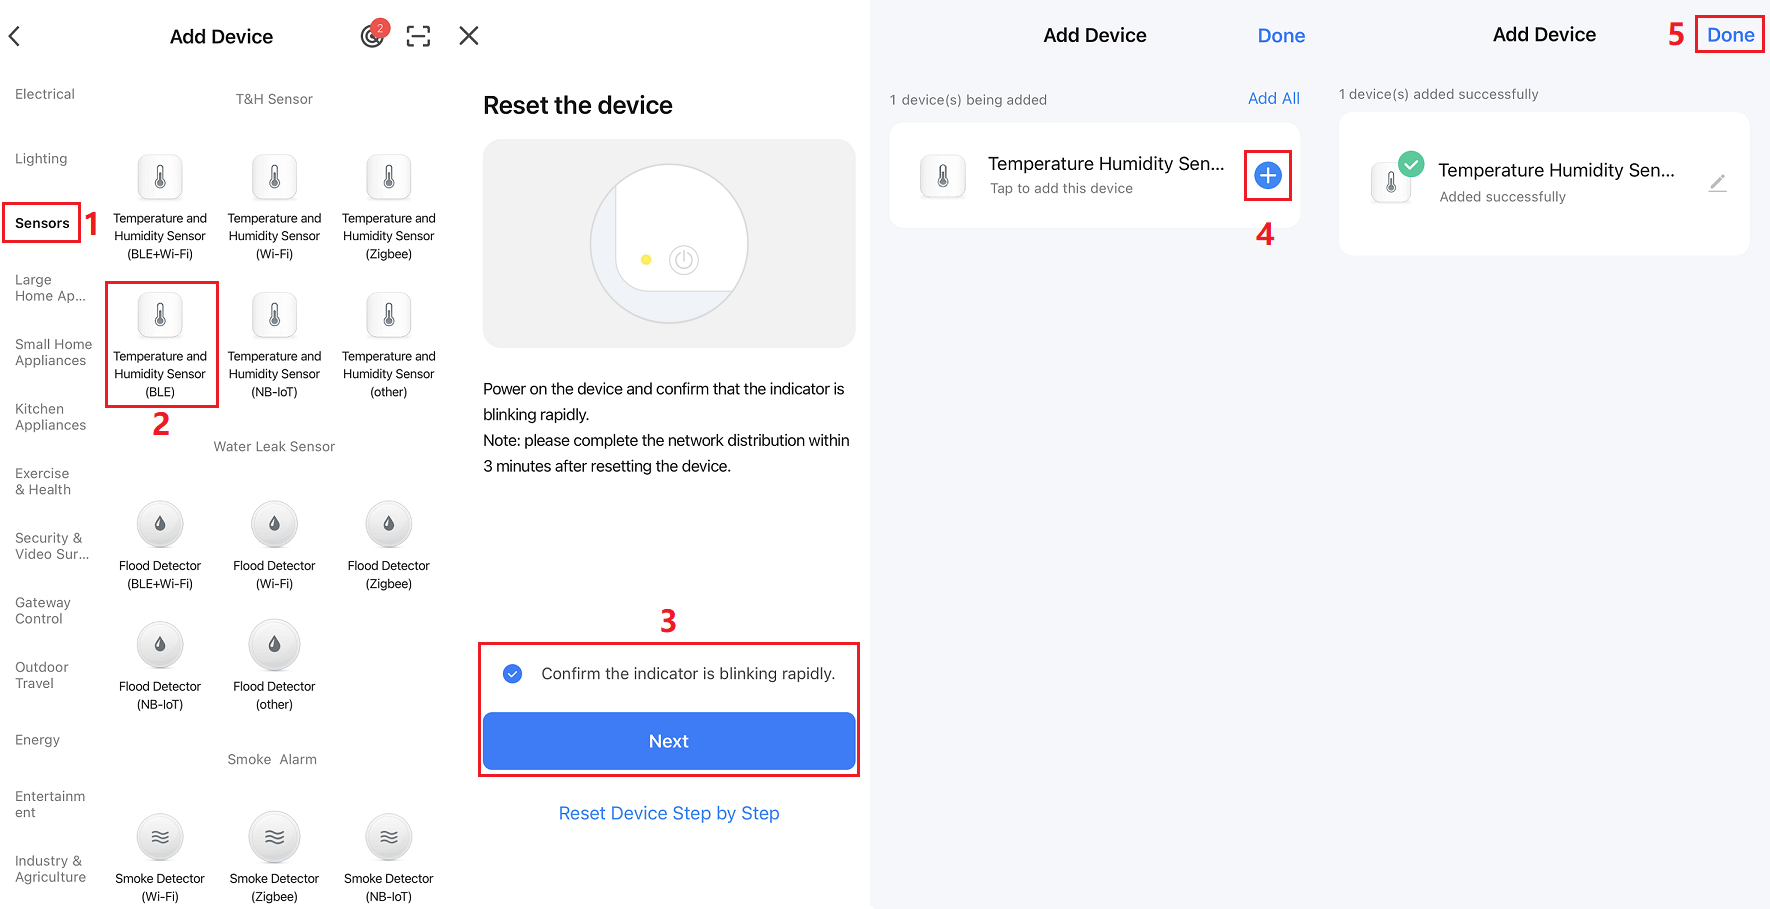
Option 2: On the Add Device page, tap Sensors > Temperature and Humidity Sensor (Bluetooth). When your device is displayed on the screen, tap + to pair it with the app.
-
Open the control panel and view the firmware version.
On the homepage, tap the added device to enter the control panel. Tap the edit icon in the top right corner. Tap Device Update to view the firmware version.
-
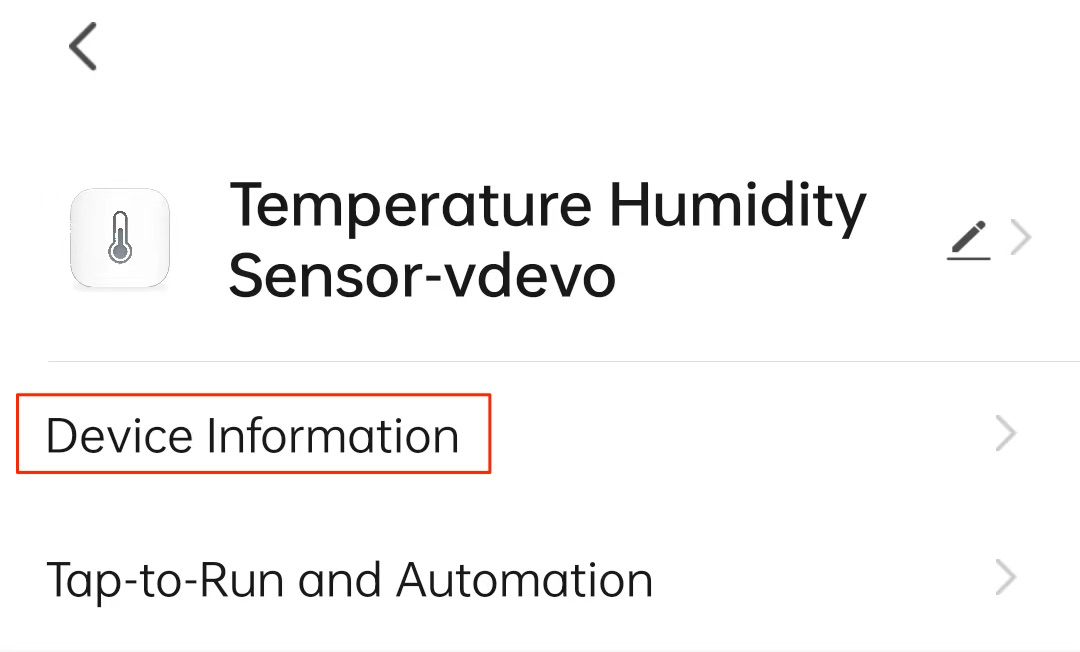
Get the virtual device ID to view cloud logs.
Tap the edit icon in the top right corner. Tap Device Information to view the Virtual ID.
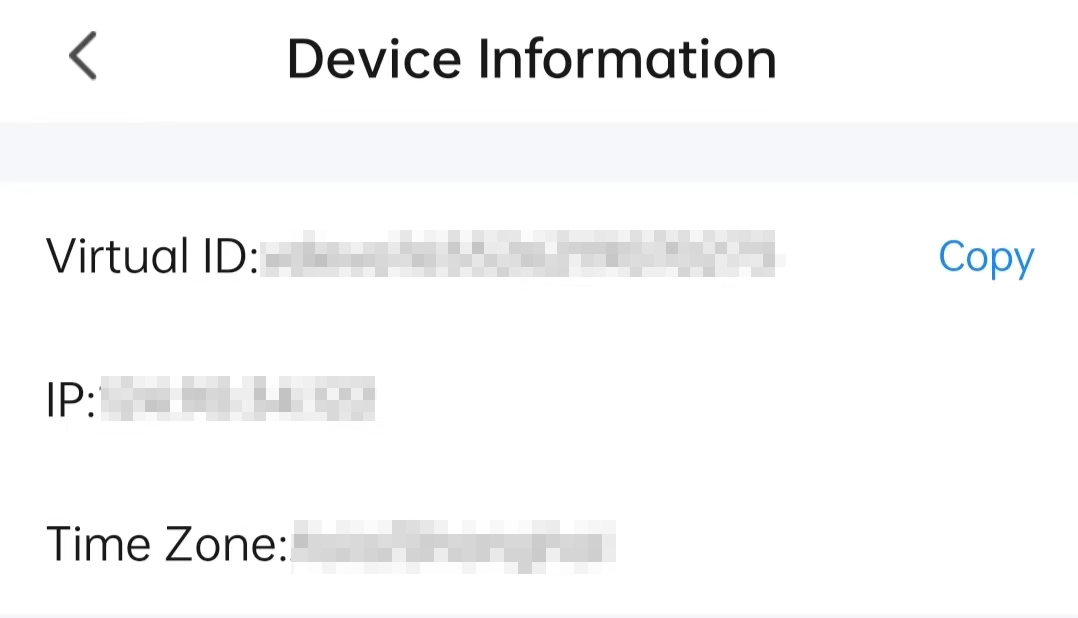
Log in to the Tuya Developer Platform. In the left navigation pane, choose Product > Device Details or Device Logs. Search for the target device by Device ID.

FAQs
Flashing and authorization for different chip platforms
This topic describes how to flash the firmware and authorize the module for the TLSR825x-based BTU module. If you use Bluetooth modules of other chip platforms, refer to Flash Firmware to and Authorize BT Series Modules.
Cloud Module Burning Authorization Platform
-
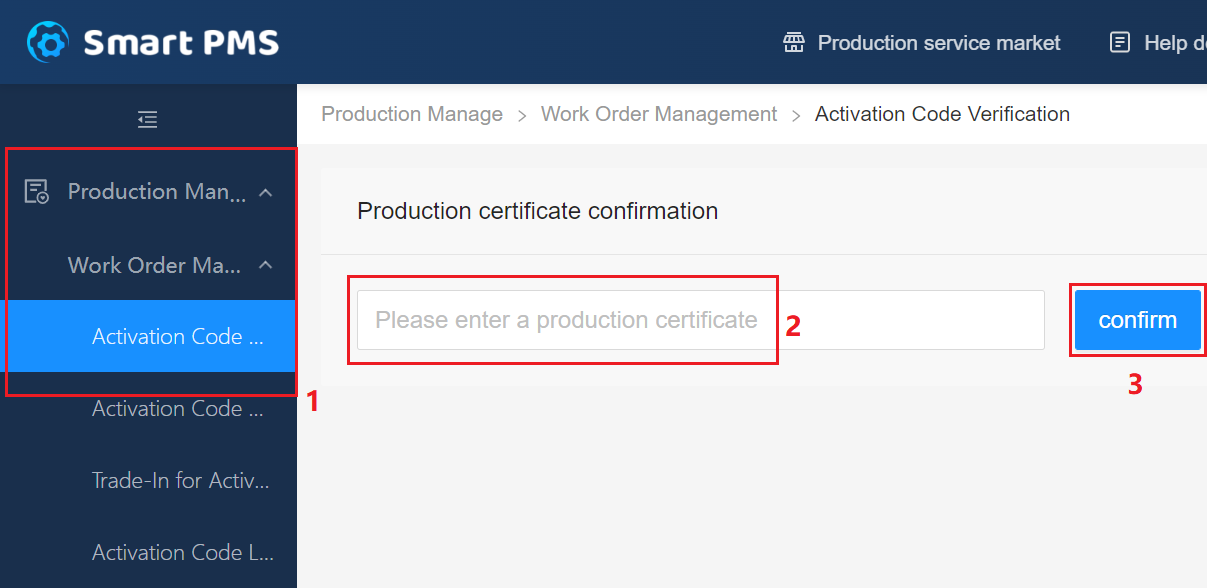
Failed to get token, no permissions for actions
Log in to the Smart PMS. Choose Production Management > Work Order Management > Activation Code Verification to confirm the credential.
-
Incorrect COM port
If you are prompted with error incorrect COM port 2 after tapping Run, the possible causes are:
- The serial port driver is not installed.
- The USB to TTL converter is not connected properly due to incorrect wiring or loose connections.
- The port is occupied. For example, the module debugging assistant enables the port.
-
Fail to get firmware fingerprint
The firmware identifier or firmware version flashed to the module is inconsistent with the one associated with the license. This error usually occurs when you use the credential (authorization only). Try the following to troubleshoot:
- Authorize the module with the credential that matches the firmware identifier and firmware version associated with the module.
- If you use other delivery modes, try flashing and authorization again.
-
Fail to enter production test
If you are prompted with error failed to enter test after tapping Run, the possible causes are:
-
The device has been connected to the network for more than 15 minutes so the testing channel is shut down. You must erase corresponding data from the flash memory to initiate a test again.
-
You might choose the wrong COM port or the TX and RX pins are wrongly connected.
-
Choose File > Set Up. Select the correct Burning Baud.
-
Some chips require a stable power supply. In this case, you must use a reliable USB hub to ensure a stable voltage supply.
For more information about the Bluetooth module test, see Production Test.
-
Is this page helpful?
YesFeedbackIs this page helpful?
YesFeedback


