Flash Firmware and Authorize Module
This topic describes approaches to flashing the firmware to the chip and authorizing access to the Tuya Cloud.
Approaches
There are two approaches to flashing firmware and authorizing access.
- Flashing and authorization combined: Allows you to flash the firmware and authorize access to the Tuya Cloud using Tuya’s Cloud Module Burning Authorization Platform. This approach applies to the release stage.
- Flashing and authorization separated: Allows you to authorize access to the Tuya Cloud using Tuya’s Cloud Module Burning Authorization Platform and flash firmware using the tool from the chip manufacturer. You can flash firmware unlimited times with the authorization performed only once. This approach applies to the testing stage.
Flashing and authorization combined
You use Tuya’s host which is integrated with the flashing tool to write firmware and license to the chip.
Before flashing firmware, you need to upload the compiled binary files to the Tuya Developer Platform and get the license for authorization.
Flashing and authorization separated
You do not use Tuya’s host, or you only use Tuya’s host to flash license for authorization and use a third-party flashing software to write binary files to the chip.
This approach applies to two situations in terms of writing licenses.
- Write the license using Tuya’s host: Tuya provides the license and you enter it on Tuya’s host. The license is written to the chip through serial communication.
- Write the license without using Tuya’s host: Tuya provides a license list in a spreadsheet. You parse and write the license to the chip on your own.
With this approach, access to the Tuya Cloud is only valid for seven days. To enable your device to access the cloud for unlimited time, you can use the flashing and authorization combined approach.
Get the license
Request free licenses
After building your project, find the generated files in the output folder.
Follow the steps below to upload the files to the Tuya Developer Platform and get the license.
-
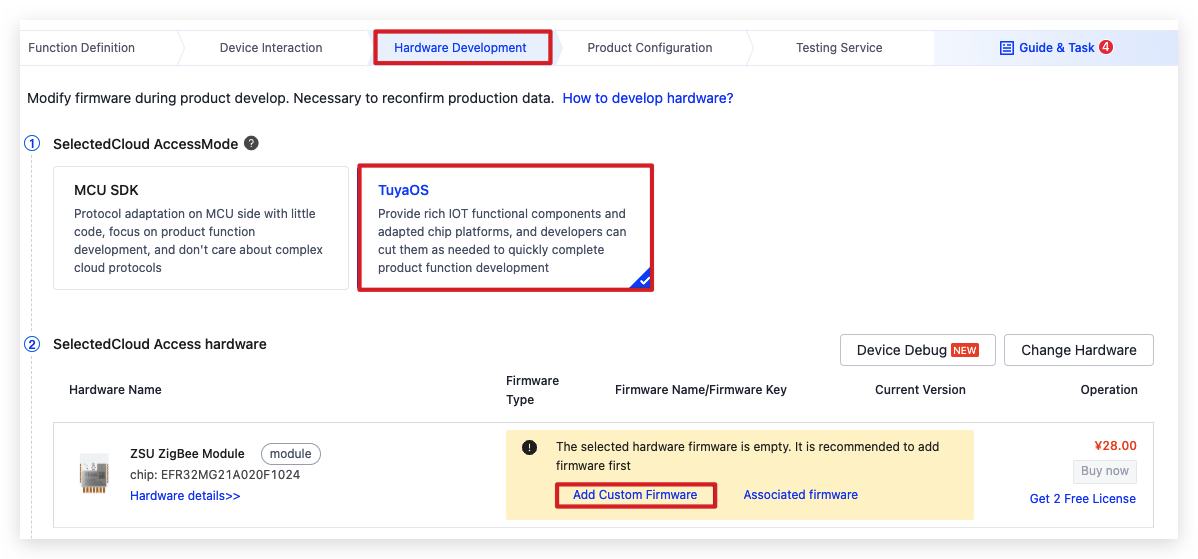
Log in to the Tuya Developer Platform. Select the target product.
-
In the third step of Hardware Development, choose TuyaOS and click Add Custom Firmware.
-
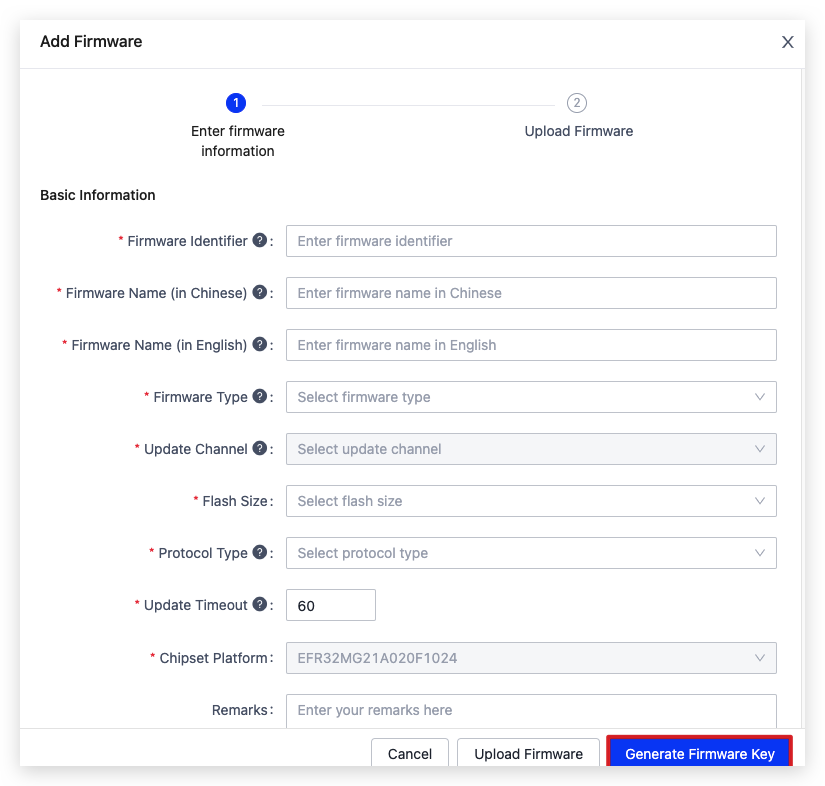
Complete the required information and click Generate Firmware Key. The Firmware Identifier must be the same as the name of the binary file to be uploaded.
-
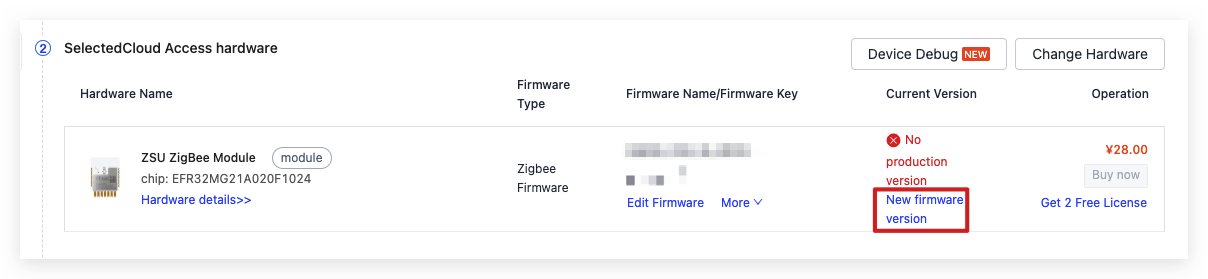
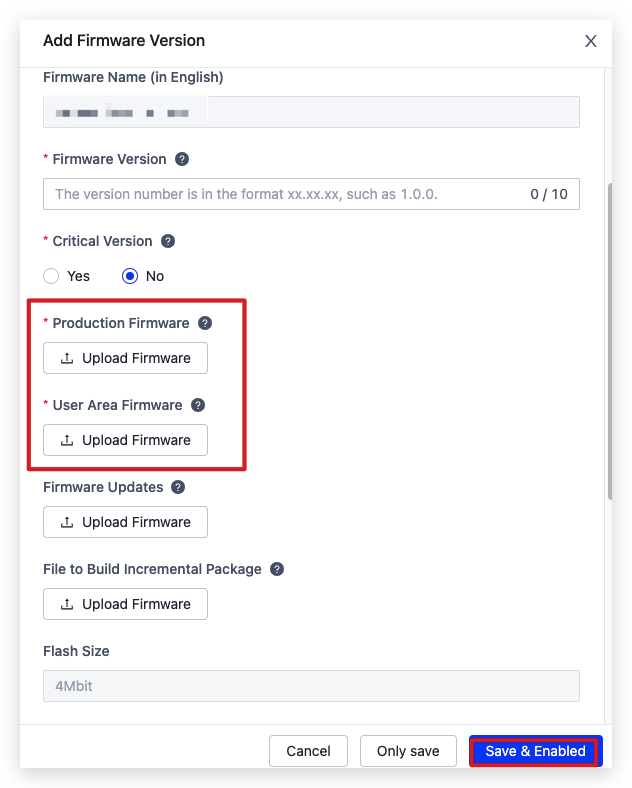
Click New firmware version. Upload your compiled binary file in the corresponding field and click Save & Enabled.
-
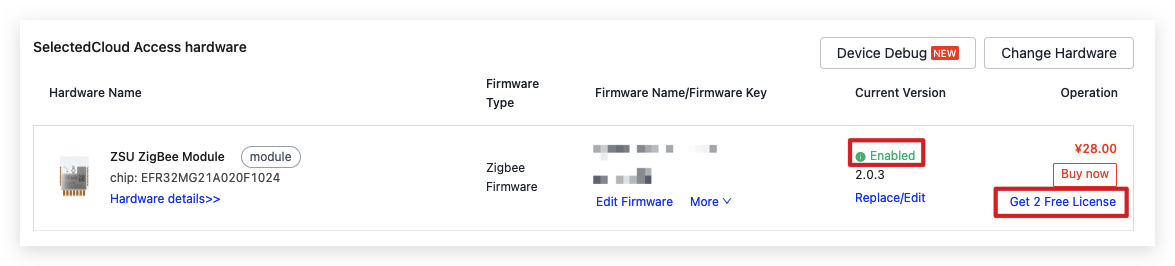
Click Get 2 Free Licenses.
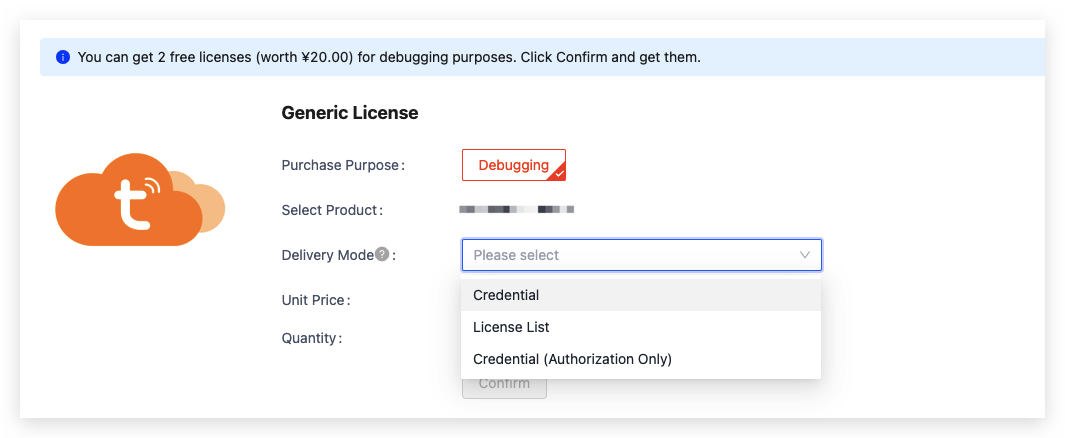
The following table lists the three types of license delivery.
Type Applicability Description Credential Flashing and authorization combined A credential is an encrypted license. You flash it to the chip using Tuya’s host. The firmware information will be verified to ensure you are flashing the correct firmware. This delivery mode is recommended. It supports Tuya standard chips only. Credential (authorization only) Flashing and authorization separated A credential (authorization only) is an encrypted license. You flash it to the chip using Tuya’s host. The firmware information will not be verified. This delivery mode supports non-Tuya standard chips. License list Not recommended. If you want to use it, submit a service ticket to consult technical support. A license list provides the plaintext of the license. You must develop a host to flash the license to your chip.
The license list is not available to the Zigbee protocol. You should choose Credential for delivery mode. Then, extract the downloaded file and get the credential.
Bind with a Sandwich development board
This section uses the ZS3L module as an example to describe how to bind with a Sandwich development board to get the license.
-
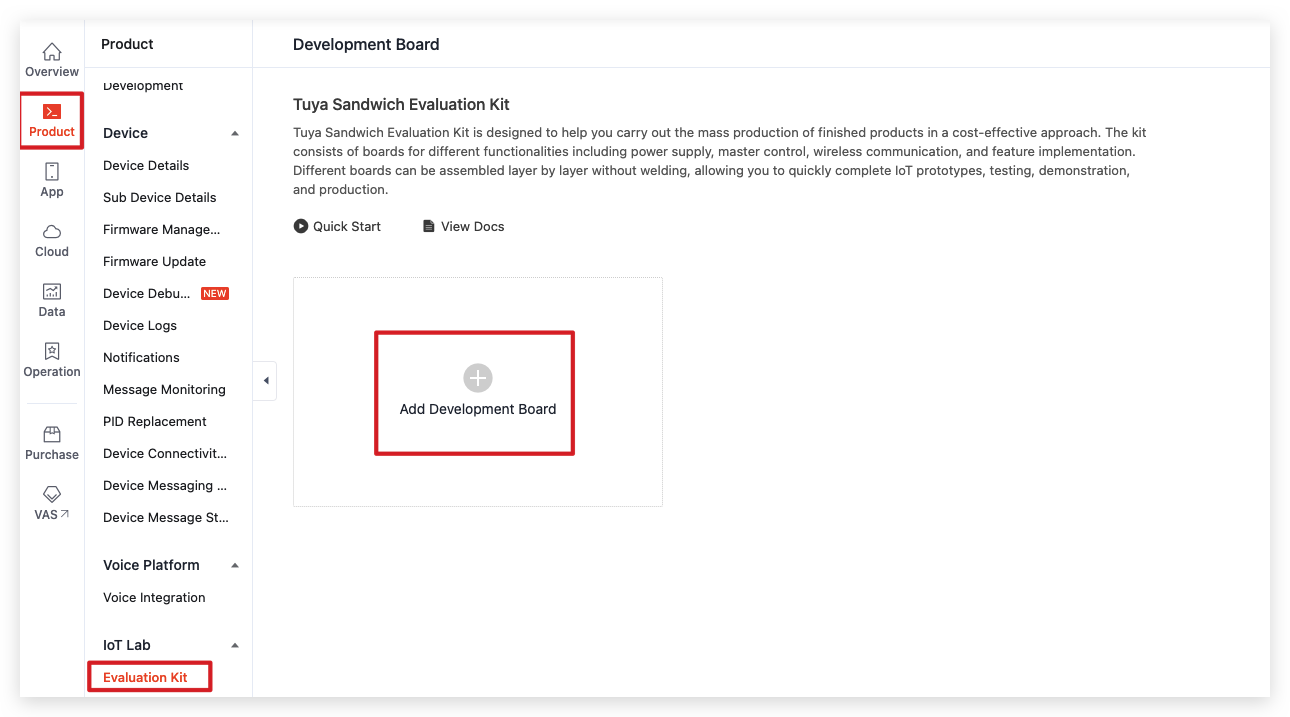
Go to the Tuya Developer Platform. Choose Product > IoT Lab > Evaluation Kit. Click Add Development Board. Enter the ID and Password to add your board.
-
Click Request a new authorization code. In the dialog box that appears, select the target product to get the license.
Get the flashing tool
-
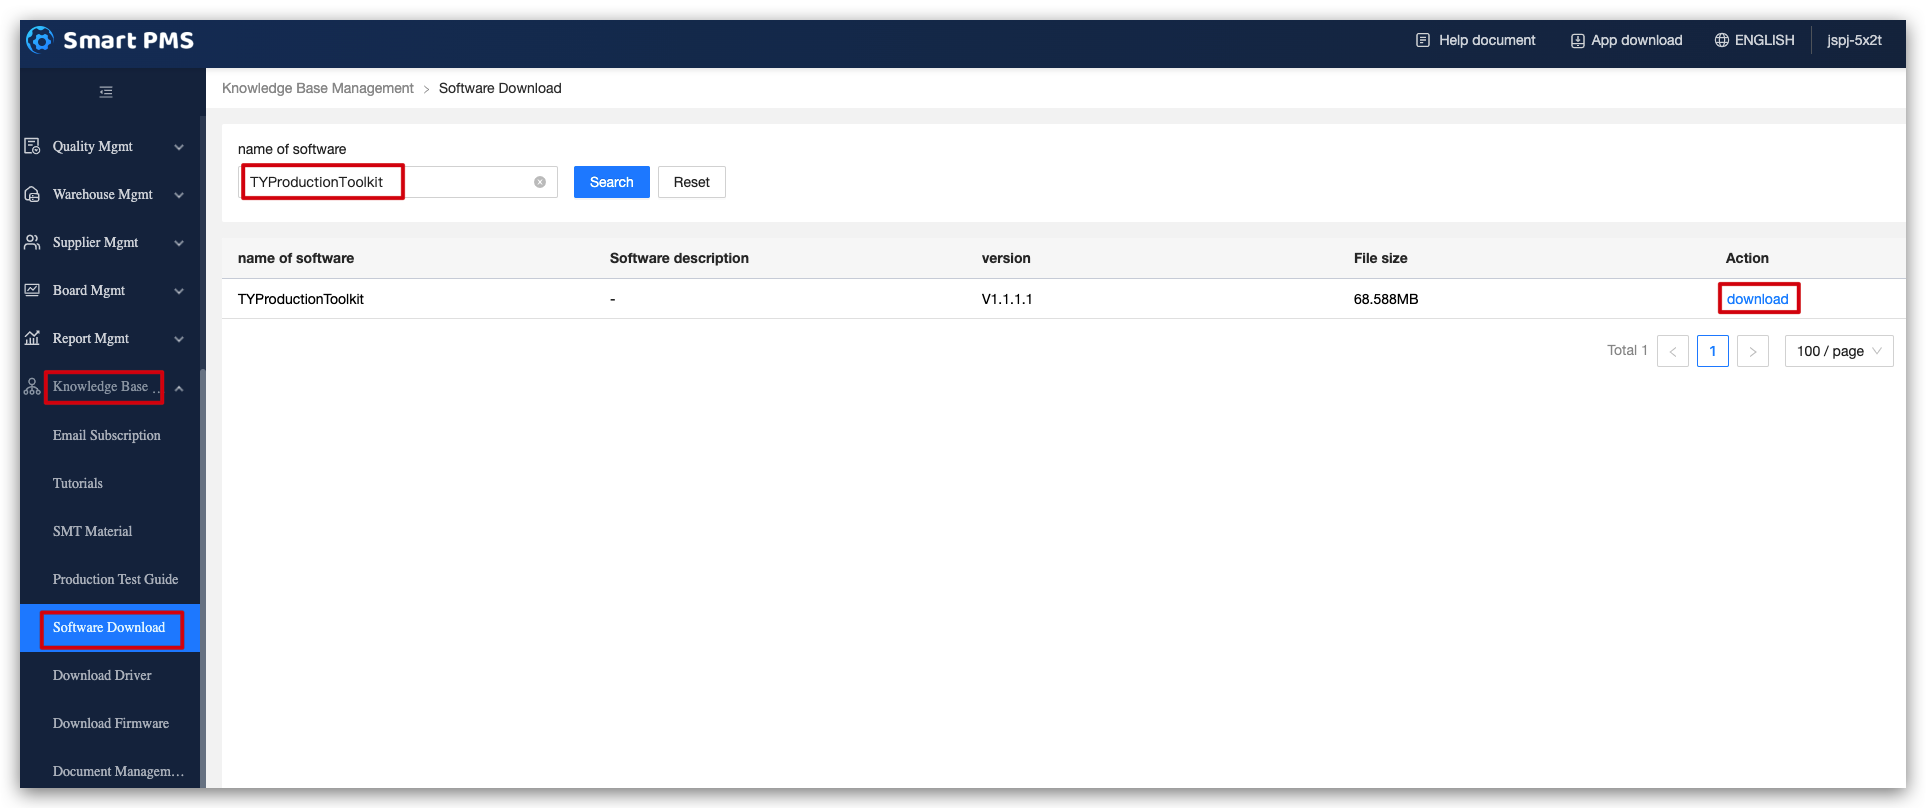
Log in to the PMS.
-
Choose Knowledge Base Management > Software Download. Search for TYProductionToolkit and click Download.
-
Open the Tuya Production Toolkit and choose TYDA.

Flash firmware and authorize chip
For custom development
-
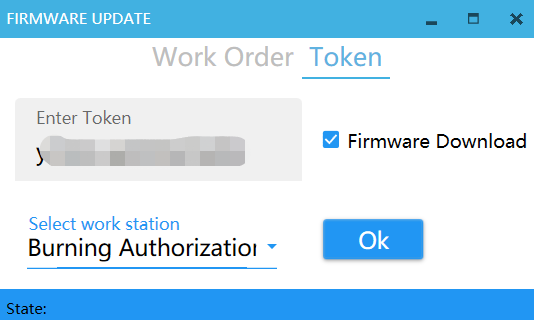
Open the Cloud Module Burning Authorization Platform. Click Enter Token, input your credential, and click OK.
-
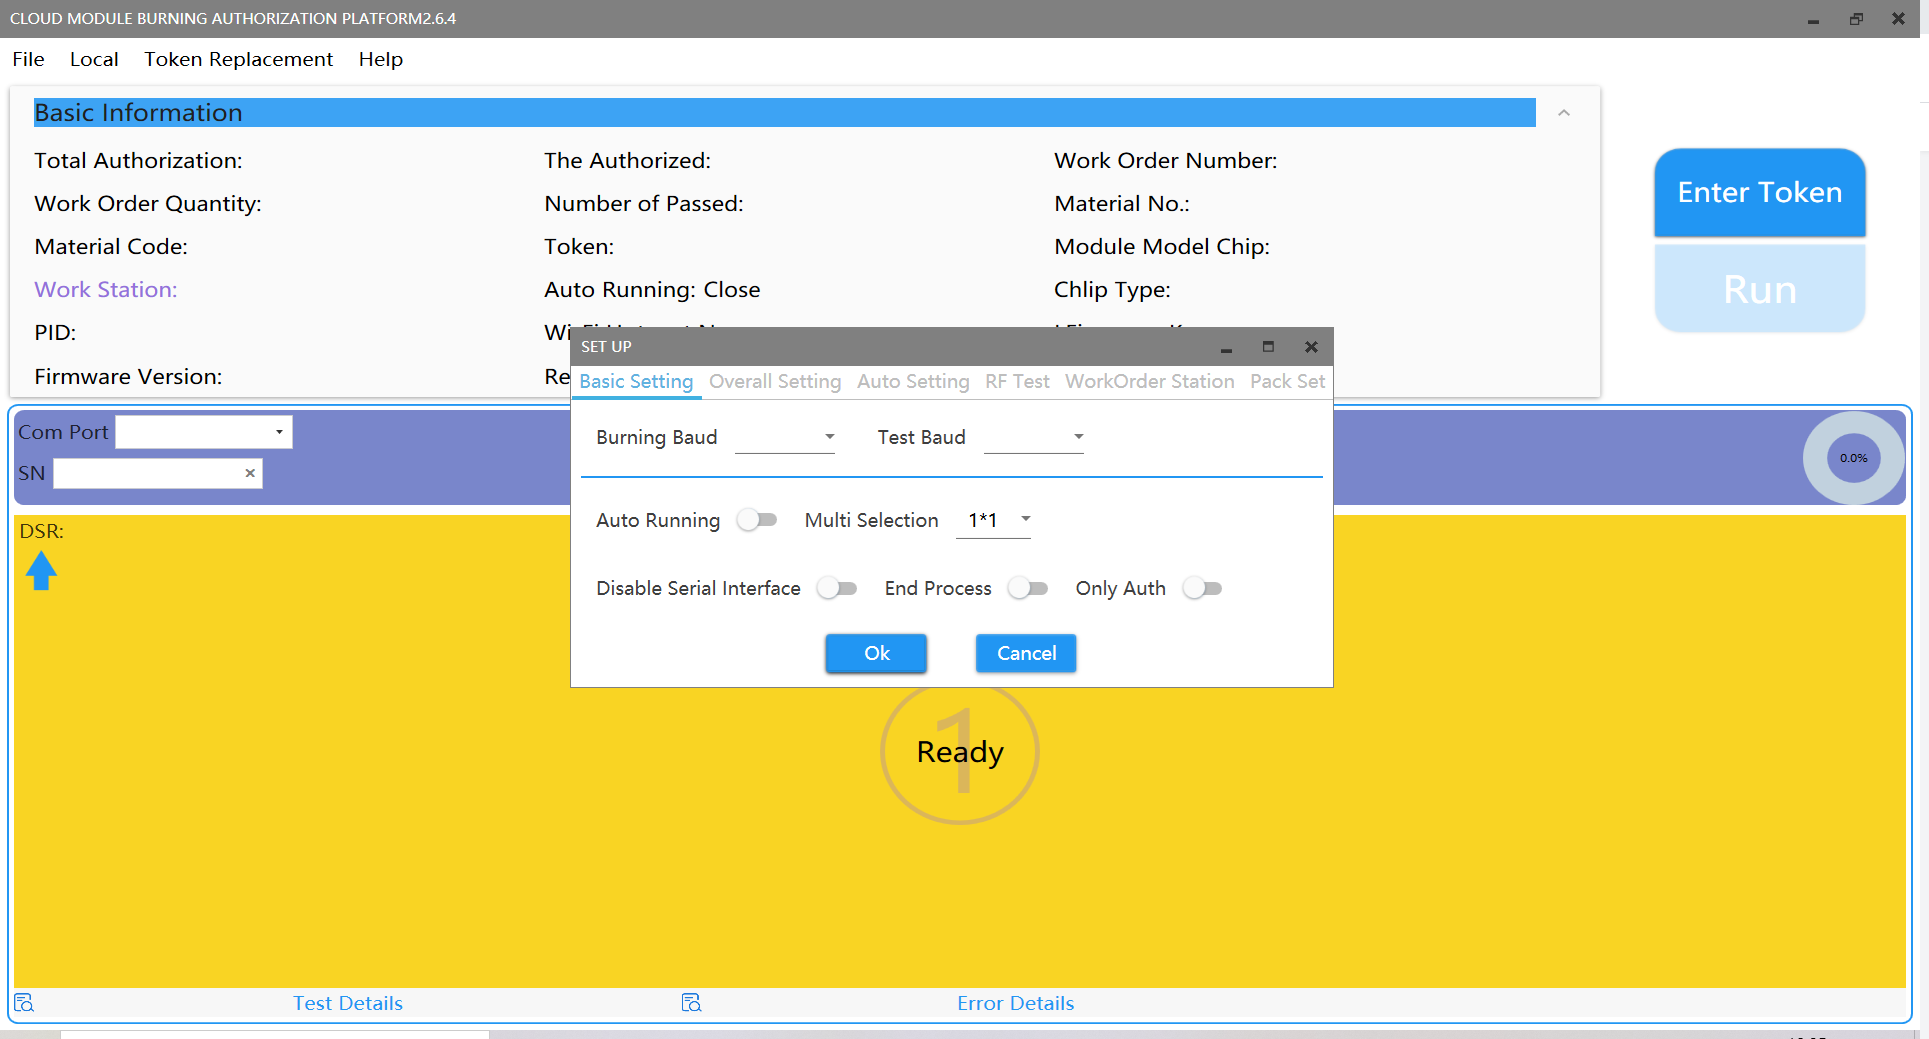
Check out firmware information in Basic Information. Choose the correct COM Port and Baud and click Run.
-
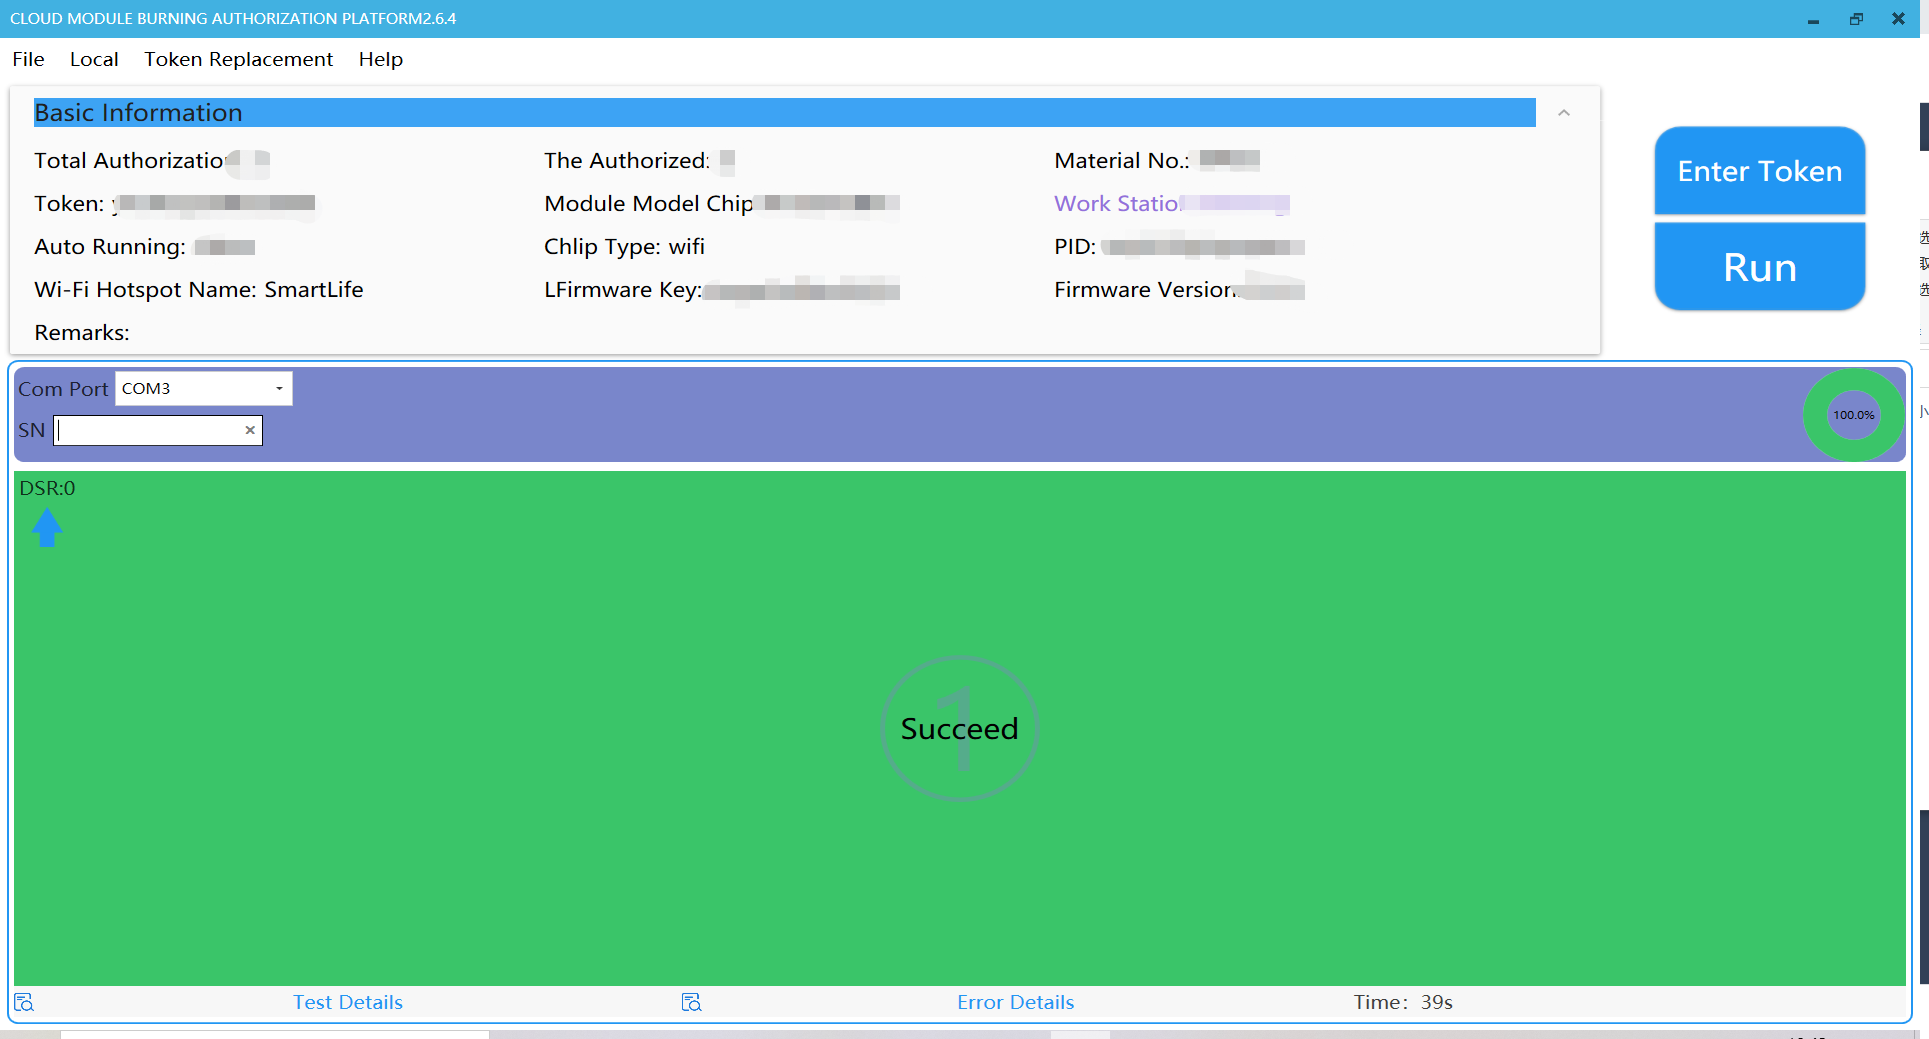
Wait for flashing to complete.
For Sandwich development board
-
Check out how to connect the board to the USB to TTL converter and the programmer.
-
Open the Cloud Module Burning Authorization Platform. Enter your credential in the token input box, and select Burning Authorization for the work station.
-
If you get an error message saying
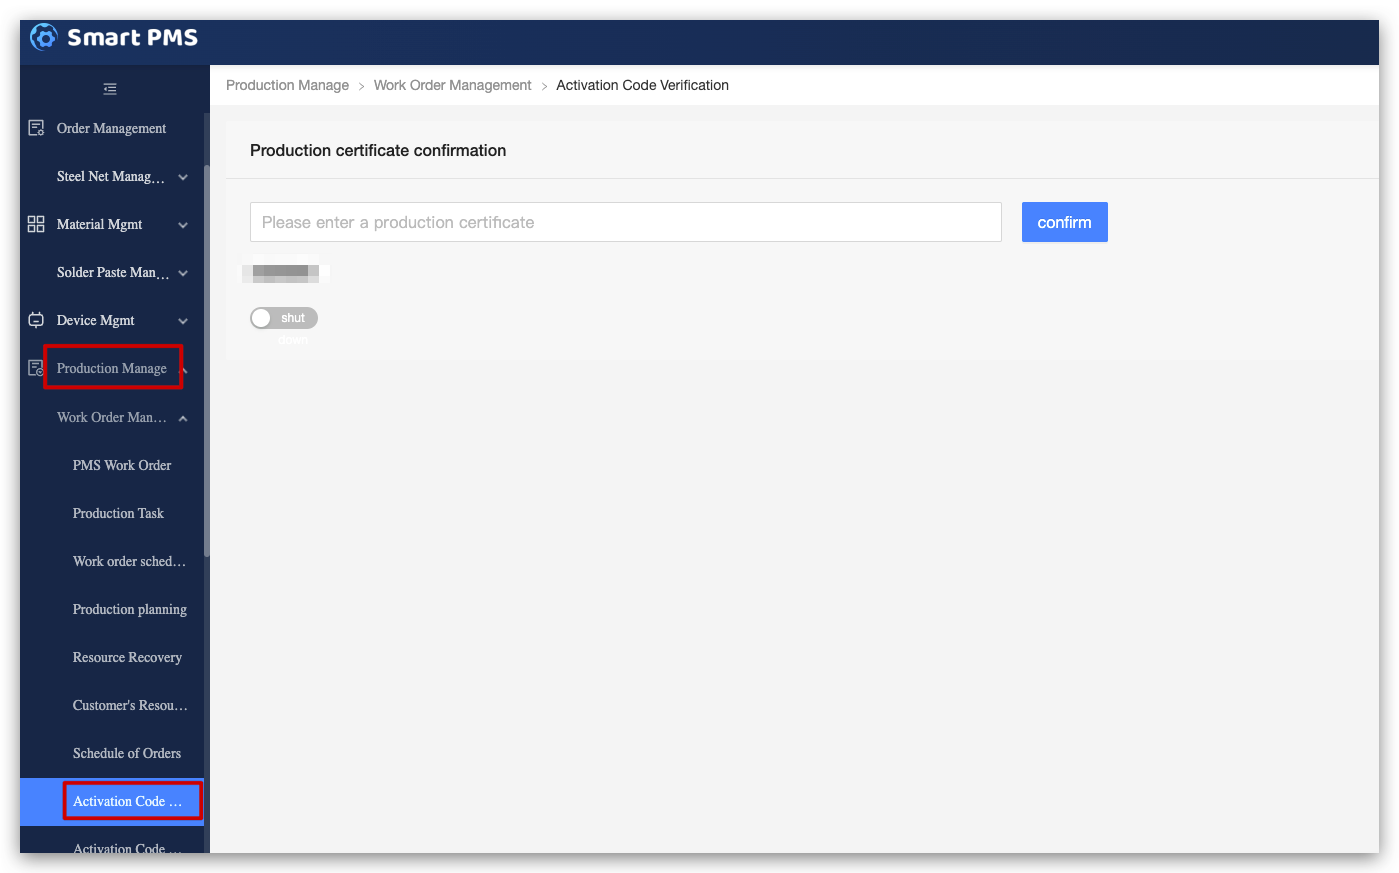
Failed to get token, no permissions for actions, try troubleshooting with the following steps.Visit Smart PMS. Choose Production Manage > Work Order Management > Activation Code Verification. Enter your credential with the issue and click Confirm. Go back to the software. Enter your credential again, and you should be good to go.
-
Choose the port connected to the J-Link debugger for the COM Port, 11 for the RF channel, and 115200 for both the Burning Baud and Test Baud. Click Run to start flashing and authorization.
-
Wait for flashing to complete.
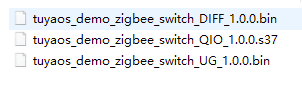
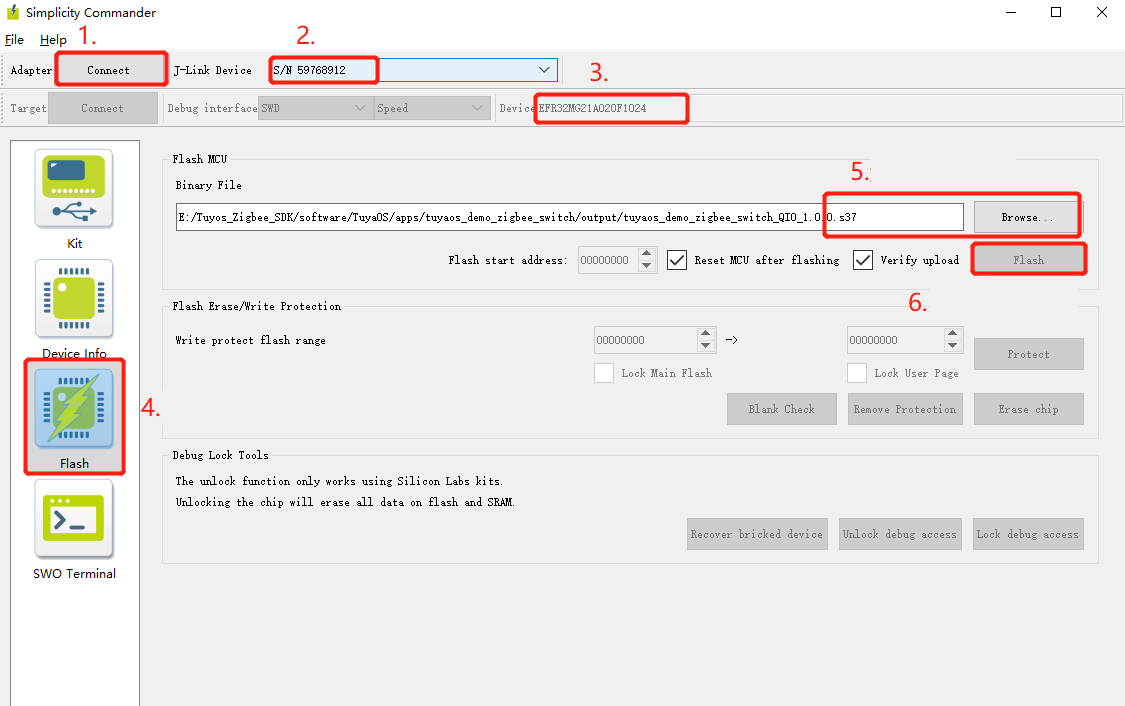
Flashing with software from chip manufacturer
Visit software\TuyaOS\tools\Commander and open commander.exe. Flash the binary file with the suffix QIO to the chip. The generated file is stored in the output folder.
The firmware flashed using the software from the chip manufacturer is only valid for seven days. After it expires, the device might not work as expected.
Is this page helpful?
YesFeedbackIs this page helpful?
YesFeedback


