MCU SDK Porting
MCU SDK is the MCU code automatically generated according to the product functions defined on the Tuya Developer Platform. It includes communication architecture and protocol parsing architecture. You can directly add the MCU SDK to the current MCU project, facilitating MCU program development.
Hardware resource requirements
MCU requirements are as follows. In the case of insufficient resources, you can implement connection protocols by yourself and refer to functions in the SDK.
- Memory: 4 KB
- RAM: The RAM is about 100 bytes, depending on the DP data length. The RAM shall be greater than 260 bytes if the OTA function is available.
- 9-level nested function is adopted.
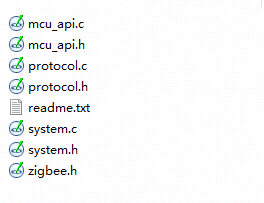
File structure
| File | Description |
|---|---|
mcu_api.c |
Contain functions that can be called. |
mcu_api.h |
mcu_api.c function declaration. |
protocol.c |
Contain the content processing function of the protocol data. You can add code to the corresponding function as needed and get data sent by the Zigbee module to the MCU. |
protocol.h |
protocol.h contains the following information:
|
system.c |
The implementation of serial communication protocol parsing. |
system.h |
system.h contains the following information:
|
zigbee.h |
Contain Zigbee macro definitions. |
Migration process
- Program the MCU and migrate SDK files.
- Confirm the macro definition of
protocol.h. - Migrate
protocol.cfile and call the function. - Add the calling function of reporting and sending DPs.
- Add production test functions.
- Add network pairing functions.
Program MCU and migrate SDK files
-
In the original project, initialize the MCU peripherals, including serial port, external interrupt (button), timer (with the indicator flickering), and more.
-
Add the
.cand.hfiles in the MCU SDK folder to the corresponding header file reference path.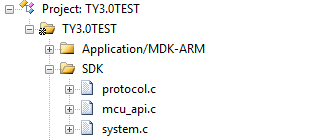
Confirm macro definition of protocol.h
Query product information
-
Define the product ID (PID).
PRODUCT_KEYis the PID macro definition. PID is the unique identifier of each product and can be obtained on the product detail page on the Tuya Developer Platform.#define PRODUCT_KEY "ax23rawjo4np****"If
PRODUCT_KEYand PID are inconsistent, replace the value ofPRODUCT_KEYwith the PID of your product created on the Tuya Developer Platform. -
Define the version number.
MCU_VERis the software version, which is1.0.0by default. If the MCU needs an OTA function, a newer MCU version number shall be added.#define MCU_VER "1.0.0"
Set OTA updates (optional)
To support the OTA firmware update, define SUPPORT_MCU_FIRM_UPDATE and enable OTA update that is disabled by default.
#define SUPPORT_MCU_FIRM_UPDATE
For the OTA update process, see OTA Update Guide.
Define transceiving buffer (optional)
Modify buffer size according to the DP.
- The serial port buffer size defaults to 24 bytes and shall be larger than the maximum DP data length.
- If the OTA function is enabled, it is recommended that the RAM should be greater than 260 bytes.
- If the RAM is insufficient, you can reduce the size of receive queues.
#define ZIGBEE_UART_QUEUE_LMT             256             // The size of receive queues
#define ZIGBEE_UART_RECV_BUF_LMT          128             // Serial port receiving buffer
#define ZIGBEE_UART_SEND_BUF_LMT          128             // Serial port sending buffer
Migrate protocol.c file and call functions
-
Save the
zigbee.hfile to the folder where Zigbee files are stored, such as themain.cfolder. -
Call the
zigbee_protocol_init()function in themcu_api.cfile after the MCU serial port and other peripherals are initialized. -
Add the single-byte sending function of the MCU serial port to the
uart_transmit_outputfunction in theprotocol.cfile. The sample is as follows./** * @brief encapsulates a generic send function, you shall use their own function to completing this function * @param[in] {value} send signle data * @return void */ void uart_transmit_output(unsigned char value); UART3_SendByte(value); -
Call the
uart_receive_inputfunction in themcu_api.cfile in the interrupt function of serial receiving. Pass in the received characters as parameters./** * @brief copy receive data from uart receive interrupt * @param[in] {value} Data received from interrupt * @return void */ void uart_receive_input(unsigned char value) { #error "please call this function in the interrupt function of serial receive, and delete this line" if(1 == queue_out - queue_in) { // Serial receiving buffer is full }else if((queue_in > queue_out) && ((queue_in - queue_out) >= sizeof(zigbee_uart_rx_buf))) { // Serial receiving buffer is full }else { // Serial receiving buffer is not full if(queue_in >= (unsigned char *)(zigbee_uart_rx_buf + sizeof(zigbee_uart_rx_buf))) { queue_in = (unsigned char *)(zigbee_uart_rx_buf); } *queue_in ++ = value; } } -
After the MCU enters the
whileloop, thezigbee_uart_service()function in themcu_api.cfile is called. The sample code structure inmain.cis as follows:include "zigbee.h" ... void main(void) { zigbee_protocol_init(); ... while(1) { zigbee_uart_service(); ... } }During the
while(1), the MCU shall directly call thezigbee_uart_service()function inmcu_api.c. After the initialization is successfully completed, it is recommended not to disable the interrupt. If the interrupt must be disabled, the duration of the disabled interrupt must be short. A disabled interrupt might cause data packet loss. Do not call the reporting function during the interrupt.
Processing function of DP data
Report all DP data
After the Zigbee module reboots or is paired again, it will send a status query command. The MCU shall report all the DP status of the device to the Zigbee module for synchronization.
- Open
protocol.cand find theall_data_update(void)function. - Enter all the initial values of DPs to be reported in the corresponding reporting function, to provide the panel with the initial values displayed at startup.
Do not call the all_data_update() function. This function will be called actively at a specific time.
/**
 * @brief  Upload the information of all DPs in the system, to synchronize data between the app and the MCU.
 * @param  Null
 * @return Null
 * @note   This function shall be called in the SDK. The MCU must implement data reporting in this function, including the data for reporting only and the data for reporting and sending.
 */
void all_data_update(void)
{
    //#error "Process the data for reporting and sending and the data for reporting only. Delete the line after processing is completed."

    /*
    // This code is automatically generated by the Tuya Developer Platform. Modify each sendable and reportable function and report-only function according to the actual data.
    mcu_dp_bool_update(DPID_SWITCH, current switch); // Report bool type data;
    mcu_dp_value_update(DPID_TEMP_SET, current temperature setting); // Report value type data;
    mcu_dp_value_update(DPID_TEMP_CURRENT, current temperature); // Report value type data;
    mcu_dp_enum_update(DPID_MODE, current working mode); // Report enumeration data;
    mcu_dp_enum_update(DPID_FAN_SPEED_ENUM, current wind speed); // Report enumeration data;
    mcu_dp_enum_update(DPID_STATUS, current status); // Report enumeration data;
    mcu_dp_bool_update(DPID_ECO, current ECO mode); // Report bool type data;
    mcu_dp_bool_update(DPID_DRYING, current drying mode); // Report bool type data;
    mcu_dp_bool_update(DPID_VENTILATION, current ventilation mode); // Report bool type data;
    mcu_dp_bool_update(DPID_HEAT, current auxiliary heat); // Report bool type data;
    mcu_dp_bool_update(DPID_LIGHT, current light); // Report bool type data;
    mcu_dp_bool_update(DPID_CHILD_LOCK, current child lock); // Report bool type data;
    mcu_dp_bool_update(DPID_BEEP, current beep); // Report bool type data;
    mcu_dp_value_update(DPID_HUMIDITY_SET, current humidity setting); // Report value type data;
    mcu_dp_value_update(DPID_HUMIDITY_CURRENT, current humidity); // Report value type data;
    mcu_dp_enum_update(DPID_TEMP_UNIT_CONVERT, current temperature unit switch); // Report enumeration data;
    mcu_dp_enum_update(DPID_COUNTDOWN_SET, current countdown); // Report enumeration data;
    mcu_dp_value_update(DPID_COUNTDOWN_LEFT, remaining time of current countdown); // Report value type data;
    mcu_dp_fault_update(DPID_FAULT, current fault alert); // Report fault type data;
    mcu_dp_value_update(DPID_TEMP_CURRENT_F, current temperature in °F); // Report value type data;
    mcu_dp_value_update(DPID_TEMP_SET_F, current temperature setting in °F); // Report value type data;
    mcu_dp_bool_update(DPID_SLEEP, current sleep feature); // Report bool type data;
    mcu_dp_bool_update(DPID_CLEANING, current self-cleaning); // Report bool type data;
    mcu_dp_bool_update(DPID_SWITCH_VERTICAL, current vertical swing); // Report bool type data;
    mcu_dp_enum_update(DPID_GEAR_VERTICAL, current vertical swing level); // Report enumeration data;
    mcu_dp_value_update(DPID_ANGLE_VERTICAL, current vertical swing angle); // Report value type data;
    mcu_dp_bool_update(DPID_SWITCH_HORIZONTAL, current horizontal swing); // Report bool type data;
    mcu_dp_enum_update(DPID_GEAR_HORIZONTAL, current horizontal swing level); // Report enumeration data;
    mcu_dp_value_update(DPID_ANGLE_HORIZONTAL, current horizontal swing angle); // Report value type data;
    mcu_dp_bool_update(DPID_DISPLAY, current screen display switch); // Report bool type data;
    */
}
Report single DP data
When the status of a single DP changes, the MCU reports this DP status, and the app updates the display content. The report format is mcu_dp_xxxx_updata(DPID_X,n), where DPID_X is the DP whose status changes. all_data_update() functions can be called individually. For example,
mcu_dp_bool_update(DPID_SWITCH,1); // Report bool type data
mcu_dp_value_update(DPID_TEMPER_SET,25); // Report value type data
mcu_dp_string_update(DPID_DAY,"1234",4); // Report string data
Send DP data
In the protocol.c file, each sendable DP has an individual processing function of sending data. The format is dp_download_xxx_handle(), where xxx is the DP that can be sent. After the function parses the DP, the MCU shall execute device control accordingly. Take the received switch DP data as an example:
/*****************************************************************************
Function name: dp_download_switch_handle.
Function description: Processing function of DPID_SWITCH.
Input parameters: value indicates data source.
length indicates data length.
Return parameters: Return SUCCESS on success. Return ERROR on a failure.
Instruction: Regarding the data for reporting and sending, the processing results are reported to the app after processing is completed.
*****************************************************************************/
static unsigned char dp_download_switch_handle(const unsigned char value[], unsigned short length)
{
  //Example: The current DP type is Bool
  unsigned char ret;
  //0: Off /1: On
  unsigned char switch1;

  switch1 = mcu_get_dp_download_bool(value,length);
  if(switch1 == 0)
  {
    // The switch is off
    MCU_OFF_switch1();
  }
  else
  {
    // The switch is on
    MCU_ON_switch1();
  }

  // Feedback after the DP data is processed
  ret = mcu_dp_bool_update(DPID_SWITCH,switch1);
  if(ret == SUCCESS)
    return SUCCESS;
  else
    return ERROR;
}
When the device status changes rather than controlled by the app, the MCU shall call mcu_dp_bool_update(DPID_SWITCH_1,switch_1); to upload the real-time status of the DP (switch) status as feedback. You can also choose the reporting time as needed.
Production test
The Zigbee general firmware provides the RF production test function. The module RF test is triggered by the serial port command. After the test is completed, the test result is sent to the MCU through the serial port. The test process requires Tuya Zigbee production test function. For more information about protocol format, see UART Protocol for Zigbee Three-level Architecture.
Pairing function
The MCU determines when to make the Zigbee module enter pairing mode. After the MCU receives the current network status of the Zigbee module, it can send the 0x03 command to make the Zigbee module ready for pairing.
Example: 0x55 aa 02 00 01 03 00 01 01 xx
Communication between MCU SDK and module
Frame format
For more information about the frame format, see Frame format description.
Initialization communication
After the MCU and the module are powered on, an initialization configuration is required. Initialization communication includes but is not limited to:
- Verify whether the MCU and the module work properly.
- Verify whether the connection works properly.
- Get the data required for module activation.
- Get the working mode of the module.
Query product information
After the module is powered on again, it will query the PID, version number, and pairing mode of the MCU firmware.
- PID: Product ID, used to activate the product.
- Version number: MCU version number, used to verify whether the OTA update is successful.
- Pairing mode: The pairing mode of the module.
Things to note
- It is recommended that normal data communication such as DP data sending and reporting and OTA update should be executed after the initialization is completed.
- For low-power devices whose power on/off is controlled by the MCU, data communication should be executed after the entire initialization of the device is completed.
Is this page helpful?
YesFeedbackIs this page helpful?
YesFeedback


