BizBundle SDK Development Tutorial
This topic provides a step-by-step guide on integrating with the BizBundle SDK. With just a few lines of code, you can create a simple app that enables interaction between home members, homes, and devices.
Prerequisites
Before you begin, get the environment ready.
- Android Studio 4.1 or later.
- Android API level 23 or later.
- An available SmartLife App SDK project. Obtain the following information from the Tuya Developer Platform. For more information, see Preparation.
- Get the package name of the SmartLife App SDK, as well as the
AppKeyandAppSecret. - Download the built Android package and extract the
security-algorithm-1.0.0-beta.aarfile.
- Get the package name of the SmartLife App SDK, as well as the
Create a project
This section describes how to create a project and add the necessary permissions.
-
(Optional) Create a new project. See Create a Project.
- Open Android Studio and choose New Project.
- Choose Phone and Tablet > Empty Views Activity and click Next.
- Specify the name and the save location, select Kotlin as the language, and click Finish to create an Android project.
After the project is created, Android Studio will automatically initiate Gradle synchronization. Wait a moment for the synchronization to finish before moving on to the next step.
-
Add the permissions to access networks and devices. Open
/app/manifests/AndroidManifest.xmland add the following permissions after<application/>:<uses-permission android:name="android.permission.INTERNET"/> <uses-permission android:name="android.permission.ACCESS_WIFI_STATE"/> <uses-permission android:name="android.permission.ACCESS_NETWORK_STATE"/>To pair and activate the device, additional permissions are required, such as location and Bluetooth. See the device pairing tutorial and add any necessary permissions.
-
Configure the obfuscation rule. Open
/app/proguard-rules.proand add the following code for obfuscation. If you already have this configuration, skip this step.#fastJson -keep class com.alibaba.fastjson.**{*;} -dontwarn com.alibaba.fastjson.** #mqtt -keep class com.thingclips.smart.mqttclient.mqttv3.** { *; } -dontwarn com.thingclips.smart.mqttclient.mqttv3.** #OkHttp3 -keep class okhttp3.** { *; } -keep interface okhttp3.** { *; } -dontwarn okhttp3.** -keep class okio.** { *; } -dontwarn okio.** -keep class com.thingclips.**{*;} -dontwarn com.thingclips.** # Matter SDK -keep class chip.** { *; } -dontwarn chip.**
Integrate the SDK
-
Open the
build.gradlefile in the root directory of your project and add the Maven Central dependencies. If you already have this configuration, skip this step.buildscript { repositories { maven { url 'https://maven-other.tuya.com/repository/maven-releases/' } maven { url "https://maven-other.tuya.com/repository/maven-commercial-releases/" } google() mavenCentral() mavenLocal() maven { url 'https://maven.aliyun.com/repository/public' } maven { url 'https://central.maven.org/maven2/' } } dependencies { classpath 'com.android.tools.build:gradle:7.4.2' classpath "org.jetbrains.kotlin:kotlin-gradle-plugin:1.8.10" } } allprojects { repositories { maven { url 'https://maven-other.tuya.com/repository/maven-releases/' } maven { url "https://maven-other.tuya.com/repository/maven-commercial-releases/" } google() mavenCentral() mavenLocal() maven { url 'https://maven.aliyun.com/repository/public' } maven { url 'https://central.maven.org/maven2/' } maven { url "https://jitpack.io" } } configurations.all { exclude group:"com.thingclips.smart",module:"thingplugin-annotation" exclude group:"com.thingclips.android.module",module:"thingmodule-annotation" exclude group: "com.thingclips.smart" ,module: 'thingsmart-modularCampAnno' resolutionStrategy.cacheChangingModulesFor 0, 'seconds' } }If you are using the new version of the Android Gradle plugin DSL, refer to the following configuration:
//setting.gradle configuration pluginManagement { repositories { google() mavenCentral() gradlePluginPortal() mavenLocal() maven { url 'https://maven-other.tuya.com/repository/maven-releases/' } maven { url "https://maven-other.tuya.com/repository/maven-commercial-releases/" } maven { url 'https://maven.aliyun.com/repository/public' } maven { url 'https://central.maven.org/maven2/' } } } dependencyResolutionManagement { repositoriesMode.set(RepositoriesMode.FAIL_ON_PROJECT_REPOS) repositories { google() mavenCentral() mavenLocal() maven { url 'https://maven-other.tuya.com/repository/maven-releases/' } maven { url "https://maven-other.tuya.com/repository/maven-commercial-releases/" } maven { url 'https://maven.aliyun.com/repository/public' } maven { url 'https://central.maven.org/maven2/' } maven { url "https://jitpack.io" } } } //build.gradle plugins { id 'com.android.application' version '7.4.2' apply false id 'com.android.library' version '7.4.2' apply false id 'org.jetbrains.kotlin.android' version '1.8.0' apply false } subprojects { configurations.all { exclude group:"com.thingclips.smart",module:"thingplugin-annotation" exclude group:"com.thingclips.android.module",module:"thingmodule-annotation" exclude group: "com.thingclips.smart" ,module: 'thingsmart-modularCampAnno' resolutionStrategy.cacheChangingModulesFor 0, 'seconds' } } ext { kotlin_version = '1.8.0' sdk_version = '5.8.0' expansion_version='5.8.2' } -
To run or debug your project, open the
/app/build.gradlefile and add thesigningConfigsinandroid.When running or debugging your project from the IDE, Android Studio automatically signs your app with a debug certificate generated by the Android SDK tools. The first time you run or debug your project in Android Studio, the IDE automatically creates the debug keystore and certificate in
$HOME/.android/debug.keystore, and sets the keystore and key passwords.Run a signing report
To get signing information for your app, run the Gradle
signingReporttask in Android Studio.- Choose View > Tool Windows > Gradle to open the Gradle tool window.
- Choose YourApp > Tasks > android > signingReport to run the report.
You can also execute the task using the command line.
- Navigate to the root directory of your Android project using the
cdcommand. - In the root directory, run
./gradlew signingReport. - On Windows, use
gradlew.batto rungradlew.bat signingReport.
View signing information
After running the
signingReporttask, you can view the signing information for a variant. The figure below displays the signing information for the debug variant.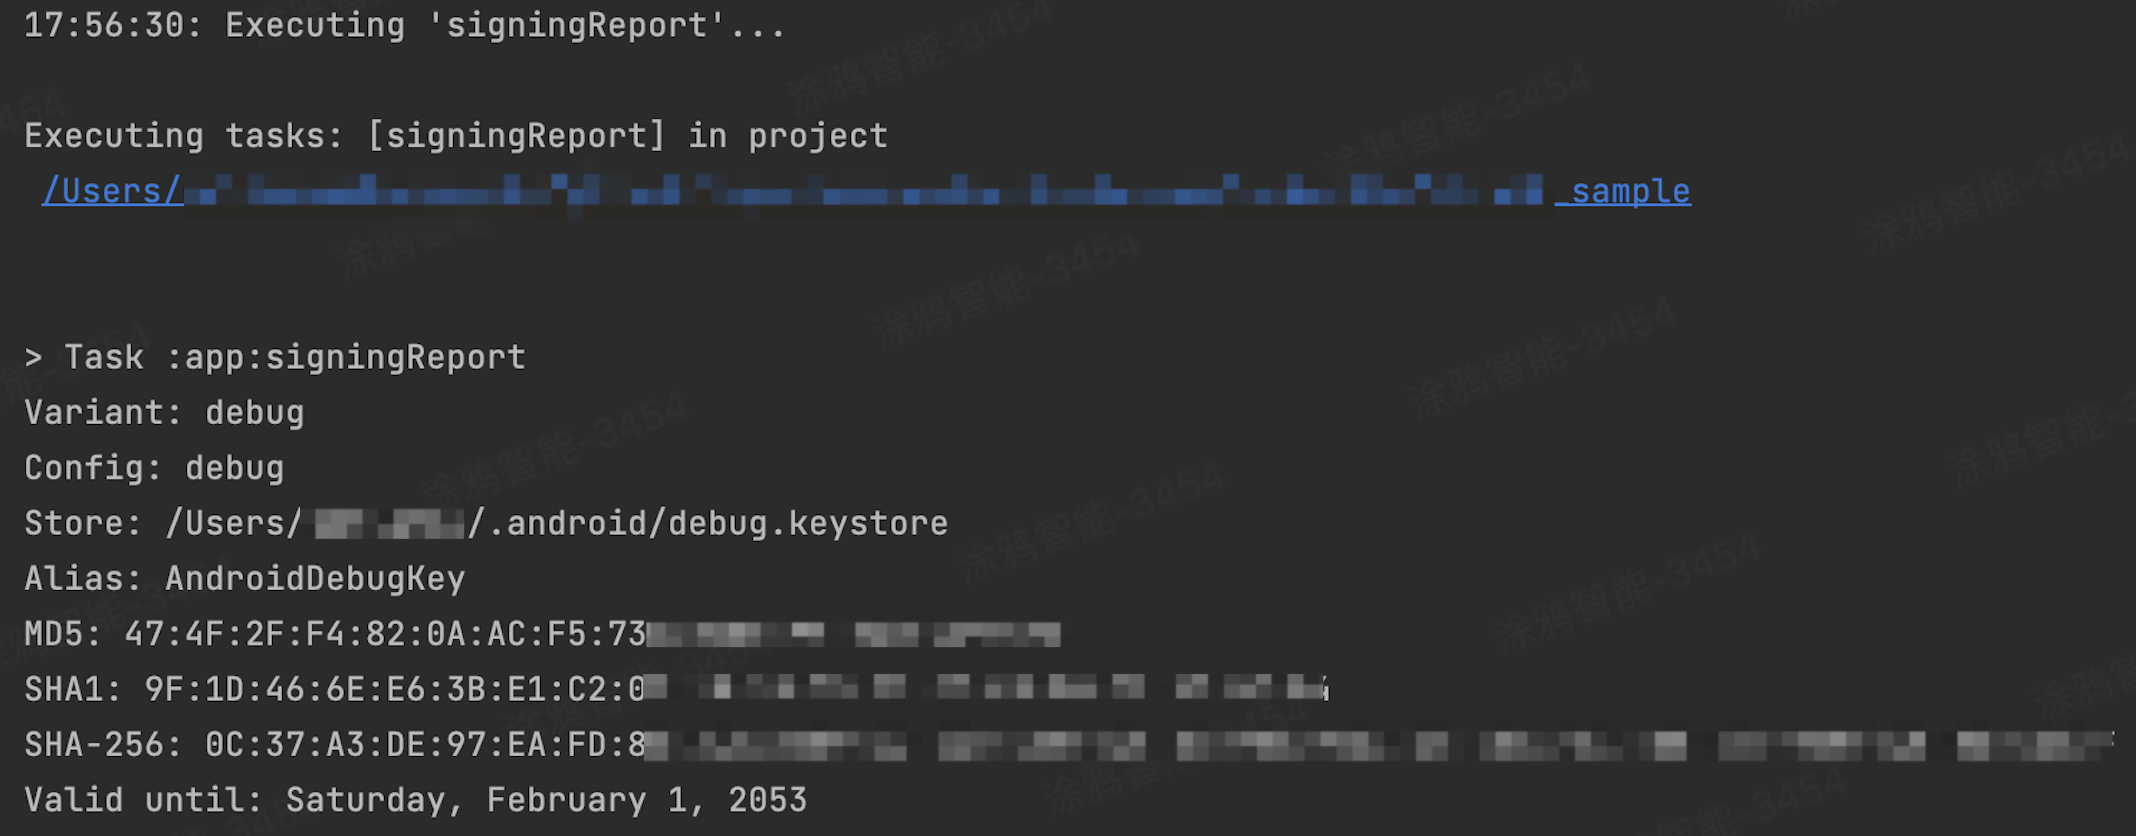
-
Because the debug certificate is insecure by design, most app stores (including the Google Play Store) do not accept apps signed with a debug certificate for publishing. See Sign Your Debug Build and get the release certificate for app publishing.
-
After you obtain the SHA-256 hash value, log in to the Tuya Developer Platform. Choose App > App SDK > SDK Development and click the target project. Click the Get Key tab and set the SHA-256. Failure to do so will result in your app displaying an Illegal Client prompt.
android { ... signingConfigs { debug { storeFile file("./debug.keystore") //You can specify the directory of the debug certificate for debugging purposes. storePassword "android" keyAlias "AndroidDebugKey" keyPassword "android" v1SigningEnabled true v2SigningEnabled true } } ... } -
Open
/app/build.gradle. Inandroid, add thedefaultConfigconfiguration withapplicationId,appKey,appSecret, andndk.android { ... defaultConfig { applicationId "com.thing.appbizsdk.sample" //Use the package name of your App SDK. For example, "com.thing.appbizsdk.sample" ... // In the local.properties file in the project root directory, set the appKey and appSecret. //appKey=your_app_key //appSecret=your_app_secret Properties properties = new Properties() properties.load(project.rootProject.file('local.properties').newDataInputStream()) manifestPlaceholders = [ TUYA_SMART_APPKEY : "${properties.getProperty("appKey")}", TUYA_SMART_SECRET : "${properties.getProperty("appSecret")}", PACKAGE_NAME : applicationId ] ndk { abiFilters "armeabi-v7a", "arm64-v8a" } } ... } -
Open
/app/build.gradle. Inandroid, add thepackagingOptionsconfiguration.android { ... packagingOptions { pickFirst 'lib/*/libc++_shared.so' // This .so file exists in multiple .aar files. Select the first one. pickFirst 'lib/*/liblog.so' pickFirst 'lib/*/libopenh264.so' } ... } -
Open
/app/build.gradle. Independencies, add the dependencies for the BizBundle SDK and SmartLife App SDK. You can find the latest version of the SDK from the release notes and replacesdk_versionandexpansion_versionwith specific version numbers.... dependencies { // Be sure to add the security-algorithm-1.0.0-beta.aar in the security resource package to app/libs implementation fileTree(dir: "libs", include: ["*.jar","*.aar"]) ... implementation "com.thingclips.smart:thingsmart:${sdk_version}" implementation "com.thingclips.smart:thingsmart-expansion-sdk:${expansion_version}" //If you already have the implementations below, skip them. implementation 'com.alibaba:fastjson:1.1.67.android' implementation 'com.squareup.okhttp3:okhttp-urlconnection:3.14.9' ... } -
Initialize the SDK. Initialize the SDK in the main thread of the Application. Make sure that all processes are initialized.
Example:
class TuyaSmartApp:Application() {
 override fun onCreate() {
     super.onCreate()
     ThingHomeSdk.setDebugMode(BuildConfig.DEBUG)
     ThingHomeSdk.init(this)
     ThingOptimusSdk.init(this)
 }
}
Implementation process
See the following for the specific implementation process.
Reference
Example project
An example project called BizSdkSample is available on GitHub for your reference.
Documentation
The developer documentation provides API references and examples.
Is this page helpful?
YesFeedbackIs this page helpful?
YesFeedback


