Quick Start
This topic describes how to quickly get started with the Wukong AI Hardware Development Framework, including environment setup, product creation, framework retrieval, configuration, compilation, and firmware flashing.
Set up the development environment
Hardware environment
- T5 development board: To get a T5 development board, apply through Tuya or a designated channel. Follow the latest instructions on the platform.
- Type-C data cable: Connects the development board to a personal computer (PC).
- Speaker: Use a speaker with a JST GH 1.25 mm 2P connector for audio playback.
- PC
Software environment
- Tuya Wind IDE: Install Tuya Wind IDE on your PC to get the framework, compile code, and flash firmware. Run on a Windows host with a Linux virtual machine or on native Linux.
- USB-to-serial driver: Install on the PC so that the system recognizes the development board’s serial port.
- TuyaOS development: Before you start, review the overall TuyaOS development process to better understand the framework and the compilation steps.
Step 1: Create a product
To create AI hardware products, first complete the standard Create Product process, and then create and bind an agent. The Tuya Developer Platform now supports AI hardware product development. For more information, see AI Capabilities Development.
Follow these steps:
- Log in to the Tuya Developer Platform, start the Create product process, select the product category and networking type, create the product, and get the product ID (PID).
- On the platform, create and bind an agent for the product, including AI capabilities and conversation configurations. For more information, see AI Capabilities Development.
- On the Product Development > Hardware Development page, get the authorization information (such as UUID and AuthKey) at no cost. Later, enter this PID and authorization information in the framework project so the device can pair and run properly.
After you complete these steps, go to Get the development framework > Modify PID and authorization information.
Step 2: Get the development framework
You can get the Wukong AI Hardware Development Framework on Tuya Wind IDE.
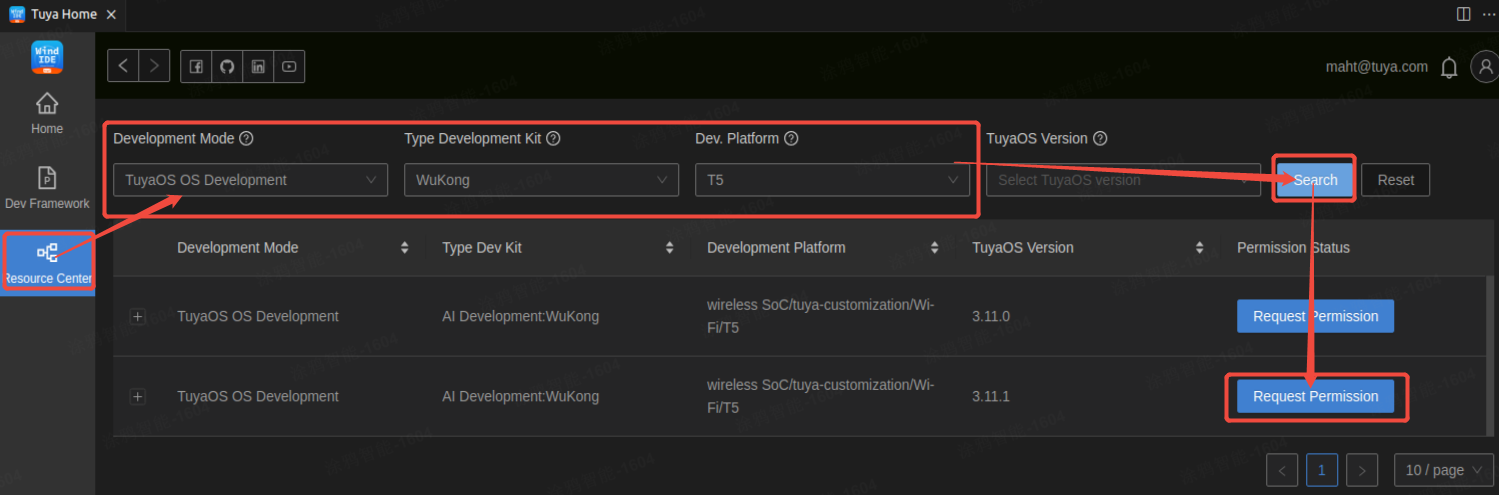
Request permissions
- Start Tuya Wind IDE and go to the Resource Center.
- On the navigation panel, select Wukong AI Hardware Development Framework, and click Request Permission.
- Enter your Tuya business email address, and submit the request. After approval, continue to the next step.
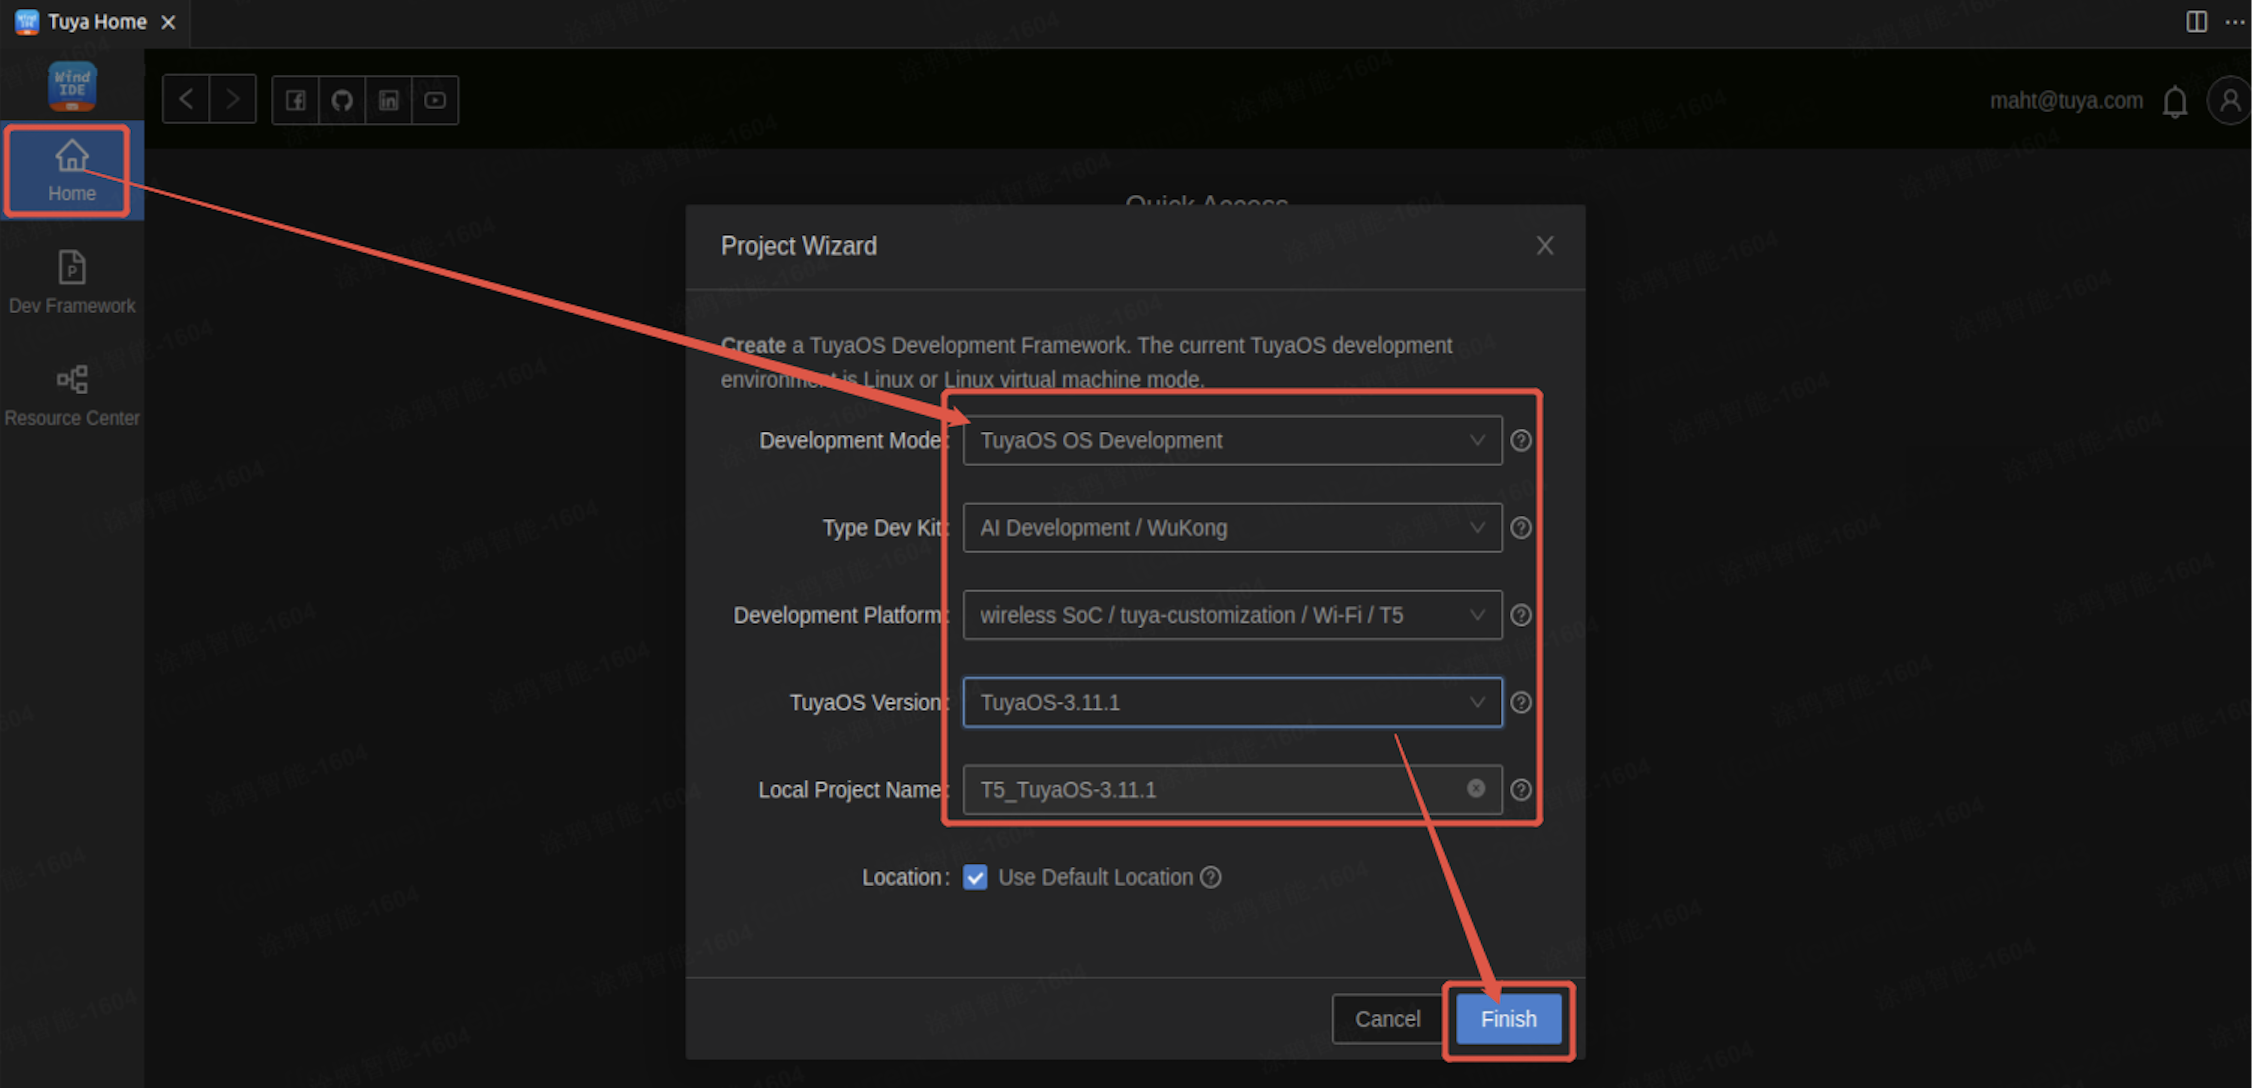
Create a framework
- After approval, click Create Framework on the home page.
- Follow the wizard to select platform options, such as the chip platform and the example application, and then click Finish to create the framework.
- Tuya Wind IDE downloads the framework automatically. The directory contains a demo application, such as
tuyaos_demo_wukong_aior a similar name.
Modify PID and authorization information
The default PID and authorization information in the demo are for example use only. Replace them with the PID and authorization information of the product that you created in Create a product. Follow these steps:
- In Tuya Wind IDE, open the downloaded framework project.
- Find the file that stores the PID and authorization information, usually a product configuration or key-related header file. For the exact file name, see the current SDK documentation.
- Replace the PID with the one that you created on the Tuya Developer Platform.
- Replace the authorization information, such as UUID and AuthKey, with the authorization information of that product on the platform.
- Save the file and recompile the project to apply the changes.
Step 3: Configure and compile
-
Configure the application, such as board type and feature switches.
In Tuya Wind IDE, go tosoftware > TuyaOS > appsand find the demo, such as tuyaos_demo_wukong_ai. Configure the application through the menu or a script. To use the command line, run this command in the SDK root directory:make app_menuconfig APP_NAME=tuyaos_demo_wukong_aiThe example supports voice and UI. The camera is on by default. You can disable the UI and keep only the voice feature as needed.
-
Generate the application configuration header file. Run this command after you change the configuration:
make app_config APP_NAME=tuyaos_demo_wukong_ai -
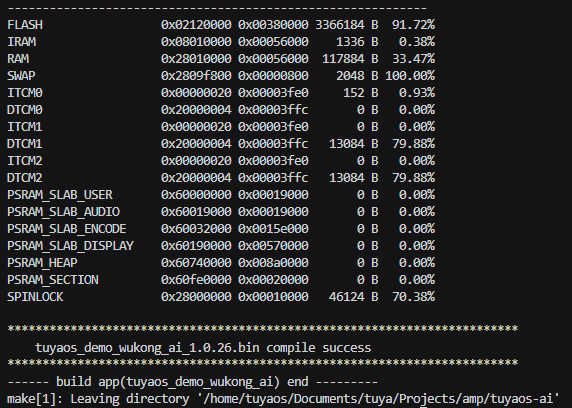
Compile the firmware.
- In Tuya Wind IDE, find the preceding demo directory in the resource manager. Right-click the directory, select Build Project, enter the compilation version number, and press Enter to start compilation.
- Or run this command in the SDK root directory:
make app APP_NAME=tuyaos_demo_wukong_ai - First compilation: The system pulls the development environment, extracts the toolchain, and builds a virtual compilation environment. This takes a while, so please wait.
- Firmware output: After the compilation succeeds, find the target QIO firmware in
software/TuyaOS/apps/tuyaos_demo_wukong_ai/output/xx.xx.xx/, for example,tuyaos_demo_wukong_ai_QIO_xx.xx.xx.bin.
-
Troubleshoot compilation failures. If the virtual environment lacks dependencies, try the following:
-
On the Linux terminal, install Python, CMake, Ninja, and the required dependencies. Example:
sudo dpkg --add-architecture i386 sudo apt-get update sudo apt-get install build-essential cmake python3 python3-pip doxygen ninja-build libc6:i386 libstdc++6:i386 libncurses5-dev lib32z1 -y sudo pip3 install sphinx_rtd_theme future breathe blockdiag sphinxcontrib-seqdiag sphinxcontrib-actdiag sphinxcontrib-nwdiag sphinxcontrib.blockdiag -
Common Python errors and solutions:
Error Solution ModuleNotFoundError: No module named 'click'pip install clickModuleNotFoundError: No module named 'Crypto'pip install pycryptodomeModuleNotFoundError: No module named 'ruamel'pip3 install ruamel.yaml
If none of the above solutions work, you can post your questions on the Tuya Developer Forum.
-
Step 4: Flash the firmware
Connect the device
- Connect the development board to the PC with a Type-C data cable. If you use a virtual machine, map the USB serial port to Linux.
- For VMware with Linux, on the VMware menu, select VM > Removable Devices > QinHeng USB Dual_Serial (the serial device shown on the host) > Connect.
- If you have not enabled serial port access permissions on your VM, run the command
sudo usermod -aG dialout $USER, restart the VM, and then reconnect the device.

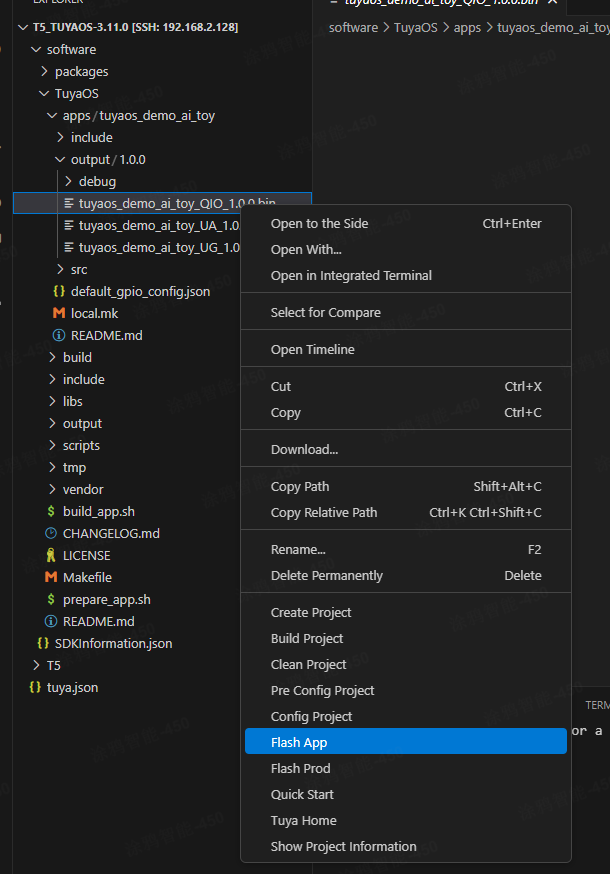
Flash the firmware
- Go to Tuya Wind IDE, find the target QIO firmware just generated (path:
software > TuyaOS > apps > tuyaos_demo_wukong_ai > output/xx.xx.xx > tuyaos_demo_wukong_ai_QIO_xx.xx.xx.bin). Right-click and select Flash App. - Select the serial port number, usually
ttyACM0. - If the terminal remains stuck at
Waiting Reset…, it indicates that this hardware does not support the auto-reset feature. Press the reset (RST) button to continue flashing. - After the device restarts, Tuya Wind IDE starts flashing. The flash completes when the terminal shows the completion message.
Feature demonstration
Restart the development board and use the Tuya app to perform device pairing.
- Open the Tuya app and start adding a device.
- Based on the device type, select Wi-Fi Device or the matching category. Follow the app instructions to put the device into pairing mode, for example, long-press the pairing button.
- Enter the current Wi-Fi password, and wait for the device to connect to the cloud and finish pairing.
- After pairing succeeds, view the device in the app, and verify voice, buttons, display, and other features.
Support
If you have any problems with TuyaOS development, you can post your questions on the Tuya Developer Forum.
Is this page helpful?
YesFeedbackIs this page helpful?
YesFeedback


