No-Code Development
No-code development solutions for electrical, lighting, and other products are provided by Tuya based on its abundant experience in developing tens of thousands of smart products.
Overview
A no-code development solution helps you to quickly develop a smart product and put it into mass production in a cost-effective way. Currently, no-code development solutions apply to switches, sockets, and light bulbs in the electrical and lighting categories, as well as sensors, IP cameras, voice & control panels, gateways, and energy products. If you have further requirements for the development and configuration of products in the above categories, you can select the custom development method.
Tuya provides two types of development solutions: no-code development solution and custom solution.
-
No-code development solution: On top of common functions and device types of smart products, Tuya offers dozens of proven no-code development solutions. You only need to select your desired solution online. Tuya will send you the modules according to the information you have configured. You can connect the received module to your product and get the functional parameters you have configured online.
-
Custom solution: If no-code solutions fail to meet your functional requirements, you can select custom development. You just need to enter the requirements in the hardware development step. The professional Tuya development team will develop the firmware and send you modules with custom functions. For example, you can develop custom panels and cloud functions.
No-code development process
Step 1: Create a product
For more information, see Create Products.
-
Log in to the Tuya Developer Platform.
-
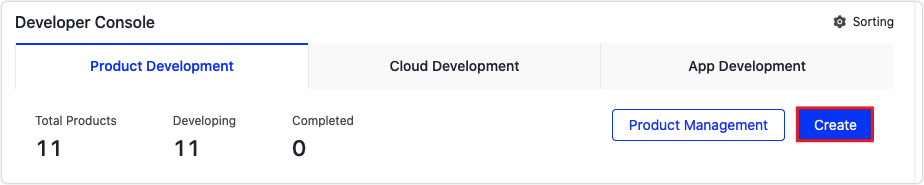
On the homepage, click Create.
-
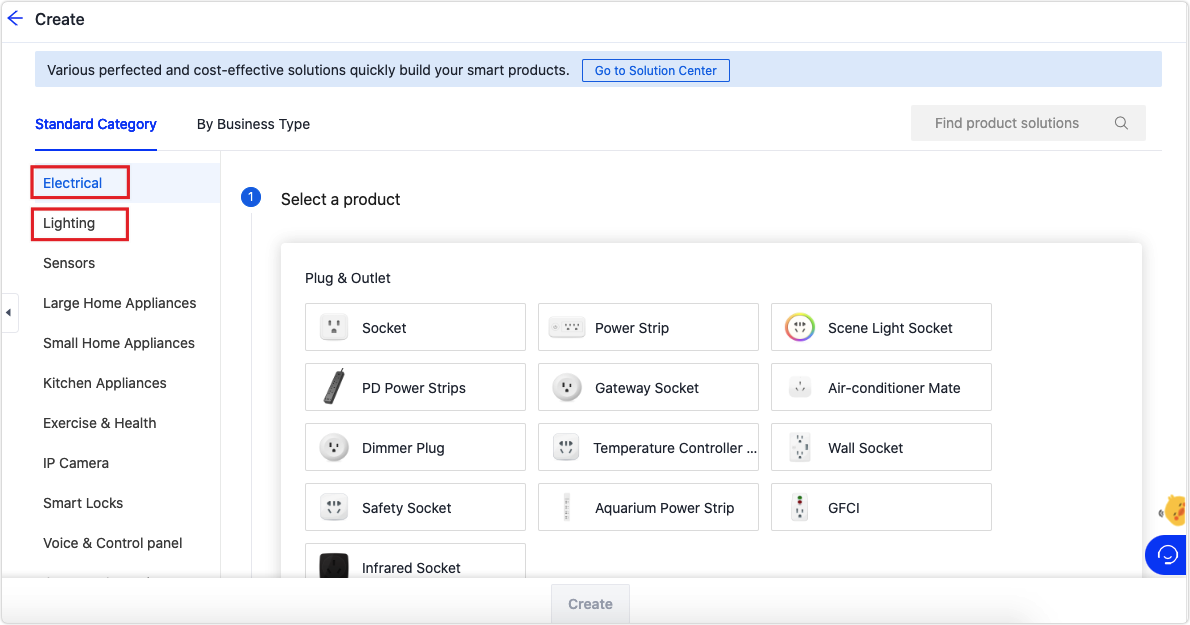
On the Create page, select your product category. For example, click Electrical and select Socket under Plug & Outlet.
-
If your product is a switch or socket, select Electrical.
-
If your product is a light bulb, select Lighting.
-
-
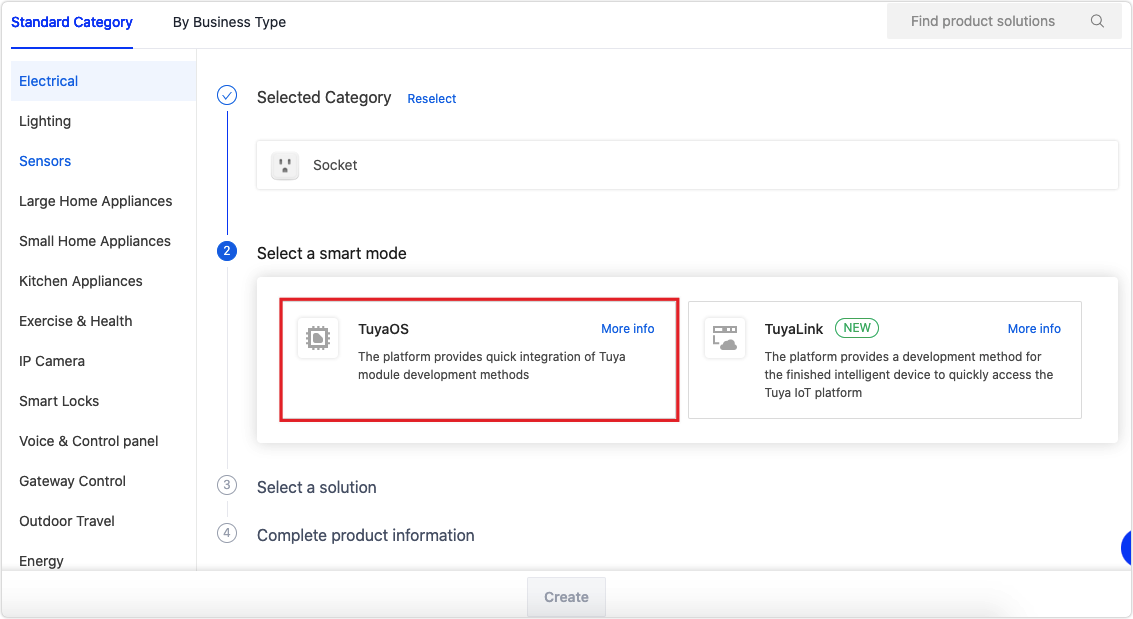
Select a smart mode. In this example, select TuyaOS. For more information, see Connection Methods.
-
Select a solution. Select the No-Code Development tab.
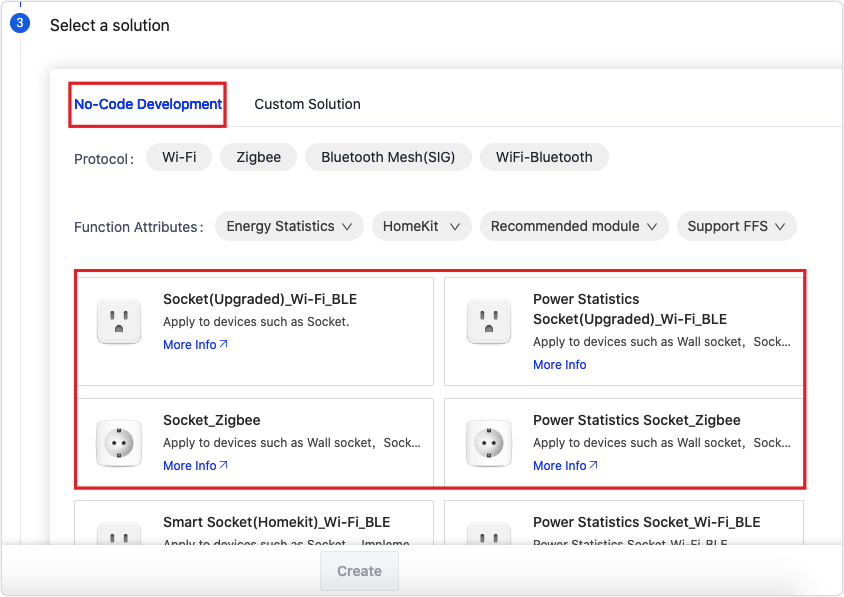
After you select No-Code Development during product creation, the system will automatically configure the Protocol of your module. Be sure to confirm.
-
Click the target product icon to fill in the basic product information, and click Create.
Item Description Required Example Product name The custom name of a specified product. For example, XXX (brand) + XXX (product) + XXX (module model). Yes Smart Socket A100 Product model The custom model of a specified product. For example, XXX (AE1123).No AE1123 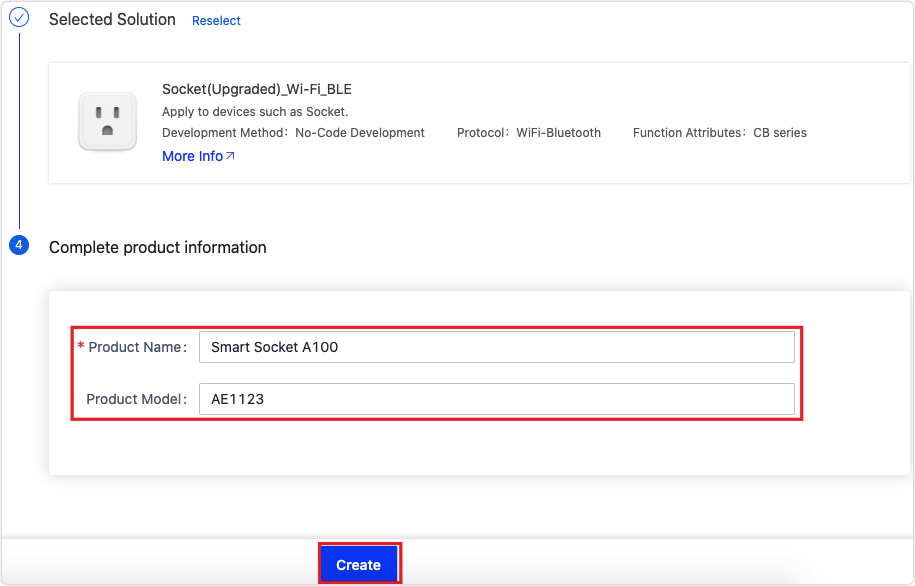
Step 2: Define functions
-
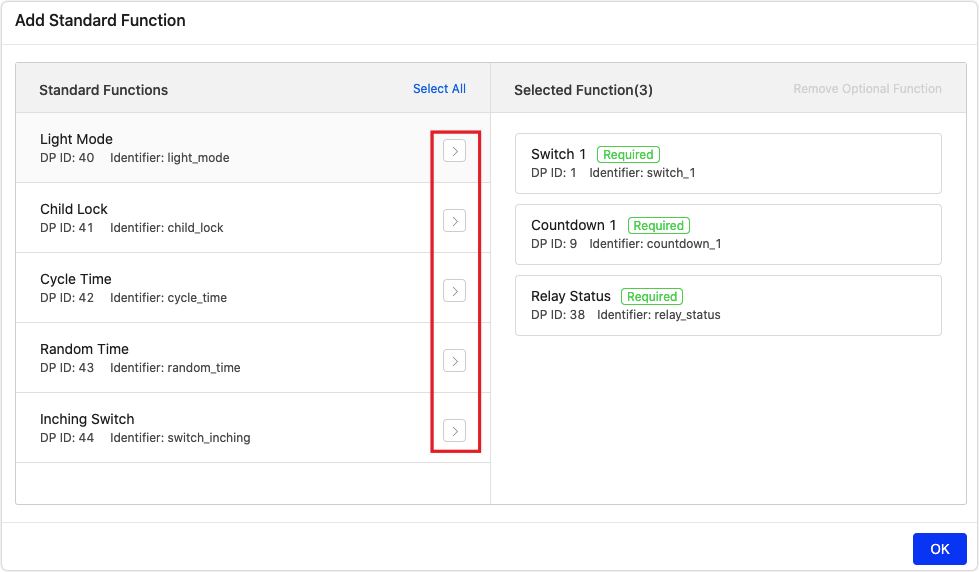
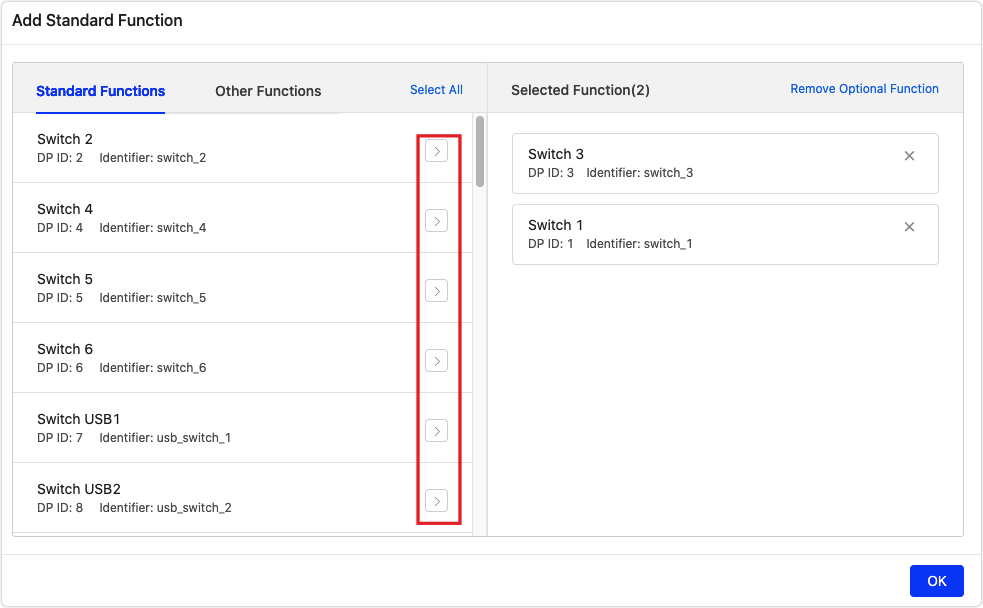
Add standard functions. Select the desired standard functions from the left window, click the arrow icon to add them to the Selected Function on the right, and then click OK.
-
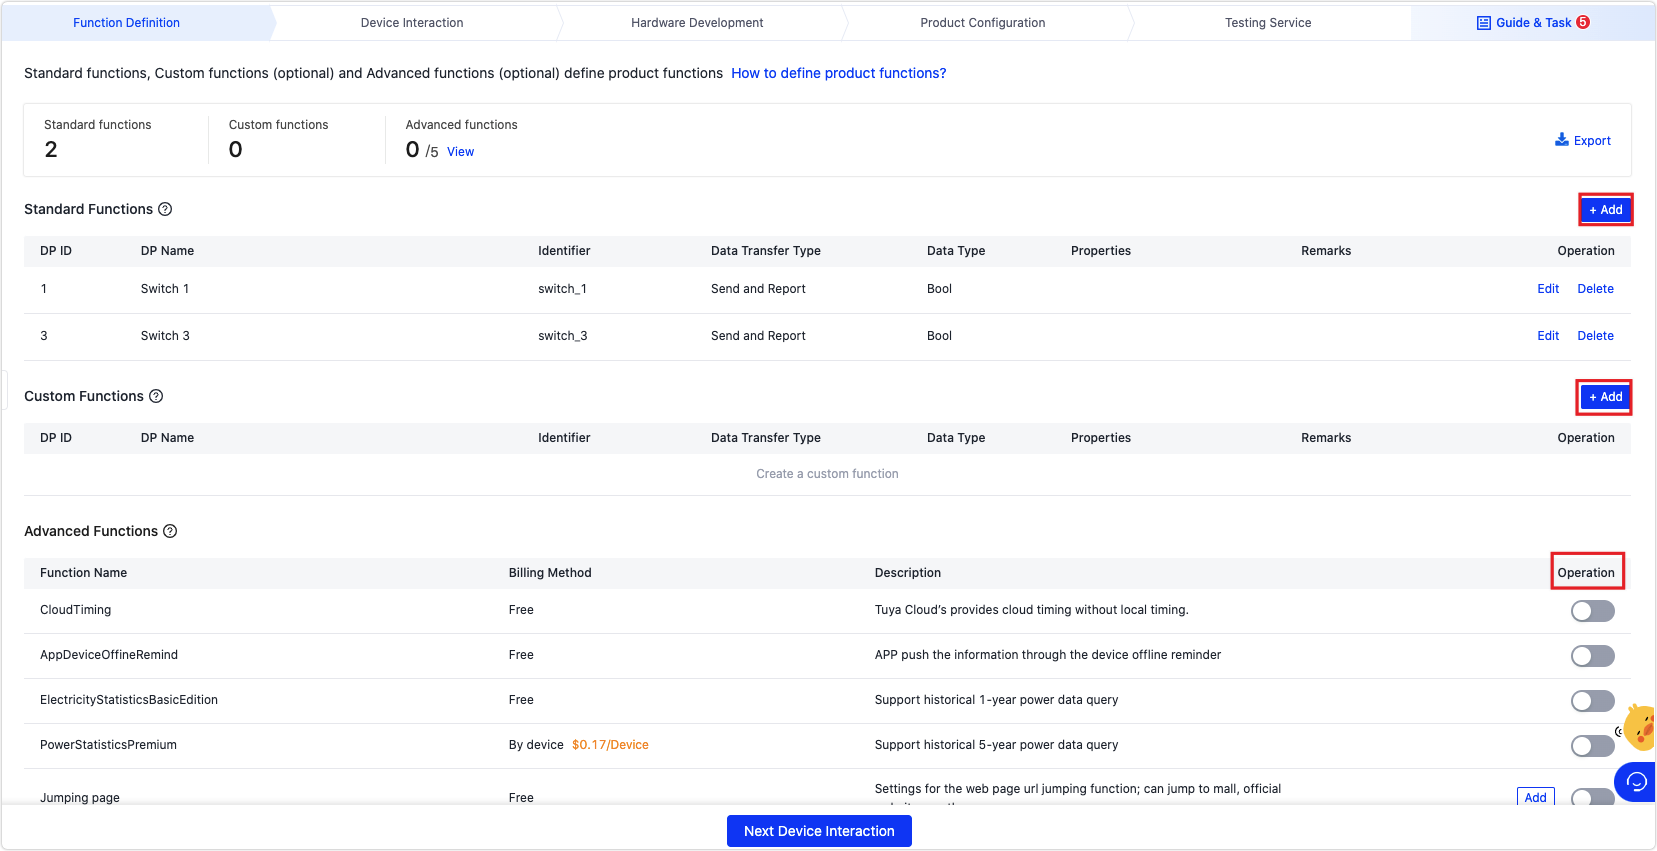
On the Function Definition page, you can set up product functions. After all the information is confirmed, click Next Device Interaction at the bottom of the page.
Name Description Follow up product development progress Shows the current product development progress. Follow the steps to set up the product. View product information - Includes the development method, PID, category, and protocol information.
- PID: the unique product ID and one of the most important product information. The PID provides information about product configuration, app, module, and more. Please keep the PID properly, which is equivalent to the ID card of a product.
- Edit product information: You can further supplement product information and edit product name, model, and remarks. Also, you can upload a product image. After editing, remember to save.
Tuya has defined the function solutions for numerous products, such as smart switches, sockets, and light bulbs. You confirm your product functions. If the existing product functions do not meet your requirements, you can create a custom product.
-
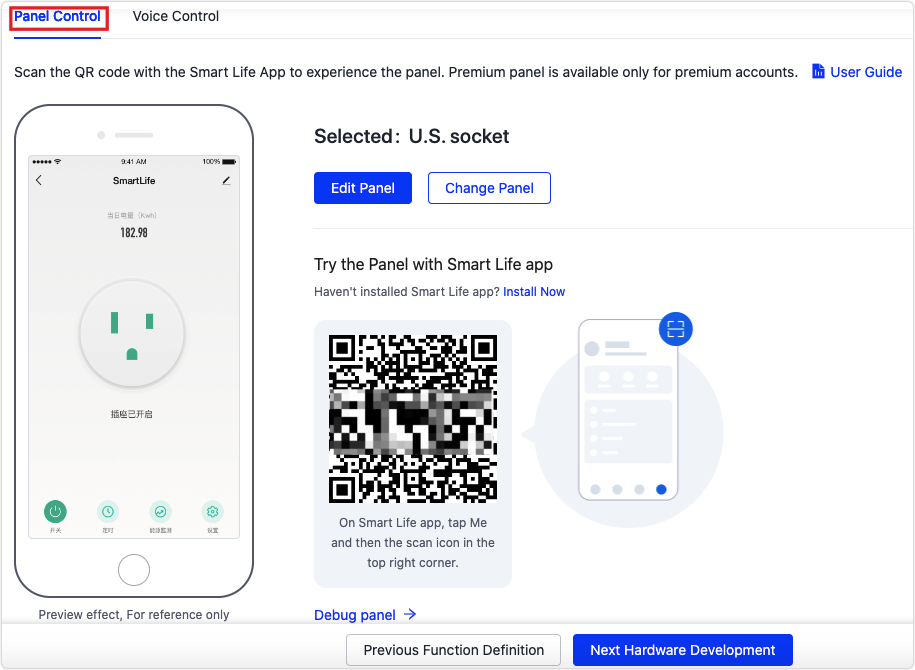
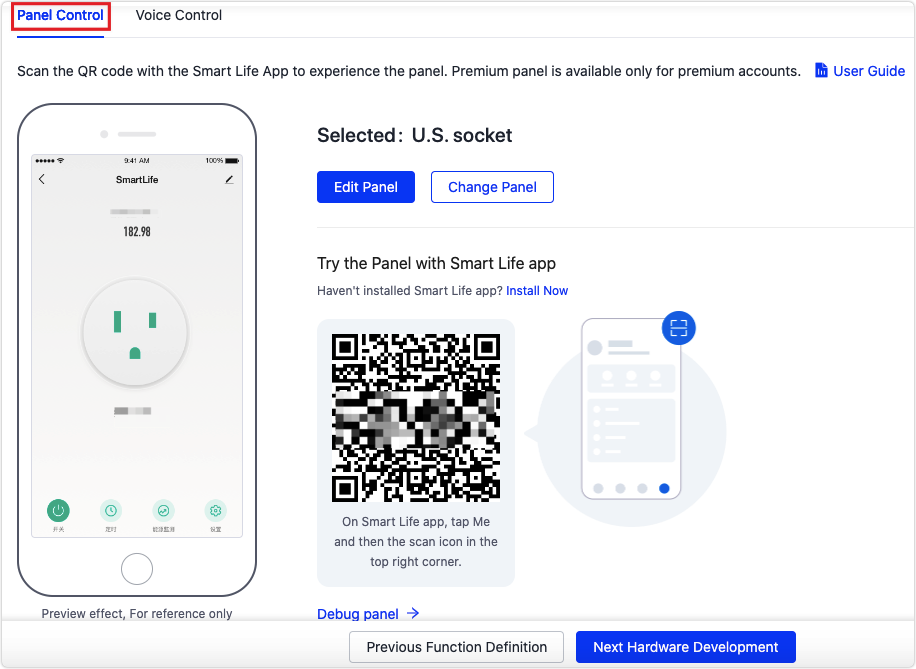
On the Device Interaction page, select a panel template.
-
On the Panel Control tab, hover over the desired panel and click Select.
-
Test the adaptation between the app and the product.
-
Scan the QR code to download the SmartLife app.

-
Use the SmartLife app to scan the product QR code, and try out your selected app interface.
-
If you are not satisfied, you can click Previous Function Definition to set up the functions again.
-
If you are satisfied, you can click Next Hardware Development.
-
-
-
-
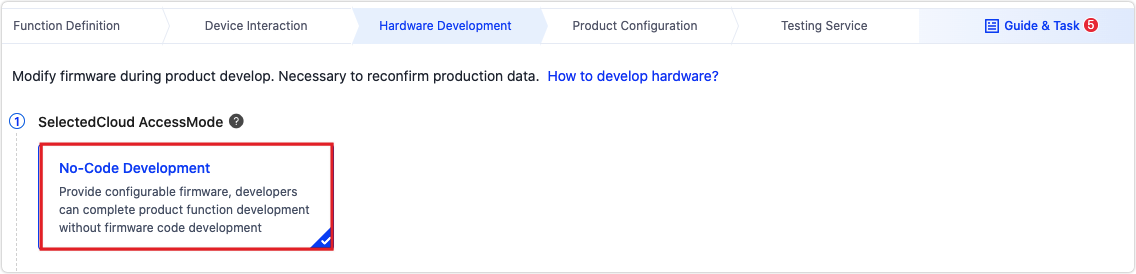
On the Hardware Development page, you can select a module and refer to the circuit diagram to configure the I/O information online. The module firmware will be automatically created. After you place an order, the module will be flashed with the configured firmware and sent to you.
-
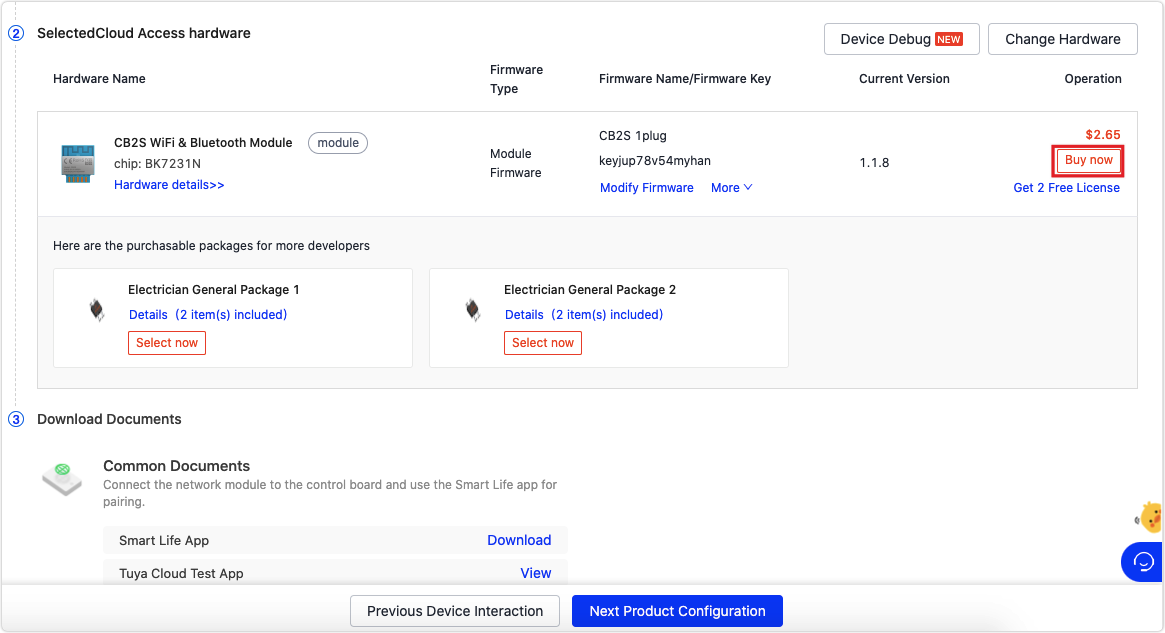
In the Selected Cloud Access Mode section, No-Code Development is selected by default.
-
Select a module. You can view Hardware Details or Change Hardware in this step. You can choose one from the recommended packages. If they cannot meet your requirements, you can change the module.

-
Configure the module firmware I/O port. The correspondence between the I/O ports is provided for your reference. The I/O configuration information varies depending on the products and provides versions to suit the power statistics, power strips, panel switches, and light bulbs. Fill in the information as specified by different versions.
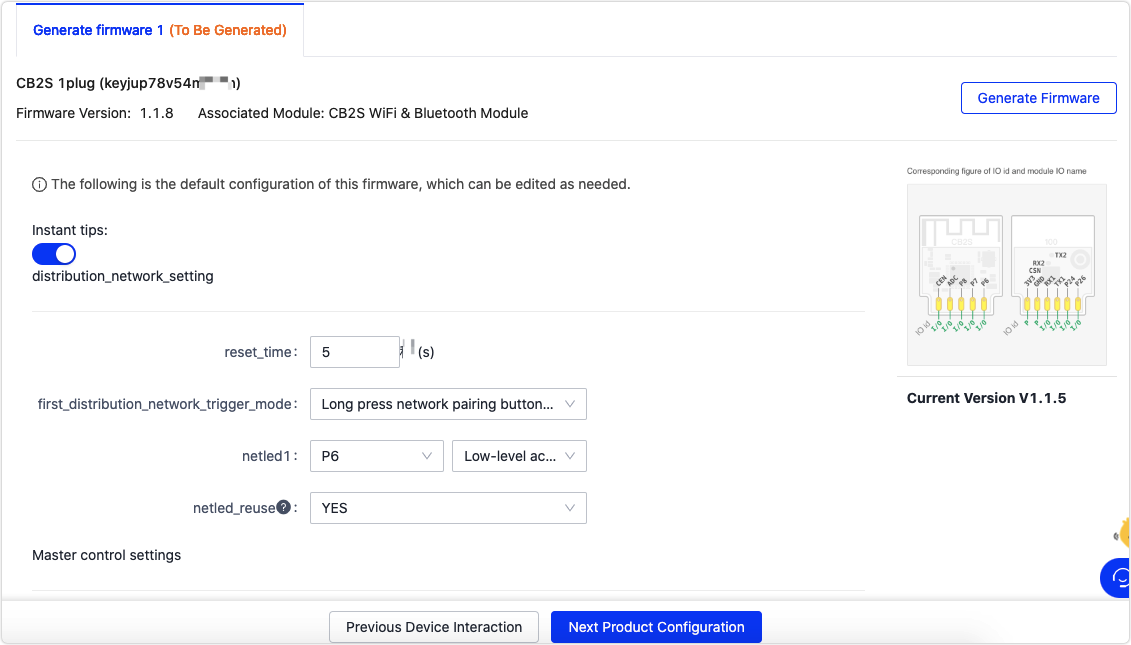
Check firmware configuration information, change the parameters based on your actual requirements, and keep the information secure. All modules will be flashed according to the information in this section, and cannot be changed after the modules are sent. If you change the information after the modules are sent, the two products will be inconsistent. As a result, the old product cannot be updated online.
-
Purchase a module for debugging. The above firmware configuration is flashed to the module. The module can be directly used to debug the product after you place an order.
-
Step 3: Extend functions
After completing the basic definition of product functions, you can also polish the details of the product. You can further carry out multilingual management, device notification, network connection, scenario connection settings, quick toggle settings, product knowledge management, and product manual management. For more information, see Product Configuration.
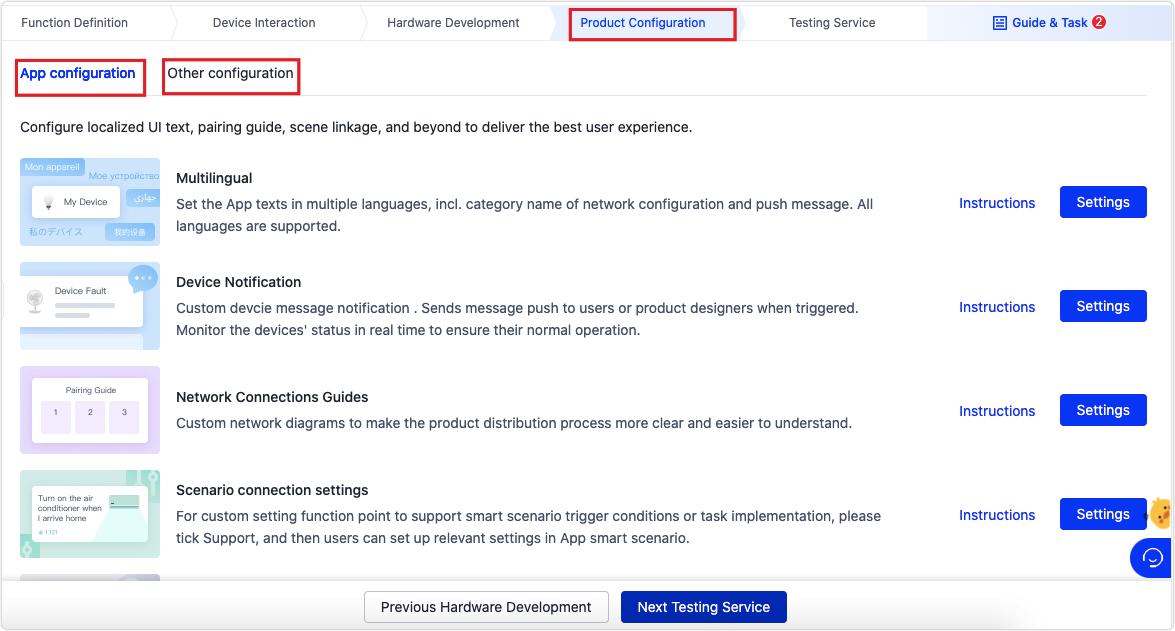
App configuration:
-
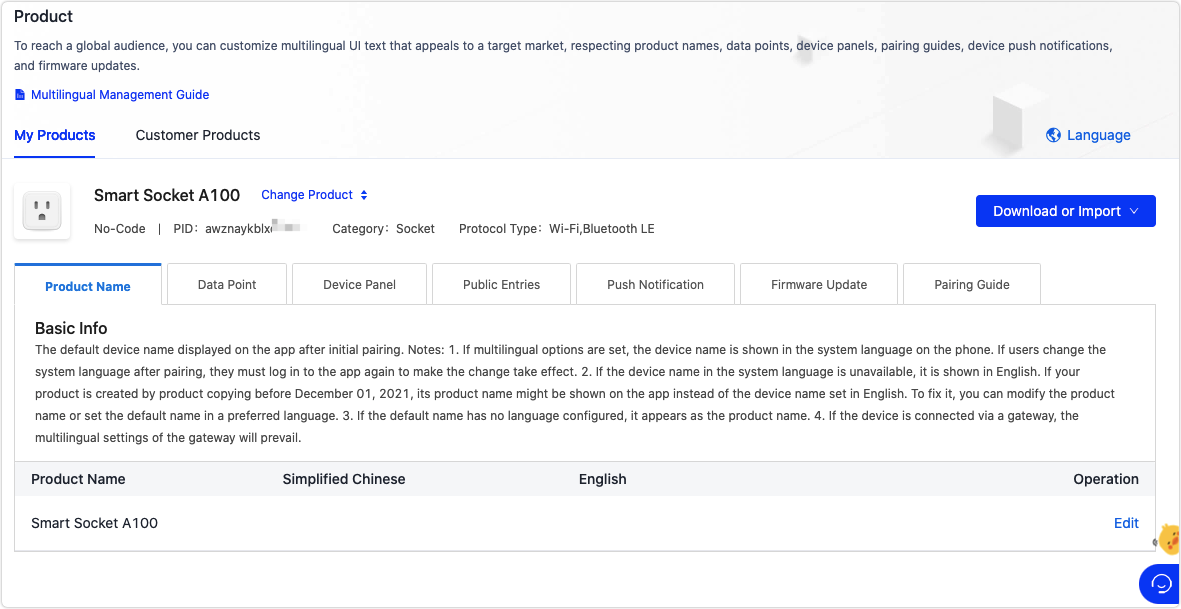
Multilingual management: Set the multilingual options for the device language that will be displayed on the app.
-
Device notification: Custom device message notification. Sends message push to users or product designers when specified conditions are triggered. Monitor the devices’ status in real time to ensure their normal operation.
-
Network connections guide: At present, custom network connection guides only apply to OEM apps. Tuya general guides are used if you select Tuya all-in-one apps, or if you have not configured the network connection guides for your OEM app. Be sure to synchronize the network configuration information you have finally confirmed to your paper guides, so as to guide your users to use the product.
-
Scenario connection settings: You can customize whether data points support smart scenario trigger conditions or task implementation. After these functions are enabled, users can configure smart scenarios on the app.
-
Quick toggle settings: On the Quick toggle settings page, you can select the Switch. This allows the product to display the switch key on the app homepage and support display and control operations in widgets.
-
Product knowledge management: Maintain FAQs during product use based on product data points. These FAQs will be displayed on the FAQs & Feedback page of the app.
-
Product manual: User manuals, specifications, installation instructions, and other content are displayed on the device page of an OEM app. Helpful manuals make your product user-friendly.
Other configuration:
Firmware updates center: Support remote MCU firmware and SDK firmware updates, without the need for flashing. The control board must support firmware updates.
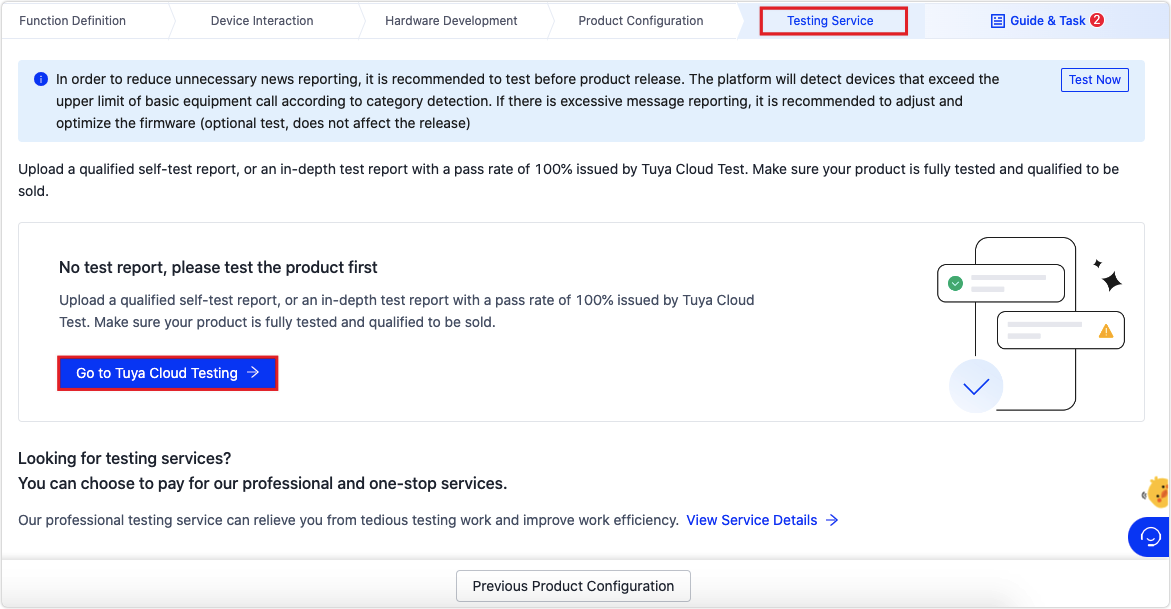
Step 4: Test the product
If your product has been debugged, you can click Next Testing Service at the bottom of the page to enter the testing stage. For more information, see Test Services.
Custom development process
Step 1: Create a product
For more information, see Create Products.
-
Log in to the Tuya Developer Platform.
-
On the homepage, click Create.
-
On the Create page, select your product category. Take a socket for example. Find Standard Category, and choose Electrical > Socket under Plug & Outlet.
- If your product is a switch or socket, select Electrical.
- If your product is a light bulb, select Lighting.
-
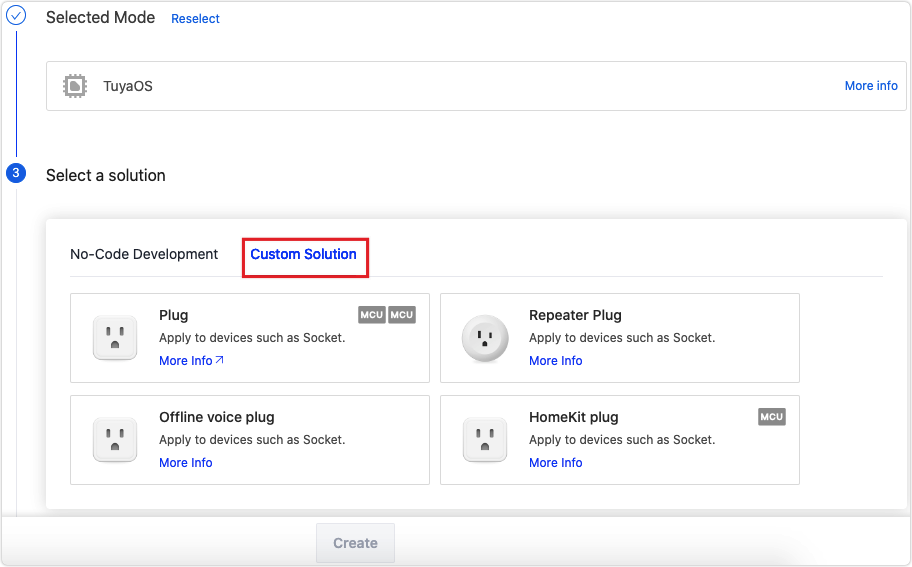
Select a smart mode. In this example, select TuyaOS. For more information, see Connection Methods.
-
Select Custom Solution.
-
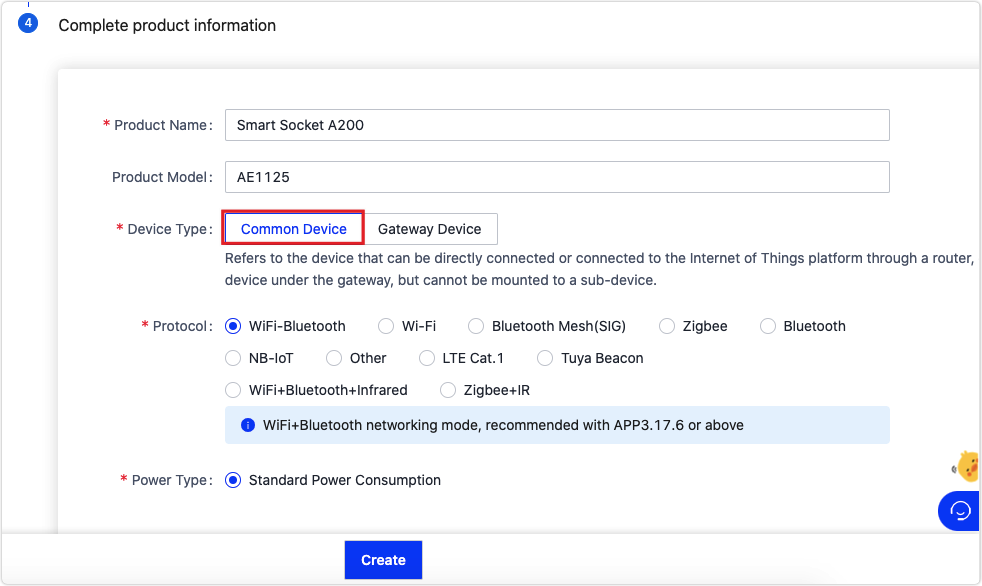
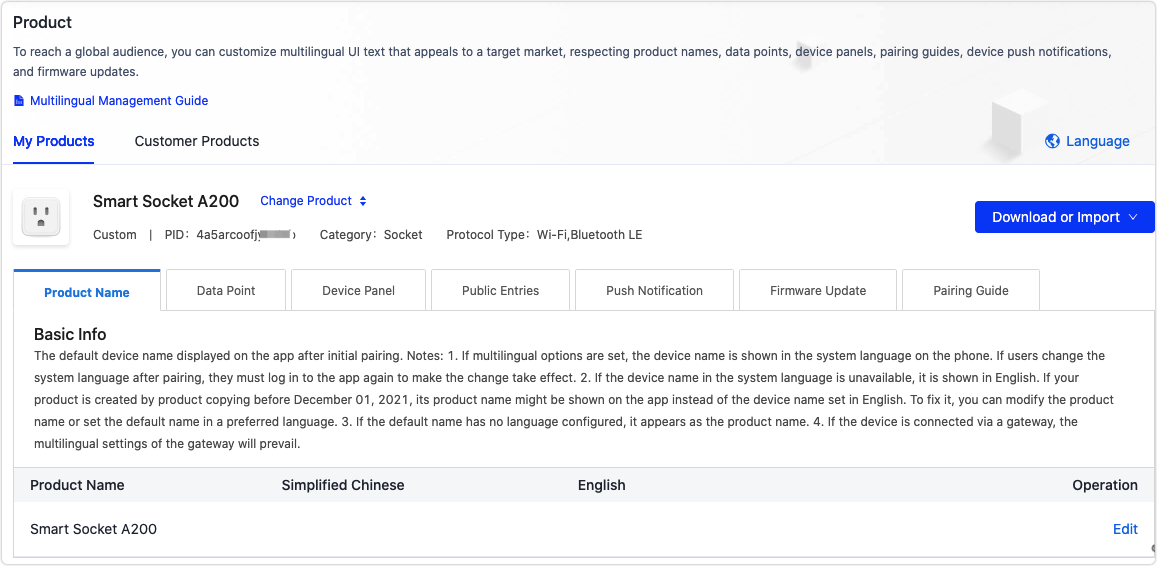
Click the target product icon to fill in the basic product information, and click Create.
Item Description Required Example Product name The custom name of a specified product. For example, XXX (brand) + XXX (product) + XXX (module model). Yes Smart Socket A200 Product model The custom model of a specified product. Example: XXX (AE1125).No AE1125 Device type Select your device type.
Common Device: refers to devices that can access the cloud through a direct connection or a router. The common device can also connect to a gateway as a sub-device, but cannot work as a hub to connect sub-devices to the cloud.
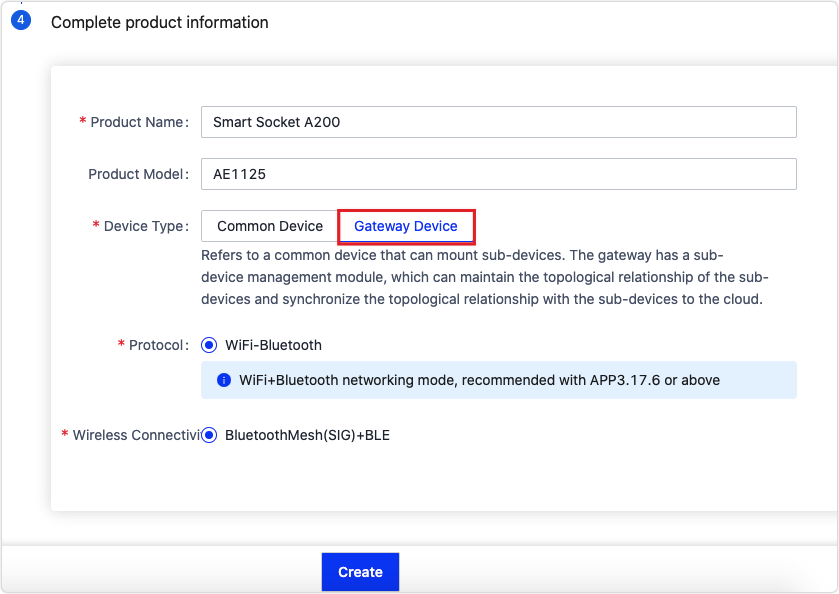
Gateway Device: refers to devices that can directly connect to the internet and provide a connection between networked sub-devices and the cloud. A gateway can manage sub-devices, maintain the topological relationships with the sub-devices, and synchronize the topology information to the cloud.Yes Common device Common device:
Gateway device:
Step 2: Define functions
-
Add standard functions. Select the desired standard functions from the left window, click the arrow icon to add them to the Selected Function on the right, and then click OK.
-
On the Function Definition page, you can set up product functions. After all the information is confirmed, click Next Device Interaction at the bottom of the page.
-
Standard functions: Click Add, and you can add the standard functions that are not selected yet. You can also edit or delete a single data point.
-
Custom functions: You can create custom functions that are not supported by standard functions. Data point (DP) is the abstract representation of a device function, and each function is defined by its data type. Six data types are available now, namely Boolean, value, enum, fault, string, and raw type.
-
Advanced functions: You can only configure cloud functions on the app control interface that is equipped with cloud function controls. For more advanced functions, see the actual interface.
- Cloud timing: allows you to implement the schedule feature without embedded development.
- Jumping page: enables navigating to another web page, such as an online store and product manual page.
-
-
On the Device Interaction page, select a panel template.
-
On the Panel Control tab, hover over the desired panel and click Select.
-
Test the adaptation between the app and the product.
-
Scan the QR code to download the SmartLife app.
-
Use the SmartLife app to scan the product QR code, and try out your selected app interface.
-
If you are not satisfied, you can click Previous Function Definition to set up the functions again.
-
If you are satisfied, you can click Next Hardware Development.
-
-
-
-
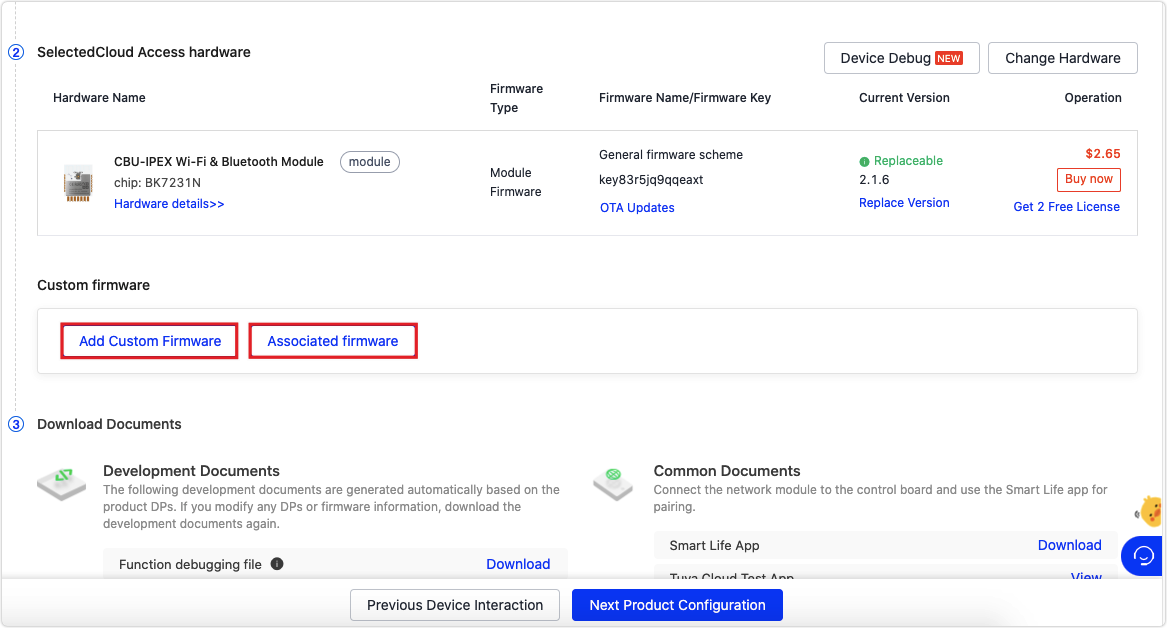
On the Hardware Development page, you can select a module and refer to the circuit diagram to configure the I/O information online. The module firmware will be automatically created. After you place an order, the module will be flashed with the configured firmware and sent to you.
-
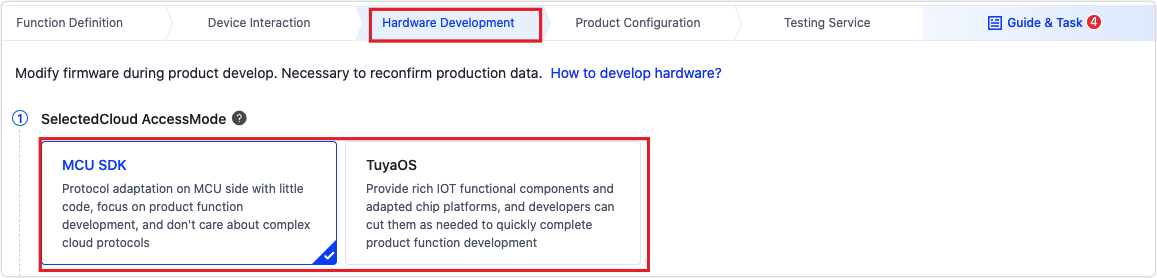
Choose MCU SDK or TuyaOS for cloud access mode.
-
MCU SDK: You can implement protocol adaptation with a few lines of code on the MCU. This allows you to focus on device functions only without worrying about complex cloud protocols.
-
TuyaOS: Provide rich IoT functional components and adapted chip platforms. You can tailor them as needed to quickly complete product function development.
-
-
Select a module. You can view Hardware Details or Change Hardware in this step.
-
In the Custom firmware section, click Add Custom Firmware or Associated Firmware and follow the interface prompts.
-
Wait for offline communication. Tuya experts will evaluate your product requirements and selected solutions, and develop customized firmware. Then, you can continue with production test and mass production.
-
Step 3: Extend functions
After completing the basic definition of product functions, you can also polish the details of the product. You can further carry out multilingual management, device notification, network connection, scenario connection settings, quick toggle settings, product knowledge management, and product manual management. For more information, see Product Configuration.
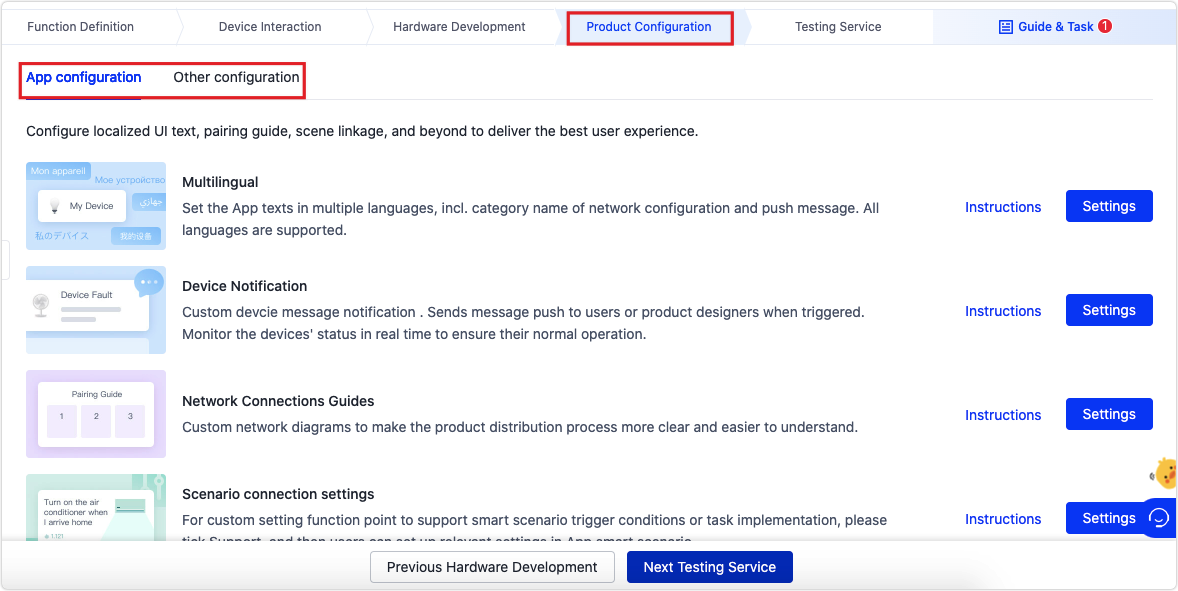
App configuration:
-
Multilingual management: Set the multilingual options for the device language that will be displayed on the app.
-
Device notification: Custom device message notification. Sends message push to users or product designers when specified conditions are triggered. Monitor the devices’ status in real time to ensure their normal operation.
-
Network connections guide: At present, custom network connection guides only apply to OEM apps. Tuya general guides are used if you select Tuya all-in-one apps, or if you have not configured the network connection guides for your OEM app. Be sure to synchronize the network configuration information you have finally confirmed to your paper guides, so as to guide your users to use the product.
-
Scenario connection settings: You can customize whether data points support smart scenario trigger conditions or task implementation. After these functions are enabled, users can configure smart scenarios on the app.
-
Quick toggle settings: On the Quick toggle settings page, you can select the Switch. This allows the product to display the switch key on the app homepage and support display and control operations in widgets.
-
Product knowledge management: Maintain FAQs during product use based on product data points. These FAQs will be displayed on the FAQs & Feedback page of the app.
-
Product manual: User manuals, specifications, installation instructions, and other content are displayed on the device page of an OEM app. Helpful manuals make your product user-friendly.
Other configuration:
Firmware updates center: Support remote MCU firmware and SDK firmware updates, without the need for flashing. The control board must support firmware updates.
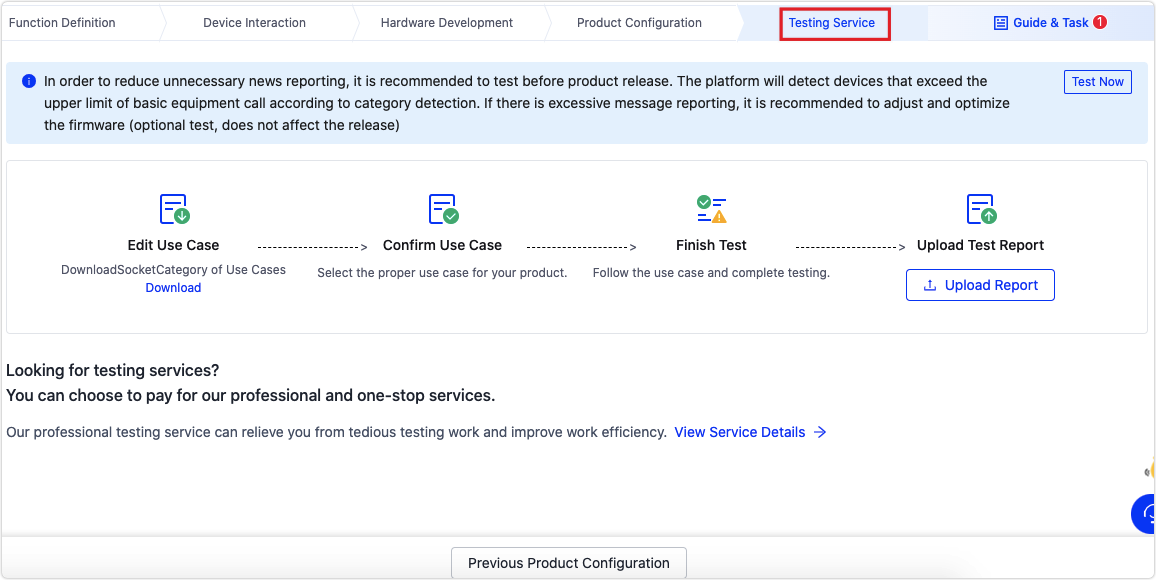
Step 4: Test the product
If your product has been debugged, you can click Next Testing Service at the bottom of the page to enter the testing stage. For more information, see Test Services.
Is this page helpful?
YesFeedbackIs this page helpful?
YesFeedback


