Zigbee Common Solution
Last Updated on : 2024-11-20 02:13:28download
This topic describes how to interface an MCU with Tuya’s Zigbee module by using the MCU SDK.
Benefits
Tuya provides complete solutions with network modules, mobile app, and cloud services covered. You can connect your product to the cloud simply by interfacing the MCU with Tuya’s Zigbee module through the serial protocol.
The Zigbee module features ad hoc network and low power and requires a gateway to connect to the internet.
Common modules
Two types of firmware are available to Tuya’s Zigbee modules: mains-powered and battery-powered.
- Mains-powered firmware is suitable for devices that are always powered and energy consumption-insensitive.
- Battery-powered firmware is suitable for devices that are powered by battery and energy consumption-sensitive.
TYZS3 and TYZS5 are the most popular Zigbee modules.
Development process
Step 1: Create product
- Create a product on the Tuya Developer Platform. For more information, see Create Products.
- Choose Zigbee for protocol. After you create a product, you can configure the function, panel, module, and firmware based on your requirements. Then, download the MCU SDK accordingly.
- After you select the module and firmware, you can purchase modules online and proceed with the PCB layout. For more information about the minimum TYZS5 system, See TYZS5 module.
Step 2: Verify network connection
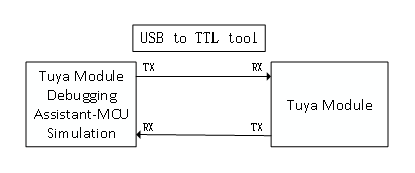
Before starting coding, you can use Tuya’s Module Debugging Assistant in MCU simulation mode to get familiar with the communication between the MCU and the Zigbee module.

In the MCU simulation mode, the Module Debugging Assistant simulates the MCU and responds to commands from the module. After you pair the module with the mobile app, you can test whether the module can receive and send data point (DP) data correctly. The following steps describe how to pair the module and use the Module Debugging Assistant.
-
Set up the peripheral circuit according to the schematic for a minimum system.
-
Open the Module Debugging Assistant and import the debugging file. Choose Zigbee Protocol and MCU Simulation.
-
Connect the module to your computer by using a USB to TTL converter. Set the Serial Port and Baud Rate. Click Open and then Start Debugging to start the data communication.
If the module does not send data after power-on, you should check whether the peripheral circuit of the module works as expected.
-
Reset the module to enter pairing mode. Pair the module with the mobile app as instructed by the guide.
To set up a Zigbee sub-device, you should have a Zigbee gateway paired with the SmartLife app. For more information, see Zigbee Pairing.
Step 3: Develop software
In the previous testing step, the left screen of Tuya’s debugging assistant shows you the data communication between the MCU and the module. For more information about communication logic, see the protocol documentation included in the development document. The protocol consists of the basic protocol and the function protocol.
- The basic protocol is product-neutral and shared by the modules. It consists of commands for module initialization and extended functions.
- The function protocol works to report and send commands based on the basic protocol and specifies the DP data format.
Tuya provides two methods to implement the communication between your MCU and Tuya’s module.
-
Method 1: Integrate with protocol yourself
If your MCU does not have sufficient resources or does not support Tuya’s MCU SDK, you can integrate with the serial protocol yourself. For more information, see Zigbee Serial Protocol.
-
Method 2: Port the MCU SDK
If your MCU has sufficient resources, we recommend you port the MCU SDK for efficiency purposes. The MCU SDK is written in C language. You can directly import it to your project. The MCU SDK requires the following MCU hardware resources:
-
4 KB flash memory.
-
About 100 bytes of RAM are required, depending on the data length of the DP. If you enable OTA updates, it must be greater than 260 bytes.
-
9-level nested function.
For more information, see MCU SDK Porting.
-
Step 4: Verify protocol
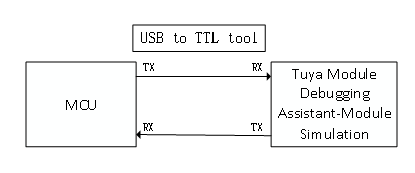
After you port the MCU SDK, you can use the module simulation mode in the Module Debugging Assistant to verify the code. In the module simulation mode, the Module Debugging Assistant automatically sends the initial data to the MCU to check whether the communication works properly. An error message will be returned if any issue occurs. After initialization, you can test different functions.
The module simulation mode only verifies the communication between the MCU and the module and does not provide real networking capability. After finishing the test, you can connect the MCU to the actual module and test pairing functionality and specific features.

Step 5: Debug functionality
After the code is verified, you can pair the module with the app and test DP data communication. You can check the device logs as shown below:
- Log in to the Tuya Developer Platform.
- On the Device Management page, search for logs by device ID.
Is this page helpful?
YesFeedbackIs this page helpful?
YesFeedback


