Quick Start
This topic walks you through how to quickly develop a simple IPC application using a type development kit. You will learn how to build and package the firmware, as well as run the program.
Prerequisites
In Tuya Wind IDE, you have requested access to the development framework and type development kit for the TuyaOS SDK development mode. For more information, see Get Development Kit.
Determine development method
Method 1 (recommended): Develop with TuyaOS framework
Developing with the TuyaOS framework is easy and efficient. You can take advantage of the tools available in Tuya Wind IDE, leverage Tuya’s script and makefile for compilation, packaging, and debugging, as well as use the chip platform adaptation APIs.
Method 2: Develop with SDK
If you already have your own IPC code architecture and only need the library (.lib) and header (.h) files to build the executable for connecting to the Tuya Developer Platform, you can choose this development method.
Develop with TuyaOS framework
Build project
There are three options to build a project with Tuya Wind IDE:
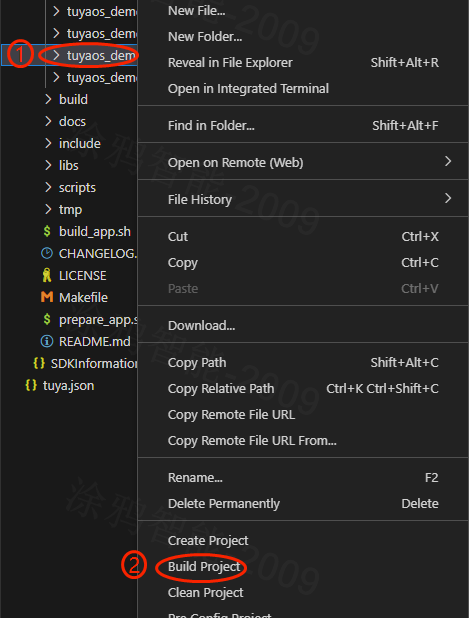
Option 1: Graphical user interface (recommended)
In Tuya Wind IDE, right-click the demo directory under software/TuyaOS/apps/ and choose Build Project.
Option 2: Shell script
Navigate to software/TuyaOS and run the following command.
sh build_app.sh $1 $2 $3 $4
$1: the path of the application project, for example,apps/tuyaos_demo_ipc.$2: the name of the generated application, for example,tuyaos_demo_ipc.$3: the version number, in the formatXX.XX.XX, for example,1.0.0.$4: user command (optional), for example,clean.
Option 3: Makefile
On the command line, navigate to software/TuyaOS, run make, and specify the application to compile. The version number defaults to 1.0.0.
Package firmware
After the project is built, apps/tuyaos_demo_ipc/ty_pack.sh is automatically invoked to generate the OTA update firmware and production firmware.
Packaging involves two steps:
-
Put all the required files, including the executable
tycam, scripts, and resource files, in the same directory and usemksquashfsto generate the partition image ofapp. -
Copy the partition image of
apptooutput/bsp/. Run thebuildscript in this directory to generate firmware based onpartitions.json.You can set the field
need_otainpartitions.jsonto specify whether to package the partition image into the OTA update firmware.The production firmware
xx_all.binand OTA update firmwarexx_ota.binare generated inoutput/platform_tuyaos/$version/firmware/out.
Run program
-
Recommended start command
./output/platform_tuyaos-ipc/firmware/tuyaos_demo_ipc -c ./apps/tuyaos_demo_ipc/ -m 2 -t AYPVEWzz0omLW8 -
Parameter description
-
c: specifies the directory oftuya_device_cfg.json. The field of the configuration file must be complete. -
m: the mode, as shown below.typedef enum { PARING_MODE_WIFI_AP = 1, // Wi-Fi AP mode. PARING_MODE_DEBUG, // Debug mode. You specify the token to try the demo. PARING_MODE_WIRED, // Wired mode. PARING_MODE_CONCURRENT // FFS mode. } TUYA_IPC_PARING_MODE_E; -
t: the specified token.
Before running, make sure
tkl_wifi.cis adapted. -
-
Debugging
When the program is run, you can get the serial commands. See
TUYA_IPC_simulation.Command Description md_start Start a motion detection event. md_stop Stop a motion detection event. status Get the device activation status. bell_press Simulate doorbell press. bell_ac Simulate video doorbell call and message recording. start_low_power Start low power mode.
Vendor directory
├── APPconfig ## The entry point to application configuration of tuyaos_adapter.
├── docs      ## BSP documentation.
├── IoTOSconfig ## The entry point to application configuration of tuyaos_adapter, compatible with legacy versions.
├── README.md ## README file for vendor build.
├── release   ## BSP firmware.
├── scripts   ## err_code header file path and tool.
├── toolchain ## Chip platform toolchain.
└── tuyaos    ## The directory of vendor build.
    ├── build ## The entry point to vendor build.
    ├── build_all.sh ## The build script that calls build.sh.
    ├── build.conf   ## The URL to download BSP's library dependencies.
    ├── build_path   ## The path specified for the build toolchain.
    ├── build.sh     ## The entry point to vendor build.
    ├── components   ## BSP components.
    │   ├── base_bsp ## The entry point to third-party library build.
    │   ├── board_xxx   ## Make rootfs.
    │   ├── bsp_adapter ## BSP-specific tuyaos_adapter.
    │   ├── bsp_comm_loader ## U-Boot BSP component.
    │   ├── bsp_cryptfs ## File system encryption.
    │   ├── bsp_sign    ## OTA signing component.
    │   ├── bsp_verify  ## OTA signature verification component.
    │   ├── IoTOSconfig ## libtuyaos_adapter_custom.so configuration.
    │   ├── linux_xxx   ## Linux kernel component.
    │   ├── local.mk    ## libtuyaos_adapter_custom.so build script.
    │   ├── nvram_kernel_driver ## NVRAM, NVRAM library, and NVRAM ko component.
    │   ├── partition_config   ## Unified partition configuration component.
    │   ├── swupgrade_pack ## OTA pack component.
    │   ├── swupgrade_unpack ## OTA unpack component.
    │   ├── sys_log     ## Log output component.
    │   ├── tkl_gpio    ## GPIO component.
    │   ├── tkl_media_xxx ## Media component.
    │   ├── tkl_system  ## Linux system interface component.
    │   ├── tkl_test    ## TKL interface testing component.
    │   ├── tkl_utils   ## TKL basic function component.
    │   ├── tkl_wifi    ## Wi-Fi component.
    │   ├── tkl_wired   ## Wired component.
    │   └── uboot_xxx   ## U-Boot component.
    ├── download        ## The URL to download third-party libraries.
    ├── hwconfig        ## I/O configuration.
    ├── include         ## tuyao_iot_config.h directory.
    ├── IoTOSconfig     ## The main entry point to vendor configuration.
    ├── Makefile        ## The main entry point to vendor build makefile.
    ├── platform.mk     ## The build parameter that the vendor passes to the application.
    ├── scripts         ## The script to create libtuyaos_adapter_custom.so
    ├── tuyaos_adapter  ## TKL adaptation layer.
    └── tuyaos_kernel.config ## TKL capability configuration.
Develop with SDK
Extract SDK library and header
First, build a project. Then, navigate to software/TuyaOS/scripts and run the script extract_standalone_sdk.sh to extract the SDK. The script will automatically create the directory software/sdk_a.b.c/ and download the demo code. You will get a directory like this:
├── sdk_6.1.0 ## The entry point to the independent SDK.
    ├── sdk ## Library and header files.
    ├── build ## Environment variables required to build a project.
    ├── demo_tuyaos_app   ## Demo application.
    ├── demo_tuyaos_adapter   ## System adaptation layer code, which can be modified to adapt to your system.
    └── Makefile  ## The entry point to build a project.
Build project
Navigate to software/sdk_6.1.0/ and run make.
Run program
The generated executable is located in sdk_6.1.0/output/demo. You can run the program as described in the above section.
Port project
Here is the list of library files that need to be extracted into your project.
| File | Description |
|---|---|
| sdk/libs/libtuyaos.a | The libraries. |
| sdk/include/* | The header file. For simplicity, extract only the header file located in svc_api_ipc/include/. |
| demo_tuyaos_adapter | The system abstraction layer code. Verify if the implementation is compatible with your platform. |
FAQs
Why is the compiled tuyaos_demo_ipc executable so large?
- When you compile the demo program, the binary audio and video files will be automatically included in the executable. See
tuyaos-ipc/vendor/x86_64/tuyaos/tuyaos_adapter/include/media/tkl_media_demo_source.h. Check if you have removed the unnecessary media files before encapsulating the TKL API for audio and video. - Check if you are using the stripped
libtuyaos.a.strippedinstead oflibtuyaos.
Is this page helpful?
YesFeedbackIs this page helpful?
YesFeedback


