Audio and Video Capabilities
This topic describes how to integrate the live video preview and audio talk features of laser robots.
Feature description
Audio and video capabilities are advanced functions for robots and are paid options. Follow the process below to add advanced capabilities.
Add advanced functions
-
Open the product development page, go to Function Definition, and then check Advanced functions.
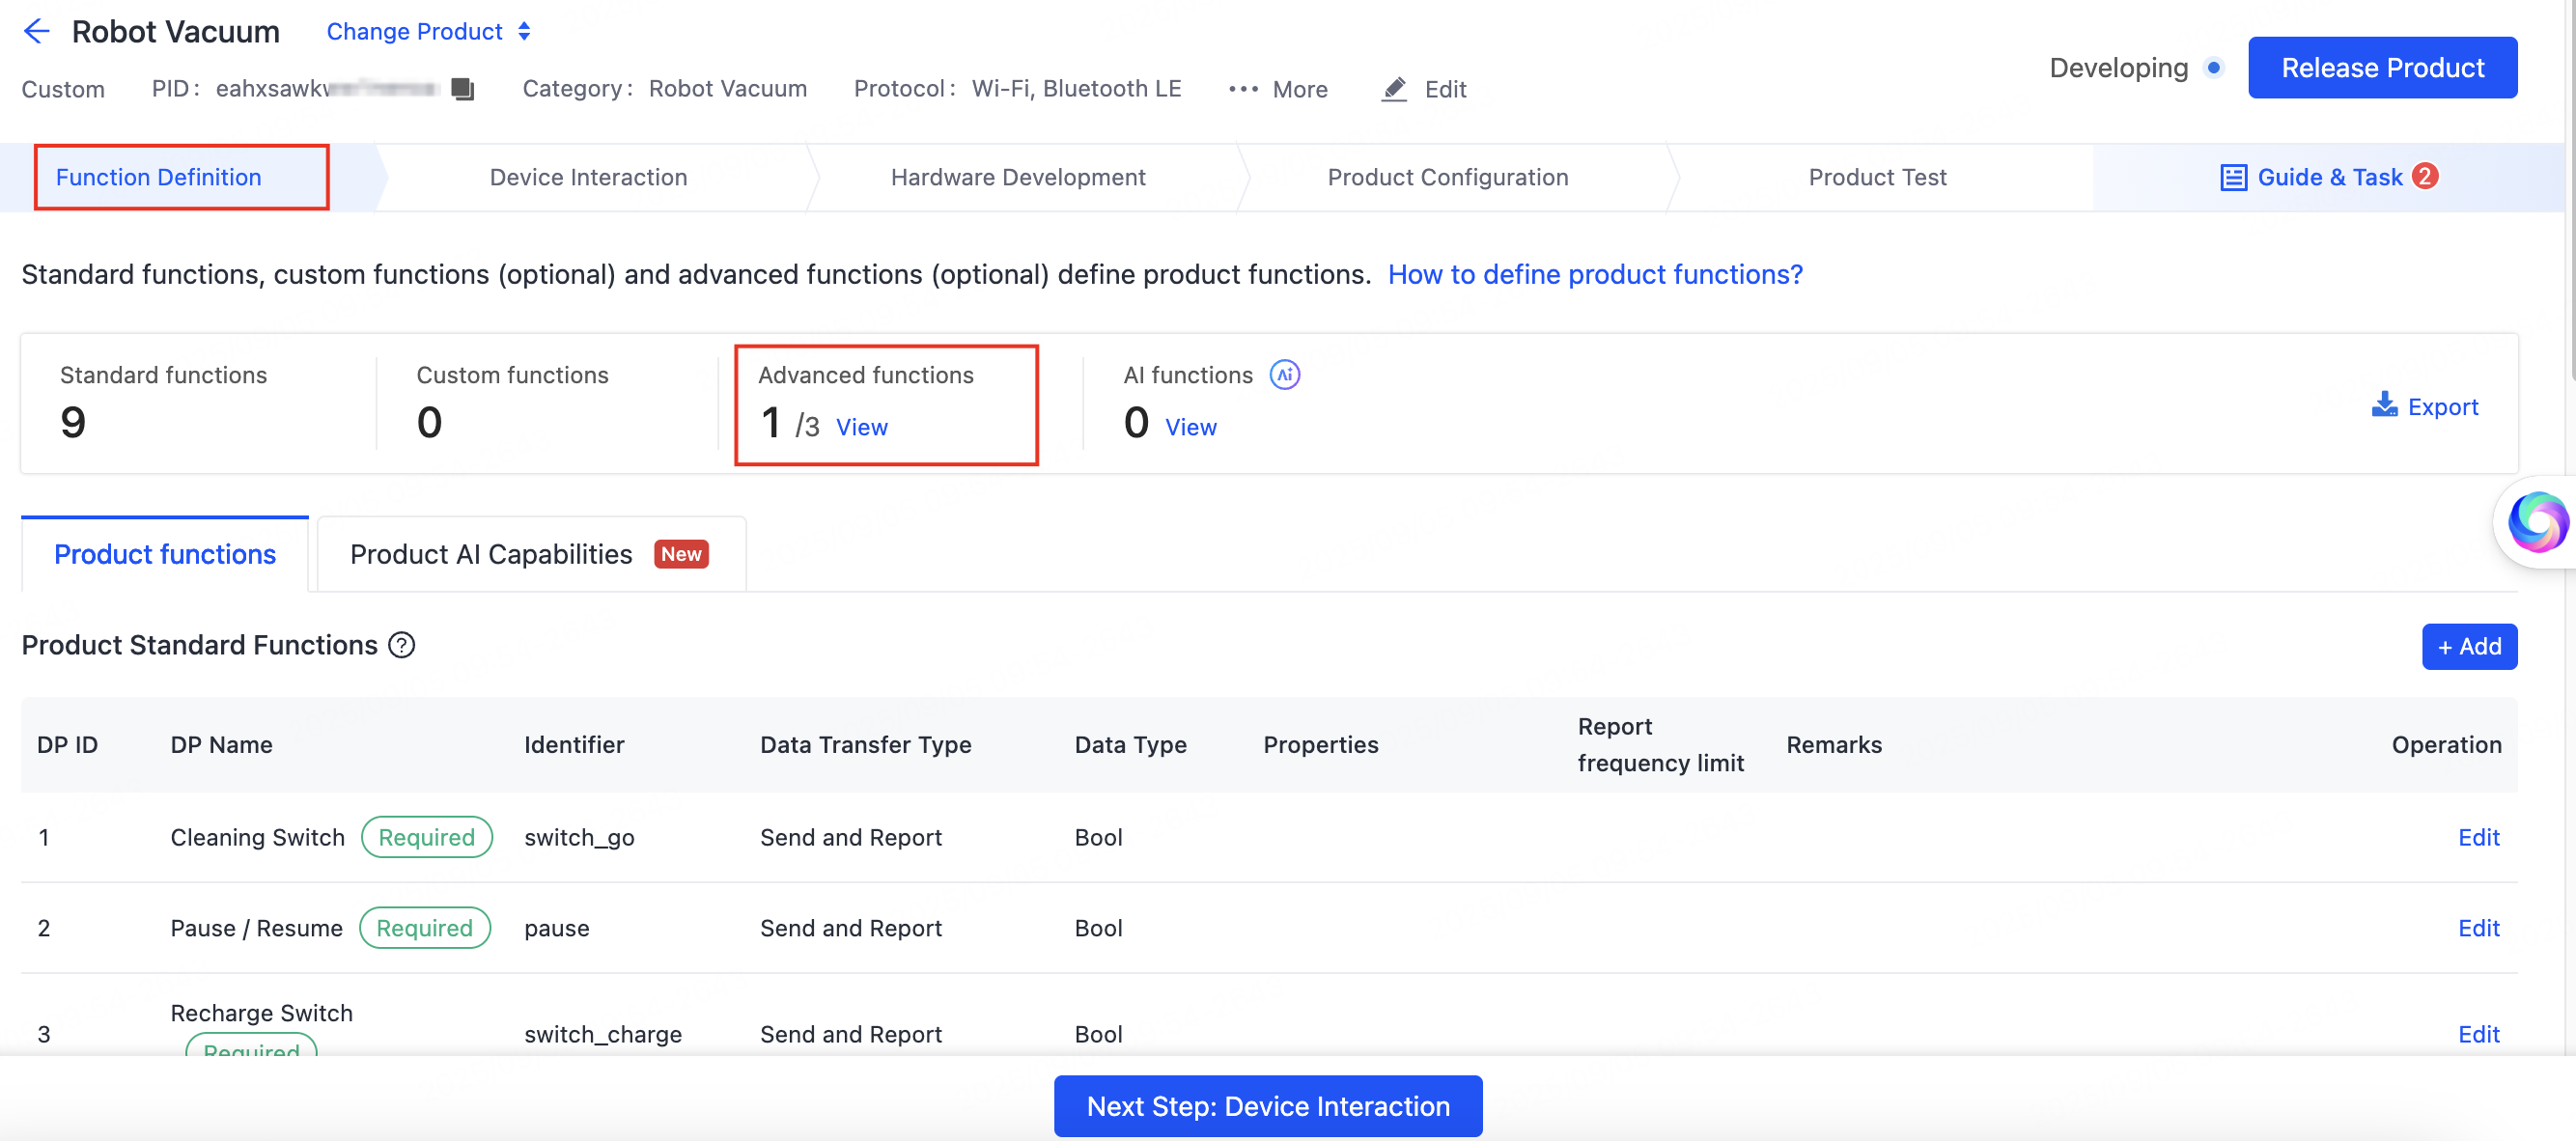
-
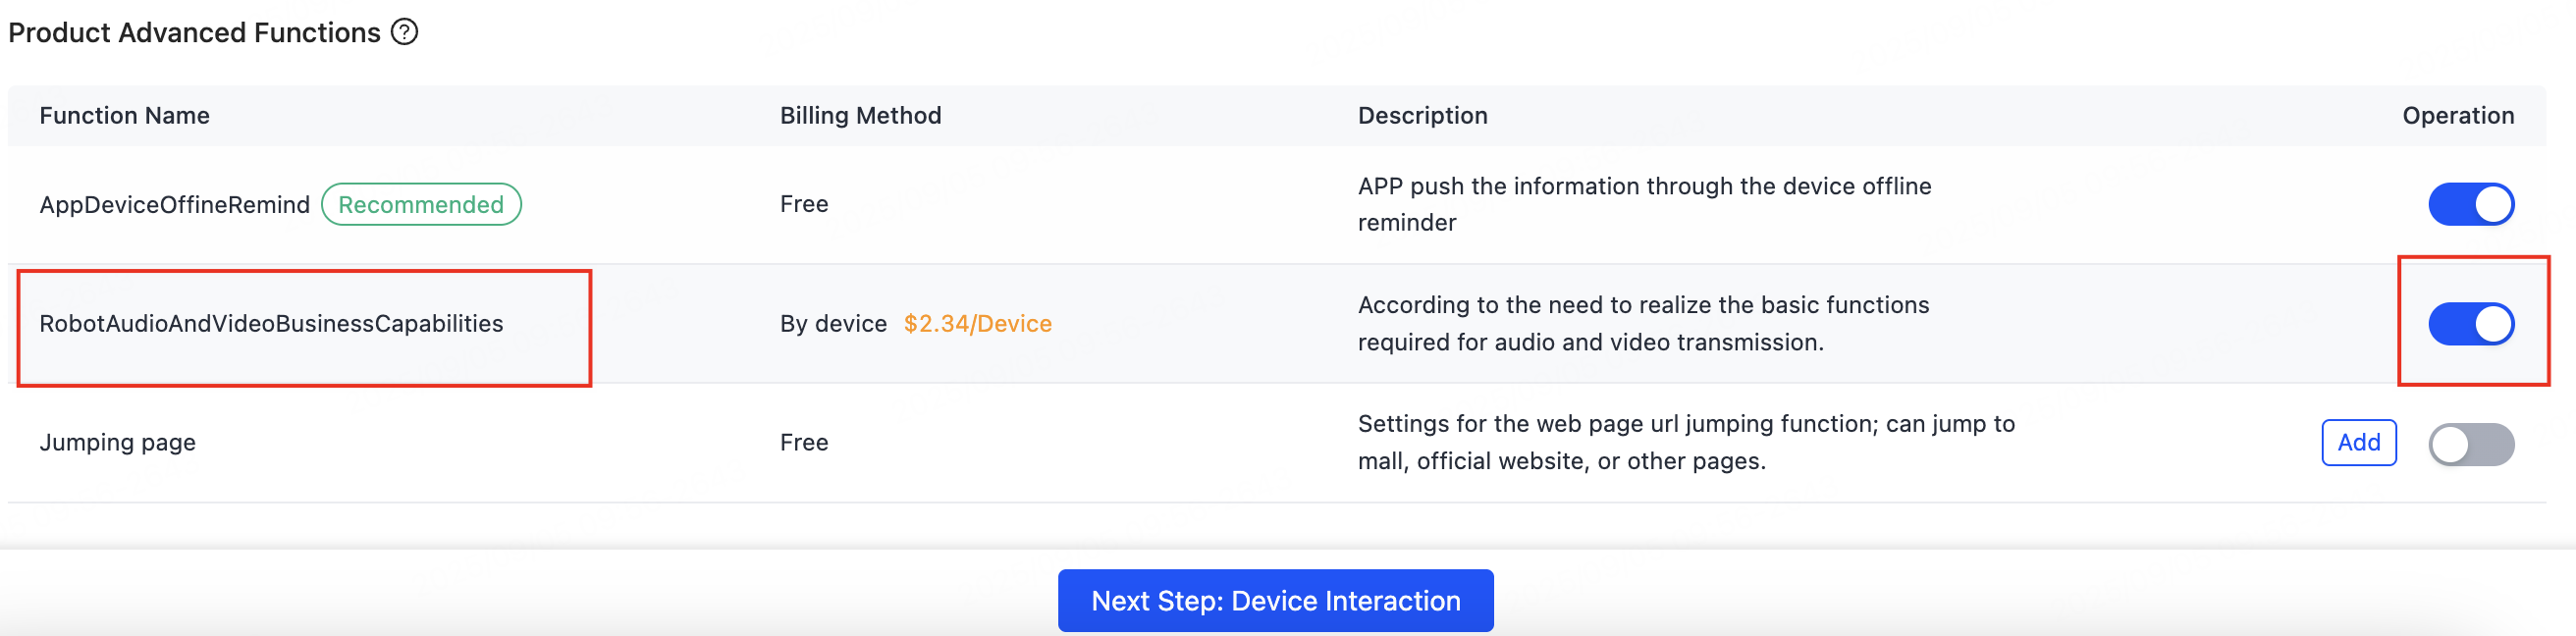
In the section of Product Advanced Functions, enable the Robot Audio and Video Business Capabilities.
Get licenses
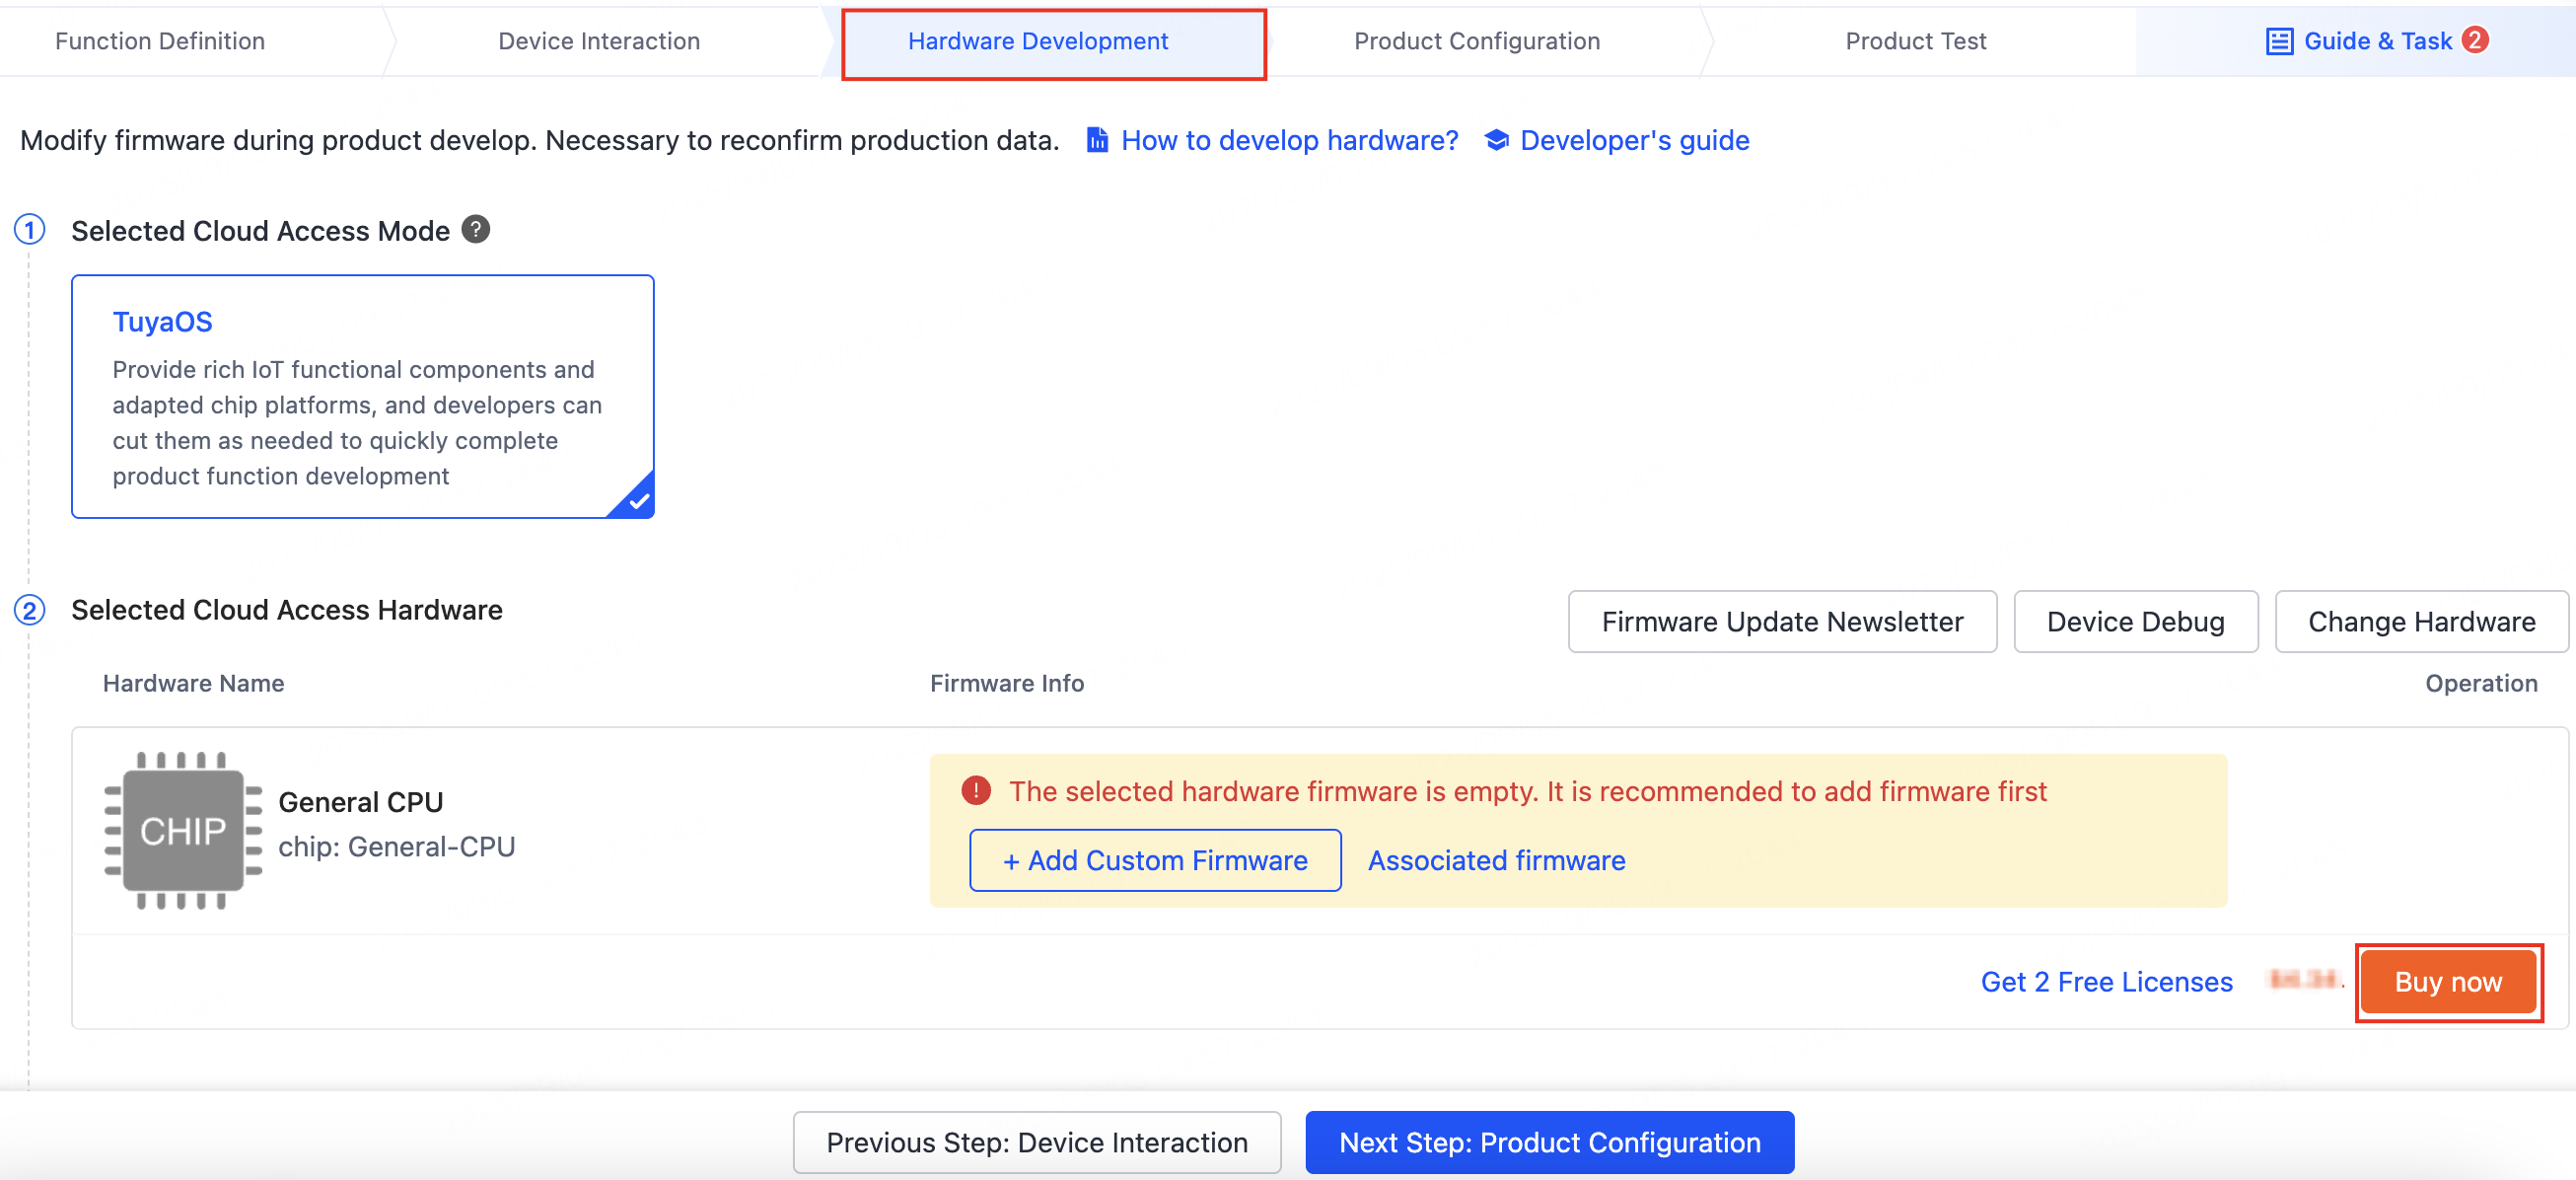
Go to the Hardware Development step and click Buy now to buy licenses. For more information, see Get the license.
Integration process
Audio and video features depend on basic services such as networking and time. Therefore, you need to wait until MQTT is connected and the time is synchronized before pushing audio and video stream data.
The demo included in the development kit provides a typical startup procedure for a robot. The following diagram shows the process:
APIs
Initialize the media abstraction layer
/***********************************************************
 *@function: ty_rvc_media_adapter_init
 *@brief initialize tuya sdk for media adapter
 *@param[in] p_media_adatper_info: TY_SDK_MEDIA_ADAPTER_S
 *@param[in] p_media_infos: DEVICE_SDK_MEDIA_INFO_S
 *@return OPRT_OK on success. Others on error, please refer to tuya_error_code.h
***********************************************************/
OPERATE_RET ty_rvc_media_adapter_init(TY_SDK_MEDIA_ADAPTER_S* p_media_adatper_info, DEVICE_SDK_MEDIA_INFO_S* p_media_infos);
Register the callback for the audio and video data sent from the mobile app to the device, and the callback for the device to get snapshot data and send it back to the mobile app. Input the audio and video codec configuration parameters.
Initialize the ring buffer
/***********************************************************
 *@function: ty_rvc_media_ring_buffer_init
 *@brief  Initialize media ring buffer
 *@param[in] pMediaInfo: DEVICE_SDK_MEDIA_INFO_S
 *@param[in] max_buffer_seconds: buffer timer 6 to 10s
 *@param[in] channel:  media channel
 *@return OPRT_OK on success. Others on error, please refer to tuya_error_code.h
 ***********************************************************/
OPERATE_RET ty_rvc_media_ring_buffer_init(CONST DEVICE_SDK_MEDIA_INFO_S* pMediaInfo, INT_T max_buffer_seconds, INT_T channel);
Initialize a specific stream of a specific video channel. This operation also creates buffers and initializes nodes. For more information, see Audio and Video Ring Buffer.
Register audio and video P2P event callbacks
/***********************************************************
 *@function: ty_rvc_media_av_event_init
 *@brief: sdk audio and video registration callback int
 *@param  [in] event_cb: audio and video stream trans cb
 *@return [*]OPRT_OK on success. Others on error, please refer to tuya_error_code.h
 ***********************************************************/
OPERATE_RET ty_rvc_media_av_event_init(RVC_AV_STREAM_EVENT_CB event_cb);
Register audio and video P2P event callbacks to transmit events such as live video preview and audio talk to the device, allowing users to handle the events. For specific events, refer to the tuya_sweeper_av_event_cb function in the demo.
The following diagram shows the process of some events:
Initialize the device media service
/**
 * @brief Real-time map and route transmission callback
 */
typedef INT_T (*RVC_TRANS_EVENT_CB)(IN CONST int onoff);

/***********************************************************
 *@Function: ty_rvc_server_init
 *@brief  Initialize media server
 *@param[in] handler The status callback for real-time data transmission,
             with statuses including: start and end.
 *@return OPRT_OK on success. Others on error, please refer to tuya_error_code.h
 ***********************************************************/

OPERATE_RET ty_rvc_server_init(RVC_TRANS_EVENT_CB handler);
Initialize the media service. After starting this interface, you can stream audio and video data as expected.
Example
/**
 * @brief Create an audio and video streaming task
 * @param
 * @return [*]
 */
void tuya_av_start(void)
{
#define TY_DSP_MEDIA_AUDIO_MAX 1 // One-channel audio capture
#define TY_DSP_MEDIA_VI_MAX 1 // One-channel video input
#define TY_DSP_MEDIA_VENC_MAX 4 // Four-channel video encoding
   // The following audio and video initialization is based on a virtual x86 device with NULL hardware resources.
    PR_DEBUG("create av task!!!\n");
    int ret = 0;
    ret = tal_vi_init(NULL, TY_DSP_MEDIA_VI_MAX);     //Initialize the underlying TKL hardware video input
    if (0 != ret) {
        PR_ERR("tal_vi_init failed,%d\n", ret);
        return ;
    }
    ret = tal_venc_init(0, NULL, TY_DSP_MEDIA_VENC_MAX); //Initialize the underlying TKL video encoding
    if (0 != ret) {
        PR_ERR("tal_venc_init failed,%d", ret);
        return ;
    }
    ret = tal_ai_init(-1, TY_DSP_MEDIA_AUDIO_MAX); //Initialize the underlying TKL hardware audio input
    if (0 != ret) {
        PR_ERR("tal_ai_init failed,%d", ret);
        return ;
    }
 // You need to complete the initialization according to your hardware resources. Refer to the "Video Input" and "Audio Input and Output" documentation links below.
    /*Create a thread*/
    pthread_t main_pid = -1;
    pthread_t sub_pid = -1;
    pthread_t audio_pid = -1;
    pthread_create(&main_pid, NULL, __video_main,NULL);
    pthread_create(&sub_pid, NULL, __video_sub,NULL);
    pthread_create(&audio_pid, NULL, __audio_main,NULL);

    return ;
}
The above example from the robot demo shows how to implement simple audio and video streaming based on the x86 platform. When developing audio and video features, you need to configure parameters to suit your hardware platform. For more information, see Video Input and Audio Input and Output.
To enable the audio and video features in the demo, you need to set the TY_ROBOT_MEDIA_ENABLE macro to 1. It is disabled by default.
Learn more
- For basic knowledge and functional introduction of audio and video, see Live Preview and Two-Way Talk.
- For the implement of audio/video (AV) two-way talk, refer to Two-way Video Talk.
- If you need to implement SD card storage and cloud storage for your robot devices, refer to Cloud Storage and Local Storage.
Things to note
- Video monitoring: Control live video via DP.
- When the device reports the audio and video switch DP
live_video_switchasfalse, tapping the video monitoring option will show a prompt: Live video is not enabled. - When the device reports the switch DP
live_video_switchastrue, tapping the video monitoring option will proceed to video monitoring mode based on password settings. If a password is set, verification is required. If no password is set, video will open directly.
- When the device reports the audio and video switch DP
- Disable video on the panel:
- The panel can only disable the live video switch, and it cannot directly open the live video. The live video switch can only be enabled via device-side operations. For example, pressing the recharge mechanical button multiple times will report the DP
live_video_switchastrue. - If a local album feature is available, closing video monitoring from the panel will not delete videos or screenshots in the album. To delete such content, go to the app album.
- The panel can only disable the live video switch, and it cannot directly open the live video. The live video switch can only be enabled via device-side operations. For example, pressing the recharge mechanical button multiple times will report the DP
FAQs
Why does streaming freeze when previewing on the mobile app with the error "Check_Buffer not enough"?
When the system logs Check_Buffer, it indicates poor network conditions, causing video stream transmission failure. Check the network connection.
Why does the video screen turn green when opening video on the app?
This issue might occur due to video data parsing exceptions, resulting in a green screen. The decoder supports network abstraction layer (NAL) units with a 4-byte start code beginning with 0x00, 0x00, 0x00, 0x01. Verify that the start code complies with this specification.
Is this page helpful?
YesFeedbackIs this page helpful?
YesFeedback


