Arduino Development Guide
This topic describes how to use Tuya_Wifi_MCU_SDK to develop a smart device.
Background information
After you get to know the installation and usage of Tuya’s official Arduino library, you can further use the library to develop your own smart device. For more information, see Connect Arduino to Tuya Cloud.
Preparation
-
Make sure that the Arduino IDE and the
Tuya_WiFi_MCU_SDKlibrary have been downloaded and installed. For more information about installation, see Connect Arduino to Tuya Cloud. -
You have got the following stuff.
- A Micro-USB cable capable of data transmission.
- Tuya Sandwich Wi-Fi communication board or Tuya Wi-Fi general module.
- Any board that supports Arduino library, such as ST Nucleo and Arduino UNO.
-
You have installed the Tuya app on your phone. Download the Tuya app from Apple Store or mobile app stores.
Step 1: Create a product
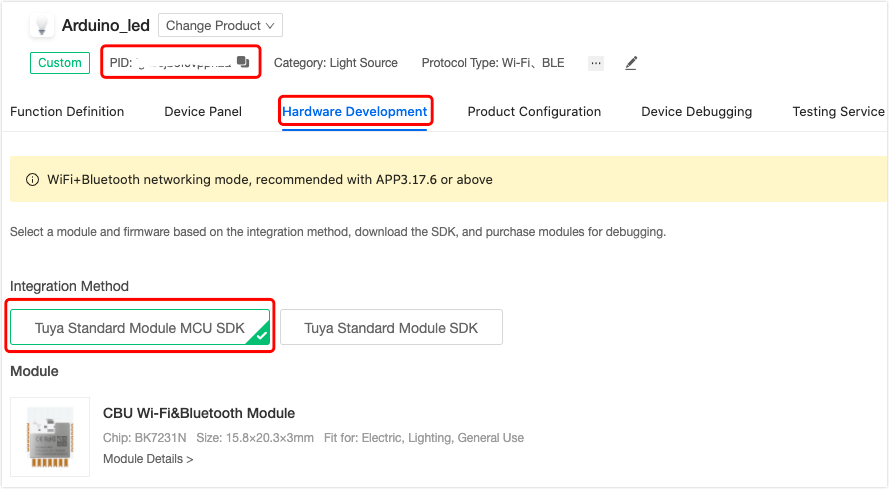
To implement the communication between an Arduino-compatible board and Tuya Sandwich Wi-Fi communication board, you need to create a product on the Tuya Developer Platform beforehand to get the product ID (PID) and data point (DP).
For example, the steps to get the PID of a smart light bulb are as follows:
-
Log in to the Tuya Developer Platform.
-
See Create Products and create a smart light bulb product, such as a Wi-Fi and Bluetooth Low Energy light bulb implemented by the Custom Solution.

-
On the Function Definition page, select desired DPs based on functional requirements.
-
On the Device Panel page, select and preview an app panel.
-
On the Hardware Debugging page, complete the settings and copy the PID.
Step 2: Develop with Arduino
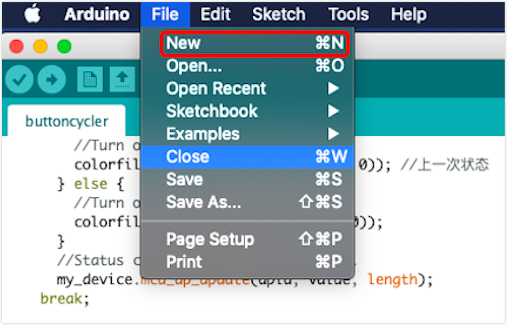
Create a sketch
Open Arduino IDE, choose File > New to create a sketch.
Important functions
Before coding, you must include Tuya_WiFi_MCU_SDK library in your sketch.
Initialization
In the unsigned char TuyaWifi::init(unsigned char *pid, unsigned char *mcu_ver) function:
- PID: stands for product ID. Each product created on the Tuya Developer Platform has a unique PID. The PID of a Wi-Fi product is usually 16 characters in length. The PID is associated with product-specific information such as data points, control panel, and shipping information.
mcu_ver: the version number of the software. Pay attention to this parameter if you want to support OTA updates of the MCU.Note: This Arduino library does not support the OTA feature.
#include <TuyaWifi.h>

TuyaWifi my_device;
...
void setup()
{
  Serial.begin(9600);
  ...
  my_device.init("xxxxxxxxxxxxxxxx", "1.0.0");// "xxxxxxxxxxxxxxxx" is the PID generated on the Tuya Developer Platform. "1.0.0" is the default software version number. You need to change "1.0.0" to the actual one.

    ...
}

void loop()
{
  ...
  my_device.uart_service();
  ...
}

...
Pass DP information into Tuya_Wifi_MCU_SDK
A data point (DP) represents a smart device function. When you create a product on the Tuya Developer Platform, you can get the product’s DP information. Tuya Smart abstracts each function into a DP. There are six types of DPs:
#define DP_TYPE_RAW     0x00    // Raw type
#define DP_TYPE_BOOL    0x01    // Boolean type
#define DP_TYPE_VALUE   0x02    // Value type
#define DP_TYPE_STRING  0x03    // String type
#define DP_TYPE_ENUM    0x04    // Enum type
#define DP_TYPE_BITMAP  0x05    // Fault type
DPs have read and write attributes. For example, a 2-gang switch has two Boolean DPs, and each DP has either a True or False value, which can be read and written.
To read means to get the current value of the switch, and to write means to change the current value of the switch.
Pass them to the Tuya_Wifi_MCU_SDK through the void TuyaWifi::set_dp_cmd_total(unsigned char dp_cmd_array[][2], unsigned char dp_cmd_num) function.
In this function, dp_cmd_array[][2] is the array storing DP information, and dp_cmd_num is the total number of DPs.
Example
Assume that a light has three functions, corresponding to three DPs as below:
- Switch (DP ID: 20, DP type: Boolean type).
- Brightness (DP ID: 21, DP type: value type).
- Light mode (DP ID: 22, DP type: enum type).
#include <TuyaWifi.h>

TuyaWifi my_device;
...
#define DPID_SWITCH  20 // The switch DP of the light.
#define DPID_LIGHT 21 // The brightness DP of the light.
#define DPID_MODE 22 // The working mode DP of the light.

// Note: `array[][0]` is DP ID, and `array[][1]` is DP type.
unsigned char dp_id_array[][2] = {
    /*  DPID     |  DP type  */
    {DPID_SWITCH, DP_TYPE_BOOL},
    {DPID_LIGHT, DP_TYPE_VALUE},
    {DPID_MODE, DP_TYPE_ENUM},
};
...
void setup()
{
    ...
    my_device.set_dp_cmd_total(dp_id_array, 3);
    ...
}
Pairing mode setting
Call void TuyaWifi::mcu_set_wifi_mode(unsigned char mode) to enter the pairing mode.
/**
 * @description: MCU sets Wi-Fi working mode
 * @param {unsigned char} mode: Enter mode
 *                               0(SMART_CONFIG): Enter  Easy Connect (EZ mode) mode
 *                               1(AP_CONFIG): Enter AP mode
 * @return {*}
 */
void TuyaWifi::mcu_set_wifi_mode(unsigned char mode);
Send and process DP data
unsigned char TuyaWifi::mcu_get_dp_download_data(unsigned char dpid, const unsigned char value[], unsigned short len) function can parse the data received from the cloud.
Currently, this function only supports three types: DP_TYPE_BOOL, DP_TYPE_VALUE, and DP_TYPE_ENUM. DP_TYPE_BITMAP refers to the data of fault type, in which the data is only reported to the cloud. You do not need to handle this type. DP_TYPE_RAW and DP_TYPE_STRING must be implemented yourself.
/**
 * @description: The MCU gets Boolean, value, and enum type to send DP values. Raw and string types need to be handled at the user's discretion. The fault type can only be reported to the cloud.
 * @param {unsigned char} dpid : Data point ID.
 * @param {const unsigned char} value: DP data buffer address.
 * @param {unsigned short} len: Data length.
 * @return {unsigned char} Parsed data.
 */
unsigned char TuyaWifi::mcu_get_dp_download_data(unsigned char dpid, const unsigned char value[], unsigned short len);
Process DP sending and register a function
The app sends DP control commands to the device through the cloud. After data parsing, the device executes the specified actions accordingly.
To process the control commands, a callback function is needed. We need to call void TuyaWifi::dp_process_func_register(tuya_callback_dp_download _func) to register the callback function.
#include <TuyaWifi.h>

TuyaWifi my_device;
...

void setup()
{
    ...
  //register DP download processing callback function
  my_device.dp_process_func_register(dp_process);
    ...
}

/**
 * @description: DP download callback function.
 * @param {unsigned char} DP ID
 * @param {const unsigned char} Value
 * @param {unsigned short} Length
 * @return {unsigned char}
 */
unsigned char dp_process(unsigned char dpid,const unsigned char value[], unsigned short length)
{
  switch(dpid) {
    case DPID_SWITCH:
      switch_value = my_device.mcu_get_dp_download_data(dpid, value, length);
      if (switch_value) {
        //Turn on

      } else {
        //Turn off

      }
      //Status changes should be reported.
      my_device.mcu_dp_update(dpid, value, length);
    break;

    default:break;
  }
  return SUCCESS;
}
Report device status
Reporting device status is to report the values of all DPs. It is also implemented through function registration.
The DP reporting function supports definitions of six data types:
/**
 * @description: DP data upload
 * @param {unsigned char} DP ID
 * @param {const unsigned char} Value
 * @param {unsigned short} Length
 * @return {*}
 */
unsigned char mcu_dp_update(unsigned char dpid, const unsigned char value[], unsigned short len); // Update raw, string type
unsigned char mcu_dp_update(unsigned char dpid, unsigned long value, unsigned short len);
unsigned char mcu_dp_update(unsigned char dpid, unsigned int value, unsigned short len);
Example of registering a device status reporting function:
#include <TuyaWifi.h>

TuyaWifi my_device;

#define DPID_SWITCH 20
// Record the current status of the LED
unsigned char switch_value = 0;
...
void setup()
{
    ...
  //register DP download processing callback function
  my_device.dp_update_all_func_register(dp_update_all);
    ...
}

/**
 * @description: Upload all DP status of the current device.
 * @param {*}
 * @return {*}
 */
void dp_update_all(void)
{
  my_device.mcu_dp_update(DPID_SWITCH, switch_value, 1);
}
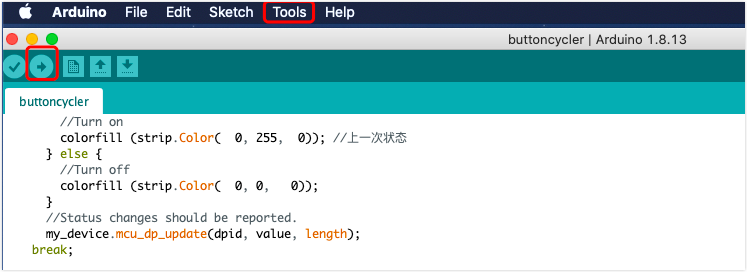
Step 3: Upload code to the board
Note: During uploading, do not connect the Arduino board to Tuya’s Wi-Fi communication board.
Click Tools, select the board and port, and click the Upload icon.
Step 4: Pair devices
Connect a jumper to Pin 7 and GND on the Arduino board to pull down for about one second. The LED on the board starts to flicker, and the device enters the pairing mode.
-
If the communication board uses a Wi-Fi and Bluetooth Low Energy combo chip, select Auto Scan on the app, and follow the prompts to pair the device.
-
If the communication board uses a Wi-Fi chip, select the Add Manually on the app, and select a Wi-Fi product for pairing.
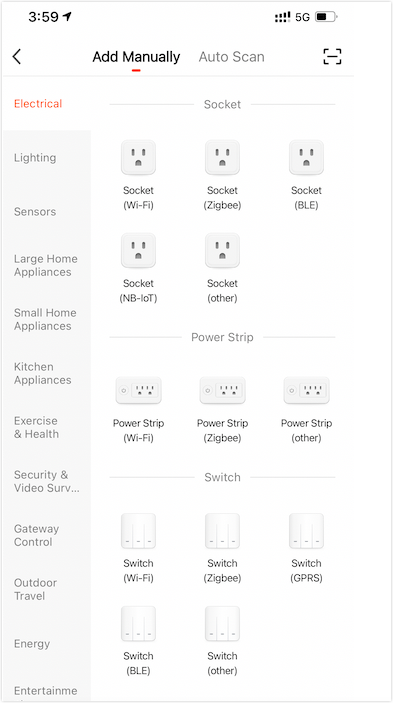
After successful pairing, the LED on the Arduino board can be controlled through the Tuya app.
Reference
-
For more information about the terms, see Glossary.
-
For more information about network module serial protocols, see Serial Port Protocol of Wi-Fi solutions.
Is this page helpful?
YesFeedbackIs this page helpful?
YesFeedback


