Flashing and Authorization
The firmware and license must be flashed to the module to enable the connection to the cloud services. Tuya provides different solutions to achieve this purpose. You can select one that best fits your needs.
Solutions
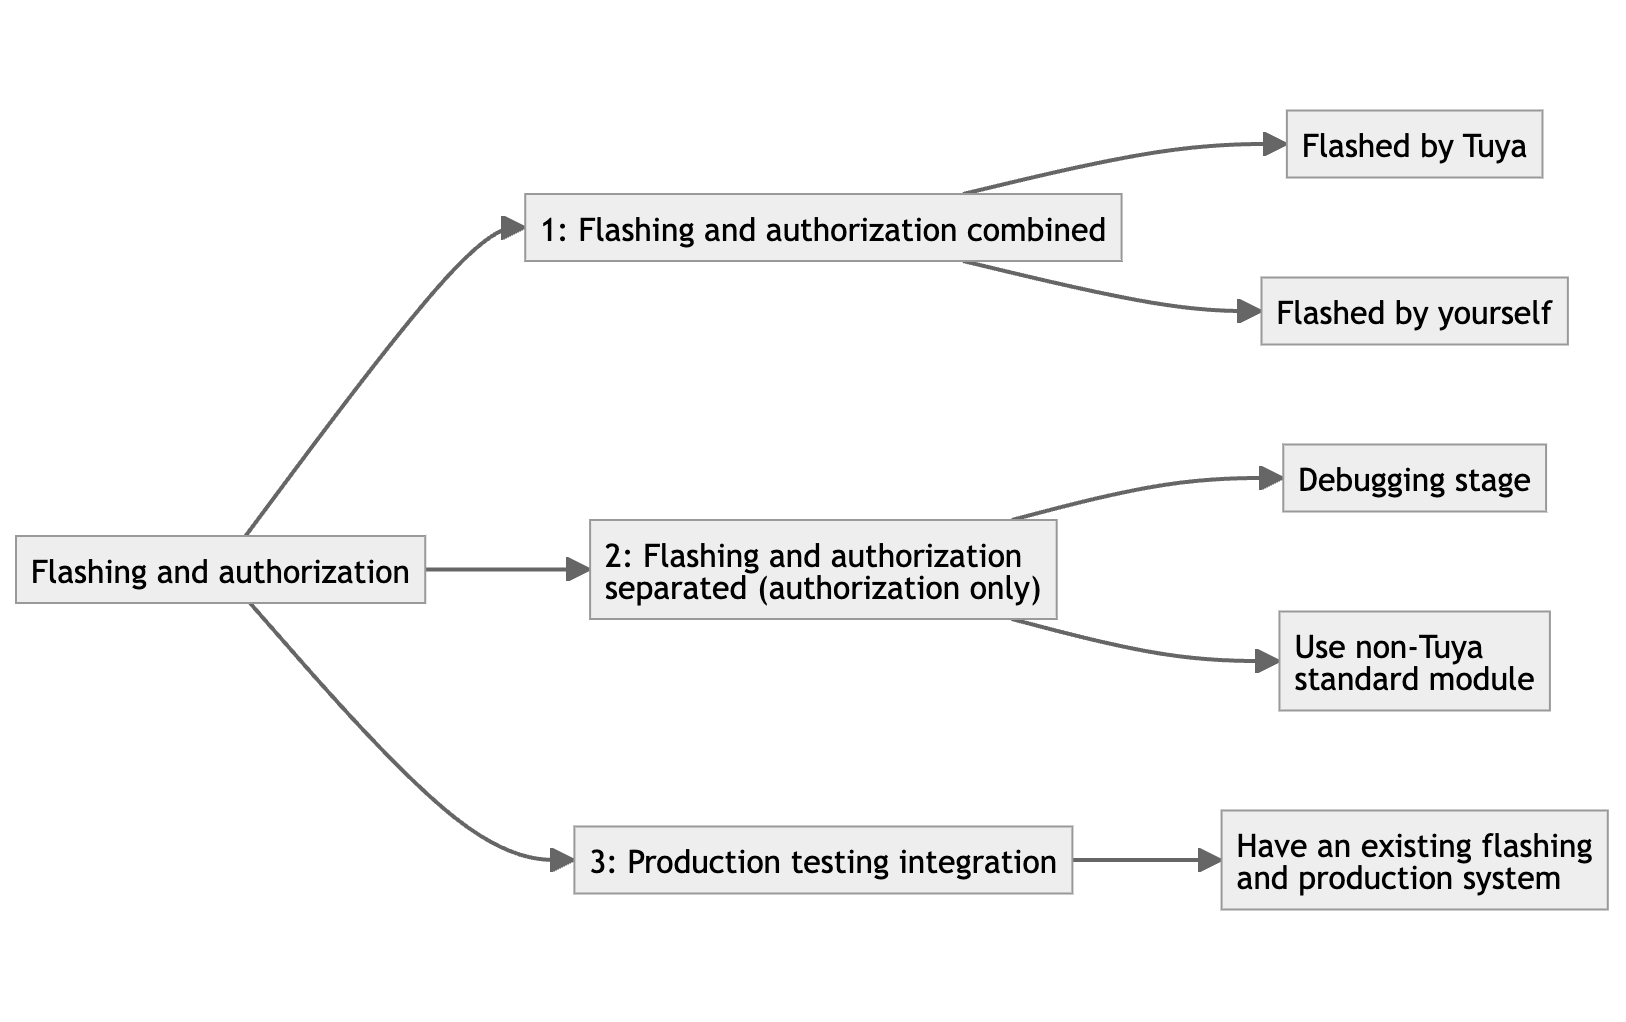
Three solutions for flashing and authorization are available for different development stages, chip types, and production methods.
```mermaid
%%{init: { "flowchart": { "htmlLabels": true, "curve": --> a["1: --> --> --> b["2: Flashing and authorization
separated (authorization only) --> --> id7[Use non-Tuya
--> c["3: --> id9[Have an existing flashing
and production system]
```
-
Flashing and authorization combined: intended for developers who use Tuya standard modules.
The firmware should be maintained on the Tuya Developer Platform. You can use Tuya’s ready-made module firmware or upload custom module firmware to the Tuya Developer Platform. You have two options for flashing firmware.
-
Flashed by Tuya: Tuya delivers the module that has been flashed with the license and firmware to you. The module is ready for use when you get it.
-
Flashed by yourself: You flash the license and firmware to the module with the provided tools and documentation.
-
-
Flashing and authorization separated: intended for debugging purposes or developers who use non-Tuya standard modules.
You use a flashing tool to flash the firmware to the module and use Tuya’s Cloud Module Burning Authorization Platform only for authorization.
-
Debugging stage: You use a flashing tool to flash the firmware and license to the module. If you update the code, you only need to flash the user firmware again, and the license is not erased.
-
Non-Tuya standard module: Tuya’s Cloud Module Burning Authorization Platform does not support non-Tuya standard chips. You use the flashing tool from the chip vendor to flash the firmware and use Tuya’s Cloud Module Burning Authorization Platform to write the license.
-
-
Production testing integration: intended for developers who already have a flashing and production system and do not require Tuya’s Cloud Module Burning Authorization Platform.
You can integrate Tuya production testing into your existing production system for flashing and authorization. For more information, see Production Test.
Procedure
The following procedure applies to the case where you use Tuya’s Cloud Module Burning Authorization Platform for flashing and authorization or authorization only.
Prerequisite
- You have purchased a license. For more information, see Cloud License and Advanced Features.
- You have the firmware file.
Step 1: Download flashing software
-
Register with and log in to Smart PMS.
-
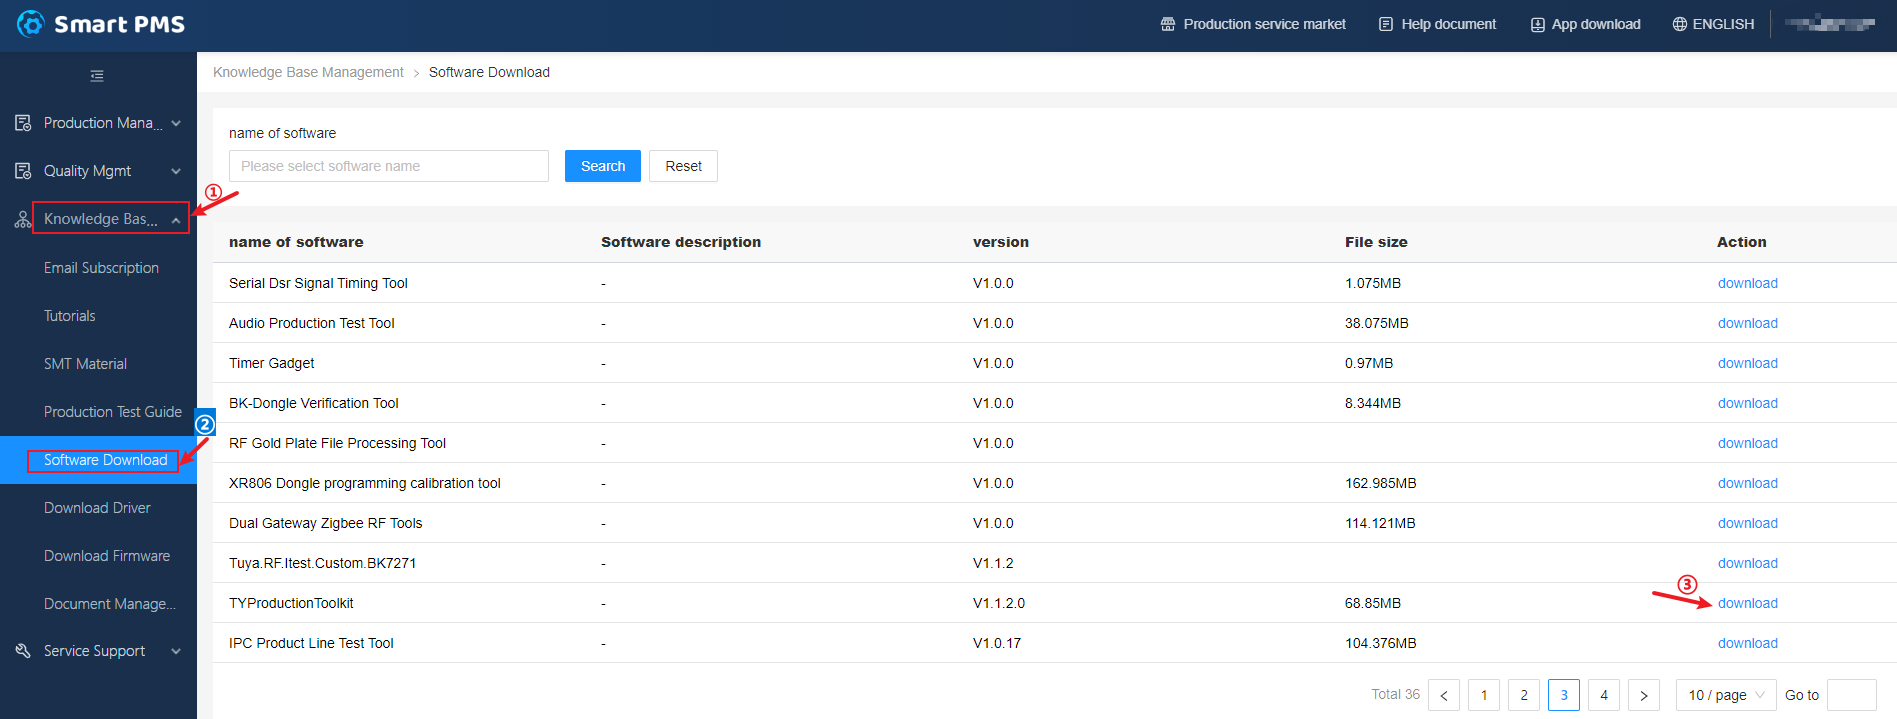
In the left navigation bar, choose Knowledge Base Management > Software Download.
-
Enter TYProductionToolkit in the search box and click Search.
-
Click Download and install the software on your computer.
-
Open Tuya Production Toolkit and click TYMZ to download the Cloud Module Burning Authorization Platform.

Step 2: Set up environment
The hardware connection varies depending on the chip or module you use.
-
Wi-Fi module: Serial communication is used for flashing and authorization. Connect the pins as shown in the following table.
Flashing tool Pins on module Pins on flashing tool USB to TTL converter 3V3 3V3 TX RX RX TX GND GND -
Bluetooth module: A dedicated programmer is used for firmware flashing and serial communication is used for license flashing. Connect the pins as shown in the following table.
Flashing tool Pins on module Pins on flashing tool Telink programmer 3V3 3V3 SWS SWM GND GND USB to TTL converter TX RX RX TX GND GND -
Zigbee module: J-Link is used for firmware flashing and serial communication is used for license flashing. Connect the pins as shown in the following table.
Flashing tool Pins on module Pins on flashing tool J-Link debugger RST RESET SWDIO SWDIO SWCLK SWCLK 3V3 VCC USB to TTL converter TX RX RX TX GND GND
Step 3: Flash firmware and authorize chip
To accurately and efficiently complete the module programming authorization and ensure that the production has stable and reliable Wi-Fi, Bluetooth, and Zigbee communication capabilities, please refer to the following production documents:
-
Connect the hardware to the computer and install the required driver.

-
Set up the software according to the flashing and authorization solution you use.
-
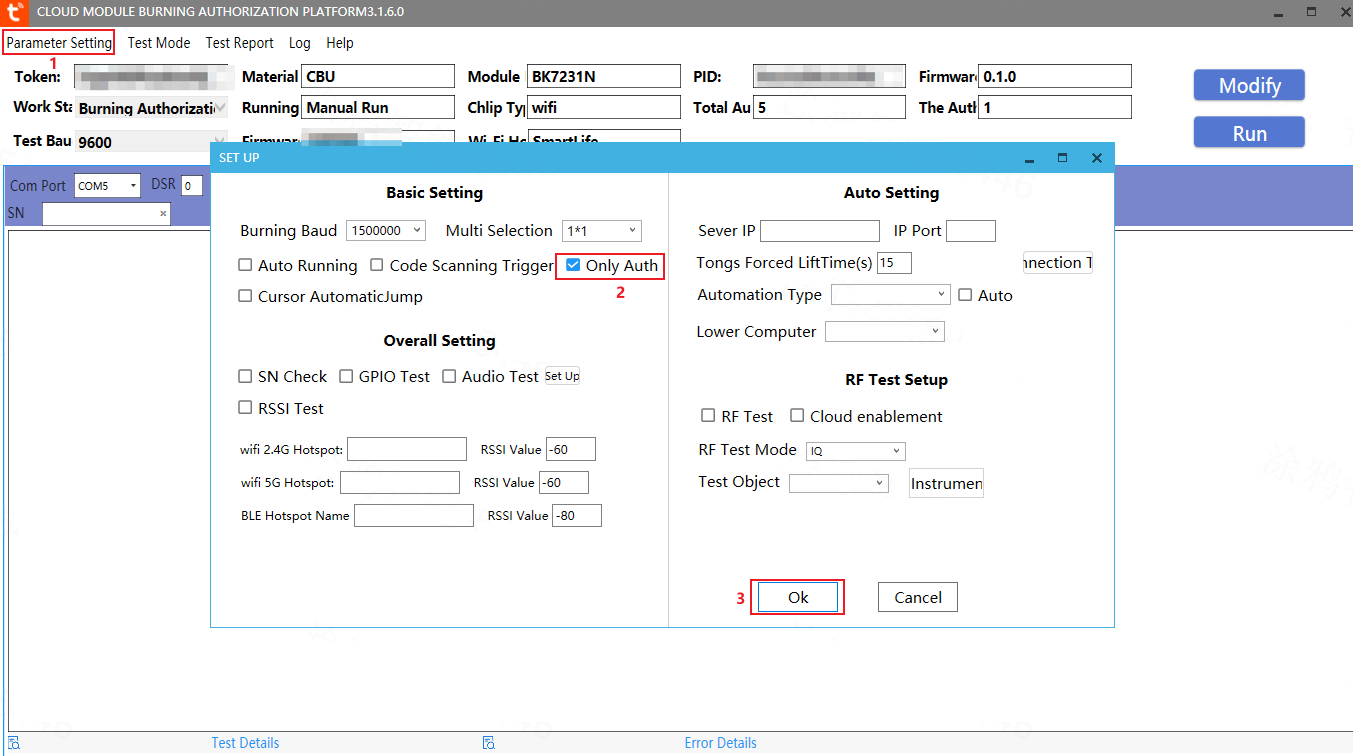
Flashing and authorization separated:
- Open the chip flashing tool and flash firmware to the device.
- In the Cloud Module Burning Authorization Platform, select Only Auth.
-
Flashing and authorization combined:
In the Cloud Module Burning Authorization Platform, disable Only Auth.
-
-
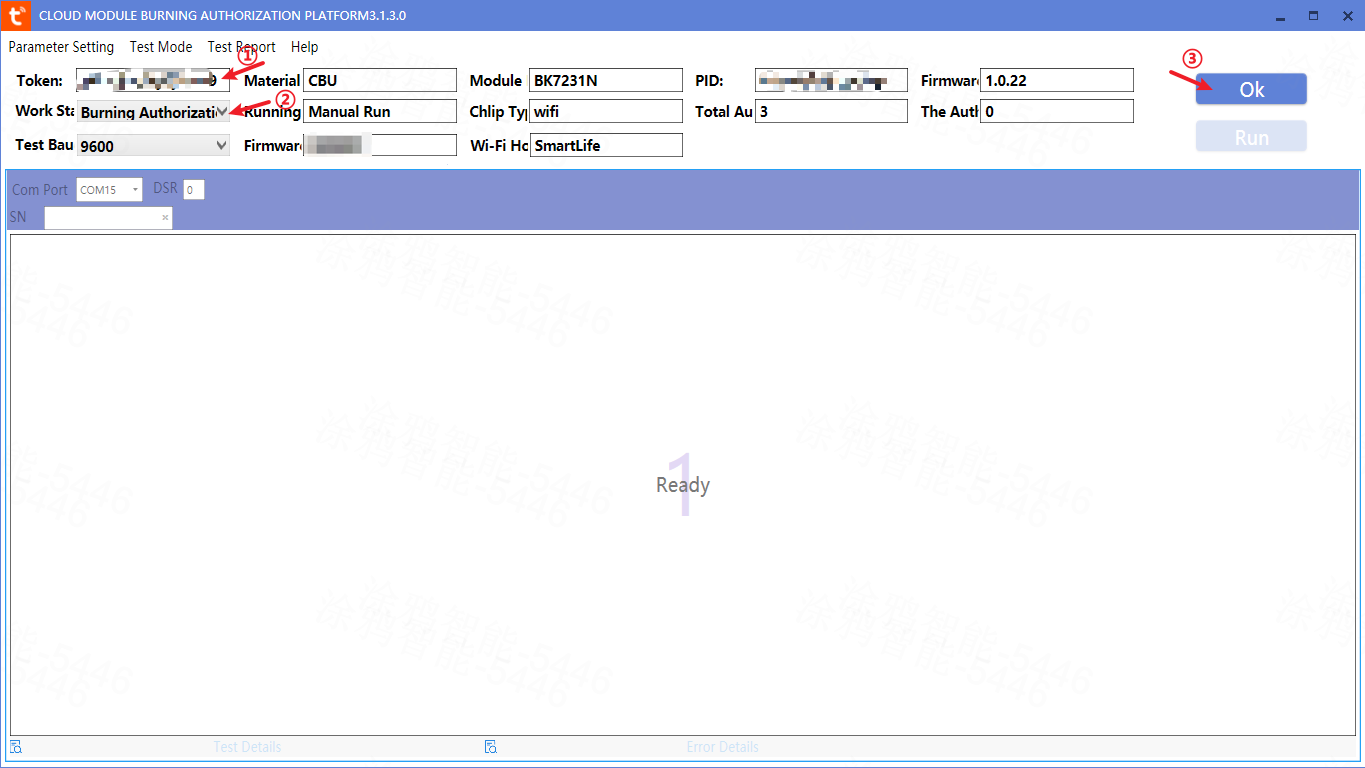
Choose the correct COM Port. Enter Token. Select Burning Authorization for the work station and click OK.
-
You can check the progress and result in the software.
-
(Optional) If you get an error, you can click Error Details to check the reason. After you correct the error, try flashing again.
Is this page helpful?
YesFeedbackIs this page helpful?
YesFeedback


