Bluetooth LE-CC2340
This topic describes the basics of the chip platform used in TuyaOS development. For more information, visit Tuya Developer Forum.
Hardware environment
Datasheet
To get the latest version, visit the TI website.
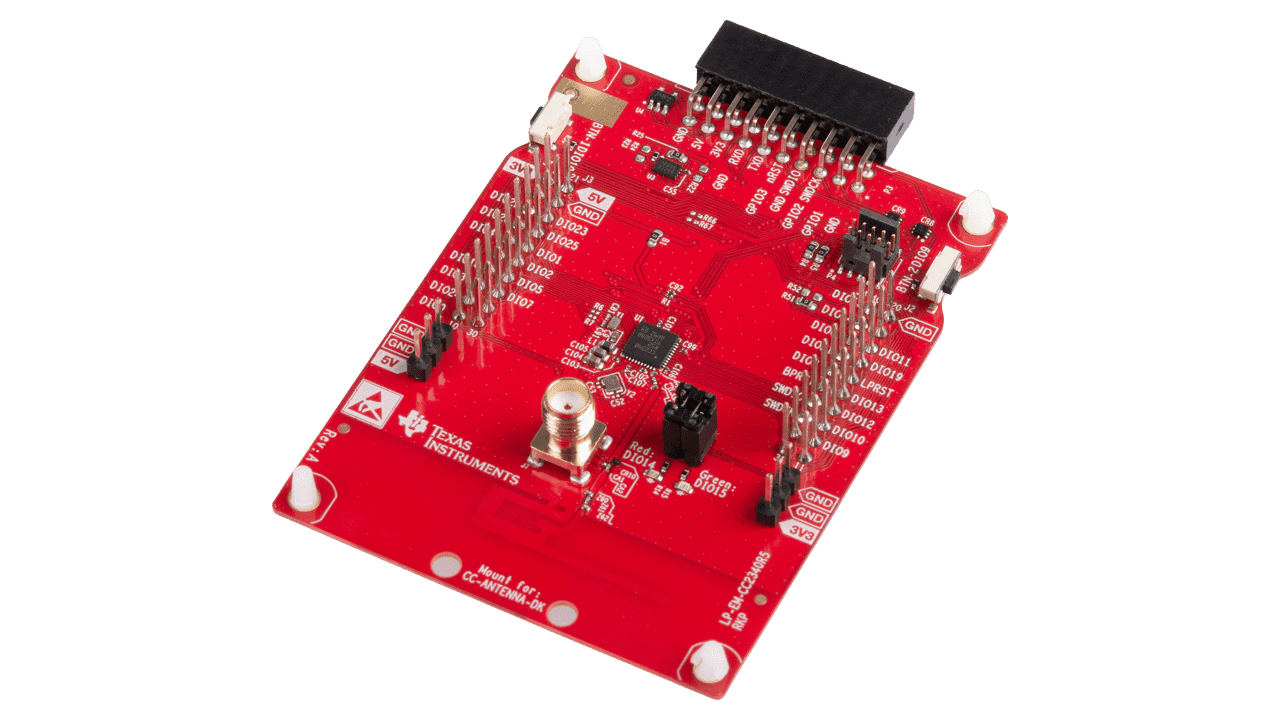
Development board
Reuse the TI official development board. For the latest version instructions, refer to the official documentation.
Peripherals
To enable newly added peripherals, you must first configure them in the TuyaOS_CC340.syscfg interface and then add the relevant code.
UART
This platform has one UART, used for authorization, debugging, and log output.
| UART | Feature | Pin |
|---|---|---|
| UART 0 | TX | DIO20 |
| UART 0 | RX | DIO22 |
You can configure it in the TuyaOS_CC2340.syscfg file. The corresponding code is CONFIG_GPIO_UART2_0_TX_CONST.
SPI
| SPI | Feature | Pin |
|---|---|---|
| SPI0 | CS | / |
| SPI0 | CLK | DIO8 |
| SPI0 | SDI | DIO21 |
| SPI0 | SDO | DIO19 |
I2C
| I2C | Feature | Pin |
|---|---|---|
| I2C0 | SCL | DIO25 |
| I2C0 | SDA | DIO0 |
PWM
By default, the SDK only supports Channel 0 to optimize resource usage. For additional channels, you can configure them by yourself.
| Channel | Pin |
|---|---|
| 0 | DIO24 |
ADC
Only supports 12-bit resolution.
By default, the SDK only supports Channel 0 to optimize resource usage. For additional channels, you can configure them by yourself.
| Channel | Pin |
|---|---|
| 0 | DIO7 |
| 1 | DIO6 |
| 2 | DIO5 |
| 3 | DIO2 |
| 4 | DIO1 |
| 5 | DIO0 |
| 6 | DIO25 |
| 7 | DIO24 |
| 8 | DIO23 |
| 9 | DIO22 |
| 10 | DIO21 |
| 11 | DIO20 |
Key control
DIO10:
- Press the key to wake up the device.
- Press and hold the key for three seconds to factory reset the device.
Startup time detection pin
DIO15: Set this pin to high after entering the main function.
Software environment
The TI CC2340R5 chip is developed based on the Code Composer Studio (CCS) integrated development environment, and the firmware is flashed with UniFlash.
Please use the default path during the installation of the following software. If you encounter any issues, please reinstall using the default path and try again.
Download and install CCS
It is recommended to download the offline version, as shown below:
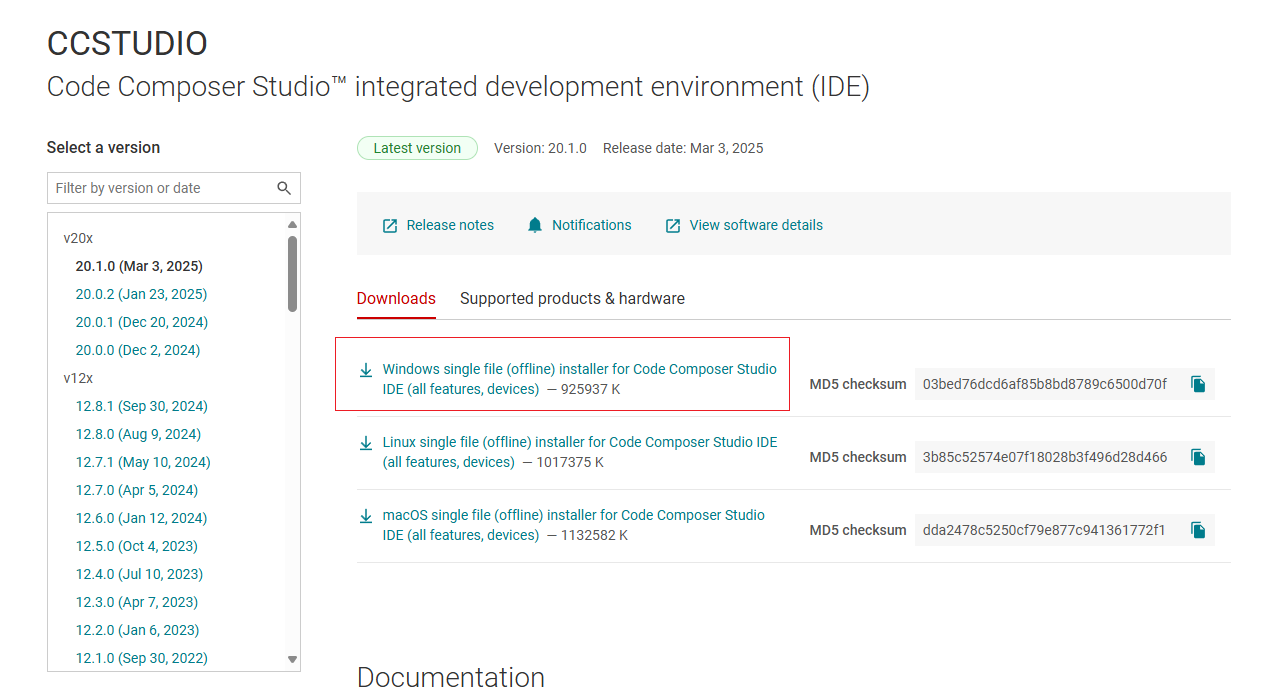
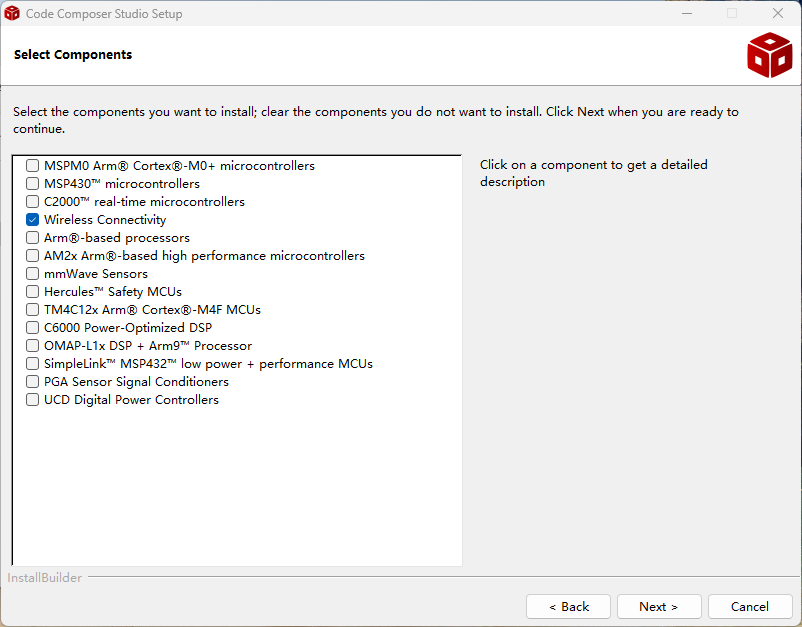
After downloading, install it using the default settings. Select the following component:
If you encounter issues during CCS installation, refer to Project import and build errors in CCS.
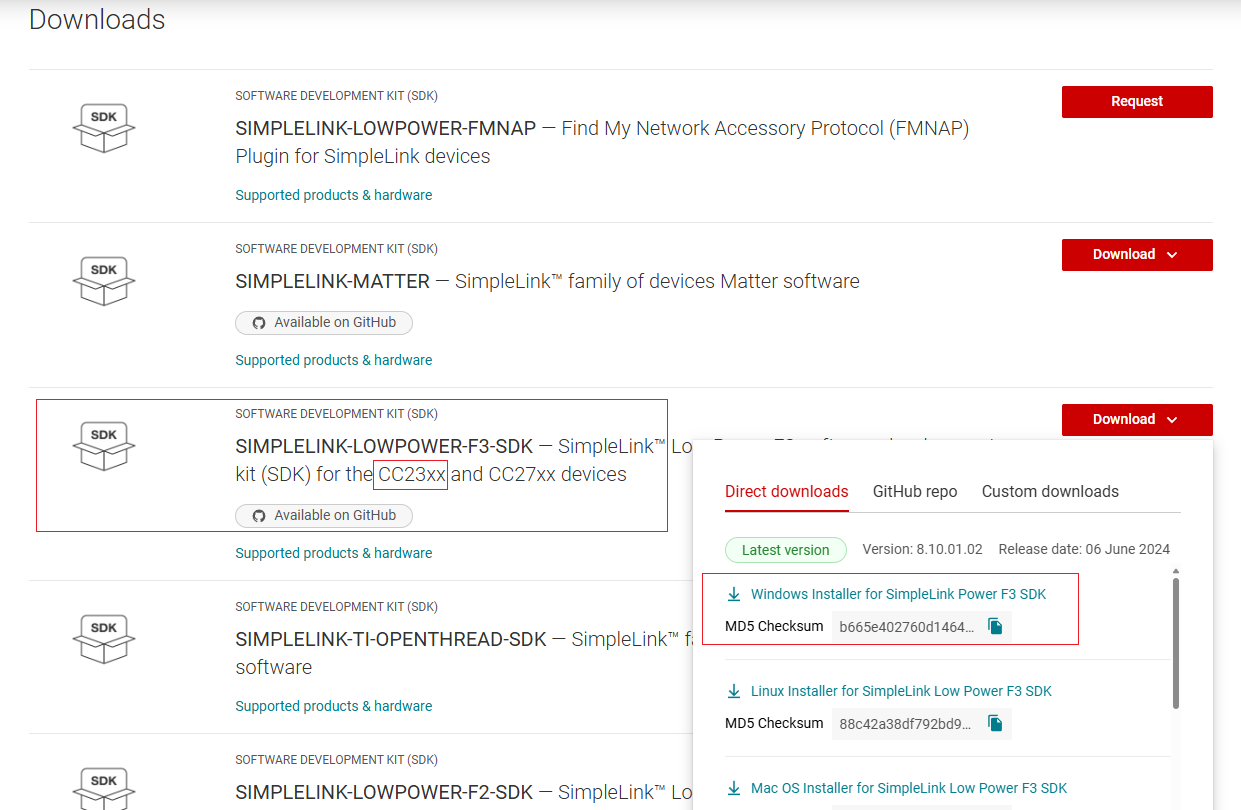
Download and install SDK
Download the SDK, and scroll down to select the version simplelink_lowpower_f3_sdk_8_40_00_61. Make sure to select the correct version. You can install it using the default settings. It is recommended not to change the installation path.
If you are using SDK version simplelink_lowpower_f3_sdk_8_40_00_61, please replace the corresponding files in your installation path with the Patch files from Tuya Patch v1.0.6.
Download and install the toolchain
Download the toolchain. Please install the toolchain and SDK under the same path, which is C:\ti\ path.
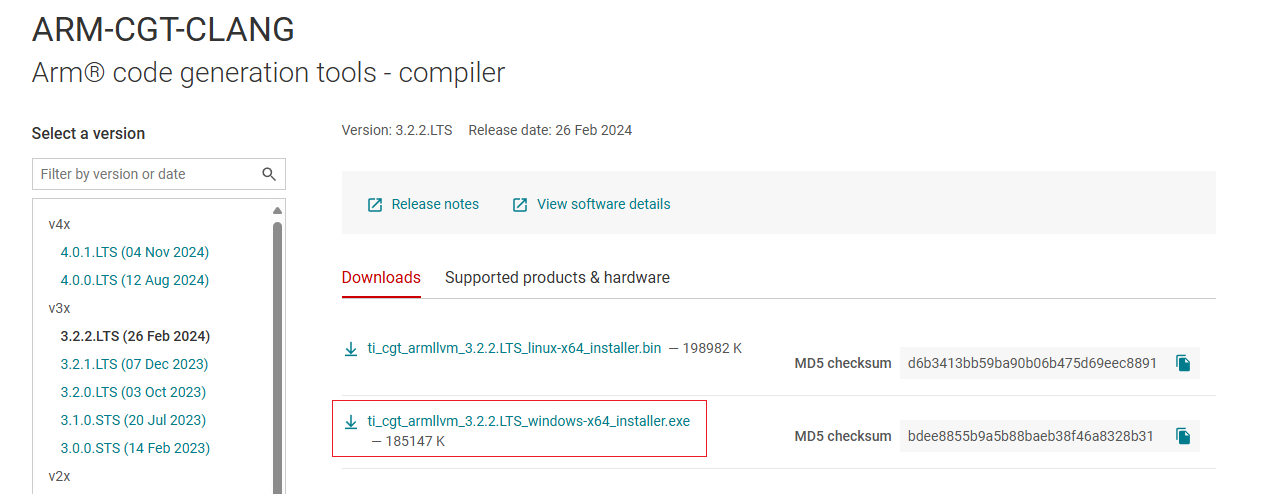
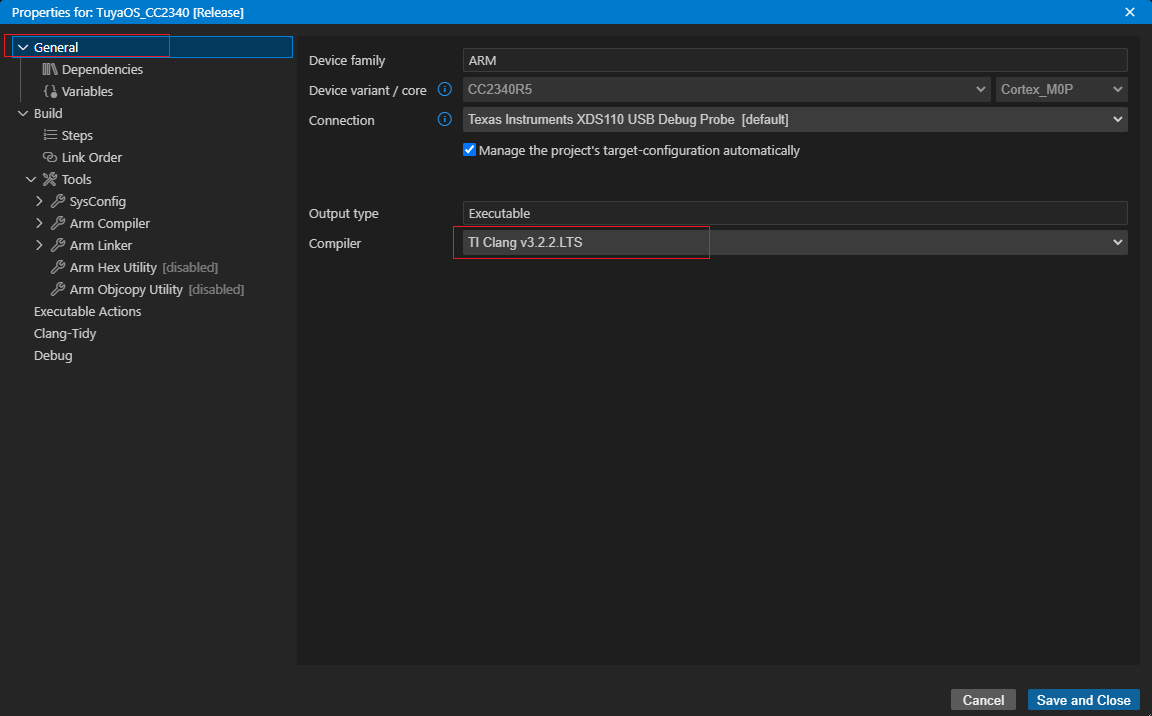
After the installation is complete and the project is imported, you can see this toolchain in CCS.
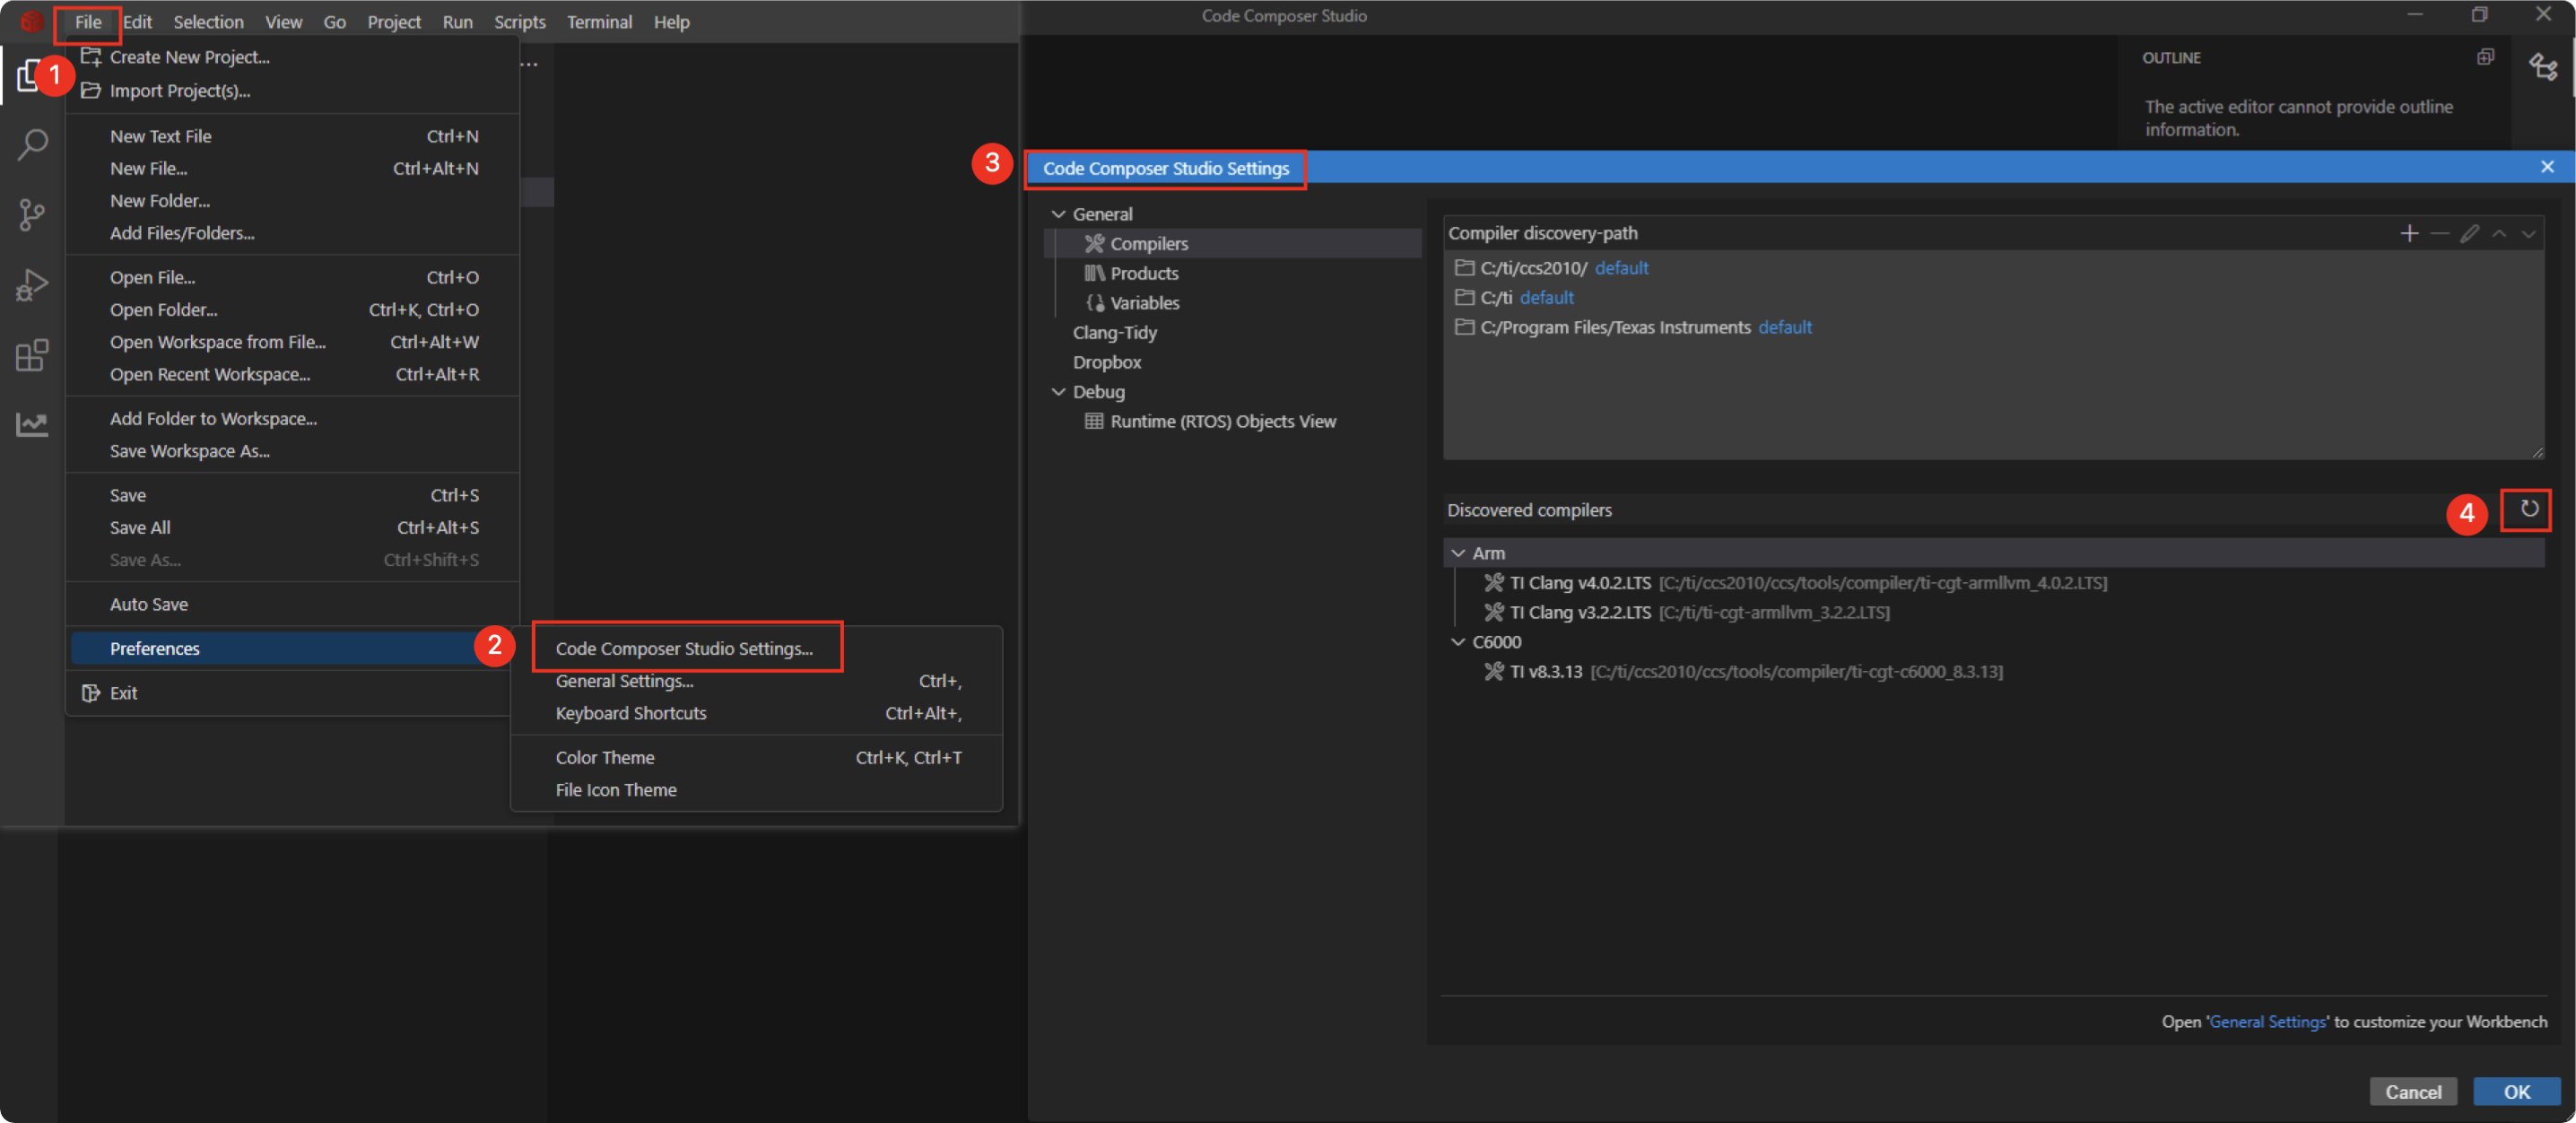
If the toolchain is not recognized when you open the CCS after installation, follow the path in the figure below and click the Refresh button.
VSCode development
This platform supports both the Visual Studio Code (hereinafter referred to as "VSCode") development environment provided by Tuya and the CCS development environment provided by the chip original manufacturer.
For detailed instructions on using the VSCode development environment, please refer to the chapters Get development framework and Build development framework.
CCS development
- Before importing the project, you must compile it at least once using Visual Studio Code. Otherwise, the system cannot locate the relevant project file paths.
- When importing the project, do not select the option to copy the project, as this will cause path-related issues.
After the above environment is installed, you can start software development. Follow the steps below to import the software project.
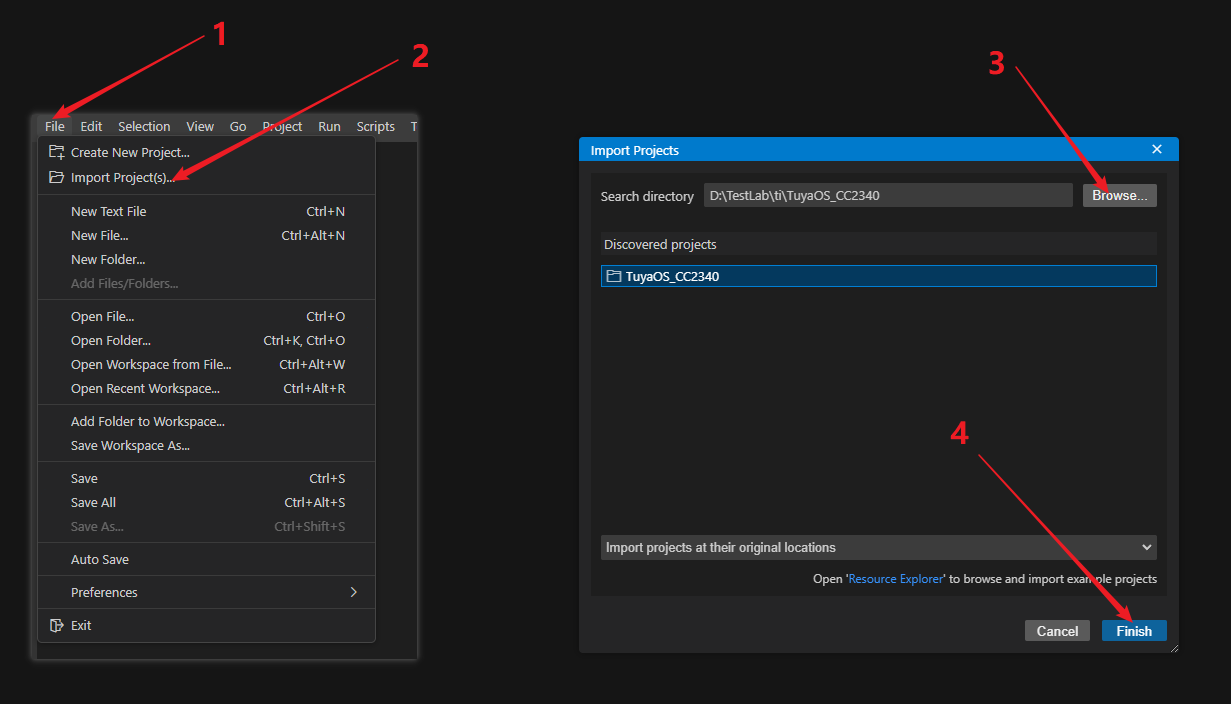
- Choose File > Import Project(s) to open an import window.
- Click Browse and select the project directory to import.
- For TuyaOS v3.11.0, the project directory is located in
TuyaOS_CC2340_V3.11.0. - Starting from TuyaOS v3.11.1, the project directory is located at
software\TuyaOS\.log\app_project.
- For TuyaOS v3.11.0, the project directory is located in
- Click Finish.
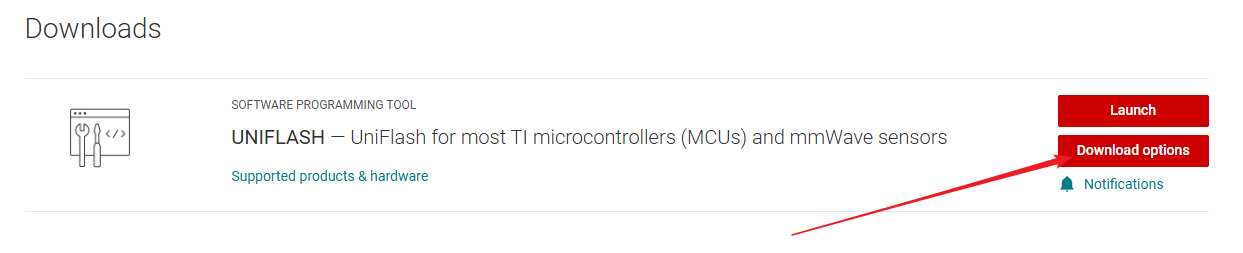
UniFlash
Go to the download page and click Download options.
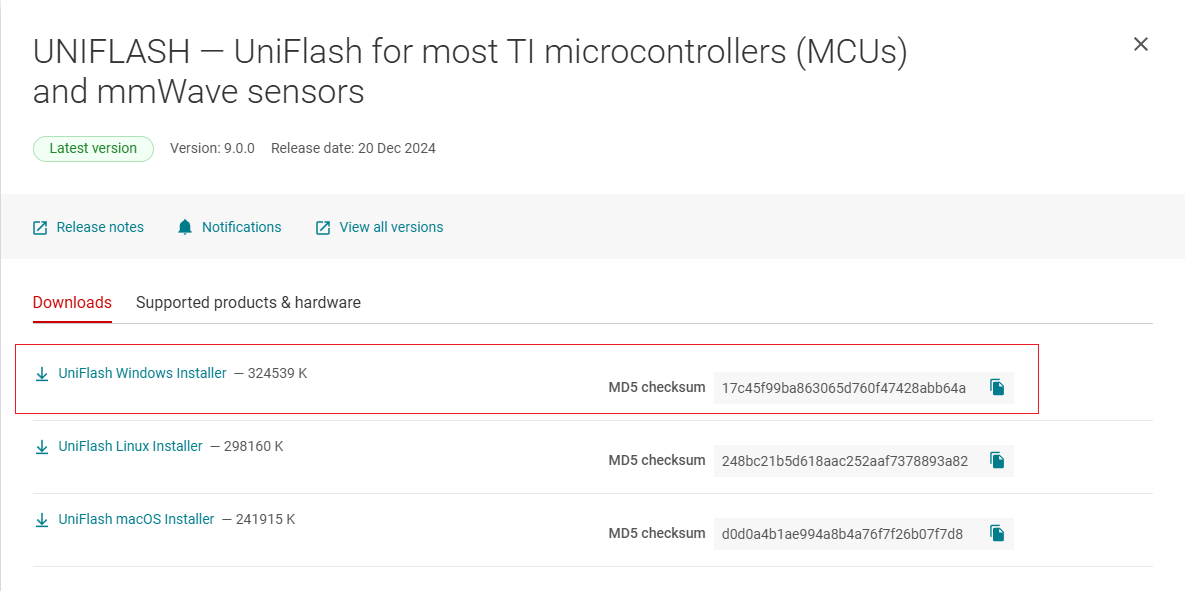
Download the file as specified in the following figure. After downloading, install it using the default settings.
Firmware flashing
Firmware description
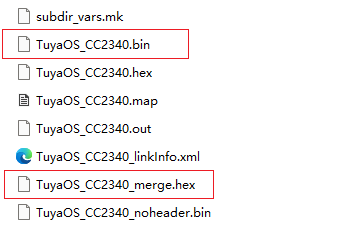
Starting from TuyaOS v3.11.1
-
Production firmware:
TuyaOS_CC2340_merge.hex(located insoftware\TuyaOS\.log\app_project\Release). -
OTA firmware:
TuyaOS_CC2340.bin(located insoftware\TuyaOS\.log\app_project\Release).
Starting from TuyaOS v3.11.1, the application firmware (OTA firmware) and bootloader firmware are merged into a single production firmware image.
TuyaOS v3.11.0
TuyaOS_CC2340.bin is the application firmware, sometimes also called production firmware. For CC2340 chips, the OTA firmware and production firmware are identical (located in the Release folder).
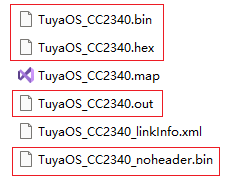
- First, generate
.hexfrom.out. - Then, generate
noheader_binvia.hex. noheader_binadds aheaderto generate.bin. Theheadercontains information such as the signature.
Flashing method
You can flash the firmware in two ways:
- Flash with XDS110: Use XDS110 debug probe and UniFlash host software to flash and debug the firmware.
- This method applies to general development scenarios.
- Flash with UART: Only UART is required to flash the firmware. However, debugging is not supported.
- This method applies to scenarios where no XDS110 debug probe is available.
- It is usually used in production line scenarios and development board scenarios with limited pins (for example, only the UART is brought out).
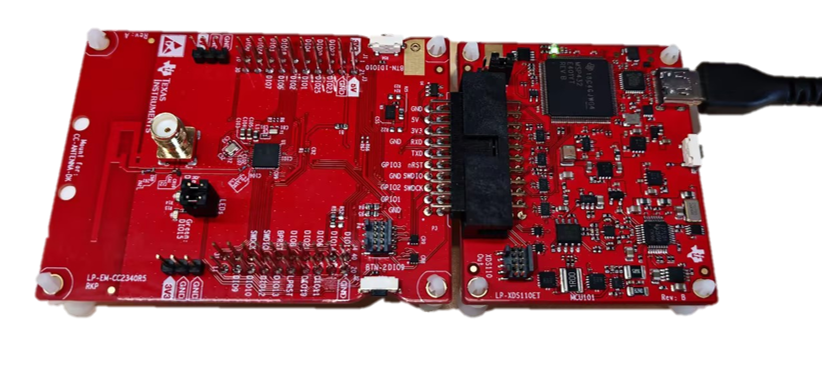
Wiring for flashing with XDS110
If you use the official development board, connect the USB interface to your computer as shown in the following figure. The development board is on the left, and XDS110 is on the right.
To connect your own development board using XDS110, the minimum wiring is as follows:
| XDS110 | Device |
|---|---|
| VCC | VCC |
| GND | GND |
| SWDIO | DIO16_SWDIO |
| SWDCK | DIO17_SWDCK |
| nRST | RSTN |
When you use the XDS debug probe, two serial ports will appear on the computer. The serial port used for communication is indicated by the red box in the figure below.

Wiring for flashing with serial port
| UART | Device |
|---|---|
| VCC | VCC |
| GND | GND |
| TX | RX (DIO22) |
| RX | TX (DIO20) |
| / | DIO7 |
- Serial port flashing is supported starting from TuyaOS v3.11.1.
- Before serial port flashing, you need to connect DIO7 to a low level and reset the device to put it into flashing mode.
- Due to the above reasons, after the program starts running, do not connect DIO7 to a low level. Ensure DIO7 is configured as output-only in the program to prevent external circuit interference during device reset.
- For serial port programming, please use an empty chip or a chip for which you know the trigger pins. Otherwise, please use the XDS programming method to erase the chip and try again.
XDS flashing method 1
-
Connect the XDS110 debugger correctly. Then, open UniFlash, enter CC2340R53, and then select the device as shown in the figure.
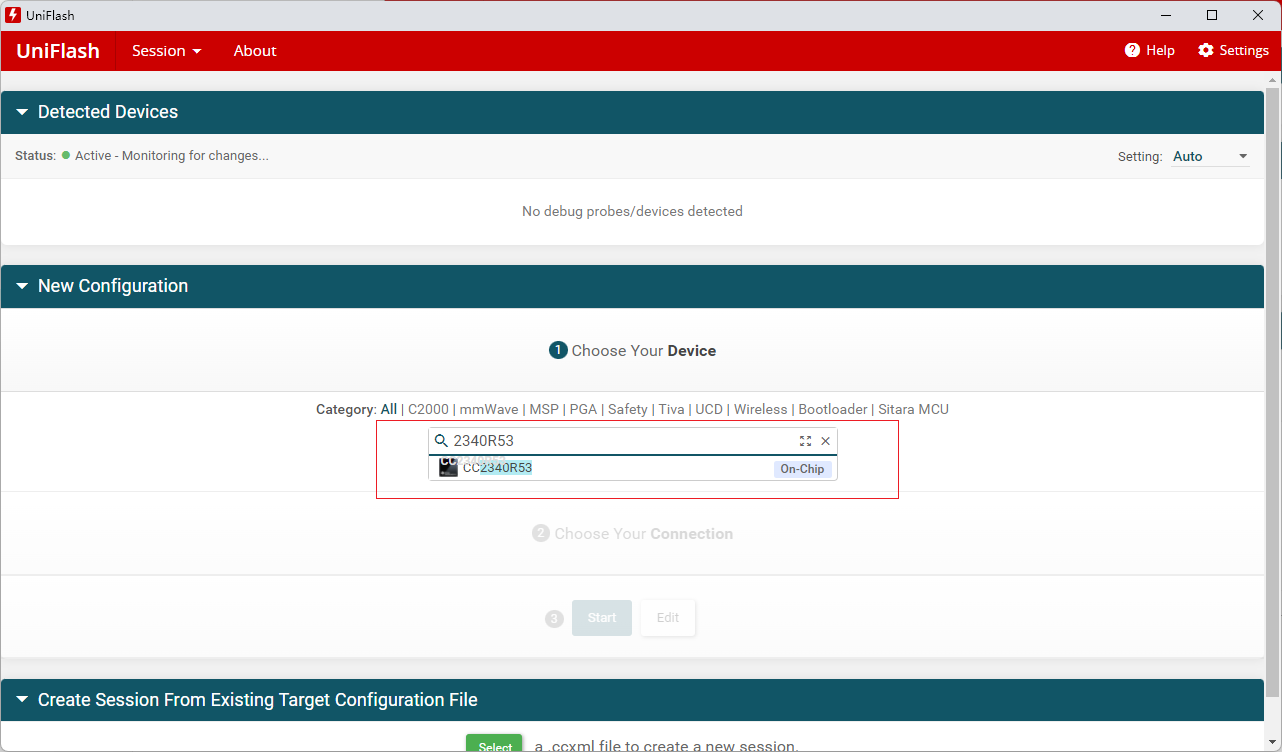
-
Click Start and follow the steps below.
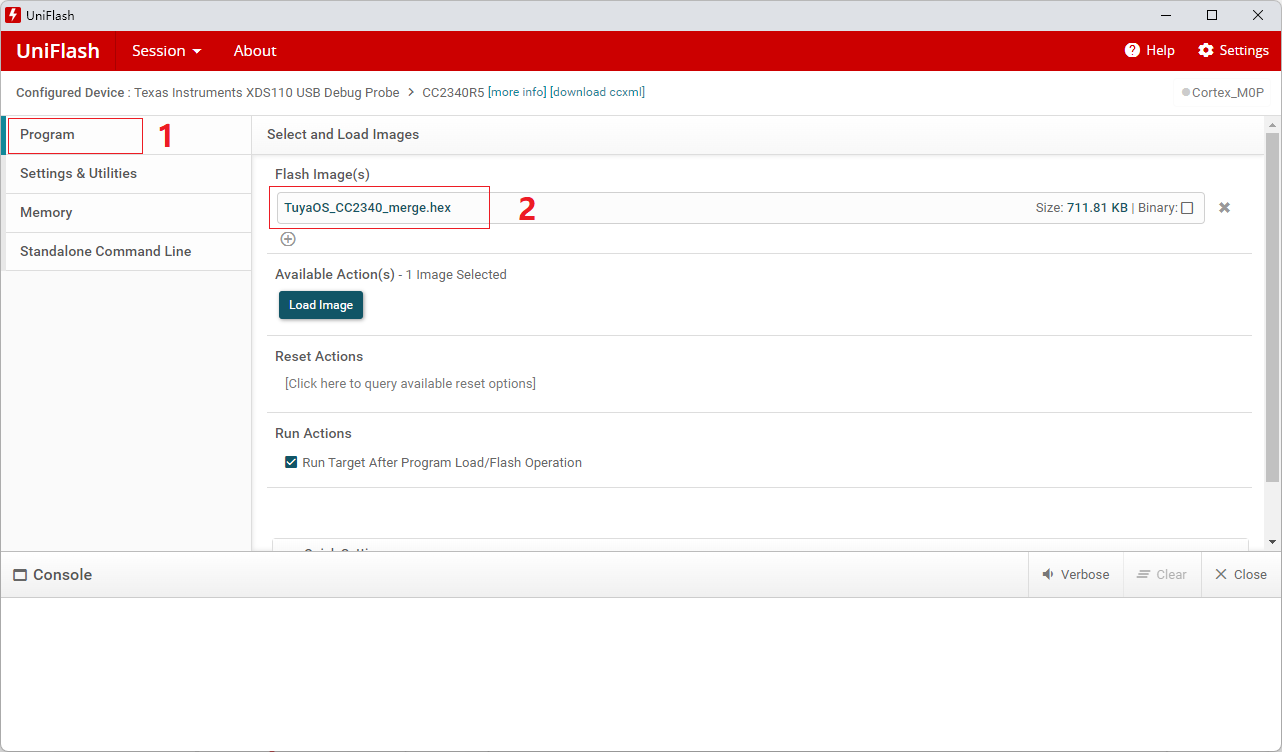
Starting from TuyaOS v3.11.1, perform the following steps.
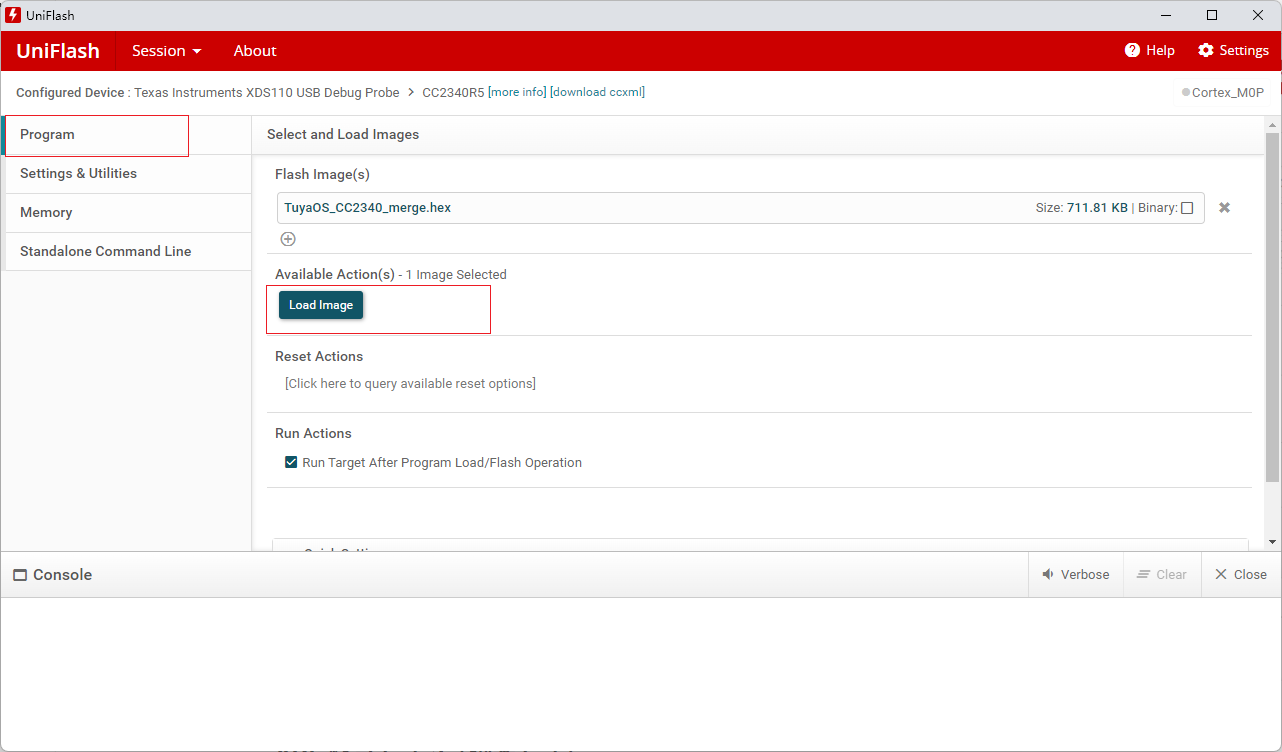
-
Click Program to enter its interface.
-
Add the production firmware.
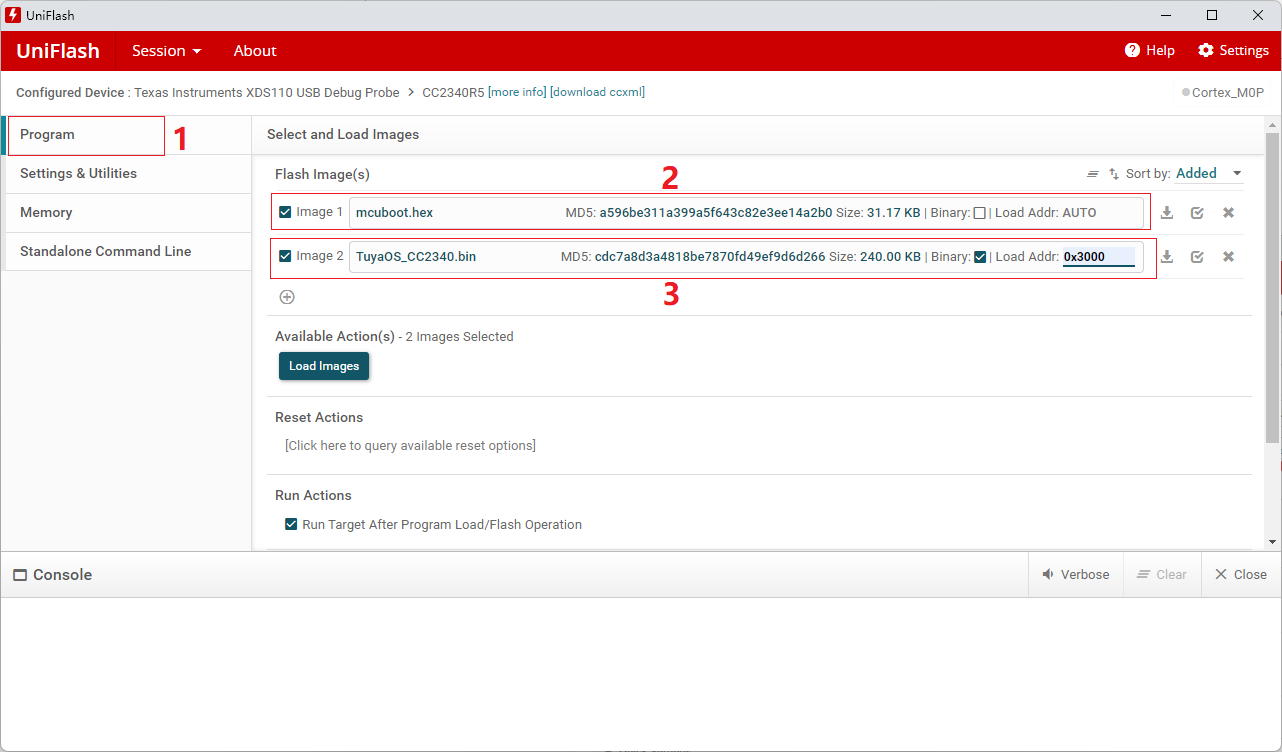
For TuyaOS v3.11.0, perform the following steps.
-
Click Program to enter its interface.
-
Add Bootloader (located in
\vendor\cc2340_ble\sdk\bootloader\mcuboot.hex) and add application firmware. -
Enter the Load Addr of the application firmware, which is
0x3000.
-
-
Choose Settings & Utilities > Chip Erase (retain sectors specified in CCFG).
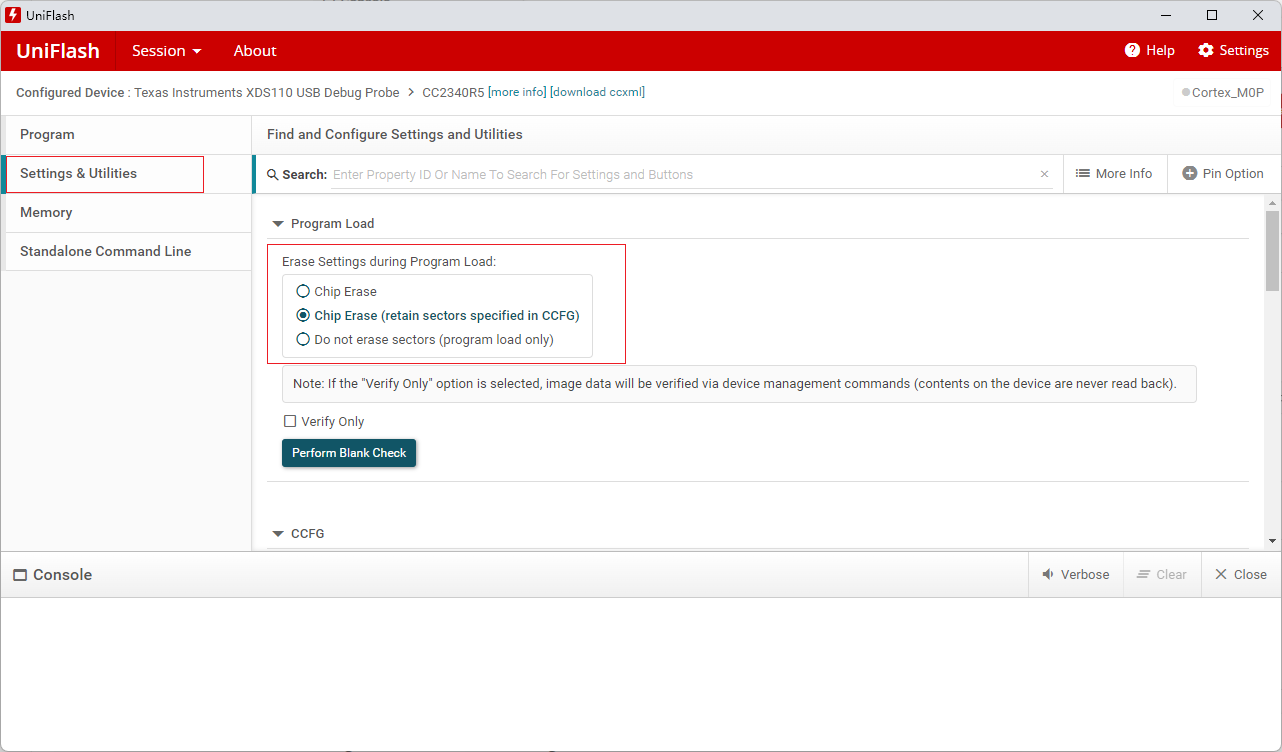
-
Go back to the Program interface and click Load Image to start flashing.
-
After successful flashing, reset the device to start running. Due to UniFlash compatibility issues, the firmware might take several seconds to run after a reset. Please wait patiently. This delay does not occur with the script-based flashing method described below.
XDS flashing method 2 (Script)
Fundamentally, this still utilizes UniFlash, but bypasses the GUI configuration by employing a script-based approach. Therefore, UniFlash must be installed first.
How-to: Double-click the cc2340_burning.bat script located in the software\TuyaOS\vendor\cc2340_ble\sdk\burn directory.
For more information, refer to the README.md file in the same directory and review the script contents.
Serial port flashing
Flashing method:
- Connect DIO7 to a low level and reset the device to put it into flashing mode.
- Open the
cc2340_burning_with_uart.shscript in thesoftware\TuyaOS\vendor\cc2340_ble\sdk\burndirectory and modify the COM port number. - Double-click to run the script.
If you use the virtual serial port created by the XDS110 debug probe, the transfer rate will be slower due to hardware limitations. For significantly faster speeds, switch to a dedicated serial port.
For more information, refer to the README.md file in the same directory and review the script contents.
Platform features
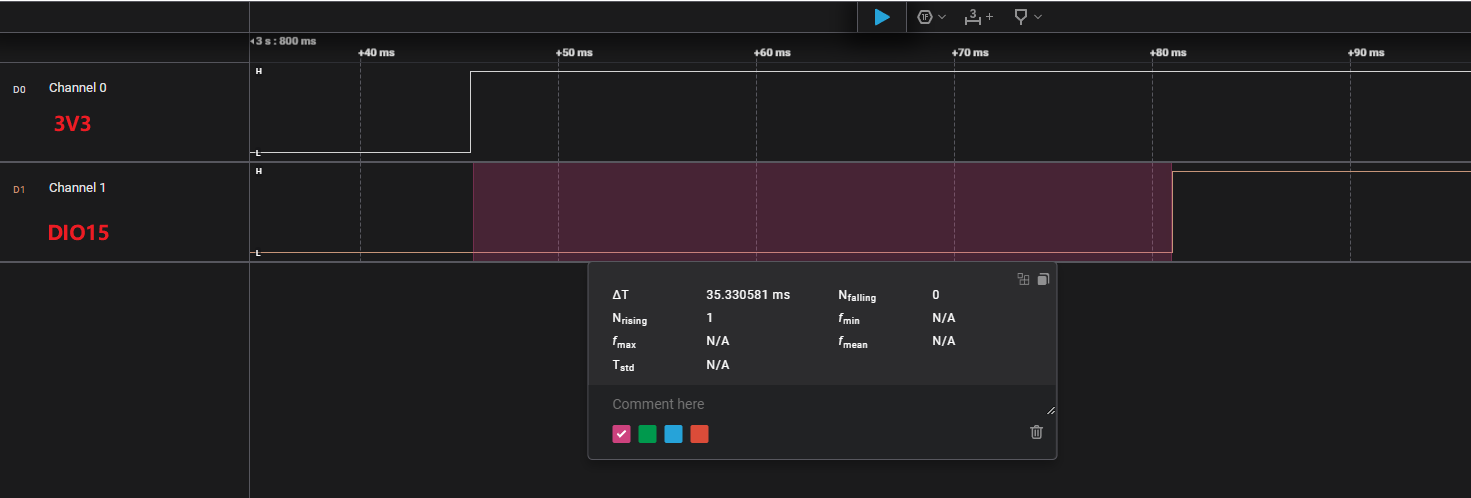
Startup time
- Use a logic analyzer to measure the signal time difference between the VCC (3V3) pin and the startup time detection pin.
- Detection pin: DIO15.
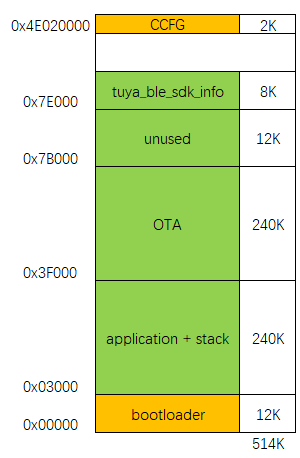
Flash partitioning
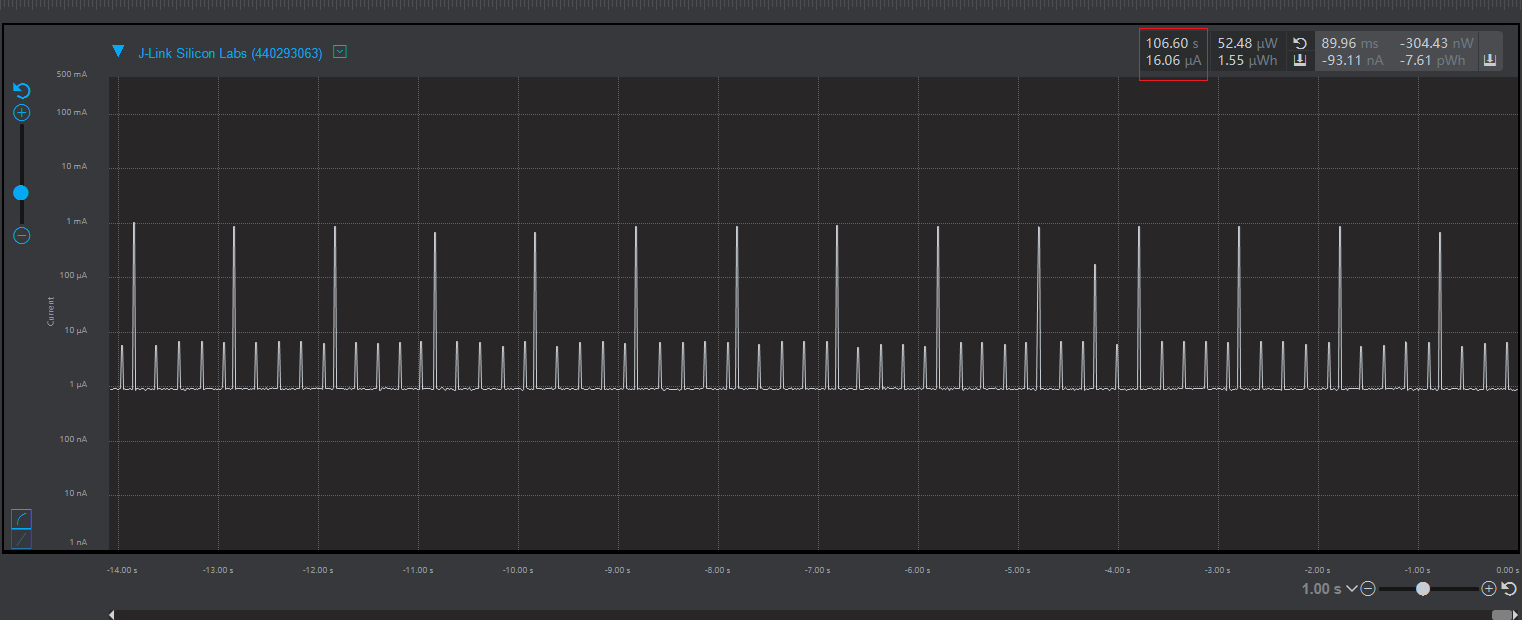
Power consumption
Measure the average power consumption of a typical one-second advertisement. It is 16.06 μA at 0 dBm.
Is this page helpful?
YesFeedbackIs this page helpful?
YesFeedback


